Configuring Mobility Services Engine Properties

Table Of Contents

Configuring and Viewing System Properties

Editing General Properties and Viewing Performance

Editing General Properties

Viewing Performance Information

Modifying NMSP Parameters

Viewing Active Sessions on a System

Adding and Deleting Trap Destinations

Adding Trap Destinations

Deleting Trap Destinations

Viewing and Configuring Advanced Parameters

Viewing Advanced Parameters Settings

Configuring Advanced Parameters

Configuring Logging Options

Configuring Advanced Parameters

Initiating Advanced Commands

Rebooting or Shutting Down a System

Clearing the System Database

Defragment Database


Configuring and Viewing System Properties


This chapter describes how to configure and view system properties on the mobility services engine.

This chapter contains the following sections:

Editing General Properties and Viewing Performance

Modifying NMSP Parameters

Viewing Active Sessions on a System

Adding and Deleting Trap Destinations

Viewing and Configuring Advanced Parameters

Configuring Advanced Parameters

Editing General Properties and Viewing Performance

General Properties—You can use Cisco WCS to edit the general properties of a mobility services engine such as contact name, username, password, services enabled on the system, and the number of remaining units on each active license. Refer to the "Editing General Properties" section.


Note You would use the general properties to modify the username and password that you defined during initial setup of the mobility services engine.


Performance—You can use Cisco WCS to view CPU and memory use for a given mobility services engine. Refer to the "Viewing Performance Information" section.

Editing General Properties

To edit the general properties of a mobility services engine, follow these steps:


Step 1 In Cisco WCS, choose Services > Mobility Services to display the Mobility Services window.

Step 2 Click the name of the mobility services engine you want to edit. A two-tabbed panel appears with the following headings: General and Performance (see Figure 4-1).

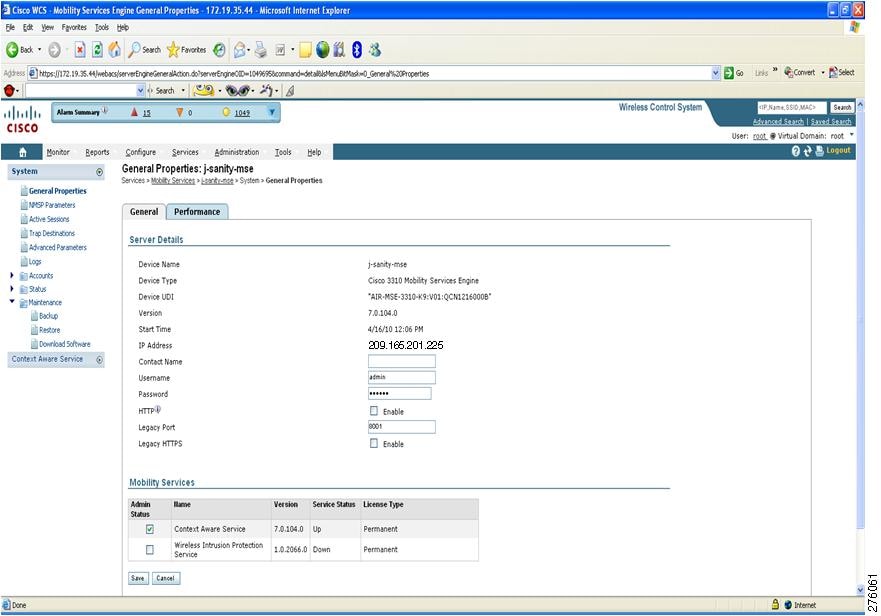
Figure 4-1 Services > Mobility Services > General Properties


Note If the General Properties window does not appear by default, choose System > General Properties (left panel).


Step 3 Modify the parameters as appropriate in the General panel. Table 4-1 describes each parameter.

Table 4-1 General Properties  

Parameter
Configuration Options

Contact Name

Enter a contact name for the mobility services engine.

Username

Enter the login username for the Cisco WCS server that manages the mobility services engine. This replaces any previously defined username including any set during initial setup.

Password

Enter the login password for the Cisco WCS server that manages the mobility services engine.This replaces any previously defined password including any set during initial setup.

Port

8001

Note The following ports are in use on a mobility services engine (MSE) in release 6.0:

tcp 80: MSE HTTP port

tcp 22: MSE SSH port

tcp 443: MSE HTTPS port

tcp 8001: Legacy port. Used for location APIs. Change in Cisco WCS.

udp 123: NTPD port (open after NTP configuration)

udp 32768: Location internal port

tcp 4096: AeroScout notifications port

tcp 1411: AeroScout SM

tcp 1999: AeroScout internal port

tcp 5900X: AeroScout (X could vary from 1 to 10)

udp 32769: AeroScout internal port

udp 37008: AeroScout internal port

udp 162: AeroScout SNMP

udp 12091: AeroScout devices (TDOA Wi-Fi Receivers, chokepoints)

udp 12092: AeroScout devices (TDOA Wi-Fi Receivers, chokepoints)

udp/tcp 4000X: AeroScout proxy (X could vary from 1 to 5)

HTTP

Check the Enable check box to enable HTTP. By default, HTTPS is enabled.

Note HTTP is primarily enabled to allow third-party applications to communicate with the mobility services engine.

Note Cisco WCS always communicates through HTTPS.

Legacy Port

Enter the mobility services port number that supports HTTPS communication. The Legacy HTTPS option must also be enabled.

Legacy HTTPS

This parameter does not apply to mobility services engines. It applies only to location appliances.

Mobility Services

To enable a service (CAS, wIPS) on a mobility services engine, check the Admin Status check box next to the service you want to enable.

Note Once selected, the service displays as Up (active). All inactive services are noted as Down (inactive) on the selected (current) system and on the network.

Note CAS and wIPS can operate on a mobility services engine at the same time.

Note All mobility services engines are shipped with an evaluation license of CAS and wIPS. Evaluation copies are good for a period of 60 days (480 hours) and have preset device limits for each service. Licenses are usage-based (time is decremented by the number of days you use it rather than by calendar days passed).

Note When you are applying an evaluation license to MSE, the behavior is slightly different from a permanent license. Firstly, an evaluation license for MSE will only increase the evaluation period but not the count of the licensed elements. Secondly, when an evaluation license is applied, there is no license file copied to MSE. Instead the update is made directly in the MSE database. Also, you will not see the license information under License Center > Files > MSE page.

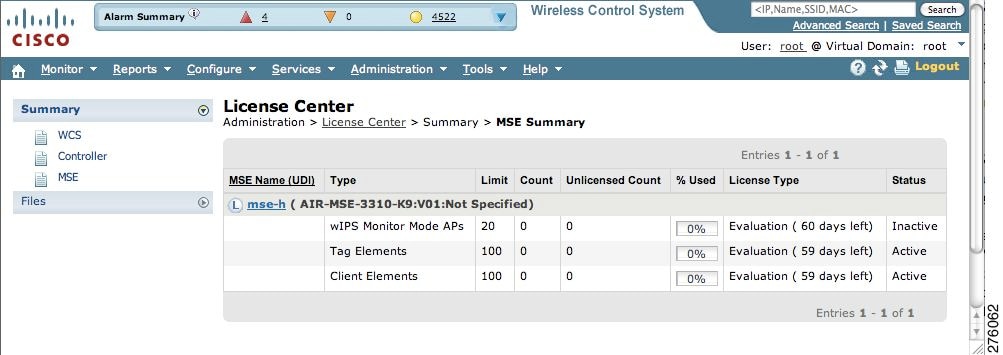
Click the here link (bottom) to see the time remaining on service licenses (evaluation or purchased) and the number of devices that can be assigned for the current system (see Figure 4-1).

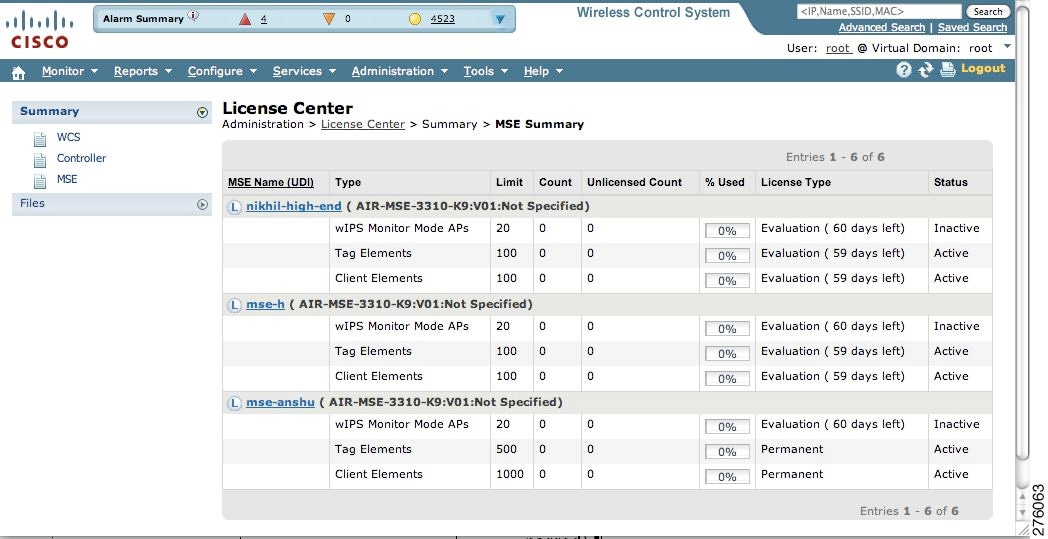
On the license summary page (see Figure 4-2), click MSE (left) to see details on licenses for all mobility services engines on the network (see Figure 4-3).

Note For more information on purchasing and installing licenses, refer to:

http://www.cisco.com/en/US/prod/collateral/wireless/ps9733/ps9742/data_sheet_c07-473865.html


Figure 4-2 License Summary for Selected Mobility Services Engine

Figure 4-3 License Summary for All Mobility Services Engines

Step 4 Click Save to update the Cisco WCS and mobility services engine databases.


Viewing Performance Information

To view performance details, follow these steps:


Step 1 In Cisco WCS, choose Services > Mobility Services to display the Mobility Services window.

Step 2 Click the name of the mobility services engine you want to view. A two-tabbed panel appears with the following headings: General and Performance.

Step 3 Click Performance tab (see Figure 4-4).

Click a time period (such as 1w) on the y-axis to see performance numbers for periods greater than one day.

To view a textual summary of performance, click the second icon under CPU.

To enlarge the screen, click the icon at the lower right.

Figure 4-4 CPU and Memory Performance


Modifying NMSP Parameters

Network Mobility Services Protocol (NMSP) is the protocol that manages communication between the mobility services engine and the controller. Transport of telemetry, emergency, and chokepoint information between the mobility services engine and the controller is managed by this protocol.


Note No change in the default parameter values is recommended unless the network is experiencing slow response or excessive latency.


Telemetry, emergency and chokepoint information is only seen on controllers and Cisco WCS installed with release 4.1 software or later.

The TCP port (16113) that the controller and mobility services engine communicate over MUST be open (not blocked) on any firewall that exists between the controller and mobility services engine.

To configure NMSP parameters, follow these steps:


Step 1 In Cisco WCS, choose Services > Mobility Services.

Step 2 Click the name of the mobility services engine whose properties you want to edit.

Step 3 Choose System > NMSP Parameters. The configuration options appear.

Step 4 Modify the NMSP parameters as appropriate. Table 4-2 describes each parameter.

Table 4-2 NMSP Parameters  

Parameter
Description

Echo Interval

How frequently an echo request is sent from a mobility services engine to a controller. The default value is 15 seconds. Allowed values range from 1 to 120 seconds.

Note If a network is experiencing slow response, you can increase the values of the echo interval, neighbor dead interval, and the response timeout values to limit the number of failed echo acknowledgements.

Neighbor Dead Interval

The number of seconds that the mobility services engine waits for a successful echo response from the controller before declaring the neighbor dead. This timer begins when the echo request is sent.

The default value is 30 seconds. Allowed values range from 1 to 240 seconds.

Note This value must be at least two times the echo interval value.

Response Timeout

How long the mobility services engine waits before considering the pending request as timed out. The default value is 1 second. Minimum value is 1. There is no maximum value.

Retransmit Interval

Interval of time that the mobility services engine waits between notification of a response timeout and initiation of a request retransmission. The default setting is 3 seconds. Allowed values range from 1 to 120 seconds.

Maximum Retransmits

The maximum number of retransmits that are sent in the absence of a response to any request. The default setting is 5. Allowed minimum value is 0. There is no maximum value.


Step 5 Click Save to update the Cisco WCS and mobility services engine databases.


Viewing Active Sessions on a System

You can view active user sessions on the mobility services engine.

For every session, Cisco WCS displays the following information:

Session identifier

IP address from which the mobility services engine is accessed

Username of the connected user

Date and time when the session started

Date and time when the mobility services engine was last accessed

How long the session was idle since it was last accessed

To view active user sessions, follow these steps:


Step 1 In Cisco WCS, choose Services > Mobility Services.

Step 2 Click the name of the mobility services engine for which you want to view active sessions.

Step 3 Choose System > Active Sessions.


Adding and Deleting Trap Destinations

You can specify which Cisco WCS or Cisco Security Monitoring, Analysis, and Response System (CS-MARS) network management platform is the recipient of SNMP traps generated by the mobility services engine.

When a user adds a mobility services engine using Cisco WCS, that WCS platform automatically establishes itself as the default trap destination. If a redundant Cisco WCS configuration exists, the backup WCS is not listed as the default trap destination unless the primary WCS fails and the backup system takes over. Only an active Cisco WCS is listed as a trap destination.

Adding Trap Destinations

To add a trap destination, follow these steps:


Step 1 In Cisco WCS, choose Services > Mobility Services.

Step 2 Click the name of the mobility services engine for which you want to define a new SNMP trap destination server.

Step 3 Choose System > Trap Destinations.

Step 4 Select Add Trap Destination from the Select a command drop-down menu. Click Go.

Step 5 Enter IP address of destination SNMP server.

Step 6 Port number default of 162 is auto-populated. You can modify this as needed.

Step 7 Community default value of public is auto-populated. You can modify this as needed.

Step 8 Destination default value of other auto-populates.


Note All trap destinations are identified as other except for the automatically created default trap destination.


Step 9 Click Save.

You are returned to the trap destinations summary window and the newly defined trap is listed.


Deleting Trap Destinations

To delete a trap destination, follow these steps;


Step 1 In Cisco WCS, choose Services > Mobility Services.

Step 2 Click the name of the mobility services engine for which you want to delete a SNMP trap destination server.

Step 3 Choose System > Trap Destinations.

Step 4 Check the check box next to the trap destination entry that you want to delete.

Step 5 Select Delete Trap Destination from the Select a command drop-down menu. Click Go.

Step 6 In the message box that appears, click OK to confirm deletion.


Viewing and Configuring Advanced Parameters

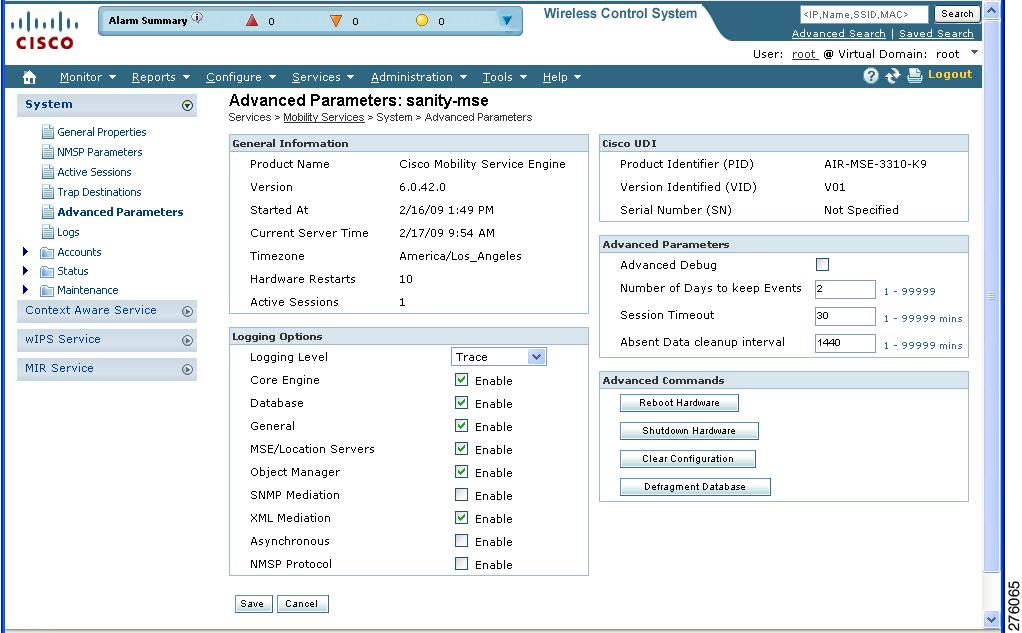
In Cisco WCS, at the Advanced Parameters window (see Figure 4-5) you can both view general system level settings of the mobility services engine and configure monitoring parameters.

Refer to the "Viewing Advanced Parameters Settings" section to view current system- level advanced parameters.

Refer to the "Initiating Advanced Commands" section to modify the current system- level advanced parameters or initiate advanced commands such as system reboot, system shutdown, clear a configuration file, or defragment the system database.

Viewing Advanced Parameters Settings

To view the advanced parameter settings of the mobility services engine, follow these steps:


Step 1 In Cisco WCS, choose Services > Mobility Services.

Step 2 Click the name of a mobility services engine to view its status.

Step 3 Choose System > Advanced Parameters (see Figure 4-5).

Figure 4-5 Services > Mobility Services > System > Advanced Parameters


Configuring Advanced Parameters

On the Advanced Parameters window, you can use Cisco WCS:

To specify the logging level and types of messages to log.

Refer to the "Configuring Logging Options" section.

To set how long events are kept, how long before a session time-outs, and the interval between data clean ups.

Refer to the "Configuring Advanced Parameters" section.

To enable or disable advanced debug level messages in the logs.

Refer to the "Configuring Advanced Parameters" section.

Configuring Logging Options

You can use Cisco WCS to specify the logging level and types of messages to log.

To configure logging options, follow these steps:


Step 1 In Cisco WCS, choose Services > Mobility Services.

Step 2 Click the name of the mobility services engine that you want to configure.

Step 3 Choose System > Advanced Parameters. The advanced parameters for the selected mobility services engine appears.

Step 4 Scroll down to the Logging Options section and choose the appropriate option (Off, Error, Information, or Trace) from the Logging Level drop-down menu.


Caution Use Error and Trace only when directed to do so by Cisco Technical Assistance Center (TAC) personnel.

Step 5 Check the Enabled check box next to each item listed in that section to begin logging of its events.

Step 6 Click Save.


Configuring Advanced Parameters

To configure advanced parameters, follow these steps:


Step 1 In Cisco WCS, choose Services > Mobility Services.

Step 2 Click the name of the mobility services engine that you want to configure.

Step 3 Choose System > Advanced Parameters. The advanced parameters for the selected mobility services engine appears.

Step 4 Scroll down to the Advanced Parameters and make the appropriate changes. Table 4-3 describes the parameters.

Table 4-3 Advanced Parameters

Parameter
Configuration Options

Advanced debug

Check the check box to enable advanced debug. This enables reporting of advanced debug level messages to the log files.

Number of days to keep events

Enter the number of days that events are kept in the event table. Default value is 2.

Session time-out (minutes)

Enter the number of minutes a Cisco WCS or client session can remain inactive before it times out. Default value is 30.

Absent data cleanup interval (minutes)

Enter the number of minutes that data for absent mobile stations is kept. An absent mobile station is one that was discovered but does not appear in the network. Default value is 1440.


Initiating Advanced Commands

You can initiate a system reboot or shutdown, clear the system database, or defragment a database by clicking the appropriate button from the Advanced Parameters page.

Rebooting or Shutting Down a System

To reboot or shutdown a mobility services engine, follow these steps:


Step 1 In Cisco WCS, click Services > Mobility Services.

Step 2 Click the name of a mobility services engine you want to reboot or shutdown

Step 3 Click System > Advanced Parameters (see Figure 4-5).

Step 4 In the Advanced Commands section of the window (right), click the appropriate button (Reboot Hardware or Shutdown Hardware).

Click OK in the confirmation pop-up window to initiate either the reboot or shutdown process. Click Cancel to stop the process.


Clearing the System Database

To clear the database of a mobility services engine, follow these steps:


Step 1 In Cisco WCS, click Services > Mobility Services.

Step 2 Click the name of a mobility services engine whose configuration file you want to clear.

Step 3 Click System > Advanced Parameters (see Figure 4-5).

Step 4 In the Advanced Commands section of the window (right), click the Clear Configuration button.

Click OK in the confirmation pop-up window to initiate the process. Click Cancel to stop the process.


Defragment Database

To defragment the database of a mobility services engine, follow these steps:


Step 1 In Cisco WCS, choose Services > Mobility Services.

Step 2 Click the name of a mobility services engine whose database you want to defragment.

Step 3 Choose System > Advanced Parameters (see Figure 4-5).

Step 4 In the Advanced Commands section of the window (right), click the Defragment Database button.

Click OK in the confirmation pop-up window to initiate the process. Click Cancel to stop the process.