- Preface
- Overview
- Using the Web-Browser and CLI Interfaces
- Ports and Interfaces
- Configuring Controller Settings
- Configuring VideoStream
- Configuring Security Solutions
- WLANs
- Controlling Lightweight Access Points
- Controlling Mesh Access Points
- Managing Controller Software and Configurations
- Managing User Accounts
- Radio Resource Management
- Configuring Cisco CleanAir
- FlexConnect
- Mobility Groups
- Configuring Mobile Concierge
- Troubleshooting
- Index
Cisco Wireless LAN Controller Configuration Guide, Release 7.3
Bias-Free Language
The documentation set for this product strives to use bias-free language. For the purposes of this documentation set, bias-free is defined as language that does not imply discrimination based on age, disability, gender, racial identity, ethnic identity, sexual orientation, socioeconomic status, and intersectionality. Exceptions may be present in the documentation due to language that is hardcoded in the user interfaces of the product software, language used based on RFP documentation, or language that is used by a referenced third-party product. Learn more about how Cisco is using Inclusive Language.
- Updated:
- August 25, 2012
Chapter: Managing User Accounts
- Information About Creating Guest Accounts
- Restrictions on Managing User Accounts
- Creating a Lobby Ambassador Account
- Viewing Guest User Accounts
- Obtaining a Web Authentication Certificate
- Information About Default Web Authentication Login Page
- Guidelines and Limitations
- Choosing the Default Web Authentication Login Page (GUI)
- Choosing the Default Web Authentication Login Page (CLI)
- Example: Creating a Customized Web Authentication Login Page
- Example: Modified Default Web Authentication Login Page Example
- Prerequisites for Downloading a Customized Web Authentication LoginPage
- Additional References
- Downloading a Customized Web Authentication Login Page (GUI)
- Downloading a Customized Web Authentication Login Page (CLI)
- Additional References
- Example: Customized Web Authentication Login Page
- Verifying the Web Authentication Login Page Settings (CLI)
Managing User Accounts
This chapter contains these sections:
- Information About Creating Guest Accounts
- Restrictions on Managing User Accounts
- Creating a Lobby Ambassador Account
- Viewing Guest User Accounts
- Obtaining a Web Authentication Certificate
- Web Authentication Process
- Choosing the Default Web Authentication Login Page
- Generating a Certificate Signing Request
- Using a Customized Web Authentication Login Page from an External Web Server
- Choosing a Customized Web Authentication Login Page from an External Web Server
- Downloading a Customized Web Authentication Login Page
- Assigning Login, Login Failure, and Logout Pages per WLAN
- Configuring Wired Guest Access
- Configuring Wired Guest Access
- Supporting IPv6 Client Guest Access
Information About Creating Guest Accounts
The controller can provide guest user access on WLANs. The first step in creating guest user accounts is to create a lobby administrator user, also known as a lobby ambassador account. Once this account has been created, a lobby ambassador can create and manage guest user accounts on the controller. The lobby ambassador has limited configuration privileges and access only to the web pages used to manage the guest accounts.
The lobby ambassador can specify the amount of time that the guest user accounts remain active. After the specified time elapses, the guest user accounts expire automatically.
Restrictions on Managing User Accounts
-
The local user database is limited to a maximum of 2048 entries, which is also the default value. This database is shared by local management users (including lobby ambassadors), local network users (including guest users), MAC filter entries, exclusion list entries, and access point authorization list entries. Together they cannot exceed the configured maximum value.
-
For net user accounts or guest user accounts, the following special characters are allowed along with alphanumeric characters: ~, @, #, $, %, ^, &, (, ), !, _, -, `, ., [, ], =, +, *, :, ;, {, }, ,, /, and \.
Creating a Lobby Ambassador Account
Creating a Lobby Ambassador Account (GUI)
Creating a Lobby Ambassador Account (CLI)
To create a lobby ambassador account use the following command:
config mgmtuser add lobbyadmin_username lobbyadmin_pwd lobby-admin
 Note | Replacing lobby-admin with read-only creates an account with read-only privileges. Replacing lobby-admin with read-write creates an administrative account with both read and write privileges. |
Creating Guest User Accounts as a Lobby Ambassador (GUI)
| Step 1 | Log into the controller as the lobby ambassador, using the username and password. The Lobby Ambassador Guest Management > Guest Users List page appears. | ||||
| Step 2 | Click New to create a guest user account. The Lobby Ambassador Guest Management > Guest Users List > New page appears. | ||||
| Step 3 | In the User Name text box, enter a name for the guest user. You can enter up to 24 characters. | ||||
| Step 4 | Perform one of the following:
| ||||
| Step 5 | From the Lifetime drop-down lists, choose the amount of time (in days, hours, minutes, and seconds) that this guest user account is to remain active. A value of zero (0) for all four text boxes creates a permanent account.
| ||||
| Step 6 | From the WLAN SSID drop-down list, choose the SSID that will be used by the guest user. The only WLANs that are listed are those WLANs for which Layer 3 web authentication has been configured.
| ||||
| Step 7 | In the Description text box, enter a description of the guest user account. You can enter up to 32 characters. | ||||
| Step 8 | Click Apply to commit your changes. The new guest user account appears in the list of guest users on the Guest Users List page. From this page, you can see all of the guest user accounts, their WLAN SSID, and their lifetime. You can also edit or remove a guest user account. When you remove a guest user account, all of the clients that are using the guest WLAN and are logged in using that account’s username are deleted. | ||||
| Step 9 | Repeat this procedure to create any additional guest user accounts. |
Viewing Guest User Accounts
Viewing the Guest Accounts (GUI)
To view guest user accounts using the controller GUI, choose . The Local Net Users page appears.
From this page, you can see all of the local net user accounts (including guest user accounts) and can edit or remove them as desired. When you remove a guest user account, all of the clients that are using the guest WLAN and are logged in using that account’s username are deleted.
Viewing the Guest Accounts (CLI)
To see all of the local net user accounts (including guest user accounts) using the controller CLI, enter this command:
Obtaining a Web Authentication Certificate
Information About Web Authentication Certificates
The operating system of the controller automatically generates a fully functional web authentication certificate, so you do not need to do anything in order to use certificates with Layer 3 web authentication. However, if desired, you can prompt the operating system to generate a new web authentication certificate, or you can download an externally generated SSL certificate.
Starting with 7.0.250.0 and 7.3.101.0 releases (but not in 7.2.x release), SHA2 certificates are supported.
Note |
Note | For WEB UI access using TACACS+ server, custom method-list for authentication and authorization pointing to the TACACS+ server group does not work. You should use the default authorization method-list pointing to the same TACACS+ server group for the WEB UI to work. |
Obtaining Web Authentication Certificates
Obtaining a Web Authentication Certificate (GUI)
| Step 1 | Choose Security > Web Auth > Certificate to open the Web Authentication Certificate page. This page shows the details of the current web authentication certificate. |
| Step 2 | If you want to use a new operating system-generated web authentication certificate, follow these steps: |
| Step 3 | If you prefer to use an externally generated web authentication certificate, follow these steps: |
Obtaining a Web Authentication Certificate (CLI)
| Step 1 | See the current web authentication certificate by entering this command:
Information similar to the following appears: Web Administration Certificate................... Locally Generated Web Authentication Certificate................... Locally Generated Certificate compatibility mode:............... off | ||||
| Step 2 | If you want the operating system to generate a new web authentication certificate, follow these steps: | ||||
| Step 3 | If you prefer to use an externally generated web authentication certificate, follow these steps:
|
Web Authentication Process
Note | If a client uses more than 20 DNS resolved addresses, the controller overwrites the 21st address in the first address space in the Mobile Station Control Block (MSCB) table, but the first address is still retained in the client. If the client again tries to use the first address, it will not be reachable because the controller does not have this address in the list of allowed addresses for the client's MSCB table. |
Note | One-Time Passwords (OTP) are not supported on web authentication. |
Note | Web Authentication does not work with IPv6 URL when WLAN is LS however IPv4 with LS and IPv6 with CS works.. The re-directed web-auth page is not displayed when IPv6 URL is typed in the browser and WLAN is in Local Switching. |
Guidelines and Limitations
When web authentication is enabled (under Layer 3 Security), users might receive a web-browser security alert the first time that they attempt to access a URL.

Note | When clients connect to a WebAuth SSID with preauthorization ACL configured to allow VPN users, the clients will get disconnected from the SSID every few minutes. Webauth SSIDs must not connect without authenticating on the web page. |
After the user clicks Yes to proceed (or if the client’s browser does not display a security alert), the web authentication system redirects the client to a login page.
To prevent the security alert from appearing, follow these steps:
Choose Place all certificates in the following store and click Browse.
At the bottom of the Select Certificate Store page, select the Show Physical Stores check box.
Expand the Trusted Root Certification Authorities folder and choose Local Computer.
When the “The import was successful” message appears, click OK.
Reboot the PC. On the next web authentication attempt, the login page appears.
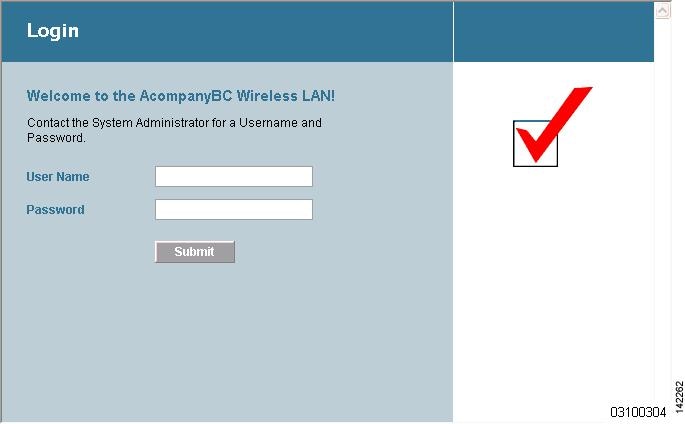
Figure 2. Default Web Authentication Login Page. The following figure shows the default web authentication login page.

The default login page contains a Cisco logo and Cisco-specific text. You can choose to have the web authentication system display one of the following:
The Choosing the Default Web Authentication Login Page section provides instructions for choosing how the web authentication login page appears.
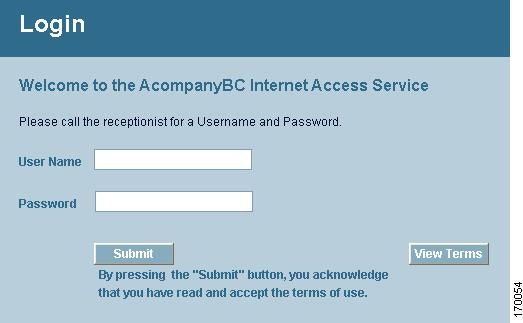
When the user enters a valid username and password on the web authentication login page and clicks Submit, the web authentication system displays a successful login page and redirects the authenticated client to the requested URL.

The default successful login page contains a pointer to a virtual gateway address URL: https://1.1.1.1/logout.html. The IP address that you set for the controller virtual interface serves as the redirect address for the login page
Choosing the Default Web Authentication Login Page
Information About Default Web Authentication Login Page
If you are using a custom web-auth bundle that is served by the internal controller web server, the page should not contain more than 5 elements (including HTML, CSS, and Images). This is because the internal controller web server implements a DoS protection mechanism that limits each client to open a maximum of 5 (five) concurrent TCP connections depending on the load. Some browsers may try to open more than 5 TCP sessions at the same time (For example Firefox 4) if the page contains more elements and this may result in the page loading slowly depending on how the browser handles the DoS protection.
If you do not want users to connect to a web page using a browser that is configured with SSLv2 only, you can disable SSLv2 for web authentication by entering the config network secureweb cipher-option sslv2 disable command. If you enter this command, users must use a browser that is configured to use a more secure protocol such as SSLv3 or later releases. The default value is disabled.
Note | Cisco TAC is not responsible for creating a custom webauth bundle. |
If you have a complex custom web authentication module, it is recommended that you use an external web-auth config on the controller, where the full login page is hosted at an external web server.
Guidelines and Limitations
If you do not want users to connect to a web page using a browser that is configured with SSLv2 only, you can disable SSLv2 for web authentication by entering the config network secureweb cipher-option sslv2 disable command. If you enter this command, users must use a browser that is configured to use a more secure protocol such as SSLv3 or later releases. The default value is disabled.
Choosing the Default Web Authentication Login Page (GUI)
| Step 1 | Choose Security > Web Auth > Web Login Page to open the Web Login page. |
| Step 2 | From the Web Authentication Type drop-down list, choose Internal (Default). |
| Step 3 | If you want to use the default web authentication login page as is, go to Step 8. If you want to modify the default login page, go to Step 4. |
| Step 4 | If you want to hide the Cisco logo that appears in the top right corner of the default page, choose the Cisco Logo Hide option. Otherwise, click the Show option. |
| Step 5 | If you want the user to be directed to a particular URL (such as the URL for your company) after login, enter the desired URL in the Redirect URL After Login text box. You can enter up to 254 characters. |
| Step 6 | If you want to create your own headline on the login page, enter the desired text in the Headline text box. You can enter up to 127 characters. The default headline is “Welcome to the Cisco wireless network.” |
| Step 7 | If you want to create your own message on the login page, enter the desired text in the Message text box. You can enter up to 2047 characters. The default message is “Cisco is pleased to provide the Wireless LAN infrastructure for your network. Please login and put your air space to work.” |
| Step 8 | Click Apply to commit your changes. |
| Step 9 | Click Preview to view the web authentication login page. |
| Step 10 | If you are satisfied with the content and appearance of the login page, click Save Configuration to save your changes. Otherwise, repeat any of the previous steps as necessary to achieve your desired results. |
Choosing the Default Web Authentication Login Page (CLI)
| Step 1 | Specify the default web authentication type by entering this command: | ||||
| Step 2 | If you want to use the default web authentication login page as is, go to Step 7. If you want to modify the default login page, go to Step 3. | ||||
| Step 3 | To show or hide the Cisco logo that appears in the top right corner of the default login page, enter this command: | ||||
| Step 4 | If you want the
user to be directed to a particular URL (such as the URL for your company)
after login, enter this command:
config custom-web redirecturl url You can enter up to 130 characters for the URL. To change the redirect back to the default setting, enter the clear redirecturl command. | ||||
| Step 5 | If you want to
create your own headline on the login page, enter this command:
config custom-web webtitle title You can enter up to 130 characters. The default headline is “Welcome to the Cisco wireless network.” To reset the headline to the default setting, enter the clear webtitle command. | ||||
| Step 6 | If you want to
create your own message on the login page, enter this command:
config custom-web webmessage message You can enter up to 130 characters. The default message is “Cisco is pleased to provide the Wireless LAN infrastructure for your network. Please login and put your air space to work.” To reset the message to the default setting, enter the clear webmessage command. | ||||
| Step 7 | To enable or
disable the web authentication logout popup window, enter this command:
config custom-web logout-popup {enable | disable} | ||||
| Step 8 | Enter the save config command to save your settings. | ||||
| Step 9 | Import your own
logo into the web authentication login page as follows:
| ||||
| Step 10 | Follow the instructions in the Verifying the Web Authentication Login Page Settings (CLI) section to verify your settings. |
Example: Creating a Customized Web Authentication Login Page
This section provides information on creating a customized web authentication login page, which can then be accessed from an external web server.
Here is a web authentication login page template. It can be used as a model when creating your own customized page:
<html> <head> <meta http-equiv="Pragma" content="no-cache"> <meta HTTP-EQUIV="Content-Type" CONTENT="text/html; charset=iso-8859-1"> <title>Web Authentication</title> <script> function submitAction(){ var link = document.location.href; var searchString = "redirect="; var equalIndex = link.indexOf(searchString); var redirectUrl = ""; if (document.forms[0].action == "") { var url = window.location.href; var args = new Object(); var query = location.search.substring(1); var pairs = query.split("&"); for(var i=0;i<pairs.length;i++){ var pos = pairs[i].indexOf('='); if(pos == -1) continue; var argname = pairs[i].substring(0,pos); var value = pairs[i].substring(pos+1); args[argname] = unescape(value); } document.forms[0].action = args.switch_url; } if(equalIndex >= 0) { equalIndex += searchString.length; redirectUrl = ""; redirectUrl += link.substring(equalIndex); } if(redirectUrl.length > 255) redirectUrl = redirectUrl.substring(0,255); document.forms[0].redirect_url.value = redirectUrl; document.forms[0].buttonClicked.value = 4; document.forms[0].submit(); } function loadAction(){ var url = window.location.href; var args = new Object(); var query = location.search.substring(1); var pairs = query.split("&"); for(var i=0;i<pairs.length;i++){ var pos = pairs[i].indexOf('='); if(pos == -1) continue; var argname = pairs[i].substring(0,pos); var value = pairs[i].substring(pos+1); args[argname] = unescape(value); } //alert( "AP MAC Address is " + args.ap_mac); //alert( "The Switch URL to post user credentials is " + args.switch_url); document.forms[0].action = args.switch_url; // This is the status code returned from webauth login action // Any value of status code from 1 to 5 is error condition and user // should be shown error as below or modify the message as it suits // the customer if(args.statusCode == 1){ alert("You are already logged in. No further action is required on your part."); } else if(args.statusCode == 2){ alert("You are not configured to authenticate against web portal. No further action is required on your part."); } else if(args.statusCode == 3){ alert("The username specified cannot be used at this time. Perhaps the username is already logged into the system?"); } else if(args.statusCode == 4){ alert("The User has been excluded. Please contact the administrator."); } else if(args.statusCode == 5){ alert("Invalid username and password. Please try again."); } else if(args.statusCode == 6){ alert("Invalid email address format. Please try again."); } } </script> </head> <body topmargin="50" marginheight="50" onload="loadAction();"> <form method="post" action="https://209.165.200.225/login.html"> <input TYPE="hidden" NAME="buttonClicked" SIZE="16" MAXLENGTH="15" value="0"> <input TYPE="hidden" NAME="redirect_url" SIZE="255" MAXLENGTH="255" VALUE=""> <input TYPE="hidden" NAME="err_flag" SIZE="16" MAXLENGTH="15" value="0"> <div align="center"> <table border="0" cellspacing="0" cellpadding="0"> <tr> <td> </td></tr> <tr align="center"> <td colspan="2"><font size="10" color="#336699">Web Authentication</font></td></tr> <tr align="center"> <td colspan="2"> User Name <input type="TEXT" name="username" SIZE="25" MAXLENGTH="63" VALUE=""> </td> </tr> <tr align="center" > <td colspan="2"> Password <input type="Password" name="password" SIZE="25" MAXLENGTH="24"> </td> </tr> <tr align="center"> <td colspan="2"><input type="button" name="Submit" value="Submit" class="button" onclick="submitAction();"> </td> </tr> </table> </div> </form> </body> </html>
These parameters are added to the URL when the user’s Internet browser is redirected to the customized login page:
-
ap_mac—The MAC address of the access point to which the wireless user is associated.
-
switch_url—The URL of the controller to which the user credentials should be posted.
-
redirect—The URL to which the user is redirected after authentication is successful.
-
statusCode—The status code returned from the controller’s web authentication server.
-
wlan—The WLAN SSID to which the wireless user is associated.
The available status codes are as follows:
-
Status Code 1: “You are already logged in. No further action is required on your part.”
-
Status Code 2: “You are not configured to authenticate against web portal. No further action is required on your part.”
-
Status Code 3: “The username specified cannot be used at this time. Perhaps the username is already logged into the system?”
-
Status Code 5: “The User Name and Password combination you have entered is invalid. Please try again.”
Note
For additional information, see the External Web Authentication with Wireless LAN Controllers Configuration Example at http://www.cisco.com/c/en/us/support/docs/wireless-mobility/wlan-security/71881-ext-web-auth-wlc.html.
Example: Modified Default Web Authentication Login Page Example
Generating a Certificate Signing Request
| Step 1 | Install and open the OpenSSL application. | ||
| Step 2 | Enter the
command:
OpenSSL> req -new -newkey rsa:1024 -nodes -keyout mykey.pem -out myreq.pem Controllers support a maximum key size of 2048 bits.
After you issue the command, you are prompted to enter information such as country name, state, city, and so on. Information similar to the following appears: OpenSSL> req -new -newkey rsa:1024 -nodes -keyout mykey.pem -out myreq.pem Loading 'screen' into random state - done Generating a 1024 bit RSA private key ................................................................++++++ ...................................................++++++ writing new private key to 'mykey.pem' ----- You are about to be asked to enter information that will be incorporated into your certificate request. What you are about to enter is what is called a Distinguished Name or a DN. There are quite a few fields but you can leave some blank For some fields there will be a default value, If you enter '.', the field will be left blank. ----- Country Name (2 letter code) [AU]:US State or Province Name (full name) [Some-State]:CA Locality Name (eg, city) []:San Jose Organization Name (eg, company) [Internet Widgits Pty Ltd]:ABC Organizational Unit Name (eg, section) []:CDE Common Name (eg, YOUR name) []:XYZ.ABC Email Address []:Test@abc.com Please enter the following 'extra' attributes to be sent with your certificate request A challenge password []:Test123 An optional company name []: OpenSSL> After you provide all the required details two files are generated: | ||
| Step 3 | Copy and paste
the Certificate Signing Request (CSR) information into any CA enrollment tool.
After you submit the CSR to a third party CA, the third party CA digitally
signs the certificate and sends back the signed certificate chain through
e-mail. In case of chained certificates, you receive the entire chain of
certificates from the CA. If you only have one intermediate certificate similar
to the example above, you will receive the following three certificates from
the CA:
| ||
| Step 4 | Once you have
all the three certificates, copy and paste into another file the contents of
each .pem file in this order:
------BEGIN CERTIFICATE------ *Device cert* ------END CERTIFICATE------ ------BEGIN CERTIFICATE------ *Intermediate CA cert * ------END CERTIFICATE-------- ------BEGIN CERTIFICATE------ *Root CA cert * ------END CERTIFICATE------ | ||
| Step 5 | Save the file as All-certs.pem. | ||
| Step 6 | Combine the All-certs.pem certificate with the private key that you generated along with the CSR (the private key of the device certificate, which is mykey.pem in this example), and save the file as final.pem. | ||
| Step 7 | Create the
All-certs.pem and final.pem files by entering these commands:
openssl> pkcs12 -export -in All-certs.pem -inkey mykey.pem
       -out All-certs.p12 -clcerts -passin pass:check123
       -passout pass:check123

openssl> pkcs12 -in All-certs.p12 -out final.pem
       -passin pass:check123 -passout pass:check123
final.pem is
the file that we need to download to the controller.
|
What to Do Next
Download the final.pem file to the controller either using CLI or GUI.
Downloading Third-Party Certificate (GUI)
| Step 1 | Copy the device certificate final.pem to the default directory on your TFTP server. |
| Step 2 | Choose Security > Web Auth > Certificate to open the Web Authentication Certificate page. |
| Step 3 | Check the Download SSL Certificate check box to view the Download SSL Certificate From Server parameters. |
| Step 4 | In the Server IP Address text box, enter the IP address of the TFTP server. |
| Step 5 | In the File Path text box, enter the directory path of the certificate. |
| Step 6 | In the File Name text box, enter the name of the certificate. |
| Step 7 | In the Certificate Password text box, enter the password to protect the certificate. |
| Step 8 | Click Apply. |
| Step 9 | After the download is complete, choose Commands > Reboot and click Save and Reboot. |
| Step 10 | Click OK in order to confirm your decision to reboot the controller. |
Downloading Third-Party Certificate (CLI)
| Step 1 | Move the
final.pem
file to the default directory on your TFTP server. Change the download settings
by entering the following commands:
(Cisco Controller) > transfer download mode tftp (Cisco Controller) > transfer download datatype webauthcert (Cisco Controller) > transfer download serverip <TFTP server IP address> (Cisco Controller) > transfer download path <absolute TFTP server path to the update file> (Cisco Controller) > transfer download filename final.pem | ||
| Step 2 | Enter the
password for the .pem file so that the operating system can decrypt the SSL key
and certificate.
(Cisco Controller) > transfer download certpassword password
| ||
| Step 3 | Start the
certificate and key download by entering the this command:
transfer download start
Example:
(Cisco Controller) > transfer download start

Mode............................................. TFTP
Data Type........................................ Site Cert
TFTP Server IP................................... 10.77.244.196
TFTP Packet Timeout.............................. 6
TFTP Max Retries................................. 10
TFTP Path........................................./
TFTP Filename.................................... final.pem

This may take some time.
Are you sure you want to start? (y/N) y

TFTP EAP Dev cert transfer starting.

Certificate installed.
Reboot the switch to use new certificate.
| ||
| Step 4 | Reboot the controller. |
Using a Customized Web Authentication Login Page from an External Web Server
Information About Customized Web Authentication Login Page
You can customize the web authentication login page to redirect to an external web server. When you enable this feature, the user is directed to your customized login page on the external web server.
You must configure a preauthentication access control list (ACL) on the WLAN for the external web server and then choose this ACL as the WLAN preauthentication ACL under Security Policies > Web Policy on the WLANs > Edit page.
Guidelines and Limitations
You must configure a preauthentication access control list (ACL) on the WLAN for the external web server and then choose this ACL as the WLAN preauthentication ACL under Security Policies > Web Policy on the WLANs > Edit page.
Choosing a Customized Web Authentication Login Page from an External Web Server
Choosing a Customized Web Authentication Login Page from an External Web Server (GUI)
| Step 1 | Choose to open the Web Login page. |
| Step 2 | From the Web Authentication Type drop-down list, choose External (Redirect to external server). |
| Step 3 | In the Redirect URL after login text box, enter the URL that you want the user to be redirected after a login. For example, you may enter your company's URL here and the users will be directed to that URL after login. The maximum length is 254 characters. By default, the user is redirected to the URL that was entered in the user's browser before the login page was served. of the customized web authentication login page on your web server. You can enter up to 252 characters. |
| Step 4 | In the External Webauth URL text box, enter the URL that is to be used for external web authentication. |
| Step 5 | Click Apply. |
| Step 6 | Click Save Configuration. |
Choosing a Customized Web Authentication Login Page from an External Web Server (CLI)
| Step 1 | Specify the web authentication type by entering this command: |
| Step 2 | Specify the URL of the customized web authentication login page on your web server by entering this command: |
| Step 3 | Specify the IP address of your web server by entering this command: config custom-web ext-webserver {add | delete} server_IP_address |
| Step 4 | Enter the save config command to save your settings. |
| Step 5 | Follow the instructions in the Verifying the Web Authentication Login Page Settings (CLI) section to verify your settings. |
Additional References
See Configuring Security Solutions for more information on ACLs.
Downloading a Customized Web Authentication Login Page
You can compress the page and image files used for displaying a web authentication login page into a.tar file for download to a controller. These files are known as the webauth bundle. The maximum allowed size of the files in their uncompressed state is 1 MB. When the .tar file is downloaded from a local TFTP server, it enters the controller’s file system as an untarred file.
You can download a login page example from Cisco Prime Infrastructure and use it as a starting point for your customized login page. For more information, see the Cisco Prime Infrastructure documentation.
Note | If you load a webauth bundle with a .tar compression application that is not GNU compliant, the controller cannot extract the files in the bundle and the following error messages appear: “Extracting error” and “TFTP transfer failed.” Therefore, we recommend that you use an application that complies with GNU standards, such as PicoZip, to compress the .tar file for the webauth bundle. |
Note | Configuration backups do not include extra files or components, such as the webauth bundle or external licenses, that you download and store on your controller, so you should manually save external backup copies of those files or components. |
Note | If the customized webauth bundle has more than 3 separated elements, we advise you to use an external server to prevent page load issues that may be caused because of TCP rate-limiting policy on the controller. |
- Prerequisites for Downloading a Customized Web Authentication Login Page
- Additional References
- Downloading a Customized Web Authentication Login Page (GUI)
- Downloading a Customized Web Authentication Login Page (CLI)
- Additional References
- Example: Customized Web Authentication Login Page
- Verifying the Web Authentication Login Page Settings (CLI)
Prerequisites for Downloading a Customized Web Authentication Login Page
Name the login page login.html. The controller prepares the web authentication URL based on this name. If the server does not find this file after the webauth bundle has been untarred, the bundle is discarded, and an error message appears.
Retain the redirect URL as a hidden input item after extracting from the original URL.
Extract and set the action URL in the page from the original URL.
Make sure that all paths used in the main page (to refer to images, for example).
Ensure that no filenames within the bundle are greater than 30 characters.
Additional References
You can download a login page example from Cisco Prime Infrastructure and use it as a starting point for your customized login page. For more information, see the Cisco Prime Infrastructure documentation.
Downloading a Customized Web Authentication Login Page (GUI)
| Step 1 | Copy the .tar file containing your login page to the default directory on your server. |
| Step 2 | Choose Commands > Download File to open the Download File to Controller page. |
| Step 3 | From the File Type drop-down list, choose Webauth Bundle. |
| Step 4 | From the Transfer Mode drop-down list, choose from the following options: |
| Step 5 | In the IP Address text box, enter the IP address of the server. |
| Step 6 | If you are using a TFTP server, enter the maximum number of times the controller should attempt to download the .tar file in the Maximum Retries text box. |
| Step 7 | If you are using a TFTP server, enter the amount of time in seconds before the controller times out while attempting to download the *.tar file in the Timeout text box. |
| Step 8 | In the File Path text box, enter the path of the .tar file to be downloaded. The default value is “/.” |
| Step 9 | In the File Name text box, enter the name of the .tar file to be downloaded. |
| Step 10 | If you are using an FTP server, follow these steps:
|
| Step 11 | Click Download to download the .tar file to the controller. |
| Step 12 | Choose Security > Web Auth > Web Login Page to open the Web Login page. |
| Step 13 | From the Web Authentication Type drop-down list, choose Customized (Downloaded). |
| Step 14 | Click Apply. |
| Step 15 | Click Preview to view your customized web authentication login page. |
| Step 16 | If you are satisfied with the content and appearance of the login page, click Save Configuration. |
Downloading a Customized Web Authentication Login Page (CLI)
| Step 1 | Copy the .tar file containing your login page to the default directory on your server. | ||
| Step 2 | Specify the download mode by entering this command: | ||
| Step 3 | Specify the type of file to be downloaded by entering this command: | ||
| Step 4 | Specify the IP
address of the TFTP server by entering this command:
transfer download serverip tftp-server-ip-address.
| ||
| Step 5 | Specify the download path by entering this command: | ||
| Step 6 | Specify the file to be downloaded by entering this command: | ||
| Step 7 | View your updated settings and answer y to the prompt to confirm the current download settings and start the download by entering this command: | ||
| Step 8 | Specify the web authentication type by entering this command: | ||
| Step 9 | Enter the save config command to save your settings. |
Additional References
Example: Customized Web Authentication Login Page
Verifying the Web Authentication Login Page Settings (CLI)
Verify your changes to the web authentication login page by entering this command:
Assigning Login, Login Failure, and Logout Pages per WLAN
Information About Assigning Login, Login Failure, and Logout Pages per WLAN
You can display different web authentication login, login failure, and logout pages to users per WLAN. This feature enables user-specific web authentication pages to be displayed for a variety of network users, such as guest users or employees within different departments of an organization.
Different login pages are available for all web authentication types (internal, external, and customized). However, different login failure and logout pages can be specified only when you choose customized as the web authentication type.
Assigning Login, Login Failure, and Logout Pages per WLAN (GUI)
| Step 1 | Choose WLANs to open the WLANs page. | ||
| Step 2 | Click the ID number of the WLAN to which you want to assign a web login, login failure, or logout page. | ||
| Step 3 | Choose Security > Layer 3. | ||
| Step 4 | Make sure that Web Policy and Authentication are selected. | ||
| Step 5 | To override the global authentication configuration web authentication pages, select the Override Global Config check box. | ||
| Step 6 | When the Web Auth Type drop-down list appears, choose one of the following options to define the web authentication pages for wireless guest users:
| ||
| Step 7 | If you chose External as the web authentication type in Step 6, choose AAA Servers and choose up to three RADIUS and LDAP servers using the drop-down lists.
| ||
| Step 8 | Establish the priority in which the servers are contacted to perform web authentication as follows:
| ||
| Step 9 | Click Apply to commit your changes. | ||
| Step 10 | Click Save Configuration to save your changes. |
Assigning Login, Login Failure, and Logout Pages per WLAN (CLI)
| Step 1 | Determine the ID number of the WLAN to which you want to assign a web login, login failure, or logout page by entering this command: | ||||
| Step 2 | If you want wireless guest users to log into a customized web login, login failure, or logout page, enter these commands to specify the filename of the web authentication page and the WLAN for which it should display:
| ||||
| Step 3 | Redirect wireless guess users to an external server before accessing the web login page by entering this command to specify the URL of the external server: | ||||
| Step 4 | Define the order in which web authentication servers are contacted by entering this command: config wlan security web-auth server-precedence wlan_id {local | ldap | radius} {local | ldap | radius} {local | ldap | radius} The default order of server web authentication is local, RADIUS and LDAP.
| ||||
| Step 5 | Define which web authentication page displays for a wireless guest user by entering this command: config wlan custom-web webauth-type {internal | customized | external} wlan_id
| ||||
| Step 6 | Use a WLAN-specific custom web configuration rather than a global custom web configuration by entering this command: config wlan custom-web global disable wlan_id
| ||||
| Step 7 | Save your changes by entering this command: |
Configuring Wired Guest Access
Information About Wired Guest Access
Wired guest access enables guest users to connect to the guest access network from a wired Ethernet connection designated and configured for guest access. Wired guest access ports might be available in a guest office or through specific ports in a conference room. Like wireless guest user accounts, wired guest access ports are added to the network using the lobby ambassador feature.
Wired guest access can be configured in a standalone configuration or in a dual-controller configuration that uses both an anchor controller and a foreign controller. This latter configuration is used to further isolate wired guest access traffic but is not required for deployment of wired guest access.
Wired guest access ports initially terminate on a Layer 2 access switch or switch port configured with VLAN interfaces for wired guest access traffic. The wired guest traffic is then trunked from the access switch to a controller. This controller is configured with an interface that is mapped to a wired guest access VLAN on the access switch.
Note | Although wired guest access is managed by anchor and foreign anchors when two controllers are deployed, mobility is not supported for wired guest access clients. In this case, DHCP and web authentication for the client are handled by the anchor controller. |
Note | You can specify the amount of bandwidth allocated to a wired guest user in the network by configuring a QoS role and a bandwidth contract. |
You can create a basic peer to peer WLAN ACL and apply it to the wired guest WLAN. This will not block peer to peer traffic and the guest users can still communicate with each other.
Prerequisites for Configuring Wired Guest Access
To configure wired guest access on a wireless network, you must perform the following:
Restrictions for Configuring Wired Guest Access
-
Wired guest access ports must be in the same Layer 2 network as the foreign controller.
-
Up to five wired guest access LANs can be configured on a controller. Also in a wired guest access LAN, multiple anchors are supported.
-
Layer 3 web authentication and web passthrough are supported for wired guest access clients. Layer 2 security is not supported.
-
Do not trunk a wired guest VLAN to multiple foreign controllers, as it might produce unpredictable results.
-
The controller does not use the callStationIDType parameter configured for the Radius server while authenticating wired clients, instead the controller uses the system MAC address configured for the callStationIDType parameter.
Configuring Wired Guest Access
Configuring Wired Guest Access (GUI)
| Step 1 | To create a dynamic interface for wired guest user access, choose Controller > Interfaces. The Interfaces page appears. | ||||
| Step 2 | Click New to open the Interfaces > New page. | ||||
| Step 3 | Enter a name and VLAN ID for the new interface. | ||||
| Step 4 | Click Apply to commit your changes. | ||||
| Step 5 | In the Port Number text box, enter a valid port number. You can enter a number between 0 and 25 (inclusive). | ||||
| Step 6 | Select the Guest LAN check box. | ||||
| Step 7 | Click Apply to commit your changes. | ||||
| Step 8 | To create a wired LAN for guest user access, choose WLANs. | ||||
| Step 9 | On the WLANs page, choose Create New from the drop-down list and click Go. The appears. | ||||
| Step 10 | From the Type drop-down list, choose Guest LAN. | ||||
| Step 11 | In the Profile Name text box, enter a name that identifies the guest LAN. Do not use any spaces. | ||||
| Step 12 | From the WLAN ID drop-down
list, choose the ID number for this guest LAN.
| ||||
| Step 13 | Click Apply to commit your changes. | ||||
| Step 14 | Select the Enabled check box for the Status parameter. | ||||
| Step 15 | Web authentication (Web-Auth) is the default security policy. If you want to change this to web passthrough, choose the Security tab after completing Step 16 and Step 17. | ||||
| Step 16 | From the Ingress Interface drop-down list, choose the VLAN that you created in Step 3. This VLAN provides a path between the wired guest client and the controller by way of the Layer 2 access switch. | ||||
| Step 17 | From the Egress Interface drop-down list, choose the name of the interface. This WLAN provides a path out of the controller for wired guest client traffic. | ||||
| Step 18 | If you want to change the authentication method (for example, from web authentication to web passthrough), choose Security > Layer 3. The WLANs > Edit (Security > Layer 3) page appears. | ||||
| Step 19 | From the Layer 3 Security drop-down list,
choose one of the following:
| ||||
| Step 20 | If you choose the Web Passthrough option, an Email Input check box appears. Select this check box if you want users to be prompted for their e-mail address when attempting to connect to the network. | ||||
| Step 21 | To override the global authentication configuration set on the Web Login page, select the Override Global Config check box. | ||||
| Step 22 | When the Web Auth Type drop-down list appears, choose one
of the following options to define the web authentication pages for wired guest
users:
| ||||
| Step 23 | If you chose
External as the web authentication type in
Step 22,
choose
Security > AAA
Servers and choose up to three RADIUS and LDAP servers using the
drop-down lists.
| ||||
| Step 24 | To establish the
priority in which the servers are contacted to perform web authentication as
follows:
| ||||
| Step 25 | Click Apply. | ||||
| Step 26 | Click Save Configuration. | ||||
| Step 27 | Repeat this process if a second (anchor) controller is being used in the network. |
Configuring Wired Guest Access (CLI)
| Step 1 | Create a dynamic interface (VLAN) for wired guest user access by entering this command: | ||||
| Step 2 | If link
aggregation trunk is not configured, enter this command to map a physical port
to the interface:
config interface port interface_name primary_port {secondary_port} | ||||
| Step 3 | Enable or
disable the guest LAN VLAN by entering this command:
config interface guest-lan interface_name {enable | disable} This VLAN is later associated with the ingress interface created in Step 5. | ||||
| Step 4 | Create a wired
LAN for wired client traffic and associate it to an interface by entering this
command:
config guest-lan create guest_lan_id interface_name The guest LAN ID must be a value between 1 and 5 (inclusive).
| ||||
| Step 5 | Configure the
wired guest VLAN’s ingress interface, which provides a path between the wired
guest client and the controller by way of the Layer 2 access switch by entering
this command:
config guest-lan ingress-interface guest_lan_id interface_name | ||||
| Step 6 | Configure an
egress interface to transmit wired guest traffic out of the controller by
entering this command:
config guest-lan interface guest_lan_id interface_name
| ||||
| Step 7 | Configure the
security policy for the wired guest LAN by entering this command:
config guest-lan security {web-auth enable guest_lan_id | web-passthrough enable guest_lan_id}
| ||||
| Step 8 | Enable or disable a wired guest LAN by entering this command: | ||||
| Step 9 | If you want
wired guest users to log into a customized web login, login failure, or logout
page, enter these commands to specify the filename of the web authentication
page and the guest LAN for which it should display:
| ||||
| Step 10 | If you want
wired guest users to be redirected to an external server before accessing the
web login page, enter this command to specify the URL of the external server:
config guest-lan custom-web ext-webauth-url ext_web_url guest_lan_id | ||||
| Step 11 | If you want to
define the order in which local (controller) or external (RADIUS, LDAP) web
authentication servers are contacted, enter this command:
config wlan security web-auth server-precedence wlan_id {local | ldap | radius} {local | ldap | radius} {local | ldap | radius} The default order of server web authentication is local, RADIUS, LDAP.
| ||||
| Step 12 | Define the web
login page for wired guest users by entering this command:
config guest-lan custom-web webauth-type {internal | customized | external} guest_lan_id | ||||
| Step 13 | Use a
guest-LAN specific custom web configuration rather than a global custom web
configuration by entering this command:
config guest-lan custom-web global disable guest_lan_id
| ||||
| Step 14 | Save your
changes by entering this command:
| ||||
| Step 15 | Display the
customized web authentication settings for a specific guest LAN by entering
this command:
show custom-web {all | guest-lan guest_lan_id}
| ||||
| Step 16 | Display a
summary of the local interfaces by entering this command:
Display detailed interface information by entering this command: | ||||
| Step 17 | Display the
configuration of a specific wired guest LAN by entering this command:
| ||||
| Step 18 | Display the active wired guest LAN clients by entering this command: | ||||
| Step 19 | Display detailed information for a specific client by entering this command: |
Supporting IPv6 Client Guest Access
The client is in WebAuth Required state until the client is authenticated. The controller intercepts both IPv4 and IPv6 traffic in this state and redirects it to the virtual IP address of the controller. Once authenticated, the user's MAC address is moved to the run state and both IPv4 and IPv6 traffic is allowed to pass.
In order to support the redirection of IPv6-only clients, the controller automatically creates an IPv6 virtual address based on the IPv4 virtual address configured on the controller. The virtual IPv6 address follows the convention of [::ffff:<virtual IPv4 address>]. For example, a virtual IP address of 192.0.2.1 would translate into [::ffff:192.0.2.1]. For an IPv6 captive portal to be displayed, the user must request an IPv6 resolvable DNS entry such as ipv6.google.com which returns a DNSv6 (AAAA) record.
 Feedback