-
Cisco Aironet Access Point Software Configuration Guide for VxWorks
-
Preface
-
Overview
-
Using the Management Interfaces
-
Configuring the Radio and Basic Settings
-
Configuring VLANs
-
Configuring Filters and Quality of Service
-
Configuring Proxy Mobile IP
-
Configuring Other Settings
-
Security Setup
-
Network Management
-
Managing Firmware and Configurations
-
Management System Setup
-
Special Configurations
-
Diagnostics and Troubleshooting
-
Appendix A - Protocol Filter Lists
-
Appendix B - Channels, Power Levels, and Antenna Gains
-
Appendix C - Event Log Messages
-
Index
-
 Feedback
Table Of Contents
Managing Firmware and Configurations
Updating with the Browser from a Local Drive
Full Update of the Firmware Components
Selective Update of the Firmware Components
Full Update of the Firmware Components
Selective Update of the Firmware Components
Retrieving Firmware and Web Page Files
Downloading, Uploading, and Resetting the Configuration
Downloading the Current Configuration
Managing Firmware and Configurations
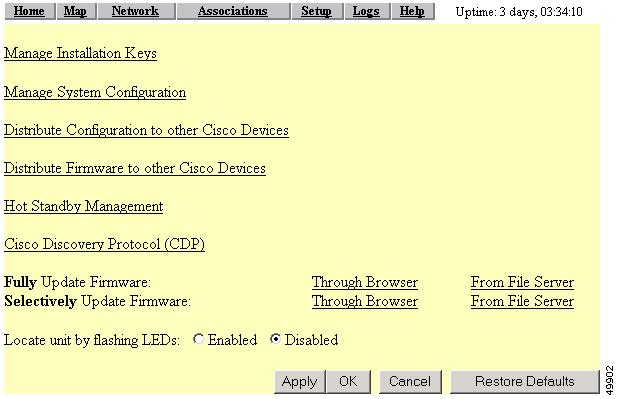
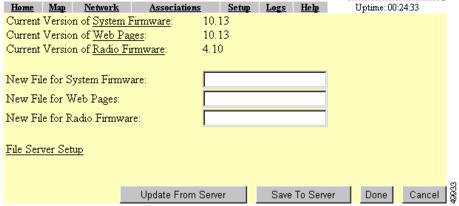
This section describes how to update the firmware version on the access point, how to distribute firmware to other access points, how to distribute the access point's configuration to other access points, and how to download, upload, and reset the access point configuration. You use the Cisco Services Setup page as a starting point for all these activities.
This chapter contains the following sections:
•
Downloading, Uploading, and Resetting the Configuration
Updating Firmware
You use the Cisco Services Setup page to update the access point's firmware. You can perform the update by browsing to a local drive or by using FTP to update the firmware from a file server. Figure 10-1 shows the Cisco Services Setup page.
Figure 10-1 Cisco Services Setup Page
Follow this link path in the browser interface to reach the Cisco Services Setup page:
1.
2.
Updating with the Browser from a Local Drive
When you update the firmware with your browser, you browse to your hard drive or to a mapped network drive for the new firmware. You can update the three firmware components—the management system firmware, the firmware web pages, and the radio firmware—individually or all at once. It is simplest to update all the components at once, but in some situations you might want to update them individually.
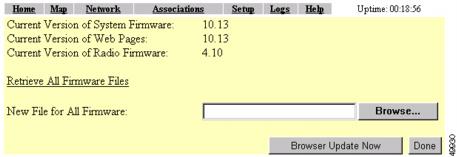
Full Update of the Firmware Components
To update all the firmware components at the same time, click Through Browser on the Fully Update Firmware line on the Cisco Services Setup page. The Update All Firmware Through Browser page appears. Figure 10-2 shows the Update All Firmware Through Browser page.
Figure 10-2 Update All Firmware Through Browser Page
Follow these steps to update all three firmware components through the browser:
Step 1
If you aren't sure of the exact path to the new firmware image file, click Browse... next to the New File entry field. When the File Upload window appears, go to the directory that contains the firmware image file and select the file. Click Open.
Step 2
Note
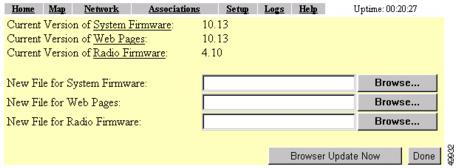
Selective Update of the Firmware Components
To update firmware components individually, click Through Browser on the Selectively Update Firmware line on the Cisco Services Setup page. The Update Firmware Through Browser page appears. Figure 10-3 shows the Update Firmware Through Browser page.
Figure 10-3 Update Firmware Through Browser Page
Follow these steps to update one of the three firmware components through the browser:
Step 1
If you aren't sure of the exact path to the new component, click Browse... next to the component's New File entry field. When the File Upload window appears, go to the directory that contains the component and select the file. Click Open.
Step 2
Updating from a File Server
When you update the firmware from a file server, you load new firmware through FTP or TFTP from a file server. You can update the three firmware components—the management system firmware, the firmware web pages, and the radio firmware—individually or all at once. It is simplest to update all the components at once, but in some situations you might want to update them individually.
Full Update of the Firmware Components
To update all the firmware components at the same time, click From File Server on the Fully Update Firmware line on the Cisco Services Setup page. The Update All Firmware From File Server page appears. Figure 10-4 shows the Update All Firmware From File Server page.
Figure 10-4 Update All Firmware From File Server Page
Follow these steps to update all three firmware components from a file server:
Step 1
Figure 10-5 FTP Setup Page
Step 2
a.
b.
c.
d.
e.
f.
Step 3
Step 4
Note
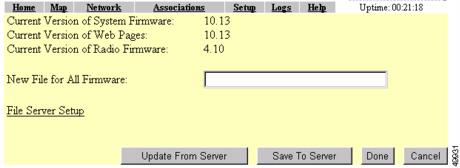
Selective Update of the Firmware Components
To update firmware components individually, click From File Server on the Selectively Update Firmware line on the Cisco Services Setup page. The Update Firmware From File Server page appears. Figure 10-6 shows the Update Firmware From File Server page.
Figure 10-6 Update Firmware From File Server Page
To update one of the three firmware components from the file server, follow the steps listed in the "Full Update of the Firmware Components" section, but in Step 3, type the filenames of the firmware components you want to update in the components' entry fields. Click Browser Update Now to load and install the new firmware. When the update is complete, the access point automatically reboots.
Retrieving Firmware and Web Page Files
You can retrieve and download the following files from an access point to your computer's hard drive:
•
•
•
These files can be downloaded selectively or at one time, depending on which page you select from which to retrieve them. To retrieve all firmware and web page files, browse to the Update All Firmware Through Browser page and click Retrieve All Firmware Files. To selectively retrieve these files, browse to the Selectively Update Firmware Through Browser or From File Server and select the files you wish to retrieve.
Follow these steps to retrieve and download all files.
Step 1
Step 2
Step 3
Step 4
Step 5
Step 6
Step 7
Follow these steps to retrieve and download selected files.
Step 1
Step 2
Step 3
Step 4
Step 5
Step 6
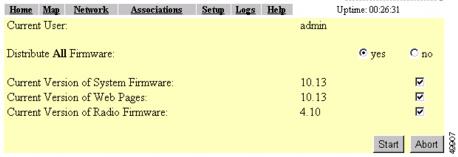
Distributing Firmware
You use the Distribute Firmware page to distribute the access point's firmware to other Cisco Aironet access points. Figure 10-7 shows the Distribute Firmware page.
The access point sends its firmware to all the access points on your network that:
•
•
•
•
•
•
Follow the steps in the "Limiting Distributions" section to limit the firmware distribution to certain access points.
Figure 10-7 Distribute Firmware Page
Follow this link path in the browser interface to reach the Distribute Firmware page:
1.
2.
3.
Follow these steps to distribute firmware to other access points:
Step 1
Step 2
To distribute the firmware components individually, select no for Distribute All Firmware, and click the checkboxes for the components you want to distribute.
Step 3
When the distribution is complete, the access points that received the firmware automatically reboot.
Distributing a Configuration
You use the Distribute Configuration page to distribute the access point's configuration to other Cisco Aironet access points. Figure 10-8 shows the Distribute Configuration page.
The access point sends its entire system configuration except for its IP identity information and its User List. The configuration is sent and applied to all the access points on your network that:
•
•
•
•
•
•
Figure 10-8 Distribute Configuration Page
Follow this link path in the browser interface to reach the Distribute Configuration page:
1.
2.
3.
Follow these steps to distribute the access point's configuration to other access points:
Step 1
Step 2
Limiting Distributions
You might need to distribute a configuration or firmware to certain access points but not to others. For example, if you distribute a configuration to several access points that use non-overlapping channels, the distributed configuration overwrites the channel settings and puts all the access points on the same channel. In this example, after the distribution you have to reconfigure all the access points to set up non-overlapping channels.
The simplest way to limit the distribution of a configuration or firmware is to create a unique user in the distributing and receiving access points' user management systems. An access point accepts distributed firmware and configurations only if its user manager contains a user with the same user name, password, and capabilities as the user performing the distribution (the person logged in on the distributing access point).
Follow these steps to limit distributions:
Step 1
Step 2
Step 3
Downloading, Uploading, and Resetting the Configuration
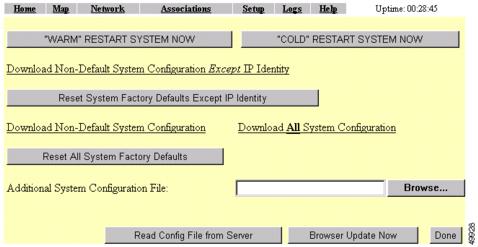
You use the System Configuration Setup page to download the current access point configuration to a local drive, upload a configuration from a local drive or file server, and reset the configuration to default settings. You can also use the System Configuration Setup page to restart the access point. Figure 10-9 shows the System Configuration Setup page.
Figure 10-9 System Configuration Setup Page
Follow this link path in the browser interface to reach the System Configuration Setup page:
1.
2.
3.
Downloading the Current Configuration
Follow these steps to download the access point's current configuration to your hard drive or to a mapped network drive:
Step 1
Step 2
•
•
•
If your web browser is Netscape Communicator, use your right mouse button to click the download configuration links and select Save link as in the pop-up menu. If you click the links with your left mouse button, Netscape Communicator displays the text file but does not open the Save as window.
Step 3
Uploading a Configuration
You can upload a configuration file to the access point from your hard drive or a mapped network drive, or you can upload a configuration from a file server.
Uploading from a Local Drive
Follow these steps to upload a configuration file from your hard drive or a mapped network drive:
Step 1
Step 2
If you aren't sure of the exact path to the configuration file, click Browse... next to the entry field. When the File Upload window appears, go to the directory that contains the configuration file and select the file. Click Open.
Step 3
The configuration file is loaded and applied in the access point.
Uploading from a File Server
Follow these steps to upload a configuration file from a file server:
Step 1
Follow this link path in the browser interface to reach the FTP Setup page:
a.
b.
The FTP Setup page appears. Figure 10-10 shows the FTP Setup page.
Figure 10-10 FTP Setup Page
Step 2
a.
b.
c.
d.
e.
f.
Step 3
Step 4
a.
b.
c.
d.
Resetting the Configuration
You can reset the access point configuration to the default settings without resetting the access point's IP identity, or you can reset the configuration to the default settings including the IP identity. If you reset the access point's IP identity, however, you might lose your browser connection to the access point.
Two buttons on the System Configuration Setup page reset the configuration to defaults:
•
–
–
–
•
–
–
Note
Follow these steps to reset the configuration to default settings:
Step 1
Step 2
Note
Restarting the Access Point
Use the System Configuration Setup page to restart the access point.
•
•