-
Cisco Unity System Administration Guide (With IBM Lotus Domino), Release 4.0(3)
-
Index
-
Preface
-
Introduction
-
Accessing the Cisco Unity Administrator
-
Using the Cisco Unity Administrator
-
Maintaining a Cisco Unity System
-
Manually Setting Up Cisco Unity to Use SSL
-
Default Accounts and Message Handling
-
Cisco Unity Conversation
-
Setting Up Client Applications
-
Subscriber, Operator, and Support Desk Orientation
-
Enhanced Phone Security
-
Languages
-
Integrating a Fax Server with Cisco Unity
-
Subscriber Template Settings
-
Class of Service Settings
-
Creating Subscriber Accounts
-
Deleting Subscriber Accounts
-
Subscriber Settings
-
Public Distribution List Settings
-
Account Policy Settings
-
Call Management
-
Call Handler Settings
-
Directory Handler Settings
-
Interview Handler Settings
-
Call Routing
-
Restriction Tables
-
Reports
-
Network Settings
-
System Settings
-
Appendix: Exiting and Starting the Cisco Unity Software and Server
-
Glossary
-
 Feedback
Table Of Contents
Using the Cisco Unity Administrator
Cisco Unity Administrator User Interface
Using the Cisco Unity Administrator
Cisco Unity Administrator User Interface
The Cisco Unity Administrator interface is divided into three areas.
Cisco Unity Data
The Cisco Unity Administrator features links from the main navigation bar to five groupings of data, representing subscribers and other Cisco Unity entities.
The data groupings available from the Cisco Unity Administrator include:
Subscribers
These pages are used to enter data related to individual subscriber records. Also included are subscriber template pages, which contain settings that are applied to groups of subscribers. Settings include schedules, passwords, account permissions, call processing and transfer options, and distribution lists.
Call Management
These pages are used to set how Cisco Unity answers, routes, transfers, and records calls. Settings include call routing, prerecorded caller interviews, call recording, and allowing or blocking certain dial strings.
Reports
These pages are used to generate reports on subscriber-based and system-based data. Reports can be generated for any of the data stored in the system, such as subscriber message activity, distribution lists, phone logons, disk storage, administration access, and port usage.
Network
These pages are used to add and view information about other Cisco Unity locations. Note that the network data pages are available only when Digital Networking is installed.
System
These pages are used to customize and view numerous system features, including business schedules, annual holidays, recording settings, and languages.
Navigation
There are two levels of navigation in the Cisco Unity Administrator.
•
At the first level, the navigation bar displays the data categories and provides links to each group of pages within those categories.
•
Always use the Cisco Unity navigation bar, rather than the Internet Explorer navigation buttons, to move between pages. Otherwise, incorrect data may be displayed.
Using the Online Help
The Cisco Unity Administrator includes two types of context-sensitive online Help:
To Display Online Documentation
Step 1
Step 2
To Display Field Help
Step 1
Step 2
Step 3
Command Icons
The command icons are located in the title bar, which is in the upper-right area of each Cisco Unity Administrator page.
Saving Data
Save newly entered data by clicking the Save icon. Cisco Unity requires you to save new data before moving to another record or to another part of the Cisco Unity Administrator. The following cues remind you when the displayed record contains unsaved data:
•
•
•
Finding Records
A record is the group of settings or collection of data for an individual subscriber, class of service (COS), or other Cisco Unity entity. For example, a subscriber record contains the subscriber account data.
To Find a Subscriber Record
Step 1
Step 2
Step 3
Step 4
Step 5
Step 6
Step 7
To Find Other Types of Records
Step 1
Step 2
Step 3
Step 4
Step 5
Adding Records
Always enter information for a new record in an Add window.
Caution
Use the following procedure to add a record, such as a new class of service (COS), distribution list, or call handler. To add a new subscriber, see the "Creating Subscriber Accounts" chapter.
To Add a Record
Step 1
Step 2
Step 3
Step 4
Recording Greetings and Names
You can record names for subscribers, public distribution lists, private lists, and call handlers (including interview handlers and directory handlers), and greetings for subscribers and call handlers, from pages within the Cisco Unity Administrator. You can also record greetings for call handlers by using the Cisco Unity phone conversation.
Subscribers can also record their own names and personal greetings by accessing the Cisco Unity conversation by phone, or the Cisco Unity Assistant website. (Note that in version 3.1 and earlier, the Cisco Unity Assistant was known as the ActiveAssistant, or AA.) For more information on setting up subscribers to record, see the "Setting Up Recording and Playback Devices" section.
Before you begin recording subscriber and call handler names and greetings, consider the following:
•
•
•
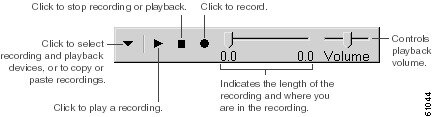
The Media Master control bar appears on each page of the Cisco Unity Administrator where recordings can be made. It allows you to make and play recordings, either with a phone or with your computer microphone and speakers, by clicking the Media Master controls. The Media Master control bar relies on DCOM (Distributed Component Object Model), and does not work through a firewall. It also requires that your browser is able to download and run ActiveX controls.
Figure 3-1 Media Master Control Bar
When determining the recording and playback device that you want to use to manage greetings and subscriber names in the Cisco Unity Administrator, consider the following:
•
•
Use the following procedure to change the recording and playback device used by the Media Master.
To Select a Recording and Playback Device
Step 1
Step 2
The Options menu button is on the far left of the Media Master control bar. See Figure 3-1.
Step 3
The <Use Preferred Device> option refers to the recording and playback devices that you have already selected for your computer (click Settings > Control Panel > Sounds and Multimedia on the Windows Start menu to set your preferred devices). See the Windows online Help for more information on preferred recording and playback devices.
Step 4