-
Cisco Unity System Administration Guide (With Microsoft Exchange), Release 4.0(1)
-
Index
-
Preface
-
Introduction
-
The Cisco Unity Administrator
-
Setting Up Cisco Unity To Use SSL
-
Default Accounts and Message Handling
-
Setting Up Client Applications
-
Subscriber and Operator Orientation
-
Maintaining Cisco Unity
-
Enhanced Phone Security
-
Multiple Languages
-
Integrating a Fax Server with Cisco Unity
-
Subscriber Template Settings
-
Class of Service Settings
-
Creating Subscriber Accounts
-
Deleting Subscriber Accounts
-
Subscriber Settings
-
Public Distribution List Settings
-
Account Policy Settings
-
Call Management
-
Call Handler Settings
-
Directory Handler Settings
-
Interview Handler Settings
-
Call Routing
-
Restriction Tables
-
Reports
-
Network Settings
-
System Settings
-
Glossary
-
 Feedback
Table Of Contents
Setting Up Client Applications
Setting Up ViewMail for Microsoft Outlook
Deploying ViewMail for Outlook
Upgrading From an Earlier Version of ViewMail
Uninstalling ViewMail 2.4(6.x)
Customizing ViewMail for Optimal Performance
Setting Up the Cisco Personal Communications Assistant
About Cisco Personal Communications Assistant Authentication
Defining Subscriber Account Policies for Logons, Passwords, and Lockouts
Configuring Subscriber Browsers To Use the Cisco PCA
Setting Up Recording and Playback Devices
Using the Phone as a Recording and Playback Device
Using a Microphone and Speakers as the Recording and Playback Device
Determining Recording and Playback Devices for Subscriber Use
Specifying Recording and Playback Device Preferences in Cisco Unity Applications
Setting Up Client Applications
Cisco Unity subscribers can send and manage voice, fax, and e-mail messages by using a touchtone phone or by using ViewMail and the Cisco Unity Inbox on their computers. In addition, the Cisco Unity Assistant lets subscribers personalize the Cisco Unity phone settings that control how they interact with Cisco Unity by phone. Note that AMIS, Bridge, Internet, and VPIM subscribers cannot log on to Cisco Unity by phone, use the Cisco Unity Assistant, or use the Cisco Unity Inbox.
This chapter reviews the preparations necessary for setting up subscriber phones and computers so that subscribers can use Cisco Unity client applications. See the following sections for details:
•
Setting Up Subscriber Phones—This section summarizes what you must do so that subscribers can access Cisco Unity by phone.
•
•
•
When you have set up subscribers to use the Cisco Unity client applications, review the tasks presented in the "Subscriber and Operator Orientation" chapter to orient subscribers and operators to Cisco Unity.
For a list of supported versions of Cisco Unity combined with the supported versions of the software on subscriber computers, refer to the Compatibility Matrix: Cisco Unity and the Software on Subscriber Workstations, available on Cisco.com at http://www.cisco.com/en/US/products/sw/voicesw/ps2237/products_device_support_tables_list.html.
Setting Up Subscriber Phones
For each subscriber phone, do the following tasks:
•
•
If desired, you can also change the phone password for individual subscribers. By default, subscriber template settings include an initial phone password for subscribers, which is 12345. You can change this setting for an individual subscriber or use the Bulk Edit utility in the Tools Depot to change this setting for multiple existing subscribers (see the "Subscriber Settings" chapter for details). For increased security, you can prohibit the use of blank phone passwords (see the "Phone Password Settings" section on page 17-1 for details.)
Subscribers can use the Cisco Unity phone conversation to change their phone passwords. Depending on the class of service associated with a subscriber account, they may also be able to use the Cisco Unity Assistant to change their phone passwords.
Setting Up ViewMail for Microsoft Outlook
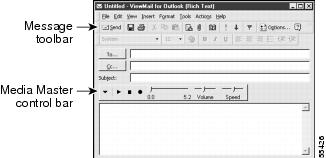
With ViewMail, Cisco Unity subscribers can send and manage voice, fax, and e-mail messages from their Outlook Inbox. Subscribers can use ViewMail to send voice messages to other subscribers, to non-Cisco Unity subscribers, and to public distribution lists. They can play and record voice messages by using the Media Master control bar, as depicted in Figure 5-1.
Cisco Unity may require that subscribers enter their credentials when they use the phone as a playback or recording device in ViewMail for Outlook, such as when subscriber computers are in a different domain than Cisco Unity.
Figure 5-1 ViewMail for Microsoft Outlook
ViewMail is not a licensed feature, nor does it require that you give subscribers special class of service privileges or passwords to use it. To set up ViewMail for subscribers in your organization, see the following sections in this chapter:
•
•
•
Deploying ViewMail for Outlook
You can install ViewMail for Outlook on subscriber workstations throughout your organization in a number of ways. Typically, organizations provide subscribers with network access to the ViewMail setup application so that they can set it up themselves.
For example, you can:
•
•
•
You can also use IntelliMirror or SMS for future upgrades of ViewMail. For details on using either of these software publishing tools, refer to the Microsoft website.
•
By default, ViewMail files are installed to the C:\Program Files\ViewMail directory. You can change this if desired. ViewMail installs and uses the following files and registry keys:
AvVox.acm
AvTsmSL.dll
AvWavSL.dll
SL_g729a.acm
HKLM/Software/Microsoft/ Exchange/Client/Extensions/Viewmail Extensions
HLU/Software/Active Voice
HKLM/Software/Active Voice
Use the following procedure to install ViewMail from a CD or a network drive on the workstations used by subscribers, as appropriate. Before doing so, consider the following:
•
•
•
•
•
To install ViewMail from CD or network drive
Step 1
Step 2
Step 3
Step 4
Note
Step 5
Upgrading From an Earlier Version of ViewMail
If subscribers are using ViewMail 2.4(6.x), see the "Uninstalling ViewMail 2.4(6.x)" section for specific instructions on how to uninstall 2.46 versions of ViewMail.
Note
When you are ready to install ViewMail 4.0(1), do so in the same directory used for the previous install of ViewMail. See the "Deploying ViewMail for Outlook" section for a detailed procedure.
Uninstalling ViewMail 2.4(6.x)
Any previously installed 2.4(6.x) version of ViewMail and the associated LightningFAX registry keys, if applicable, must be removed from client workstations before ViewMail 4.0(1) is installed. The uninstall process removes ViewMail menu items and the ViewMail toolbar icon from the Outlook Inbox.
Note that the first time that the subscriber receives a voice message after ViewMail is uninstalled, the ViewMail icon identifies the message as a voice message. When the subscriber tries to open the message, Outlook displays a message informing the subscriber that the message form is not available. However, the error message does not prevent the subscriber from opening the message. Subsequent voice messages appear as e-mail with WAV attachments without the ViewMail icon, and no error message is displayed when a subscriber open them.
To remove ViewMail and associated LightningFAX registry keys
Step 1
Step 2
Step 3
Step 4
Caution
Step 5
Step 6
•
CurrentVersion\App Management\ARPCache\LightningFAX 6.5 - PrintToMail.•
Monitors\LightningFAX.Step 7
Customizing ViewMail for Optimal Performance
When subscribers use ViewMail in a low bandwidth deployment (for example, with a slow modem or in a branch office), they should download messages before playing them for best performance and quality.
You can also reduce the amount of disk space needed for storing sent messages on subscriber computers by customizing ViewMail so that it saves only the message headers for voice messages that subscribers send, and not the message recordings.
Use the following procedures to set up either of these options on subscriber workstations. Subscribers can also refer to the ViewMail online Help or the Cisco Unity User Guide to set up these options on their own.
To download messages before playing them
Step 1
Step 2
Step 3
Step 4
To save only message headers
Step 1
Step 2
Step 3
Step 4
Setting Up the Cisco Personal Communications Assistant
Subscribers use the Cisco Personal Communications Assistant (PCA) to access the Cisco Unity Assistant and the Cisco Unity Inbox. The Cisco Unity Assistant is a website that gives subscribers the ability to customize personal settings—including recorded greetings or message delivery options—on their computers. The Cisco Unity Inbox website lets subscribers listen to, compose, reply to, forward, and delete voice messages. (The Cisco Unity Inbox is a licensed feature, and can be accessed only if it is purchased.)
The Cisco PCA is not a licensed feature, nor are subscribers required to have class of service rights to access it. Any Cisco Unity subscriber can access Cisco PCA at the following URL: http://<Cisco Unity server>/ciscopca. (Note that the URL is case-sensitive.) In version 3.1 and earlier, the Cisco Unity Assistant was known as the ActiveAssistant, or AA; the Cisco Unity Inbox was known as the Visual Messaging Interface, or VMI. Subscribers who use the following ActiveAssistant URLs will be automatically redirected to the Cisco PCA website:
•
•
Likewise, subscribers who use http://<Cisco Unity server name>/web/vmi will also be automatically redirected to the Cisco PCA website.
Cisco PCA is installed on the Cisco Unity server during installation. To allow subscribers to access it, you do not need to install any additional files on subscriber workstations; however, you must complete the following tasks:
1.
2.
3.
4.
About Cisco Personal Communications Assistant Authentication
Cisco Unity offers application-level authentication to allow subscribers to access the Cisco Personal Communications Assistant (PCA). This means that IIS is configured so that the Cisco PCA uses Anonymous authentication, and that Cisco Unity authenticates the credentials that subscribers enter when they log on to the Cisco PCA. Review the "How authentication for the Cisco Personal Communications Assistant works" section for further details. (Note that unlike the Cisco Unity Administrator, you cannot change the authentication method that is used by the Cisco PCA.)
By default, when subscribers log on to the Cisco PCA, their user names and passwords are sent across the network to Cisco Unity in clear text. The information that a subscriber enters on the Cisco PCA pages is also not encrypted. For increased security, we recommended that you set up Cisco Unity to use the Secure Sockets Layer (SSL) protocol. To set up a web server like Cisco Unity to use SSL, you can either obtain a digital certificate from a Certificate Authority (CA), or you can use Microsoft Certificate Services available with Windows to issue your own certificate. (See the "Setting Up Cisco Unity To Use SSL" chapter for details.)
As a best practice, it is recommended that Cisco Unity administrators not use the same subscriber account to log on to the Cisco Unity Administrator, as they do to log on to the Cisco PCA.
How authentication for the Cisco Personal Communications Assistant works
1.
2.
3.
4.
5.
6.
7.
8.
If the credentials cannot be authenticated, Cisco Unity presents a web page that indicates that the subscriber does not have permission to view the Cisco PCA website.
9.
If the subscriber account does not exist or does not have the proper COS rights, Cisco Unity presents a web page, which indicates that the subscriber does not have permission to view the Cisco PCA website.
Defining Subscriber Account Policies for Logons, Passwords, and Lockouts
The account policy that you specify on the Authentication page in the Cisco Unity Administrator determines how Cisco Unity handles situations when subscribers attempt to log on to the Cisco PCA and repeatedly enter incorrect passwords; the number of failed logon attempts that Cisco Unity allows before the subscriber account cannot be used to access the Cisco PCA; and the length of time that a user remains locked out.
When you add a subscriber by using the Cisco Unity Administrator, subscriber template settings include initial Windows passwords that subscribers can use to access the Cisco PCA. The default password for new Windows accounts is 12345678. However, when you use either the Cisco Unity Administrator or the Cisco Unity Bulk Import wizard to create subscriber accounts by importing data from Exchange, the passwords that subscribers use to access the Cisco PCA is inherited from the Windows domain accounts.
Subscribers cannot use the Cisco Unity phone conversation or the Cisco Unity Assistant to change their Cisco PCA passwords, nor can administrators change them in the Cisco Unity Administrator. However, for increased security, you can use the settings on the Authentication page to prohibit the use of blank passwords, even when the Windows account allows them.To customize the logon, password, and lockout policies that Cisco Unity applies whenever subscribers use the Cisco PCA to access Cisco Unity, see the "Authentication Settings" section on page 26-11.
Configuring Subscriber Browsers To Use the Cisco PCA
To allow subscribers to access the Cisco PCA, configure their browsers to:
•
•
•
•
If you set up Cisco Unity to use SSL, consider that the Cisco PCA website automatically uses an SSL connection every time that a subscriber points the browser to either website. However, until the digital certificate is added to the trusted root store on the subscriber computer, the browser will display a message to alert the subscriber that the authenticity of the site cannot be verified and therefore, its content cannot be trusted.
To prevent the browser from displaying the security alert, you can distribute the certificate to the trusted root store for all users in the domain by adding it to the Group Policy (see the "Setting Up Cisco Unity To Use SSL" chapter) or you can tell subscribers how to add the certificate to the trusted root store on their own computers by providing them with the following procedure.
Depending on your organization, it may be a good idea to provide subscribers with the following procedure—even if you distributed the certificate to the trusted root store for all users in the domain by adding it to the Group Policy, as the browser will display the security alert any time that subscribers access the Cisco PCA from a computer that does belong to a trusted domain (for example, a computer at home).
To add the Cisco Unity certificate to the trusted root store on subscriber computers
Step 1
Step 2
Step 3
Step 4
Step 5
Step 6
Setting Up Recording and Playback Devices
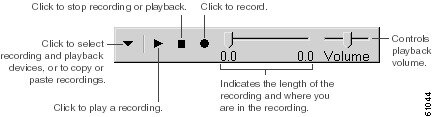
In the Cisco Unity Assistant, the Cisco Unity Inbox, and ViewMail, subscribers can make and play recordings—either by using the phone, or by using computer microphone and speakers, and clicking the Media Master controls. Subscribers with the appropriate class of service settings can also use the Media Master in the Cisco Unity Administrator to make and play recordings.
Figure 5-2 Media Master Control Bar
See the following sections for more information:
•
•
•
•
Using the Phone as a Recording and Playback Device
When subscribers use the phone as a recording and playback device in the Cisco Unity Administrator, the Cisco Unity Assistant, the Cisco Unity Inbox, or ViewMail, the following occurs:
a.
b.
c.
d.
When playing recordings, the subscriber answers the phone, and the client application asks Cisco Unity to play the message. Cisco Unity streams the recording over the phone.
Note that subscribers must manually change the server name field during failover and failback. Refer to the Cisco Unity Failover Configuration and Administration Guide for details, available on Cisco.com at http://www.cisco.com/en/US/products/sw/voicesw/ps2237/products_installation_and_configuration_guide_books_list.html.
Using a Microphone and Speakers as the Recording and Playback Device
When subscribers use a computer microphone and speakers as a recording and playback device in the Cisco Unity Administrator, the Cisco Unity Assistant, the Cisco Unity Inbox, or ViewMail, the following occurs:
a.
b.
When playing recordings, Cisco Unity streams the message to the client application. Streaming occurs on demand, regardless of network traffic. The client application begins to play the message through the speakers as soon as a few seconds of the message are buffered in memory on the subscriber computer.
Determining Recording and Playback Devices for Subscriber Use
When determining recording and playback devices that you want subscribers use, consider the following:
•
•
•
•
Specifying Recording and Playback Device Preferences in Cisco Unity Applications
Subscribers can set up their own recording and playback device preferences. For example, the Media Master Options menu allows subscribers to choose their own recording and playback devices. Media Master recording and playback settings are saved per user, per computer. This means that:
•
•
•