Feedback
Table Of Contents
AMIS Networking (Cisco Unity 3.1(2) and Later)
Task List: Setting Up Cisco Unity to Use AMIS
Procedures for Setting Up Cisco Unity to Use AMIS
Setting Up the Voice Connector for AMIS Networking
Setting Up the Voice Connector for Exchange 5.5
Setting Up the Voice Connector for Exchange 2000
Designating Voice Ports for Outbound AMIS Calls
Customizing the Primary Location
Setting the Addressing, Directory Handler, and Automated Attendant Search Scopes
Setting the Addressing Search Scope
Setting the Directory Handler Search Scope
Setting the Automated Attendant Search Scope
Customizing the AMIS Restriction Table
Creating AMIS Delivery Locations
Before Creating Subscriber Accounts
Using the External User Import Utility to Create Multiple AMIS Subscriber Accounts
Using the Cisco Unity Administrator to Create AMIS Subscriber Accounts
After Creating Subscriber Accounts
Voice Connector and AMIS Networking
Message Addressing Limitations
Blind Addressing and AMIS Networking
Subscriber Experience with AMIS Subscribers
Unidentified Callers and AMIS Subscribers
Migrating Subscribers from Another Voice Messaging System to Cisco Unity
Considerations for Networked Cisco Unity Servers
AMIS Delivery Location Profile Settings
AMIS Delivery Options Settings
Leaving a Message Versus Sending a Message
Restriction Table Selection Is Not Automatically Replicated Between Servers Set Up for Failover
AMIS Networking (Cisco Unity 3.1(2) and Later)
Overview: AMIS
Cisco Unity supports the Audio Messaging Interchange Specification analog (AMIS-a) protocol, which provides a mechanism for transferring voice messages between different voice messaging systems.
AMIS Networking is a licensed feature. If your organization has multiple Cisco Unity servers networked together, only one server needs to be licensed and configured for AMIS Networking. The Cisco Unity server configured for AMIS Networking is referred to as the bridgehead server.
In this chapter, you will find procedures for setting up AMIS Networking, followed by detailed discussions of the concepts and terminology you need to understand. See the following sections:
•
Task List: Setting Up Cisco Unity to Use AMIS—This task list provides a high-level view of all of the tasks that you need to complete, and the order in which they should be completed.
•
•
•
•
•
•
Task List: Setting Up Cisco Unity to Use AMIS
Use this task list to set up Cisco Unity to use AMIS. The cross-references take you to detailed procedures for the setup.
1.
2.
3.
Then, for each Cisco Unity server that will handle AMIS calls:
4.
5.
6.
7.
8.
9.
10.
11.
12.
13.
14.
15.
16.
17.
Procedures for Setting Up Cisco Unity to Use AMIS
This section contains all of the procedures necessary to set up Cisco Unity to use AMIS.
Setting Up the Voice Connector for AMIS Networking
There are two Voice Connector installation programs included on Cisco Unity Disc 1, and separate setup procedures:
•
•
As applicable, see the "Setting Up the Voice Connector for Exchange 5.5" section or the "Setting Up the Voice Connector for Exchange 2000" section.
Setting Up the Voice Connector for Exchange 5.5
Install the Voice Connector on an Exchange 5.5 server that is in the same Exchange site as Cisco Unity. Although the Voice Connector can be installed on the Cisco Unity server (if Exchange 5.5 is also on the server), this is not recommended for performance reasons. Following are additional requirements:
•
•
–
–
–
–
–
For installations running Cisco Unity 3.1(6), skip to the "To Install the Voice Connector for Exchange 5.5" section.
For installations running Cisco Unity 3.1(2) through 3.1(5), we recommend that you download the most recent 10.0(x) version of the Voice Connector for Exchange 5.5, as described in the following procedure, "To Download the Voice Connector for Exchange 5.5 (Cisco Unity 3.1(2) - 3.1(5) Only)."
To Download the Voice Connector for Exchange 5.5 (Cisco Unity 3.1(2) - 3.1(5) Only)
Step 1
Step 2
Step 3
Step 4
Step 5
To Install the Voice Connector for Exchange 5.5
As a best practice, back up the Exchange server before installing the Voice Connector.
Step 1
Step 2
Step 3
Step 4
Step 5
Step 6
Step 7
Step 8
Step 9
Step 10
Step 11
Setting Up the Voice Connector for Exchange 2000
Install the Voice Connector on an Exchange 2000 server. If the Exchange 2000 and Cisco Unity servers are in different routing groups, a routing group connector must be installed. Although the Voice Connector can be installed on the Cisco Unity server (if Exchange 2000 is also on the server), this is not recommended for performance reasons.
Do not install the Voice Connector on a server in an Exchange cluster. Microsoft does not support third-party connectors on an Exchange cluster server.
For installations running Cisco Unity 3.1(6), skip to the "To Install the Voice Connector for Exchange 2000" section.
For installations running Cisco Unity 3.1(2) through 3.1(5), we recommend that you download the most recent 10.0(x) version of the Voice Connector for Exchange 5.5, as described in the following procedure, "To Download the Voice Connector for Exchange 5.5 (Cisco Unity 3.1(2) - 3.1(5) Only)."
To Download the Voice Connector for Exchange 2000 (Cisco Unity 3.1(2) - 3.1(5) Only)
Step 1
Step 2
Step 3
Step 4
Step 5
To Install the Voice Connector for Exchange 2000
As a best practice, back up the Exchange server before installing the Voice Connector.
Step 1
Step 2
Step 3
Step 4
If you downloaded the Voice Connector files from the Software Center website, browse to the directory in which the files were extracted.
Step 5
Step 6
Step 7
Step 8
Step 9
Step 10
Note
To Determine if the Microsoft Windows 2000 Script Host Should Be Updated
Step 1
Step 2
Step 3
Step 4
Step 5
To update the Windows Script Host, go to the downloads page on the Microsoft website, and do a keyword search for Windows Script Host. Follow the installation instructions.
Creating the UAmis Mailbox
In installations with multiple Cisco Unity servers networked together, the UAmis mailbox needs to be created only on the Cisco Unity server(s) that will place and receive AMIS calls. Note that the mailbox is actually homed on the Exchange server that Cisco Unity is connected to (the Exchange server that was selected in the Configuration Setup).
The UAmis mailbox can be removed just like any other Exchange mailbox, by using standard Microsoft tools.
Note
To Create the UAmis Mailbox
Step 1
Step 2
Step 3
Step 4
Step 5
Step 6
Step 7
Designating Voice Ports for Outbound AMIS Calls
In installations with multiple Cisco Unity servers networked together, designate voice ports for AMIS calls only on those Cisco Unity server(s) that will place and receive AMIS calls.
To Designate Voice Ports for Outbound AMIS Calls
Step 1
Step 2
Step 3
Customizing the Primary Location
Carefully consider the Dial ID that you will assign to the primary location, particularly if your organization has multiple Cisco Unity servers networked together. See the "Guidelines for Assigning Dial IDs and Extensions" section on page 6-2 for detailed information about choosing a Dial ID.
In installations with multiple Cisco Unity servers networked together, specify the AMIS primary location information only on those Cisco Unity server(s) that will place and receive AMIS calls.
To Customize the Primary Location
Step 1
Step 2
Step 3
Step 4
Step 5
•
•
Note
The time that it takes for the primary location data from other Cisco Unity servers to be reflected on the local server depends on your network configuration and replication schedule.
Step 6
Step 7
Setting the Addressing, Directory Handler, and Automated Attendant Search Scopes
In installations with multiple Cisco Unity servers networked together, set the addressing search options on all Cisco Unity servers, not just those that are set up for AMIS.
Note
Do the following procedures to set up the addressing, directory handler, and automated attendant search scopes.
•
•
•
In Cisco Unity 3.1(6), the automated attendant search scope must be set to search the dialing domain in order for identified subscriber messaging to work.
Setting the Addressing Search Scope
For detailed information about the addressing search options, see the "Primary Location Addressing Option Settings" section on page 6-6.
To Set the Addressing Search Scope
Step 1
•
•
Step 2
Step 3
Setting the Directory Handler Search Scope
For detailed information refer to the "Directory Handler Search Options Settings" section in the "Directory Handler Settings" chapter of the Cisco Unity System Administration Guide. (The Cisco Unity System Administration Guide is available on Cisco.com at http://www.cisco.com/en/US/products/sw/voicesw/ps2237/products_administration_guide_books_list.html.)
To Set the Directory Handler Search Scope
Step 1
Step 2
Step 3
Setting the Automated Attendant Search Scope
By default, outside callers who reach the opening greeting for your organization can be transferred only to subscribers associated with the local Cisco Unity server. If you want to set up the automated attendant so that callers can be transferred to subscribers associated with other Cisco Unity servers in the same dialing domain, change a registry setting as described in the following procedure.
In Cisco Unity 3.1(6), the automated attendant search scope must be set to search the dialing domain in order for identified subscriber messaging to work.
Note
To Set the Automated Attendant Search Scope
Step 1
Step 2
Step 3
Step 4
Step 5
You do not need to restart Cisco Unity to enable the change.
Step 6
Setting AMIS Delivery Options
The AMIS delivery option settings control attributes of outgoing AMIS calls on the Cisco Unity server.
In installations with multiple Cisco Unity servers networked together, set the AMIS delivery options only on those Cisco Unity server(s) that will place and receive AMIS calls.
To Set AMIS Delivery Options
Step 1
Step 2
The Local Dial Restriction Table and the AMIS schedule together determine when outgoing AMIS calls are made.
Step 3
Step 4
Customizing the AMIS Restriction Table
By default, the AMIS restriction table allows all delivery numbers; you can customize the restriction table as needed. The AMIS restriction table and the AMIS schedule together determine when outgoing AMIS calls are made. If a delivery number for an outgoing AMIS message is allowed by the AMIS restriction table, the message is sent immediately—the schedule settings do not apply. If the delivery number is not allowed by the AMIS restriction table, the schedule determines when the message is sent.
In installations with multiple Cisco Unity servers networked together, customize the AMIS restriction table only on those Cisco Unity server(s) that will place and receive AMIS calls.
To Customize the AMIS Restriction Table
Step 1
Step 2
Step 3
The AMIS restriction table is specified in the Local Dial Restriction Table field on the Network > AMIS Options > Delivery Options page.
Step 4
•
•
•
Step 5
Setting Up the AMIS Schedule
Set up the AMIS schedule for messages that are not allowed by the AMIS restriction table.
In installations with multiple Cisco Unity servers networked together, set up the AMIS schedule only on those Cisco Unity server(s) that will place and receive AMIS calls.
To Set Up the AMIS Schedule
Step 1
Step 2
Step 3
Creating AMIS Delivery Locations
Create an AMIS delivery location on your local Cisco Unity server for each remote voice messaging system to which subscribers will send messages.
In installations with multiple Cisco Unity servers networked together, create the AMIS delivery locations only on those Cisco Unity server(s) that will place and receive AMIS calls.
To Create AMIS Delivery Locations
Step 1
Step 2
Step 3
Step 4
Step 5
Step 6
Step 7
Step 8
Step 9
Step 10
Creating AMIS Subscribers
You can create AMIS subscriber accounts by using the Cisco Unity External User Import utility or the Cisco Unity Administrator. See the following sections:
•
•
•
•
Before Creating Subscriber Accounts
This section lists—in order—the issues that you must consider before creating subscriber accounts.
1.
If you are unsure whether the account that you are using has sufficient rights and permissions to create subscribers, or whether Cisco Unity is properly configured to work with your message store, use the following procedure to run the SysCheck diagnostic tool.
To Check Cisco Unity Setup and Permissions by Using the Cisco Unity SysCheck Tool
Step 1
Step 2
Step 3
Step 4
Step 5
Step 6
Step 7
a.
b.
c.
Step 8
2.
A class of service (COS) defines limits and permissions for subscribers who use Cisco Unity. For example, a COS dictates the maximum length of subscriber messages and greetings. Although most COS settings are not applicable to AMIS subscribers, they still must be members of a COS. In the Cisco Unity Administrator, a COS is specified in each subscriber template; thus, a subscriber is assigned to the COS that is specified in the template upon which the subscriber account is based. Cisco Unity includes predefined classes of service, which you can modify. You can also create new classes of service. For details, refer to the "Class of Service Settings" chapter in the Cisco Unity System Administration Guide.
3.
Each COS specifies a restriction table for call transfers, one for message notification, and one for fax deliveries. Cisco Unity applies the restriction table associated with the COS of a subscriber, and displays an error message if the phone number is not allowed. Cisco Unity comes with predefined restriction tables, which you can modify.
Although most restriction table settings do not apply to AMIS subscribers because they cannot log on to Cisco Unity or use the ActiveAssistant, administrators can enter call transfer numbers for AMIS subscribers. For security purposes, you should modify the restriction table used for transfers in the COS to which AMIS subscribers belong, as necessary. For details, refer to the "Restriction Tables" chapter in the Cisco Unity System Administration Guide.
4.
Public distribution lists are used to send voice messages to multiple subscribers at the same time. Cisco Unity assigns new subscribers to the public distribution lists that are specified in the template on which the subscriber account is based. For details, refer to the "Public Distribution List Settings" chapter in the Cisco Unity System Administration Guide.
In Active Directory, AMIS subscribers correspond to contacts, and public distribution lists correspond to distribution groups. In Exchange 5.5, AMIS subscribers correspond to custom recipients, and public distribution list correspond to Exchange distribution lists. This means that the contacts (or custom recipients) and distribution lists are listed in the address book for Microsoft Outlook (or other e-mail client). To prevent others from sending e-mails to AMIS subscribers, you may want to create lists that contain only AMIS subscribers, and then hide these distribution lists from Exchange address lists. Additionally, you may also want to exclude AMIS subscribers from the All Subscribers distribution list or any other distribution list that contains regular subscribers.
5.
In the Cisco Unity Administrator, you can specify settings for a group of subscribers by using a subscriber template. Subscriber templates contain settings that are applicable for subscribers of a particular type, such as a department. The settings from the template you choose are applied to subscriber accounts as the accounts are created. Cisco Unity comes with a default subscriber template, which you can modify, and you can create an unlimited number of additional templates. For more details, refer to the "Subscriber Template Settings" chapter in the Cisco Unity System Administration Guide.
Note
Using the External User Import Utility to Create Multiple AMIS Subscriber Accounts
To Create AMIS Subscribers by Using the External User Import Utility
Step 1
Step 2
Step 3
LAST_NAME, FIRST_NAME, REMOTE_USER_ID, EXTENSION
•
•
Refer to the External User Import Help file that comes with the utility for more information about the optional fields. The Help file is available on the Cisco Unity server in the directory C:\CommServer\Utilities\ExternalUserImport.
Step 4
Step 5
Step 6
Step 7
Step 8
Step 9
Using the Cisco Unity Administrator to Create AMIS Subscriber Accounts
By using the Cisco Unity Administrator, you can create AMIS subscriber accounts one at a time. When you add a new AMIS subscriber account, Cisco Unity creates a contact or a custom recipient. (If Cisco Unity uses an Exchange 2000 server as its partner server, a contact is created in Active Directory. If Cisco Unity uses an Exchange 5.5 server as its partner server, a custom recipient is created in the Exchange 5.5 directory.)
To create an AMIS subscriber account, do the following procedure.
To Add a New AMIS Subscriber by Using the Cisco Unity Administrator
Step 1
Step 2
Step 3
Step 4
Step 5
Step 6
Step 7
Step 8
Step 9
Step 10
After Creating Subscriber Accounts
After creating AMIS subscriber accounts, consider the following:
•
•
•
•
•
AMIS Concepts and Definitions
The following sections explain AMIS concepts in detail:
•
•
•
•
•
Introduction to AMIS
In AMIS terminology, Cisco Unity and the other voice messaging systems that it communicates with are called nodes. Each node is assigned a unique ID, referred to as a Node ID. The node that places an AMIS call and delivers messages is called the originating node. The node that answers the AMIS call and receives messages is called the destination node. If a particular system acts as both an originating node and a destination node, its Node ID is the same for both functions. AMIS nodes correspond to locations in Cisco Unity.
The Cisco Unity subscribers and the users on the other voice messaging systems are identified by mailbox numbers. On Cisco Unity, the mailbox number for a subscriber is the same as the subscriber extension.
Voice messages are transmitted between nodes by using ordinary phone connections. When one node calls another by dialing a specified delivery phone number, the originating node transmits its Node ID by using a sequence of touchtones. If the destination node accepts the call, the originating node transmits each voice message by using analog playback, and the destination node records each message and delivers it to the applicable mailbox. For detailed information about the touchtones that are transmitted during an AMIS call, refer to the White Paper: AMIS Analog Networking Definitions, which is available on Cisco.com at http://www.cisco.com/en/US/products/sw/voicesw/ps2237/prod_technical_reference_list.html.
In compliance with the AMIS protocol, Cisco Unity batches outgoing messages by node, with a maximum of nine messages per batch. If there are more than nine messages for a particular node, Cisco Unity ends the AMIS session after sending the ninth message, hangs up for a brief period of time, and then redials the node to send the next batch of messages.
The AMIS protocol specifies that a message be a maximum of eight minutes long. During an AMIS transmission, before playing a message, the originating node sends the destination node the length of the message. If the message is too long, the destination node may refuse the message and skip to the next message. However, some voice messaging systems will accept longer messages. If the voice messaging system refuses the message, a non-delivery receipt (NDR) is returned to the sender. If a subscriber sends a message that is longer than eight minutes, Cisco Unity will attempt to transmit it. In addition, Cisco Unity may accept messages longer than eight minutes. For each incoming message, Cisco Unity checks the space available in the subscriber mailbox and the Maximum Message Length setting on the Subscriber > Messages page to determine whether to accept the message.
Incoming AMIS messages are delivered to subscriber mailboxes only, and cannot be delivered to public distribution lists.
Note that for incoming AMIS calls, the initial "handshake" between the originating system and Cisco Unity must take place in a call handler, such as the Opening Greeting call handler. For AMIS Networking to be properly configured, you need to ensure that all incoming AMIS calls are routed to a call handler. When Cisco Unity is initially installed, the default setting is for the call routing table to route calls to the Opening Greeting call handler; thus it is properly configured for AMIS Networking. If the call routing table was modified after installation, you need to make sure that a rule is in place in your call routing table to route any incoming AMIS calls to a call handler.
Port Usage and Schedules
In the Cisco Unity Telephony Integration Manager (UTIM) and in the Cisco Unity Administrator on the System > Ports page, you can designate which ports on your system are used for outgoing AMIS calls. All ports are used for incoming AMIS calls.
AMIS transmissions can be lengthy and thus tie up ports on your Cisco Unity server. For example, 10 hours of AMIS messages take at least 10 hours of port time to transmit. A 2-minute message sent to a public distribution list that contains 200 AMIS recipients results in 200 messages in the outbound queue, and would require at least 6.5 hours of port time to transmit.
When multiple ports have been designated for outgoing AMIS messages, Cisco Unity uses all designated ports as message traffic warrants. For example, if there are 10 ports available for outgoing AMIS messages, and 10 hours of messages to deliver, the time to transmit all the messages will be about one hour plus the time it takes to place the calls and establish the AMIS sessions. If there are numerous messages to one destination, each batch of messages (with a maximum of nine per batch) is transmitted on a different port (if available). If there are multiple destinations, multiple ports are used to transmit the messages.
Because the transmission of outgoing AMIS messages can tie up voice ports for long periods of time, you may want to adjust the schedule so that outgoing AMIS calls are placed during closed hours or at times when Cisco Unity is not processing many calls. Additionally, if most or all of your AMIS delivery numbers are long distance, you may want to schedule the outgoing AMIS calls when the long distance phone rates are lower. Keep in mind, however, that outgoing messages are queued up in the UAmis mailbox, so there must be sufficient storage available if you restrict the delivery window.
You can override the AMIS schedule so that messages marked urgent are sent immediately. Additionally, by setting up a restriction table, you can specify which delivery numbers are sent immediately and which numbers must wait for the AMIS schedule to become active.
If you adjust the AMIS schedule so that outgoing AMIS calls are made only after normal business hours, be sure to inform subscribers. They may choose to contact users on the other voice messaging system directly, or send e-mail, rather than send a voice message that will not be delivered immediately.
In organizations with multiple Cisco Unity servers networked together, you can set up a "bridgehead" Cisco Unity server to handle all AMIS calls—both inbound and outbound—for all of the Cisco Unity servers in the network. This way, the ports on just one Cisco Unity server are used for AMIS messages.
For additional information, see the following:
•
•
•
UAmis Mailbox
Outgoing AMIS messages are placed in a special Exchange mailbox, which has the display name UAmis_<Server name>. Before AMIS messages can be transmitted, you must create the UAmis mailbox (see the "Creating the UAmis Mailbox" section).
When Cisco Unity and its partner Exchange server are on the same computer, the UAmis Exchange mailbox is created on the Cisco Unity server. When the partner Exchange server is not on the same computer as Cisco Unity, the UAmis mailbox is created on the partner Exchange server.
The storage limits for the UAmis mailbox are set to the limits defined for the mailbox store in which the UAmis mailbox is created. You can change the storage limit for the UAmis mailbox by using the Exchange 2000 System Manager or Exchange 5.5 Administrator, as applicable. If the UAmis mailbox is full, subsequent outgoing messages cannot be delivered, and the sender receives a NDR.
Consider the following when determining whether limits should be set on the UAmis mailbox:
•
•
•
You may want to monitor the outgoing AMIS message traffic by running the AMIS Out Traffic Report before setting limits on the UAmis mailbox. For more information, refer to the "AMIS Out Traffic Report" section in the "Reports" chapter of the Cisco Unity System Administration Guide. (The Cisco Unity System Administration Guide is available on Cisco.com at http://www.cisco.com/en/US/products/sw/voicesw/ps2237/products_administration_guide_books_list.html.)
The UAmis mailbox can be moved and deleted just like any other Exchange mailbox, by using standard Microsoft tools. To avoid inadvertently moving or deleting the UAmis mailbox, consider changing the Exchange display name so that the mailbox is more clearly identified to you or the Exchange administrator as requiring "special" treatment.
Caution
Messages are sent from the UAmis mailbox at one or more of the following times:
•
•
•
When AMIS messages are sent, Cisco Unity follows the AMIS protocol. It batches the outgoing messages by destination, with a maximum of nine messages per batch. If there are more than nine messages for a particular destination, Cisco Unity ends the AMIS session after sending the ninth message, hangs up for a brief period of time, and then redials the delivery number to send the next batch of messages. Messages that have not been sent when the schedule becomes inactive remain in the UAmis mailbox until the schedule becomes active again. An error is logged in the Windows Application Event log when messages remain in the UAmis mailbox for more than 24 hours. See the "Maintenance" section for information about monitoring the UAmis mailbox.
In organizations with multiple Cisco Unity servers networked together, the UAmis mailbox needs to be created only on those Cisco Unity servers that will place and receive AMIS calls. See the "Considerations for Networked Cisco Unity Servers" section for more information.
Voice Connector and AMIS Networking
The Voice Connector allows Cisco Unity to send and receive AMIS messages. When subscribers use the phone to address a message to an AMIS recipient, Cisco Unity constructs an address with the form AMIS:<Location Dial ID>_<Remote Mailbox> for the message. The Voice Connector is registered with Exchange to handle messages with the AMIS address type. For an outbound message to an AMIS recipient, the Voice Connector transforms the message properties and delivers the message to the UAmis mailbox. For installations with multiple Cisco Unity servers, the Voice Connector delivers the message to the UAmis mailbox associated with the Cisco Unity server on which the AMIS location or AMIS subscriber was created.
There are two versions of the Voice Connector. The version that you use depends on your Exchange network:
•
•
Caution
See the "Setting Up the Voice Connector for AMIS Networking" section for information about setting up the Voice Connector.
Locations and AMIS Networking
Central to how you set up AMIS is a Cisco Unity object called a location. Each Cisco Unity server is associated with one location referred to as the default or primary location, which is created during installation and which cannot be deleted. When setting up AMIS, you give the primary location a new name and a Dial ID (which is an identifier for the location within Cisco Unity), enter the AMIS Node ID, and customize other properties as applicable. The AMIS Node ID on the primary location is transmitted on all outgoing AMIS calls and identifies your Cisco Unity system to the destination nodes. See the "Primary Location Profile Settings" section on page 6-1 for more information.
You create a delivery location in Cisco Unity to correspond to each remote voice messaging system with which Cisco Unity communicates. Delivery locations contain the information that Cisco Unity needs to exchange messages with other nodes—the Delivery Phone Number and the AMIS Node ID. See the "AMIS Delivery Location Profile Settings" section for more information.
In organizations with multiple Cisco Unity servers networked together, the delivery locations should be created only on those Cisco Unity servers that will place and receive AMIS calls. See the "Considerations for Networked Cisco Unity Servers" section for more information.
Message Addressing Options
Cisco Unity provides the following message addressing options:
•
•
Message Addressing Limitations
Subscribers can use the Cisco Unity phone conversation (also known as the telephone user interface, or TUI), ViewMail for Microsoft Outlook, or the Cisco Unity Visual Messaging Interface to reply to and forward AMIS messages just as they do with regular voice messages. However, when sending or retrieving AMIS messages, subscribers will encounter the following limitations:
•
•
•
•
Blind Addressing and AMIS Networking
AMIS blind addressing is one of the methods that Cisco Unity provides for addressing AMIS messages to users of another voice messaging system. Blind addressing allows Cisco Unity subscribers to send messages to subscribers on the remote voice messaging system even though the recipient mailbox number, name, and recorded name are not in the directory. Even though Cisco Unity cannot provide voice name confirmation (hence the term "blind addressing"), the message is addressed and sent.
One of the steps to setting up blind addressing is adjusting the Blind Addressing setting on the Primary Location > Addressing Options page. You also create a delivery location that corresponds to each voice messaging system with which Cisco Unity communicates.
You provide the following information for each delivery location:
•
•
•
When blind addressing a message, subscribers dial a number that is made up of the delivery location Dial ID and the mailbox number of the recipient. Before addressing the message, Cisco Unity parses the number that the subscriber entered and searches for a matching delivery location. If Cisco Unity does not find a matching location, it reports the error to the sender and does not address the message. If a matching delivery location is found, Cisco Unity addresses the message without verifying that the remote mailbox number exists. Cisco Unity does provide voice name confirmation that the delivery location exists before addressing the message (assuming a voice name was recorded for the delivery location).
Because your Cisco Unity server does not have access to the names and extensions of the users on the other voice messaging system, subscribers cannot use spelling mode when blind addressing a message to someone on the other system.
Subscribers can also address voice messages in ViewMail for Microsoft Outlook and in the Cisco Unity Visual Messaging Interface to someone on the remote voice messaging system as follows:
•
[VOICE:<Location Dial ID>_<Extension>]•
[VOICE:<Location Dial ID>_<Extension>]@<Domain name>.comFor administrators of Cisco Unity, blind addressing is the option which requires the least amount of work to set up. However, subscribers will encounter some limitations when blind addressing messages to users on the other voice messaging system. Subscribers can address the message only by using number mode, so they must know the delivery location Dial ID and the mailbox number for the recipient. Additionally, Cisco Unity cannot verify that the number entered is correct, so subscribers may inadvertently address a message to the wrong person or to a non-existent mailbox.
In organizations with multiple Cisco Unity servers networked together, when subscribers use blind addressing to address messages to someone at an AMIS location, the AMIS transmission originates from the Cisco Unity server on which the AMIS delivery location was created. See the "Considerations for Networked Cisco Unity Servers" section for more information.
AMIS Subscribers
AMIS subscribers are a representation in Cisco Unity of the subscribers on the remote messaging system. AMIS subscribers are created in Cisco Unity to enable Cisco Unity subscribers to find them in the directory and send them messages as they would with any other subscriber. Voice messages addressed to AMIS subscribers are sent to the voice messaging system that they use. To set up AMIS subscribers, you first create an AMIS delivery location that corresponds to each remote voice messaging system with which Cisco Unity communicates.
After creating the delivery location(s), you create an AMIS subscriber account for each remote user. When creating each AMIS subscriber account, you specify the user mailbox number on the other voice messaging system and select the AMIS delivery location with which the AMIS subscriber is associated. Cisco Unity uses the Delivery Phone Number and AMIS Node ID from the associated delivery location when delivering messages to the AMIS subscriber.
In organizations with multiple Cisco Unity servers networked together, AMIS subscribers can be associated only with AMIS delivery locations created on your Cisco Unity server. When subscribers address messages to an AMIS subscriber, the AMIS transmission originates from the Cisco Unity server on which the AMIS subscriber was created. See the "Considerations for Networked Cisco Unity Servers" section for more information.
AMIS subscribers in Cisco Unity are represented as custom recipients in Exchange 5.5 and as contacts in Active Directory. When you delete AMIS subscribers in the Cisco Unity Administrator either by deleting individual accounts or by deleting a delivery location that the AMIS subscribers are associated with, the underlying contacts/custom recipients are removed automatically.
You create and manage AMIS subscriber accounts in much the same way that you do regular subscriber accounts. You can use the Cisco Unity Administrator to create, modify, and delete AMIS subscribers.
Extensions are mandatory for AMIS subscriber accounts. The extension, which must be unique across the dialing domain, is the number that subscribers dial when addressing a message to an AMIS subscriber. This number may or may not be the same as the mailbox number of the AMIS subscriber on the remote voice messaging system. Callers who reach the opening greeting of your organization can dial the extension of an AMIS subscriber or look up an AMIS subscriber in directory assistance and leave a message.
Other than receiving messages, AMIS subscribers do not have access to other Cisco Unity features, and some sections of the Cisco Unity Administrator are disabled for AMIS subscribers. AMIS subscribers:
•
•
•
•
•
•
Setting up AMIS subscribers requires more overhead for administrators of Cisco Unity than AMIS blind addressing does. However, the AMIS subscriber option allows other subscribers to address messages to AMIS subscribers the same way that they address messages to regular subscribers.
Subscriber Experience with AMIS Subscribers
Provided that AMIS Subscribers are listed in the phone directory and have had voice names and greetings recorded for them:
•
•
•
•
•
•
Note
Unidentified Callers and AMIS Subscribers
AMIS subscribers can be listed in the phone directory and have recorded voice names and greetings just like regular Cisco Unity subscribers. If you have used Cisco Unity to set up an automated attendant, callers who reach the opening greeting can enter an extension of an AMIS subscriber, and callers who reach the phone directory can look up the extension of an AMIS subscriber.
You configure call transfer settings for AMIS subscribers in the Cisco Unity Administrator just as you do for regular Cisco Unity subscribers, and the behavior is the same. However, depending on the call transfer settings, messages left by unidentified callers for AMIS subscribers may be recorded directly by the remote voice messaging system, or they may be recorded by Cisco Unity and sent via AMIS to the remote voice messaging system. If you allow calls to AMIS subscribers to be transferred to the phone system, you usually set the call transfer settings to release to switch so that messages left by callers will be recorded directly by the remote voice messaging system.
Because AMIS requires a mailbox number for the sender, Cisco Unity uses the Dial ID of the primary location as the sending mailbox for messages that are left by unidentified callers for AMIS subscribers and that are recorded by Cisco Unity and sent via AMIS to the remote voice messaging system. Although AMIS subscribers can reply to these messages, the messages are returned as NDRs.
Deleting AMIS Subscribers
Each AMIS subscriber is associated with a directory object, which is either an Active Directory contact or an Exchange 5.5 custom recipient. When you delete AMIS subscribers in the Cisco Unity Administrator—either by deleting the subscriber accounts individually, or by deleting the associated AMIS delivery location—the underlying directory objects are not removed; you must delete them manually by using Microsoft Active Directory Users and Computers or Microsoft Exchange 5.5 System Administrator.
Caution
Extension Addresses
When you create an AMIS subscriber, Cisco Unity automatically generates an e-mail address in the following format:
AMIS:<Location Dial ID>_<Remote Mailbox>This special e-mail address is called an extension address. The extension address is a combination of the delivery location Dial ID with which the AMIS subscriber is associated, and the Remote Mailbox Number of the AMIS subscriber. Each contact in Active Directory that corresponds to an AMIS subscriber contains an extension address. Similarly, each custom recipient in Exchange 5.5 that corresponds to an AMIS subscriber contains an extension address.
When subscribers use the phone to address messages to an AMIS subscriber, they dial an extension. Cisco Unity recognizes the recipient as an AMIS subscriber and retrieves the extension address from the SQL database on the Cisco Unity server.
Although extension addresses are generated automatically when you create AMIS subscribers, if you later change the Dial ID of a delivery location, you will need to run the Extension Address utility to update the extension addresses for the AMIS subscribers associated with the location. Otherwise, AMIS subscribers will have incorrect extension addresses, and they will not receive messages.
To Run the Extension Address Utility
Step 1
Step 2
Step 3
Step 4
It may take a few minutes for the extension addresses to be updated in Exchange.
Hiding AMIS Subscribers
Depending on your installation, the users of the remote voice messaging system may already have Windows accounts and Exchange mailboxes on your local network. Therefore, when AMIS subscriber accounts are created for them, the Exchange address list will contain duplicate listings—the existing user account and a contact (or custom recipient). Both listings are viewable in Outlook.
To prevent the AMIS subscribers from being listed in the Exchange address list, you will need to hide them by using the Microsoft Exchange 5.5 Administrator or Windows Active Directory for Users and Computers. (To access either tool, click View > Advanced Features, and then make changes on the Exchange Advanced property page.) Note that even when recipients are hidden, Cisco Unity is able to deliver messages to them. However, if you hide the contact created for the AMIS subscriber, subscribers who use ViewMail for Microsoft Outlook must manually enter the address for the AMIS subscriber in the following format:
[AMIS:<Location Dial ID>_<Remote Mailbox>]Because e-mail should not be sent to AMIS subscribers, you may want to exclude them from distribution lists in addition to hiding them in the Exchange address list, because distribution lists are also viewable in Outlook. Before creating AMIS subscriber accounts, create a subscriber template just for AMIS subscribers, and modify the subscriber template distribution lists settings so that the AMIS subscribers are not added to any distribution lists. For more information, refer to the "Subscriber Template Distribution Lists Settings" section in the "Subscriber Template Settings" chapter of the Cisco Unity System Administration Guide. (The Cisco Unity System Administration Guide is available on Cisco.com at http://www.cisco.com/en/US/products/sw/voicesw/ps2237/products_administration_guide_books_list.html.)
Migrating Subscribers from Another Voice Messaging System to Cisco Unity
If you have set up AMIS subscriber accounts for the subscribers on another voice messaging system, and if they have existing Exchange mailboxes, you may want to use the Migrate Subscriber Data utility when the time comes to migrate them to Cisco Unity. The Migrate Subscriber Data utility creates a Cisco Unity subscriber account by combining the Cisco Unity-specific data from an existing AMIS subscriber account (such as the voice name) with an existing mail user. The utility then deletes the AMIS subscriber account and the associated Active Directory contact (or Exchange 5.5 custom recipient).
In Cisco Unity 3.1(5) and later, the Migrate Subscriber Data utility is available in Tools Depot on the Cisco Unity server. The Tools Depot icon is available on the Cisco Unity server desktop. The Migrate Subscriber Data utility is also available on the Cisco Unity Utilities page of the Software Center website at http://www.cisco.com/pcgi-bin/tablebuild.pl/unity-util. Refer to the Help file that comes with the utility for more information.
Considerations for Networked Cisco Unity Servers
In organizations with multiple Cisco Unity servers networked together, when subscribers address messages to an AMIS delivery location (by using blind addressing) or to an AMIS subscriber, the AMIS transmission originates from the Cisco Unity server on which the AMIS delivery location was created. (Note that AMIS subscribers can be associated only with those AMIS delivery locations created on the same Cisco Unity server.)
When subscribers address a message to someone on the remote voice messaging system, the Voice Connector delivers the message to the UAmis mailbox associated with the Cisco Unity server on which the addressed AMIS delivery location was created. The AMIS schedule and the AMIS delivery options on the pertinent Cisco Unity server are applied.
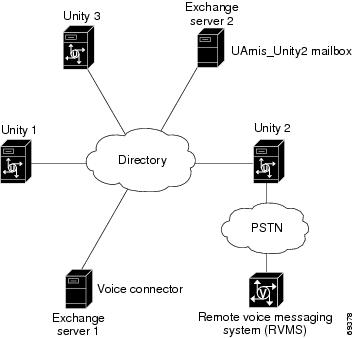
Only one Cisco Unity server in the network needs to be set up for AMIS. If allowed by the primary location addressing options, all subscribers, no matter which Cisco Unity server they are associated with, can send messages to an AMIS delivery location or to an AMIS subscriber. The Cisco Unity server configured for AMIS acts as the AMIS "bridgehead" server for the other Cisco Unity servers in the network. For example, in Figure 4-1, there are three Cisco Unity servers in the network, but Unity 2 is the only server configured for AMIS. Unity 2 places and receives all the AMIS calls. Thus, no matter which Cisco Unity server a subscriber is associated with, when the subscriber sends a message to someone on another voice messaging system, the message is routed to the UAmis mailbox associated with Unity 2. This mailbox is homed on the Exchange server that was selected during the setup of Unity 2.
Note that the Voice Connector in Figure 4-1 is installed on Exchange server 1. Only one instance of the Voice Connector can be installed on any Exchange server in the Exchange 5.5 site or Exchange 2000 routing group. If your network spans multiple sites or routing groups, install the Voice Connector in each site or routing group.
Figure 4-1
AMIS Bridgehead Configuration
Design Considerations
Because AMIS calls are placed and answered on the Cisco Unity server on which the AMIS delivery locations were created, you can configure your Cisco Unity servers as needed to handle AMIS traffic.
•
•
•
For example, assume there are Cisco Unity servers in Chicago and in New York, and that there is also another voice messaging system in New York to which subscribers in Chicago want to send messages. To avoid long distance phone charges when subscribers in Chicago send messages to individuals who use the remote voice messaging system in New York, you create an AMIS delivery location, and optionally, AMIS subscribers, on the New York Cisco Unity server. When subscribers associated with the Chicago Cisco Unity server address messages to the AMIS subscribers in New York, the messages are first delivered by Exchange and the Voice Connector to the UAmis mailbox associated with the New York Cisco Unity server. Then the New York Cisco Unity server dials a local number to deliver the message to the remote voice messaging system, thus avoiding long distance phone charges.
Maintenance
Cisco Unity monitors AMIS transmissions and the UAmis mailbox, and logs error events to the Windows Application Event log. Outgoing messages that cannot be delivered are returned to the sender, or to the Unaddressed Messages public distribution list if Cisco Unity cannot determine who the sender is.
For detailed information about the touchtones that are transmitted during an AMIS call, refer to the White Paper: AMIS Analog Networking Definitions, which is available on Cisco.com at http://www.cisco.com/en/US/products/sw/voicesw/ps2237/prod_technical_reference_list.html. You can use the StatusMonitor.exe utility in the \CommServer\TechTools directory on the Cisco Unity server to monitor AMIS transmissions.
Cisco Unity also provides reports on AMIS message traffic. For more information, refer to the "AMIS Out Traffic Report" and the "AMIS In Traffic Report" sections in the "Reports" chapter of the Cisco Unity System Administration Guide. (The Cisco Unity System Administration Guide is available on Cisco.com at http://www.cisco.com/en/US/products/sw/voicesw/ps2237/products_administration_guide_books_list.html.)
Although Cisco Unity monitors the UAmis mailbox, you may want to check the UAmis mailbox periodically to confirm that messages are being sent in a timely manner. For example, if there are still messages to be sent when the AMIS schedule becomes inactive, they remain in the UAmis mailbox until the AMIS schedule becomes active again. If messages are often left in the UAmis mailbox, you may need to adjust the AMIS schedule or designate more voice ports for outgoing AMIS calls. Access to the UAmis mailbox is also needed when troubleshooting outbound message delivery problems.
In order to use Microsoft Outlook to access the UAmis mailbox, use the following procedure to add the UAmis mailbox to the user profile of someone with administrative rights to Exchange. Refer to the Outlook documentation for more information.
To Add the UAmis Mailbox to a User Profile
Step 1
Step 2
Step 3
Step 4
Step 5
Step 6
Step 7
AMIS Reference
This section contains tables that define the fields on the Cisco Unity Administrator web pages related to AMIS setup, and briefly explain the options for correctly entering information in the fields. See the following sections for details:
•
•
AMIS Delivery Location Profile Settings
AMIS delivery locations are Cisco Unity objects that contain the addressing information that Cisco Unity needs to send messages to and receive messages from another voice messaging system. You create an AMIS delivery location that corresponds to each remote voice messaging system with which Cisco Unity communicates.
Use the following tables to learn more about the delivery location profile settings for an AMIS location.
AMIS Delivery Options Settings
The AMIS delivery options settings control attributes of outgoing AMIS calls. These settings apply to messages sent to all AMIS delivery locations and AMIS subscribers created on your Cisco Unity server.
One of the settings that you specify here is the Local Dial Restriction Table. This restriction table and the AMIS schedule together determine when outgoing AMIS calls are made. Refer to the "Restriction Tables" chapter of the Cisco Unity System Administration Guide for general information about restriction tables. (The Cisco Unity System Administration Guide is available on Cisco.com at http://www.cisco.com/en/US/products/sw/voicesw/ps2237/products_administration_guide_books_list.html.)
Use the following table to learn more about AMIS delivery options settings.
AMIS Schedule Settings
The AMIS schedule and the AMIS restriction table together determine when outgoing AMIS calls are made. If a delivery number for an outgoing AMIS message is allowed by the AMIS restriction table, the message is sent immediately—the schedule settings do not apply. If the delivery number is not allowed by the AMIS restriction table, the schedule determines when the message is sent. Therefore, the schedule determines when messages are sent for delivery numbers that are disallowed by the AMIS restriction table.
Cisco Unity batches messages to a delivery location, with a maximum of nine messages per batch. If an AMIS transmission is in progress when the schedule becomes inactive, the transmission of the entire batch of messages is completed. However, any other messages remaining in the queue, but not in the batch that was in the process of being transmitted, are queued until the next active time in the schedule. Queued messages are placed in the Inbox for the UAmis account.
Because the transmission of AMIS messages may tie up voice ports for long periods of time, you may want to schedule outgoing AMIS calls during closed hours or at times when Cisco Unity is not processing many calls. Additionally, if most or all of your AMIS delivery numbers are long distance, you may want to schedule the AMIS calls when the long distance phone rates are lower.
Use the following table to learn more about AMIS schedule settings.
Troubleshooting
For information on troubleshooting problems with AMIS messages, refer to the following sections in the Cisco Unity Troubleshooting Guide, which is available on Cisco.com at http://www.cisco.com/en/US/products/sw/voicesw/ps2237/prod_troubleshooting_guides_list.html.
•
–
–
For detailed information about the touchtones that are transmitted during an AMIS call, refer to the White Paper: AMIS Analog Networking Definitions, which is available on Cisco.com at http://www.cisco.com/en/US/products/sw/voicesw/ps2237/prod_technical_reference_list.html.
Finally, you can use the StatusMonitor utility (located in \CommServer\TechTools on the Cisco Unity server) to observe call progress.
Notable Behavior
This section describes notable behavior of AMIS Networking.
Inbound Search Scope
In installations with multiple Cisco Unity servers networked together, if the AMIS bridgehead server is running Cisco Unity 3.1(3) or later, the search scope for a matching subscriber extension for inbound messages sent from another AMIS-compliant voice messaging system is controlled by the primary location addressing options in the Cisco Unity Administrator. The search scope for inbound AMIS messages can be set to the local Cisco Unity server, to the dialing domain that the local Cisco Unity server is a member of, or to the entire global directory. In Cisco Unity 3.1(2), the inbound search scope is set to the global directory and cannot be changed.
Leaving a Message Versus Sending a Message
When a person on the remote voice messaging system who has a corresponding AMIS subscriber account calls a Cisco Unity subscriber and leaves a message, Cisco Unity does not identify the message as being from the AMIS subscriber. In this case, when the phone system forwards the call to Cisco Unity, the message is handled as though it came from an unidentified caller. This means that:
•
•
•
However, when a person on the remote voice messaging system records and sends a message to a Cisco Unity subscriber, Cisco Unity can identify the message as being from the corresponding AMIS subscriber. In this case, the phone system is not involved and the recipient phone does not ring. Instead, the message is sent directly from the remote voice messaging server via AMIS to Cisco Unity, and then to Exchange, which delivers the message to the recipient. Thus, when the recipient listens to the message, Cisco Unity plays the recorded name of the AMIS subscriber, and allows the recipient to record a reply.
Restriction Table Selection Is Not Automatically Replicated Between Servers Set Up for Failover
On a system set up for Cisco Unity failover, when you change the restriction table to be used for outgoing AMIS calls, the table selection on the primary server does not replicate to the secondary server. You must manually select the same AMIS restriction table on the secondary server. Note, however, that the settings on the restriction table itself replicate. You specify the AMIS restriction table in the Cisco Unity Administrator on the Network > AMIS Options page.