Installing the Wall Mount Kit for the Cisco IP Phone 7900 Series
Available Languages
Table of Contents
Installing the Wall Mount Kit for the Cisco IP Phone
Installing the Wall Mount Kit for the Cisco IP Phone
This package contains a wall mount for use with the Cisco IP Phone.

Before You Begin
You will need these tools to install the bracket:
You must also install an Ethernet jack for the telephone in the desired location if an Ethernet jack does not currently exist. This jack must be wired appropriately for an Ethernet connection. You cannot use a regular telephone jack. For more information on phone installation requirements and warnings, see Cisco IP Phone Administration Guide
To ensure that the handset attaches securely to a wall-mounted phone, remove the handset wall hook from the handset rest, rotate the hook 180 degrees, and reinsert the hook. Turning the hook exposes a lip on which the handset catches when the phone is vertical. For an illustrated procedure, see Installing the Wall Mount Kit for the Cisco Unified IP Phone at:
https://www.cisco.com/c/en/us/support/collaboration-endpoints/unified-ip-phone-7900-series/products-installation-guides-list.html
Installing the Bracket
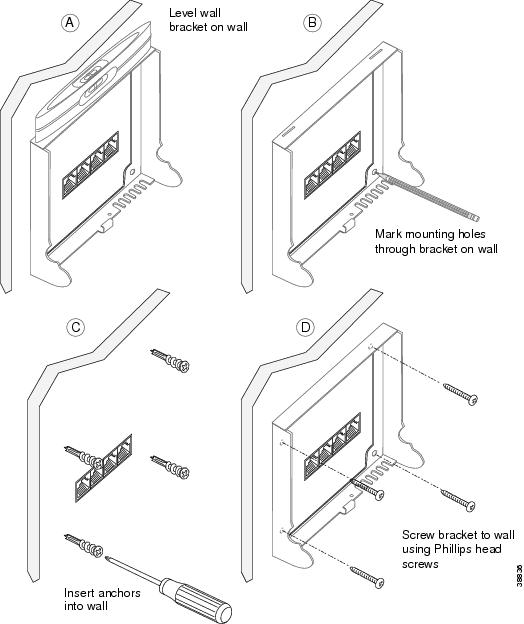
Step 1 Mount the wall bracket to the desired location (Figure 2). You can install the bracket over an Ethernet jack, or you can run the Ethernet network cable to a jack nearby.
a. Use the level to ensure the bracket is level, then use a pencil to mark the screw holes.
b. Using a #2 Phillips-head screwdriver, carefully center the anchor over the pencil mark and press the anchor into the wall.
c. Screw the anchor clockwise into the wall until it is seated flush.
d. Use the included screws and a #2 Phillips-head screwdriver to attach the bracket to the wall.

Note The cable openings must be facing down.
Figure 2 Mounting the Wall Bracket
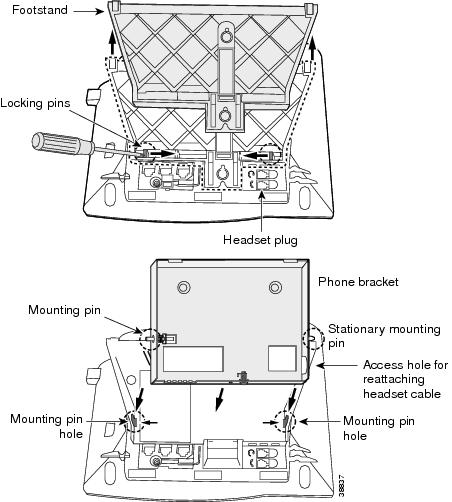
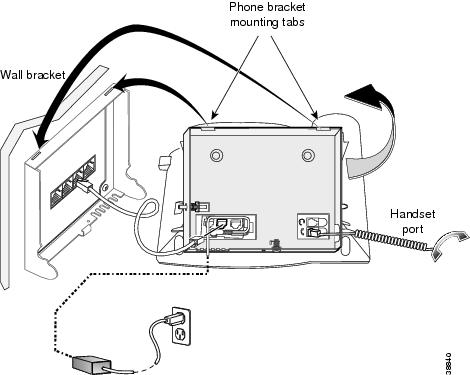
Step 2 Attach the phone bracket to the IP phone (Figure 3).
a. Detach the handset cord (and headset cord, if there is a headset), power cord, and any other attached cords from the base of the phone.
b. On the back of the phone’s footstand, push out the pins and remove the stand. You might need to use a screwdriver or other pointed device to push out the pins. The pins are firmly set, so it requires significant force to push them out.
c. Attach the bracket by inserting the pins in the same holes vacated by the footstand. The phone’s ports should be accessible through the holes in the bracket.
d. Thread the handset cord (and headset cord, if using one) through the hole in the side of the mount closest to the handset and headset ports on the phone. Reattach the cords and seat them in the clips incorporated into the phone body.
Figure 3 Attaching the Phone Bracket
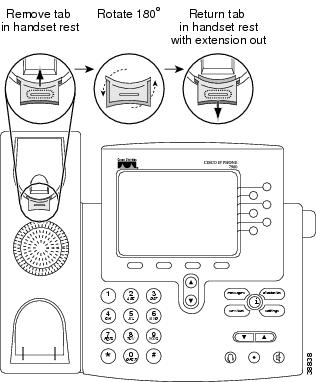
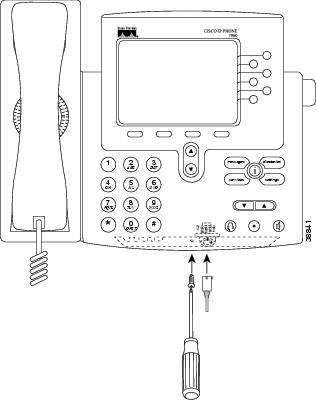
Step 3 Remove the handset wall hook in the handset rest, rotate the hook 180 degrees, and reinsert the hook. The hook should have a lip on which the handset catches when the phone is vertical (Figure 4).
Figure 4 Preparing the Handset Hook
Step 4 Attach the Ethernet cable to the 10/100 SW network port and wall jack.
If you are connecting a network device (such as a computer) to the phone, attach the cable to the 10/100 PC access port.
If you are using an external power supply, plug the power cord into the phone and dress the cord by clipping it into the clips incorporated into the phone body next to the 10/100 PC port.
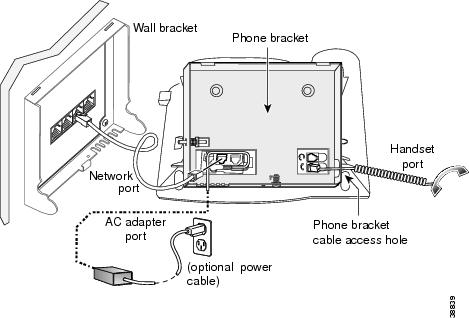
Step 5 Attach the phone to the wall bracket by inserting the tabs on the top of the phone bracket into the slots on the wall bracket. Ensure that the power cord and any other cable that does not terminate in the wall behind the bracket are positioned in one of the cable-access openings in the bottom of the bracket. The phone and wall brackets’ openings together form circular openings with room for one cable per opening.
Figure 6 Attaching the Phone to the Wall Bracket
Step 6 Using a #1 Phillips-head screwdriver, secure the brackets using the sheet metal screw. The screw goes in the bottom face of the bracket.
If you are using the locking version of the mount kit, lock the phone to the wall bracket.
Cisco and the Cisco logo are trademarks or registered trademarks of Cisco and/or its affiliates in the U.S. and other countries. To view a list of Cisco trademarks, go to this URL: www.cisco.com/go/trademarks . Third-party trademarks mentioned are the property of their respective owners. The use of the word partner does not imply a partnership relationship between Cisco and any other company. (1721R)
 Feedback
Contact Cisco
- Open a Support Case

- (Requires a Cisco Service Contract)