Cisco CallManager Features and Services Guide, Release 4.1(3)
Cisco CallManager Extension Mobility

Table Of Contents

Cisco CallManager Extension Mobility

Introducing Cisco CallManager Extension Mobility

Understanding Device Profiles

User Device Profile

Autogenerated Device Profile

Device Profile Default

Overview of Cisco CallManager Extension Mobility

Login and Behavior

Login Call Flow

Logout Call Flow

System Requirements for Cisco CallManager Extension Mobility

Interactions and Restrictions

Interactions

Cisco CallManager Services Running on the Same Server

Bulk Administration Tool

Cisco IP Manager Assistant

Cisco CallManager Attendant Console

Call Display Restrictions

Restrictions

Installing Cisco CallManager Extension Mobility for the First Time

Upgrading Cisco CallManager Extension Mobility to Cisco CallManager 4.1

Configuring Cisco CallManager Extension Mobility

Configuration Guidelines

Configuration Example 1

Configuration Example 2

Configuration Checklist for Cisco CallManager Extension Mobility

Starting the Cisco Extension Mobility Service

Adding the Cisco Extension Mobility Service

Setting the Service Parameters

Creating a Device Profile Default for Each Cisco IP Phone Model

Creating the Device Profile for a User

Associating a User Device Profile to a User

Subscribing Cisco IP Phones to Cisco CallManager Extension Mobility

Providing Information to Cisco CallManager Extension Mobility Users


Cisco CallManager Extension Mobility


The Cisco CallManager Extension Mobility feature allows users to temporarily access their Cisco IP Phone configuration such as line appearances, services, and speed dials from other Cisco IP Phones.

With Cisco CallManager 4.0 or later, extension mobility functionality extends to most Cisco IP Phone models. You can configure each Cisco IP Phone model to support Cisco CallManager Extension Mobility by using the Device Profile Default window in Cisco CallManager Administration. This allows users who do not have a user device profile for a particular Cisco IP Phone model to use Cisco CallManager Extension Mobility with that phone model.


Note Check the Cisco IP Phone model documentation to verify that Cisco CallManager Extension Mobility is supported.


This chapter provides the following information about Cisco CallManager Extension Mobility:

Introducing Cisco CallManager Extension Mobility

System Requirements for Cisco CallManager Extension Mobility

Interactions and Restrictions

Installing Cisco CallManager Extension Mobility for the First Time

Upgrading Cisco CallManager Extension Mobility to Cisco CallManager 4.1

Configuring Cisco CallManager Extension Mobility

Providing Information to Cisco CallManager Extension Mobility Users

For information on resolving problems with Cisco CallManager Extension Mobility, see Troubleshooting Cisco CallManager Extension Mobility.

Introducing Cisco CallManager Extension Mobility

The following sections will help you to understand Cisco CallManager Extension Mobility, so you can configure and troubleshoot the feature:

Understanding Device Profiles

Overview of Cisco CallManager Extension Mobility

Login and Behavior

Login Call Flow

Logout Call Flow

Understanding Device Profiles

A device profile defines the attributes of a particular device. A device profile includes information such as the phone template, user locale, subscribed services, and speed dials.

The device profile does not get associated with a physical phone. It includes all the properties of a device except those that are explicitly tied to a device, such as MAC address or directory URL.

When a device profile has been loaded onto a device, the device adopts the attributes of that device profile.

User Device Profile

As system administrator, you configure a user device profile for each individual user. Using the Cisco CallManager User Options window, a user can access this profile and make changes, such as adding a service. You can add, modify or delete a user device profile in Cisco CallManager Administration.

When a user logs in to a phone that is configured for Cisco CallManager Extension Mobility and the user has a user device profile that is configured for that phone, the user device profile replaces the existing configuration of the device.

When a user logs out, the logout profile replaces the user device profile.

Autogenerated Device Profile

The autogenerated device profile represents a special device profile that gets generated when you configure a phone for Cisco CallManager Extension Mobility and choose "Use Current Settings" from the Phone Configuration window. The autogenerated device profile then associates with a specific phone to be the logout device profile.


Note Cisco strongly recommends that you configure Cisco CallManager Extension Mobility to use the autogenerated device profile as the logout profile, not the user device profile.


You cannot associate an autogenerated device profile with a user. An autogenerated device profile can be loaded onto a device only when no user is logged in. You can modify the autogenerated device profile, but you cannot delete it.

When you make changes to a phone and update it, the update may overwrite modifications of the autogenerated device profile.

Device Profile Default

With Cisco CallManager 4.0 or later, you can configure a device profile default for each Cisco IP Phone model that you want to support Cisco CallManager Extension Mobility. The phone takes on the device profile default whenever a user logs in to a phone model for which that user does not have a user device profile.

A device profile default includes device type (phone model), user locale, phone button template, softkey template, and multilevel precedence and preemption (MLPP) information.

You create a device profile default by using the Device Profile Default Configuration window. A phone model can have zero or one device profile default. The maximum number of device profile defaults cannot exceed the number of phone models that support Cisco CallManager Extension Mobility.

Overview of Cisco CallManager Extension Mobility

Cisco CallManager Extension Mobility (an XML-based authentication feature) comprises the Cisco Extension Mobility application and the Cisco Extension Mobility service.

The Cisco Extension Mobility service runs as an application on the Cisco Tomcat Web Service. When you install Cisco CallManager, Cisco Tomcat (an NT service) gets installed and loads Cisco CallManager Extension Mobility on all Cisco CallManager servers in a cluster. Cisco CallManager Extension Mobility works on phones within a single Cisco CallManager cluster only.

Then, you use CallManager Administration to start the Cisco Extension Mobility service, define how the features will work in your system (using the System Parameters window), and define the phone models that will support the feature (using the Device Profile Default window).

As system administrator, you configure a user device profile for each individual user. Using the Cisco CallManager User Options window, a user can access this profile and make changes, such as adding a service like Cisco Extension Mobility.

Users access Cisco CallManager Extension Mobility by pressing the Services button on a Cisco IP Phone and then entering login information in the form of a Cisco CallManager UserID and a Personal Identification Number (PIN). If a user has more than one user device profile, a prompt displays on the phone and asks the user to choose a device profile for use with Cisco CallManager Extension Mobility.

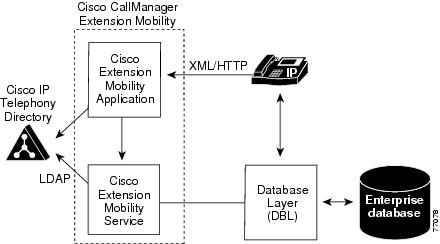
When a user logs in, the Cisco Extension Mobility application receives the XML-over-HTTP request for user authentication and verifies the information against the Cisco CallManager Directory. (See Figure 1-1.)

Figure 1-1 Cisco CallManager Extension Mobility

On authentication, if the login profile matches the login device (that is, the user has a user device profile that is configured for a Cisco IP Phone Model 7960 and logs into a Cisco IP Phone Model 7960), Cisco CallManager Extension Mobility behaves the same way as it does with Cisco CallManager 3.3:

The phone automatically reconfigures with the individual user device profile information.

If the user has one user device profile, then the system uses this profile. If the user has more than one user device profile, the user can choose the user device profile that will be used from a list.

The user can access all the services that the user configured on the device profile.

If that same user logs into a Cisco IP Phone model where the user does not have a configured user device profile, the login profile will not match the login device on authentication. In this scenario, the system loads the device profile default for that phone model onto the phone, and Cisco CallManager Extension Mobility works as described here:

The system copies all device-independent configuration (that is, user hold audio hold audio source, user locale, userid, speeddials, and directory number configuration except for the setting "line setting for this device") from the user device profile to the login device.

The system uses the device profile default for that phone model for phone template and softkey template configuration and, if the phone can support addon modules, for the addon module.

If the phone model supports Cisco IP Phone Services and they are configured, the system copies the services from the user device profile.

If the user device profile does not have Cisco IP Phone Services configured, the system uses the Cisco IP Phone Services that are configured in the device profile default for the login device that is accessed during login. If parameters exist for the subscriber service, the system copies the parameters from the device profile default and the parameters may not reflect the correct information.

For example, the following scenarios occur when a user who has a user device profile that is configured for Cisco IP Phone Model 7960 logs in to a Cisco IP Phone Model 7905, and the device default profile is loaded on the phone.

The user can access the user's hold audio source, user locale, userid, speeddials and directory number configuration. The user cannot access his phone line setting; the system configured the phone line setting from the device profile default that is configured for the Cisco IP Phone Model 7905.

The user can access the phone template and the softkey template of the Cisco IP Phone Model 7905.

The user cannot access an addon module because Cisco IP Phone Model 7905 does not support it.

The user can access Cisco IP Phone Services if they are configured for the Cisco IP Phone 7905, but, the parameters from the subscriber services will reflect the device profile default, not the parameters that the user chose on the User Options window.

Users log out of Cisco CallManager Extension Mobility by pressing the Services button and choosing logout. If users do not log out themselves, the system will automatically log them out if you configured the Service Parameters to do so, or the next user of the phone can log out the previous user. After logout, Cisco CallManager sends the logout profile to the phone and restarts the phone.

Related Topics

Overview of Cisco CallManager Extension Mobility

Login and Behavior

Login and Behavior

This section describes how login and logout works from the user's perspective. Use this information to respond to questions or problems that users may encounter.

Cisco recommends that you direct your users to log in to their phones at the beginning of the work day. This practice ensures that the user device profile gets loaded on their phone.

If users make changes to their profiles on the Cisco CallManager User Options window, the changes will apply until the next time that they log in.

The system does not apply the change if the user is already logged in.

If the User Locale that is associated with the login user or profile does not match the locale or device, after a successful login, the phone will perform a restart followed by a reset. This occurs because the phone configuration file is being rebuilt. Addon module mismatches between profile and device may have the same behavior.

You can establish a time limit, so Cisco CallManager Extension Mobility automatically logs out users after a certain time throughout the cluster:

At the Enforce Maximum Login Time, choose True to specify a maximum time for logins and then set the maximum login time.

Enable Auto Logout.

See the "Setting the Service Parameters" section.

You can set the service parameter to allow for multiple logins. If you set multiple login not allowed, Cisco CallManager Extension Mobility supports only one login at a time for a user. Subsequent logins on other devices will fail until the user logs out on the first device.

If Auto Logout is not enabled and if users forget to log out of a phone, as system administrator, you can log them out. Another user also can log them out when the second user tries to log in to that phone.

If users are logged out of a Cisco IP Phone that has the Cisco CallManager Extension Mobility feature configured for it, depending on the logout profile, they may not be able to check voice-messaging systems from that phone until they log in. If they receive a busy signal after pressing the Messages button or any key on the touchtone key pad, they must log in before using the phone.

Users can log in to a phone that is off the hook; however, their Cisco IP Phone will not assume their settings until they go on-hook. When they go on-hook after logging in, their phone will display a "Resetting..." message, and then their phone settings will be available from that phone.

A user's Cisco CallManager Extension Mobility profile does not maintain ring type, contrast settings, and volume settings; users configure these settings directly on the Cisco IP Phone.

When a Cisco CallManager Extension Mobility user logs out of a device, all Call Back services active on the Cisco CallManager Extension Mobility user automatically cancel.

Related Topics

Understanding Device Profiles

Login Call Flow

Login Call Flow

This section describes the flow of events for the Cisco CallManager Extension Mobility login from a system perspective. Understanding the call flow will help you troubleshoot problems that you may have with the feature.

1. A user presses the Services button on the Cisco IP Phone and requests to log in. This action invokes a URL for the Cisco Extension Mobility application.

2. The application determines the URL of the service.


Note Cisco CallManager Extension Mobility looks up the URL in the Cisco CallManager Directory on the first instance only; the system then stores the URL as a static variable.


3. The Cisco Extension Mobility application sends a formatted XML/HTTP query to the Cisco CallManager Extension Mobility service to determine the state of the phone. The service responds in an XML format with "No one logged in."

4. The application prompts the user for UserID and PIN. The user enters the UserID and PIN and presses the Submit softkey.

5. The phone performs a HTTP request, and the application tries to authenticate the UserID and PIN.

6. If the UserID and PIN cannot be authenticated, the phone displays "Authentication Error."

If the UserID and PIN are authenticated, the application queries the Cisco CallManager Directory to get the list of device profiles that are associated with the user.

7. The directory responds with the list of the user's device profile(s). If the list has more than one entry, the phone displays the device profiles from which the user can choose.

8. When the user chooses an entry from this list (or if the list has only one entry), the application generates the XML for the service.

9. The application posts, via HTTP, the generated XML login request to the service URL (The application determined the service URL in step 2).

10. The service responds in a defined XML format to the request with a Success (or Failure) message.

11. The application returns the correct notification to the device; the user receives a "Login Successful" message on the phone. The phone restarts with the user's device profile.

Related Topics

Login and Behavior

Logout Call Flow

Troubleshooting Cisco CallManager Extension Mobility

Logout Call Flow

This section describes the flow of events for the Cisco CallManager Extension Mobility logout from a system perspective. Understanding the call flow will help you troubleshoot any problems that you may have with the Cisco CallManager Extension Mobility feature.

1. A user presses the Services button on the Cisco IP Phone and requests to log out. This action invokes a URL for the Cisco Extension Mobility application.

2. The application determines the URL of the service.


Note Cisco CallManager Extension Mobility looks up the URL in the Cisco CallManager Directory on the first instance only; the system then stores the URL as a static variable.


3. The application generates the XML to query the Cisco Extension Mobility service for the current state of the device.

4. The service responds to the application with the current state of device; for example, <userID> is logged in.

5. The application prompts the user to confirm that the user wants to log out.

6. When the user presses the Yes softkey to confirm that the user wants to log out, the application generates XML for the logout operation.

7. The application posts, via HTTP, the generated XML login request to the service URL (The application determined the service URL in step 2).

8. The service responds to the application request with a Success or Failure message in an XML format.

9. The application parses the received XML and creates an XML response message.

10. The XML gets returned as a suitable notification to the device, and the phone displays "Logout successful" to the user.

11. The phone restarts to load the original user profile or the logout profile (autogenerated device profile).

Related Topics

Login Call Flow

Troubleshooting Cisco CallManager Extension Mobility

System Requirements for Cisco CallManager Extension Mobility

This version of Cisco CallManager Extension Mobility requires the following software components to operate:

Cisco CallManager 4.0 or later


Note Cisco CallManager 3.1 introduced Cisco CallManager Extension Mobility running on the Cisco Customer Response Application (CRA) 2.2 engine. With Cisco CallManager 3.3(2) or later, the Cisco CallManager Extension Mobility application and the Cisco CallManager Extension Mobility service in Cisco CallManager provide the extension mobility functionality. The feature no longer requires the Cisco CRA engine.


Note With Cisco CallManager 3.3(2) and later, Cisco CallManager Extension Mobility installs automatically on the same server with Cisco CallManager. You do not require an additional server. Cisco CallManager Extension Mobility can run on any server in a Cisco CallManager cluster.


Microsoft Windows 2000

Netscape 4.7 or Internet Explorer 5.5 or later for Cisco CallManager Administration

With Cisco CallManager 4.0 or later, extension mobility functionality extends to most Cisco IP Phones. Check the Cisco IP Phone model documentation to verify that Cisco CallManager Extension Mobility is supported.


Note Cisco IP Phone Model 7960 and Cisco IP Phone Model 7960G that are running Cisco CallManager Extension Mobility may be equipped with Cisco 7914 Expansion Modules.


Related Topics

Introducing Cisco CallManager Extension Mobility

Interactions and Restrictions

Installing Cisco CallManager Extension Mobility for the First Time

Interactions and Restrictions

Use the following sections to understand how Cisco CallManager Extension Mobility interacts with other Cisco CallManager services and to understand restrictions that apply to Cisco CallManager Extension Mobility:

Interactions

Restrictions

Interactions

The following sections describe how Cisco CallManager Extension Mobility interacts with Cisco CallManager applications:

Cisco CallManager Services Running on the Same Server

Bulk Administration Tool

Cisco IP Manager Assistant

Cisco CallManager Attendant Console

Call Display Restrictions

Cisco CallManager Services Running on the Same Server

Cisco CallManager Extension Mobility can run on the same Cisco CallManager server with Cisco IP Manager Assistant (IPMA) and CDR Analysis and Reporting (CAR).

Bulk Administration Tool

You can use the Bulk Administration Tool (BAT) to add and delete several user device profiles for Cisco  CallManager Extension Mobility at one time. Refer to the Cisco CallManager Bulk Administration Tool User Guide for more information.

Related Topic

Associating a User Device Profile to a User

Cisco IP Manager Assistant

A manager who uses Cisco CallManager Extension Mobility can simultaneously use Cisco IP Manager Assistant (IPMA). The manager logs into the Cisco IP Phone by using Cisco CallManager Extension Mobility and then chooses the Cisco IPMA service. When the IPMA service starts, the manager can access assistants and all IPMA features (such as call filtering and Do Not Disturb). For more information about Cisco IPMA, see the Cisco IP Manager Assistant With Proxy Line Support chapter.

Cisco CallManager Attendant Console

If a user logs in to or logs out of the Cisco IP Phone by using Cisco CallManager Extension Mobility while logged in to Cisco CallManager Attendant Console, the Cisco IP Phone resets and the call-control status of the attendant console goes down. Cisco CallManager Attendant Console displays a message that indicates that the attendant needs to log out and log back in if the directory numbers of the phone have changed. The user must log out of the Cisco CallManager Attendant Console. When logging back into the Cisco CallManager Attendant Console, the attendant must specify the current directory number of the phone in the Directory Number of Your Phone field of the Settings dialog box.

For more information on entering a directory number in the Cisco CallManager Attendant Console, refer to the "Configuring Cisco CallManager Attendant Console Settings" section.

Call Display Restrictions

When you enable Call Display Restrictions with Cisco CallManager Extension Mobility, Cisco CallManager Extension Mobility functions as usual: when a user is logged in to the device, the presentation or restriction of the call information depends on the user device profile that is associated with that user. When the user logs out, the presentation or restriction of the call information depends on the configuration that is defined for that phone type in the Phone Configuration window.

To use Call Display restrictions with Cisco CallManager Extension Mobility, you enable the Ignore Presentation Indicators in both the User Device Profile Configuration window (see the "Creating the Device Profile for a User" section) and the Phone Configuration window (see the "Subscribing Cisco IP Phones to Cisco CallManager Extension Mobility" on page 38).

For more information about the Call Display Restrictions features, refer to the Call Display Restrictions chapter.

Restrictions

The following restrictions apply to Cisco CallManager Extension Mobility:

Cisco CallManager Extension Mobility works on phones within a single Cisco CallManager cluster only.

Cisco CallManager Extension Mobility supports a maximum of 2000 login and logout operations per hour. Remember that these operations are sequential, not concurrent.

The characters that display when a user logs in depend on the current locale of the phone. For example, if the phone is currently in the English locale (based on the Logout profile of the phone), the user can only enter English characters in the UserID.

If the User Locale that is associated with the login user or profile is not the same as the locale or device, after a successful login, the phone will perform a restart followed by a reset. This occurs because the phone configuration file is being rebuilt. Addon module mismatches between profile and device may have the same behavior.

Cisco CallManager Extension Mobility requires a physical Cisco IP Phone for login. Users of office phones that are configured with Cisco CallManager Extension Mobility cannot log in to their phones remotely.

When a Cisco CallManager Extension Mobility user logs out of a device, all Call Back services active on the Cisco CallManager Extension Mobility user automatically cancel.

Installing Cisco CallManager Extension Mobility for the First Time

Cisco Tomcat, an NT service, gets installed at Cisco CallManager installation and loads Cisco CallManager Extension Mobility on all Cisco CallManager servers in a cluster.

When you install Cisco CallManager 4.0 or later, make sure that you also install the Cisco IP Telephony Locale Installer on every server in the cluster. Installing the locale installer ensures that you have the latest translated text available for user windows and phone displays. For more information, refer to the Cisco IP Telephony Locale Installer documentation.

Now perform the procedures in the "Configuring Cisco CallManager Extension Mobility" section.

Related Topics

System Requirements for Cisco CallManager Extension Mobility

Interactions and Restrictions

Configuring Cisco CallManager Extension Mobility

Upgrading Cisco CallManager Extension Mobility to Cisco CallManager 4.1

If you have Cisco CallManager Extension Mobility that is configured with Cisco CallManager 3.1 or 3.2, use the following procedure to update the existing Login Service and the Logout Service to run on Cisco CallManager 4.1.

For upgrades from Cisco CallManager 3.3(x) or Cisco CallManager 4.0 to Cisco CallManager 4.1, you do not need to perform this procedure.

Before You Begin

Before you upgrade Cisco CallManager Extension Mobility

1. Complete all procedures to upgrade your system to Cisco CallManager 4.1.

2. Make sure that you have installed the Cisco IP Telephony Locale Installer on every server in the cluster. Installing the locale installer ensures that you have the latest translated text available for user windows and phone displays. For more information, refer to the Cisco IP Telephony Locale Installer documentation.

Perform the following procedure to upgrade your existing Cisco CallManager Extension Mobility to 4.1.

Procedure


Step 1 From Cisco CallManager Administration, choose Feature > Cisco IP Phone Services.

Step 2 From the Cisco IP Phone Services list, choose Extension Mobility Service.

Step 3 Change the URL to the new service URL:

http://<IP Address of Extension Mobility>/emapp/EMAppServlet?device=
#DEVICENAME#

where IP Address of Extension Mobility specifies the IP Address of the Cisco CallManager where Cisco CallManager Extension Mobility is installed.

Step 4 From the Cisco IP Phone Services list, choose Logout Service.


Note The existing names for the Extension Mobility Service and Logout Service continue to display on user phones when users press the Services button. To change the name (to Extension Mobility Service, for example), delete the Extension Mobility Service and the Logout Service, add the new name for the service, and click Update.


Step 5 At the Service URL field, enter the new service URL:

http://<IP Address of Extension Mobility>/emapp/EMAppServlet?device=
#DEVICENAME#

where IP Address of Extension Mobility specifies the IP Address of the Cisco CallManager where Cisco CallManager Extension Mobility is installed.


Caution Because the URL is case-sensitive, make sure that you enter the name exactly as described.

Step 6 Click Update.

Step 7 In the Cisco IP Phone Services Configuration window, click Update Subscriptions to apply the service changes and to rebuild all user subscriptions.


Note If you change the service URL, remove a phone service parameter, or change the name for a phone service parameter, you must update subscriptions.


Step 8 Because the Service Parameters settings apply clusterwide in Cisco CallManager 3.3(3) or later, you may need to reenter settings that were changed for Cisco CallManager Extension Mobility in Cisco CallManager  3.1 or Cisco CallManager 3.2. See the "Setting the Service Parameters" section.


Cisco CallManager Extension Mobility can now run with Cisco CallManager 4.1.

Related Topics

Providing Information to Cisco CallManager Extension Mobility Users

Troubleshooting Cisco CallManager Extension Mobility

Configuring Cisco CallManager Extension Mobility

Review the Configuration Guidelines before you configure the feature. If you are unsure how device profiles work, refer to the "Understanding Device Profiles" section. Then, perform the configuration procedures in the sequence that is shown in the"Configuration Checklist for Cisco CallManager Extension Mobility" on page 21:

Configuration Guidelines

Configuration Example 1

Configuration Example 2

Configuration Checklist for Cisco CallManager Extension Mobility

Configuration Guidelines

To avoid problems with deploying Cisco CallManager Extension Mobility, be sure to follow these configuration guidelines:

Configure a Device Profile Default for each Cisco IP Phone Model in a cluster that you want to support Cisco CallManager Extension Mobility.

If you want to enable all phones within a Cisco CallManager cluster for Cisco CallManager Extension Mobility, do not allow the users to control these phones.

In this scenario, when users go to their Cisco CallManager User Options window to change their services, they must choose "Device Profiles" from the "Select a device to configure" drop-down list box. They cannot control an individual phone nor modify the settings for an individual phone.

As administrator, you can change the services for a phone by using Cisco CallManager Administration. After making the changes, if you update on the main window (not the popup menu), you must reset the phone for the changes to take effect. This action ensures that the new snapshot gets stored as the logout profile.


Note If the Enterprise Parameter "Synchronization between Auto Device Profile and Phone Configuration" is set to True, the auto device profile automatically updates, and you do not need to update on the main window.


If a particular user controls a device, for example, the user's office phone, do not allow anyone else to log in to that device.


Caution The Cisco CallManager Extension Mobility feature does not operate properly if you allow users to access another user's assigned phone.

Related Topics

Configuration Example 1

Configuration Example 2

Configuration Checklist for Cisco CallManager Extension Mobility

Configuration Example 1

In a typical Cisco CallManager Extension Mobility scenario:

All employees represent users of Cisco CallManager Extension Mobility.

All users have a user device profile.

Users do not control individual phones, and they cannot modify settings for an individual phone.

Before a user can use a phone, the user needs to log in.

Users can access common devices, such as lobby phones, conference room phones, and cubicle phones that are meant to be shared.

When users go to their Cisco CallManager User Options window to change services or speed dials, they can choose only their device profiles from the "Select a device to configure" drop-down menu. This method ensures that changes that users make to their services will follow them to any Cisco IP Phone after they log in.

Configuration Example 2

In another typical Cisco CallManager Extension Mobility scenario

Each user has an assigned phone.

Each user has a device profile that follows the user to every device to which the user logs in.

Each user can access common devices, such as lobby phones, conference room phones, and cubicle phones that are configured to be shared.

In this scenario, no one can use anyone else's assigned phone.

Related Topics

Configuration Example 1

Configuration Checklist for Cisco CallManager Extension Mobility

Configuration Checklist for Cisco CallManager Extension Mobility

Perform the procedures in the order shown in Table 1-1 to configure Cisco CallManager Extension Mobility.

Summary steps in Table 1-1 point out the major tasks required to configure Cisco CallManager Extension Mobility in Cisco CallManager Administration. For a complete set of instructions, be sure to follow the procedure that is listed in the Related Procedures and Topics.

Table 1-1 Configuration Checklist for Cisco CallManager Extension Mobility 

Configuration Steps
Related Procedures and Topics

Step 1 

Using the Cisco CallManager Serviceability tool, Service Activation, activate the Cisco Extension Mobility service.


Note To disable the Extension Mobility service on any node, you must first deactivate the service in Service Activation; then you must restart the Cisco Tomcat Web Service for the changes to take effect, as specified in the following step.


Cisco CallManager Serviceability Administration Guide

Step 2 

Using the Tomcat Manager window, stop and start the Cisco Extension Mobility service.

Starting the Cisco Extension Mobility Service

Microsoft Online Help

Step 3 

Create the Cisco Extension Mobility Service.

Summary steps include:

Choose Feature > Cisco IP Phone Services.

Enter the service name (such as, Extension Mobility Service).

Enter the following URL:
http://<IP Address of Extension Mobility server>/ emapp/
EMAppServlet?
device= #DEVICENAME#

Click Insert.

See Adding the Cisco Extension Mobility Service

Step 4 

Configure administration parameters.

Setting the Service Parameters

Step 5 

Create a device profile default for each phone model that you want to support Cisco CallManager Extension Mobility.

Creating a Device Profile Default for Each Cisco IP Phone Model

Step 6 

Create the device profile for a user.

Summary steps include:

Choose Device > Device Setting > Device Profile and click Add a New User Device Profile.

Enter the Device Type 7960/40 and the Device Profile Name; choose the User Locale and Phone template (if needed) and click Insert.

Enter the directory numbers (DNs) and required information and click Insert. Repeat for all DNs.

On User Device Profile Configuration, choose Update service. Choose the service that you added in Step 3.

Click Continue and Subscribe.

Creating the Device Profile for a User

Step 7 

Associate a user device profile to a user.

Summary steps include:

Choose User > Add a New User and enter the user name, password, PIN and locale. Click Insert.

Choose Extension Mobility from the left column and add the User Device Profile created in Step 5.

Tip To check that you have associated the user device profile to the user, open the user file and make sure that the Controlled Device Profile displays the User Device Profile name.

Associating a User Device Profile to a User

Step 8 

Configure and subscribe Cisco IP Phones to the feature.

Summary steps include:

Choose Device > Phone, click Add a New Phone and click Insert.

On Phone Configuration window, check Enable Extension Mobility Feature.

Under the Logout Device Profile, choose User Current Device Settings and click Update.

Cisco IP Phone Configuration, Cisco CallManager Administration Guide

Subscribing Cisco IP Phones to Cisco CallManager Extension Mobility

Starting the Cisco Extension Mobility Service

Cisco Extension Mobility service runs as an application on Cisco Tomcat. To start or stop the Cisco Extension Mobility service, log in to the Tomcat Manager window by using administrator privileges. The following URL goes to the Tomcat Manager window

http://<Cisco Extension Mobility server>/manager/list

where:

Cisco Extension Mobility server specifies the IP address of the server that has the Cisco Extension Mobility service running on it.


Note Make sure that you restart the Cisco Tomcat Web Service after you make any changes using service activation/deactivation; restarting the Cisco Tomcat Web Service is necessary for changes to take effect.


Related Topics

Configuration Checklist for Cisco CallManager Extension Mobility

Adding the Cisco Extension Mobility Service

Adding the Cisco Extension Mobility Service

Add the Cisco Extension Mobility service as a new Cisco IP Phone Service. Configure a name, description, and the URL for the Cisco Extension Mobility service.

To add the Cisco CallManager Extension Mobility service, perform the following steps:

Procedure


Step 1 From Cisco CallManager Administration, choose Feature > Cisco IP Phone Services.

Step 2 Click the Add a New IP Phone Service link.

Step 3 At the Service Name field, enter a name for the service.

The user receives this name on the phone when the user presses the Services button. Use a meaningful name; for example, Extension Mobility.

Step 4 At the Service URL field, enter the IP address of the Cisco CallManager server:

http://<IP Address of Extension Mobility server>/emapp/EMAppServlet?device=
#DEVICENAME#

where IP Address of Extension Mobility server specifies the IP Address of the Cisco CallManager where Cisco CallManager Extension Mobility is installed.

For example

http://123.45.67.89/emapp/EMAppServlet?device=#DEVICENAME#


Caution Because the URL is case-sensitive, make sure that you enter the name exactly as described.


Tip To provide redundancy for the Cisco IP Phone Service, create a Cisco IP Phone Service that uses the host name rather than the IP address. The phone functionality for softkeys and filtering, as well as the phone service, will fail over automatically in the case of a failover.


Step 5 At the Character Set drop-down menu, you can choose the language that this window will display.

Step 6 Click Insert.


Related Topics

Configuration Checklist for Cisco CallManager Extension Mobility

Setting the Service Parameters

Setting the Service Parameters

Set the Service Parameters to define how the Cisco Extension Mobility service will work across a Cisco CallManager cluster. You can use these settings to:

Enable and define a maximum login time.

Define the multi-login behavior; that is, whether you allow the user to log in to more than one device at a time.

Enable "remember last user logged in."


Note In Cisco CallManager 4.0 or later, you no longer enable the trace directory and debug tracing for Cisco Extension Mobility in the Service Parameters window. Instead, you use Cisco CallManager Serviceability administration. See the Troubleshooting Features and Services chapter for details.


Tip Be sure that you have activated the Cisco Extension Mobility service before you perform this procedure. The service parameters will not be visible if you have not activated the service. Refer to the Cisco CallManager Serviceability Administration Guide for information about using the Cisco CallManager Serviceability tool, Service Activation.


To set the Service Parameters for Cisco CallManager Extension Mobility, perform the following steps:

Procedure


Step 1 From Cisco CallManager Administration, choose Service > Service Parameters.

The Service Parameters Configuration window displays.

Step 2 From the Server drop-down menu, choose the server that is running the Cisco Extension Mobility service.

Step 3 From the Service drop-down menu, choose Cisco Extension Mobility.

A new Service Parameters Configuration window displays.

Step 4 At the Enforce Maximum Login Time field, choose True to specify a clusterwide maximum time for logins. After this time, the system automatically logs out the device.

Choosing False means that no clusterwide maximum time for logins exists.

The default value specifies False.


Tip To set an automatic logout, you must choose True in Step 4 and also specify a system maximum login time in Step 5. Cisco CallManager then uses the automatic logout service for all logins.


Step 5 If you specified True at the Maximum Login Time field in Step 4 of this procedure, specify the maximum login time in Hours:Minutes from 0:01 to 168:00 (1 minute to one week).

The default value specifies 8:00 (8 hours).

Step 6 At the Multi Login Behavior field, choose one of the following responses:

Multiple Logins Allowed: A user can log in to more than one device at a time.

Multiple Logins Not Allowed: The second and subsequent login attempts after a user successfully logs in once will fail.

Auto Logout: After a user logs in to a second device, the Cisco CallManager automatically logs the user out of the first device.

The default value specifies Multiple Logins Not Allowed.

Step 7 At the Alphanumeric Userid field, choose True to allow the UserID to contain alphanumeric characters. Choosing False allows the UserID to contain only numeric characters.

The default value specifies True.


Note The Alphanumeric Userid parameter applies systemwide. You can have a mix of alphanumeric and numeric userids. The system supports only Userids that can be entered by using the alphanumeric keypad.


Step 8 At the Remember last user logged in field, choose the default value, False.

In a typical hoteling scenario, where users can come into any office and use any phone on a temporary basis, you should set this parameter to False.

A True setting specifies that the Extension Mobility application remembers the user ID of the last user that logged in to the phone. Use this setting in situations where individuals use their own phone on a regular basis, and no one else uses that phone.

For example, Cisco CallManager Extension Mobility could be used to enable the types of calls that are allowed from a phone. Individuals who are not logged in and who are using their office phone can make only internal or emergency calls. But after logging in using Cisco CallManager Extension Mobility, the user can make local, long-distance and international calls. In this scenario, only this user regularly logs in to the phone. It makes sense to set the Cisco CallManager Extension Mobility to remember the last user ID that logged in, and you would set the field to True.

Step 9 Click Update.

Step 10 If Cisco CallManager displays a message that a Cisco Tomcat restart is required, click Update again.


Tip From the Service Parameters window, you can choose another server, or you can choose to view a list of the service parameters for all servers in the cluster; the Parameters for All Servers window displays where you can check whether any service parameters in the cluster are out of synch, or you can view just those service parameters in the cluster that have been modified.


Related Topics

Configuration Checklist for Cisco CallManager Extension Mobility

Adding the Cisco Extension Mobility Service

Creating the Device Profile for a User

Creating a Device Profile Default for Each Cisco IP Phone Model

With Cisco CallManager 4.0 or later, you configure a clusterwide device profile default for each model of Cisco IP Phone that you want to support Cisco CallManager Extension Mobility. The phone takes on the device profile default whenever a user logs in to a phone model for which the user has no user device profile.

For more information on how Device Profile Defaults work, see the "Overview of Cisco CallManager Extension Mobility" section.

To add a device profile default for a phone model, perform the following procedure.

Procedure


Step 1 From Cisco CallManager Administration, choose Device > Device Settings > Device Profile Default.

The Device Profile Default Configuration window displays.

Step 2 Click the Add a New Device Profile Default link. From the Device Type drop-down list box, choose the device (such as a Cisco IP Phone) to which a profile gets created.

Step 3 From the User Hold Audio Source field, choose from the drop-down list box to specify the audio source that plays when a user initiates a hold action.

If you do not choose an audio source, Cisco CallManager uses the audio source that is defined in the device pool or, if the device pool does not specify an audio source ID, the system default.


Tip You define audio sources in the Music On Hold Audio Source Configuration window. For access, choose Service > Music On Hold.


Step 4 At the User Locale drop-down list box, choose the locale that is associated with the phone user interface.

The user locale identifies a set of detailed information, including language and font, to support users. Cisco CallManager makes this field available only for phone models that support localization.


Note If no user locale is specified, Cisco CallManager uses the user locale that is associated with the device pool.


Note If the users require information to be displayed (on the phone) in any language other than English, verify that the locale installer is installed before configuring user locale. Refer to the Cisco IP Telephony Locale Installer documentation.


Step 5 At the Phone Button Template field, choose the appropriate phone button template. The phone button template determines the configuration of the softkeys on Cisco IP Phones. Leave this field blank if the device pool contains the assigned softkey template.

Step 6 If the phone model supports Cisco IP Phone 7914 Expansion Modules, Cisco CallManager displays the expansion module field.

a. At the Module 1 drop-down list box choose one or zero 7914 14-button expansion module.

b. At the Module 2 drop-down list box, choose one or zero 7914 14-button expansion module.

Step 7 To configure Multilevel Precedence and Preemption (MLPP) information:

a. At the MLPP Domain, enter a hexadecimal value for the MLPP domain that is associated with this device profile. Ensure the value is blank or a value between 0 and FFFFFF.

b. If available, the MLPP Indication setting specifies whether a device will use the capability when it places the MLPP precedence call.

From the drop-down list box, choose a setting to assign to devices that use this device profile default from the following options:

Default—This device inherits its MLPP indication setting from its device pool.

Off—This device does not send indication of an MLPP precedence call.

On—This device does send indication of an MLPP precedence call.


Note Do not configure a device profile default with the following combination of settings: MLPP Indication is set to Off while MLPP Preemption is set to Forceful.


c. If available, the MLPP Preemption setting specifies whether a device that is capable of preempting calls in progress will use the capability when it places an MLPP precedence call.

From the drop-down list box, choose a setting to assign to devices that use this device profile default from the following options:

Default—This device inherits its MLPP preemption setting from its device pool.

Disabled—This device does not preempt calls in progress when it places an MLPP precedence call.

Forceful—This device preempts calls in progress when it places an MLPP precedence call.


Note Do not configure a device profile default with the following combination of settings: MLPP Indication is set to Off while MLPP Preemption is set to Forceful.


Step 8 Click Insert.

The device profile displays in the Device Profile Default pane.

Step 9 Click the Subscribe/Unsubscribe Services link to add the Cisco Extension Mobility service to this profile.

The Subscribe Cisco IP Phone services window displays.

Step 10 From the Select a Service drop-down list box, choose the service that you added in the "Adding the Cisco Extension Mobility Service" section.

Step 11 Click Continue.

The window displays the service that you chose.


Tip To choose another service, click Back, choose a service from the Select a Service drop-down list box, and click Continue.


Step 12 Click Subscribe.

The service displays in the Subscribed Services list.


Related Topics

Configuration Checklist for Cisco CallManager Extension Mobility

Setting the Service Parameters

Associating a User Device Profile to a User

Creating the Device Profile for a User

The User Device Profile contains attributes such as name, description, phone template, addon modules, directory numbers, subscribed services, and speed-dial information.


Note Before proceeding, you must ensure that a device profile name and phone button template(s) are configured. Refer to the Cisco CallManager Administration Guide.


To add a default device profile for a new user of Cisco CallManager Extension Mobility, perform the following procedure.

Procedure


Step 1 From Cisco CallManager Administration, choose Device > Device Settings > Device Profile.

The Find and List Device Profiles window displays.

Step 2 Click the Add a New User Device Profile link in the upper, right corner.

The User Device Profile Configuration window displays.

Step 3 At the User Device Profile Name field, enter a name of your choice for the device profile. You can make this text anything that describes this particular user device profile, such as "Terry's Device Profile."

Step 4 To enable the Call Display Restrictions feature, check the Ignore Presentation Indicators checkbox.


Note To enable the Call Display Restrictions feature, check the Ignore Presentation Indicators checkbox here on the User Device Profile window and also on the Phone Configuration window (see the "Subscribing Cisco IP Phones to Cisco CallManager Extension Mobility" on page 38).


Step 5 At the Phone Button Template field, choose the appropriate phone button template. The phone button template determines the configuration of the softkeys on Cisco IP Phones. Leave this field blank if the device pool contains the assigned softkey template.

Step 6 If the phone model supports Cisco IP Phone 7914 Expansion Modules, Cisco CallManager displays expansion module field. At the Module 1 drop-down list box and at the Module 2 drop-down list box, choose one or zero 7914 14-button expansion module.


Note You may view a phone button list at any time by choosing the View button list link next to the phone button template fields. A separate window pops up and displays the phone buttons for that particular expansion module.


Step 7 At the Directory Number field, enter the directory number and click Insert.

Step 8 The following prompt displays: The Directory Number has been assigned to the current device. Click OK to return to the current device.

Click OK.

Step 9 The window refreshes to the User Device Profile Configuration window for this device profile.

On the User Device Profile Configuration window, choose Update service.

Step 10 To update services, choose the service that you added in the "Adding the Cisco Extension Mobility Service" section.

Step 11 Click Continue.

Step 12 Click Subscribe.


Related Topics

Configuration Checklist for Cisco CallManager Extension Mobility

Associating a User Device Profile to a User

Associating a User Device Profile to a User

You associate a User Device Profile to a user in the same way that you associate a physical device. For more details, refer to the "Adding a New User" in the Cisco CallManager Administration Guide.


Tip You can use the Bulk Administration Tool (BAT) to add and delete several user device profiles for Cisco CallManager Extension Mobility at one time. Refer to the Cisco CallManager Bulk Administration Tool User Guide for more information.


To associate a user device profile to a user for Cisco CallManager Extension Mobility, follow these steps:

Procedure


Step 1 From Cisco CallManager Administration, choose User > Add a New User.

Step 2 At the Add a New User window, enter the first name (for example, terry), last name (for example, brody), and UserID (for example, tbrody).


Tip With Cisco CallManager 3.3(2) or later, you can specify Alphanumeric or Numeric user IDs for the user logins, instead of just Alphanumeric user IDs. The user IDs remain case-sensitive. Be aware that only characters that are supported on the Cisco IP Phone can be used for user IDs: the digits 0 - 9 and their corresponding letters; the asterisk (*); and the octothorpe or pound sign (#).


Step 3 At the User Password and Confirm Password fields, enter a password of your choice.

Step 4 At the PIN field, enter a numeric (five or more characters) Personal Identification Number (PIN) of your choice. Confirm the PIN number.

Step 5 Enter the user telephone number.

Step 6 You may enter the name of the manager ID and enter the user department number.


Note The manager name that you enter must already exist in the directory as a user.


Step 7 At the User Locale field, from the drop-down list box, choose the locale that is associated with the user. The user locale identifies a set of detailed information to support users, including language and font.

Cisco CallManager uses this locale for Cisco CallManager Extension Mobility and the Cisco CallManager User Options windows. For Cisco CallManager Extension Mobility log on, the locale that is specified here takes precedence over the device and device profile settings. For Cisco Extension Mobility log off, Cisco CallManager uses the user locale that is specified in the default device profile.


Note If you do not choose a user locale, the locale that is specified in the Cisco CallManager service parameters as Default User Locale applies.


Step 8 You may check the box by the following fields to enable these features:

a. Enable CTI Application Use

b. Enable CTI Super Provider

c. Call Park Retrieval Allowed

d. Enable Calling Party Number Modification

Refer to the "Adding a New User" in the Cisco CallManager Administration Guide for details on these fields as well as the Associated PC, Primary Extension, and Controlled Devices fields.

Step 9 To save your changes and add the user, click Insert.

Step 10 From the left pane, choose Cisco Extension Mobility.

Step 11 Enable Authentication Proxy Rights to allow an extension mobility application, such as a scheduling application called MySchedulingAppUser, to use the Cisco Extension Mobility service to log in and log out users.

Step 12 Click Select Profiles to display the profile that you created in the "Creating the Device Profile for a User" section.

Step 13 Scroll and click the box next to the device profile to choose the appropriate profile.


Note Cisco CallManger Extension Mobility uses the first checked profile.Click Update.


Tip To check that you have associated the User Device Profile to the user, open the user file and make sure that the Controlled Device Profile displays the User Device Profile name.


Related Topic

Subscribing Cisco IP Phones to Cisco CallManager Extension Mobility

Subscribing Cisco IP Phones to Cisco CallManager Extension Mobility

Prerequisite

You must configure the Cisco IP  Phones in Cisco CallManager before you subscribe the phones to Cisco CallManager Extension Mobility. To configure the phones, refer to the "Cisco IP Phone Configuration" section in the Cisco CallManager Administration Guide.

For a review of device profiles, refer to the "Understanding Device Profiles" section.

To subscribe to the Cisco CallManager Extension Mobility feature, perform the following procedure.

Procedure


Step 1 From Cisco CallManager Administration, choose Device > Phone.

Step 2 Click Add a New Phone and click Insert.

The Phone Configuration window displays.

Step 3 From the Phone Configuration window, choose the Subscribe/Unsubscribe Services link.

Step 4 From the drop-down arrow, choose the service name that you added in the "Adding the Cisco Extension Mobility Service" section (for example, Extension Mobility).

Step 5 Click Continue.

Step 6 Click Subscribe. Close the window.

Step 7 On the Cisco CallManager Phone Configuration window, to enable the Call Party Restrictions feature, check the Ignore Presentation Indicators checkbox.


Note To enable the Call Display Restrictions feature, check the Ignore Presentation Indicators checkbox here on the Phone Configuration window and also on the User Device Profile window (see the "Creating the Device Profile for a User" on page 34).


Note For information about this feature, refer to the Call Display Restrictions chapter.


Step 8 On Cisco CallManager Phone Configuration, scroll down to the bottom of the window. Click the checkbox to Enable Extension Mobility Feature.

Step 9 At the Log Out Profile field, choose Use Current Device Settings.

This action specifies the device profile that the device uses when no one is logged into the device that is using Cisco CallManager Extension Mobility. When a logout executes, the Autogenerated Device Profile (the default device profile) replaces the current configuration (the User Device Profile).


Note Cisco strongly recommends that you use the Autogenerated Device Profile and not assign a user device profile as the default device profile.


Step 10 The remaining fields show the current device information regarding the login status of the device: Log in UserID; Log In Time; Log Out Time.

Step 11 Click Update.


You have now configured Cisco CallManager Extension Mobility.

Related Topics

Configuration Checklist for Cisco CallManager Extension Mobility

Associating a User Device Profile to a User

Providing Information to Cisco CallManager Extension Mobility Users

Providing Information to Cisco CallManager Extension Mobility Users

After you have configured the system for Cisco CallManager Extension Mobility, provide your phone users with the following information:

Notification of feature availability and the phone models that support Cisco CallManager Extension Mobility. Include the name that you have given the Cisco CallManager Extension Mobility feature (for example, extension mobility).

User password, UserID, and PIN

URL for the Cisco CallManager User Options window for the user to change user password and PIN


Note Be aware that user passwords and PINs can only contain characters that can be supported on the IP phones: the digits 0 - 9 and their corresponding letters; the asterisk (*); and the octothorpe or pound sign (#).


Their phone model user guide that contains a Cisco CallManager Extension Mobility overview and instructions on logging in, logging out, and troubleshooting the feature.

The Customizing Your Cisco IP Phone on the Web document that contains information on using their Cisco IP Options window.

Description of the feature login and logout behavior that you defined in the "Setting the Service Parameters" section.