Feedback
Contents
- Configuring VN-Link Components and Connectivity
- Components of VN-Link in Hardware
- Configuring a VMware ESX Host for VN-Link
- Configuring a VMware vCenter Instance for VN-Link
- Configuring a Certificate for VN-Link in Hardware
- Certificate for VN-Link in Hardware
- Copying a Certificate to the Fabric Interconnect
- Creating a Certificate for VN-Link in Hardware
- Deleting a Certificate for VN-Link in Hardware
- Connecting Cisco UCS Manager to VMware vCenter Using the Extension Key
- (Optional) Modifying the vCenter Extension Key
- Exporting a vCenter Extension File from Cisco UCS Manager
- Registering a vCenter Extension File in VMware vCenter
Configuring VN-Link Components and Connectivity
This chapter includes the following sections:
- Components of VN-Link in Hardware
- Configuring a VMware ESX Host for VN-Link
- Configuring a VMware vCenter Instance for VN-Link
- Configuring a Certificate for VN-Link in Hardware
- Connecting Cisco UCS Manager to VMware vCenter Using the Extension Key
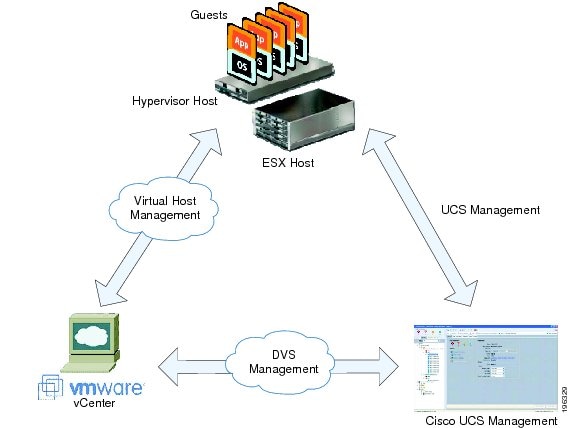
Components of VN-Link in Hardware
The following three main components must be connected for VN-Link in hardware to work:
- VMware ESX Host
A server with the VMware ESX installed. It contains a datastore and the virtual machines.
The ESX host must have a Cisco M81KR VIC installed, and it must have uplink data connectivity to the network for communication with VMware vCenter.
- VMware vCenter
Windows-based software used to manage one or more ESX hosts.
VMware vCenter must have connectivity to the UCS management port for management plane integration, and uplink data connectivity to the network for communication with the ESX Host. A vCenter extension key provided by Cisco UCS Manager must be registered with VMware vCenter before the Cisco UCS instance can be acknowledged.
- Cisco UCS Manager
The Cisco UCS management software that integrates with VMware vCenter to handle some of the network-based management tasks.
Cisco UCS Manager must have management port connectivity to VMware vCenter for management plane integration. It also provides a vCenter extension key that represents the Cisco UCS identity. The extension key must be registered with VMware vCenter before the Cisco UCS instance can be acknowledged.
The following figure shows the three main components of VN-Link in hardware and the methods by which they are connected:
Configuring a VMware ESX Host for VN-Link
Before You BeginProcedureEnsure that Virtualization Technology is enabled in BIOS of the UCS server if you intend to run 64-bit VMs on the ESX host. An ESX host will not run 64-bit VMs unless Virtualization Technology is enabled.
Step 1 If not already present, install a Cisco M81KR VIC in the server you intend to use as the VMware ESX host. For more information about installing a Cisco M81KR VIC, see the Cisco UCS 5108 Server Chassis Hardware Installation Guide. Step 2 Configure and associate a service profile to the server. The service profile configuration must include the following:
A Dynamic vNIC Connection policy that determines how the VN-link connectivity between VMs and dynamic vNICs is configured.
Two static vNICs for each adapter on the ESX host. For ESX hosts with multiple adapters, your service profile must use either vCons or have an associated vNIC/vHBA placement profile that ensures the static vNICs are assigned to the appropriate adapters.
For more information, see the following chapter: Configuring Service Profiles.
Step 3 Install VMware ESX 4.0 or later on the blade server. No additional drivers are required during the installation.
Configuring a VMware vCenter Instance for VN-Link
Procedure
What to Do Next
Do one of the following:
Certificate for VN-Link in Hardware
Cisco UCS Manager generates a default, self-signed SSL certificate to support communication with vCenter. You can also create your own custom certificate to communicate with multiple vCenter instances. When you create a custom certificate, Cisco UCS Manager recreates the extension files to include the new certificate. If you subsequently delete the custom certificate, Cisco UCS Manager recreates the extension files to include the default, self-signed SSL certificate.
To create a custom certificate, you must obtain and copy an external certificate into Cisco UCS, and then create a certificate for VN-Link in hardware that uses the certificate you copied into Cisco UCS.
Copying a Certificate to the Fabric Interconnect
ProcedureWhat to Do NextThe following example uses FTP to copy a certificate (certificate.txt) to the temp folder in the workspace:
UCS-A # connect local-mgmt
Cisco UCS 6100 Series Fabric Interconnect

TAC support: http://www.cisco.com/tac

Copyright (c) 2009, Cisco Systems, Inc. All rights reserved.

The copyrights to certain works contained herein are owned by
other third parties and are used and distributed under license.
Some parts of this software may be covered under the GNU Public
License or the GNU Lesser General Public License. A copy of
each such license is available at
http://www.gnu.org/licenses/gpl.html and
http://www.gnu.org/licenses/lgpl.html

UCS-A(local-mgmt)# copy ftp://192.168.10.10/certs/certificate.txt workspace:/temp/certificate.txt
UCS-A(local-mgmt)#
Create a certificate for VN-Link in hardware.
Creating a Certificate for VN-Link in Hardware
Procedure
Deleting a Certificate for VN-Link in Hardware
Procedure
(Optional) Modifying the vCenter Extension Key
Procedure
What to Do Next
Export the vCenter extension file or files from Cisco UCS Manager.
Exporting a vCenter Extension File from Cisco UCS Manager
ProcedureDepending on the version of VMware vCenter you are using, you can either generate one extension file or a set of nine extension files.
What to Do Next
Register the vCenter extension file or files in VMware vCenter.
Registering a vCenter Extension File in VMware vCenter
Before You BeginProcedureExport the vCenter extension file(s) from Cisco UCS Manager. Ensure that the exported vCenter extension files are saved to a location that can be reached by VMware vCenter.
Step 1 In VMware vCenter, choose . Step 2 Right-click any empty space below the Available Plug-ins section of the Plug-in Manager dialog box and click New Plug-in. Step 3 Click Browse and navigate to the location where the vCenter extension file(s) are saved. Step 4 Choose a vCenter extension file and click Open. Step 5 Click Register Plug-in. Step 6 If the Security Warning dialog box appears, click Ignore. Step 7 Click OK. The vCenter extension file registers as an available VMware vCenter plug-in. You do not need to install the plug-in, leave it in the available state. If you are registering multiple vCenter extension files, repeat this procedure until all files are registered.