Feedback
Table Of Contents
Licensing Requirements for Using MQC Objects
Configuring or Modifying a Class Map
Configuring or Modifying a Table Map
Configuring or Modifying a Policy Map
Applying Descriptions to MQC Objects
Attaching and Detaching a QoS Policy Action from an Interface
Feature History for Using Modular QoS CLI
Using Modular QoS CLI
This chapter describes how to configure Modular QoS CLI (MQC) objects that can be used for configuring QoS features.
This chapter includes the following sections:
•
Licensing Requirements for Using MQC Objects
•
•
Information About MQC
MQC provides a language to define QoS policies.
Note
You configure QoS policies using three steps:
1.
2.
3.
MQC provides three command types to define traffic classes and policies:
•
•
•
You define the following class-map and policy-map object types when you create them:
•
•
Note
You can attach policies to ports, port channels, VLANs, subinterfaces, or tunnels by using the service-policy interface configuration command.
You can view all or individual values for MQC objects by using the show table-map, show class-map, and show policy-map commands.
Note
Licensing Requirements for Using MQC Objects
The following table shows the licensing requirements for this feature:
However, using VDCs requires an Advanced Services license.
Using an MQC Object
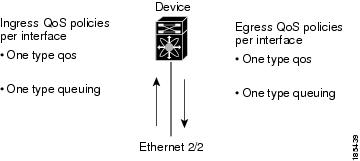
You configure QoS and queuing policies using the MQC class-map, policy-map, and table-map objects. You cannot use table maps in queuing policies. After you configure class maps and policy maps, you can attach one policy map of each type to each of the ingress or egress directions of an interface. Figure 2-1 lists the maximum QoS and queuing policies that you can define on each interface.
Figure 2-1 Maximum QoS Policies Per Interface
A policy map contains either a QoS policy or queuing policy. The policy map references the names of class maps that represent traffic classes. For each class of traffic, the device applies the policies on the interface or VLAN that you select.
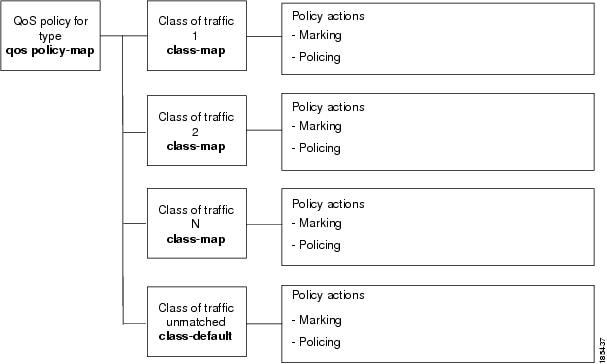
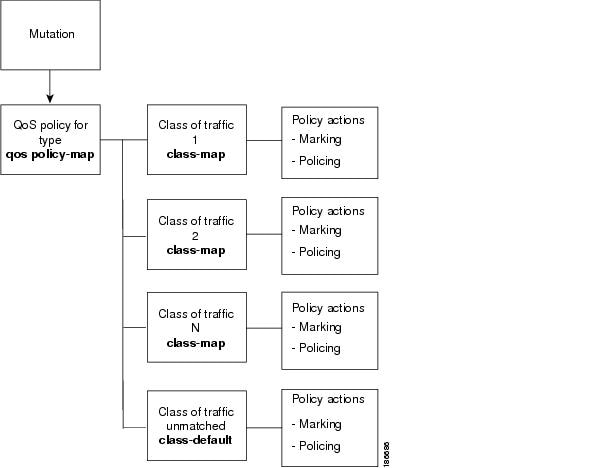
A packet is matched sequentially to a class of traffic starting from the first traffic class definition. When a match is found, the policy actions for that class are applied to the packet.
The reserved class map receives all traffic that is not matched in type qos policies, and the device applies the policy actions as it would for any other traffic class. You use class-default to perform mutations (mutation is a method for translating QoS values in the packet header prior to traffic classification).
Note
This section includes the following topics:
•
Type qos Policies
You use type qos policies to mark, to apply mutations, to set the ingress port trust state, and to police packets.
Figure 2-2 shows the QoS policy structure with the associated MQC objects of type qos without mutation, and Figure 2-3 shows the QoS policy structure with mutation. The MQC objects are shown in bold.
Figure 2-2 QoS Policy Diagram Showing Type qos MQC Object Usage without Mutation
Figure 2-3 QoS Policy Diagram Showing Type qos MQC Object Usage with Mutation
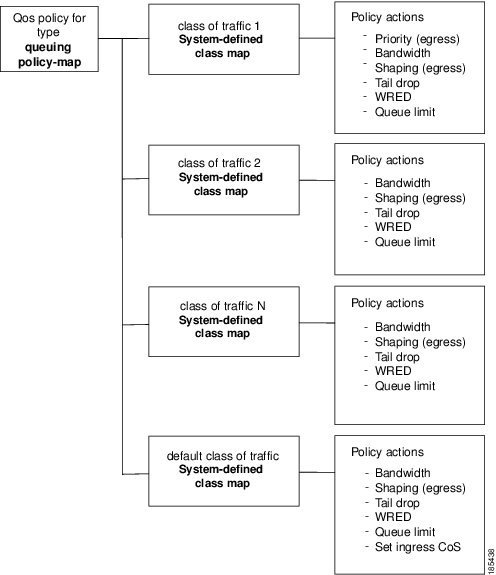
Type queuing Policies
You use type queuing policies to mark, shape, and queue packets. Marking is limited to the CoS field and does not support the use of table maps.
Figure 2-4 shows the QoS policy structure with associated MQC objects of type queuing. The MQC objects are shown in bold.
Note
Figure 2-4 QoS Policy Diagram Showing Type queuing MQC Object Usage
System-Defined MQC Objects
Note
When you configure QoS features, and the systems requests one of these MQC objects, you can use these system-defined objects.The system-defined MQC objects are shown in Table 2-1. See the tables listed next to the object for information on these system-defined objects.
Table 2-1 System-Defined MQC Objects
Type qos class maps
Type queuing class maps
Table maps
Policy maps
Type qos class maps that are defined by the system are listed in Table 2-2.
Note
Type queuing class maps that are defined by the system are listed in Table 2-3.
Table 2-3 System-Defined Type queuing Class Maps
1 Gigabit Module Ingress: 2 queues with 4 thresholds per queue
2q4t-in-q1
Ingress queue 1 of 2q4t type
5-7
2q4t-in-q-default
Ingress default queue of 2q4t type
0-4
1 Gigabit Module Egress: 1 strict priority queue and 3 normal queues with 4 thresholds per queue
1p3q4t-out-pq1 1
Egress priority queue of 1p3q4t type
5-7
1p3q4t-out-q2
Egress queue 2 of 1p3q4t type
-
1p3q4t-out-q3
Egress queue 3 of 1p3q4t type
-
1p3q4t-out-q-default
Egress default queue of 1p3q4t type
0-4
10 Gigabit Module Ingress: 8 queues with 2 thresholds per queue
8q2t-in-q1
Ingress queue 1 of 8q2t type
5-7
8q2t-in-q2
Ingress queue 2 of 8q2t type
-
8q2t-in-q3
Ingress queue 3 of 8q2t type
-
8q2t-in-q4
Ingress queue 4 of 8q2t type
-
8q2t-in-q5
Ingress queue 5 of 8q2t type
-
8q2t-in-q6
Ingress queue 6 of 8q2t type
-
8q2t-in-q7
Ingress queue 7 of 8q2t type
-
8q2t-in-q-default
Ingress default queue of 8q2t type
0-4
10 Gigabit Module Egress: 1 strict priority queue and 7 normal queues with 4 thresholds per queue
1p7q4t-out-pq1 1
Egress priority queue of 1p7q4t type
5-7
1p7q4t-out-q2
Egress queue 2 of 1p7q4t type
-
1p7q4t-out-q3
Egress queue 3 of 1p7q4t type
-
1p7q4t-out-q4
Egress queue 4 of 1p7q4t type
-
1p7q4t-out-q5
Egress queue 5 of 1p7q4t type
-
1p7q4t-out-q6
Egress queue 6 of 1p7q4t type
-
1p7q4t-out-q7
Egress queue 7 of 1p7q4t type
-
1p7q4t-out-q-default
Egress default queue of 1p7q4t type
0-4
1 These are either priority or normal queues. If you use the priority keyword in your configuration, these are used as priority queues. Otherwise, they are used as normal queues.
Table maps that are defined by the system are listed in Table 2-4. The default mapping of values in the tables maps is contained in RFC 2597.
Policy maps that are defined by the system are listed in Table 2-5.
Configuring an MQC Object
When you specify a MQC object command, the device creates the object if it does not exist and then enters map mode.
To remove a class-map, table-map, or policy-map object, use the no form of the command that you used to create the object.
For the commands that you can use in the MQC object mode, see the following configuration chapters:
•
•
•
•
•
This section includes the following topics:
•
•
•
Configuring or Modifying a Class Map
You can create or modify a class map. You can then reference class maps in policy maps.
Note
SUMMARY STEPS
1.
2.
3.
4.
5.
6.
7.
8.
9.
10.
DETAILED STEPS
Step 1
config t
Example:
switch# config t
switch(config)#
Enters configuration mode.
Step 2
class-map [type qos] [match-any | match-all] class-map-name
Example:
switch(config)# class-map class1
switch(config-cmap-qos)#
Creates or accesses the class map of type qos, and then enters class-map qos mode. Class-map names can contain alphabetic, hyphen, or underscore characters, are case sensitive, and can be up to 40 characters.
Step 3
exit
Example:
switch(config-cmap-qos)# exit
switch(config)#
Exits class-map qos mode and enters configuration mode.
Step 4
class-map [type qos] {conform-color-in | conform-color-out | exceed-color-in | exceed-color-out}
Example:
switch(config)# class-map exceed-color-in
switch(config-color-map)#
(Optional) Accesses the class map of type qos for one of the system-defined color maps, and then enters color-map mode.
Note
Step 5
exit
Example:
switch(config-color-map)# exit
switch(config)#
Exits color-map mode, and then enters configuration mode.
Step 6
class-map type queuing match-any [class-queuing-name]
Example:
switch(config)# class-map type queuing match-any 1p3q4t-out-pq1
switch(config-cmap-que)#
Creates or accesses the class map of type queuing, and then enters class-map queuing mode. Class queuing names are listed in Table 2-3.
Step 7
exit
Example:
switch(config-cmap-que)# exit
switch(config)#
Exits class-map queuing mode and enters configuration mode.
Step 8
show class-map [type qos] [class-map-name | conform-color-in | conform-color-out | exceed-color-in | exceed-color-out]
Example:
switch(config)# show class-map
(Optional) Displays information about all configured class maps or a selected class map of type qos.
Step 9
show class-map type queuing [class-queuing-name]
Example:
switch(config)# show class-map type queuing
(Optional) Displays information about all configured class maps or a selected class map of type queuing. Class queuing names are listed in Table 2-3.
Step 10
copy running-config startup-config
Example:
switch(config)# copy running-config startup-config
(Optional) Saves the running configuration to the startup configuration.
Configuring or Modifying a Table Map
You can create or modify a table map that you can reference in policy maps. See Chapter 4, "Configuring Marking" for information on configuring table maps.
SUMMARY STEPS
1.
2.
3.
4.
5.
6.
7.
DETAILED STEPS
Configuring or Modifying a Policy Map
You can create or modify a policy map that you can use to define actions to perform on class maps.
SUMMARY STEPS
1.
2.
3.
4.
5.
6.
7.
8.
DETAILED STEPS
Applying Descriptions to MQC Objects
You can apply the description command to any MQC object.
SUMMARY STEPS
1.
2.
or
table-map table-map-name
or
policy-map [type qos] [match-first] policy-map-name3.
4.
5.
DETAILED STEPS
Verifying an MQC Object
To display MQC object configuration information, perform one of the following tasks:
show class-map [type qos] [class-map-name | conform-color-in | conform-color-out | exceed-color-in | exceed-color-out]
Displays information about all configured class maps or a selected class map of type qos.
show class-map type queuing [class-queuing-name]
Displays information about all configured class maps or a selected class map of type queuing. Class queuing names are listed in Table 2-3.
show table-map [table-map-name | cir-markdown-map | pir-markdown-map | cos-discard-class-map | cos-dscp-map | cos-precedence-map | dscp-cos-map | dscp-precedence-map | dscp-discard-class-map | precedence-dscp-map | precedence-cos-map | precedence-discard-class-map | discard-class-cos-map | discard-class-prec-map | discard-class-dscp-map]
Displays information about all configured table maps or a selected table map.
show policy-map [type qos] [policy-map-name]
Displays information about all configured policy maps or a selected policy map of type qos.
show policy-map type queuing [policy-map-name]
Displays information about all configured policy maps or a selected policy map of type queuing.
For detailed information about the fields in the output from these commands, see the Cisco NX-OS Quality of Service Command Reference.
Attaching and Detaching a QoS Policy Action from an Interface
The software does not allow you to enable or disable QoS features with a configuration command. To enable or disable QoS features, you must attach or detach QoS policies to or from interfaces, VLANs, or tunnels as described in this section.
Note
The system-defined type queuing class maps (see Table 2-3) are attached to each interface unless you specifically attach a different class map.
Note
Policies that are defined at multiple interfaces have the following restrictions:
•
•
•
•
•
•
•
•
For example, a policer configured on a specific VLAN that limits the rate for the VLAN to 100 Mbps and has one switch port in the VLAN on one module and has another switch port in the VLAN on another module, each forwarding engine enforces the 100-Mbps rate. In this case, you could actually have up to 200 Mbps in the VLAN you configured to limit the rate to 100 Mbps.
Note
The interface where a QoS policy is applied is summarized in Table 2-6. Each row represents the interface levels. The entry descriptions are as follows:
•
•
•
•
Table 2-6 QoS Policy Interfaces
Applied
Not present
Present or not
Present or not
Applied
Present or not
Not present
Not present
Applied
To attach a policy map to an interface, use the service-policy interface command mode or the VLAN command mode. You specify whether the policies defined in the policy map are applied to the input or output stream of packets on the interface.
To detach a policy map from an interface or VLAN, use the no form of the service-policy interface command mode or the VLAN command mode.
SUMMARY STEPS
1.
2.
3.
4.
5.
DETAILED STEPS
Feature History for Using Modular QoS CLI
Table 2-7 lists the release history for this feature.