Cisco Nexus 1000V Layer 2 Switching Configuration Guide, Release 4.2(1)SV1(5.1)
Bias-Free Language
The documentation set for this product strives to use bias-free language. For the purposes of this documentation set, bias-free is defined as language that does not imply discrimination based on age, disability, gender, racial identity, ethnic identity, sexual orientation, socioeconomic status, and intersectionality. Exceptions may be present in the documentation due to language that is hardcoded in the user interfaces of the product software, language used based on RFP documentation, or language that is used by a referenced third-party product. Learn more about how Cisco is using Inclusive Language.
- Updated:
- January 31, 2012
Chapter: Configuring a Private VLAN
- Flow Chart: Configuring a Private VLAN
- Enabling or Disabling the Private VLAN Feature Globally
- Configuring a VLAN as a Primary VLAN
- Configuring a VLAN as a Secondary VLAN
- Associating the VLANs in a PVLAN
- Configuring a Private VLAN Host Port
- Associating a Host Port with a Private VLAN
- Configuring a Layer 2 Interface as a Promiscuous Trunk Port
- Configuring a Private VLAN Promiscuous Access Port
- Associating a Promiscuous Access Port with a Private VLAN
- Removing a Private VLAN Configuration
Configuring a Private VLAN
Use this chapter to configure private VLAN (PVLAN) to divide a normal VLAN into isolated Layer 2 partitions.
The chapter contains the following topics:
•![]() Information About Private VLANs
Information About Private VLANs
•![]() Verifying a Private VLAN Configuration
Verifying a Private VLAN Configuration
•![]() Example Configurations for Private VLAN
Example Configurations for Private VLAN
•![]() Feature History for Private VLAN
Feature History for Private VLAN
Information About Private VLANs
PVLANs achieve device isolation through the use of three separate port designations, each having its own unique set of rules regulating each connected endpoint's ability to communicate with other connected endpoints within the same private VLAN domain.
This section includes the following topics:
Private VLAN Domains
A private VLAN domain consists of one or more pairs of VLANs. The primary VLAN makes up the domain; and each VLAN pair makes up a subdomain. The VLANs in a pair are called the primary VLAN and the secondary VLAN. All VLAN pairs within a private VLAN have the same primary VLAN. The secondary VLAN ID is what differentiates one subdomain from another (see Figure 4-1).
Figure 4-1 Private VLAN Domain

Spanning Multiple Switches
Private VLANs can span multiple switches, just like regular VLANs. Inter-switch link ports need not be aware of the special VLAN type and carry frames tagged with these VLANs just like they do any other frames. Private VLANs ensure that traffic from an isolated port in one switch does not reach another isolated or community port in a different switch even after traversing an inter-switch link. By embedding the isolation information at the VLAN level and by transporting it along with the packet, it is possible to maintain consistent behavior throughout the network. Therefore, the mechanism which restricts Layer 2 communication between two isolated ports in the same switch, also restricts Layer 2 communication between two isolated ports in two different switches.
Private VLAN Ports
Within a private VLAN domain, there are three separate port designations. Each port designation has its own unique set of rules which regulate the ability of one endpoint to communicate with other connected endpoints within the same private VLAN domain. The following are the three port designations:
•![]() promiscuous
promiscuous
•![]() isolated
isolated
•![]() community
community
Figure 4-2 shows the private VLAN ports
Figure 4-2 Private VLAN Ports
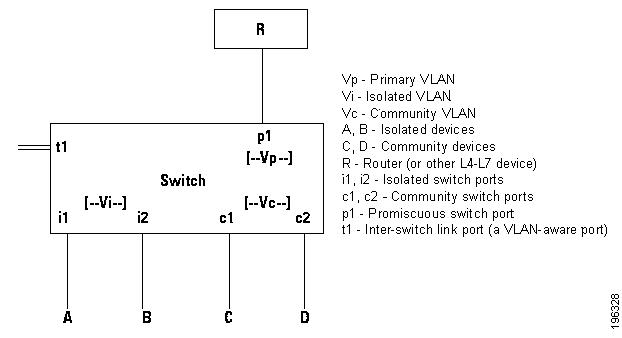
Primary VLANs and Promiscuous Ports
The primary VLAN encompasses the entire private VLAN domain. It is a part of each subdomain and provides the Layer 3 gateway out of the VLAN. A private VLAN domain has only one primary VLAN. Every port in a private VLAN domain is a member of the primary VLAN. In other words, the primary VLAN is the entire private VLAN domain.
As the name suggests, a promiscuous port (p1 in Figure 4-2) can talk to all other types of ports. A promiscuous port can talk to isolated ports as well as community ports and vice versa. Layer 3 gateways, DHCP servers and other trusted devices that need to communicate with the customer endpoints are typically connected with a promiscuous port. A promiscuous port can be either an access port or a hybrid/trunk port according to the terminology presented in Annex D of the IEEE 802.1Q specification.
Secondary VLANs and Host Ports
Secondary VLANs provide Layer 2 isolation between ports in a private VLAN domain. A private VLAN domain can have one or more subdomains. A subdomain is made up of a VLAN pair consisting of the primary VLAN and a secondary VLAN. Since the primary VLAN is a part of every subdomain, secondary VLANs differentiate the VLAN subdomains.
In order to communicate to the Layer 3 interface, a secondary VLAN must be associated with at least one of the promiscuous ports in the primary VLAN. You can associate a secondary VLAN to more than one promiscuous port within the same private VLAN domain, for example, if needed for load-balancing or redundancy. A secondary VLAN that is not associated with any promiscuous port cannot communicate with the Layer 3 interface.
A secondary VLAN can be one of the following types:
•![]() Isolated VLANs— Isolated VLANs use isolated host ports. An isolated port (i1 or i2 in Figure 4-2) cannot talk to any other port in that private VLAN domain except for promiscuous ports. If a device needs to have access only to a gateway router, then it should be attached to an isolated port. An isolated port is typically an access port, but in certain applications it can also be a hybrid or trunk port.
Isolated VLANs— Isolated VLANs use isolated host ports. An isolated port (i1 or i2 in Figure 4-2) cannot talk to any other port in that private VLAN domain except for promiscuous ports. If a device needs to have access only to a gateway router, then it should be attached to an isolated port. An isolated port is typically an access port, but in certain applications it can also be a hybrid or trunk port.
The distinct characteristic of an isolated VLAN is that it allows all its ports to have the same degree of segregation that could be obtained from using one separate dedicated VLAN per port. Only two VLAN identifiers are consumed in providing this port isolation.

Note ![]() While there can be multiple community VLANs in a private VLAN domain, one isolated VLAN is sufficient to serve multiple customers. All endpoints connected to its ports are isolated at Layer 2. Service providers can assign multiple customers to the same isolated VLAN, and be assured that their Layer 2 traffic cannot be sniffed by other customers sharing the same isolated VLAN.
While there can be multiple community VLANs in a private VLAN domain, one isolated VLAN is sufficient to serve multiple customers. All endpoints connected to its ports are isolated at Layer 2. Service providers can assign multiple customers to the same isolated VLAN, and be assured that their Layer 2 traffic cannot be sniffed by other customers sharing the same isolated VLAN.
•![]() Community VLANs—Community VLANs use community host ports. A community port (c1 or c2 in Figure 4-2) is part of a group of ports. The ports within a community can have Layer 2 communications with one another and can also talk to any promiscuous port. If an ISP customer has, for example, 4 devices and wants them isolated from those of other customers but still be able to communicate among themselves, then community ports should be used.
Community VLANs—Community VLANs use community host ports. A community port (c1 or c2 in Figure 4-2) is part of a group of ports. The ports within a community can have Layer 2 communications with one another and can also talk to any promiscuous port. If an ISP customer has, for example, 4 devices and wants them isolated from those of other customers but still be able to communicate among themselves, then community ports should be used.
Note ![]() Because trunks can support a VLAN carrying traffic between its ports, it is possible for VLAN traffic to enter or leave the device through a trunk interface.
Because trunks can support a VLAN carrying traffic between its ports, it is possible for VLAN traffic to enter or leave the device through a trunk interface.
Communication Between Private VLAN Ports
The following table shows how access is permitted or denied between private VLAN port types.
|
|
|
|
|
|
|
|---|---|---|---|---|---|
Isolated |
Deny |
Permit |
Deny |
Deny |
Permit |
Promiscuous |
Permit |
Permit |
Permit |
Permit |
Permit |
Community 1 |
Deny |
Permit |
Permit |
Deny |
Permit |
Community 2 |
Deny |
Permit |
Deny |
Permit |
Permit |
Interswitch Link Port |
Deny 2 |
Permit |
Permit |
Permit |
Permit |
1 An interswitch link port is a regular port that connects two switches and that happens to carry two or more VLANs. 2 This behavior applies to traffic traversing inter-switch link ports over an isolated VLAN only. Traffic from an inter-switch link port to an isolated port will be denied if it is in the isolated VLAN. Traffic from an inter-switch link port to an isolated port will be permitted if it is in the primary VLAN. |
Guidelines and Limitations
Private VLAN has the following configuration guidelines and limitations:
•![]() Control VLANs, packet VLANs, and management VLANs must be configured as regular VLANs and not as private VLANs.
Control VLANs, packet VLANs, and management VLANs must be configured as regular VLANs and not as private VLANs.
Default Settings
Table 4-2 lists the default setting for a private VLAN.
|
|
|
|---|---|
Private VLANs |
Disabled |
Configuring a Private VLAN
Use the following procedures in this section to configure a private VLAN.
•![]() Flow Chart: Configuring a Private VLAN
Flow Chart: Configuring a Private VLAN
•![]() Enabling or Disabling the Private VLAN Feature Globally
Enabling or Disabling the Private VLAN Feature Globally
•![]() Configuring a VLAN as a Primary VLAN
Configuring a VLAN as a Primary VLAN
•![]() Configuring a VLAN as a Secondary VLAN
Configuring a VLAN as a Secondary VLAN
•![]() Associating the VLANs in a PVLAN
Associating the VLANs in a PVLAN
•![]() Configuring a Private VLAN Host Port
Configuring a Private VLAN Host Port
•![]() Associating a Host Port with a Private VLAN
Associating a Host Port with a Private VLAN
•![]() Configuring a Layer 2 Interface as a Promiscuous Trunk Port
Configuring a Layer 2 Interface as a Promiscuous Trunk Port
•![]() Configuring a Private VLAN Promiscuous Access Port
Configuring a Private VLAN Promiscuous Access Port
•![]() Associating a Promiscuous Access Port with a Private VLAN
Associating a Promiscuous Access Port with a Private VLAN
•![]() Removing a Private VLAN Configuration
Removing a Private VLAN Configuration
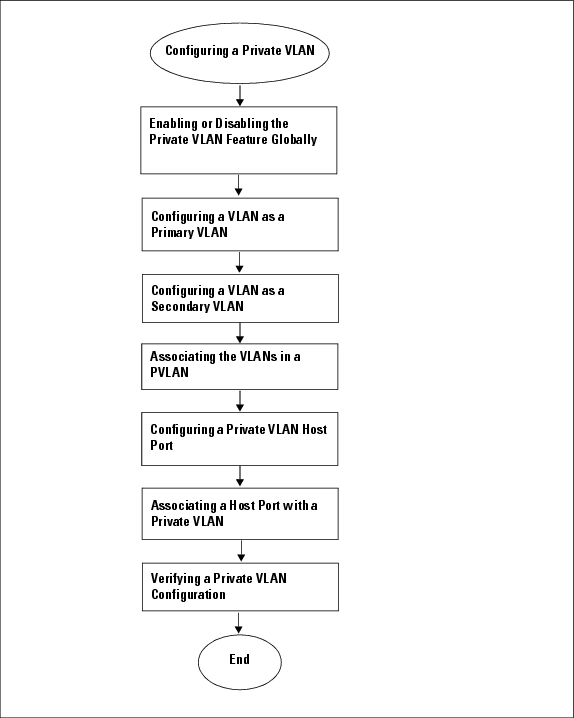
Flow Chart: Configuring a Private VLAN
The following flow chart will guide you through this process. After completing each procedure, return to this section to make sure you complete all required procedures in the correct sequence.
Figure 4-3 Flow Chart: Configuring a Private VLAN
Enabling or Disabling the Private VLAN Feature Globally
You can use this procedure to globally enable or disable the private VLAN feature.
SUMMARY STEPS
1. ![]() config t
config t
2. ![]() [no] feature private-vlan
[no] feature private-vlan
3. ![]() show feature
show feature
4. ![]() copy running-config startup-config
copy running-config startup-config
DETAILED STEPS
|
|
|
|
|---|---|---|
Step 1 |
config t
Example: n1000v# configure t n1000v(config)# |
Enters global configuration mode. |
Step 2 |
[no] feature private-vlan
Example: n1000v(config)# feature private-vlan n1000v(config-vlan)# |
Globally enables or disables the private VLAN feature. |
Step 3 |
show feature
Example: n1000v(config-vlan)# show feature Feature Name Instance State -------------------- -------- -------- dhcp-snooping 1 enabled http-server 1 enabled ippool 1 enabled lacp 1 enabled lisp 1 enabled lisphelper 1 enabled netflow 1 disabled port-profile-roles 1 enabled private-vlan 1 enabled sshServer 1 enabled tacacs 1 enabled telnetServer 1 enabled n1000v(config)# |
(Optional) Displays features available, such as PVLAN, and whether they are enabled globally. |
Step 4 |
copy running-config startup-config
Example: n1000v(config-vlan)# copy running-config startup-config |
(Optional) Saves the running configuration persistently through reboots and restarts by copying it to the startup configuration. |
Step 5 |
You have completed this procedure. If using the flow chart, return to the Figure 4-3, Flow Chart: Configuring a Private VLAN, on page 4-6 |
|
Configuring a VLAN as a Primary VLAN
Use this procedure to configure a VLAN to function as the primary VLAN in a PVLAN.
BEFORE YOU BEGIN
•![]() You are logged in to the CLI in EXEC mode.
You are logged in to the CLI in EXEC mode.
•![]() You have already enabled the private VLAN feature using the "Enabling or Disabling the Private VLAN Feature Globally" procedure.
You have already enabled the private VLAN feature using the "Enabling or Disabling the Private VLAN Feature Globally" procedure.
•![]() The VLAN you are configuring as a primary VLAN already exists in the system as a normal VLAN, and you know the VLAN ID.
The VLAN you are configuring as a primary VLAN already exists in the system as a normal VLAN, and you know the VLAN ID.
Note ![]() If the VLAN does not already exist, you are prompted to create it when you create the primary VLAN. For information about creating a VLAN, see the "Creating a VLAN" procedure.
If the VLAN does not already exist, you are prompted to create it when you create the primary VLAN. For information about creating a VLAN, see the "Creating a VLAN" procedure.
SUMMARY STEPS
1. ![]() config t
config t
2. ![]() vlan primary-vlan-id
vlan primary-vlan-id
3. ![]() private-vlan primary
private-vlan primary
4. ![]() show vlan private-vlan
show vlan private-vlan
5. ![]() copy running-config startup-config
copy running-config startup-config
DETAILED STEPS
|
|
|
|
|---|---|---|
Step 1 |
config t
Example: n1000v# configure t n1000v(config)# |
Enters global configuration mode. |
Step 2 |
vlan primary-vlan-id
Example: n1000v(config)# vlan 202 n1000v(config-vlan)# |
Enters VLAN configuration mode for the specified VLAN and configures the primary |
Step 3 |
private-vlan primary
Example: n1000v(config-vlan)# private-vlan primary |
Designates the primary VLAN as a private VLAN in the running configuration. |
Step 4 |
show vlan private-vlan
Example: n1000v(config-vlan)# show vlan private-vlan |
(Optional) Displays the PVLAN configuration. |
Step 5 |
copy running-config startup-config
Example: n1000v(config-vlan)# copy running-config startup-config |
(Optional) Saves the running configuration persistently through reboots and restarts by copying it to the startup configuration. |
Step 6 |
You have completed this procedure. If using the flow chart, return to the Figure 4-3, Flow Chart: Configuring a Private VLAN, on page 4-6 |
|
Example:
n1000v(config)# vlan 202
n1000v(config-vlan)# private-vlan primary
n1000v(config-vlan)# show vlan private-vlan
Primary Secondary Type Ports
------- --------- --------------- -------------------------------------------
202 primary
n1000v(config-vlan)#
Configuring a VLAN as a Secondary VLAN
Use this procedure to configure VLANs to function as secondary VLANs in a PVLAN.
BEFORE YOU BEGIN
•![]() You are logged in to the CLI in EXEC mode.
You are logged in to the CLI in EXEC mode.
•![]() You have already enabled the private VLAN feature using the "Enabling or Disabling the Private VLAN Feature Globally" procedure.
You have already enabled the private VLAN feature using the "Enabling or Disabling the Private VLAN Feature Globally" procedure.
•![]() The VLANs you are configuring as secondary VLANs already exists in the system as normal VLANs, and you know their VLAN IDs.
The VLANs you are configuring as secondary VLANs already exists in the system as normal VLANs, and you know their VLAN IDs.
Note ![]() If the VLAN does not already exist, you are prompted to create it when you create the secondary VLAN. To create a VLAN, see the section, Creating a VLAN.
If the VLAN does not already exist, you are prompted to create it when you create the secondary VLAN. To create a VLAN, see the section, Creating a VLAN.
•![]() You know whether you want the secondary VLANs to be community VLANs or isolated VLANs, and the VLAN IDs for each.
You know whether you want the secondary VLANs to be community VLANs or isolated VLANs, and the VLAN IDs for each.
•![]() For information about private VLANs, see the section, Private VLANs.
For information about private VLANs, see the section, Private VLANs.
SUMMARY STEPS
1. ![]() config t
config t
2. ![]() vlan secondary-vlan-id
vlan secondary-vlan-id
3. ![]() private-vlan {community | isolated}
private-vlan {community | isolated}
4. ![]() show vlan private-vlan
show vlan private-vlan
5. ![]() copy running-config startup-config
copy running-config startup-config
DETAILED STEPS
|
|
|
|
|---|---|---|
Step 1 |
config t
Example: n1000v# configure t n1000v(config)# |
Enters global configuration mode. |
Step 2 |
vlan secondary-vlan-id
Example: n1000v(config)# vlan 303 n1000v(config-vlan)# |
Enters VLAN configuration mode for the specified VLAN; and configures the secondary |
Step 3 |
private-vlan {community | isolated}
Example: n1000v(config-vlan)# private-vlan community n1000v(config-vlan)#
Example: n1000v(config-vlan)# private-vlan isolated n1000v(config-vlan)# |
Designates the VLAN as either a community or isolated private VLAN in the running configuration. |
Step 4 |
Do one of the following: • • |
|
Step 5 |
show vlan private-vlan
Example: n1000v(config-vlan)# show vlan private-vlan |
(Optional) Displays the PVLAN configuration. |
Step 6 |
copy running-config startup-config
Example: n1000v(config-vlan)# copy running-config startup-config |
(Optional) Saves the running configuration persistently through reboots and restarts by copying it to the startup configuration. |
Step 7 |
You have completed this procedure. If using the flow chart, return to the Figure 4-3, Flow Chart: Configuring a Private VLAN, on page 4-6 |
|
Example:
n1000v(config)# vlan 303
n1000v(config-vlan)# private-vlan community
n1000v(config-vlan)# show vlan private-vlan
Primary Secondary Type Ports
------- --------- --------------- -------------------------------------------
202 primary
303 community
n1000v(config-vlan)#
Associating the VLANs in a PVLAN
Use this procedure to associate the primary VLANs in a PVLAN with the secondary VLANs.
BEFORE YOU BEGIN
•![]() You are logged in to the CLI in EXEC mode.
You are logged in to the CLI in EXEC mode.
•![]() The primary VLAN for this PVLAN is already configured as a PVLAN.
The primary VLAN for this PVLAN is already configured as a PVLAN.
•![]() The secondary VLANs for this PVLAN are already configured as PVLANs.
The secondary VLANs for this PVLAN are already configured as PVLANs.
•![]() You know the VLAN IDs for each VLAN that is a part of the PVLAN.
You know the VLAN IDs for each VLAN that is a part of the PVLAN.
•![]() For information about private VLANs, see the "Private VLANs" section.
For information about private VLANs, see the "Private VLANs" section.
SUMMARY STEPS
1. ![]() config t
config t
2. ![]() vlan primary-vlan-id
vlan primary-vlan-id
3. ![]() private-vlan association {add | remove} secondary vlan-id
private-vlan association {add | remove} secondary vlan-id
4. ![]() show vlan private-vlan
show vlan private-vlan
5. ![]() copy running-config startup-config
copy running-config startup-config
DETAILED STEPS
|
|
|
|
|---|---|---|
Step 1 |
config t
Example: n1000v# configure t n1000v(config)# |
Enters global configuration mode. |
Step 2 |
vlan primary-vlan-id
Example: n1000v(config)# vlan 202 n1000v(config-vlan)# |
Enters VLAN configuration mode and associates the VLANs to function as a PVLAN in the running configuration. |
Step 3 |
private-vlan association {add | remove} secondary vlan-id
Example: n1000v(config-vlan)# private-vlan association add 303 n1000v(config-vlan)# |
Associates a specified secondary VLAN with the primary VLAN to function as a PVLAN in the running configuration. |
Step 4 |
Do one of the following: • • |
|
Step 5 |
show vlan private-vlan
Example: n1000v(config-vlan)# show vlan private-vlan |
(Optional) Displays the PVLAN configuration. |
Step 6 |
copy running-config startup-config
Example: n1000v(config-vlan)# copy running-config startup-config |
(Optional) Saves the running configuration persistently through reboots and restarts by copying it to the startup configuration. |
Step 7 |
You have completed this procedure. If using the flow chart, return to the Figure 4-3, Flow Chart: Configuring a Private VLAN, on page 4-6 |
|
Example:
n1000v(config)# vlan 202
n1000v(config-vlan)# private-vlan association add 303
n1000v(config-vlan)# show vlan private-vlan
Primary Secondary Type Ports
------- --------- --------------- -------------------------------------------
202 303 community Veth1
n1000v(config)#
Configuring a Private VLAN Host Port
Use this procedure to configure an interface as a host port to function with a PVLAN.
BEFORE YOU BEGIN
•![]() You are logged in to the CLI in EXEC mode.
You are logged in to the CLI in EXEC mode.
•![]() The primary VLAN for this PVLAN is already configured as a PVLAN.
The primary VLAN for this PVLAN is already configured as a PVLAN.
•![]() The secondary VLANs for this PVLAN are already configured as PVLANs.
The secondary VLANs for this PVLAN are already configured as PVLANs.
•![]() The secondary VLANs are already associated with the primary VLAN.
The secondary VLANs are already associated with the primary VLAN.
•![]() You know the name of the interface to be used with the PVLAN as a host port.
You know the name of the interface to be used with the PVLAN as a host port.
•![]() For information about private VLANs, see the section, Private VLANs.
For information about private VLANs, see the section, Private VLANs.
SUMMARY STEPS
1. ![]() config t
config t
2. ![]() interface type if_id
interface type if_id
3. ![]() switchport mode private-vlan host
switchport mode private-vlan host
4. ![]() show interface type if_id
show interface type if_id
5. ![]() copy running-config startup-config
copy running-config startup-config
DETAILED STEPS
|
|
|
|
|---|---|---|
Step 1 |
config t
Example: n1000v# configure t n1000v(config)# |
Enters global configuration mode. |
Step 2 |
interface type if_id
Example: n1000v(config)# interface veth1 n1000v(config-if)# |
Enters interface configuration mode and creates a the named interface if it does not exist. |
Step 3 |
switchport mode private-vlan host
Example: n1000v(config-if)# switchport mode private-vlan host n1000v(config-if)# |
Designates that the physical interface is to function as a PVLAN host port in the running configuration. |
Step 4 |
show interface type if_id
Example: n1000v(config-if)# show interface veth1 |
(Optional) Displays the interface configuration. |
Step 5 |
copy running-config startup-config
Example: n1000v(config-if)# copy running-config startup-config |
(Optional) Saves the running configuration persistently through reboots and restarts by copying it to the startup configuration. |
Step 6 |
You have completed this procedure. If using the flow chart, return to the Figure 4-3, Flow Chart: Configuring a Private VLAN, on page 4-6 |
|
Example:
n1000v# config t
n1000v(config)# interface veth1
n1000v(config-if)# switchport mode private-vlan host
n1000v(config-if)# show interface veth1
Vethernet1 is up
Hardware is Virtual, address is 0050.56b0.34c8
Owner is VM "HAM61-RH5-32bit-ENVM-7.60.1.3"
Active on module 2, host VISOR-HAM61.localdomain 0
VMware DVS port 16777215
Port-Profile is vlan631
Port mode is Private-vlan host
Rx
48600 Input Packets 34419 Unicast Packets
0 Multicast Packets 14181 Broadcast Packets
4223732 Bytes
Tx
34381 Output Packets 34359 Unicast Packets
22 Multicast Packets 0 Broadcast Packets 0 Flood Packets
3368196 Bytes
5 Input Packet Drops 11 Output Packet Drops
n1000v(config-if)#
Associating a Host Port with a Private VLAN
Use this procedure to associate the host port with the primary and secondary VLANs in a PVLAN.
BEFORE YOU BEGIN
•![]() You are logged in to the CLI in EXEC mode.
You are logged in to the CLI in EXEC mode.
•![]() You know the VLAN IDs of the primary and secondary VLANs in the PVLAN.
You know the VLAN IDs of the primary and secondary VLANs in the PVLAN.
•![]() The primary and secondary VLANs are already configured as PVLAN.
The primary and secondary VLANs are already configured as PVLAN.
•![]() You know the name of the interface functioning in the PVLAN as a host port.
You know the name of the interface functioning in the PVLAN as a host port.
•![]() For information about private VLANs, see the section, Private VLANs.
For information about private VLANs, see the section, Private VLANs.
SUMMARY STEPS
1. ![]() config t
config t
2. ![]() interface type if_id
interface type if_id
3. ![]() switchport private-vlan host-association primaryvlan-id secondary vlan-id
switchport private-vlan host-association primaryvlan-id secondary vlan-id
4. ![]() show interface type if_id
show interface type if_id
5. ![]() copy running-config startup-config
copy running-config startup-config
DETAILED STEPS
|
|
|
|
|---|---|---|
Step 1 |
config t
Example: n1000v# configure t n1000v(config)# |
Enters global configuration mode. |
Step 2 |
interface type if_id
Example: n1000v(config-if)# interface veth1 n1000v(config-if)# |
Enters interface configuration mode and configures a name for the specified interface in the running configuration. |
Step 3 |
switchport private-vlan host-association primaryvlan-id secondary vlan-id
Example: n1000v(config-if)# switchport private-vlan host-association 202 303 n1000v(config-if)# |
Associates the host port with the primary and secondary VLAN IDs for the PVLAN in the running configuration. The interface is associated with the VLANs in the PVLAN. |
Step 4 |
show interface type if_id
Example: n1000v(config-if)# show interface veth1 |
(Optional) Displays the interface configuration. |
Step 5 |
copy running-config startup-config
Example: n1000v(config-if)# copy running-config startup-config |
(Optional) Saves the running configuration persistently through reboots and restarts by copying it to the startup configuration. |
Step 6 |
You have completed this procedure. If using the flow chart, return to the Figure 4-3, Flow Chart: Configuring a Private VLAN, on page 4-6 |
|
Example:
n1000v# config t
n1000v(config)# interface veth1
n1000v(config-if)# switchport private-vlan host-association 202 303
n1000v(config-if)# switchport mode private-vlan host
n1000v(config-if)# show interface veth1 switchport
Name: Vethernet1
Switchport: Enabled
Switchport Monitor: Not enabled
Operational Mode: access
Access Mode VLAN: 1 (default)
Trunking Native Mode VLAN: 1 (default)
Trunking VLANs Enabled: 1-3967,4048-4093
Administrative private-vlan primary host-association: 202
Administrative private-vlan secondary host-association: 203
Administrative private-vlan primary mapping: none
Administrative private-vlan secondary mapping: none
Administrative private-vlan trunk native VLAN: 1
Administrative private-vlan trunk encapsulation: dot1q
Administrative private-vlan trunk normal VLANs: none
Administrative private-vlan trunk private VLANs:
Operational private-vlan: 202, 203n1000v(config-if)#
Configuring a Layer 2 Interface as a Promiscuous Trunk Port
Use this procedure to configure a Layer 2 interface as a promiscuous trunk port that does the following:
•![]() Combines multiple promiscuous ports into a single trunk port.
Combines multiple promiscuous ports into a single trunk port.
•![]() Carries all normal VLANs.
Carries all normal VLANs.
•![]() Carries multiple PVLAN primary VLANs each with selected secondary VLANs.
Carries multiple PVLAN primary VLANs each with selected secondary VLANs.
Note ![]() A promiscuous port can be either access or trunk. If you have one primary vlan you can use a promiscuous access port. If you have multiple primary vlans you can use a promiscuous trunk port.
A promiscuous port can be either access or trunk. If you have one primary vlan you can use a promiscuous access port. If you have multiple primary vlans you can use a promiscuous trunk port.
BEFORE YOU BEGIN
•![]() You are logged in to the CLI in EXEC mode.
You are logged in to the CLI in EXEC mode.
•![]() The private-vlan mapping trunk command does not decide or override the trunk configuration of a port.
The private-vlan mapping trunk command does not decide or override the trunk configuration of a port.
•![]() The port is already configured in a regular trunk mode before adding the private-vlan trunk configurations.
The port is already configured in a regular trunk mode before adding the private-vlan trunk configurations.
•![]() Primary VLANs must be added to the list of allowed VLAN for the promiscuous trunk port.
Primary VLANs must be added to the list of allowed VLAN for the promiscuous trunk port.
•![]() Secondary VLANs are not configured in the allowed VLAN list.
Secondary VLANs are not configured in the allowed VLAN list.
•![]() The trunk port can carry normal VLANs in addition to primary VLANs.
The trunk port can carry normal VLANs in addition to primary VLANs.
•![]() You can map up to 64 primary VLANs to their secondary VLANs in one promiscuous trunk port.
You can map up to 64 primary VLANs to their secondary VLANs in one promiscuous trunk port.
•![]() On the promiscuous trunk port, the allowed VLAN list includes normal VLANs and primary VLANs for which the mappings are configured in the port profile.The switchport private-vlan trunk allowed vlan none command allows you to remove the normal VLANs from the allowed VLAN list. The command does not remove the primary VLANs with mapings present in the port profile. It removes the primary VLANs with no mappings configured in the port profile.
On the promiscuous trunk port, the allowed VLAN list includes normal VLANs and primary VLANs for which the mappings are configured in the port profile.The switchport private-vlan trunk allowed vlan none command allows you to remove the normal VLANs from the allowed VLAN list. The command does not remove the primary VLANs with mapings present in the port profile. It removes the primary VLANs with no mappings configured in the port profile.
SUMMARY STEPS
1. ![]() config t
config t
2. ![]() interface type slot/port
interface type slot/port
3. ![]() switchport mode private-vlan trunk promiscuous
switchport mode private-vlan trunk promiscuous
4. ![]() switchport private-vlan trunk allowed vlan all
switchport private-vlan trunk allowed vlan all
5. ![]() switchport private-vlan mapping trunk primary_vlan_ID {secondary_vlan_list | add secondary_vlan_list | remove secondary_vlan_list}
switchport private-vlan mapping trunk primary_vlan_ID {secondary_vlan_list | add secondary_vlan_list | remove secondary_vlan_list}
6. ![]() switchport private-vlan trunk native vlan vlan_ID
switchport private-vlan trunk native vlan vlan_ID
7. ![]() show interfaces [type slot/port] switchport
show interfaces [type slot/port] switchport
8. ![]() copy running-config startup-config
copy running-config startup-config
DETAILED STEPS
Example:
n1000v# config t
n1000v(config)# int eth2/6
n1000v(config-if)# switchport mode private-vlan trunk promiscuous
n1000v(config-if)# switchport private-vlan trunk allowed vlan all
n1000v(config-if)# switchport private-vlan mapping trunk 202 303, 440
n1000v(config-if)# switchport private-vlan mapping trunk 210 310, 450
n1000v(config-if)# switchport private-vlan mapping trunk 210 add 451,460
n1000v(config-if)# switchport private-vlan mapping trunk 210 remove 310
n1000v(config-if)# switchport private-vlan trunk native vlan 100
n1000v(config-if)# sh int eth 2/6 switchport
Name: Ethernet2/6
Switchport: Enabled
Switchport Monitor: Not enabled
Operational Mode: Private-vlan trunk promiscuous
Access Mode VLAN: 1 (default)
Trunking Native Mode VLAN: 1 (default)
Trunking VLANs Enabled: 25-27
Administrative private-vlan primary host-association: none
Administrative private-vlan secondary host-association: none
Administrative private-vlan primary mapping: none
Administrative private-vlan secondary mapping: none
Administrative private-vlan trunk native VLAN: 100
Administrative private-vlan trunk encapsulation: dot1q
Administrative private-vlan trunk normal VLANs: 1-3967, 4048-4093
  Administrative private-vlan trunk private VLANs: (202,303) (202,440) (210,450) (210,451)
(210,460)
Operational private-vlan: 202,210,303,440,450-451,460n1000v(config-if)#
Configuring a Private VLAN Promiscuous Access Port
Use this procedure to configure a port to be used as a promiscuous access port in a PVLAN.
BEFORE YOU BEGIN
•![]() You are logged in to the CLI in EXEC mode.
You are logged in to the CLI in EXEC mode.
•![]() You know the name of the interface that will function as a promiscuous access port.
You know the name of the interface that will function as a promiscuous access port.
•![]() For information about private VLANs, see the section, Private VLANs.
For information about private VLANs, see the section, Private VLANs.
SUMMARY STEPS
1. ![]() config t
config t
2. ![]() interface type [slot/port | number]
interface type [slot/port | number]
3. ![]() switchport mode private-vlan promiscuous
switchport mode private-vlan promiscuous
4. ![]() show interface type [slot/port | number]
show interface type [slot/port | number]
5. ![]() copy running-config startup-config
copy running-config startup-config
DETAILED STEPS
|
|
|
|
|---|---|---|
Step 1 |
config t
Example: n1000v# configure t n1000v(config)# |
Enters global configuration mode. |
Step 2 |
interface type [slot/port | number]
Example: n1000v(config-if)# interface veth1 n1000v(config-if)#
Example: n1000v(config-if)# interface eth3/2 n1000v(config-if)# |
Enters interface configuration mode for a specified interface. |
Step 3 |
switchport mode private-vlan promiscuous
Example: n1000v(config-if)# switchport mode private-vlan promiscuous n1000v(config-if)# |
Designates that the interface is to function as a promiscuous access port for a PVLAN in the running configuration. |
Step 4 |
show interface type [slot/port | number]
Example: n1000v(config-if)# show interface eth3/2 |
(Optional) Displays the interface configuration. |
Step 5 |
copy running-config startup-config
Example: n1000v(config-if)# copy running-config startup-config |
(Optional) Saves the running configuration persistently through reboots and restarts by copying it to the startup configuration. |
Step 6 |
You have completed this procedure. If using the flow chart, return to the Figure 4-3, Flow Chart: Configuring a Private VLAN, on page 4-6 |
|
Example:
n1000v# config t
n1000v(config)# interface eth3/2
n1000v(config-if)# switchport mode private-vlan promiscuous
n1000v(config-if)# show int eth3/2
Ethernet3/2 is up
Hardware is Ethernet, address is 0050.5655.2e85 (bia 0050.5655.2e85)
MTU 1500 bytes, BW -1942729464 Kbit, DLY 10 usec,
reliability 255/255, txload 1/255, rxload 1/255
Encapsulation ARPA
Port mode is promiscuous
full-duplex, 1000 Mb/s
Beacon is turned off
Auto-Negotiation is turned on
Input flow-control is off, output flow-control is off
Rx
276842 Input Packets 100419 Unicast Packets
138567 Multicast Packets 37856 Broadcast Packets
25812138 Bytes
Tx
128154 Output Packets 100586 Unicast Packets
1023 Multicast Packets 26545 Broadcast Packets 26582 Flood Packets
11630220 Bytes
173005 Input Packet Drops 37 Output Packet Drops
n1000v(config-if)#
Example:
n1000v# config t
n1000v(config)# interface vethernet1
n1000v(config-if)# switchport mode private-vlan promiscuous
n1000v# show interface vethernet 1
Vethernet1 is up
Port description is VM-1, Network Adapter 7
Hardware: Virtual, address: 0050.569e.009f (bia 0050.569e.009f)
Owner is VM "VM-1", adapter is Network Adapter 7
Active on module 5
VMware DVS port 5404
Port-Profile is pri_25
Port mode is Private-vlan promiscuous
5 minute input rate 0 bits/second, 0 packets/second
5 minute output rate 7048 bits/second, 2 packets/second
Rx
20276 Input Packets 379239 Unicast Packets
24 Multicast Packets 1395 Broadcast Packets
1428168 Bytes
Tx
256229 Output Packets 74946 Unicast Packets
16247 Multicast Packets 2028117 Broadcast Packets 190123 Flood Packets
44432239 Bytes
162 Input Packet Drops 159 Output Packet Drops
Associating a Promiscuous Access Port with a Private VLAN
Use this procedure to associate the promiscuous access port with the primary and secondary VLANs in a PVLAN.
BEFORE YOU BEGIN
•![]() You are logged in to the CLI in EXEC mode.
You are logged in to the CLI in EXEC mode.
•![]() You know the VLAN IDs of the primary and secondary VLANs in the PVLAN.
You know the VLAN IDs of the primary and secondary VLANs in the PVLAN.
•![]() The primary and secondary VLANs are already configured as PVLAN.
The primary and secondary VLANs are already configured as PVLAN.
•![]() You know the name of the interface functioning in the PVLAN as a promiscuous access port.
You know the name of the interface functioning in the PVLAN as a promiscuous access port.
•![]() For information about private VLANs, see the section, Private VLANs.
For information about private VLANs, see the section, Private VLANs.
SUMMARY STEPS
1. ![]() config t
config t
2. ![]() interface type [slot/port | number]
interface type [slot/port | number]
3. ![]() switchport private-vlan mapping primary_vlan_ID {secondary_vlan_list | add secondary_vlan_list | remove secondary_vlan_list}
switchport private-vlan mapping primary_vlan_ID {secondary_vlan_list | add secondary_vlan_list | remove secondary_vlan_list}
4. ![]() show interface type [slot/port | number]
show interface type [slot/port | number]
5. ![]() copy running-config startup-config
copy running-config startup-config
DETAILED STEPS
|
|
|
|
|---|---|---|
Step 1 |
config t
Example: n1000v# configure t n1000v(config)# |
Enters global configuration mode. |
Step 2 |
interface type [slot/port | number]
Example: n1000v(config)# interface eth3/2 n1000v(config-if)# |
Enters interface configuration mode for the specified interface in the running configuration. |
Step 3 |
switchport private-vlan mapping primary_vlan_ID {secondary_vlan_list | add secondary_vlan_list | remove secondary_vlan_list}
Example: n1000v(config-if)# switchport private-vlan mapping 202 303 Example: n1000v(config-if)# switchport private-vlan mapping trunk 202 add 451,460 n1000v(config-if)# switchport private-vlan mapping trunk 202 remove 303 n1000v(config-if)# |
Associates the promiscuous access port with the VLAN IDs in the PVLAN in the running configuration. |
Step 4 |
show interface type [slot/port | number]
Example: n1000v(config-if)# show vlan private-vlan |
(Optional) Displays the interface configuration. |
Step 5 |
copy running-config startup-config
Example: n1000v(config-if)# copy running-config startup-config |
(Optional) Saves the running configuration persistently through reboots and restarts by copying it to the startup configuration. |
Step 6 |
You have completed this procedure. If using the flow chart, return to the Figure 4-3, Flow Chart: Configuring a Private VLAN, on page 4-6 |
|
Example:
n1000v(config)# int eth3/2
n1000v(config-if)# switchport private-vlan mapping 202 303
n1000v(config-if)# show vlan private-vlan
Primary Secondary Type Ports
------- --------- --------------- -------------------------------------------
202 303 community Eth3/2, Veth1
n1000v(config-if)#
Removing a Private VLAN Configuration
Use this procedure to remove a private VLAN configuration and return the VLAN to normal VLAN mode.
BEFORE YOU BEGIN
•![]() You are logged in to the CLI in EXEC mode.
You are logged in to the CLI in EXEC mode.
•![]() The VLAN is configured as a private VLAN, and you know the VLAN ID.
The VLAN is configured as a private VLAN, and you know the VLAN ID.
•![]() When you remove a PVLAN configuration, the ports associated with it become inactive.
When you remove a PVLAN configuration, the ports associated with it become inactive.
•![]() For information about private VLANs, see the section, Private VLANs.
For information about private VLANs, see the section, Private VLANs.
SUMMARY STEPS
1. ![]() config t
config t
2. ![]() vlan private vlan-id
vlan private vlan-id
3. ![]() no private-vlan {community | isolated | primary}
no private-vlan {community | isolated | primary}
4. ![]() show vlan private-vlan
show vlan private-vlan
5. ![]() copy running-config startup-config
copy running-config startup-config
DETAILED STEPS
Example:
n1000v# configure t
n1000v(config)# vlan 5
n1000v(config-vlan)# no private-vlan primary
n1000v(config-vlan)# show vlan private-vlan
Primary Secondary Type Ports
------- --------- --------------- -------------------------------------------
n1000v(config-vlan)#
Verifying a Private VLAN Configuration
Use the following commands to display and verify a private VLAN configuration.
Example Configurations for Private VLAN
This section includes the following example configurations:
•![]() Example: PVLAN Using Port Profiles
Example: PVLAN Using Port Profiles
Example: PVLAN Trunk Port
The following example shows how to configure interface Ethernet 2/6 as the following:
•![]() private VLAN trunk port
private VLAN trunk port
•![]() mapped to primary private VLAN 202 which is associated with secondary VLANs 303 and 440
mapped to primary private VLAN 202 which is associated with secondary VLANs 303 and 440
•![]() mapped to primary private VLAN 210 which is associated with secondary VLANs 310 and 450
mapped to primary private VLAN 210 which is associated with secondary VLANs 310 and 450
Example:
n1000v# config t
n1000v(config)# vlan 303,310
n1000v(config-vlan)# private-vlan community
n1000v(config)# vlan 440,450
n1000v(config-vlan)# private-vlan isolated
n1000v(config)# vlan 202
n1000v(config-vlan)# private-vlan primary
n1000v(config-vlan)# private-vlan association 303,440
n1000v(config)# vlan 210
n1000v(config-vlan)# private-vlan primary
n1000v(config-vlan)# private-vlan association 310,450
n1000v# config t
n1000v(config)# int eth2/6
n1000v(config-if)# switchport mode private-vlan trunk promiscuous
n1000v(config-if)# switchport private-vlan trunk allowed vlan all
n1000v(config-if)# switchport private-vlan mapping trunk 202 303, 440
n1000v(config-if)# switchport private-vlan mapping trunk 210 310, 450
n1000v(config-if)# show int switchport
Name: Ethernet2/6
Switchport: Enabled
Operational Mode: Private-vlan trunk promiscuous
Access Mode VLAN: 1 (default)
Trunking Native Mode VLAN: 1 (default)
Trunking VLANs Enabled: 1-3967,4048-4093
Administrative private-vlan primary host-association: none
Administrative private-vlan secondary host-association: none
Administrative private-vlan primary mapping: none
Administrative private-vlan secondary mapping: none
Administrative private-vlan trunk native VLAN: 1
Administrative private-vlan trunk encapsulation: dot1q
Administrative private-vlan trunk normal VLANs: 1-3967, 4048-4093
  Administrative private-vlan trunk private VLANs: (202,303) (202,440) (210,310) (210,450)
Operational private-vlan: 202,210,303,310,440,450
n1000v(config-if)#
Example: PVLAN Using Port Profiles
The following example configuration shows how to configure interface eth2/6 using port-profile, uppvlanpromtrunk156.
In this configuration, packets from secondary interfaces 153, 154, and 155 are translated into the primary VLAN 156 as a result of the command, switchport private-vlan mapping trunk 156 153-155.
Example:
vlan 153-154
private-vlan community
vlan 155
private-vlan isolated
vlan 156
private-vlan association 153-155
private-vlan primary
n1000v# show run int eth2/6
n1000v# show run int eth2/6
version 4.0(1)
interface Ethernet2/6
switchport
inherit port-profile uppvlanpromtrunk156
n1000v# show port-profile name uppvlanpromtrunk156
port-profile uppvlanpromtrunk156
description:
status: enabled
capability privileged: no
capability uplink: yes
port-group: uppvlanpromtrunk156
config attributes:
switchport mode private-vlan trunk promiscuous
switchport private-vlan trunk allowed vlan all
switchport private-vlan mapping trunk 156 153-155
no shutdown
evaluated config attributes:
switchport mode trunk
switchport trunk allowed vlan all
switchport private-vlan mapping trunk 156 153-155
no shutdown
assigned interfaces:
Ethernet2/6
n1000v# sh int eth 2/6 switchport
Name: Ethernet2/6
Switchport: Enabled
Switchport Monitor: Not enabled
Operational Mode: Private-vlan trunk promiscuous
Access Mode VLAN: 1 (default)
Trunking Native Mode VLAN: 1 (default)
Trunking VLANs Enabled: 1-3967,4048-4093
Administrative private-vlan primary host-association: none
Administrative private-vlan secondary host-association: none
Administrative private-vlan primary mapping: none
Administrative private-vlan secondary mapping: none
Administrative private-vlan trunk native VLAN: 1
Administrative private-vlan trunk encapsulation: dot1q
Administrative private-vlan trunk normal VLANs: 1-155,157-3967,4048-4093
Administrative private-vlan trunk private VLANs: (156,153) (156,155)
Operational private-vlan: 156,153,155 inherit port-profile uppvlanpromtrunk156
Additional References
For additional information related to implementing private VLANs, see the following sections:
Related Documents
Standards
|
|
|
|---|---|
No new or modified standards are supported by this feature, and support for existing standards has not been modified by this feature. |
— |
Feature History for Private VLAN
This section provides the private VLAN release history.
|
|
|
|
|---|---|---|
feature private-vlan command |
4.2(1)SV1(4) |
The ability to globally enable the private VLAN feature. |
Private VLAN |
4.0(4)SV1(1) |
This feature was introduced. |
 Feedback