Cisco Fabric Manager Server Federation Deployment Guide
Bias-Free Language
The documentation set for this product strives to use bias-free language. For the purposes of this documentation set, bias-free is defined as language that does not imply discrimination based on age, disability, gender, racial identity, ethnic identity, sexual orientation, socioeconomic status, and intersectionality. Exceptions may be present in the documentation due to language that is hardcoded in the user interfaces of the product software, language used based on RFP documentation, or language that is used by a referenced third-party product. Learn more about how Cisco is using Inclusive Language.
- Updated:
- March 14, 2010
Chapter: Deploying Cisco Fabric Manager Server Federation
Deploying Cisco Fabric Manager Server Federation
Fabric Manager Server federation provides scalability and easy manageability of data and programs running within the federation. A federation of Fabric Manager Servers include several functional units such as Fabric Manager Server, embedded web servers, database, and Fabric Manager Client accesses the servers. Three stages in the deployment cycle include planning for deployment, installing the federated servers and managing the federated servers.
This chapter contains the following sections:
•![]() Installing the Federated Servers
Installing the Federated Servers
•![]() Managing Federated Servers with Fabric Manager Client
Managing Federated Servers with Fabric Manager Client
•![]() Managing Federated Servers with Fabric Manager Web Client
Managing Federated Servers with Fabric Manager Web Client
Planning for Deployment
To design a solution, including determining the structure, capabilities, and architecture for a site, you might want information that helps you to structure the server topology, plan authentication methods, determine which capabilities of Server Federation you want to take advantage of, and that helps you to plan for those capabilities and to tailor the solution to your organization's requirements.
When planning for a federated environment, consider the following factors:
•![]() Geographic locations of the data centers that are participating in the federation.
Geographic locations of the data centers that are participating in the federation.
•![]() Total number of ports or end devices for all the existing and potential fabrics in each data center (to determine the workload).
Total number of ports or end devices for all the existing and potential fabrics in each data center (to determine the workload).
•![]() The Fabric Manager should be placed close to the fabrics it manages in order to reduce the latency in SNMP request and response.
The Fabric Manager should be placed close to the fabrics it manages in order to reduce the latency in SNMP request and response.
•![]() One Fabric Manager will be able to manage 150,000 ports.
One Fabric Manager will be able to manage 150,000 ports.
•![]() Dedicate one separate physical server for the database.
Dedicate one separate physical server for the database.
•![]() Dedicate one separate physical server for each Fabric Manager Server in the federation.
Dedicate one separate physical server for each Fabric Manager Server in the federation.
Installing the Federated Servers
During this stage, you configure your environment, install Federated Servers, and then start operating and managing sites. Depending on your environment and your solution, you may have several configuration steps to perform for your servers.
If you choose PostgreSQL as your database, you can set up the database using the install wizard when installing the first server in the federation. You should use the database URL and DBA user and password that was created when you installed the first server when adding new servers to the federation.
Installing the Database
You need to install the database first. Although it supports both PostgreSQL and Oracle XE, you should install and use Oracle Enterprise version.

Note ![]() All the servers in the federation must be using the database installed by the first server in the federation. The database information is available in the server properties file.
All the servers in the federation must be using the database installed by the first server in the federation. The database information is available in the server properties file.
Note ![]() For more information on configuring Oracle database for Fabric Manager Server in a federation, see Installing Fabric Manager Server section in Cisco Fabric Manager Fundamentals Guide.
For more information on configuring Oracle database for Fabric Manager Server in a federation, see Installing Fabric Manager Server section in Cisco Fabric Manager Fundamentals Guide.
Installing the Fabric Manager Server
After you install the first Fabric Manager Server, you can configure all the subsequent installations to join the existing server federation. You can install only ten servers in a federation.
To install Fabric Manager Server on Windows, follow these steps:
Step 1 ![]() Click the Install Management Software link on your desktop.
Click the Install Management Software link on your desktop.
Step 2 ![]() Choose Management Software > Cisco Fabric Manager.
Choose Management Software > Cisco Fabric Manager.
Step 3 ![]() Click the Installing Fabric Manager link.
Click the Installing Fabric Manager link.
Step 4 ![]() Click the FM Installer link.
Click the FM Installer link.
You see the welcome message in the Cisco Fabric Manager Installer window shown in Figure 2-1.
Figure 2-1 Welcome to the Management Software Setup Wizard
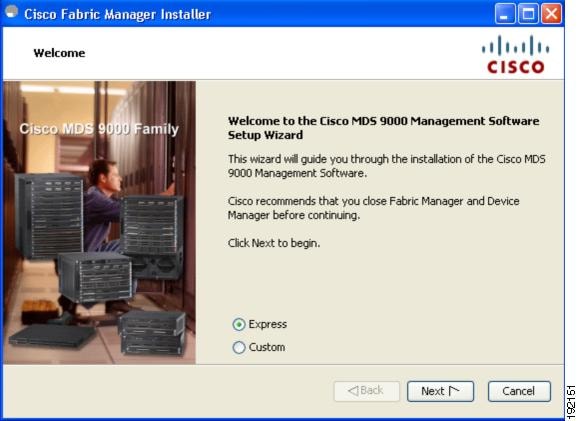
Step 5 ![]() Click the Custom radio button, and then click Next to begin the installation.
Click the Custom radio button, and then click Next to begin the installation.
Step 6 ![]() Check the I accept the terms of the License Agreement check box, and then click Next.
Check the I accept the terms of the License Agreement check box, and then click Next.
You see the Install Options dialog box shown in Figure 2-2.
Figure 2-2 Install Options Dialog Box
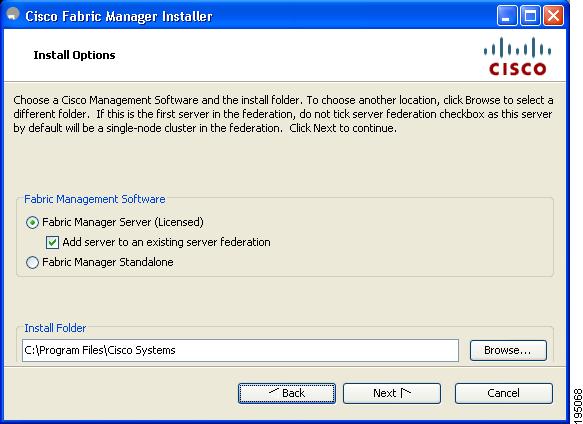
Step 7 ![]() Click Fabric Manager Server (Licensed) to install the server components for Fabric Manager Server.
Click Fabric Manager Server (Licensed) to install the server components for Fabric Manager Server.
•![]() Check the Add server to an existing federation check box to add the server into an existing federation.
Check the Add server to an existing federation check box to add the server into an existing federation.
Note ![]() Verify that the Fabric Manager Server hostname entry exists on the DNS server, unless the Fabric Manager Server is configured to bind to a specific interface during installation.
Verify that the Fabric Manager Server hostname entry exists on the DNS server, unless the Fabric Manager Server is configured to bind to a specific interface during installation.
Note ![]() You may need to add the following line in the pg-hba.conf file under # IPv4 local connections in order to allow remote hosts to connect to PostgreSQL database:
You may need to add the following line in the pg-hba.conf file under # IPv4 local connections in order to allow remote hosts to connect to PostgreSQL database:
host all all 0.0.0.0/0 md5
After adding, save the configuration file, restart the PostgreSQL database before you install the second server node.
Note ![]() If you are joining more then three Fabric Manager Servers in a federation, you need to use an Oracle database with the following settings.
If you are joining more then three Fabric Manager Servers in a federation, you need to use an Oracle database with the following settings.
C:\Documents and Settings\Administrator>sqlplus /nolog
SQL*Plus: Release 10.2.0.1.0 - Production on Wed Jan 6 17:19:32 2010
Copyright (c) 1982, 2005, Oracle. All rights reserved.
SQL> connect / as sysdba;
Connected.
SQL> alter system set processes=100 scope=spfile;
System altered.
SQL> alter system set open_cursors=500 scope=spfile;
System altered.
SQL> shutdown immediately;
SP2-0717: illegal SHUTDOWN option
SQL> shutdown immediate;
Database closed.
Database dismounted.
ORACLE instance shut down.
SQL> startup;
ORACLE instance started.
Total System Global Area 805306368 bytes
Fixed Size 1453836 bytes
Variable Size 218714356 bytes
Database Buffers 583008256 bytes
Redo Buffers 2129920 bytes
Database mounted.
Database opened.
SQL> show parameter processes;
Total System Global Area 805306368 bytes
Fixed Size 1453836 bytes
Variable Size 218714356 bytes
Database Buffers 583008256 bytes
Redo Buffers 2129920 bytes
Database mounted.
Database opened.
SQL> show parameter processes;
NAME TYPE VALUE
------------------------------------ ----------- ------------------------------
aq_tm_processes integer 0
db_writer_processes integer 4
gcs_server_processes integer 0
job_queue_processes integer 4
log_archive_max_processes integer 2
processes integer 100
Step 8 ![]() Select an installation folder on your workstation for Fabric Manager.
Select an installation folder on your workstation for Fabric Manager.
On Windows, the default location is C:\Program Files\Cisco Systems\MDS 9000. On a UNIX (Solaris or Linux) machine, the installation path name is /usr/local/cisco_mds9000 or $HOME/cisco_mds9000, depending on the permissions of the user doing the installation.
Step 9 ![]() Click Next.
Click Next.
You see the Database Options dialog box shown in Figure 2-3.
Figure 2-3 Database Options Dialog Box
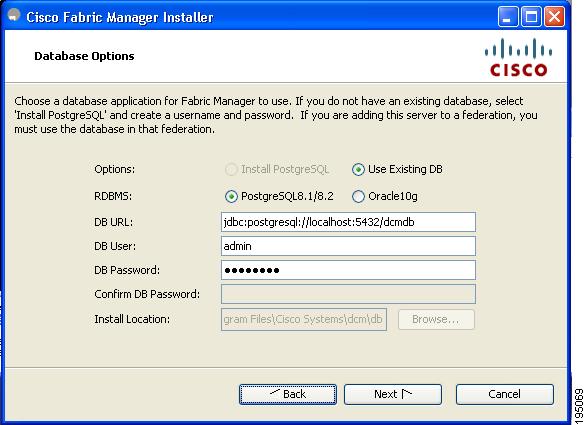
Step 10 ![]() Click either the Install PostgreSQL radio button or the Use existing DB radio button to specify which database you want to use.
Click either the Install PostgreSQL radio button or the Use existing DB radio button to specify which database you want to use.
Note ![]() If you choose to install PostgreSQL, you must disable any security software you are running because PostgreSQL may not install certain folders or users.
If you choose to install PostgreSQL, you must disable any security software you are running because PostgreSQL may not install certain folders or users.
Note ![]() If you had installed the database separately, click the Use existing database radio button and enter the credentials of the database that you installed in the previous step.
If you had installed the database separately, click the Use existing database radio button and enter the credentials of the database that you installed in the previous step.
Note ![]() Before you install PostgreSQL, remove the cygwin/bin from your environment variable path if Cygwin is running on your system.
Before you install PostgreSQL, remove the cygwin/bin from your environment variable path if Cygwin is running on your system.
Step 11 ![]() If you select Use existing DB, click either the either Install PostgreSQL radio button or the Use existing DB radio button.
If you select Use existing DB, click either the either Install PostgreSQL radio button or the Use existing DB radio button.
Step 12 ![]() Click Next in the Database Options dialog box.
Click Next in the Database Options dialog box.
You see the User Options dialog box shown in Figure 2-4.
Figure 2-4 User Options Dialog Box
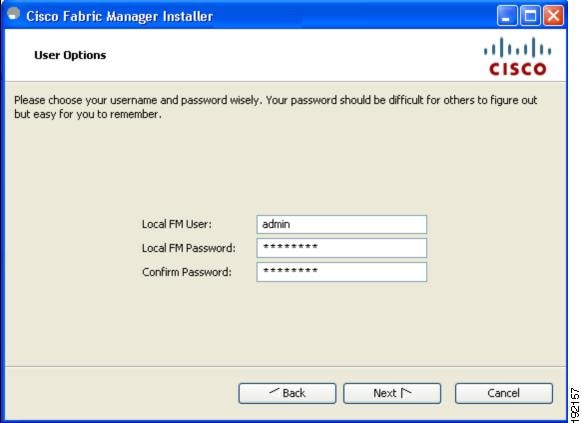
Step 13 ![]() Enter a user name and password and click Next.
Enter a user name and password and click Next.
You see the Authentication Options dialog box shown in Figure 2-5.
Figure 2-5 Authentication Options Dialog Box
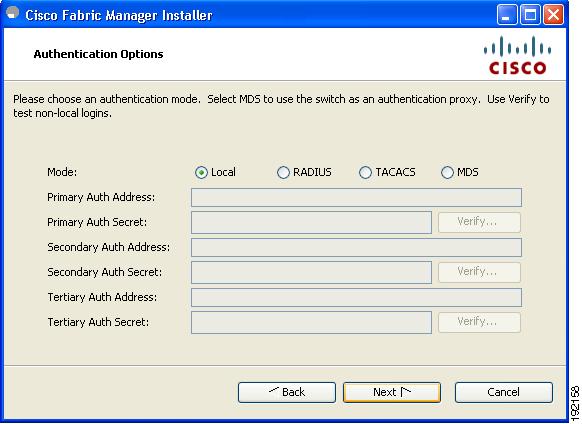
Step 14 ![]() Choose an authentication mode (Local, RADIUS, TACACS or MDS) and click Next.
Choose an authentication mode (Local, RADIUS, TACACS or MDS) and click Next.
Note ![]() When the MDS radio button is selected, the FM authentication uses the user database in the switch for authentication.
When the MDS radio button is selected, the FM authentication uses the user database in the switch for authentication.
Step 15 ![]() Click Verify to test your login.
Click Verify to test your login.
You see the Configuration Options dialog box for Fabric Manager as shown in Figure 2-6.
Figure 2-6 Configuration Options Dialog Box for Fabric Manager
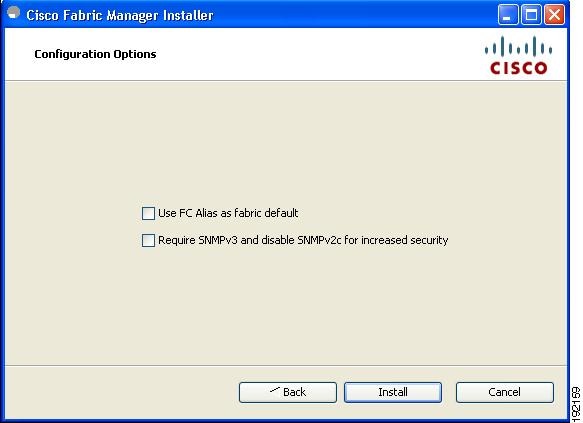
Step 16 ![]() Check the FC Alias and SNMPv3 check boxes as desired and click Install if you are installing Fabric Manager.
Check the FC Alias and SNMPv3 check boxes as desired and click Install if you are installing Fabric Manager.
You see the Configuration Options dialog box for Fabric Manager Server shown in Figure 2-7.
Figure 2-7 Configuration Options Dialog Box for Fabric Manager Server
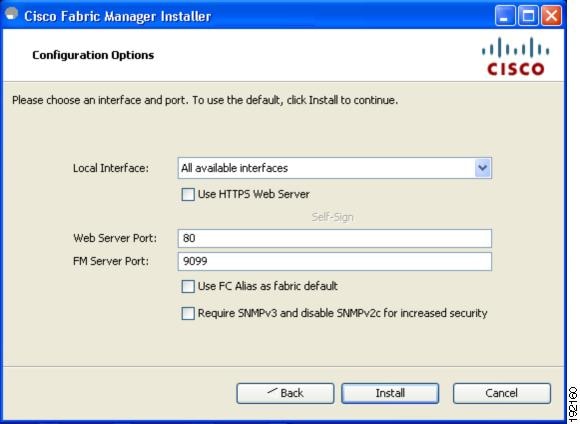
Step 17 ![]() Select the local interface and web server port or Fabric Manager server port. You can change the Fabric Manager Server port number to a port that is not used by any other application. If you check the Use HTTPS Web Server check box, the Web Server Port field is grayed out and the default port is 443.
Select the local interface and web server port or Fabric Manager server port. You can change the Fabric Manager Server port number to a port that is not used by any other application. If you check the Use HTTPS Web Server check box, the Web Server Port field is grayed out and the default port is 443.
Step 18 ![]() Check the FC Alias and SNMPv3 check boxes as desired.
Check the FC Alias and SNMPv3 check boxes as desired.
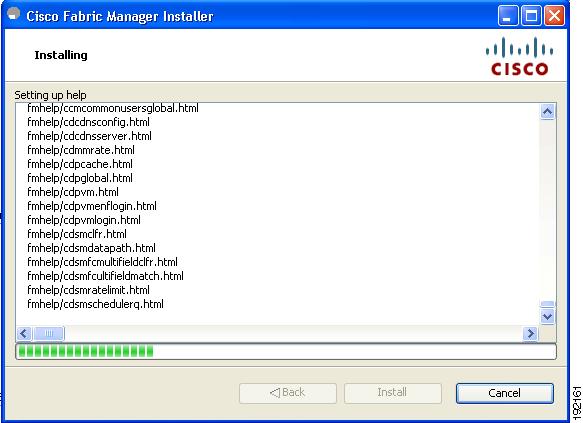
Step 19 ![]() Click Install if you are installing Fabric Manager Server. You see the installation progress in the Cisco Fabric Manager Installer window as shown in Figure 2-8.
Click Install if you are installing Fabric Manager Server. You see the installation progress in the Cisco Fabric Manager Installer window as shown in Figure 2-8.
Note ![]() You should verify that the Fabric Manager Server hostname entry exists on the DNS server, unless the Fabric Manager Server is configured to bind to a specific interface during installation.
You should verify that the Fabric Manager Server hostname entry exists on the DNS server, unless the Fabric Manager Server is configured to bind to a specific interface during installation.
Note ![]() If you select a specific IP address during installation and change the server host IP address, you must modify the following two files that are all located in the $INSTALL/conf directory. Change server.bindaddrs to the new IP address in the server.properties file and change wrapper.app.parameter.4 to the new IP address in the FMServer.conf file.
If you select a specific IP address during installation and change the server host IP address, you must modify the following two files that are all located in the $INSTALL/conf directory. Change server.bindaddrs to the new IP address in the server.properties file and change wrapper.app.parameter.4 to the new IP address in the FMServer.conf file.
Figure 2-8 Progress of Installation
Once the installation is finished, you see an installation completed message in the Cisco Fabric Manager Installer window shown in Figure 2-9.
Figure 2-9 Install Complete
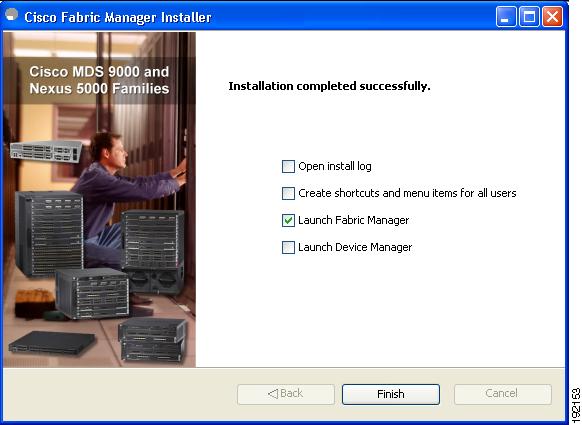
Note ![]() You can choose to launch Fabric Manager or Device Manager by checking the Launch Fabric Manager or Launch Device Manager check boxes. Icons for Fabric Manager and Device Manager are automatically created on the desktop.
You can choose to launch Fabric Manager or Device Manager by checking the Launch Fabric Manager or Launch Device Manager check boxes. Icons for Fabric Manager and Device Manager are automatically created on the desktop.
Step 20 ![]() Click Finish to close the Cisco Fabric Manager Installer window.
Click Finish to close the Cisco Fabric Manager Installer window.
Managing Federated Servers with Fabric Manager Client
Discovering a Fabric
Step 1 ![]() Double-click the Fabric Manager icon to launch Fabric Manager.
Double-click the Fabric Manager icon to launch Fabric Manager.
You see the Fabric Manager Login dialog box shown inFigure 2-10.
Figure 2-10 Fabric Manager Server Login Dialog Box
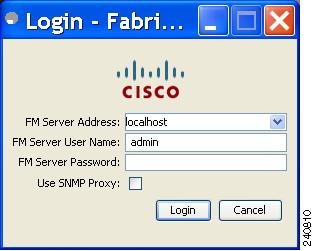
Step 2 ![]() Enter the Fabric Manager Server user name and password.
Enter the Fabric Manager Server user name and password.
Step 3 ![]() Check the Use SNMP Proxy check box if you want Fabric Manager Client to communicate with Fabric Manager Server through a TCP-based proxy server.
Check the Use SNMP Proxy check box if you want Fabric Manager Client to communicate with Fabric Manager Server through a TCP-based proxy server.
Step 4 ![]() Click Login. Once you successfully log in to Fabric Manager Server, you can set the seed switch and open the fabrics that you are entitled to access.
Click Login. Once you successfully log in to Fabric Manager Server, you can set the seed switch and open the fabrics that you are entitled to access.
You see the control panel as shown in Figure 2-11.
Figure 2-11 Control Panel - Open Tab
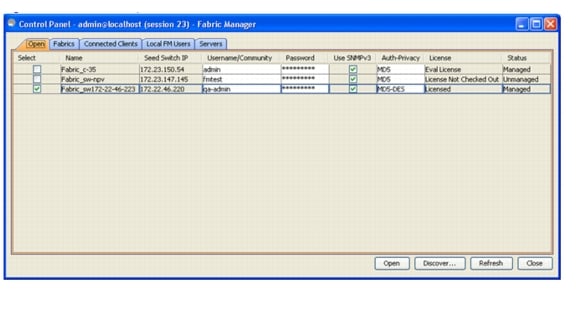
Step 5 ![]() Click Open to open a selected fabric.
Click Open to open a selected fabric.
Opening the Fabric on a Different Server
To open the fabric on a different server follow these steps:
Step 1 ![]() Choose Server > Admin.
Choose Server > Admin.
You see the Control Panel as shown in Figure 2-12.
Figure 2-12 Control Panel
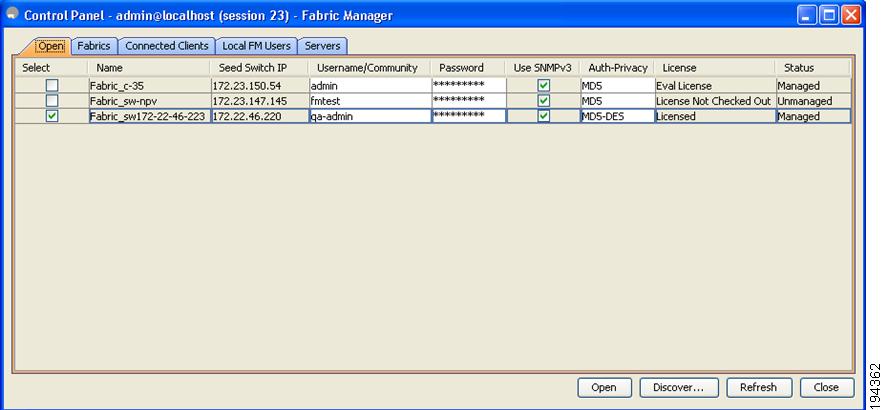
Step 2 ![]() Click Discover.
Click Discover.
You see the Discover New Fabric dialog box as shown in Figure 2-13.
Figure 2-13 Discover new Fabric
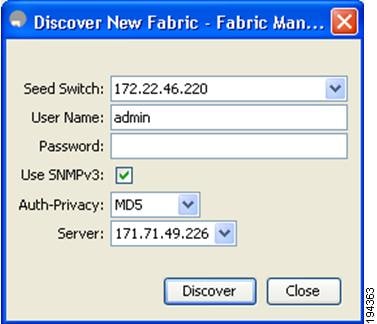
Step 3 ![]() In the Seed Switch list box, enter the IP Address of the seed switch.
In the Seed Switch list box, enter the IP Address of the seed switch.
Step 4 ![]() In the User Name field, enter the user name.
In the User Name field, enter the user name.
Step 5 ![]() In the password field, enter the password.
In the password field, enter the password.
Step 6 ![]() From the Auth-Privacy drop-down list, choose the privacy protocol you want to apply.
From the Auth-Privacy drop-down list, choose the privacy protocol you want to apply.
Step 7 ![]() To open the selected fabric in a different server, select the server ID from the Server drop-down list.
To open the selected fabric in a different server, select the server ID from the Server drop-down list.
Step 8 ![]() Click Discover.
Click Discover.
Note ![]() You may receive an error message when you discover a fabric in a federation while another Fabric Manager Server is joining the federation. You can discover the fabric on after the installation or upgradation is complete.
You may receive an error message when you discover a fabric in a federation while another Fabric Manager Server is joining the federation. You can discover the fabric on after the installation or upgradation is complete.
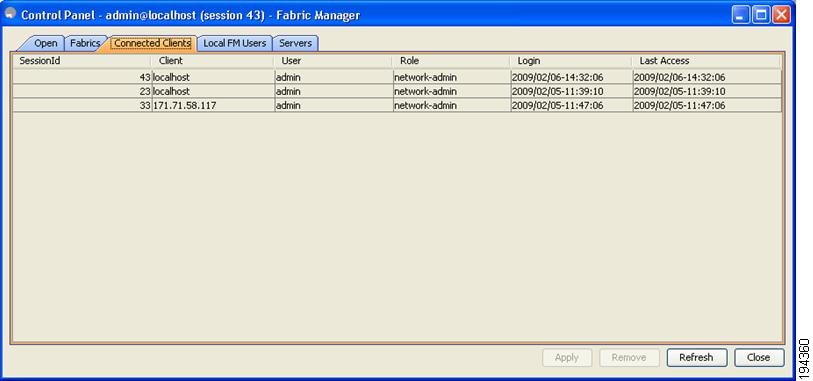
Viewing the Sessions in a Federation
To view all the sessions in a federation, follow these steps:
Step 1 ![]() Choose Server > Admin.
Choose Server > Admin.
Step 2 ![]() Click the Connected Clients tab.
Click the Connected Clients tab.
You see the Control Panel as shown inFigure 2-14.
Figure 2-14 Connected Clients
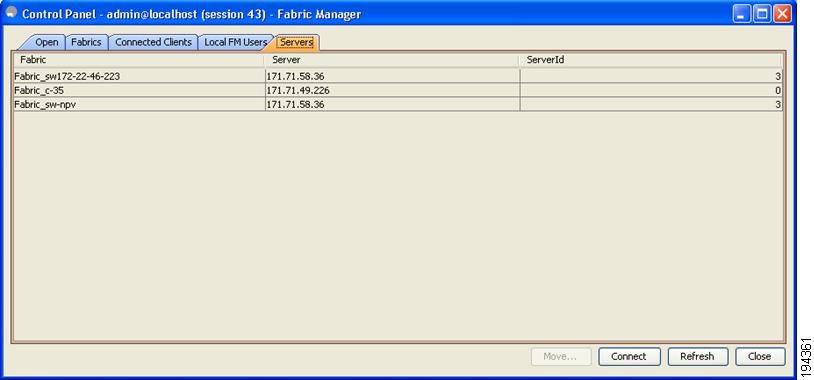
Viewing the Servers in a Federation
To view all the servers in a federation follow these steps:
Step 1 ![]() Choose Server > Admin.
Choose Server > Admin.
Step 2 ![]() Click Servers tab.
Click Servers tab.
You see the Control Panel as shown in Figure 2-15
Figure 2-15 Servers
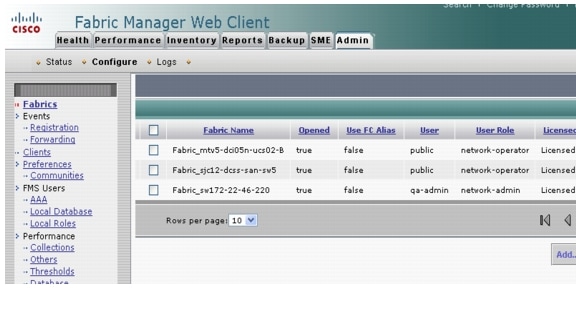
Managing Federated Servers with Fabric Manager Web Client
To start managing fabrics using Fabric Manager Web Client, follow these steps:
Step 1 ![]() Click the Admin tab, and then click Configure.
Click the Admin tab, and then click Configure.
Step 2 ![]() Click Fabrics in the left navigation pane.
Click Fabrics in the left navigation pane.
You see the list of fabrics (if any) managed by Fabric Manager Server in the Opened column as shown in Figure 2-16.
Figure 2-16 List of Fabrics
Step 3 ![]() Click Add.
Click Add.
You see the Add Fabric dialog box as shown in Figure 2-17.
Figure 2-17 Add Fabric
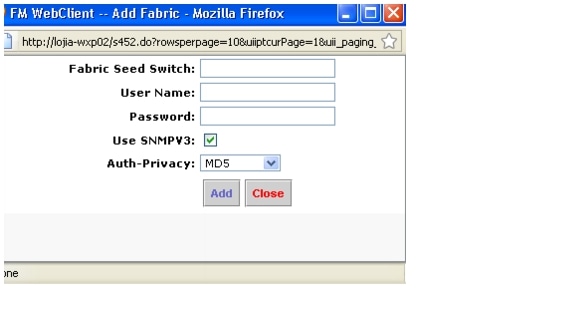
Step 4 ![]() Enter the fabric seed switch IP address for this fabric.
Enter the fabric seed switch IP address for this fabric.
Step 5 ![]() Enter the user name and password for this fabric.
Enter the user name and password for this fabric.
Step 6 ![]() (Optional) Check the SNMPV3 check box.
(Optional) Check the SNMPV3 check box.
Step 7 ![]() Select the privacy settings from the Auth-Privacy listbox.
Select the privacy settings from the Auth-Privacy listbox.
Step 8 ![]() Click Add to begin managing this fabric.
Click Add to begin managing this fabric.
 Feedback