Cisco MDS 9000 Family Secure Erase Configuration Guide
Configuring Secure Erase

Table Of Contents

Configuring Secure Erase

Configuration Overview

Configuartion Process

Obtaining Information

Setting up Cisco Secure Erase

Job Configuration

Recovering Secure Erase Configuration


Configuring Secure Erase


This chapter describes how to configure Cisco MDS Secure Erase, and has the following sections:

Configuration Overview

Configuartion Process

Secure Erase is included in the SSI image. For more information on how to install SSM, refer to the Cisco MDS 9000 Family Storage Services Module Software Installation and Upgrade Guide.

Configuration Overview

Cisco Secure Erase runs on the SSM installed in an MDS 9500 or 9200 series switch.

The Secure Erase software package is included in the SSI image, which is delivered as part of SAN-OS.

For information on how to install the SSM image, refer to the Cisco MDS 9000 Family Storage Services Module Software Installation and Upgrade Guide.

The Secure Erase feature must be provisioned on the SSM.

Configuartion Process

The following sections provide an overview of a typical Secure Erase process:

Obtaining Information

Setting up Cisco Secure Erase

Job Configuration

Recovering Secure Erase Configuration

Figure 2-1 Secure Erase Workflow Diagram

Obtaining Information

You need to collect the following information about the target enclosure:

Information about the target enclosure or storage array on which you would like to perform Secure Erase. The storage array is also called as Secure Erase storage array.

Information about WWNs of the target ports you would like to use to access the target enclosure. The target ports are called Secure Erase target ports and the VSANs where the Secure Erase target ports reside are called Secure Erase VSANs.

Information about one or more LUNs on the Secure Erase storage array on which you would like to perform Secure Erase. These LUNs are also called as Secure Erase LUNs.

Setting up Cisco Secure Erase

You need to create the VIs, setup zone, and storage array configuration to preconfigure Secure Erase.

The CLI configuration is preserved across reboots or switch reloads. It is preferred to have one job per storage enclosure. A storage enclosure can have multiple storage ports spanning multiple VSANs and storage LUNs.

Step
Command
Comments

Step 1 

ssm enable feature se module 
module-id

Provisions the Secure Erase feature on the specific module.

Step 2 

secure-erase module module-id create-vi vsan secure-erase VSAN

Creates VIs in a Secure Erase VSAN.

Note This command must be performed for each Secure Erase VSAN. Once created, VIs are available for all Secure Erase jobs. Also, WWNs of the VIs are persistent across reload of switch or SSM.

Step 3 

show secure-erase module module-id vsan secure-erase VSAN

Displays the WWNs of Secure Erase VIs created in the previous step.

Additionally, complete the following tasks:

Set up the zone.

Decide on one or more Secure Erase VIs and zone target ports that you would like to use to perform Secure Erase.

Program the storage array.

The Secure Erase storage array must be programed to enable Secure Erase VIs to access the Secure Erase LUNs. Secure Erase requires write commands to go directly to the physical media.

Secure Erase sends all write commands with Force Unit Access (FUA) bit on. When the bit is set, the SCSI device is instructed to bypass the cache and perform the command directly on the physical media.


Note Check with the storage array vendor to confirm that FUA bit is supported in SCSCI writes.


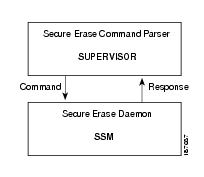
Figure 2-2 Interaction of SUP and SSM

All Secure Erase CLIs are performed at Supervisor. The Secure Erase configuration is stored in persistent memory on the supervisor engine.

Job Configuration

You can configure Cisco Secure Erase jobs and sessions using the CLI. For information about the CLI, refer to the "Secure Erase CLI Command Reference, page A-1".

To create a Secure Erase job and session, follow these steps:

Step
Command
Purpose

Step 1 

secure-erase module module-id create job job-id

Creates a Secure Erase job.

Step 2 

secure-erase module module-id 
job job-id 
add-vi vsan secure-erase VSAN 
all | pwwn secure-erase VI 
pwwn
add-tgt vsan secure-erase 
VSAN pwwn secure-erase target 
port pwwn

Adds Secure Erase VIs and Secure Erase target ports to a Secure Erase job.

Note You can use the CLI commands several times to include all the Secure Erase VIs and Secure Erase target ports in all the Secure Erase VSANs.

Step 3 

secure-erase module module-id 
job job-id 
add-session vsan secure-erase 
VSAN pwwn secure-erase target 
port pwwn all-lun | lun 
secure-erase LUN algorithm 
algorithm name/id

Creates Secure Erase sessions for each Secure Erase LUN. This command performs these tasks:

Creates a login from the Secure Erase VIs to the Secure Erase target ports.

Discovers LUNs exposed through Secure Erase target ports. For example, issue TUR, Report LUNs, Inquiry, and Read Capacity.

Note The job must have one or more Secure Erase VIs in the Secure Erase VSAN.

Step 4 

show secure-erase module 
module-id job | job-id 
|details

Displays information about all jobs.

Step 5 

secure-erase module module-id start job job-id

Starts the job. The process of writing the pattern sequence dictated by the erase algorithm is specified.

To stop or abort a Secure Erase job and session, follow this step:

Step 1 

secure-erase module module-id stop | abort job job-id

You have an option to stop or abort the job. The Stop command waits for completion of the current pattern and pauses the pattern sequence. A stopped job can be restarted. Aborting the job does not wait for completion of a current pattern. An aborted job can not be restarted.

Recovering Secure Erase Configuration

The SSM and supervisor engine configuration recovery process consists of the following tasks:

All Secure Erase configuration is stored in persistent memory and is automatically recovered on a crash or reload of the SSM or a reload of the Cisco MDS supervisors.

After the recovery process is complete, the recovered data is validated by performing a discovery process using this command:

	secure-erase module module-id validate job job-id