-
Cisco MDS 9000 Family CLI Configuration Guide, Release 3.3(3)
-
Index
-
New and Changed Information
-
Preface
- Getting Started
- Installation and Switch Management
- Switch Configuration
-
Fabric Configuration
-
Configuring and Managing VSANs
-
SAN Device Virtualization
-
Creating Dynamic VSANs
-
Configuring Inter-VSAN Routing
-
Distributing Device Alias Services
-
Configuring Fibre Channel Routing Services and Protocols
-
Managing FLOGI, Name Server, FDMI, and RSCN Databases
-
Discovering SCSI Targets
-
Configuring FICON
-
Advanced Features and Concepts
-
Configuring and Managing Zones
-
-
Security
-
Configuring FIPS
-
Configuring Users and Common Roles
-
Configuring SNMP
-
Configuring RADIUS and TACACS+
-
Configuring IPv4 and IPv6 Access Control Lists
-
Configuring Certificate Authorities and Digital Certificates
-
Configuring IPsec Network Security
-
Configuring FC-SP and DHCHAP
-
Configuring Port Security
-
Configuring Fabric Binding
-
- IP Services
- Intelligent Storage Services
- Network and Switch Monitoring
- Traffic Management
- Troubleshooting
-
Configuration Limits for Cisco MDS SAN-OS Release 3.x
-
 Feedback
Table Of Contents
Port Security Configuration Guidelines
Configuring Port Security with Auto-Learning and CFS Distribution
Configuring Port Security with Auto-Learning without CFS
Configuring Port Security with Manual Database Configuration
Forcing Port Security Activation
Auto-Learning Device Authorization
Port Security Manual Configuration
Port Security Configuration Distribution
Activation and Auto-learning Configuration Distribution
Port Security Database Deletion
Port Security Database Cleanup
Displaying Port Security Configuration
Configuring Port Security
All switches in the Cisco MDS 9000 Family provide port security features that reject intrusion attempts and report these intrusions to the administrator.
Note
Port security is only supported for Fibre Channel ports.
This chapter includes the following sections:
•
•
•
•
•
•
About Port Security
Typically, any Fibre Channel device in a SAN can attach to any SAN switch port and access SAN services based on zone membership. Port security features prevent unauthorized access to a switch port in the Cisco MDS 9000 Family in the following ways:
•
•
•
•
This section includes the following topics:
Port Security Enforcement
To enforce port security, configure the devices and switch port interfaces through which each device or switch is connected, and activate the configuration.
•
•
Each Nx and xE port can be configured to restrict a single port or a range of ports.
Enforcement of port security policies are done on every activation and when the port tries to come up.
The port security feature uses two databases to accept and implement configuration changes.
•
•
About Auto-Learning
You can instruct the switch to automatically learn (auto-learn) the port security configurations over a specified period. This feature allows any switch in the Cisco MDS 9000 Family to automatically learn about devices and switches that connect to it. Use this feature when you activate the port security feature for the first time as it saves tedious manual configuration for each port. You must configure auto-learning on a per-VSAN basis. If enabled, devices and switches that are allowed to connect to the switch are automatically learned, even if you have not configured any port access.
When auto-learning is enabled, learning happens only for the devices or interfaces that were not already logged into the switch. Learned entries on a port are cleaned up after you shut down that port if auto-learning is still enabled.
Learning does not override the existing configured port security policies. So, for example, if an interface is configured to allow a specific pWWN, then auto-learning will not add a new entry to allow any other pWWN on that interface. All other pWWNs will be blocked even in auto-learning mode.
No entries are learned for a port in the shutdown state.
When you activate the port security feature, auto-learning is also automatically enabled.
Note
Port Security Activation
By default, the port security feature is not activated in any switch in the Cisco MDS 9000 Family.
By activating the port security feature, the following apply:
•
–
–
•
•
After the database is activated, subsequent device login is subject to the activated port bound WWN pairs, excluding the auto-learned entries. You must disable auto-learning before the auto-learned entries become activated.
When you activate the port security feature, auto-learning is also automatically enabled. You can choose to activate the port security feature and disable auto-learning.
Tip
Port Security Configuration Guidelines
The steps to configure port security depend on which features you are using. Auto-learning works differently if you are using CFS distribution.
This section includes the following topics:
•
•
•
Configuring Port Security with Auto-Learning and CFS Distribution
To configure port security, using auto-learning and CFS distribution, follow these steps:
Step 1
Step 2
Step 3
Step 4
Step 5
Step 6
Step 7
Step 8
Step 9
Step 10
Configuring Port Security with Auto-Learning without CFS
To configure port security using auto-learning without CFS, follow these steps:
Step 1
Step 2
Step 3
Step 4
Step 5
Step 6
Step 7
Configuring Port Security with Manual Database Configuration
To configure port security and manually configure the port security database, follow these steps:
Step 1
Step 2
Step 3
Step 4
Step 5
Step 6
Step 7
Enabling Port Security
By default, the port security feature is disabled in all switches in the Cisco MDS 9000 Family.
To enable port security, follow these steps:
Port Security Activation
This section includes the following topics:
•
•
Activating Port Security
To activate the port security feature, follow these steps:
Note
Database Activation Rejection
Database activation is rejected in the following cases:
•
•
•
•
If the database activation is rejected due to one or more conflicts listed in the previous section, you may decide to proceed by forcing the port security activation.
Forcing Port Security Activation
If the port security activation request is rejected, you can force the activation.
Note
You can view missing or conflicting entries using the port-security database diff active vsan command in EXEC mode.
To forcefully activate the port security database, follow these steps:
Database Reactivation
Tip
To reactivate the port security database, follow these steps:
Auto-learning
This section contains the following topics:
•
About Enabling Auto-learning
The state of the auto-learning configuration depends on the state of the port security feature:
•
•
Tip
Enabling Auto-learning
To enable auto-learning, follow these steps:
Disabling Auto-learning
To disable auto-learning, follow these steps:
Auto-Learning Device Authorization
Table 39-1 summarizes the authorized connection conditions for device requests.
Authorization Scenarios
Assume that the port security feature is activated and the following conditions are specified in the active database:
•
•
•
•
•
•
•
•
Table 39-2 summarizes the port security authorization results for this active database. The conditions listed refer to the conditions from Table 39-1.
Port Security Manual Configuration
To configure port security on any switch in the Cisco MDS 9000 Family, follow these steps:
Step 1
Step 2
Step 3
Step 4
This section includes the following topics:
About WWN Identification
If you decide to manually configure port security, be sure to adhere to the following guidelines:
•
•
•
•
•
•
•
•
•
Adding Authorized Port Pairs
After identifying the WWN pairs that need to be bound, add those pairs to the port security database.
Tip
To add authorized port pairs for port security, follow these steps:
Port Security Configuration Distribution
The port security feature uses the Cisco Fabric Services (CFS) infrastructure to enable efficient database management, provide a single point of configuration for the entire fabric in the VSAN, and enforce the port security policies throughout the fabric (see Chapter 7, "Using the CFS Infrastructure").
This section includes the following topics:
•
Enabling Distribution
All the configurations performed in distributed mode are stored in a pending (temporary) database. If you modify the configuration, you need to commit or discard the pending database changes to the configurations. The fabric remains locked during this period. Changes to the pending database are not reflected in the configurations until you commit the changes.
Note
For example, if you activate port security, follow up by disabling auto-learning, and finally commit the changes in the pending database, then the net result of your actions is the same as issuing a port-security activate vsan vsan-id no-auto-learn command.
Tip
To enable the port security distribution, follow these steps:
Locking The Fabric
The first action that modifies the existing configuration creates the pending database and locks the feature in the VSAN. Once you lock the fabric, the following situations apply:
•
•
Committing the Changes
If you commit the changes made to the configurations, the configurations in the pending database are distributed to other switches. On a successful commit, the configuration change is applied throughout the fabric and the lock is released.
To commit the port security configuration changes for the specified VSAN, follow these steps:
Step 1
switch# config t
switch(config)#
Enters configuration mode.
Step 2
switch(config)# port-security commit vsan 3
Commits the port security changes in the specified VSAN.
Discarding the Changes
If you discard (abort) the changes made to the pending database, the configuration remains unaffected and the lock is released.
To discard the port security configuration changes for the specified VSAN, follow these steps:
Activation and Auto-learning Configuration Distribution
Activation and auto-learning configurations in distributed mode are remembered merely as actions to be performed when you commit the changes in the pending database.
Learned entries are temporary and do not have any role in determining if a login is authorized or not. As such, learned entries do not participate in distribution. When you disable learning and commit the changes in the pending database, the learned entries become static entries in the active database and are distributed to all switches in the fabric. After the commit, the active database on all switches are identical and learning can be disabled.
If the pending database contains more than one activation and auto-learning configuration when you commit the changes, then the activation and auto-learning changes are consolidated and the behavior may change (see Table 39-3).
Table 39-3 Scenarios for Activation and Auto-Learning learning Configurations in Distributed Mode
A and B exist in the configuration database, activation is not done and devices C,D are logged in.
1.
configuration database = {A,B}
active database = {A,B, C1 , D*}
configuration database = {A,B}
active database = {null}
pending database = {A,B + activation to be enabled}
2.
configuration database = {A,B, E}
active database = {A,B, C*, D*}
configuration database = {A,B}
active database = {null}
pending database = {A,B, E + activation to be enabled}
3.
Not applicable
configuration database = {A,B, E}
active database = {A,B, E, C*, D*}
pending database = empty
A and B exist in the configuration database, activation is not done and devices C,D are logged in.
1.
configuration database = {A,B}
active database = {A,B, C*, D*}
configuration database = {A,B}
active database = {null}
pending database = {A,B + activation to be enabled}
2.
configuration database = {A,B}
active database = {A,B, C, D}
configuration database = {A,B}
active database = {null}
pending database = {A,B + activation to be enabled +
learning to be disabled}3.
Not applicable
configuration database = {A,B}
active database = {A,B} and devices C and D are logged out. This is equal to an activation with auto-learning disabled.
pending database = empty
1 The * (asterisk) indicates learned entries.
Database Merge Guidelines
A database merge refers to a union of the configuration database and static (unlearned) entries in the active database. See the CFS Merge Support, page 7-8 for detaileds concepts.
When merging the database between two fabrics, follow these guidelines:
•
•
Caution
Database Interaction
Table 39-4 lists the differences and interaction between the active and configuration databases.
Note
This section includes the following topics:
•
•
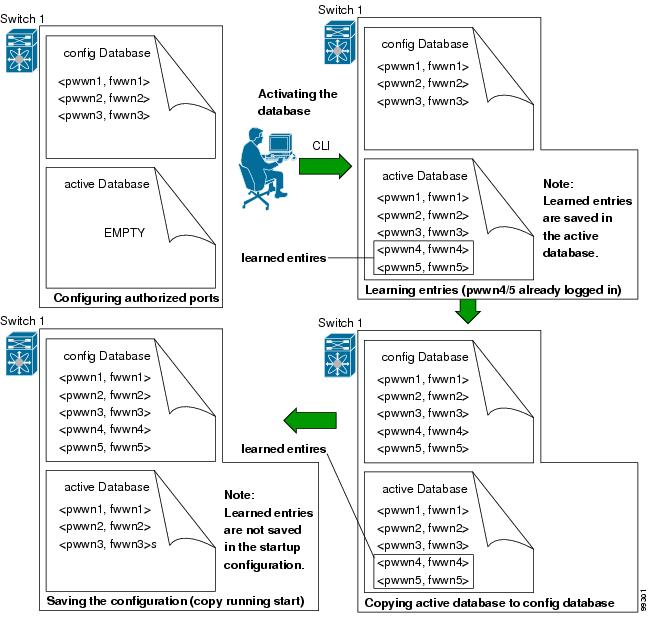
Database Scenarios
Figure 39-1 depicts various scenarios to depict the active database and the configuration database status based on port security configurations.
Figure 39-1 Port Security Database Scenarios
Port Security Database Copy
Tip
Use the port-security database copy vsan command to copy from the active to the configured database. If the active database is empty, this command is not accepted.
switch# port-security database copy vsan 1Use the port-security database diff active vsan command to view the differences between the active database and the configuration database. This command can be used when resolving conflicts.
switch# port-security database diff active vsan 1Use the port-security database diff config vsan command to obtain information on the differences between the configuration database and the active database.
switch# port-security database diff config vsan 1Port Security Database Deletion
Tip
Use the no port-security database vsan command in configuration mode to delete the configured database for a specified VSAN
switch(config)# no port-security database vsan 1Port Security Database Cleanup
Use the clear port-security statistics vsan command to clear all existing statistics from the port security database for a specified VSAN.
switch# clear port-security statistics vsan 1Use the clear port-security database auto-learn interface command to clear any learned entries in the active database for a specified interface within a VSAN.
switch# clear port-security database auto-learn interface fc1/1 vsan 1Use the clear port-security database auto-learn vsan command to clear any learned entries in the active database for the entire VSAN.
switch# clear port-security database auto-learn vsan 1
Note
Use the port-security clear vsan command to clear the pending session in the VSAN from any switch in the VSAN.
switch# clear port-security session vsan 5Displaying Port Security Configuration
The show port-security database commands display the configured port security information (see Examples 39-1 to 39-11).
Example 39-1 Displays the Contents of the Port Security Configuration Database
switch# show port-security database---------------------------------------------------------------------------------------VSAN Logging-in Entity Logging-in Point (Interface)----------------------------------------------------------------------------------------1 21:00:00:e0:8b:06:d9:1d(pwwn) 20:0d:00:05:30:00:95:de(fc1/13)1 50:06:04:82:bc:01:c3:84(pwwn) 20:0c:00:05:30:00:95:de(fc1/12)2 20:00:00:05:30:00:95:df(swwn) 20:0c:00:05:30:00:95:de(port-channel 128)3 20:00:00:05:30:00:95:de(swwn) 20:01:00:05:30:00:95:de(fc1/1)[Total 4 entries]You can optionally specify a fWWN and a VSAN, or an interface and a VSAN in the show port-security command to view the output of the activated port security (see Example 39-2).
Example 39-2 Displays the Port Security Configuration Database in VSAN 1
switch# show port-security database vsan 1--------------------------------------------------------------------------------Vsan Logging-in Entity Logging-in Point (Interface)--------------------------------------------------------------------------------1 * 20:85:00:44:22:00:4a:9e (fc3/5)1 20:11:00:33:11:00:2a:4a(pwwn) 20:81:00:44:22:00:4a:9e (fc3/1)[Total 2 entries]Example 39-3 Displays the Activated Database
switch# show port-security database active----------------------------------------------------------------------------------------VSAN Logging-in Entity Logging-in Point (Interface) Learnt----------------------------------------------------------------------------------------1 21:00:00:e0:8b:06:d9:1d(pwwn) 20:0d:00:05:30:00:95:de(fc1/13) Yes1 50:06:04:82:bc:01:c3:84(pwwn) 20:0c:00:05:30:00:95:de(fc1/12) Yes2 20:00:00:05:30:00:95:df(swwn) 20:0c:00:05:30:00:95:de(port-channel 128) Yes3 20:00:00:05:30:00:95:de(swwn) 20:01:00:05:30:00:95:de(fc1/1)[Total 4 entries]Example 39-4 Displays the Contents of the Temporary Configuration Database
switch# show port-security pending vsan 1Session Context for VSAN 1---------------------------Activation Status: ActiveAuto Learn Status: OnForce activate: NoConfig db modified: YesActivation done: YesSession owner: admin(2)Session database:--------------------------------------------------------------------------------VSAN Logging-in Entity Logging-in Point (Interface)--------------------------------------------------------------------------------1 20:11:00:33:22:00:2a:4a(pwwn) 20:41:00:05:30:00:4a:1e(fc2/1)[Total 1 entries]Example 39-5 Displays the Difference Between the Temporary Configuration Database and the Configuration Database
switch# show port-security pending-diff vsan 1Session Diff for VSAN: 1-------------------------Database will be activatedLearning will be turned ONDatabase Diff:+pwwn 20:11:00:33:22:00:2a:4a fwwn 20:41:00:05:30:00:4a:1eThe access information for each port can be individually displayed. If you specify the fWWN or interface options, all devices that are paired in the active database (at that point) with the given fWWN or the interface are displayed (see Examples 39-6 to 39-8).
Example 39-6 Displays the Wildcard fWWN Port Security in VSAN 1
switch# show port-security database fwwn 20:85:00:44:22:00:4a:9e vsan 1Any port can login thru' this fwwnExample 39-7 Displays the Configured fWWN Port Security in VSAN 1
switch# show port-security database fwwn 20:01:00:05:30:00:95:de vsan 120:00:00:0c:88:00:4a:e2(swwn)Example 39-8 Displays the Interface Port Information in VSAN 2
switch# show port-security database interface fc 1/1 vsan 220:00:00:0c:88:00:4a:e2(swwn)The port security statistics are constantly updated and available at any time (see Example 39-9).
Example 39-9 Displays the Port Security Statistics
switch# show port-security statisticsStatistics For VSAN: 1------------------------Number of pWWN permit: 2Number of nWWN permit: 2Number of sWWN permit: 2Number of pWWN deny : 0Number of nWWN deny : 0Number of sWWN deny : 0Total Logins permitted : 4Total Logins denied : 0Statistics For VSAN: 2------------------------Number of pWWN permit: 0Number of nWWN permit: 0Number of sWWN permit: 2Number of pWWN deny : 0Number of nWWN deny : 0Number of sWWN deny : 0...To verify the status of the active database and the auto-learning configuration, use the show port-security status command (see Example 39-10).
Example 39-10 Displays the Port Security Status
switch# show port-security statusFabric Distribution EnabledVSAN 1 :No Active database, learning is disabled, Session Lock TakenVSAN 2 :No Active database, learning is disabled, Session Lock Taken...The show port-security command displays the previous 100 violations by default (see Example 39-11).
Example 39-11 Displays the Violations in the Port Security Database
switch# show port-security violations------------------------------------------------------------------------------------------VSAN Interface Logging-in Entity Last-Time [Repeat count]------------------------------------------------------------------------------------------1 fc1/13 21:00:00:e0:8b:06:d9:1d(pwwn) Jul 9 08:32:20 2003 [20]20:00:00:e0:8b:06:d9:1d(nwwn)1 fc1/12 50:06:04:82:bc:01:c3:84(pwwn) Jul 9 08:32:20 2003 [1]50:06:04:82:bc:01:c3:84(nwwn)2 port-channel 1 20:00:00:05:30:00:95:de(swwn) Jul 9 08:32:40 2003 [1][Total 2 entries]The show port-security command issued with the last number option displays only the specified number of entries that appear first.
Default Settings
Table 39-6 lists the default settings for all port security features in any switch.