Feedback
Table Of Contents
Configuring Users and Common Roles
Configuring Roles and Profiles
Configuring Rules and Features for Each Role
Committing Role-Based Configuration Changes
Discarding Role-Based Configuration Changes
Enabling Role-Based Configuration Distribution
Displaying Role-Based Information
Displaying Roles When Distribution is Enabled
Mapping of CLI Operations to SNMP
Characteristics of Strong Passwords
Displaying User Account Information
Generating the SSH Server Key-Pair
Overwriting a Generated Key-Pair
Enabling SSH or Telnet Service
Displaying SSH Protocol Status
SSH Authentication Using Digital Certificates
Recovering the Administrator Password
Using the CLI with Network-Admin Privileges
Configuring Users and Common Roles
The CLI and SNMP use common roles in all switches in the Cisco MDS 9000 Family. You can use the CLI to modify a role that was created using SNMP and vice versa.
Users, passwords, and roles for all CLI and SNMP users are the same. A user configured through the CLI can access the switch using SNMP (for example, the Fabric Manager or the Device Manager) and vice versa.
This chapter includes the following sections:
•
Recovering the Administrator Password
Role-Based Authorization
Switches in the Cisco MDS 9000 Family perform authentication based on roles. Role-based authorization limits access to switch operations by assigning users to roles. This kind of authentication restricts you to management operations based on the roles to which you have been added.
When you execute a command, perform command completion, or obtain context sensitive help, the switch software allows the operation to progress if you have permission to access that command.
This section includes the following topics:
•
•
About Roles
Each role can contain multiple users and each user can be part of multiple roles. For example, if role1 users are only allowed access to configuration commands, and role2 users are only allowed access to debug commands, then if Joe belongs to both role1 and role2, he can access configuration as well as debug commands.
Note
Tip
Configuring Roles and Profiles
To create an additional role or to modify the profile for an existing role, follow these steps:
Note
Configuring Rules and Features for Each Role
Up to 16 rules can be configured for each role. The user-specified rule number determines the order in which the rules are applied. For example, rule 1 is applied before rule 2, which is applied before rule 3, and so on. A user not belonging to the network-admin role cannot perform commands related to roles.
For example, if user A is permitted to perform all show commands, user A cannot view the output of the show role command if user A does not belong to the network-admin role
The rule command specifies operations that can be performed by a specific role. Each rule consists of a rule number, a rule type (permit or deny), a command type (for example, config, clear, show, exec, debug), and an optional feature name (for example, FSPF, zone, VSAN, fcping, or interface).
Note
Modifying Profiles
To modify the profile for an existing role, follow these steps:
In Step 3, rule 1 is applied first, thus permitting sangroup users access to all config commands. Rule 2 is applied next, denying FSPF configuration to sangroup users. As a result, sangroup users can perform all other config commands, except fspf configuration commands.
Note
Configuring the VSAN Policy
Configuring the VSAN policy requires the ENTERPRISE_PKG license (see Chapter 3, "Obtaining and Installing Licenses").
You can configure a role so that it only allows tasks to be performed for a selected set of VSANs. By default, the VSAN policy for any role is permit, which allows tasks to be performed for all VSANs. You can configure a role that only allows tasks to be performed for a selected set of VSANs. To selectively allow VSANs for a role, set the VSAN policy to deny, and then set the configuration to permit or the appropriate VSANs.
Note
Tip
Users belonging to roles in which the VSAN policy is set to deny are referred to as VSAN-restricted users.
Modifying the VSAN Policy
To modify the VSAN policy for an existing role, follow these steps:
Role Distributions
Role-based configurations use the Cisco Fabric Services (CFS) infrastructure to enable efficient database management and to provide a single point of configuration for the entire fabric (see Chapter 5, "Using the CFS Infrastructure").
The following configurations are distributed:
•
•
•
This section includes the following topics:
•
•
•
•
•
About Role Databases
Role-based configurations use two databases to accept and implement configurations.
•
•
Locking the Fabric
The first action that modifies the database creates the pending database and locks the feature in the entire fabric. Once you lock the fabric, the following situations apply:
•
•
Committing Role-Based Configuration Changes
If you commit the changes made to the pending database, the configuration is committed to all the switches in the fabric. On a successful commit, the configuration change is applied throughout the fabric and the lock is released. The configuration database now contains the committed changes and the pending database is now cleared.
To commit role-based configuration changes, follow these steps:
Step 1
switch# config t
switch(config)#
Enters configuration mode.
Step 2
switch(config)# role commit vsan 3
Commits the role-based configuration changes.
Discarding Role-Based Configuration Changes
If you discard (abort) the changes made to the pending database, the configuration database remains unaffected and the lock is released.
To discard role-based configuration changes, follow these steps:
Enabling Role-Based Configuration Distribution
To enable role-based configuration distribution, follow these steps:
Clearing Sessions
To forcibly clear the existing role session in the fabric, issue the clear role session command from any switch that is part of the initiated session.
Caution
switch# clear role sessionDatabase Merge Guidelines
Fabric merge does not modify the role database on a switch. If two fabrics merge, and the fabrics have different role databases, the software generates an alert message.
See the "CFS Merge Support" section on page 5-8 for detailed concepts.
•
•
Displaying Role-Based Information
Use the show role command to display rules configured on the switch. The rules are displayed by rule number and are based on each role. All roles are displayed if the role name is not specified. See Example 31-1.
Example 31-1 Displays Information for All Roles
switch# show roleRole: network-adminDescription: Predefined Network Admin group. This role cannot be modifiedAccess to all the switch commandsRole: network-operatorDescription: Predefined Network Operator group. This role cannot be modifiedAccess to Show commands and selected Exec commandsRole: svc-adminDescription: Predefined SVC Admin group. This role cannot be modifiedAccess to all SAN Volume Controller commandsRole: svc-operatorDescription: Predefined SVC Operator group. This role cannot be modifiedAccess to selected SAN Volume Controller commandsRole: TechDocsvsan policy: permit (default)Role: sangroupDescription: SAN management groupvsan policy: denyPermitted vsans: 10-30---------------------------------------------Rule Type Command-type Feature---------------------------------------------1. permit config *2. deny config fspf3. permit debug zone4. permit exec fcpingDisplaying Roles When Distribution is Enabled
Use the show role command to display the configuration database.
Use the show role status command to display whether distribution is enabled for role configuration, the current fabric status (locked or unlocked), and the last operation performed. See Example 31-2.
Example 31-2 Displays the Role Status Information
switch# show role statusDistribution: EnabledSession State: LockedLast operation (initiated from this switch): Distribution enableLast operation status: SuccessUse the show role pending command to display the pending role database.
Example 31-3 displays the output of the show role pending command by following this procedure:
1.
2.
3.
Example 31-3 Displays Information on the Pending Roles Database
switch# show role pendingRole: network-adminDescription: Predefined Network Admin group. This role cannot be modifiedAccess to all the switch commandsRole: network-operatorDescription: Predefined Network Operator group. This role cannot be modifiedAccess to Show commands and selected Exec commandsRole: svc-adminDescription: Predefined SVC Admin group. This role cannot be modifiedAccess to all SAN Volume Controller commandsRole: svc-operatorDescription: Predefined SVC Operator group. This role cannot be modifiedAccess to selected SAN Volume Controller commandsRole: TechDocsvsan policy: permit (default)Role: sangroupDescription: SAN management groupvsan policy: denyPermitted vsans: 10-30---------------------------------------------Rule Type Command-type Feature---------------------------------------------1. permit config *2. deny config fspf3. permit debug zone4. permit exec fcpingRole: myrolevsan policy: permit (default)---------------------------------------------Rule Type Command-type Feature---------------------------------------------1. permit config fspfUse the show role pending-diff command to display the differences between the pending and configuration role database. See Example 31-4.
Example 31-4 Displays the Differences Between the Two Databases
switch# show role pending-diff+Role: myrole+ vsan policy: permit (default)+ ---------------------------------------------+ Rule Type Command-type Feature+ ---------------------------------------------+ 1. permit config fspfConfiguring Common Roles
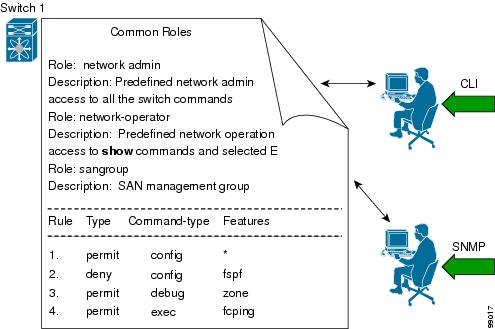
The CLI and SNMP in all switches in the Cisco MDS 9000 Family use common roles. You can use SNMP to modify a role that was created using the CLI and vice versa (see Figure 31-1).
Figure 31-1 Common Roles
Each role in SNMP is the same as a role created or modified through the CLI (see the "Role-Based Authorization" section).
Each role can be restricted to one or more VSANs as required.
You can create new roles or modify existing roles using SNMP or the CLI.
•
•
Mapping of CLI Operations to SNMP
SNMP has only three possible operations: GET, SET, and NOTIFY. The CLI has five possible operations: DEBUG, SHOW, CONFIG, CLEAR, and EXEC.
Note
Table 31-1 explains how the CLI operations are mapped to the SNMP operations.
Table 31-1 CLI Operation to SNMP Operation Mapping
DEBUG
Ignored
SHOW
GET
CONFIG
SET
CLEAR
SET
EXEC
SET
Example 31-5 shows the privileges and rules mapping CLI operations to SNMP operations for a role named my_role.
Example 31-5 Displays CLI Operation to SNMP Operation Mapping
switch# show role name my_roleRole:my_rolevsan policy:permit (default)---------------------------------------------Rule Type Command-type Feature---------------------------------------------1. permit clear *2. deny clear ntp3. permit config *4. deny config ntp5. permit debug *6. deny debug ntp7. permit show *8. deny show ntp9. permit exec *
Note
Configuring User Accounts
Every Cisco MDS 9000 Family switch user has the account information stored by the system. Your authentication information, user name, user password, password expiration date, and role membership are stored in your user profile.
The tasks explained in this section enable you to create users and modify the profile of an existing user. These tasks are restricted to privileged users as determined by your administrator.
This section includes the following topics:
•
•
About Users
The passphrase specified in the snmp-server user option and the password specified username option are synchronized (see the "SNMPv3 CLI User Management and AAA Integration" section on page 32-2).
By default, the user account does not expire unless you explicitly configure it to expire. The expire option determines the date on which the user account is disabled. The date is specified in the YYYY-MM-DD format.
Note
Tip
Note
Tip
Caution
Tip
Characteristics of Strong Passwords
A strong password has the following characteristics:
•
•
•
•
•
•
•
The following are examples of strong passwords:
•
•
•
Note
Configuring Users
To configure a new user or to modify the profile of an existing user, follow these steps:
Logging Out Users
To log out another user on the switch, use the clear user command.
In the following example, the user named vsam is logged out from the switch.
switch# clear user vsamUse the show users command to view a list of the logged in users (see Example 31-6).
Example 31-6 Displays All Logged in Users
switch# show usersadmin pts/7 Jan 12 20:56 (10.77.202.149)admin pts/9 Jan 12 23:29 (user.example.com)admin pts/10 Jan 13 03:05 (dhcp-10-10-1-1.example.com)admin pts/11 Jan 13 01:53 (dhcp-10-10-2-2.example.com)Displaying User Account Information
Use the show user-account command to display configured information about user accounts. See Examples 31-7 to 31-8.
Example 31-7 Displays Information for a Specified User
switch# show user-account user1user:user1this user account has no expiry dateroles:network-operatorno password set. Local login not allowedRemote login through RADIUS is possibleExample 31-8 Displays Information for All Users
switch# show user-accountshow user-accountuser:adminthis user account has no expiry dateroles:network-adminuser:usamexpires on Sat May 31 00:00:00 2003roles:network-admin network-operatoruser:msamthis user account has no expiry dateroles:network-operatoruser:user1this user account has no expiry dateroles:network-operatorno password set. local login not allowedRemote login through RADIUS is possibleConfiguring SSH Services
The Telnet service is enabled by default on all Cisco MDS 9000 Family switches. Before enabling the SSH service, generate a server key-pair (see the "Generating the SSH Server Key-Pair" section).
Use the ssh key command to generate a server key.
Caution
This section includes the following topics:
•
•
•
•
•
About SSH
SSH provides secure communications to the Cisco SAN-OS CLI. You can use SSH keys for the following SSH options:
•
•
•
Generating the SSH Server Key-Pair
Be sure to have an SSH server key-pair with the appropriate version before enabling the SSH service. Generate the SSH server key-pair according to the SSH client version used. The number of bits specified for each key-pair ranges from 768 to 2048.
The SSH service accepts three types of key-pairs for use by SSH versions 1 and 2.
•
•
•
Caution
To generate the SSH server key-pair, follow these steps:
Specifying the SSH Key
You can specify an SSH key to log in using the SSH client without being prompted for a password. You can specify the SSH key in three different formats:
•
•
•
To specify or delete the SSH key in OpenSSH format for a specified user, follow these steps:
To specify or delete the SSH key in IETF SECSH format for a specified user, follow these steps:
To specify or delete the SSH key in PEM-formatted Public Key Certificate form for a specified user, follow these steps:
Overwriting a Generated Key-Pair
If the SSH key-pair option is already generated for the required version, you can force the switch to overwrite the previously generated key-pair.
To overwrite the previously generated key-pair, follow these steps:
Clearing SSH Hosts
The clear ssh hosts command clears the existing list of trusted SSH hosts and reallows you to use SCP/SFTP along with the copy command for particular hosts.
When you use SCP/SFTP along with the copy command, a list of trusted SSH hosts are built and stored within the switch (see Example 31-9).
Example 31-9 Using SCP/SFTP to Copy Files
switch# copy scp://abcd@10.10.1.1/users/abcd/abcbootflash:abc The authenticity of host '10.10.1.1 (10.10.1.1)'can't be established.RSA1 key fingerprint is 01:29:62:16:33:ff:f7:dc:cc:af:aa:20:f8:20:a2:db.Are you sure you want to continue connecting (yes/no)? yesAdded the host to the list of known hosts(/var/home/admin/.ssh/known_hosts). [SSH key information about the host isstored on the switch]abcd@10.10.1.1's password:switch#If a host's SSH key changes before you use SCP/SFTP along with the copy command, you will receive an error (see Example 31-10).
Example 31-10 Using SCP/SFTP to Copy Files—Error Caused by SSH Key Change
switch# copy scp://apn@10.10.1.1/isan-104bootflash:isan-ram-1.0.4@@@@@@@@@@@@@@@@@@@@@@@@@@@@@@@@@@@@@@@@@@@@@@@@@@@@@@@@@@@@ WARNING: REMOTE HOST IDENTIFICATION HAS CHANGED! @@@@@@@@@@@@@@@@@@@@@@@@@@@@@@@@@@@@@@@@@@@@@@@@@@@@@@@@@@@@IT IS POSSIBLE THAT SOMEONE IS DOING SOMETHING NASTY!Someone could be eavesdropping on you right now (man-in-the-middle attack)!It is also possible that the RSA1 host key has just been changed.The fingerprint for the RSA1 key sent by the remote host is36:96:ca:d7:29:99:79:74:aa:4d:97:49:81:fb:23:2f.Please contact your system administrator.Add correct host key in /mnt/pss/.ssh/known_hosts to get rid of thismessage.Offending key in /mnt/pss/.ssh/known_hosts:2RSA1 host key for 10.10.1.1 has changed and you have requested strictchecking.Enabling SSH or Telnet Service
By default, the SSH service is disabled.
To enable or disable the SSH service, follow these steps:
Displaying SSH Protocol Status
Use the show ssh server command to display the status of the SSH protocol (enabled or disabled) and the versions that are enabled for that switch (see Example 31-11).
Example 31-11 Displays SSH Protocol Status
switch# show ssh serverssh is enabledversion 1 enabledversion 2 enabledUse the show ssh key command to display the server key-pair details for the specified key or for all keys, (see Example 31-12).
Example 31-12 Displays Server Key-Pair Details
switch# show ssh key
rsa1 Keys generated:Sun Jan 13 07:16:26 1980
1024 35fingerprint:1024 67:76:02:bd:3e:8d:f5:ad:59:5a:1e:c4:5e:44:03:07could not retrieve rsa key informationdsa Keys generated:Sun Jan 13 07:40:08 1980ssh-dss AAAAB3NzaC1kc3MAAABBAJTCRQOydNRel2v7uiO6Fix+OTn8eGdnnDVxw5eJs5OcOEXOyjaWcMMYsEgxc9ada1NElp 8Wy7GPMWGOQYj9CU0AAAAVAMCcWhNN18zFNOIPo7cU3t7d0iEbAAAAQBdQ8UAOi/Cti84qFb3kTqXlS9mEhdQUo0lH cH5bw5PKfj2Y/dLR437zCBKXetPj4p7mhQ6Fq5os8RZtJEyOsNsAAABAA0oxZbPyWeR5NHATXiyXdPI7j9i8fgyn9F NipMkOF2Mn75Mi/lqQ4NIq0gQNvQOx27uCeQlRts/QwI4q68/eaw=fingerprint:512 f7:cc:90:3d:f5:8a:a9:ca:48:76:9f:f8:6e:71:d4:ae
Note
SSH Authentication Using Digital Certificates
SSH authentication on the Cisco MDS 9000 Family switches provide X.509 digital certificate support for host authentication. An X.509 digital certificate is a data item that vouches for the origin and integrity of a message. It contains encryption keys for secured communications and is "signed" by a trusted certification authority (CA) to verify the identity of the presenter. The X.509 digital certificate support provides either DSA or RSA algorithms for authentication.
The certificate infrastructure uses the first certificate that supports the Secure Socket Layer (SSL) and is returned by the security infrastructure, either through query or notification. Verification of certificates is successful if the certificates are from any of the trusted CAs.
You can configure your switch for either SSH authentication using an X.509 certificate or SSH authentication using a Public Key Certificate, but not both. If either of them is configured and the authentication fails, you will be prompted for a password.
For more information on CAs and digital certificates, see Chapter 35, "Configuring Certificate Authorities and Digital Certificates."
Recovering the Administrator Password
You can recover the administrator password using one of two methods:
•
•
The following topics included in this section:
•
Using the CLI with Network-Admin Privileges
If you are logged in to, or can log into, switch with a user name that has network-admin privileges and then recover the administrator password, follow these steps:
Step 1
switch# show user-accountuser:adminthis user account has no expiry dateroles:network-adminuser:dbgusrthis user account has no expiry dateroles:network-admin network-operatorStep 2
switch# config tswitch(config)# username admin password <new password>switch(config)# exitswitch#Step 3
switch# copy running-config startup-config
Power Cycling the Switch
If you cannot start a session on the switch that has network-admin privileges, you must recover the administrator password by power cycling the switch.
Caution
Note
To recover a administrator password by power cycling the switch, follow these steps:
Step 1
slot 6 from the chassis.
Note
Step 2
Step 3
Ctrl-]switch(boot)#Step 4
switch(boot)# config terminalStep 5
switch(boot-config)# admin-password <new password>For information on strong passwords, see the "Characteristics of Strong Passwords" section.
Step 6
switch(boot-config)# exitswitch(boot)#Step 7
switch(boot)# load bootflash:m9500-sf1ek9-mz.2.1.1a.bin
Caution
Step 8
switch login: adminPassword: <new password>Step 9
switch# config tswitch(config)# username admin password <new password>switch(config)# exitswitch#Step 10
switch# copy running-config startup-configStep 11
Default Settings
Table 31-2 lists the default settings for all switch security features in any switch.