Table Of Contents
Managing Interfaces
Managing Ports
Enabling or Disabling Ports
Managing General Port Attributes
Managing Interface Attributes for Ports
Viewing FLOGI Attributes
Viewing Port ELP Attributes
Viewing Trunking Information
Managing Physical Attributes for a Port
Viewing Port Capability Attributes
Managing PortChannel Interfaces
Managing PortChannel General Attributes
Managing PortChannel Interface Attributes
Monitoring Port Statistics
Monitoring and Charting Traffic Statistics
Monitoring Port Traffic (Bytes)
Monitoring Port Traffic (Frames)
Monitoring Port Discards
Monitoring Port Class 2 Errors
Monitoring Port Link Errors
Monitoring Port Sequence Errors
Monitoring Port Frame Errors
Managing PortChannels
Managing Interfaces
Fabric Manager allows you to configure and monitor interfaces on multiple Cisco 9000 switches. The Device Manager allows you to configure and monitor interfaces on a single Cisco 9000 switch.
This chapter describes how to configure interfaces using the Fabric Manager and Device Manager. For information about interfaces and configuring them using the command-line interface (CLI), refer to the Cisco 9000 Family Configuration Guide. This chapter includes the following sections:
• Managing Ports
•Managing PortChannel Interfaces
•Monitoring Port Statistics
Managing Ports
This section describes how to enable, disable, configure, and view port attributes and statistics. It includes the following topics:
•Enabling or Disabling Ports
•Managing General Port Attributes
•Managing Interface Attributes for Ports
•Viewing FLOGI Attributes
•Viewing Port ELP Attributes
•Viewing Trunking Information
•Managing Physical Attributes for a Port
•Viewing Port Capability Attributes
Enabling or Disabling Ports
To enable a port, right-click on a disabled port in Device Manager and choose Enable from the pop-up menu.
To disable a port, right-click on a enabled port in Device Manager and choose Disable from the pop-up menu.
To enable or disable multiple ports, ctrl-click each port or drag the mouse around a group of ports. Then right-click any of the selected ports and click either Enable or Disable from the pop-up menu.
Managing General Port Attributes
To manage general port attributes, such as Alias, PortVsan, and Admin Mode from the Fabric Manager, select the Switch tab at the bottom of the screen and choose Interface from the menu tree and then choose the type of port. To manage these attributes from the Device Manager, choose the type of port from the Interface menu. You can select FxPorts, xEPorts, Enabled Ports, All Ports, or the Mgmt Port.
The following are the different port types supported by the Cisco MDS 9000 Family.
•xE ports:
–An E_Port (expansion port) connects two switches and can carry frames between switches for configuration and management of the fabric for a single VSAN.
–A TE_Port (trunking expansion port) allows a link between two Cisco 9000 switches to carry traffic for multiple VSANs.
•Fx ports:
–An F_Port (fabric port) connects to an N_Port (end node port) on a host node through a point-to-point link.
–An Fl_Port (fabric loop port) connects to an NL_Port (end node loop port) on a public loop through a point-to-point link or an arbitrated loop.
•A TL (translative loop) port may be connected to one or more private loop devices (NL ports). TL ports are unique to Cisco MDS 9000 Family switches and have similar properties to FL ports. The default is Auto, so the switch will autonegotiate the port speed.
For further information about port types, refer to the Cisco 9000 Family Configuration Guide.
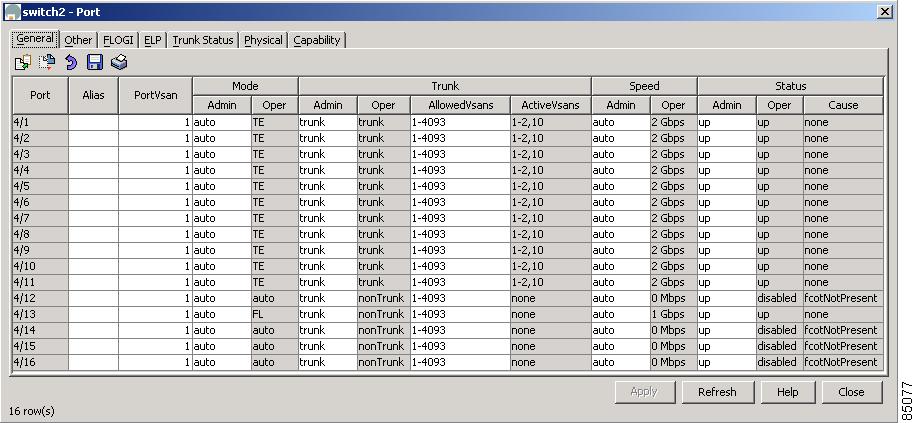
The dialog boxes from the Fabric Manager display attributes for multiple switches. Figure 7-1 shows the dialog box with the General tab selected from the Device Manager, which displays general attributes for a single switch.
Figure 7-1 Interface > All Ports Dialog Box, Device Manager
The dialog boxes in both tools provide the information described in Table 7-1 (the order of the columns varies slightly between the two tools).
Table 7-1 Interface > xxPorts > General —Display-Only Port Attributes
Display-Only Attribute
|
Description
|
Switch
|
Displays the switch ID. This attribute is only displayed from the Fabric Manager.
|
Port
|
Displays the port ID.
|
Mode—Oper
|
Displays the current operating mode of the port.
|
Trunk—Oper
|
Displays the current trunking mode of the port. Valid values are:
•trunk—In trunking mode
•nonTrunk—Not in trunking mode
•auto—Automatically set based on the value set on the connected port
|
Trunk—ActiveVsans
|
Displays the VSANs with which this port is associated. Only ports operating in trunking mode can belong to multiple VSANs.
|
Speed—Oper
|
Displays an estimate of the interface's current bandwidth, in bits per second.
|
Status—Oper
|
Displays the current operating status of the interface.
|
Status—Cause
|
Displays the cause of the current operating status of the interface.
|
Table 7-2 describes the configurable port attributes.
Table 7-2 Interface > xxPorts > General—Configurable Port Attributes
Configurable Attribute
|
Description
|
Alias
|
Specifies an alias for the port.
|
PortVsan
|
Specifes the ID of the VSAN to which this interface is statically assigned.
|
Mode—Admin
|
Specifies the port's mode. Valid values are:
•auto—Automatically set based on the value of the connected port
Note In any pair of ports, only one port can be set for autodetect.
•F—Fabric port
•FL—Fabric loop port
•E—Expansion port
•FX—Either FL or F
•SD—Span destination port
•TL—Translative loop port
|
Trunk—Admin
|
Specifies the port's trunking mode. Valid values are:
•trunk—In trunking mode
•nonTrunk—Not in trunking mode
•auto—Automatically set based on the value of the connected port
|
Trunk—AllowedVsans
|
Specifies the VSANs that are allowed to be received/ transmitted on the port when the port is operating in trunking mode. Valid values are 1 to 4093. Only ports operating in trunking mode can belong to multiple VSANs.
|
Speed—Admin
|
Specifies the port speed. Valid values are:
•auto
•1 Gb/s
•2 Gb/s
|
Status—Admin
|
Specifies the port status.
|
Managing Interface Attributes for Ports
To manage port interface attributes from the Fabric Manager, choose Interface from the menu tree and then choose one of the following port types to be configured:
•Port Channels
•xEPorts
•FxPorts
•Other Ports
To manage port interface attributes from the Device Manager, choose a port type from the Interface menu.
The Fabric Manager dialog box displays interface attributes for multiple switches. The dialog box from Device Manager displays interface attributes for a single switch. Both dialog boxes provide the display-only information described in Table 7-3.
Table 7-3 Interface > xxPorts > Interfaces—Display Only Attributes
Display-Only Attribute
|
Description
|
Switch
|
Displays the switch ID. This attribute is only displayed from the Fabric Manager.
|
Index
|
Displays the port ID. This attribute is only displayed from the Fabric Manager.
|
Mtu
|
Displays the size of the largest packet that can be sent or received on the interface, specified in octets. For interfaces that transmit network datagrams, this is the size of the largest network datagram that can be sent on the interface.
|
LastChange
|
Displays the date and time the interface entered its current operating state.
|
PortChannelid
|
Displays the PortChannel to which this port belongs.
|
Wwn
|
Displays the 64-bit world wide name for the port.
|
BbCreditModel
|
Displays the buffer-to-buffer credit model used by the port.
An alternate BbCreditModel can be used in an arbitrated loop topology to manage the flow of frames between the two ports participating in the loop circuit.
|
HoldTime
|
Displays the maximum time (in milliseconds) that the port holds a frame in the transmitter buffer before discarding it, if it is unable to deliver the frame.
A zero (0) value indicates the frame is discarded immediately if the port is unable to deliver the frame.
|
Table 7-4 describes the configurable interface attributes for ports.
Table 7-4 Interface > xxPorts > Interfaces—Configurable Attributes
Configurable Attribute
|
Description
|
Alias
|
Specifies the alias for the interface.
|
EnableLinkTrap
|
Enables or disables traps for the link.
|
Viewing FLOGI Attributes
To view fabric login (FLOGI) attributes, such as the Fibre Channel ID (FCID), port name, and class of service for FxPorts from the Fabric Manager, choose Interface > FxPorts > LoggedIn on the menu tree.
To view FLOGI attributes from the Device Manager, choose FxPorts or All Ports from the Interface menu and click the FLOGI tab.
The dialog box in Fabric Manager displays attributes for multiple switches. The dialog box from Device Manager displays attributes for a single switch. Both dialog boxes provide the display-only information described in Table 7-5.
Table 7-5 Interface > FxPorts > LoggedIn—Display-Only Attributes
Display-Only Attribute
|
Description
|
Switch
|
Displays the switch ID. This attribute is only displayed from the Fabric Manager.
|
Port
|
Displays the logged-in Nx_Port's port ID.
|
Fcid
|
Displays the Fibre Channel ID that has been assigned to the logged-in Nx_Port.
|
PortName
|
Displays the logged-in Nx_Port's world wide name.
|
NodeName
|
Displays the world wide name of the remote node to which the logged-in Nx_Port belongs.
|
Version
|
Displays the version of FC-PH (Fibre Channel Physical Interface) that the logged-in Nx_Port has agreed to support from the fabric login.
|
BB Credit—Rx
|
Displays the maximum number of receive buffers available for holding class 2 and class 3 frames received from the logged-in Nx_Port. This attribute is for buffer-to-buffer flow control in the incoming direction from the logged-in Nx_Port to the Fibre Channel port.
|
BB Credit—Tx
|
Displays the total number of buffers available for holding class 2 and class 3 frames to be transmitted to the logged-in Nx_Port. This attribute is for buffer-to-buffer flow control in the direction from the Fibre Channel port to the logged-in Nx_Port.
|
CoS
|
Displays the classes of service for which the logged-in Nx_Port has requested support from the Fibre Channel port.
|
Class 2—RxDataSize
|
Displays the class 2 receive data field size of the logged-in Nx_Port. This attribute specifies the largest data field size for an FT_1 frame that can be received by the Nx_Port.
|
Class 2—SeqDeliv
|
Displays whether the port has agreed to support class 2 sequential delivery during the fabric login. This is meaningful only if class 2 service has been agreed upon. This attribute is applicable only to Fx_Ports.
|
Class 3—RxDataSize
|
Displays the class 3 receive data field size of the logged-in Nx_Port. This attribute specifies the largest data field size for an FT_1 frame that can be received by the Nx_Port.
|
Class 3—SeqDeliv
|
Displays whether the FxPort has agreed to support class 3 sequential delivery during the fabric login. This is meaningful only if class 3 service has been agreed upon. This attribute is applicable only to Fx_Ports.
|
Viewing Port ELP Attributes
To monitor exchange link parameter (ELP) attributes, such as port and node world wide names and class of service from the Fabric Manager, choose Interface > xEPorts > ELP from the menu tree. To monitor these attributes from the Device Manager, choose xEPorts or All Ports from the Interface menu and click the ELP tab.
The dialog box in Fabric Manager displays attributes for multiple switches. The dialog box from Device Manager displays attributes for a single switch. Both dialog boxes provide the display-only information described in Table 7-6.
Table 7-6 Interface > xEPorts > ELP —Display-Only Attributes
Display-Only Attribute
|
Description
|
Switch
|
Displays the switch ID. This attribute is only displayed from the Fabric Manager.
|
Port
|
Displays the port ID.
|
NbrPortNodeName (Fabric Manager)
NeighborWWNs—Port (Device Manager)
|
Displays the node world wide name of the peer (neighbor) node.
|
NbrPortName (Fabric Manager)
NeighborWWNs—Node (Device Manager)
|
Displays the port world wide name of the peer (neighbor) Interconnect_Port.
|
BbCredit—Rx
|
Displays the maximum number of receive buffers available for holding class 2, class 3, and class F frames received from the peer Interconnect_Port. This attribute provides buffer-to-buffer flow control in the incoming direction from the peer Interconnect_Port to the local Interconnect_Port.
|
BbCredit—Tx
|
Displays the total number of buffers available for holding class 2,class 3, and class F frames to be transmitted to the peer Interconnect_Port. This attribute provides buffer-to-buffer flow control in the direction from the local Interconnect_Port to peer Interconnect_Port.
|
CoS
|
Displays the classes of services for which the peer Interconnect_Port has requested support from the local Interconnect_Port, and the local Interconnect_Port has granted the request.
|
Class 2—SeqDeliv
|
Displays whether the local Interconnect_Port has agreed to support class 2 sequential delivery during the ELP switch fabric internal link service request. This is meaningful only if class 2 service has been agreed upon.
|
Class 2 —RxDataSize
|
Displays the class 2 receive data field size of the peer Interconnect_Port. This attribute specifies the largest data field size for an FT_1 frame that can be received by the Interconnect_Port.This is meaningful only if class 2 service has been agreed upon.
|
Class 3—SeqDeliv
|
Displays whether the local Interconnect_Port has agreed to support class 3 sequential delivery during the ELP switch fabric internal link service request. This is meaningful only if class 3 service has been agreed upon.
|
Class 3 RxDataSize
|
Displays the class 3 receive data field size of the peer Interconnect_Port. This attribute specifies the largest data field size for an FT_1 frame that can be received by the Interconnect_Port.This is meaningful only if class 3 service has been agreed upon.
|
XII
|
Indicates, when true, that the peer Interconnect_Port supplying this attribute requires that an interlock be used during X_id assignment in class F. This is meaningful only if class F service has been agreed upon.
|
Class F—RxDataSize
|
Displays the class F receive data field size of the peer Interconnect_Port. class F service is always agreed upon between two Interconnect_Ports. This attribute specifies the largest data field size for an FT_1 frame that can be received by the Interconnect_Port.
|
Class F—ConSeq
|
Displays the number of sequence status blocks provided by the Interconnect_Port for tracking the progress of a sequence as a sequence recipient. The maximum number of concurrent sequences that can be specified is 255.
|
Class F—EECredit
|
Displays the maximum number of class F data frames that can be transmitted by an Interconnect_Port without receipt of accompanying ACK or link_response frames. The minimum value of end-to-end credit is one. The end-to-end credit field specified is associated with the number of buffers available for holding the data field of a class F frame and processing the contents of that data field by the Interconnect_Port supplying the attributes.
|
Class F—OpenSeq
|
Displays the maximum number of sequences that can be open at one time at the recipient between a pair of Interconnect_Ports for one exchange.This value is used for exchange and sequence tracking.
|
Viewing Trunking Information
To monitor trunking for ports from the Fabric Manager, choose Interface > xEPorts > Trunk Status from the menu tree. To view trunking for ports from the Device Manager, choose xEPorts from the Interface menu and then click the Trunk Status tab.
The dialog box in Fabric Manager displays attributes for multiple switches. The dialog box from Device Manager displays attributes for a single switch. Both dialog boxes provide the display-only information described in Table 7-7.
Table 7-7 Interface > xEPorts > Trunk Status—Display-Only Attributes
Display-Only Attribute
|
Description
|
Switch
|
Displays the switch ID. This attribute is only displayed from the Fabric Manager.
|
Port, Vsan
|
Displays the port ID and the VSAN ID.
|
OperStatus
|
Displays the current operating state of the port. Valid values are up, down, and disabled.
If the port is in trunking mode, it is possible for the port state to be down only in some VSANs.
|
OperStatusCause
|
Displays the cause of the port's current operating state.
|
Managing Physical Attributes for a Port
To configure beacon mode and monitor physical attributes for ports from the Fabric Manager, choose Interface from the menu tree and choose the type of port to be configured:
•Port Channels
•xEPorts
•FxPorts
•Other Ports
To configure beacon mode and monitor physical attributes for ports from the Device Manager, choose the type of port from the Interface menu and click the Physical tab.
The dialog box in Fabric Manager displays attributes for multiple switches. The dialog box from Device Manager displays attributes for a single switch. Both dialog boxes provide the display-only information described in Table 7-8.
Table 7-8 Interface > FxPorts > Physical—Display-Only Attributes
Display-Only Attribute
|
Description
|
Switch
|
Displays the switch ID. This attribute is only displayed from the Fabric Manager.
|
Index (Fabric Manager)
ID (Device Manager)
|
Displays the port ID.
|
ConnectorPresent
|
Displays whether the interface has a physical connector. Valid values are true and false.
This attribute is only displayed from the Device Manager.
|
TransmitterType
|
Displays the technology type of the port.
|
ConnectorType
|
Displays the module type of the port connector. Valid values are:
•embedded—The gigabit interface converter (GBIC) hardware is not removable.
•gbicSerialid—Displays if the GBIC serial ID can be read, otherwise it displays gbicNoSerialid.
•sfpSerialid—Displays if the GBIC's serial ID can be read, otherwise it displays sfpNoSerialid.
|
SerialNo
|
Displays the serial number of the GBIC.
|
Revision
|
Displays the port revision of the GBIC.
|
Vendor
|
Displays the name of the GBIC manufacturer.
|
To enable or disable beacon mode, check the BeaconMode check box. When beacon mode is enabled, an interface LED flashes to identify the interface.
Viewing Port Capability Attributes
To monitor port capability attributes, such as buffer-to-buffer credit, hold time, and class of service from the Fabric Manager, choose Interface from the menu tree and choose the type of port to be configured:
•xEPorts
•FxPorts
•Disabled Ports
To monitor these attributes from the Device Manager, choose the type of port from the Interface menu and click the Capability tab.
The dialog box in Fabric Manager displays attributes for multiple switches. The dialog box from Device Manager displays attributes for a single switch. Both dialog boxes provide the display-only information described in Table 7-9.
.
Table 7-9 Interface > FxPorts > Capabilities—Display-Only Attributes
Display-Only Attribute
|
Description
|
Switch
|
Displays the switch ID. This attribute is only displayed from the Fabric Manager.
|
Port
|
Displays the port ID.
|
FcphVersion—Low
|
Displays the lowest version of FC-PH that the port is capable of supporting.
|
FcphVersion—High
|
Displays the highest version of FC-PH that the port is capable of supporting.
|
BbCredit—Min
|
Displays the minimum number of receive buffers the port hardware (ASIC) is capable of holding for class 2 or class 3 frames from the attached Nx_Port.
Displays, for xE_ports, the maximum number of receive buffers the port hardware (ASIC) is capable of holding for class F frames from the attached xE_port.
|
BbCredit—Max
|
Displays the maximum number of receive buffers the port hardware (ASIC) is capable of holding for class 2 or class 3 frames from the attached Nx_Port.
Displays, for xE_ports, the maximum number of receive buffers the port hardware (ASIC) is capable of holding for class F frames from the attached xE_port.
|
RxDataSize—Min
|
Displays the minimum size of the data field (in bytes) in a frame that the port is capable of receiving from its attached port.
|
RxDataSize—Max
|
Displays the maximum size of the data field (in bytes) in a frame that the port is capable of receiving from its attached port.
|
HoldTime—Min
|
Displays the minimum holding time (in microseconds) that the port is capable of supporting.
|
HoldTime—Max
|
Displays the maximum holding time (in microseconds) that the port is capable of supporting.
|
Cos
|
Displays the bit mask indicating the set of classes of service that the port is capable of supporting.
|
Class2SeqDeliv
|
Displays whether the port is capable of supporting class 2 sequential delivery.
|
Class3SeqDeliv
|
Displays whether the port is capable of supporting class 3 sequential delivery.
|
Managing PortChannel Interfaces
PortChanneling, also called port bundling, is the aggregation of multiple physical ports into one logical port to provide higher bandwidth, load balancing, and link redundancy. The Fabric Manager allows you to configure and monitor PortChannel interfaces on multiple Cisco 9000 switches. The Device Manager allows you to configure and monitor PortChannel interfaces on a single Cisco 9000 switch. This section describes how to configure PortChannel interfaces using the Fabric Manager and the Device Manager and includes the following topics:
•Managing PortChannel General Attributes
•Managing PortChannel Interface Attributes
Managing PortChannel General Attributes
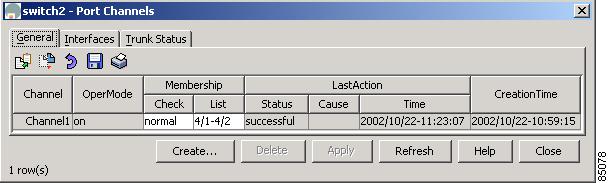
To manage PortChannels from the Fabric Manager, choose Interface > PortChannels > General from the menu tree. To manage PortChannels from the Device View, choose PortChannels from the Interface menu.
The dialog box in Fabric Manager displays attributes for multiple switches. The dialog box from Device Manager (Figure 7-2) displays attributes for a single switch.
Figure 7-2 PortChannels
Both dialog boxes show the display-only information described in Table 7-10.
Table 7-10 Interface > PortChannels > General—Display-Only Attributes
Display-Only Attribute
|
Description
|
Switch
|
Displays the switch ID. This attribute is only displayed from the Fabric Manager.
|
OperMode
|
Displays the port's current operating channel mode.
|
LastAction—Status
|
Displays the status of the last operation (add or remove a member) performed. Valid values are successful and failed.
|
LastAction—Cause
|
Displays the cause of failure to add ports to a PortChannel. This attribute displays zero (0) if the last operation was successful.
|
LastAction—Time
|
Displays the time the last action was performed on this PortChannel.
|
CreationTime
|
Displays the time the PortChannel was created.
|
Table 7-11 describes the configurable PortChannel general attributes.
Table 7-11 Interface > PortChannels > General—Configurable Attributes
Configurable Attributes
|
Description
|
Membership: Check
|
Specifies the method to be adopted by the agent to add ports to a PortChannel. Valid values are:
•normal—A compatibility check is done on the parameters of the ports being added to the PortChannel. The ports being added must have the same physical and configured parameters as the PortChannel.
•force—A compatibility check is done only on physical parameters. The ports being added must have the same physical parameters as the PortChannel. The ports' configured parameters are overwritten by the PortChannel's configured parameters.
|
Membership:List/MemberList
|
Specifies the xEPorts that are members of this PortChannel.
|
To add ports to a PortChannel, click Create. You see the dialog box shown in Figure 7-3.
Figure 7-3 Create PortChannels
Click the button to the right of the MemberList field and select any members to include in the PortChannel. Identify the other options you want to use and click OK.
Managing PortChannel Interface Attributes
To manage PortChannel interface attributes, such as the port mode and trunking from the Fabric Manager, choose the Interfaces > PortChannels > Interfaces from the menu tree. To manage PortChannel interface attributes from the Device Manager, choose PortChannels from the Interface menu and click the Interfaces tab.
The dialog box in Fabric Manager displays attributes for multiple switches. The dialog box from Device Manager displays attributes for a single switch. Both dialog boxes provide the display-only information described in Table 7-12.
Table 7-12 Interface > PortChannels > Interfaces—Display-Only Attributes
Display-Only Attribute
|
Description
|
Switch
|
Displays the switch ID. This attribute is only displayed from the Fabric Manager.
|
Group
|
Displays the PortChannel's interface ID.
|
Mode—Oper
|
Displays the current operating channel mode of the port.
|
Trunk—Oper
|
Displays the current operating state of the trunk. Valid values are up, down, and disabled.
|
Trunk—ActiveVsans
|
Displays the VSANs this port is associated with. Only ports operating in trunking mode can belong to multiple VSANs.
|
Speed
|
Displays an estimate of the port's current bandwidth in bits per second.
•For interfaces with a bandwidth that does not vary or where there is no accurate estimation of bandwidth, a nominal bandwidth displays.
•If the interface's bandwidth is greater than the maximum bandwidth reportable, the maximum bandwidth value displays.
|
Status—Oper
|
Displays the current operating state of the port. Valid values are up, down, and disabled.
|
Status—Cause
|
Displays the cause of the port's current operating state.
|
LastChange
|
Displays the date and time the interface entered its current operating state.
|
Table 7-13 describes the configurable PortChannel interface attributes.
Table 7-13 Interface > PortChannels > Interfaces—Configurable Attributes
Configurable Attributes
|
Description
|
Alias
|
Specifies the PortChannel's alias.
|
PortVsan
|
Specifies the ID of the VSAN to which this interface is statically assigned.
|
Mode—Admin
|
Specifies the current operating mode of the port. Valid values are:
•auto—Autonegotiated based on the value configured on the connected port
•F—Fabric port
•FL—Fabric loop port
•E—Expansion port
•FX—Either F or FL
•SD—SPAN destination port
•TL—Translative loop port
|
Trunk—Admin
|
Specifies the desired state of the trunk. Valid values are:
•trunk—In trunking mode
•nonTrunk—Not in trunking mode
•auto—Autonegotiated based on the value configured on the connected port
|
Trunk—AllowedVsans
|
Specifies the VSANs that are allowed to be received or transmitted on the port when the port is operating in trunking mode. Only ports operating in trunking mode can belong to multiple VSANs.
|
Status—Admin
|
Specifies the desired state of the interface. Valid values are:
•up
•down—When a managed system initializes, all interfaces start in the down state.
•testing—No operational packets can be passed.
|
Monitoring Port Statistics
This section describes how to monitor port statistics, the options available, and the different types of statistics you can monitor. These options are available on the Interface menu from Device Manager's Device View or Summary View. This section includes the following topics:
•Monitoring and Charting Traffic Statistics
•Monitoring Port Traffic (Bytes)
•Monitoring Port Traffic (Frames)
•Monitoring Port Discards
•Monitoring Port Class 2 Errors
•Monitoring Port Link Errors
•Monitoring Port Sequence Errors
•Monitoring Port Frame Errors
Monitoring and Charting Traffic Statistics
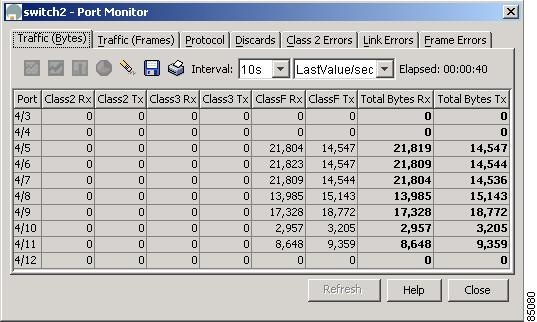
To monitor port traffic, discards, and errors for ports from the Device Manager, choose Monitor Selected from the Interface menu or right-click on one or more ports and choose Monitor from the pop-up menu. You see the dialog box shown in Figure 7-4.
Figure 7-4 Monitoring Ports
You can change the display by changing the following attributes from the Monitor Selected dialog box:
•Interval—Specifies the polling interval for the display in seconds, minutes, hours.
•AbsoluteValue—The actual counter value for the interface.
•Cumulative—The difference between the original absolute value and the last value retrieved for the interface.
•Average/sec —The average last value since the category was first displayed.
•Minimum/sec—The smallest last value.
•Maximum/sec—The largest last value.
•LastValue/sec—The difference between the current and previous counter values, normalized to per/second.
To display a line, area, or bar chart graph, select a traffic statistic and click one of the chart icons on the left side of the dialog box. You see the dialog box shown in Figure 7-5.
Figure 7-5 Bar Chart
Monitoring Port Traffic (Bytes)
To monitor port traffic bytes from the Device view, choose the Port Traffic (Bytes) tab from the Port Monitor dialog box. The dialog box shows the display-only information described in Table 7-14.
Table 7-14 Interface > Monitor Selected > Traffic (Bytes)—Display-Only Attributes
Display-Only Attribute
|
Description
|
Port
|
Displays the port ID.
|
Class2 Rx
|
Displays the class 2 bytes received by the port.
|
Class2 Tx
|
Displays the class 2 bytes transmitted by the port.
|
Class3 Rx
|
Displays the class 3 bytes received by the port.
|
Class3 Tx
|
Displays the class 3 bytes transmitted by the port.
|
ClassF Rx
|
Displays the class F bytes received by the port.
|
ClassF Tx
|
Displays the class F bytes transmitted by the port.
|
Total Bytes Rx
|
Displays the total bytes received by the port.
|
Total Bytes Tx
|
Displays the total bytes transmitted by the port.
|
Monitoring Port Traffic (Frames)
To monitor port traffic frames, choose the Port Traffic (Frames) tab on the Monitor Selected dialog box. The dialog box shows the display-only information described in Table 7-15.
Table 7-15 Interface > Monitor Selected > Traffic (Frames)—Display-Only Attributes
Display-Only Attribute
|
Description
|
Port
|
Displays the port ID.
|
Class2 Rx
|
Displays the class 2 frames received by the port.
|
Class2 Tx
|
Displays the class 2 frames transmitted by the port.
|
Class3 Rx
|
Displays the class 3 frames received by the port.
|
Class3 Tx
|
Displays the class 3 frames transmitted by the port.
|
ClassF Rx
|
Displays the class F frames received by the port.
|
ClassF Tx
|
Displays the class F frames transmitted by the port.
|
Total Bytes Rx
|
Displays the total frames received by the port.
|
Total Bytes Tx
|
Displays the total frames transmitted by the port.
|
Monitoring Port Discards
To monitor port discards, click the Discards tab on the Monitor Selected dialog box. The dialog box shows the display-only information described in Table 7-16.
Table 7-16 Interface > Monitor Selected > Discards—Display-Only Attributes
Display-Only Attribute
|
Description
|
Port
|
Displays the port ID.
|
Frames
|
Displays the number of frames discarded by the port.
|
EISL
|
Displays the number of Extended Inter-Switch Link (EISL) frames discarded by the port.
|
Class 2
|
Displays the number of class 2 frames discarded by the port.
|
Class 3
|
Displays the number of class 3 frames discarded by the port.
|
Class F
|
Displays the number of class F frames discarded by the port.
|
TotalRx
|
Displays the total number of inbound packets that were discarded even though no errors had been detected to prevent them being delivered to a higher layer protocol. One possible reason for discarding such a packet would be to free up buffer space.
|
TotalTx
|
Displays the total number of outbound packets that were discarded even though no errors had been detected to prevent them being delivered to a higher layer protocol. One possible reason for discarding such a packet would be to free up buffer space.
|
Monitoring Port Class 2 Errors
To monitor port class 2 errors, click the Class 2 Errors tab on the Monitor Selected dialog box. The dialog box shows the display-only information described in Table 7-17.
Table 7-17 Interface > Monitor Selected > Class 2 Errors—Display-Only Attributes
Display-Only Attribute
|
Description
|
Port
|
Displays the port ID.
|
FBSY
|
Displays the number of F_Port-busy frames generated by this port against class 2 frames.
|
FRJT
|
Displays the number of F_Port-reject frames generated by this port against class 2 frames.
|
PBSY
|
Displays the number of times that port busy was returned to this port when a class 2 frame could not be delivered to the other end of the link. This occurs if the destination Nx_Port is temporarily busy.
|
PRJT
|
Displays the number of times that port reject was returned to this port when a class 3 frame was rejected at the destination Nx_Port.
|
Monitoring Port Link Errors
To monitor port link errors, click the Link Errors tab on the Monitor Selected dialog box. The dialog box shows the display-only information described in Table 7-18.
Table 7-18 Interface > Monitor Selected > Link Errors—Display-Only Attributes
Display-Only Attribute
|
Description
|
Port
|
Displays the port ID.
|
LinkFailures
|
Displays the number of link failures detected by the port.
|
SigLosses
|
Displays the number of signal losses detected by the port.
|
SyncLosses
|
Displays the number of loss-of-synchronization failures detected by the port.
|
InvalidTxWords
|
Displays the number of invalid transmission words detected by the port.
|
BBCreditTransitionFromZero
|
Displays the number of buffer-to-buffer credit transitions out of zero state.
|
TxWaitCount
|
Displays the number of times the port waited due to lack of transmit credits.
|
LinkResetIns
|
Displays the number of link reset protocol errors received by the port from the attached port.
|
LinkResetOuts
|
Displays the number of link reset protocol errors transmitted by the port from the attached port.
|
LRRIn
|
Displays the number of link reset responses received by the port.
|
LRROut
|
Displays the number of link reset responses transmitted by the port.
|
Monitoring Port Sequence Errors
To monitor port sequence errors, click the Seq Errors tab on the Monitor Selected dialog box. The dialog box shows the display-only information described in Table 7-19.
Table 7-19 Interface > Monitor Selected > Seq Errors—Display-Only Attributes
Display-Only Attributes
|
Description
|
Port
|
Displays the port ID.
|
PrimSeqProtoErrors
|
Displays the number of primitive sequence protocol errors detected by the port.
|
DelimiterErrors
|
Displays the number of delimiter errors detected by the port.
|
UnknownClassFrames
|
Displays the number of unknown class frames received by the port.
|
EOFaFrames
|
Displays the number of frames with EOF aborts received by the port.
|
AddressidErrors
|
Displays the number of address identifier errors detected by the port.
|
OlsIns
|
Displays the number of offline sequence errors received by the port.
|
OlsOuts
|
Displays the number of offline sequence errors issued by the port.
|
NOSIn
|
Displays the number of nonoperational sequences received by the port.
|
NOSOut
|
Displays the number of nonoperational sequences transmitted by the port.
|
Monitoring Port Frame Errors
To monitor port frame errors, click the Frame Errors tab on the Monitor Selected dialog box. The dialog box shows the display-only information described in Table 7-20.
Table 7-20 Interface > Monitor Selected > Frame Errors—Display-Only Attributes
Display-Only Attributes
|
Description
|
Port
|
Displays the port ID.
|
InvalidCrcs
|
Displays the number of invalid CRCs detected by the port. Loop ports should not count CRC errors passing through when monitoring.
|
FragFrames
|
Displays the number of fragmented frames received by the port.
|
RuntFramesIn
|
Displays the number of frames received by the port that are shorter than the minimum allowable frame length, whether the CRC is good or not.
|
JabberFramesIn
|
Displays the number of frames received by the port that are longer than a maximum frame length, and also have a CRC error.
|
FramesTooLong
|
Displays the number of frames received by the port where the frame length was greater than what was agreed to in FLOGI/PLOGI. This could be caused by losing the end-of-frame delimiter.
|
FramesTooShort
|
Displays the number of frames received by the port where the frame length was less than the minimum indicated by the frame header. Normally the frame-length minimum is 24 bytes, but it could be more if the DFCTL field indicates an optional header should be present.
|
FramingErrorFrames
|
Displays the number of framing errors.
|
ELPFailures
|
Displays the number of ELP switch fabric internal link service request failures detected by the port. This attribute is applicable only to interconnect ports, which are E_Ports or B_Ports.
|
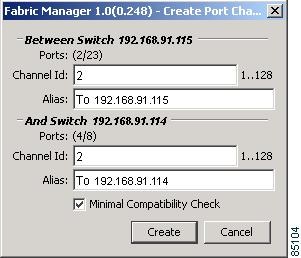
Managing PortChannels
To create a PortChannel from Fabric Manager, right-click two or more Inter-Switch Links (ISLs) and select PortChannel from the pop-up menu. You see the dialog box shown in Figure 7-6.
Figure 7-6 Create PortChannel Dialog Box
To add a link to an existing PortChannel, right-click an ISL on the Fabric Manager map and select PortChannel from the pop-up menu. You see the confirmation prompt shown in Figure 7-7.
Figure 7-7 Add to Port Channel Confirmation Prompt
Click Add to add a link to a PortChannel when the ports on each link and at both ends of the link have the same port speed, trunking type, and administrative state.
To force the addition of the link to a PortChannel, regardless of the port attributes, click the ForceAdd button.
Note To create a PortChannel, all the ports on both ends of the link must have the same port speed, trunking type, and administrative state.

 Feedback