-
User Guide for Cisco Security MARS Local Controller, Release 5.2.x
-
Preface
-
STM Task Flow Overview
-
Reporting and Mitigation Devices Overview
-
Configuring Router and Switch Devices
-
Configuring Firewall Devices
-
Configuring VPN Devices
-
Configuring Network-based IDS and IPS Devices
-
Configuring Host-Based IDS and IPS Devices
-
Configuring Antivirus Devices
-
Configuring Vulnerability Assessment Devices
-
Configuring Generic, Solaris, Linux, and Windows Application Hosts
-
Configuring Database Applications
-
Configuring Web Server Devices
-
Configuring Web Proxy Devices
-
Configuring AAA Devices
-
Configuring Custom Devices
-
Policy Table Lookup on Cisco Security Manager
-
Network Summary
-
Case Management
-
Incident Investigation and Mitigation
-
Queries and Reports
-
Rules
-
Sending Alerts
-
Management Tab Overview
-
System Maintenance
-
Cisco Security MARS XML API Reference
-
Regular Expression Reference
-
Date/Time Format Specfication
-
System Rules and Reports Reference
-
Glossary
-
Index
-
 Feedback
Table Of Contents
Policy Table Lookup on Cisco Security Manager
Overview of Cisco Security Manager Policy Table Lookup
More About Cisco Security Manager Device Lookup
More About Cisco Security Manager Policy Table Lookup
Prerequisites for Policy Table Lookup
Restrictions for Policy Table Lookup
Checklist for Security Manager-to-MARS Integration
Bootstrapping Cisco Security Manager Server to Communicate with MARS
Add a Cisco Security Manager Server to MARS
Procedure for Invoking Cisco Security Manager Policy Table Lookup from Cisco Security MARS
Policy Table Lookup on Cisco Security Manager
MARS and Cisco Security Manager (Security Manager) can be configured to provide round-trip policy audit features and improve traffic flow analysis and debugging. Using this feature, you can identify the ACL on a router or firewall that generated a syslog message received by MARS. It is important to understand that the integration between MARS and Security Manager is unique; MARS can provide users of Security Manager with better analytical tools.
When using MARS as your STM solution, you must understand that MARS suggests and makes changes to devices without notifying Security Manager of the suggested changes. Specifically, you can use the "Big Red" button to shutdown a port for support L2 devices. For a layer 3 device, MARS suggest ACL changes to block the traffic. In such cases, you can use Security Manager to manually mitigate using the ACL recommendations provided by MARS, thereby, ensuring that the configuration management solution stays abreast of the mitigation responses. Security Manager can also publish the same change to all like devices that it manages, providing a more robust containment.
For example, consider the following case where a user cannot connect to destination X from source Y. To troubleshoot this issue, an administrator can do the following:
1.
Log into the MARS web interface, and using an on-demand query, determine whether an event has been received that shows that traffic from source Y to destination X has been blocked.
2.
3.
This chapter describes how to configure Security Manager and MARS to ensure optimal functionality and seamless integration.
Overview of Cisco Security Manager Policy Table Lookup
When MARS receives a syslog from a Cisco PIX firewall, Cisco Adaptive Security Appliance (Cisco ASA), Cisco Firewall Services Module (Cisco FWSM), or Cisco IOS, and can derive the five tuple information required to establish an event (source IP, destination IP, source port, destination port, and protocol) the Security Manager Policy Table Lookup icon
appears in the Reporting Device column of the MARS session display. Clicking the icon invokes a query to the Security Manager, the result of which is to identify the access rule in the policy table of the device which created the traffic incident or event. Figure 16-1 depicts the policy query process between MARS and Security Manager.
Figure 16-1 Cisco Security MARS Policy Table Query Process
The syslog that generated the MARS incident or event may not have sufficient information for Security Manager to uniquely identify the device or the access rule. In these ambiguous cases, Security Manager returns a list of all possible devices to MARS in a pop-up window. When the MARS user manually selects a reporting device, the policy table is then displayed for that device. Access rules that match the query criteria are highlighted.
Note
http://www.cisco.com/en/US/products/ps6498/tsd_products_support_series_home.html
More About Cisco Security Manager Device Lookup
MARS requests the Policy Table of a Security Manager device by supplying the following criteria to Security Manager:
•
•
•
•
The Device Lookup query includes the following actions between MARS and Security Manager:
1.
2.
3.
4.
5.
More About Cisco Security Manager Policy Table Lookup
The device lookup information is combined with the event information to perform the Security Manager policy table lookup.
The following MARS event information derived from the reporting device raw message is passed to Security Manager:
•
•
•
•
•
The device, five tuple, action, ACL name, interface, and direction information comprise the policy query criteria submitted to the Security Manager. MARS displays the policy table in a pop-up window. The matching access rule is displayed in highlight. If MARS was unable to provide the interface, direction, and action information, multiple matched access rules may be highlighted.
Sample Cisco PIX Firewall Syslog Messages with Direction and Protocol Information
10.33.10.2 <142>%PIX-6-302013: Built outbound TCP connection 2021 for
inside:10.1.1.10/4000 (10.1.1.10/4000) to dmz:192.168.1.10/80 (192.168.1.10/80)
10.33.10.2 <142>%PIX-6-302013: Built inbound TCP connection 2000 for outside:1.234.58.149/12000 (1.234.58.149/12000) to inside:192.168.1.10/25 (100.1.4.10/25)Sample Cisco PIX Firewall Syslog Messages with Access Group Name Information
10.33.10.2 <142>%PIX-4-106023: Deny tcp src inside:10.1.5.234/3010 dst outside:5.6.7.8/21
by access-group "Cisco Security Manager-acl-inside"
Sample Cisco IOS 12.2 Syslog Messages with ACL Name Information
100.1.20.2 Mon Jun 9 14:46:31 2003 <46>485232: Jun 9 14:46:29 PDT: %SEC-6-IPACCESSLOGP:
list Cisco Security Manager-acl-FastEthernet0/0 permitted tcp 1.234.51.255(12000) ->
100.1.4.10(25), 1540 packet
10.34.1.1 <46>146570: Dec 19 21:01:57 PST: %SEC-6-IPACCESSLOGP: list Cisco Security Manager-acl-FastEthernet1/0 denied tcp 10.10.1.20(59399) -> 10.1.5.11(23), 1 packetPrerequisites for Policy Table Lookup
•
•
•
Restrictions for Policy Table Lookup
•
•
–
–
–
–
•
•
•
•
Note
•
This behavior is expected. When MARS receives events, they are parsed, sessionized, written to an event shared buffer, and then written to the database. Because sessionization takes time, sometimes keeping an event in cache for 2 minutes, the low-latency event query displays events right after parsing, but before sessionization. Displaying the event at this point allows the low-latency query to achieve a close to real-time effect. For some events, parsing cannot determine some part of the 5-tuple data, such as a destination address. Later, sessionization later fills in such missing data using configuration data. As a result, the 5-tuple data displayed by the low-latency event query can be different from values stored in the database, which are used to populate the standard queries.
•
<190>2312080: *May 9 23:50:02.199: %SEC-6-IPACCESSLOGDP: list permit-all permitted
icmp 10.2.3.8 -> 10.4.21.2 (0/0), 1 packet
An error occurred while querying policies from Cisco Security Manager. Reason: Failed to retrieve policy information from CSM. Reason: Cisco Security Manager Internal error: Failed to get interfaces in the device!The device LC2DTM was discovered by CSM without any errors.Before you perform policy queries, verify that all discovered devices have been submitted in Security Manager.
Checklist for Security Manager-to-MARS Integration
Security Manager-to-MARS integration deals with identifying the required and optional points of integration, configuring the applications and devices, and ensuring proper authorization among the two management platforms. This checklist assumes a greenfield install of both Security Manager and MARS.
The following checklist describes the tasks required to understand the decision-making process and the basic flow required to integrate MARS with a Security Manager server and the reporting and mitigation devices managed by that Security Manager server. Each step might contain several substeps; the steps and substeps should be performed in order. The checklist contains references to the specific procedures used to perform each task.
Note
STM Task Flow Overview, page 1-1.
1.
MARS supports round-trip policy audit analysis for reporting and mitigation devices that are both managed by Security Manager and monitored by a MARS Appliance. In other words, MARS can query the policy rules that generated an audit event log only when the policies are defined using Security Manager. As such, the first step in integrating MARS and Security Manager involves identifying those devices for which Security Manager is used to define policy rules. You must also ensure that devices are running a software versions supported by both MARS and Security Manager.
This list focuses on those devices that Security Manager manages and should include all of the following devices:
•
•
•
Note
Note
Result: The list of devices for which Security Manager manages the security and audit log policies is defined. The details of each device include device name, reporting IP address, management IP address, management protocol, administrative account information, and the logging features, levels, and protocols to enable.
For more information, see:
•
•
•
•
2.
After you identify the devices managed by the Security Manager server, you must verify that the network services they use for management, reporting, and notification are permitted along the required traffic flows. Using the detailed Device Inventory Worksheet identified in Step 1., ensure that the management, logging, and notification traffic between the MARS Appliance and each supporting device, reporting device, and mitigation device is allowed by intermediate gateways.
In addition, network services of supporting devices, such as DNS, e-mail, AAA, and NTP servers, must also be permitted to flow among the MARS Appliance, the supporting devices, and the reporting devices and mitigation devices on your network.
TipResult: You have verified that all intermediate gateways permit the log, management, and notification traffic between the devices and the MARS Appliance.
For more information, see:
•
•
•
•
•
3.
For each device identified in Task 1., you must prepare, or bootstrap, that device to ensure that the desired communications with MARS occur. Bootstrapping a device involves configuring the settings for that device, based on its role in the STM system. Perform the following subtasks as applicable to a device type and its role:
•
•
•
•
Note
You must configure the router and switch settings using the CLI, as Security Manager does not support those features. However, for ASA, FSWM, and PIX, you can use the Security Manager user interface to configure the management and log settings.
TipYou may also need to enable alternate settings on the to provide richer data. For more information on these possible settings, see Task 5 in the Checklist for Provisioning Phase, page 1-2 found in the STM Task Flow Overview chapter.
Result: The correct logging levels are enabled on the reporting devices and mitigation devices. The MARS Appliance can receive or pull any necessary logs from those devices, and it can retrieve configuration settings and push ACLS to the supported mitigation devices. While the MARS Appliance picks up and stores the events it receives, it does not inspect them until the reporting devices and mitigation devices are defined and activated in web interface.
For more information, see:
•
•
•
•
User Guide for Cisco Security Manager 3.0
•
See SNMP credentials.
•
See device access, SNMP settings, logging policies, and static routes as needed.
Note
•
•
See device access, SNMP, 802.1x, NAC, and static routes as needed.
•
See Spanning Tree Settings (STP).
4.
After you identify and bootstrap the reporting devices and mitigation devices and enable the required traffic flows, you must represent those devices in MARS, which uses this information to communicate with the devices. You can do this by adding individual devices in the web interface or by importing a comma separated vector (CSV) file, which can define the required settings for basic device types and give you a headstart on defining the more complicated devices. After you add the devices, you must activate them by clicking Activate on any page in the web interface.
To display all devices that are either added incorrectly or not activated in MARS, you can define one of two queries:
•
•
For both queries, if you are looking for a specific reporting IP address, enter that address in the Keyword field to filter the results down to those that include that IP address.
Result: All reporting devices and mitigation devices are defined and activated in MARS. When the devices are bootstrapped and defined in MARS, MARS begins to inspect the logs received from the devices. Until the devices are added in MARS, MARS picks up and stores the events it receives without inspecting them.
For more information, see:
•
•
•
•
•
•
•
•
•
•
5.
The required setup of the Security Manager server is quite simple:
•
•
•
•
Note
In addition, you should ensure that the user account used by MARS is exclusive on the Security Manager server. An exclusive account allows you to more easily detect any fraudulent use of the account.
MARS does not retrieve any audit log data from the Security Manager server. It merely accesses the set of policy rules that are defined on the server.
Once you prepare the Security Manager server, you must return to the MARS web interface and add the Security Manager server.
Result: The correct settings are enabled on each Security Manager server. The MARS Appliance can request and receive queries from no more than one Security Manager server. After adding the Security Manager server to the MARS web interface, you can test the connectivity by performing a policy lookup query on any of the events that have been received from one of the managed reporting devices and mitigation devices.
For more information, see:
•
•
•
•
6.
Once an event generated by one of the Security Manager-managed devices is received by MARS, you can perform a policy lookup operation. This operation allows you to, from a given incident or an event query, retrieve a list of the possible policies that could have affected the generation of that event from the Security Manager server.
For more information, see:
•
•
•
•
•
7.
While MARS suggests ACL changes to mitigate attacks, and in the case of Layer 2 devices such as Cisco switches, it can push changes to layer 2 device via the "Big Red" button (which shuts down a port on a switch), you must ensure accuracy between the policy defined in Security Manager and the configuration running on the managed devices. This synchronization ensures an accurate understanding of your network configuration and improves your ability to troubleshoot issues using the policy analysis tools provided in Security Manager.
Therefore, we recommend that you perform the device mitigation by applying the rules recommended by MARS with Security Manager. This approach also prevents you from having to manually synchronize your policy between Security Manager and the mitigation devices. As an added benefit, you can enable and remove containment rules on multiple devices via global rules, thereby further restricting the spread of possibly undetected infections. Using comments in the rules, you can document the attack responses, allowing for future analysis when considering global network stances and when developing attack response strategies.
Bootstrapping Cisco Security Manager Server to Communicate with MARS
To prepare the Security Manager server to be queried by MARS, you must configure the following settings:
•
–
–
–
–
Note
For more information on defining admin accounts on the Common Services 3.0 server, see:
•
•
Add a Cisco Security Manager Server to MARS
The Security Manager server is represented in MARS by defining a host with a software application residing on that host. Once you have identified the reporting devices to a Local Controller, you can add the Security Manager server that manages the policies for those reporting devices.
Each Local Controller can query one Security Manager server only; you cannot define more than one Security Manager server per Local Controller. You can define the same Security Manager server on multiple Local Controllers. When planning the zones for Global Controller/multi-Local Controller deployments, ensure that each Local Controller maps to the Security Manager server that manages the reporting devices monitored by that Local Controller.
To identify a Security Manager server to use for policy lookups from within the web interface of MARS, follow these steps;
Step 1
Step 2
•
•
Step 3
•
•
•
•
Step 4
This address represents the physical IP address of the Security Manager server. This information is used to ensure that the topology generated by MARS represents all network connections for the Security Manager server. It is also used to calculate possible attack paths that might include the Security Manager server.
Step 5
Step 6
Step 7
Step 8
•
•
•
•
Step 9
Result: If the username and password are correct and the MARS Appliance is configured as an administrative host for the device, the "Connectivity successful." dialog box appears when the discovery operation completes. Otherwise, an error message appears, which you can click on the View Error link for more information.
Step 10
Result: The submit operation records the changes in the database tables. However, it does not load the changes into working memory of the MARS Appliance. The activate operation loads submitted changes into working memory.
Step 11
Result: Once the MARS Appliance is activated, it can query the Security Manager server to perform policy lookups.
Procedure for Invoking Cisco Security Manager Policy Table Lookup from Cisco Security MARS
Do the following steps to view a Cisco Security Manager policy table from the Cisco Security MARS:
Step 1
Step 2
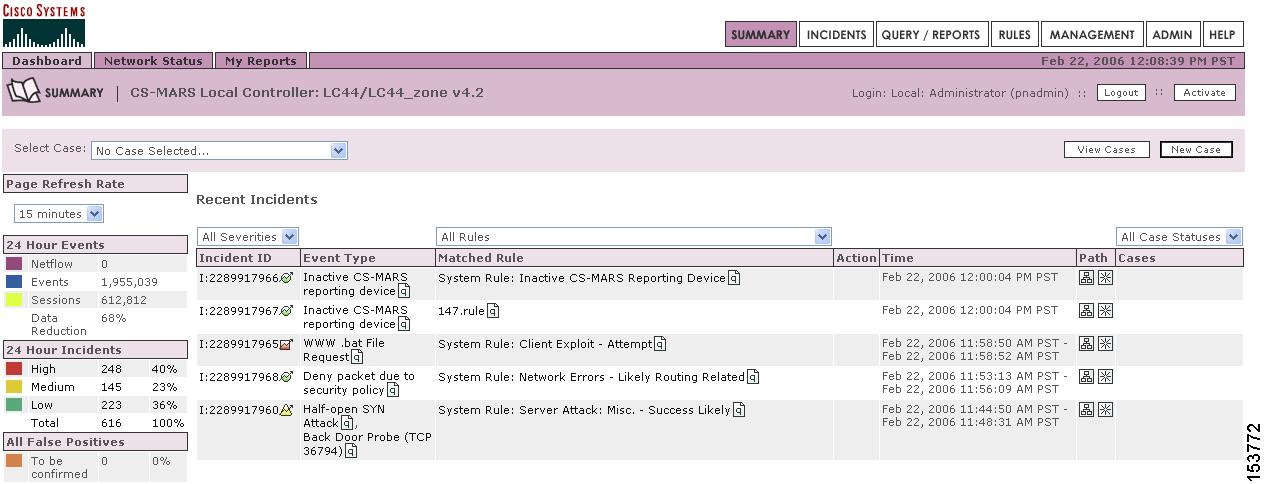
In this procedure, and incident to investigate appears on the Recent Incidents section of the Dashboard, as shown in Figure 16-2.
Figure 16-2 Recent Incidents on MARS Summary Page
Step 3
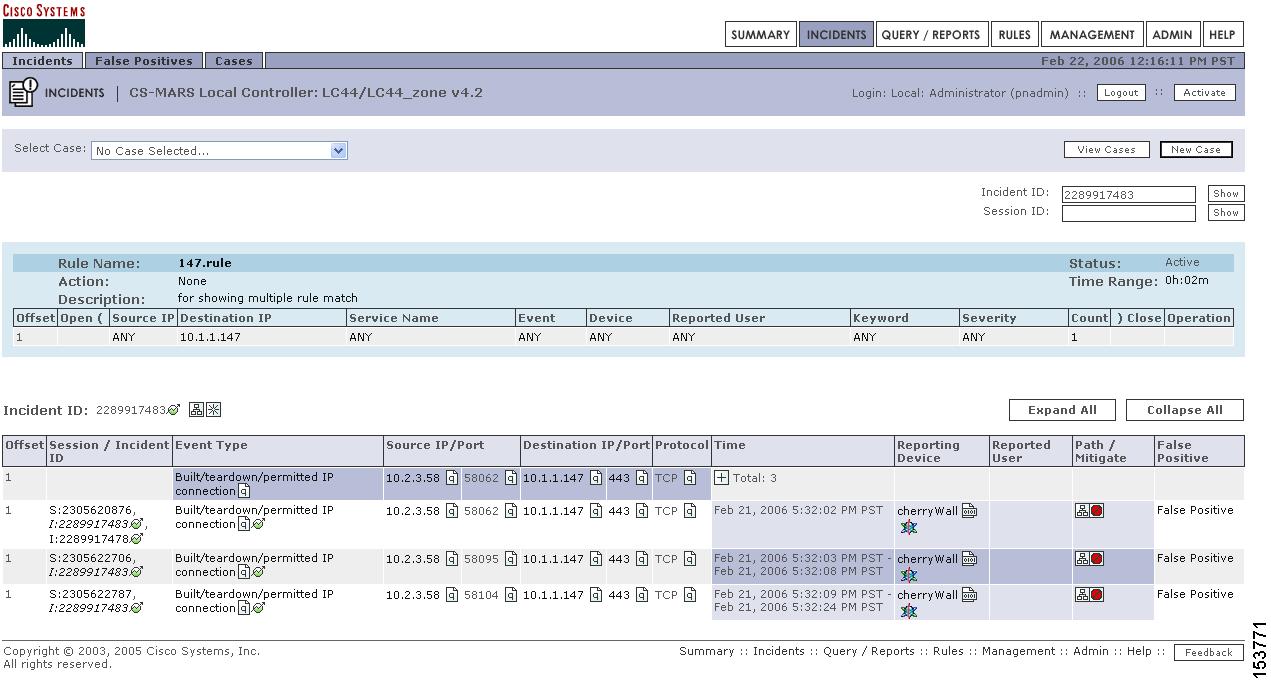
Figure 16-3 MARS Incident Page Displaying the Cisco Security Manager Icon in the
Reporting Device Field
Step 4
Security Manager policy table lookup. One of the following three pop-up windows may appear:–
–
–
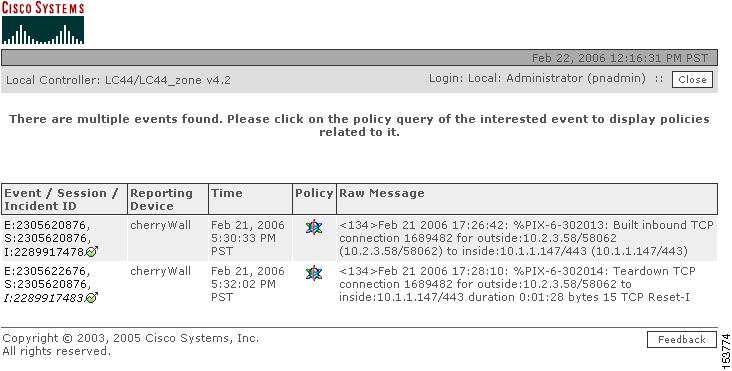
In this procedure, the Multiple Events window appears, as shown in Figure 16-4.
Figure 16-4 MARS Multiple Events Pop-up Window
Step 5
–
–
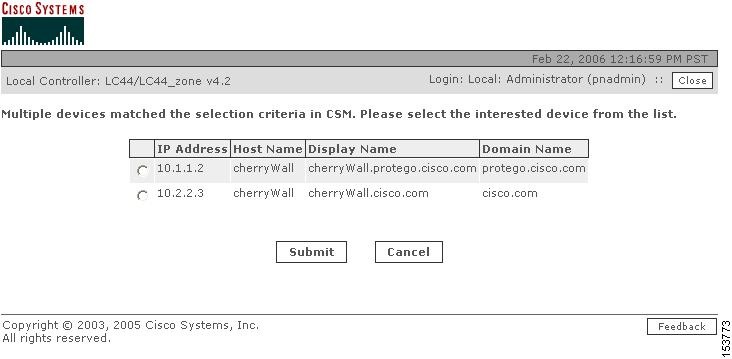
In this procedure the Multiple Device pop-up window is displayed, as shown in Figure 16-5.
Figure 16-5 MARS Multiple Devices Pop-up Window
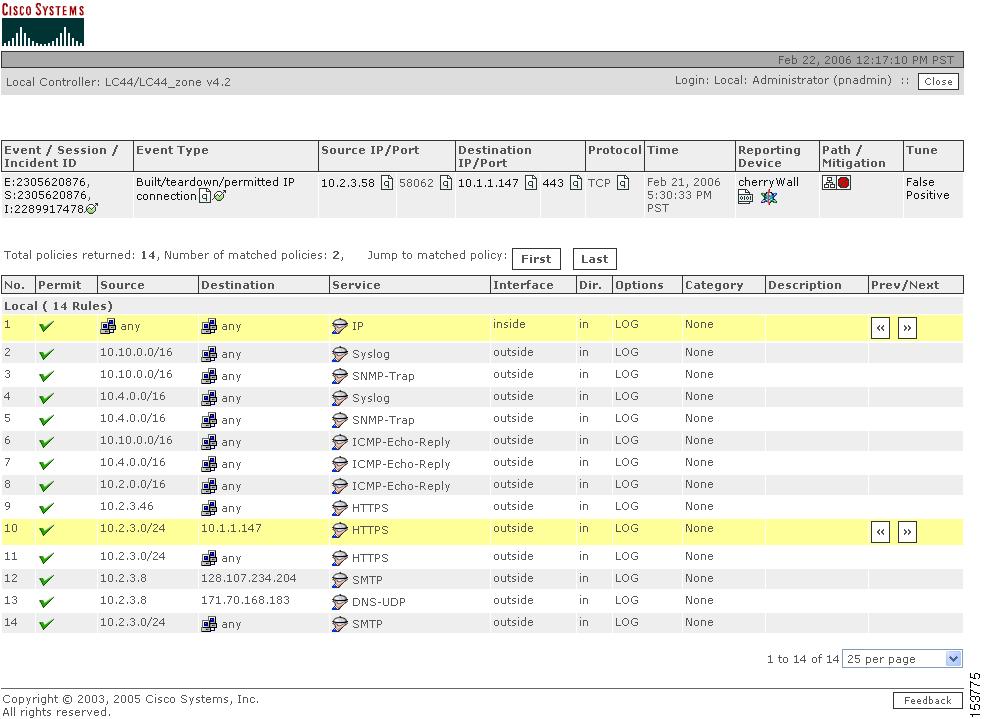
Step 6
Figure 16-6 Policy Table Pop-up Window
Cisco Security Manager
The access rules that match the MARS query criteria appear in highlight. The access rules displayed in the Policy Table window are derived from the Security Manager committed view, not the deployed view. You must login to Security Manager or the specific device to examine or alter the access rule generating the MARS event or incident. If the committed and deployed views are identical, locating the policy is simplified. A MARS event can be generated from a deployed access rule not visible in the
committed view.Step 7
This ends the Procedure for Accessing Cisco Security Manager Logs from Cisco Security MARS.
Note