Feedback
Table Of Contents
"Type `?' for a list of commands" Message
Command Reference
Configure PIX Firewall using the commands that follow. You can enter commands from your console computer or terminal, or through Telnet or the HTML management interface.
Help Information
Help information is available by entering a question mark by itself for a listing of all commands, or with a command for command syntax. For example:
pixfirewall> int ?usage: interface ethernet inside|outside 10baseT|100baseTX|autoComments
You can add comments to your configuration by entering a colon (:) as the first command in a line. Use comments to improve configuration file readability or to make configuration file commands not executable.
Abbreviating Commands
You can abbreviate most commands down to the fewest unique characters for a command; for example, you can enter write t to view the configuration instead of entering the full command write terminal, or you can enter en (enable) to start privileged mode and conf t (configure terminal) to start configuration mode.
"Type `?' for a list of commands" Message
To simplify the PIX Firewall interface, the "Type `?' for a list of commands" message displays for a variety of reasons:
1
Incorrect access mode — Ensure you are in configuration mode before entering configuration mode commands. From unprivileged mode, enter the enable command to start privileged mode. From privileged mode, enter config terminal to start configuration mode.
2
pixfirewall(config)# hostname ?usage: hostname <newname>3
age
Sets Private Link key duration. (Configuration mode.)
age minutes
Syntax Description
Usage Guidelines
The age command specifies the length of time in minutes that a key is active over Private Link. Private Link supports up to seven keys that it selects sequentially to ensure additional security.
Note
Private Link packet information tells the remote side what key number to use to decrypt the data. The aging duration can be different, as well as the system clocks themselves on either side of the link, but as long as you use the same link statements on both sides, all information decrypts correctly.See also: link, show age.
Example
pixfirewall(config)# age 0pixfirewall(config)# show agePrivate Link Key Aging: 10 minutesapply
Apply outbound access list to an IP address. (Configuration mode.)
apply number outgoing_src|outgoing_dest
Syntax Description
Usage Guidelines
The apply command applies the outbound list parameters to permit or deny access from an IP address in your inside network to an IP address in the outside network. Use outbound lists to permit or deny access to system ports.
See also: clear apply, no apply, outbound, show apply, show outbound.
Example
pixfirewall(config)# apply 1 192.168.42.42 10.10.10.42arp
Add entry to PIX Firewall ARP table. (Configuration mode.)
arp inside|outside ip_address mac_address [alias]
Syntax Description
Usage Guidelines
The arp command adds an entry to the PIX Firewall ARP table. ARP is a low-level TCP/IP protocol that resolves a node's physical address from its IP address through an ARP request asking the node with a particular IP address to send back its physical address.
See also: clear arp, no arp, show arp.
Example
pixfirewall(config)# arp 192.168.0.42 0000.0101.0202pixfirewall(config)# arp 192.168.0.43 0000.0101.0203 aliasarp timeout
Change PIX Firewall ARP table entry duration. (Configuration mode.)
arp timeout seconds
Syntax Description
Usage Guidelines
The arp timeout command sets the duration that an ARP entry can stay in the PIX Firewall ARP table before expiring. The timer is known as the ARP persistence timer. The default value is
14400 seconds (4 hours).See also: show arp timeout
Example
pixfirewall(config)# arp timeout 42pixfirewall(config)# show arp timeoutarp timeout 42 secondsauth
Enable PIX Firewall user authentication. (Configuration mode.)
auth inside|outside
Syntax Description
Usage Guidelines
The auth command enables PIX Firewall authentication. The no auth command disables authentication. With the inside or outside argument, you can enable or disable authentication on one side of the PIX Firewall or the other. Without arguments, you can enable or disable authentication on both sides.
For outside connections, a challenge prompt appears during FTP or Telnet sessions as defined by the type of authentication server.
Authorization notes:
1
2
3
4
5
6
7
8
9
10
11
12
13
authentication_username@remote_system_usernameauthentication_password@remote_system_password14
15
Example
pixfirewall(config)# auth insideauth-server
Specify IP address of authentication server. (Configuration mode.)
auth-server type server_ip[-server_ip] skey
Syntax Description
Usage Guidelines
The auth-server command lets you identify the IP address of the authentication server. The authentication server must be on the inside PIX Firewall network interface.
Defines a server for the specified authentication server type. PIX Firewall tries each server in order until it receives an answer for the type of authentication you specify. Refer to the previous auth command description for more information on authentication.
Note
RADIUS must have skey defined.
Example
pixfirewall(config)# auth-server radius 192.168.42.20-192.168.42.42auth-user
Specify IP address of authentication user. (Configuration mode.)
auth-user type ip_address netmask
Syntax Description
Usage Guidelines
The auth-user command lets you provide authentication services for an IP address. For outbound connections, use of auth-user indicates that anyone on the IP address you specify must use authentication when using Telnet, FTP, or HTTP. For inbound connections, auth-user indicates that anyone attempting to access the specified IP address with FTP, Telnet, or HTTP must use authentication.
Note
Refer to the previous auth command description for more information on authentication.
See Also: auth, no auth-user, show auth-user
Example
pixfirewall(config)# auth-user radius 192.168.42.1 255.255.255.0clear apply
Clear previous apply of outbound access lists to an IP address. (Configuration mode.)
clear apply number [outgoing_src|outgoing_dest]
Syntax Description
Usage Guidelines
The clear apply command clears an outbound access list created by a previous use of apply.
See also: apply, no apply, show apply.
Example
pixfirewall(config)# clear applyclear arp
Clear PIX Firewall ARP table entry. (Privileged mode.)
clear arp inside|outside [ip_address mac_address alias]
Syntax Description
Usage Guidelines
The clear arp command clears the PIX Firewall ARP table. To remove alias entries, specify the alias keyword. You may clear entries by IP or MAC address.
This command is the same as no arp.
See also: arp, no arp, show arp.
Example
pixfirewall# clear arp insideclear auth-user
Remove authentication support for IP address. (Configuration mode.)
clear auth-user type ip_address netmask
Syntax Description
Usage Guidelines
The clear auth-user command removes authentication access for an IP address. You can remove all access by not specifying options, or you can remove access by authentication type, such as TACACS+, or by type and IP address.
Example
pixfirewall(config)# clear auth-user tacacs+clear auth-server
Stop authentication access to a server. (Configuration mode.)
clear auth-server type server_ip skey
Syntax Description
Usage Guidelines
The clear auth-server command specifies that an authentication server is no longer servicing authentication requests. Use this command when you take an authentication server offline or have changed your network topology.
You can remove access to all authentication servers by not specifying options, or you can remove access by authentication type, such as TACACS+, or by type and server IP address.
Note
RADIUS must have skey defined.
Example
pixfirewall(config)# clear auth-serverclear http
Remove HTTP access to the PIX Firewall HTML management interface from the specified IP address or all IP addresses. (Configuration mode.)
clear http ip_address [netmask]
Syntax Description
Usage Guidelines
The clear http command removes HTTP access to an IP address. This is the same as the no http command.
See also: http, show http.
Example
pixfirewall(config)# clear httpclear outbound
Clear outbound access list. (Configuration mode.)
clear outbound num [permit|deny ip_address netmask port]
Syntax Description
Usage Guidelines
The clear outbound command clears an outbound access list or specific details within it.
See also: apply, no outbound, outbound, show outbound.
Example
pixfirewall(config)# clear outbound 1clear route
Clear the inside or outside interface's routing table. (Configuration mode.)
clear route inside|outside [static]
Syntax Description
Usage Guidelines
The clear route command clears the routing table for the specified interface. You can clear both routing tables by entering clear route without the inside or outside keywords. To clear static routes, use the static keyword. To remove an individual route without clearing the entire table, use the no route command.
See also: no route, route, show route
Example
pixfirewall(config)# clear route inside staticclear snmp-server
Clear SNMP contact or location, or stop sending SNMP event information. (Configuration mode.)
clear snmp-server contact|location|host value
Syntax Description
contact
Clear the contact information.
location
Clear the PIX Firewall location.
host
Stop sending SNMP event information.
Usage Guidelines
The clear snmp-server contact command deletes the contact information from that which is sent to the SNMP server. The clear snmp-server location command has the same effect for the location. Use these commands when you want to change the text in the contact or location fields; that is, by clearing it and then replacing the information with the snmp-server command.
The clear snmp-server host command stops sending SNMP traps, or you can specify one or more IP addresses to which SNMP traps are not sent.
Using SNMP, you can monitor system events on the PIX Firewall.
See also: no snmp-server, snmp-server, show snmp-server
Example
pixfirewall(config)# clear snmp-server locationclear syslog
Stop logging SYSLOG messages. (Configuration mode.)
clear syslog console
clear syslog host ip_address
clear syslog output facility.level
Syntax Description
Usage Guidelines
The clear syslog console command disables SYSLOG messages on the console. The clear syslog host command disables sending SYSLOG messages to the specified host. The clear syslog output command stops sending all SYSLOG messages. This command is the same as no syslog.
See also: syslog, show syslog
Example
pixfirewall(config)# clear syslogclear telnet
Remove PIX Firewall Telnet access from user. (Configuration mode.)
clear telnet ip_address netmask
Syntax Description
Usage Guidelines
The clear telnet command removes Telnet access to an IP address. Up to 16 hosts or networks are allowed access to the PIX Firewall, 4 simultaneously. show telnet displays the current list of IP addresses authorized to access the PIX Firewall. You can use the who command to see which IP addresses are currently accessing the firewall with Telnet.
See also: show telnet, who
Example
pixfirewall(config)# clear telnet 192.168.42.42
conduit
Add conduit through firewall for incoming connections. (Configuration mode.)
conduit global_ip port[-port] protocol ip_address [netmask]
Syntax Description
Usage Guidelines
The conduit command creates an exception to the PIX Firewall Adaptive Security mechanism by letting you permit connections from outside the PIX Firewall to hosts on the inside network. Conduits exist on the static translation slots and can be added with the conduit command or through the last parameter of the static command. The conduit command is the recommended method. The no conduit command removes the conduit you specify.
Note
If a conduit is specified as, for example: conduit 192.1.1.1 tcp:192.1.2.2/32-0, the host 192.1.2.2 can access the inside host that is mapped to the global address 192.1.1.1 on any TCP port. The same syntax applies for UDP.
See also: no conduit, show conduit.
Example
The following pair of commands enables only SMTP communication between the UNIX gateway host (10.10.25.10) and an SMTP server on the inside network (192.168.1.49):
pixfirewall(config)# static 10.10.26.147 192.168.1.49pixfirewall(config)# conduit 10.10.26.147 tcp:10.10.25.10/32-25To remove the last conduit, issue the following:
pixfirewall(config)# no conduit 10.10.26.147 tcp:10.10.25.10/32-25configure floppy
Merge current configuration with that on floppy disk. (Privileged mode.)
configure floppy
Usage Guidelines
The configure floppy command merges the current running configuration with the configuration stored on floppy disk. This command assumes that the floppy disk was previously created by the write floppy command.
Each statement on floppy disk is read into the current configuration and evaluated in the same way as commands entered from a keyboard with these rules:
•
•
•
Example
pixfirewall# configure floppyconfigure memory
Merge configuration with that from flash memory. (Privileged mode.)
configure memory
Usage Guidelines
The configure memory command merges the configuration in flash memory into the current configuration in RAM. Each statement in flash memory is read into the current configuration and evaluated in the same way as commands entered from a keyboard with these rules:
•
•
•
Example
pixfirewall# configure memoryconfigure terminal
Start configuration mode. (Privileged mode.)
configure terminal
Usage Guidelines
The configure terminal command starts configuration mode. Exit configuration mode by pressing ^z. After exiting configuration mode, use write memory to store your changes in flash memory or write floppy to store the configuration on floppy disk. Use the write terminal command to display the current configuration.
Example
pixfirewall# configure terminaldisable
Exit privileged mode and return to unprivileged mode. (Privileged mode.)
disable
Usage Guidelines
The disable command exits privileged mode and returns you to unprivileged mode. Use the enable command to return to privileged mode.
Example
pixfirewall# disablepixfirewall>enable
Start privileged mode. (Unprivileged mode.)
enable
Usage Guidelines
The enable command starts privileged mode. PIX Firewall prompts you for your privileged mode password. The default password is cisco. Use disable to exit privileged mode. Use enable password to change the password.
Example
pixfirewall> enablePassword: #######pixfirewall# disablepixfirewall>enable password
Set the privileged mode password. (Privileged mode.)
enable password password
Syntax Description
password
A password of up to 16 alphanumeric characters, which is not case sensitive. PIX Firewall converts the password to all lowercase.
Usage Guidelines
The enable password command changes the privileged mode password, for which you are prompted after you enter the enable command. When the PIX Firewall starts and you enter privileged mode, the password prompt appears. The default password is cisco.
Note
Privileged mode password:__________________________
Example
pixfirewall(config)# enable password fnord42failover
Enable access to the optional failover feature. (Configuration mode.)
failover [active]
Syntax Description
Usage Guidelines
The failover command without an argument indicates that you have connected the optional failover cable from your primary PIX Firewall to a secondary PIX Firewall. Failover works by passing control to the secondary unit should the primary unit fail. The switch between units occurs within
60 seconds of the failure event. The markings on the cable let you choose which unit is primary and which is secondary. Refer to Installing the Failover Connector Assembly and Cable (Document Number 78-3749-01) supplied with the failover cable option for more information about upgrading an existing PIX Firewall unit to accept the failover cable.
Note
Failover only works with the Cisco failover cable. PIX Firewall failover does not work with alternate vendor DB15-to-DB15 cables.Enable the failover feature by adding the failover command (without the active parameter) to the configuration files for both the primary and secondary PIX Firewalls.
When you use Telnet to access the PIX Firewall, only the active unit serves the connection. Use the hostname command on both units to identify a unique name for each unit. Using the host name, you can tell if you are communicating with the primary or secondary unit. If you are using Telnet when a failure occurs, you need to disconnect the Telnet session and restart it to the IP address.
If a failure occurs, the host name in the Telnet command prompt gives you positive acknowledgment that the secondary unit is active. In addition, SYSLOG messages indicate whether the primary or secondary unit failed. Use the show failover command to verify which unit is active.
Aside from the different host names, the configuration files for both units need to be identical.
If you want to force a PIX Firewall to be active or go to standby you can use the failover active or no failover active command. Use this feature to force a PIX Firewall offline for maintenance or to return a failed unit to service.
Use the show failover command to verify the status of the connection and to determine which unit is active.
Failover SYSLOG Messages
In the messages that follow, P|S can be either Primary or Secondary depending on which PIX Firewall is sending the message. Failover messages always have a SYSLOG priority level of 2, which indicates critical condition. Refer to the syslog output command description for more information on SYSLOG messages.
The SYSLOG messages sent to record failover events are:
•
•
•
•
•
•
•
•
•
•
•
•
•
•
•
•
•
See also: no failover, show failover.
Example
pixfirewall(config)# failover activeglobal
Define IP address in the global pool. (Configuration mode.)
global global_id ip_address
Syntax Description
Usage Guidelines
The global command defines the addresses in the global pool. Global pool addresses must be registered with the NIC; they provide an IP address for each incoming and outgoing connection. Always use the nat command with the global command to assign the global_id values to each network.
Configuring the PIX Firewall requires you to specify at least two global IP addresses with the global command. PIX Firewall uses the global addresses to assign a virtual IP address to a connection. When the translate times out (defined by the timeout command), the global address returns to the available pool. If the outside network connects with the Internet, each IP address you specify as a global must be registered with the NIC. The phrases global network and virtual network are synonymous in this document.
When you assign global addresses from the pool for Private Link, select addresses from the start of global pool range. The PIX Firewall allocates IP addresses from the global pool by starting at the end of the range you specify and working backward.
The minimum number of IP addresses you must add to the global pool is 2; for example, 10.10.26.10-10.10.26.11. The maximum is 1 class B network worth of IP addresses. It is not valid to add 1 address; for example, global 10.10.26.20.
Note that the IP addresses assigned to the global pool differ by class type. If you specify a class A address, such as 1.2.3.0, global assigns address 1.0.0.1 through 1.0.255.254 to the global pool; whereas, if you specify a class C address, such as 192.168.42.0, global assigns only the
254 addresses from .1 to .254.If you are using the same subnet and want to share it between the outside network and the PIX Firewall virtual network, the PIX Firewall causes a proxy-arp for the global pool on the outside network. If you are using global networks that are disjoint from the outside network address, be certain that the networking equipment and computers have a routing table entry for the global network with a next hop of the outside interface of the PIX Firewall.
When you enter the global command and specify a network address, such as 192.168.42.0, the "Some globals not created" message appears if the addresses you requested could not be assigned to the global pool. The firewall cannot assign either the .0 address or the .255 address to the global pool. Use the show global command to view which IP addresses were created.
Example
pixfirewall(config)# global 1 10.10.10.0help
Display help information. (Unprivileged mode.)
help
?
Usage Guidelines
The help or ? command displays help information about all commands. You can view help on an individual command by entering the command name followed by a question mark.
Example
pixfirewall(config)# age ?age <minutes>Help information is available on the core commands (not show, no, or clear commands) by entering ? at the command prompt:
pixfirewall(config)# ?hostname
Change the host name in the PIX Firewall command line prompt. (Configuration mode.)
hostname newname
Syntax Description
newname
New host name for the PIX Firewall prompt. This name can be up to
16 alphanumeric characters and is not case sensitive. PIX Firewall converts the host name to all lowercase.
Usage Guidelines
The hostname command changes the host name label on prompts. The default host name is "pixfirewall." If you have the optional failover feature, assign host names to both PIX Firewall units. Then if a failure occurs and you Telnet to the IP address, the host name in the prompt verifies that the secondary unit is functioning.
Example
pixfirewall(config)# hostname spinnerspinner(config)# hostname pixfirewallpixfirewall(config)#http
Permit inside IP address access to the PIX Firewall HTML management interface. (Configuration mode.)
http ip_address netmask
Syntax Description
Usage Guidelines
The http command lets an IP address access the PIX Firewall HTML management interface. Use no http or clear http to disable management interface access. Use show http to list the information you entered.
Note
You cannot access the PIX Firewall HTML management interface unless you have used the passwd command to create an access password.
Example
pixfirewall(config)# http 192.168.42.42 255.255.255.255interface ethernet
Identify Ethernet board speed and duplex. (Configuration mode.)
interface ethernet inside|outside 10baseT|100baseTX|auto
Syntax Description
Usage Guidelines
The interface ethernet command identifies the speed and duplex settings of the network interface boards. The speed setting affects the show blocks command. Refer to Installing Circuit Boards in the Cisco PIX Firewall (Document Number 78-3748-01) for information on installing an Ethernet board. Use no interface ethernet to disable access to the network interface. Use show interface ethernet to view information about the interface.
Example
pixfirewall(config)# interface ethernet inside autopixfirewall(config)# interface ethernet outside autointerface token
Identify Token-Ring board speed. (Configuration mode.)
interface token inside|outside [4mbps|16mbps]
Syntax Description
Usage Guidelines
The interface token command identifies the speed of the Token-Ring network interface. Refer to Installing Circuit Boards in the Cisco PIX Firewall (Document Number 78-3748-01) for more information on installing a Token-Ring board. Use no interface token to disable access to the network interface. Use show interface token to view information about the interface.
Example
pixfirewall(config)# interface token inside 16mbpspixfirewall(config)# interface token outside 16mbpsip address
Identify IP address for PIX Firewall. (Configuration mode.)
ip address inside|outside ip_address [netmask]
Syntax Description
inside|outside
The inside or outside network interface.
ip_address
IP address.
[netmask]
Network mask of ip_address.
Usage Guidelines
The ip address command assigns an IP address to the PIX Firewall. Use the show ip address command to view which addresses are assigned to the inside and outside network interfaces.
Example
pixfirewall(config)# ip address inside 130.10.2.1 255.255.255.0kill
Terminate a Telnet session. (Privileged mode.)
kill telnet_id
Syntax Description
Usage Guidelines
The kill command terminates a Telnet session. Use the who command to view the Telnet session ID value. When you kill a Telnet session, PIX Firewall lets any active commands terminate and then drops the connection without warning to the user.
See also: show who, telnet
Example
pixfirewall# show who2: From 10.10.54.0pixfirewall# kill 2link
Specify Private Link connection to PIX Firewall. (Configuration mode.)
link remote_ip_address key-id key
Syntax Description
Usage Guidelines
The link command creates an encrypted path between version 3 Private Link equipped PIX Firewall units. You can specify up to seven encryption keys for data access between your unit and the remote unit. The key-ID and key values must be the same on each side of the Private Link. Once you specify the same keys on both sides of the connection, the systems alert each other when a new key takes effect. You can use the age command to specify the number of minutes that a key is in effect.
Specify the link command once for each key you want to specify; for example, if you want seven keys, enter the link command in the configuration seven times.
The PIX Firewall Private Link consists of an encryption card and software that permits PIX Firewall units to provide encrypted communications across an unsecure network such as the Internet. This optional feature is available to domestic customer sites.
PIX Firewall allows up to 64 Private Links. At least two PIX Firewall units are required along with the hardware/software option to use this feature.
Private Link works by checking packets that arrive at the PIX Firewall inside interface. If a route link previously created by the linkpath command exists that matches the destination network address, the packet is encrypted and encapsulated in an AH/ESP frame. The frame has a destination address of the remote PIX Firewall and a source address of the local PIX Firewall. When the packet arrives at the remote PIX Firewall unit, the data in the packet is decrypted and then sent through the inside interface to the original IP address specified. No translation takes place on packets that traverse the PIX Firewall Private Link. The addressing and data remains completely unchanged.
PIX Firewall allows up to 512 link paths.
You can manage remote PIX Firewall units through the Private Link interface.
See also: linkpath, show link
Example
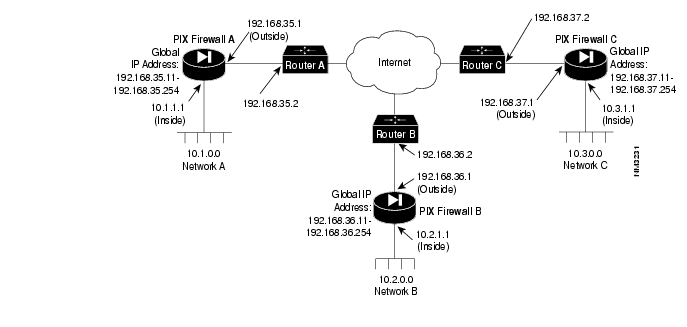
To configure a Private Link, refer to the example setup in .
Figure 4-1 Example Private Link Network Diagram
Before configuring Private Link, you would initially configure the systems using the standard commands. To configure PIX Firewall A, use these commands:
pixfirewall(config)# interface ethernet inside auto uppixfirewall(config)# interface ethernet outside auto uppixfirewall(config)# ip address inside 10.1.1.1 255.255.255.0pixfirewall(config)# ip address outside 192.168.35.1 255.255.255.0pixfirewall(config)# nat 1 0.0.0.0pixfirewall(config)# global 1 192.168.35.0pixfirewall(config)# route inside 10.1.1.2pixfirewall(config)# route outside 192.168.35.2For this example, assume that PIX Firewall B, the version 2 PIX Firewall, is already configured to have the IP addresses and global IP addresses shown in the illustration, and that it has its Private Link configured to talk to PIX Firewall A and C. Refer to the version 2 Private Internet Exchange Reference Guide (Document Number 78-3362-02) for more information on configuring Private Link.
To initially configure PIX Firewall C, use these commands:
pixfirewall(config)# interface ethernet inside auto uppixfirewall(config)# interface ethernet outside auto uppixfirewall(config)# ip address inside 10.3.1.1 255.255.255.0pixfirewall(config)# ip address outside 192.168.37.1 255.255.255.0pixfirewall(config)# nat 1 0.0.0.0pixfirewall(config)# global 1 192.168.37.0pixfirewall(config)# route inside 10.3.1.2pixfirewall(config)# route outside 192.168.37.2When you configure a Private Link, follow these steps:
Step 1
Step 2
(14 hexadecimal digits).Step 3
Step 4
On PIX Firewall A, in the previous illustration, enter these commands to configure the Private Link:
pixfirewall(config)# : Configure for firewall C:pixfirewall(config)# link 192.168.37.1 1 fadebacpixfirewall(config)# link 192.168.37.1 2 bacfadepixfirewall(config)# link 192.168.37.1 3 baabaaapixfirewall(config)# link 192.168.37.1 4 beebeeepixfirewall(config)# linkpath 10.3.1.1 255.255.255.0 192.168.37.1pixfirewall(config)# :pixfirewall(config)# : Configure for firewall B:pixfirewall(config)# lnko 192.168.36.2 fadebacpixfirewall(config)# lnkopath 10.2.1.1 255.255.255.0 192.168.36.2On PIX Firewall C, enter these commands:
pixfirewall(config)# : Configure for firewall A:pixfirewall(config)# link 192.168.35.1 1 fadebacpixfirewall(config)# link 192.168.35.1 2 bacfadepixfirewall(config)# link 192.168.35.1 3 baabaaapixfirewall(config)# link 192.168.35.1 4 beebeeepixfirewall(config)# linkpath 10.1.1.1 255.255.255.0 192.168.35.1pixfirewall(config)# :pixfirewall(config)# : Configure for firewall B:pixfirewall(config)# lnko 192.168.36.2 fadebacpixfirewall(config)# lnkopath 10.2.1.1 255.255.255.0 192.168.36.2linkpath
Define a Private Link destination IP address. (Configuration mode.)
linkpath dest_net netmask remote_ip
Syntax Description
Usage Guidelines
The linkpath command specifies IP address information for the remote Private Link PIX Firewall. Use show linkpath to view the IP addresses you specify. Use no linkpath to stop access to a Private Link remote firewall. Refer to the link command description for more information about using linkpath.
See also: no linkpath, show linkpath, lnkopath
Example
pixfirewall(config)# linkpathlnko
Define access to an older version 2 Private Link PIX Firewall. (Configuration mode.)
lnko remote_global key
Syntax Description
Usage Guidelines
The lnko command defines access to a version 2 Private Link PIX Firewall and specifies an encryption key. The PIX Firewall Private Link consists of an encryption card and software that permits PIX Firewall units to provide encrypted communications across an unsecure network such as the Internet. This optional feature is available to domestic customer sites.
Note
Refer to the link command description for more information about using lnko.
See also: lnkopath, show lnko
Example
pixfirewall(config)# lnko 192.168.42.1 0xfadedlnkopath
Specify a version 2 Private Link path to the remote PIX Firewall. (Configuration mode.)
lnkopath dest_net netmask remote_global
Syntax Description
Usage Guidelines
The lnkopath command sets the network paths for PIX Firewall version 2 Private Link connections.
Note
See also: show lnkopath, lnko
Example
pixfirewall(config)# lnkopath 1.2.3.4 255.255.255.0 192.168.42.1nat
Associate a network with a pool of IP addresses. (Configuration mode.)
nat global_id ip_address [netmask]
Syntax Description
Usage Guidelines
The nat command lets you specify lists of inside hosts that can use the firewall for address translation. You can specify up to 10 global pools of IP addresses. Use nat 0 to enable the identity feature so that address translation is not performed. Use this feature when you have NIC-registered IP addresses on your inside network that you want to be visible on the outside network.
See also: global, no nat, show nat.
Example
pixfirewall(config)# nat 1 192.168.42.0 255.255.255.255pixfirewall(config)# show natnat 1 192.168.42.0 255.255.255.255no apply
Cancel a previous use of the apply command. (Configuration mode.)
no apply num outgoing_src|outgoing_dest
Syntax Description
Usage Guidelines
The no apply command cancels a previous apply statement. All arguments must be specified.
See also: apply, show apply
Example
pixfirewall(config)# outbound 1 deny 192.168.42.2 255.255.255.255 80pixfirewall(config)# apply 1 outgoing_srcpixfirewall(config)# show applyapply 1 outgoing_srcpixfirewall(config)# no apply 1 outgoing_srcpixfirewall(config)# show applypixfirewall(config)#no arp
Erases the contents of the PIX Firewall ARP table. (Privileged mode.)
no arp [inside|outside ip_address mac_address alias]
Syntax Description
Usage Guidelines
The no arp command clears the PIX Firewall ARP table. This command does not clear aliased ARPs unless you specify alias. You may remove individual entries by specifying either the IP or MAC address.
This command is the same as clear arp.
See also: arp, clear arp, show arp
Example
pixfirewall(config)# no arpno auth
Suspend user authentication services. (Configuration mode.)
no auth [inside|outside]
Syntax Description
Usage Guidelines
The no auth command suspends user authentication for both inside and outside, or you can selectively disable it by interface. Use show auth to view the state of authentication. Use auth to restart authentication. Refer to the auth command description for more information on user authentication.
See also: auth, show auth
Example
pixfirewall(config)# authpixfirewall(config)# show authauth outsideauth insidepixfirewall(config)# no authpixfirewall(config)# show authno auth outsideno auth insideno auth-server
Remove access to authentication server. (Configuration mode.)
no auth-server [type server_ip[-server_ip] skey]
Syntax Description
Usage Guidelines
The no auth-server command removes knowledge of all authentication servers, or you can remove servers by type, or type and server IP address. Use show auth-server to view which servers are specified in the configuration.
Note
RADIUS must have skey defined.See also: auth-server, show auth-server
Example
pixfirewall(config)# show auth-serverauth-server 1.2.3.4 thism0dernw0rldpixfirewall(config)# no auth-serverpixfirewall(config)# show auth-serverpixfirewall(config)#no auth-user
Disable user authentication for IP address. (Configuration mode.)
no auth-user [type ip_address netmask]
Syntax Description
Usage Guidelines
The no auth-user command disables user authentication access to the PIX Firewall. Use show auth-user to view which IP addresses have access to user authentication.
See also: auth-user, show auth-user
Example
pixfirewall(config)# show auth-userauth-user radius 192.168.30.2 255.255.255.0pixfirewall(config)# no auth-userpixfirewall(config)# show auth-userpixfirewall(config)#no conduit
Remove a conduit. (Configuration mode.)
no conduit global_ip port protocol ip_address [netmask]
Syntax Description
Usage Guidelines
The no conduit command removes conduits to static translations. To remove groups of conduits, you must specify the global IP address, the port, and the protocol. You can also delete individual conduits by specifying the IP address and network mask. Use the show conduit command to view which conduits remain.
The conduit command lets you permit connections from outside the PIX Firewall to hosts on the inside network. Conduits exist on the static translation slots and can be added with the conduit command. The conduit command is the recommended method.
Example
pixfirewall(config)# no conduit 192.168.42.0 25 tcpno failover
Turn failover off or force PIX Firewall into standby mode. (Configuration mode.)
no failover [active]
Syntax Description
Usage Guidelines
The no failover command without an argument turns the optional failover feature off. With the active argument, no failover forces a PIX Firewall into standby mode. The failover feature works by passing control to a secondary PIX Firewall should the primary unit fail.
Use show failover to view the status of the connection and to determine if the failover cable is connected to both units.
Refer to the description of the failover command for more information on this feature.
See also: failover, show failover
Example
pixfirewall(config)# no failoverpixfirewall(config)# show failoverFailover OffThis host: Primary - Active...pixfirewall(config)# no failover activepixfirewall(config)# show failoverFailover OffThis host: Primary - Standby...pixfirewall(config)#no global
Remove IP address from the global pool. (Configuration mode.)
no global global_id [ip_address]
Syntax Description
Usage Guidelines
The no global command removes IP addresses from the global pool.
Example
pixfirewall(config)# global 1 192.168.42.0Some globals not createdpixfirewall(config)# show globalglobal 1 192.168.42.1-192.168.42.254pixfirewall(config)# no global 1pixfirewall(config)# show globalpixfirewall(config)#no http
Remove IP address access to the PIX Firewall HTML management interface. (Configuration mode.)
no http ip_address netmask
Syntax Description
Usage Guidelines
The no http command lets you deny an IP address access to the PIX Firewall HTML management interface. This command is the same as clear http.
After you enter no http, current HTML sessions can view the pages in the network browser's memory, but if the user tries to reload the configuration interface, the network browser returns an error message and the screen goes blank.
If you immediately re-enter the http command, the network browser restores access to the HTML management interface. Use the reload command in the browser to display the pages.
See also: http, show http, passwd
Example
pixfirewall(config)# no httpno link
Disable Private Link connection. (Configuration mode.)
no link remote_ip_address key-id key
Syntax Description
Usage Guidelines
The no link command disables a Private Link connection. Use show link to view link information. Refer to the description of the link command for more information on Private Link.
Removing the last key removes the link. You can only remove the link if all linkpath statements have already been removed.
See also: link, show link
Example
pixfirewall(config)# no link 1.2.3.4 1no linkpath
Disable Private Link destination IP address. (Configuration mode.)
no linkpath dest_net netmask remote_ip
Syntax Description
Usage Guidelines
The no linkpath command disables a Private Link connection to a remote PIX Firewall. Use show linkpath to view connection status. Refer to the description of the link command for more information on Private Link.
Improper use of this command can yield the error message "Path does not exist." This results from the no linkpath command being used for a link not previously created.
See also: link, linkpath
Example
pixfirewall(config)# no linkpathno lnko
Disable access to an older version 2 Private Link PIX Firewall. (Configuration mode.)
no lnko remote_global key
Syntax Description
Usage Guidelines
The no lnko command disables access to a version 2 Private Link PIX Firewall. Use show lnko to view Private Link status. Refer to the description of the link command for more information on Private Link.
Note
See also: link, lnko, lnkopath
Example
pixfirewall(config)# no lnko 16.17.18.19 1a2b3c4dno lnkopath
Disable a version 2 Private Link path to the remote PIX Firewall. (Configuration mode.)
no lnkopath dest_net netmask remote_global
Syntax Description
Usage Guidelines
The no lnkopath command disables the network paths for PIX Firewall version 2 Private Link connections.
Note
See also: show lnkopath, lnko
Example
pixfirewall(config)# no lnkopath 1.2.3.0 255.255.255.255.0 5.6.7.8no nat
Disassociate a network with a pool of IP addresses. (Configuration mode.)
no nat global_id ip_address [netmask]
Syntax Description
Usage Guidelines
The no nat command disables a previous occurrence of the nat command.
See also: nat, show nat
Example
pixfirewall(config)# no natno outbound
Removes an access list previously created with outbound. (Configuration mode.)
no outbound num permit|deny ip_address [netmask [port[-port]]]
Syntax Description
Usage Guidelines
The no outbound command removes an access list. Use show outbound to view status.
See also: outbound, show outbound
Example
pixfirewall(config)# no outboundno rip
Disables RIP updates. (Configuration mode.)
no rip inside|outside default|passive
Syntax Description
Usage Guidelines
The rip command enables IP routing table updates from received RIP (Routing Information Protocol) broadcasts. Use show rip to display the current RIP settings. Use no rip to disable PIX Firewall IP routing table updates. The default is to disable all RIP functionality.
Example
pixfirewall(config)# no rip outside defaultno route
Remove an entry from the routing table. (Configuration mode.)
no route inside|outside dest_net_ip [static]
inside|outside
Specifies either the inside or outside
dest_net_ip
The destination network IP address.
static
Remove a static route entry.
Syntax Description
Usage Guidelines
The no route command lets you remove an entry from the routing table. To remove a static entry, use the static keyword. Static routes are routes previously entered with the route command.
Example
pixfirewall(config)# no route inside 192.168.42.0no snmp-server
Stops the PIX Firewall from sending SNMP event information. (Configuration mode.)
no snmp-server contact|location text
no snmp-server host ip_address
Syntax Description
Usage Guidelines
The no snmp-server command clears a previously specified snmp-server statement. Use this command to either erase the information from what SNMP receives or to change an existing statement by clearing it and re-entering it with the snmp-server command.
Using SNMP, you can monitor system events on the PIX Firewall.
Example
pixfirewall(config)# no snmp-serverno static
Disable local IP address to a global IP address. (Configuration mode.)
no static global_ip [local_ip]
Syntax Description
global_ip
The registered IP address to be used from the global pool.
local_ip
The local IP address from the inside network.
Usage Guidelines
The no static command disables a permanent mapping (static translation slot) between a local IP address and a global IP address in the virtual pool. A static address is a permanent mapping from one of the global, registered IP addresses to a local IP address inside the private network. Use show static to view static statements in the configuration.
See also: conduit, show static
Example
pixfirewall(config)# no staticno syslog
Stop logging SYSLOG messages. (Configuration mode.)
no syslog console
no syslog host ip_address
no syslog output facility.level
Syntax Description
Usage Guidelines
The no syslog console command disables SYSLOG messages on the console. The no syslog host command disables sending SYSLOG messages to the specified host. The no syslog output command stops sending all SYSLOG messages. The no syslog command is the same as clear syslog.
See also: syslog, show syslog
Example
pixfirewall(config)# no syslog consoleno telnet
Disable IP address Telnet access to the PIX Firewall. (Privileged mode.)
no telnet ip_address netmask
Syntax Description
Usage Guidelines
The no telnet command lets you disable Telnet access to the PIX Firewall. The show telnet command displays the current list of IP addresses authorized to access the PIX Firewall. Use the who command to view which IP addresses are currently accessing the firewall. The no telnet command is the same as the clear telnet command.
See also: telnet, who
Example
pixfirewall(config)# no telnet 192.168.42.2 255.255.255.255outbound
Creates an access list for controlling Internet use. (Configuration mode.)
outbound num permit|deny ip_address [netmask [port[-port]]]
Syntax Description
Usage Guidelines
The outbound command creates an access list that determines how inside IP addresses can access outside activities. Use with the apply command to specify whether an access list applies to the outside network, or to downloading information from a remote source to the inside network.
See also: apply, show outbound
Example
The following commands prevent host 192.168.1.49 from accessing the World Wide Web (port 80).
pixfirewall(config)# outbound 11 deny 192.168.1.49 255.255.255.255 80pixfirewall(config)# apply 11 outgoing_srcIf your employees are spending too much time examining GIF images on a particular site with two web servers, you can use the following lines to restrict this access:
pixfirewall(config)# outbound 12 deny 192.168.146.201 255.255.255.255 80pixfirewall(config)# outbound 12 deny 192.168.146.202 255.255.255.255 80pixfirewall(config)# apply 12 outgoing_destpasswd
Set password for Telnet and HTML access.
passwd password
Syntax Description
password
A password of up to 16 alphanumeric characters, which is not case sensitive. PIX Firewall converts the password to all lowercase.
Usage Guidelines
The passwd command sets a password for Telnet and HTML access. Use show passwd to view this password.
See also: enable password, show passwd
Example
pixfirewall# passwd athensge0rg1apixfirewall# show passwdpasswd athensge0rg1a
ping
Determine if other IP addresses are visible from the PIX Firewall. (Configuration mode.)
ping inside|outside ip_address
Syntax Description
Usage Guidelines
The ping command determines if the PIX Firewall has connectivity or if a host is available on the network. The command output shows if the response was received; that is, that the host exists on the network. If the host is not responding, ping displays "no response received." Use show interface to ensure that the PIX Firewall is connected to the network and has connectivity.
Example
The command displays three attempts to reach the specified address:
pixfirewall(config)# ping inside 192.168.42.54192.168.42.54 response received - nnMs192.168.42.54 response received - nnMs192.168.42.54 response received - nnMsreload
Reboots and reloads the configuration from flash memory. (Privileged mode.)
reload
Usage Guidelines
The reload command reboots the PIX Firewall and reloads the configuration from flash memory.
Note
Example
pixfirewall# reloadProceed with reload? [confirm] nRebooting...rip
Changes RIP settings. (Configuration mode.)
rip inside|outside default|passive
Syntax Description
Usage Guidelines
The rip passive command enables IP routing table updates from received RIP (Routing Information Protocol) broadcasts. Use show rip to display the current RIP settings. Use no rip to disable PIX Firewall IP routing table updates. The default is to enable IP routing table updates.
RIP default broadcast is possible on either the inside interface.
The rip default passive command causes the PIX Firewall to broadcast default route messages on the specified interface.
Examples
pixfirewall(config)# show riprip outside passiveno rip outside defaultrip inside passiveno rip inside defaultpixfirewall(config)# rip inside defaultpixfirewall(config)# show riprip outside passiveno rip outside defaultrip inside passiverip inside defaultroute
Enter a static route for the specified interface. (Configuration mode.)
route inside|outside dest_net_ip netmask gateway_ip metric
Syntax Description
Usage Guidelines
Use the route command to enter static routes for an interface. To enter a default route, set dest_net_ip and netmask to 0.0.0.0. All routes entered using the route command are stored in the configuration when it is saved. Refer to the write command for more information.
Example
pixfirewall(config)# route inside 192.168.42.0 255.255.255.255.0 192.168.88.1 1pixfirewall(config)# route outside 0.0.0.0 0.0.0.0 10.10.1.1 1show
View command information. (Differs by mode.)
show
show ?
Usage Guidelines
The show command without arguments or the show ? command lets you view the names of the show commands and a description.
Example
pixfirewall> showshow actkey
Show activation key and number of user licenses. (Unprivileged mode.)
show actkey
Usage Guidelines
The show actkey command displays the activation key and number of licensed users for your PIX Firewall. When you install new software, PIX Firewall prompts you for an activation key. Use this command to view the activation key after you have completed the installation. Write this number down in the space that follows so that it is available the next time you upgrade your unit:
Example
pixfirewall> show actkeyActivation Key: 0xfadebacc 0x42424242 0xa1b2c3d4 0xe5f6a1b2Connections: 16384show age
Show duration of Private Link key aging. (Unprivileged mode.)
show age
Usage Guidelines
The show age command shows the current length of time that a Private Link key encrypts communications between the local and remote PIX Firewall units. Refer to the link command for more information on Private Link.
Example
pixfirewall> show agePrivate Link Key Aging: 10 minutesshow apply
View outbound access list to an IP address. (Unprivileged mode.)
show apply [number outgoing_src|outgoing_dest]
Syntax Description
Usage Guidelines
The show apply command lets you view outbound access lists collectively or you can search for lists by number or with the outgoing_src or outgoing_dest keywords.
See also: apply
Example
pixfirewall> show applyapply 1 outgoing_srcshow arp
Display ARP table. (Unprivileged mode.)
show arp [inside|outside ip_address mac alias]
Syntax Description
Usage Guidelines
The show arp command without arguments displays all inside and outside network interfaces' ARP tables, aliased or not. show arp inside displays all inside arps, aliased or not. show arp inside ip displays the IP address if it exists. show arp inside 0 alias displays all aliased ARP entries for the inside network interface ARP table (0 is used as a place holder for wild card). show arp inside 0 mac finds and displays the ARP entry that matches the MAC address.
Example
pixfirewall> show arpinside 192.168.89.113 0020.af29.51b0show arp timeout
Display number of seconds that an ARP entry can remain in the ARP table. (Unprivileged mode.)
show arp timeout
Usage Guidelines
The show arp timeout command lets you view the number of seconds that an ARP entry remains in the ARP table before expiring. Set the duration with the arp command. The default is
14400 seconds (4 hours).Example
pixfirewall> show arp timeoutarp timeout 14400 secondsshow auth
Show status of PIX Firewall user authentication. (Unprivileged mode.)
show auth
Usage Guidelines
The show auth command lists the status of PIX Firewall user authentication on each interface:
See also: auth
Example
pixfirewall# show authauth outsideauth insideshow auth-server
Show IP address of authentication server. (Unprivileged mode.)
show auth-server
Usage Guidelines
The show auth-server command output lists the following information:
Example
pixfirewall> show auth-serverauth-server radius 192.168.89.106 skishow auth-user
Show IP address information for user authentication. (Unprivileged mode.)
show auth-user
Usage Guidelines
The show auth-user command output lists the following information:
Note
See also: auth, auth-user
Example
pixfirewall> show auth-userauth-user radius 192.168.89.0 255.255.255.0show blocks
Show system buffer utilization. (Unprivileged mode.)
show blocks
Usage Guidelines
The show blocks command lists system buffer utilization.
Example
pixfirewall> show blocksSIZE MAX LOW CNT4 1600 1598 160080 100 94 97256 80 79 801550 800 791 80064000 16 16 16show conduit
Show conduit through firewall for incoming connections. (Unprivileged mode.)
show conduit
Usage Guidelines
The show conduit command output contains the following information:
Example
pixfirewall> show conduitconduit 192.168.42.1 80 tcp 10.10.10.1 255.255.255.255show config
View configuration in flash memory. (Privileged mode.)
show config
Usage Guidelines
The show config command displays the configuration in flash memory. Use write term to view the current configuration in RAM.
See also: write term
Example
pixfirewall# show config: Saved... config commands ...: Endshow failover
Show status of optional failover feature. (Unprivileged mode.)
show failover
Usage Guidelines
The show failover command lists the following information:
•
•
•
•
•
See also: failover
Example
pixfirewall> show failoverFailover OnThis host: Secondary - ActiveOther host: Secondary - StandbyCable status: 0x2 - My side not connectedOutside Interfacethis host: Rx cnt 0 Uptime 12975other host: Rx cnt 0 Uptime 0Inside Interfacethis host: Rx cnt 0 Uptime 12975other host: Rx cnt 0 Uptime 0show global
View global commands in the configuration. (Unprivileged mode.)
show global
Usage Guidelines
The show global command lists the contents of the global command statements in the configuration.
See also: global
Example
pixfirewall> show globalglobal 1 192.168.88.1-192.168.88.7show http
View which IP addresses can access the PIX Firewall HTML management interface. (Unprivileged mode.)
show http
Usage Guidelines
The show http command lists the IP addresses that can access the PIX Firewall HTML management interface.
See also: http
Example
pixfirewall> show http192.168.89.111 255.255.255.255192.168.89.113 255.255.255.255show hw
Display hardware identification values. (Unprivileged mode.)
show hw
Usage Guidelines
The show hw command lets you view hardware identification information.
Example
pixfirewall> show hwHardware ID: 0x52c 0x1bf 19126show interface
View network interface information. (Unprivileged mode.)
show interface
Usage Guidelines
The show interface command lets you view network interface information for both Ethernet and Token-Ring depending on which is installed in your PIX Firewall. This is the first command that you should use whenever you are attempting to get connectivity with the rest of your network.
The information in the display is as follows:
•
•
•
•
•
•
•
•
•
•
•
•
•
•
•
•
•
Example
pixfirewall> show interfaceethernet outside is up, line protocol is upHardware is i82557 ethernet, address is 00a0.c90a.eb4dMTU 1500 bytes, BW 10000 Kbit half duplex798 packets input, 35112 bytes, 0 no bufferReceived 0 broadcasts, 0 runts, 0 giants0 input errors, 0 CRC, 0 frame, 0 overrun, 0 ignored, 0 abort798 packets output, 35112 bytes, 0 underrunsethernet inside is up, line protocol is upHardware is i82557 ethernet, address is 00a0.c90a.eb43MTU 1500 bytes, BW 10000 Kbit half duplex1071 packets input, 71410 bytes, 0 no bufferReceived 232 broadcasts, 0 runts, 0 giants0 input errors, 0 CRC, 0 frame, 0 overrun, 0 ignored, 0 abort1071 packets output, 71410 bytes, 0 underrunsshow ip address
Display the IP address of the PIX Firewall. (Unprivileged mode.)
show ip address
Usage Guidelines
The show ip address command displays the IP address of the PIX Firewall. The inside or outside keywords in the display indicate the interface to which the IP address is assigned.
Example
pixfirewall> show ip addressinside ip address 1.2.3.4 mask 255.255.255.0outside ip address 5.6.7.8 mask 255.255.255.0show link
View Private Link remote IP address and interface status. (Unprivileged mode.)
show link
Usage Guidelines
The show link command lets you view the remote Private Link's IP address, each encryption key, and the number of packets sent and transmitted ("nn out, nn in").
Example
pixfirewall> show linkForeign IP KeyID Key192.168.42.2 1 0x000000000022222 0x000000000011113 0x000000000033334 0x0000000000444420 out, 20 inshow linkpath
View Private Link connection information. (Unprivileged mode.)
show linkpath
Usage Guidelines
The show linkpath command lets you view the IP address of the outside interface on the remote PIX Firewall ("Foreign IP"), the IP address of the network served by the remote firewall, and the network mask of the foreign network.
Example
pixfirewall> show linkpathForeign IP Foreign Network Mask192.168.31.3311.0.0.0 255.0.0.0show lnko
View version 2 Private Link information. (Unprivileged mode.)
show lnko
Usage Guidelines
The show lnko command lets you view the IP of the outside interface on the remote PIX Firewall ("Foreign IP"), the local IP address, and the encryption key.
Note
See also: lnko, lnkopath
Example
pixfirewall> show lnkoForeign IP Local IP Key1.2.3.4 5.6.7.8 fadebacpixfirewall>show lnkopath
View version 2 Private Link information. (Unprivileged mode.)
show lnkopath
Usage Guidelines
The show lnkopath command lets you view the remote IP address, the remote network address, and the network mask.
See also: lnko, linkopath
Example
pixfirewall> show lnkopathForeign IP Foreign Network Mask1.2.3.4 5.6.7.8 255.255.255.0pixfirewall>show nat
View nat statement information from the configuration. (Unprivileged mode.)
show nat
Usage Guidelines
The show nat command lets you view the contents of the nat statements in the configuration.
See also: nat
Example
pixfirewall> show natnat 1 0.0.0.0 0.0.0.0show memory
Show system memory utilization. (Unprivileged mode.)
show memory
Usage Guidelines
The show memory command displays a summary of the maximum physical memory and current free memory available to the PIX Firewall operating system. Everything in PIX Firewall is preallocated and the number of free memory should never change.
Example
pixfirewall> show memorynnnnnnnn bytes total, nnnnnnn bytes freeshow outbound
View outbound statement information in configuration. (Unprivileged mode.)
show outbound
Usage Guidelines
The show outbound command lets you view the contents of the previously entered outbound statements in your configuration.
See also: outbound
Example
pixfirewall> show outboundoutbound 1 permit 192.168.42.1 255.255.255.255 80-80outbound 2 deny 192.168.42.1 255.255.255.255 80-80show passwd
View the password you entered with the passwd command. (Privileged mode.)
show passwd
Usage Guidelines
The show passwd command lets you view the password you entered with the passwd command. This password permits access to the PIX Firewall with the Telnet command and to the HTTP configuration facility, which you access with a network browser such as Netscape Navigator.
Note
See also: passwd, enable password, telnet, http, write term
Example
pixfirewall# passwd moopixfirewall# show passwdPassword mooshow processes
Display processes. (Unprivileged mode.)
show processes
Usage Guidelines
The show processes command displays a summary listing of running processes. Processes are lightweight threads requiring only few instructions to switch. In the listing, PC is the program counter, SP is the stack pointer, STATE is the address of a thread queue, Runtime is the number of milliseconds that the thread has been running, SBASE is the stack base address, Stack is the current number of bytes used and the total size of the stack, and Process lists the thread's function.
Example
pixfirewall> show processesPC SP STATE Runtime SBASE Stack Process8000139e 8024ad00 80005354 940 80249d1c 36/4096 arp_timer...show rip
View the RIP listening status on your PIX Firewall. (Unprivileged mode.)
show rip
Usage Guidelines
The show rip command lets you view the status of RIP listening on the PIX Firewall. The display contains the following information:
See also: rip
Example
pixfirewall> show riprip outside passiveno rip outside defaultrip inside passiveno rip inside defaultshow route
View PIX Firewall routing table. (Unprivileged mode.)
show route
Usage Guidelines
The show route command lets you view the route information.
The output display contains the following information:
Example
pixfirewall> show routeoutside 0.0.0.0 0.0.0.0 192.168.42.42 1 OTHER staticinside 0.0.0.0 0.0.0.0 10.10.41.10 1 OTHER staticshow snmp-server
View PIX Firewall SNMP location, contact, and host information from configuration. (Unprivileged mode.)
show snmp-server
Usage Guidelines
The show snmp-server command lists the following information:
contact
Your name or that of the PIX Firewall system administrator.
location
Your PIX Firewall location.
host
One or more IP addresses of hosts to which SNMP traps are being sent.
See also: snmp-server
Example
pixfirewall(config)# show snmp-serverpixfirewall(config)# show snmp-server hostsnmp-server host 192.168.42.54pixfirewall(config)# snmp-server contact 'arthur dent'pixfirewall(config)# snmp-server location 'building 42, earth'pixfirewall(config)# show snmp-serversnmp-server host 192.168.42.54snmp-server location 'building 42, earth'snmp-server contact 'arthur dent'pixfirewall(config)#show static
View static information in the configuration. (Unprivileged mode.)
show static
Usage Guidelines
The show static command lets you view the static information you entered in the configuration.
See also: static
Example
pixfirewall> show staticstatic 10.1.1.5 192.168.42.2show syslog
View previously sent SYSLOG events. (Unprivileged mode.)
show syslog
Usage Guidelines
The show syslog command lets you view previously sent SYSLOG events. The facility value tells the host where to file the messages. Refer to the description of the syslog output command for more information.
The levels are:
•
•
•
•
•
•
•
•
See also: clear syslog, syslog output
Example
pixfirewall> show syslogOUTPUT ON (20.6)CONSOLE OFF<162> Secondary: Switching to ACTIVE.<162> Secondary: Disabling Failover.show telnet
View which IP addresses have Telnet access to the PIX Firewall. (Unprivileged mode.)
show telnet
Usage Guidelines
The show telnet command lets you view which IP addresses can access the PIX Firewall with Telnet. Use the who command to view which of these IP addresses are currently using the PIX Firewall.
See also: telnet, who, kill
Example
pixfirewall> show telnet192.168.42.42 255.255.255.255show timeout
Displays the maximum idle time for translation and connection slots. (Configuration mode.)
show timeout
Usage Guidelines
The show timeout command lets you view the idle time for connection and translation slots. If the connection or translation slot has not been used for the idle time specified, the resource is returned to the free pool. The minimum idle time for both xlate and conn is 5 minutes. TCP connection slots are freed within 60 seconds after a normal connection close sequence.
See also: timeout
Example
pixfirewall(config)# show timeouttimeout xlate 24:00:00 conn 12:00:00show version
View PIX Firewall version. (Unprivileged mode.)
show version
Usage Guidelines
The show version command lets you view the version of your PIX Firewall software.
Example
pixfirewall> show versionPIX Version 3.pv.nnnwhere: pv is the point release version and nnn is the release number
show who
Shows active HTTP and Telnet administration sessions on PIX Firewall. (Unprivileged mode.)
show who [ip_address]
Syntax Description
ip_address
An optional IP address to limit the listing to one IP address or to a network IP address.
Usage Guidelines
The show who command shows the PIX Firewall tty_id and IP address of each HTTP and Telnet client currently logged into the PIX Firewall. This command is the same as the who command.
See also: http, kill, telnet
Example
pixfirewall# show who2: From 192.168.2.21: From 192.168.1.30: On consolepixfirewall#show xlate
View translation slot information. (Unprivileged mode.)
show xlate [global_ip] [local_ip]
Syntax Description
global_ip
The registered IP address to be used from the global pool.
local_ip
The local IP address from the inside network.
Usage Guidelines
The show xlate command displays the contents of the translation slots.
Example
pixfirewall# show xlateGlobal 192.168.88.7 Local 192.168.89.207 staticGlobal 192.168.88.11 Local 192.168.89.215out 192.168.88.207:23 in 192.168.89.215:1284 idle 0:00:00 Bytes 436Global 192.168.88.12 Local 192.168.89.11snmp-server
Provide SNMP event information. (Configuration mode.)
snmp-server contact|location text
snmp-server host ip_address
Syntax Description
Usage Guidelines
This command causes the PIX Firewall to send SNMP traps so that the firewall can be monitored remotely. Use snmp-server host to specify which systems receive the SNMP traps. You can specify up to five systems and all must be on the inside network of the firewall. PIX Firewall converts the contact and location information to lowercase.
Note
Use snmp-server contact and snmp-server location to specify your name and the location of the PIX Firewall so that hosts receiving SNMP traps can contact you if monitored problems occur.
Using SNMP, you can monitor system events on the PIX Firewall.
The PIX Firewall SNMP MIB-II groups available are System, Interfaces, and SNMP.
The PIX Firewall SNMP traps available to an SNMP server are:
•
•
•
•
•
•
Use CiscoWorks Windows (Product Number CWPC-2.0-WIN) or any other SNMP V1, MIB-II compliant browser to receive SNMP traps and browse the MIB. SNMP traps occur at UDP port 162. Up to five hosts can receive SNMP traps. SNMP events can be read, but information on the PIX Firewall cannot be changed with SNMP.
Example
pixfirewall(config)# snmp-server location `building 42, sector 54'static
Map local IP address to a global IP address. (Configuration mode.)
static global_ip local_ip
Syntax Description
global_ip
The registered IP address to be used from the global pool.
local_ip
The local IP address from the inside network.
Usage Guidelines
The static command creates a permanent mapping (static translation slot) between a local IP address and a global IP address in the virtual pool. A static address is a permanent mapping from one of the global, registered IP addresses to a local IP address inside the private network. Static addresses are recommended for internal network service hosts, such as an SMTP server. Use show static to view static statements in the configuration.
See also: conduit, show static
Example
pixfirewall(config)# staticsyslog console
View SYSLOG messages on the PIX Firewall console. (Configuration mode.)
syslog console
Usage Guidelines
Displays syslog messages on the console port. Use no syslog console to stop the display. Refer to the description of syslog output for more information on SYSLOG.
See also: no syslog console
Example
pixfirewall(config)# syslog consolepixfirewall(config)# no syslog consolesyslog host
Define which hosts are sent SYSLOG messages. (Configuration mode.)
syslog host ip_address
Syntax Description
Usage Guidelines
The syslog host command lets you specify up to 16 host IP addresses to which SYSLOG messages are sent. Use no syslog host to remove a host from the receiving list. Use show syslog to view the current hosts. Refer to the description of syslog output for more information on SYSLOG.
Example
pixfirewall(config)# syslog host 192.168.0.99pixfirewall(config)# no syslog host 192.168.0.99syslog output
Start sending SYSLOG notification messages. (Configuration mode.)
syslog output facility.level
Syntax Description
Usage Guidelines
The syslog output command configures the facility and level of SYSLOG messages. Because network devices share the eight facilities, syslog output lets you set the facility marked on all messages. Messages are sent to the SYSLOG host over UDP. The syslog output command also starts sending messages onto the network. Use the syslog host command to specify which systems receive the messages.
You can use show syslog to view previously sent messages.
PIX Firewall generates SYSLOG messages for system events, such as security alerts and resource depletion. SYSLOG messages may be used to create email alerts and log files, or displayed on the console of a designated host using UNIX SYSLOG conventions. The log host must be on the internal network.
A PC WinSock version of syslogd also will work.
Note
In addition, PIX Firewall sends SYSLOG messages only to a single file on the receiving system.PIX Firewall sends SYSLOG messages to document the following events:
•
•
•
•
Logging is enabled by configuring the PIX Firewall with the IP address of the log host.
Configuring a UNIX System for SYSLOG
To configure a UNIX system to accept SYSLOG messages:
1
2
# mkdir /var/log/pix# touch /var/log/pix/name3
In the syslog.conf file, you code each selector and action pair for the messages you want to receive. For example, if you want to receive messages in a file called pixfirewall for message priorities 0, 1, 2, and 3, and you use the default LOCAL4 facility, the syslog.conf statements would be:
# PIX Firewall SYSLOG messages (formerly A.S. violations)local4.emerg /var/log/pix/pixfirewalllocal4.alert /var/log/pix/pixfirewalllocal4.crit /var/log/pix/pixfirewalllocal4.error /var/log/pix/pixfirewallThis configuration directs PIX Firewall SYSLOG message to the specified file. Alternatively, if you want the message sent to the logging host console or emailed to a system administrator, refer to the UNIX syslog.conf(4) manual page.
Note
Entries in /etc/syslog.conf must obey these rules:
•
•
•
4
# cat /etc/syslog.pid92# kill -HUP 92The first command lists the SYSLOG process ID. This number may vary by system. The second command sends SYSLOG the HUP signal to cause it to restart.
pixfirewall(config)# syslog output 23.4Examples of PIX Firewall SYSLOG messages resemble the following:
Oct 15 12:55:03 pix-in PIX out of connections!Oct 15 12:54:28 pix-in conn end faddr 192.168.42.42 fport 4457 gaddr 10.10.10.1 laddr 10.10.10.2Oct 15 13:04:02 pix-in deny tcp out 192.168.96.14 in 10.10.10.42 flags SYN ACKOct 15 13:37:44 pix-in conns 16384 conns_used 0 xlate 254 xlate_used 1Oct 15 13:47:21 pix-in PIX logged in from 10.10.42.112Example
pixfirewall(config)# syslogtelnet
Allow inside IP address to configure the PIX Firewall from Telnet. (Privileged mode.)
telnet ip_address netmask
Syntax Description
Usage Guidelines
The telnet command lets you decide who can configure the PIX Firewall from Telnet. Up to 16 hosts or networks are allowed access to the PIX Firewall, four simultaneously. The show telnet command displays the current list of IP addresses authorized to access the PIX Firewall. Use no telnet or clear telnet to remove Telnet access from a previously set IP address. Use the who command to view which IP addresses are currently accessing the firewall.
With Telnet, you can configure the PIX Firewall from the inside network or over Private Link.
Note
See also: clear telnet, no telnet, show telnet, who
Examples
pixfirewall(config)# telnet 192.168.1.3 255.255.255.255pixfirewall(config)# telnet 192.168.1.4 255.255.255.255pixfirewall(config)# telnet 192.168.2.0 255.255.255.0pixfirewall(config)# show telnet192.168.1.3 255.255.255.255192.168.1.4 255.255.255.255192.168.2.0 255.255.255.0pixfirewall(config)# no telnet 192.168.1.3pixfirewall(config)# show telnet192.168.1.4 255.255.255.255192.168.2.0 255.255.255.0timeout
Sets the maximum idle time for translation and connection slots. (Configuration mode.)
timeout [xlate [hh:mm:ss]] [conn [hh:mm:ss]]
Syntax Description
xlate hh:mm:ss
Idle time until a translation slot is cleared (default value is
24 hours).conn hh:mm:ss
Idle time until a connection slot is cleared (default value is
12 hours).
Usage Guidelines
The timeout command sets the idle time for connection and translation slots. If the connection or translation slot has not been used for the idle time specified, the resource is returned to the free pool. The minimum idle time for both xlate and conn is 5 minutes. TCP connection slots are freed within 30 seconds after a normal connection close sequence.
Use show timeout to display the current timeout settings.
See also: show timeout
Examples
pixfirewall(config)# show timeouttimeout xlate 24:00:00 conn 12:00:00pixfirewall(config)# timeout xlate 5:0:0pixfirewall(config)# timeout conn 2:0:0pixfirewall(config)# show timeouttimeout xlate 5:00:00 conn 2:00:00pixfirewall(config)# timeout xlate 0:10:0 conn 0:5:0pixfirewall(config)# show timeouttimeout xlate 0:10:00 conn 0:05:00pixfirewall(config)# timeout xlate 0:0:12345pixfirewall(config)# show timeouttimeout xlate 3:25:45 conn 0:05:00pixfirewall(config)#who
Shows active Telnet administration sessions on PIX Firewall. (Unprivileged mode.)
who [ip_address]
Syntax Description
ip_address
An optional IP address to limit the listing to one IP address or to a network IP address.
Usage Guidelines
The who command shows the PIX Firewall tty_id and IP address of each Telnet client currently logged into the PIX Firewall. This command is the same as the show who command.
See also: http, kill, telnet
Example
pixfirewall# who2: From 192.168.2.21: From 192.168.1.30: On consolepixfirewall#write erase
Clear the contents of flash memory. (Privileged mode.)
write erase
Usage Guidelines
The write erase command clears the flash memory configuration. To clear the current running configuration, use write erase and then reload to reboot the PIX Firewall.
Example
pixfirewall# write erasepixfirewall# reloadwrite floppy
Store the current configuration on floppy disk. (Privileged mode.)
write floppy
Usage Guidelines
The write floppy command stores the current running configuration on floppy disk. Use configure floppy to replace the current configuration with what you saved on floppy disk. The write floppy command assumes that the floppy disk is formatted for an IBM computer; however, once you use write floppy to write to the disk, its contents can only be accessed with the PIX Firewall.
See also: configure floppy
Example
pixfirewall# write floppywrite memory
Save current configuration in flash memory. (Privileged mode.)
write memory
Usage Guidelines
The write memory command saves the current running configuration to flash memory. Use configure memory to replace the current configuration with the image you saved in flash memory.
Note
See also: configure memory
Example
pixfirewall# write memorywrite terminal
View current configuration on console. (Privileged mode.)
write terminal
Usage Guidelines
The write terminal command displays the current running configuration on the console computer. Before using this command, set your terminal communications program to store the screen display in a log file, or else once the configuration displays, you can use copy and paste commands to copy it to a file on your console computer.
Use configure terminal to start configuration mode. You can then copy and paste a configuration from a text file into the configuration.
You can also display the current configuration contents with show config, but passwords are not displayed. The write terminal command lists all information in configuration including passwords.
See also: configure terminal, show config
Example
pixfirewall# write terminal