Managing Network Devices

Table Of Contents

Managing Network Devices

Managing Network Devices

Adding and Editing Devices

Deleting a Device

Configuring a Default Device

Managing Network Device Groups

Creating a Network Device Group

Editing a Network Device Group

Deleting a Network Device Group

Importing Network Devices and Device Groups

Exporting Network Devices and Network Device Groups


Managing Network Devices


This chapter describes how to manage the devices in your network. This chapter contains the following sections:

Managing Network Devices

Managing Network Device Groups

Importing Network Devices and Device Groups

Exporting Network Devices and Network Device Groups

Managing Network Devices

A network device is an authentication, authorization, and accounting (AAA) client through which AAA service requests are attempted, for example, switches, routers, and so on. The network device definition enables the Cisco Identity Services Engine (Cisco ISE) to interact with the network devices that are configured. A network device that is not defined in Cisco ISE cannot receive AAA services from Cisco ISE.

You can also define a default network device that Cisco ISE can use if it does not find the device definition for a particular IP address. Cisco ISE supports the default device definition for RADIUS authentications. This feature enables you to define a default RADIUS shared secret and level of access for newly provisioned devices.

When Cisco ISE receives a RADIUS request from a network device, it looks for the corresponding device definition to retrieve the shared secret that is configured. If it finds the device definition, it obtains the shared secret that is configured on the device and matches it against the shared secret in the request to authenticate access. If it does not find the device definition, it obtains the shared secret from the default network device and processes the request. If the shared secrets match, network access is granted. A passed authentication report is generated. If they do not match, a reject response is sent to the device. A failed authentication report is generated, which provides the failure reason.

Cisco ISE allows you to configure authentication and authorization policies based on device attributes such as device type, location, model name, and so on, which are available in the device dictionary. When you create a new network device group (NDG), a new device attribute is added to the dictionary, which you can use in policy definitions.

The network device definition must include the following:

Device Name—The device name is a descriptive name that you can provide to the network device. It can be different from the hostname of the device. The device name is a logical identifier.

IP Address and Subnet Mask—You must specify an IP address and a subnet mask. The following are some guidelines that must be followed while defining the IP addresses and subnet masks:

You can define a specific IP address, or a range with a subnet mask.

You cannot define two devices with the same specific IP addresses.

You cannot define two devices with the same IP range. The IP ranges must not overlap either partially or completely.


Note If device A has an IP address range defined, you can configure another device B with an individual address from the range that is defined in device A.


When Cisco ISE receives a RADIUS request and tries to match the request against a network device, it does the following:

a. It looks for a specific IP address that matches the one in the request.

b. It looks up the ranges to see if the IP address in the request falls within the range that is specified.

c. If both of these fail, it uses the default device definition (if defined) to process the request.

Network Device Group—NDGs allow you to group devices based on location, type, and other groupings and allow you to define policy conditions based on these groupings. If you do not specifically assign a device to a group when you configure it, it becomes a part of the default All Locations and All Device Types device groups. See the "Managing Network Device Groups" section for more information.

The following are optional settings that you can define for a network device:

Model Name—The model name identifies the model of the network device. For example, CAT 6K, Nexus 7K, and so on. You can use the model name as one of the parameters while checking for conditions in rule-based policies. This attribute is present in the device dictionary.

Software Version—The version of the software that is running on the network device. For example, Cisco IOS version 12.3, 12.3 (2), and so on. You can use the software version as one of the parameters while checking for conditions in rule-based policies. This attribute is present in the device dictionary.

In addition, you can configure the following settings for network devices:

Authentication Settings—Configure this setting for RADIUS authentications.

Simple Network Management Protocol (SNMP) Settings—Configure this setting for the Profiler service in Cisco ISE to profile the end points. The ISE Profiler service can communicate with network devices that have SNMP settings defined. The Profiler service uses these settings to initiate SNMP-based communication with the device and obtains device-related information for monitoring purposes.

Security Group Access (SGA) Settings—For devices that can be part of the Cisco Security Group Access solution. Any switch that supports the SGA solution is an SGA device. For example, the Nexus 7000 Series Switches, Catalyst 6000 Series Switches, Catalyst 4000 Series Switches, Catalyst 3000 Series Switches, and so on. SGA devices are authenticated using the SGA settings that you must define while adding SGA devices. See Chapter 21, "Configuring Cisco Security Group Access Policies" for more information on SGA settings.

Device Configuration Details—Credentials to edit the configuration of a network device.

You can configure these network devices manually or import a list of devices into Cisco ISE using a .csv file.

This section contains the following topics:

Adding and Editing Devices

Deleting a Device

Configuring a Default Device

Importing Network Devices and Device Groups

Exporting Network Devices and Network Device Groups

Adding and Editing Devices

You can add devices or edit the device definition in the Cisco ISE server.

Prerequisites:

Before you begin this task, you should have a basic understanding of network devices and how they are managed in Cisco ISE. See the "Managing Network Devices" section for more information.

Every Cisco ISE administrator account is assigned one or more administrative roles. To perform the operations described in the following procedure, you must have one of the following roles assigned: Super Admin or Network Device Admin. See Cisco ISE Admin Group Roles and Responsibilities for more information on the various administrative roles and the privileges associated with each of them.

To add or edit a device, complete the following steps:


Step 1 Choose Administration > Network Resources > Network Devices.

Step 2 From the Network Devices navigation pane on the left, click Network Devices.

The Network Devices page appears with a list of configured devices.

Step 3 Click Add, or check the check box next to a device and click Edit to edit it or click Duplicate to create a duplicate entry. You can alternatively click Add new device from the action icon on the Network Devices navigation pane or click a device name from the list to edit it.

Step 4 In the right pane, enter the values as described in Table 6-1.

Step 5 Check the Authentication Settings check box and define a shared secret for RADIUS authentications. The shared secret can be up to 128 characters in length. The shared secret is the key that you have configured on the device using the radius-host command with pac option.

Check the SNMP check box to configure SNMP settings on the device. These settings are used by the Profiler service in Cisco ISE. Enter the values as described in Table 6-2.

For information on switch-related SNMP settings, see:

Enable SNMP Traps, page C-8

Enable SNMP v3 Query for Profiling, page C-8

Step 6 Check the Security Group Access (SGA) check box to configure an SGA device. SGA devices do not use the IP address. Instead, you must define other settings so that SGA devices can communicate with Cisco ISE. Enter the values as described in Table 21-4.

Step 7 Check the Device Configuration Deployment check box to enter user credentials to edit the configuration of the device. Enter the values as described in Table 6-3.

Step 8 Click Submit to save the device definition.


Network Devices Page

Table 6-1 lists the fields in the Network Devices page and their descriptions.

Table 6-1 Network Devices Page 

Field
Description

Name

(Required) This field is the name of the device.

Note You cannot edit the name of a device.

Description

This field is the description of the device.

IP Address

(Required) This field includes the IP address and subnet masks that are associated with the device. A single address or a range, the routable IP address should be one with which the ISE appliance can communicate.

Model Name

This field is the device model, for example, the Cisco Catalyst 6K, the Cisco Nexus 7K, and so on.

Software Version

This field is the version of the software on the device, for example, Version 12.2, 12.3, and so on.

Network Device Group

(Required) From the Location and Device Type drop-down list boxes, choose a location and device type to associate with the device.

Note If you do not choose a device group, the default device groups (root NDGs) are assigned.


Network Devices: SNMP Settings

Table 6-2 lists the SNMP settings in the Network Devices page and their descriptions.

Table 6-2 Network Devices List Page: SNMP Settings 

Field
Description

SNMP Version

(Required) This setting is the version of SNMP to be used for requests. Valid options are:

1—SNMPv1 does not support informs.

2c

3—SNMPv3 is the most secure model because it allows packet encryption when you choose the Priv security level.

Note If you have configured your network device with SNMPv3 parameters, you cannot generate the Network Device Session Status Summary report provided by the Monitoring service (Monitor > Reports > Catalog > Network Device > Session Status Summary). You can generate this report successfully if your network device is configured with SNMPv1 or SNMPv2c parameters.

SNMP RO Community

(Required if you choose SNMP version 1 or 2c) This setting is the Read Only community string. A community string is similar to a password and it provides Cisco ISE with a particular type of access to the device.

SNMP Username

(Required if you choose SNMP version 3) This setting is the SNMPv3 username.

Security Level

(Required if you choose SNMP version 3) Choose the security level for SNMPv3. Valid options are the following:

Auth—Enables MD51 or Secure Hash Algorithm (SHA) packet authentication

No Auth—No authentication and no privacy security level

Priv—Enables DES2 packet encryption

Auth Protocol

This setting is the authentication protocol that you want the device to use. Valid options are MD5 or SHA1.

Auth Password

Enter the authentication key. The authentication key must be at least 8 characters in length.

Privacy Protocol

This setting is the privacy protocol that you want the device to use. Valid options are DES, AES128, AES192, AES256, and 3DES.

Privacy Password

Enter the privacy key.

Polling Interval

This setting is the SNMP polling interval in seconds. Default is 3600 seconds.

Link Trap Query

Check this check box for the profiler service to query the device, if it receives the link trap from the NAD3 connected to the device.

MAC Trap Query

Check this check box for the profiler service to query the device, if it receives the MAC trap from the NAD connected to the device.

1 MD5 = Message Digest 5.

2 DES = Data Encryption Standard.

3 NAD = Network Access Device


Network Devices: Device Configuration Deployment Settings

Table 6-3 Network Devices Page: Device Configuration Deployment Settings

Field
Description

Exec Mode Username

Enter the username that has privileges to edit the device configuration.

Exec Mode Password

Enter the device password.

Enable Mode Password

Enter the enable password for the device that would allow you to edit its configuration.


For more information:

Managing Network Devices

Managing Network Device Groups

Importing Network Devices and Device Groups

Deleting a Device

Prerequisite:

Every Cisco ISE administrator account is assigned one or more administrative roles. To perform the operations described in the following procedure, you must have one of the following roles assigned: Super Admin or Network Device Admin. See Cisco ISE Admin Group Roles and Responsibilities for more information on the various administrative roles and the privileges associated with each of them.

To delete network devices, complete the following steps:


Step 1 Choose Administration > Network Resources > Network Devices.

Step 2 From the Network Devices navigation pane on the left, click Network Devices.

The Network Devices List page appears.

Step 3 Check the check boxes next to the devices that you want to delete and click Delete > Delete Selected. You can alternatively choose the network device listed in the navigation pane on the left and from the action icon (), and click Delete device.


Note You can click Delete > Delete All to delete all the devices that you have defined.


A dialog box appears with the following message:

Are you sure you want to delete "Device name"?

Step 4 Click OK to delete the device.


Configuring a Default Device

You can use the default device definition when no specific device definition is found for a RADIUS request.

Prerequisite:

Every Cisco ISE administrator account is assigned one or more administrative roles. To perform the operations described in the following procedure, you must have one of the following roles assigned: Super Admin or Network Device Admin. See Cisco ISE Admin Group Roles and Responsibilities for more information on the various administrative roles and the privileges associated with each of them.

To define a default device, complete the following steps:


Step 1 Choose Administration > Network Resources > Network Devices.

Step 2 From the Network Devices navigation pane on the left, click Default Device.

The Default Network Device page appears.

Step 3 To enable the default network device definition, choose Enable from the Default Network Device Status drop-down list box.

Step 4 Enter the RADIUS shared secret.

Step 5 Click Submit to save the default network device definition.


Result:

A dialog box appears with the following message:

The configuration was saved successfully.

For more information, see the "Managing Network Devices" section.

Managing Network Device Groups

A device group is a hierarchical structure that contains the network device groups (NDGs). NDGs logically group the devices based on various criteria such as location or device type. When you create a root NDG node, you must provide the name and the type of the NDG. For all subsequent child NDG nodes, you will need to provide only the name. The type is inherited from the parent NDG and hence all the child NDG nodes under a root NDG will be of the same type.

Cisco ISE allows you to create hierarchical NDGs. Thus, a device can be part of multiple NDGs. For example, you can group devices by continent, region, and country such as the following:

Africa -> Southern -> Namibia

Africa -> Southern -> South Africa

Africa -> Southern -> Botswana

You can also group devices by device types such as the following:

Africa -> Southern -> Botswana -> Firewalls

Africa -> Southern -> Botswana -> Routers

Africa -> Southern -> Botswana -> Switches

You can use NDGs in policy conditions. There are two predefined root NDGs in Cisco ISE (Location and Device Type). You cannot edit or delete these predefined NDGs. Devices can be assigned to a single NDG. After you create an NDG, you can use it while defining policies. When you create a new root NDG, a new device attribute is added to the dictionary. You can use this attribute in authentication and authorization policies.


Note The device type of the root NDG is available as an attribute in the device dictionary. You can define conditions based on this attribute. The name of the NDG is one of the values that this attribute can take.


This section contains the following topics:

Creating a Network Device Group

Editing a Network Device Group

Deleting a Network Device Group

Import Network Device Groups into Cisco ISE

Exporting Network Device Groups

Creating a Network Device Group

Prerequisite:

Every Cisco ISE administrator account is assigned one or more administrative roles. To perform the operations described in the following procedures, you must have one of the following roles assigned: Super Admin or Network Device Admin. See Cisco ISE Admin Group Roles and Responsibilities for more information on the various administrative roles and the privileges associated with each of them.

To create an NDG, complete the following steps:


Note Default NDGs (All Locations and All Device Types) cannot be edited, but you can add new device subgroups under them.


Step 1 Choose Administration > Network Resources > Network Device Groups.

From the Network Device Groups navigation pane on the left, click Group Types.

The Network Device Groups page appears.

Step 2 Do one of the following:

To create a root NDG, click Add.

To create a child NDG, from the navigation pane on the left, choose a group to which you want to add a child NDG, and click Add.

Step 3 In the right-side pane, enter the following information:

(Required) Name of the NDG. This name appears in the navigation pane.

The full name of an NDG can have a maximum of 100 characters. For example, if you are creating a subgroup India under the parent groups Global > Asia, then the full name of the NDG that you are creating would be Global#Asia#India and this full name should not exceed 100 characters. If the full name of the NDG exceeds 100 characters, the NDG creation fails.

An optional description.

(Required) Type of NDG. If this NDG is a root NDG, then this device type will be available as an attribute in the device dictionary. If this NDG is a child NDG, then the name of the parent NDG should appear in this field.

Step 4 Click Save to save the NDG configuration.


Result:

On successful creation of the NDG, a pop-up appears at the right bottom corner of your screen with the following message: NDG_name has been saved successfully.

Related Topics

Managing Network Devices

Editing a Network Device Group

Deleting a Network Device Group

Editing a Network Device Group

Prerequisite:

Every Cisco ISE administrator account is assigned one or more administrative roles. To perform the operations described in the following procedures, you must have one of the following roles assigned: Super Admin or Network Device Admin. See Cisco ISE Admin Group Roles and Responsibilities for more information on the various administrative roles and the privileges associated with each of them.

To edit an NDG, complete the following steps:


Note You cannot edit the predefined Location and Device Type NDGs.


Step 1 Choose Administration > Network Resources > Network Device Groups.

Step 2 From the navigation pane on the left, click Group Types.

The Network Device Groups listing page appears.

Step 3 From the Group Types navigation pane on the left, choose the parent NDG whose child NDG you want to edit.

The Network Device Group listing page appears with a list of child NDGs.

Step 4 Check the check box next to the NDG that you want to edit and click Edit.

Step 5 Edit the NDG name or description or both.

You cannot edit the NDG type.

Step 6 Click Save to save the changes.


Result:

On successful completion of the edit process, a pop-up appears at the right bottom corner of your screen with the following message: NDG_name has been saved successfully.

Related Topics

Managing Network Devices

Creating a Network Device Group

Deleting a Network Device Group

Deleting a Network Device Group

Prerequisite:

Every Cisco ISE administrator account is assigned one or more administrative roles. To perform the operations described in the following procedures, you must have one of the following roles assigned: Super Admin or Network Device Admin. See Cisco ISE Admin Group Roles and Responsibilities for more information on the various administrative roles and the privileges associated with each of them.

To delete an NDG, complete the following steps:


Note You cannot delete an NDG that has a subgroup under it.


Step 1 Choose Administration > Network Resources > Network Device Groups.

Step 2 From the navigation pane on the left, click Group Types.

The Network Device Groups listing page appears.

Step 3 From the Group Types navigation pane on the left, choose the parent NDG whose child NDG you want to delete.

The Network Device Group listing page appears with a list of child NDGs.

Step 4 Check the check box next to the NDG that you want to delete and click Delete. Alternatively, you can choose the child NDG that you want to delete from the navigation pane on the left and click Delete Group from the action icon.

A dialog box appears with the following message:

Are you sure you want to delete?

Step 5 Click OK to delete the NDG.


Result:

On successful completion of the delete process, a pop-up appears at the right bottom corner of your screen with the following message: Group was deleted successfully.

Related Topics

Managing Network Devices

Creating a Network Device Group

Editing a Network Device Group


Importing Network Devices and Device Groups

Cisco ISE allows you to import a large number of network devices and network device groups using comma-separated value (.csv) files. While importing devices and device groups, you can create new records or update existing records. You can download the .csv import template from the Cisco ISE user interface, enter your device or device group details in the template, and save it as a .csv file, which you can then import back into Cisco ISE. When you configure an import job, you can also define whether you want Cisco ISE to overwrite the existing device definitions with the new definitions or stop the import process when it encounters the first error.

After an import job has begun, you can view the status of the job in the Cisco ISE user interface. You cannot run two import jobs of the same resource type at the same time. For example, you cannot concurrently run two import jobs to import network devices from two different import files.

To import devices into Cisco ISE, you must complete the following tasks:

1. Download the Import File Template

2. Create the CSV Import File

3. Import Devices into Cisco ISE or Import Network Device Groups into Cisco ISE

Download the Import File Template

Prerequisite:

Every Cisco ISE administrator account is assigned one or more administrative roles. To perform the operations described in the following procedures, you must have one of the following roles assigned: Super Admin or Network Device Admin. See Cisco ISE Admin Group Roles and Responsibilities for more information on the various administrative roles and the privileges associated with each of them.

To download the import file template, complete the following steps:


Step 1 Choose Administration > Network Resources > Network Devices.

Step 2 From the Network Devices navigation pane on the left, click Network Devices.

The Network Devices page appears.


Note If you want to download the template for Network Device Groups, then choose Administration > Network Resources > Network Device Groups and from the navigation pane on the left, and click Group Types.


Step 3 Click Import.

The Import page appears.

Step 4 Click Generate a Template.

Step 5 Save the template file to your local hard disk.


Result:

The template is downloaded to your local hard disk.

Create the CSV Import File

You must first create the CSV import file before you can import it into Cisco ISE.

Prerequisite:

Every Cisco ISE administrator account is assigned one or more administrative roles. To perform the operations described in the following procedures, you must have one of the following roles assigned: Super Admin or Network Device Admin. See Cisco ISE Admin Group Roles and Responsibilities for more information on the various administrative roles and the privileges associated with each of them.

To create the CSV import file, complete the following steps:


Step 1 Open the CSV template that you downloaded using Microsoft Excel or any spreadsheet application.

The first line in your CSV template is the header and it defines the format of the fields in the file. This header should not be edited and should be used as is.

Table 6-4 lists the fields in the header and provides a description of the fields in the Network Device CSV file template.

Table 6-5 lists the fields in the header and provides a description of these fields in the Network Device Group CSV file template.

Step 2 Enter the data for your network devices as shown in Figure 6-1 or network device groups as shown in Figure 6-2.

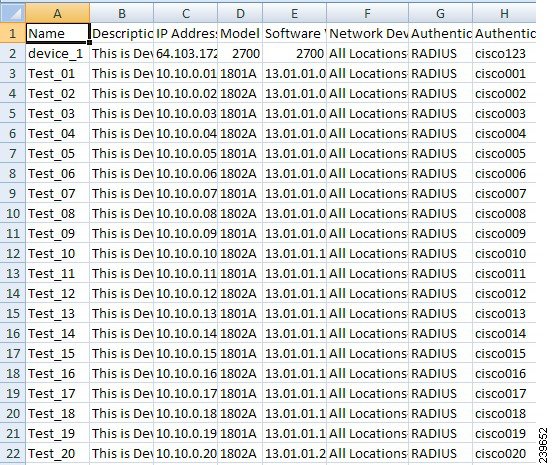
Figure 6-1 Sample CSV File for Importing Network Devices

Step 3 Save the .csv file.


Description of the Fields in the Network Device CSV Template

Table 6-4 CSV Template Fields and Description 

Field
Description

Name:String(32):Required

(Required) This field is the network device name. It is an alphanumeric string, with a maximum of 32 characters.

Description:String(256)

This field is an optional description for the network device. A string, with a maximum of 256 characters.

IP Address:Subnets(a.b.c.d/
m|...):Required

(Required) This field is the IP address and subnet mask of the network device (can take on more than one value separated by a pipe "|" symbol).

Model Name:String(32):Required

(Required) This field is the network device model name. It is a string, with a maximum of 32 characters.

Software Version:String(32):Required

(Required) This field is the network device software version. It is a string, with a maximum of 32 characters.

Network Device Groups:String(100):Required

(Required) This field should be an existing network device group. It can be a subgroup, but must include both the parent and subgroup separated by a space. It is a string, with a maximum of 100 characters, for example, Location#All Location#US

Authentication:Protocol:String(6)

This is an optional field. It is the protocol that you want to use for authentication. The only valid value is RADIUS (not case sensitive).

Authentication:Shared Secret:String(128)

(Required if you have entered a value for the Authentication Protocol field) This is a string, with a maximum of 128 characters.

SNMP:Version:Enumeration
(1|2c|3)

This is an optional field, used by the Profiler service. It is the version of the SNMP protocol. Valid values are 1, 2c, or 3.

SNMP:RO Community:String(32)

(Required if you have entered a value for the SNMP Version field) SNMP RO Community. It is a string, with a maximum of 32 characters.

SNMP:RW Community:String(32)

(Required if you have entered a value for the SNMP Version field) SNMP RW Community. It is a string, with a maximum of 32 characters.

SNMP:Username:String(32)

This is an optional field. It is a string, with a maximum of 32 characters.

SNMP:Security Level:Enumeration(Auth|No Auth|Priv)

(Required if you have chosen SNMP version 3) Valid values are Auth, No Auth, Priv.

SNMP:Authentication Protocol:Enumeration(MD5|SHA)

(Required if you have entered Auth or Priv for the SNMP security level) Valid values are MD5 or SHA.

SNMP:Authentication Password:String(32)

(Required if you have entered Auth for the SNMP security level) It is a string, with a maximum of 32 characters.

SNMP:Privacy Protocol:Enumeration(DES|AES128|AES192|AES256|3DES)

(Required if you have entered Priv for the SNMP security level) Valid values are DES, AES128, AES192, AES256, or 3DES.

SNMP:Privacy Password:String(32)

(Required if you have entered Priv for the SNMP security level) It is a string, with a maximum of 32 characters.

SNMP:Polling Interval:Integer:600-86400 seconds

This is an optional field to set the SNMP polling interval. Valid value is an integer between 600 and 86400.

SNMP:Is Link Trap Query:Boolean(true|false)

This is an optional field to enable or disable the SNMP link trap. Valid values are true or false.

SNMP:Is MAC Trap Query:Boolean(true|false)

This is an optional field to enable or disable the SNMP MAC trap. Valid values are true or false.

SGA:Device Id:String(32)

This is an optional field. It is the security group access device ID, and is a string, with a maximum of 32 characters.

SGA:Device Password:String(256)

(Required if you have entered SGA device ID) It is the security group access device password and is a string, with a maximum of 256 characters.

SGA:Environment Data Download Interval:Integer

This is an optional field. It is the security group access environment data download interval. Valid value is an integer between 1 and 24850.

SGA:Peer Authorization Policy Download Interval:Integer

This is an optional field. It is the security group access peer authorization policy download interval. Valid value is an integer between 1 and 24850.

SGA:Reauthentication Interval:Integer

This is an optional field. It is the security group access reauthentication interval. Valid value is an integer between 1 and 24850.

SGA:SGACL List Download Interval:Integer

This is an optional field. It is the security group access SGACL list download interval. Valid value is an integer between 1 and 24850.

SGA:Is Other SGA Devices Trusted:Boolean(true|false)

This is an optional field. Indicates whether security group access is trusted or not. Valid value is true or false.

SGA:Is Device Included on SGT Mapping:Boolean(true|false)

This is an optional field. It is the security group access device included on SGT. Valid value is true or false.

Deployment:Execution Mode Username:String(32)

This is an optional field. It is the username that has privileges to edit the device configuration. It is a string, with a maximum of 32 characters.

Deployment:Execution Mode Password:String(32)

This is an optional field. It is the device password and is a string, with a maximum of 32 characters.

Deployment:Enable Mode Password:String(32)

This is an optional field. It is the enable password of the device that would allow you to edit its configuration and is a string, with a maximum of 32 characters.


For a detailed description of each of these fields, see Table 6-1, Table 6-2, Table 21-4, and Table 6-3.

Result:

You now have the .csv file to begin the import process.

Related Topics

Importing Network Devices and Device Groups

Import Devices into Cisco ISE

Import Devices into Cisco ISE

Prerequisite:

Every Cisco ISE administrator account is assigned one or more administrative roles. To perform the operations described in the following procedures, you must have one of the following roles assigned: Super Admin or Network Device Admin. See Cisco ISE Admin Group Roles and Responsibilities for more information on the various administrative roles and the privileges associated with each of them.

After you have created your .csv import file, complete the following steps:


Step 1 Choose Administration > Network Resources > Network Devices.

Step 2 From the Network Devices navigation pane on the left, click Network Devices.

The Network Devices page appears.

Step 3 Click Import.

The Import page appears.

Step 4 Click Browse to choose the .csv file from the system that is running the client browser.

Step 5 Check or uncheck the following options:

a. Overwrite Existing Data with New Data—Check this check box if you want Cisco ISE to replace the existing network devices with the devices in your import file. If you do not check this check box, new network device definitions that are available in the import file are added to the network device repository. Duplicate entries are ignored.

b. Stop Import on First Error—Check this check box if you want Cisco ISE to discontinue the import process when it encounters an error in the import process. The records that were processed until that time are imported. If this check box is not checked and an error is encountered, the error is reported and Cisco ISE continues the import process.

Step 6 Click Import.

The Import Progress window appears and provides the status of the import process. The page appears with a summary of the number of devices that are imported and also reports any errors that were found during the import process.

Step 7 Click Network Devices from the navigation pane or the Network Devices List link at the top of this screen to view the imported devices.


Result:

On successful completion of the import process, a dialog box appears with the "Import Completed" message.

Import Network Device Groups into Cisco ISE

Prerequisite:

Every Cisco ISE administrator account is assigned one or more administrative roles. To perform the operations described in the following procedures, you must have one of the following roles assigned: Super Admin or Network Device Admin. See Cisco ISE Admin Group Roles and Responsibilities for more information on the various administrative roles and the privileges associated with each of them.

To import NDGs, complete the following steps:


Step 1 Choose Administration > Network Resources > Network Device Groups.

Step 2 From the navigation pane on the left, click Group Types.

The Network Device Groups page appears.

Step 3 Click Import. You can alternatively click Import from the action icon on the navigation pane.

The Import page appears.

Step 4 Click Generate a Template to download the template for creating the import file.

Step 5 Save the template to your local hard disk.

Step 6 Open this template in Microsoft Excel or any spreadsheet application.

The first line in your CSV template is the header and it defines the format of the fields in the file. This header should not be edited and should be used as is.

Step 7 Enter the details as shown in Figure 6-2.

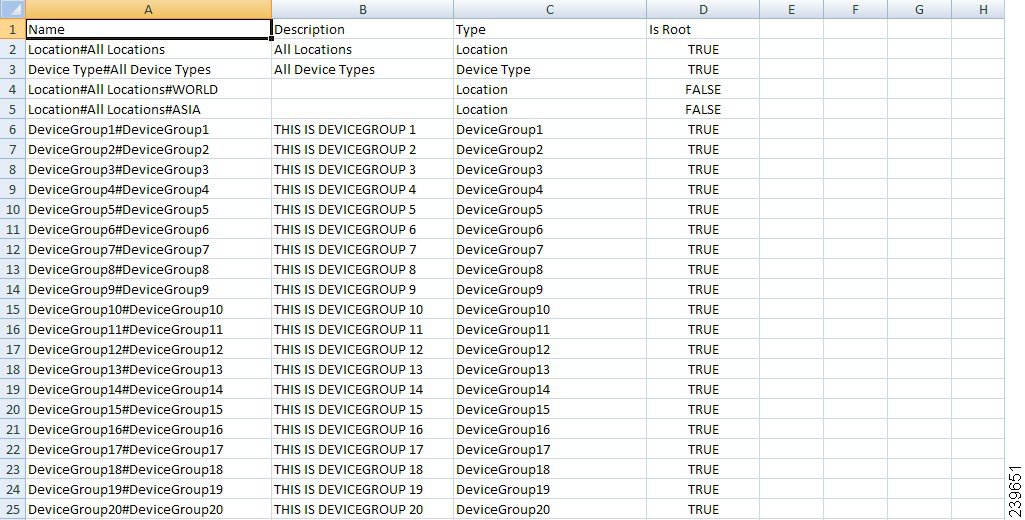
Figure 6-2 NDG Import File

Step 8 Save the import file to your local hard disk.

Step 9 Click Browse from the Import page to choose your import file.

Step 10 Check or uncheck the following options:

a. Overwrite Existing Data with New Data—Check this check box if you want Cisco ISE to replace the existing network device groups with the device groups in your import file. If you do not check this check box, new network device group definitions that are available in the import file are added to the network device group repository. Duplicate entries are ignored.

b. Stop Import on First Error—Check this check box if you want Cisco ISE to discontinue the import process when it encounters an error in the import process. The records that were processed until that time are imported. If this check box is not checked and an error is encountered, the error is reported and Cisco ISE continues the import process.

Step 11 Click Import.

The import progress is displayed on the screen and the result appears at the end of the import process.


Description of Fields in the Network Device Groups CSV Template

Table 6-5 Network Device Groups CSV Template Fields

Field
Description

Name:String(100):Required

(Required) This field is the network device group name. It is a string with a maximum of 100 characters. The full name of an NDG can have a maximum of 100 characters. For example, if you are creating a subgroup India under the parent groups Global > Asia, then the full name of the NDG that you are creating would be Global#Asia#India and this full name should not exceed 100 characters. If the full name of the NDG exceeds 100 characters, the NDG creation fails.

Description:String(1024)

This is an optional network device group description. It is a string, with a maximum of 1024 characters.

Type:String(64):Required

(Required) This field is the network device group type. It is a string, with a maximum of 64 characters.

Is Root:Boolean(true|false):Required

(Required) This is a field that determines if the specific network device group is a root group or not. Valid value is true or false.


Related Topics

Importing Network Devices and Device Groups

Create the CSV Import File

Exporting Network Devices and Network Device Groups

You can export the list of network devices and network device groups configured in Cisco Cisco ISE in the form of a .csv file that you can import into another Cisco ISE node.

This section contains the following topics:

Exporting Network Devices

Exporting Network Device Groups

Exporting Network Devices

Prerequisite:

Every Cisco ISE administrator account is assigned one or more administrative roles. To perform the operations described in the following procedures, you must have one of the following roles assigned: Super Admin or Network Device Admin. See Cisco ISE Admin Group Roles and Responsibilities for more information on the various administrative roles and the privileges associated with each of them.

To export the network device configuration, complete the following steps:


Step 1 Choose Administration > Network Resources > Network Devices.

Step 2 From the Network Devices navigation pane on the left, click Network Devices.

The Network Devices page appears with a list of device configurations.

Step 3 Check the check boxes next to the devices that you want to export, and choose Export > Export Selected.


Note To export all the network devices that are defined, choose Export > Export All.


Step 4 Save the export.csv file to your local hard disk.


Result:

You have your network device configuration in the form of a .csv file that you can import into another Cisco ISE node.

Exporting Network Device Groups

Prerequisite:

Every Cisco ISE administrator account is assigned one or more administrative roles. To perform the operations described in the following procedures, you must have one of the following roles assigned: Super Admin or Network Device Admin. See Cisco ISE Admin Group Roles and Responsibilities for more information on the various administrative roles and the privileges associated with each of them.

To export network device groups, complete the following steps:


Step 1 Choose Administration > Network Resources > Network Device Groups.

Step 2 From the navigation pane on the left, click Group Types.

The Network Device Groups page appears.

Step 3 Click Export. Alternatively, you can click Export from the action icon on the navigation pane.

Step 4 Save the export.csv file to your local hard disk.


Result:

You have exported the network device group configuration from an Cisco ISE node, which can now be imported into another Cisco ISE node.