Feedback
Table Of Contents
Configuring Event Action Rules
Signature Event Action Processor
Task List for Configuring Event Action Rules
Configuring Event Action Variables
Configuring Target Value Ratings
Configuring Event Action Overrides
Configuring Event Action Filters
Configuring the General Settings
Clearing the Denied Attackers List
Configuring Event Action Rules
This chapter explains how to configure event action rules. It contains the following sections:
•
Signature Event Action Processor
•
•
•
About Event Action Rules
Event action rules are a group of settings you configure for the event action processing component of the sensor. These rules dictate the actions the sensor performs when an event occurs.
The event action processing component is responsible for the following functions:
•
•
•
•
•
•
Signature Event Action Processor
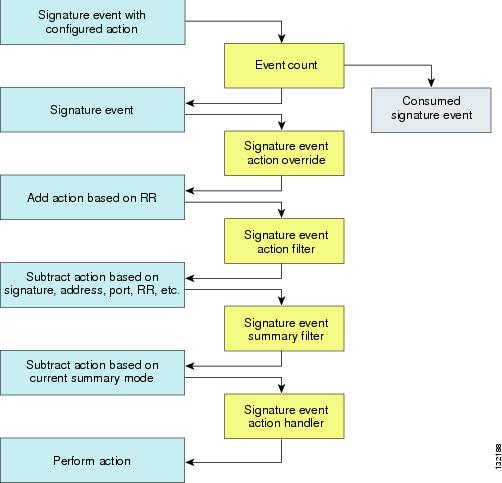
SEAP coordinates the data flow from the signature event in the alarm channel to processing through the SEAO, the SEAF, and the SEAH. It consists of the following components:
•
The unit that represents the area to communicate signature events from the Sensor App inspection path to signature event handling.
•
Adds actions based on the RR value. SEAO applies to all signatures that fall into the range of the configured RR threshold. Each SEAO is independent and has a separate configuration value for each action type. For more information, see Calculating the Risk Rating.
•
Subtracts actions based on the signature event's SIGID, addresses, and RR. The input to the SEAF is the signature event with actions possibly added by the SEAO.
Note
The following parameters apply to the SEAF:
–
–
–
–
–
–
–
–
–
–
–
•
Performs the requested actions. The output from the SEAH is the actions being performed and possibly an evIdsAlert written to the Event Store.
Figure 6-1 illustrates the logical flow of the signature event through the SEAP and the operations performed on the action for this event. It starts with the signature event with configured action received in the alarm channel and flows top-to-bottom as the signature event passes through the functional components of the SEAP.
Figure 6-1 Signature Event Through SEAP
Event Actions
Table 6-1 describes the event actions.
Caution
Task List for Configuring Event Action Rules
Follow these steps when configuring the event action rules component of the IPS:
1.
2.
Assign TVRs to your network assets so that you can calculate the RR.
3.
Assign an RR to each event action type.
4.
Assign filters to subtract actions based on the signature's SIGID, IP addresses, and RR.
5.
Specify whether you want to use the summarizer, the meta event generator, or configure denied attacker parameters.
Event Action Variables
This section describes event action variables, and contains the following topics:
•
About Event Action Variables
You can create event action variables and then use those variables in event action filters. When you want to use the same value within multiple filters, use a variable. When you change the value of the variable, any filter that uses that variable is updated with the new value.
Note
Some variables cannot be deleted because they are necessary to the signature system. If a variable is protected, you cannot edit it. You receive an error message if you try to delete protected variables. You can edit only one variable at a time.
When configuring IP addresses, specify the full IP address or ranges or set of ranges. For example:
•
•
•
Timesaver
Configuring Event Action Variables
Use the variables variable_name address ip_address command in service event action rules submode to set up event action variables. The IP address can be one address, a range, or ranges separated by a comma.
To configure event action variables, follow these steps:
Step 1
Step 2
sensor# configure terminalsensor(config)# service event-action-rules rules0Step 3
sensor(config-rul)# variables variable1 address 10.89.130.108The valid values for address are A.B.C.D-A.B.C.D [,A.B.C.D-A.B.C.D].
Step 4
sensor(config-rul)# show settingsvariables (min: 0, max: 256, current: 2)-----------------------------------------------variableName: variable1-----------------------------------------------address: 10.89.130.108 default: 0.0.0.0-255.255.255.255----------------------------------------------------------------------------------------------Step 5
sensor(config-rul)# exitApply Changes:?[yes]:Step 6
Calculating the Risk Rating
An RR is a value between 0 and 100 that represents a numerical quantification of the risk associated with a particular event on the network. The calculation takes into account the value of the network asset being attacked (for example, a particular server), so it is configured on a per-signature basis (ASR and SFR) and on a per-server basis (TVR).
RRs let you prioritize alerts that need your attention. These RR factors take into consideration the severity of the attack if it succeeds, the fidelity of the signature, and the overall value of the target host to you. The RR is reported in the evIdsAlert.
The following values are used to calculate the RR for a particular event:
•
The ASR is derived from the alert severity parameter of the signature.
•
SFR is calculated by the signature author on a per-signature basis. The signature author defines a baseline confidence ranking for the accuracy of the signature in the absence of qualifying intelligence on the target. It represents the confidence that the detected behavior would produce the intended effect on the target platform if the packet under analysis were allowed to be delivered. For example, a signature that is written with very specific rules (specific Regex) has a higher SFR than a signature that is written with generic rules.
•
TVR is a user-configurable value that identifies the importance of a network asset (through its IP address). You can develop a security policy that is more stringent for valuable corporate resources and looser for less important resources. For example, you could assign a TVR to the company web server that is higher than the TVR you assign to a desktop node. In this example, attacks against the company web server have a higher RR than attacks against the desktop node.
Note
Configuring Target Value Ratings
You can assign a TVR to your network assets. T he TVR is one of the factors used to calculate the RR value for each alert. You can assign different TVRs to different targets. Events with a higher RR trigger more severe signature event actions.
Use the target-value [zero value | low | medium | high | mission-critical] target-address ip_address range command in service event action rules submode to set TVRs for your network assets. The default is medium.
To configure TVRs for your network assets, follow these steps:
Step 1
Step 2
sensor# configure terminalsensor(config)# service event-action-rules rules0Step 3
sensor(config-rul)# target-value mission-critical target-address 10.89.130.108Step 4
sensor(config-rul)# show settings-----------------------------------------------target-value (min: 0, max: 5, current: 1)-----------------------------------------------target-value-setting: mission-criticaltarget-address: 10.89.130.108 default: 0.0.0.0-255.255.255.255-----------------------------------------------sensor(config-rul)#Step 5
sensor(config-rul)# exitApply Changes:?[yes]:Step 6
Event Action Overrides
This section describes event action overrides, and contains the following topics:
•
About Event Action Overrides
You can add an event action override to change the actions associated with an event based on the RR of that event. Event action overrides are a way to add event actions globally without having to configure each signature individually. Each event action has an associated RR range. If a signature event occurs and the RR for that event falls within the range for an event action, that action is added to the event. For example, if you want any event with an RR of 85 or more to generate an SNMP trap, you can set the RR range for Request SNMP Trap to 85-100. If you do not want to use action overrides, you can disable the entire event action override component.
Configuring Event Action Overrides
Use the overrides [request-block-connection | request-block-host | deny-attacker-inline | deny-packet-inline | deny-connection-inline | log-attacker-packets | log-victim-packets | log-pair-packets | reset-tcp-connection | produce-alert | produce-verbose-alert | request-snmp-trap] command in service event action rules submode to configure the parameters of event action overrides.
To add event action overrides, follow these steps:
Step 1
Step 2
sensor# configure terminalsensor(config)# service event-action-rules rules0Step 3
Note
a.
sensor(config-rul)# overrides deny-attacker-inlineb.
sensor(config-rul-ove)# exitsensor(config-rul)# overrides deny-packet-inlinec.
sensor(config-rul-ove)# exitsensor(config-rul)# overrides deny-connection-inlined.
sensor(config-rul-ove)# exitsensor(config-rul)# overrides reset-tcp-connectionStep 4
a.
sensor(config-rul-ove)# exitsensor(config-rul)# overrides request-block-connectionb.
sensor(config-rul-ove)# exitsensor(config-rul-ove)# exitsensor(config-rul)# overrides request-block-hostStep 5
a.
sensor(config-rul-ove)# exitsensor(config-rul)# overrides log-attacker-packetsb.
sensor(config-rul-ove)# exitsensor(config-rul)# overrides log-victim-packetsc.
sensor(config-rul-ove)# exitsensor(config-rul)# overrides log-pair-packetsStep 6
a.
sensor(config-rul-ove)# exitsensor(config-rul)# overrides produce-alertb.
sensor(config-rul-ove)# exitsensor(config-rul)# overrides produce-verbose-alertc.
sensor(config-rul-ove)# exitsensor(config-rul)# overrides request-snmp-trapStep 7
sensor(config-rul-ove)# exitsensor(config-rul)#Apply Changes:?[yes]:Step 8
Event Action Filters
This section describes event action filters, and contains the following topics:
•
About Event Action Filters
Event action filters are processed as an ordered list and you can move filters up or down in the list.
Filters let the sensor perform certain actions in response to the event without requiring the sensor to perform all actions or remove the entire event. Filters work by removing actions from an event. A filter that removes all actions from an event effectively consumes the event.
Note
Caution
Configuring Event Action Filters
You can configure event action filters to remove specific actions from an event or to discard an entire event and prevent further processing by the sensor. You can use event action variables that you defined to group addresses for your filters. For the procedure for configuring event action variables, see Configuring Event Action Variables.
Note
Bad source and destinationerror.
Use the filters [edit | insert | move] name1 [begin | end | inactive | before | after] command in service event action rules submode to set up event action filters.
To configure event action filters, follow these steps:
Step 1
Step 2
sensor# configure terminalsensor(config)# service event-action-rules rules0Step 3
sensor(config-rul)# filters insert name1 beginUse name1, name2, and so forth to name your event action filters. Use the begin | end | inactive | before | after keywords to specify where you want to insert the filter.
Step 4
a.
sensor(config-rul-fil)# signature-id-range 1000-1005The default is 900 to 65535.
b.
sensor(config-rul-fil)# subsignature-id-range 1-5The default is 0 to 255.
c.
sensor(config-rul-fil)# attacker-address-range 10.89.10.10-10.89.10.23The default is 0.0.0.0 to 255.255.255.255.
d.
sensor(config-rul-fil)# victim-address-range 192.56.10.1-192.56.10.255The default is 0.0.0.0 to 255.255.255.255.
e.
sensor(config-rul-fil)# victim-port-range 0-434The default is 0 to 65535.
f.
sensor(config-rul-fil)# risk-rating-range 85-100The default is 0 to 100.
g.
sensor(config-rul-fil)# actions-to-remove reset-tcp-connectionYou can choose from the following actions:
request-block-connection Request SHUN of connectionrequest-block-host Request SHUN of attacker hostdeny-attacker-inline Do not transmit packets with source address ofattackerdeny-packet-inline Do not transmit the single packet causing alertdeny-connection-inline Do not transmit packets on this TCP connectionlog-attacker-packets Activate packet logging for attacker addresslog-victim-packets Activate packet logging for victim addresslog-pair-packets Activate packet logging for attacker/victim address pairreset-tcp-connection Send TCP RST packets to terminate connectionproduce-alert Write evIdsAlert to EventStoreproduce-verbose-alert Write evIdsAlert to EventStore with triggerPacketrequest-snmp-trap Write evIdsAlert to EventStore with SNMP request inAlarmTraitsh.
sensor(config-rul-fil)# filter-item-status [enable | disable]The default is enabled
i.
sensor(config-rul-fil)# stop-on-match [true | false]True tells the sensor to stop processing filters if this item matches. False tells the sensor to continue processing filters even if this item matches.
j.
sensor(config-rul-fil)# user-commentsStep 5
sensor(config-rul-fil)# show settingsNAME: name1-----------------------------------------------signature-id-range: 1000-10005 default: 900-65535subsignature-id-range: 1-5 default: 0-255attacker-address-range: 10.89.10.10-10.89.10.23 default: 0.0.0.0-255.255.255.255victim-address-range: 192.56.10.1-192.56.10.255 default: 0.0.0.0-255.255.255.255attacker-port-range: 0-65535 <defaulted>victim-port-range: 1-343 default: 0-65535risk-rating-range: 85-100 default: 0-100actions-to-remove: reset-tcp-connection default:filter-item-status: Enabled default: Enabledstop-on-match: True default: Falseuser-comment: This is a new filter. default:-----------------------------------------------Step 6
sensor(config-rul)# filters edit name1Step 7
Step 8
sensor(config-rul-fil)# exitsensor(config-rul)# filters move name5 before name1Step 9
sensor(config-rul-fil)# exitsensor(config-rul)# show settings-----------------------------------------------filters (min: 0, max: 4096, current: 5 - 4 active, 1 inactive)-----------------------------------------------ACTIVE list-contents-----------------------------------------------NAME: name5-----------------------------------------------signature-id-range: 900-65535 <defaulted>subsignature-id-range: 0-255 <defaulted>attacker-address-range: 0.0.0.0-255.255.255.255 <defaulted>victim-address-range: 0.0.0.0-255.255.255.255 <defaulted>attacker-port-range: 0-65535 <defaulted>victim-port-range: 0-65535 <defaulted>risk-rating-range: 0-100 <defaulted>actions-to-remove: <defaulted>filter-item-status: Enabled <defaulted>stop-on-match: False <defaulted>user-comment: <defaulted>----------------------------------------------------------------------------------------------NAME: name1-----------------------------------------------signature-id-range: 900-65535 <defaulted>subsignature-id-range: 0-255 <defaulted>attacker-address-range: 0.0.0.0-255.255.255.255 <defaulted>victim-address-range: 0.0.0.0-255.255.255.255 <defaulted>attacker-port-range: 0-65535 <defaulted>victim-port-range: 0-65535 <defaulted>risk-rating-range: 0-100 <defaulted>actions-to-remove: <defaulted>filter-item-status: Enabled <defaulted>stop-on-match: False <defaulted>user-comment: <defaulted>----------------------------------------------------------------------------------------------NAME: name2-----------------------------------------------signature-id-range: 900-65535 <defaulted>subsignature-id-range: 0-255 <defaulted>attacker-address-range: 0.0.0.0-255.255.255.255 <defaulted>victim-address-range: 0.0.0.0-255.255.255.255 <defaulted>attacker-port-range: 0-65535 <defaulted>victim-port-range: 0-65535 <defaulted>risk-rating-range: 0-100 <defaulted>actions-to-remove: <defaulted>filter-item-status: Enabled <defaulted>stop-on-match: False <defaulted>user-comment: <defaulted>---------------------------------------------------------------------------------------------------------------------------------------------INACTIVE list-contents----------------------------------------------------------------------------------------------sensor(config-rul)#Step 10
sensor(config-rul)# filters move name1 inactiveStep 11
sensor(config-rul-fil)# exitsensor(config-rul)# show settings-----------------------------------------------INACTIVE list-contents----------------------------------------------------------------------------------------------NAME: name1-----------------------------------------------signature-id-range: 900-65535 <defaulted>subsignature-id-range: 0-255 <defaulted>attacker-address-range: 0.0.0.0-255.255.255.255 <defaulted>victim-address-range: 0.0.0.0-255.255.255.255 <defaulted>attacker-port-range: 0-65535 <defaulted>victim-port-range: 0-65535 <defaulted>risk-rating-range: 0-100 <defaulted>actions-to-remove: <defaulted>filter-item-status: Enabled <defaulted>stop-on-match: False <defaulted>user-comment: <defaulted>----------------------------------------------------------------------------------------------sensor(config-rul)#Step 12
sensor(config-rul)# exitApply Changes:?[yes]:Step 13
General Settings
This section describes the general settings, and contains the following topics:
•
•
About General Settings
You can configure the general settings that apply to event action rules, such as whether you want to use the summarizer and the meta event generator. The summarizer groups events into a single alert, thus decreasing the number of alerts the sensor sends out. The meta event generator processes the component events, which lets the sensor watch for suspicious activity transpiring over a series of events.
You can configure how long you want to deny attackers, the maximum number of denied attackers, and how long you want blocks to last.
Event Action Summarization
Summarization decreases the volume of alerts sent out from the sensor by providing basic aggregation of events into a single alert. Special parameters are specified for each signature and they influence the handling of the alerts. Each signature is created with defaults that reflect a preferred normal behavior. However, you can tune each signature to change this default behavior within the constraints for each engine type.
The non-alert generating actions (deny, block, TCP reset) go through the filters for each signature event unsummarized. The alert-generating actions are not performed on these summarized alerts; instead the actions are applied to the one summary alert and then put through the filters.
If you select one of the other alert-generating actions and do not have it filtered out, the alert is created even if you do not select Produce Alert. To prevent alerts from being created, you must have all alert-generating actions filtered out.
Summarization and event actions are processed after Engine. META has processed the component events. This lets the sensor watch for suspicious activity transpiring over a series of events.
Event Action Aggregation
Basic aggregation provides two operating modes. The simple mode involves configuring a threshold number of hits for a signature that must be met before the alert is sent. A more advanced mode is timed-interval counting. In this mode, the sensor tracks the number of hits per second and only sends alerts when that threshold is met. In this example, a hit is a term used to describe an event, which is basically an alert, but it is not sent out of the sensor as an alert until the threshold number of hits has been exceeded.
You can select from the following summarization options:
•
•
•
•
Deny Attackers
You can configure certain aspects of the deny attackers inline event action. You can configure the number of seconds you want to deny attackers inline and you can limit the number of attackers you want denied in the system at any one time.
Configuring the General Settings
Use the following commands in service event action rules submode to configure general event action rules settings:
•
The valid range is 0 to 10000000. The default is 30 minutes.
•
The valid range is 0 to 518400. The default is 3600.
•
The default is enabled.
•
The default is enabled.
•
The default is enabled.
•
The default is enabled.
•
The valid range is 0 to 100000000. The default is 10000.
To configure event action general settings, follow these steps:
Step 1
Step 2
sensor# configure terminalsensor(config)# service event-action-rules rules0Step 3
sensor(config)# generalStep 4
sensor(config-rul-gen)# global-metaevent-status [enabled | disabled]The default is enabled.
Step 5
sensor(config-rul-gen)# global-summarization-status [enabled | disabled]The default is enabled.
Step 6
a.
sensor(config-rul-gen)# max-denied-attackers 100The default is 1000.
b.
sensor(config-rul-gen)# global-deny-timeout 1000The default is 3600 seconds.
Step 7
sensor(config-rul-gen)# global-block-timeout 20The default is 30 minutes.
Step 8
sensor(config-rul-gen)# global-overrides-status [enabled | disabled]The default is enabled.
Step 9
sensor(config-rul-gen)# global-filters-status [enabled | disabled]The default is enabled.
Step 10
sensor(config-rul-gen)# show settingsgeneral-----------------------------------------------global-overrides-status: Enabled default: Enabledglobal-filters-status: Enabled default: Enabledglobal-summarization-status: Enabled default: Enabledglobal-metaevent-status: Enabled default: Enabledglobal-deny-timeout: 1000 default: 3600global-block-timeout: 20 default: 30max-denied-attackers: 100 default: 10000-----------------------------------------------sensor(config-rul-gen)#Step 11
sensor(config-rul-gen)# exitsensor(config-rul)# exitApply Changes:?[yes]:Step 12
Clearing the Denied Attackers List
Use the clear denied-attackers command in service event action rules submode to delete the denied attackers list and clear the virtual sensor statistics.
If your sensor is configured to operate in inline mode, the traffic is passing through the sensor. You can configure signatures to deny packets, connections, and attackers while in inline mode, which means that single packets, connections, and specific attackers will be denied, that is, not transmitted, when the sensor encounters them.
When the signature fires, the attacker is denied and placed in a list. As part of sensor administration, you may want to delete the list or clear the statistics in the list.
To delete the list of denied attackers and clear the statistics, follow these steps:
Step 1
Step 2
sensor# show statistics denied-attackersDenied Attackers and hit count for each.10.20.4.2 = 910.20.5.2 = 5The statistics show that there are two IP addresses being denied at this time.
Step 3
sensor# clear denied-attackersWarning: Executing this command will delete all addresses from the list ofattackers currently being denied by the sensor.Continue with clear? [yes]:Step 4
Step 5
sensor# show statistics virtual-sensorVirtual Sensor StatisticsStatistics for Virtual Sensor vs0Name of current Signature-Definition instance = sig0Name of current Event-Action-Rules instance = rules0List of interfaces monitored by this virtual sensor = mypairDenied Address InformationNumber of Active Denied Attackers = 0Number of Denied Attackers Inserted = 2Number of Denied Attackers Total Hits = 287Number of times max-denied-attackers limited creation of new entry = 0Number of exec Clear commands during uptime = 1Denied Attackers and hit count for each.There is no longer any information under the
Denied Attackers and hit count for each category.Step 6
sensor# show statistics virtual-sensor clearStep 7
JWK-4255# show statistics virtual-sensorVirtual Sensor StatisticsStatistics for Virtual Sensor vs0Name of current Signature-Definition instance = sig0Name of current Event-Action-Rules instance = rules0List of interfaces monitored by this virtual sensor = mypairDenied Address InformationNumber of Active Denied Attackers = 2Number of Denied Attackers Inserted = 0Number of Denied Attackers Total Hits = 0Number of times max-denied-attackers limited creation of new entry = 0Number of exec Clear commands during uptime = 1Denied Attackers and hit count for each.10.20.2.5 = 010.20.5.2 = 0The statistics have all been cleared except for the Number of Active Denied Attackers and Number of exec Clear commands during uptime categories. It is important to know if the list has been cleared.
Event Action Rules Example
The following example demonstrates how the individual components of your event action rules work together.
Risk Rating Ranges for Example 1
•
•
•
•
•
•
•
•
•
•
•
•
Event Action Filters for Example 1
1.
2.
3.
4.
5.
Results for Example 1
When SIG 2004 is detected:
•
If the attacker address is not 30.1.1.1 and the victim address is not 20.1.1.1:
•
•
•