Feedback
Table Of Contents
Common Steps for Creating an Entity
Creating an Application Group Type
Creating a Resource Type (Action)
Creating a Resource Type (Attributes)
Add Members to the Adhoc Resource Group
Create Rule Based Resource Group
PAP API Quickstart Guide
The CEPM V3.3.0.0 supports web service client. The CEPM includes a set of administrative APIs, which will enable enterprise and third-party developers to create entities and mappings according to their requirements. Several new APIs have also been added to provide more efficient interactions between the CEPM and client applications. These APIs support WS-I compliant WSDLs which can be used as clients for any language such as DotNet, C, and COM. As a result, if you want to create a CEPM entity, you can call the CEPM Services or PAP client.
Customizing the PAP Client
One way to create the entities using the new APIs is by using the PAP client stubs (wrapper classes), which are available in the ServiceLocator. These wrapper classes facilitate the creation of the entities by calling the CEPM's own services. Another way to write your own PAP client is by making use of these WSDLs as per your application requirement.
You can access the WSDLs for the corresponding entities from the following service URLs:
For Application Group services:http://<host>:<port>/cepm/services/AdminApplicationGroupService?wsdlFor Application services:http://<host>:<port>/cepm/services/AdminApplicationService?wsdlFor Resource services:http://<host>:<port>/cepm/services/AdminResourceService?wsdlFor User services:http://<host>:<port>/cepm/services/AdminUserService?wsdlFor Group services:http://<host>:<port>/cepm/services/AdminGroupService?wsdlFor Role services:http://<host>:<port>/cepm/services/AdminRoleService?wsdlFor Context services:http://<host>:<port>/cepm/services/AdminContextService?wsdlFor RoleBundle services:http://<host>:<port>/cepm/services/AdminRoleBundleService?wsdlwhere you need to replace the host name and port number arguments in the URL with the correct values corresponding to where you have deployed the administration console.
You can access the common XML Schema Definition (xsd) files from the following service URLs:
http://<host>:<port>/cepm/services/vo.xsdhttp://<host>:<port>/cepm/services/exception.xsdThese files are common for all the previously mentioned WSDLs.
Implementing New APIs
Using the PAP Client
If you are using the PAP client, you must call the service from the corresponding service locator. For example if you want to create a role, you must call the following service:
iRole = ServiceLocator.GetInstance().GetRoleManager(endPoint, userName, password,
domainName, 1000);
where:
•
endpoint refers to the URL of the server machine where the PAP is running.
•
•
•
For example:
IRole = ServiceLocator.GetInstance().GetRoleManager("http://localhost:9090/cepm",
"superuser", "admin", "Default Domain", 1000000);
You can also call the ServiceLocator without giving the preceding parameters. For example:
IRole = ServiceLocator.GetInstance().GetRoleManager()In this case, the required details will be retrieved from the <api> tag of the pep_config.xml file.
Common Steps for Creating an Entity
To create an entity using the new APIs, follow these common steps:
Step 1
Step 2
Step 3
The concurrency and serializability is controlled by setting two parameters, such as Transactional and Override. There may be various reasons for failure, such as wrong FQN or entity unique IDs.
Transactional: This is a Boolean expression. When set to false, if any of the objects fails to create due to any reason during compilation, it will ignore the failure and complete the task by throwing an exception "Creation of following objects are failed and hence skipped" at the end of process. If set to true, it will throw an exception immediately after it finds any of the objects has failed to create and rollback the creation of object. The value for this parameter is set to false by default.
Override: This is a Boolean expression. When set to false, if it finds a duplicate role (having the same fully qualified name) within the hierarchy during compilation, it will throw a DuplicateRole exception and complete the task without updating the existing role. If set to true, it will update the existing role with the corresponding inputs of the new role. The value for this parameter is set to false by default.
It is important to note that before updating or deleting an object, you must call the GetObject method. This method returns the entire child objects up to the specified level along with a unique object ID (for every object) for updating or deletion of the same.
Following are the sample implementation of a few of the important APIs (mainly for hierarchical objects) with sample codes. These examples elaborate the procedures to create an object (CreateObject), get the object for updating, and deleting that object (GetObject and updateObject).
Creating an Application Group Type
To create an application group Type in the CEPM, follow these steps:
Step 1
IApplicationGroup applicationGroupMgr =
ServiceLocator.GetInstance().GetApplicationGroupManager("http://localhost:7070/cepm",
"superuser", "h1BYu+lcwcM=", "Default Domain", 10000);
Step 2
ApplicationGroupType appGrpType=new ApplicationGroupType();Step 3
ApplicationGroupType appgrptype = new ApplicationGroupType();appgrptype.name = "AppGroupInfo";appgrptype.description = "This is a test Application Group Type";Attribute[] attb = new Attribute[2];attb[0]=new Attribute();attb[0].attributeName = "Location";attb[0].attributeType = "String";attb[0].attributeValueType = "Single";attb[1] = new Attribute();attb[1].attributeName = "Address";attb[1].attributeType = "String";attb[1].attributeValueType = "Enum";attb[1].enumerationValue = "2";appgrptype.attributes = attb;Step 4
applicationGroupMgr.CreateApplicationGroupType(appgrptype);This creates the application group type named TestAppGroupType.
Step 5
Creating an Application Group
To create an application group in the CEPM, follow these steps:
Step 1
IApplicationGroup applicationGroupMgr =
ServiceLocator.GetInstance().GetApplicationGroupManager("http://localhost:7070/cepm",
"superuser", "h1BYu+lcwcM=", "Default Domain", 10000);
Step 2
ApplicationGroup appGrp=new ApplicationGroup();Step 3
appgrp.applicationGroupName ="TestAppGroup";appGrp.repositoryName="Default Domain";appgrp.applicationGroupDescription ="This is a test application group";ApplicationGroupType applicationGroupType = applicationGroupMgr.GetApplicationGroupType="Global:Default";appGrp.applicationGroupType(applicationGroupType);appgrp.applicationGroupOwner ="superuser";Step 4
applicationGroupMgr.CreateApplicationGroup(appGrp);This creates the application group named TestAppGroup.
Step 5
Creating an Application Type
To create an application type, follow these steps:
Step 1
IApplication applicationMgr =
ServiceLocator.GetInstance().GetApplicationManager("http://localhost:7070/cepm",
"superuser", "h1BYu+lcwcM=", "Default Domain", 10000);
Step 2
ApplicationType appType = new ApplicationType();Step 3
appType.name="AppInfo";appType.description="This is a test ApplicationType";Attribute att = new Attributeatt.attributeName="Location";att.attributeType="String";att.attributeValueType="Single";Attribute att1 = new Attributeatt1.attributeName="Address";att1.attributeType="String";att1.attributeValueType="Single";Attribute [] atts = new Attribute[2];atts[0]=att;atts[1]=att1;appType.Attributes(atts);Step 4
applicationMgr.CreateApplicationType(appType);This creates the application type named AppInfo with attributes such as Location and Address.
Step 5
Creating an Application
Before creating an application, you must create a PDP to associate it with the new application.
To create an application in the CEPM, assuming that PDP(s) and application types have already been created, follow these steps:
Step 1
IApplication applicationMgr =
ServiceLocator.GetInstance().GetApplicationManager("http://localhost:7070/cepm",
"superuser", "h1BYu+lcwcM=", "Default Domain", 10000);
Step 2
Application application = new Application();Step 3
String pdp[] = new String[1];pdp[0]="pdpserver";Step 4
application.applicationName="TestApp";application.applicationDesc="This is a Test Portal";application.applicationGroupName="Prime group";application.applicationOwner="superuser";application.applicationServer="Tomcat";application.enableXacmlLogs="True";application.enableCopyEntitlement="1";application.applicationAction="any";application.partialFQN="True";EntitlementServer[] entitilementserver = new EntitlementServer[1];entitilementserver[0] = new EntitlementServer();entitilementserver[0].entitlementServerName = "Test PDP";app.entitlementServerDestination = entitilementserver;application.Status="Active";string appTypeFQN = "Global:Default";ApplicationType apptype = applicationMgr.GetApplicationType(appTypeFQN);Step 5
applicationMgr.CreateApplication(application);This creates the application named TestApp.
Step 6
Creating a User Type
To create a user type, follow these steps:
Step 1
IUser userMgr = ServiceLocator.GetInstance().GetUserManager("http://localhost:7070/cepm",
"superuser", "h1BYu+lcwcM=", "Default Domain", 10000);
Step 2
UserType userTypeObj = new usertype();Step 3
userType.name="UserInfo";userType.description="UserInfo";Attribute att = new Attributeatt.attributeName="Location";att.attributeType="String";att.attributeValueType="Single";Attribute att1 = new Attributeatt1.attributeName=="Address";att1.AttributeType="String";att1.attributeValueType="Single";Attribute [] atts = new Attribute[2];atts[0]=att;atts[1]=att1;userType.Attributes(atts);Step 4
UserMgr.CreateUserType(userTypeObj);This creates the usertype named UserInfo with attributes such as Location and Address.
Step 5
Creating User
This method is used to create a user in global/application group/application level. To create a user, follow this procedure:
Step 1
IUser userMgr =
ServiceLocator.GetGetInstance().GetUserManager("http://localhost:7070/cepm", "superuser",
"h1BYu+lcwcM=", "Default Domain", 10000);
Step 2
User user = new User();Step 3
user.firstName="Mary";user.lastName="L";user.userEmail="ml@abc1.com";user.userName="TestUser";user.parentFQN="Prime group:Prime portal";user.userDescription="This is a test user";Step 4
string userTypeName = "Global:Default"UserType utype = userMgr.GetUserType(userTypeName);user.userType = utype;Step 5
userMgr.CreateUser(user);Step 6
Creating Role Type
This method is used to create role types. To create a role type, follow this procedure:
Step 1
IRole roleMgr = ServiceLocator.GetInstance().GetRoleManager("http://localhost:7070/cepm",
"superuser", "h1BYu+lcwcM=", "Default Domain", 10000);
Step 2
RoleType roletype = new RoleType();Step 3
roletype.name="rtype2";roletype.description="rtype2";roletype.applicationName="Prime group:Prime portal";roletype.owner="superuser";Step 4
attr[0] = new Attribute();//first attributeattr[0].attributeName="Att_rtype1";attr[0].attributeType="String";attr[0].attributeValueType="Single";//second attributeattr[1] = new Attribute();attr[1].attributeName="Att2_rtype1";attr[1].attributeType="Enum";attr[1].attributeValueType="Multiple";attr[1].attributeTypeValue="100,200,300,400,500";roletype.Attributes=attr;Step 5
roleMgr.CreateRoleType(roletype)This creates the required roletype with the specified attributes.
Step 6
Creating Role
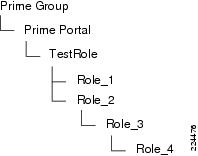
This method is used to create a role (parent role) and its child roles up to the nth level in a single API call. Consider the following role hierarchy. Using the new createRole API, you can construct the whole hierarchy in a single API call.
Figure 3-1 Role hierarchy
Step 1
IRole roleMgr = ServiceLocator.GetInstance().GetRoleManager("http://localhost:7070/cepm",
"superuser", "h1BYu+lcwcM=", "Default Domain", 10000);
Step 2
Role rl = new Role();Step 3
RoleType rlType = new RoleType();rlType.name="Default";rlType.applicationName="Global";Step 4
rl.roleType=rlType;rl.roleName="TestRole";rl.parentFQN="Prime group:Prime portal";rl.roleDescription="This is a test";rl.roleStatus="STATIC";Step 5
Role[] levelOne = new Role[2];Step 6
levelOne[0] = new Role();levelOne[0].roleType=rlType;levelOne[0].parentFQN="Prime group:Prime portal:TestRole";levelOne[0].roleName="Role_1";levelOne[0].roleDescription="This is a test for level 1";levelOne[0].roleStatus="STATIC";levelOne[0].owner="superuser";levelOne[1] = new Role();levelOne[1].roleType=rlType;levelOne[1].parentFQN="Prime group:Prime portal:TestRole";levelOne[1].roleName="Role_2";levelOne[1].roleDescription="This is a test for level 1";levelOne[1].roleStatus="STATIC";levelOne[1].owner="superuser";// Set the child roles of parent rolerl.children(levelOne);Step 7
Role[] levelTwo = new Role[1];levelTwo[0] = new Role();levelTwo[0].roleType=rlType;//Parent role FQN for Role_3 will be Prime group:Prime portal:TestRole:Role_2levelTwo[0].parentFQN="Prime group:Prime portal:TestRole:Role_2";levelTwo[0].roleName="Role_3";levelTwo[0].roleDescription="This is a test for level 2";levelTwo[0].roleStatus="STATIC";levelTwo[0].owner="superuser";// Set the child roles of Level 1 role i.e. Role_2levelOne[0].children(levelTwo);Step 8
Role[] levelThree = new Role[1];levelThree[0] = new Role();levelThree[0].roleType=rlType;//Parent role FQN for Role_4 will bePrime group:Prime portal:TestRole:Role_2:Role_3levelThree[0].parentFQN="Prime group:Prime portal:TestRole:Role_2:Role_3";levelThree[0].roleName="Role_3";levelThree[0].roleDescription="This is a test for level 3";levelThree[0].roleStatus="STATIC";levelThree[0].owner="superuser";// Set the child roles of Level 2 role i.e. Role_3levelTwo[0].children(levelThree);Step 9
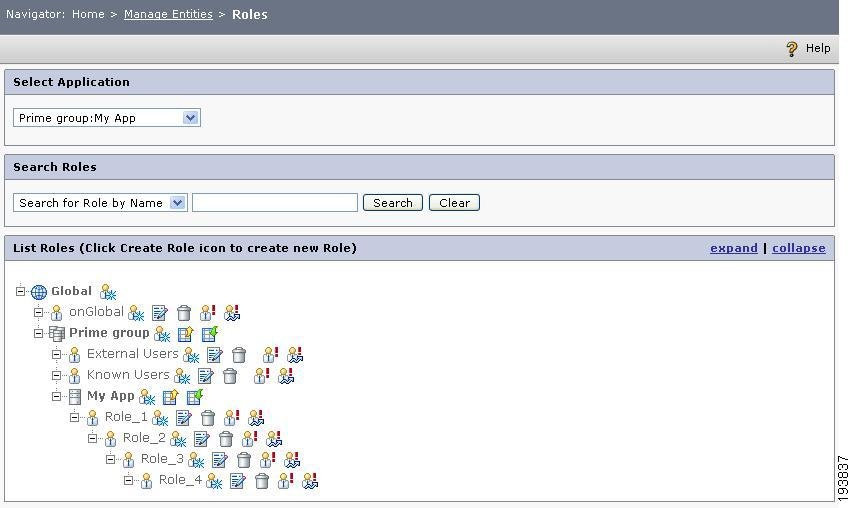
roleMgr.CreateRole(rl, false, false);Step 10
Figure 3-2 Roles Page
Creating a Group Type
To create a group type, follow these steps:
Step 1
IGroup groupMgr =
ServiceLocator.GetInstance().GetGroupManager("http://localhost:7070/cepm", "superuser",
"h1BYu+lcwcM=", "Default Domain", 10000);
Step 2
GroupType grpType = new GroupType();Step 3
grpType.name="GroupInfo";grpType.description="GroupInfo";Attribute att = new Attributeatt.attributeName="Location";att.attributeType="String";att.attributeValueType="Single";Attribute att1 = new Attributeatt1.attributeName="Address";att1.attributeType="String";attr.attributeValueType="Single";Attribute [] atts = new Attribute[2];atts[0]=att;atts[1]=att1;grpType.Attributes(atts);Step 4
groupMgr.CreateGroupType(grpType);This creates the group type named GroupInfo with the specified attributes.
Step 5
Creating Group
This method is used to create a group along with its child group up to n-th level. The procedure to create a group hierarchy is same as that of creating roles.
To create a group object, follow these steps:
Step 1
IGroup groupMgr =
ServiceLocator.GetInstance().GetGroupManager("http://localhost:7070/cepm", "superuser",
"h1BYu+lcwcM=", "Default Domain", 10000);
Step 2
Group gp = new Group();Step 3
GroupType gpType = new GroupType();gpType.name="Default";gpType.applicationName="Global";Step 4
gp.groupType(gpType);gp.groupName="TestGroup";gp.parentFQN="Prime group:Prime portal";gp.groupDescription="This is a test";gp.groupStoreDetails="Local Database";gp.g roupStatus="STATIC";Step 5
Group[] childGp = new Group[1];Step 6
levelOne[0] = new Group();levelOne[0].groupType(gpType);levelOne[0].parentFQN="Prime group:Prime portal:TestGroup";levelOne[0].groupName="Group_1";levelOne[0].groupDescription="This is a test for level 1";childGp[0].groupStoreDetails="Local Database";levelOne[0].groupStatus="STATIC";levelOne[0].owner="superuser";gp.children(levelOne);Step 7
Group[] levelTwo = new Group[1];levelTwo[0] = new Group();levelTwo[0].groupType(gpType);//Parent role FQN for Group_2 will be Prime group:Prime portal:TestGroup:Group_1levelTwo[0].parentFQN="Prime group:Prime portal:TestGroup:Group_1";levelTwo[0].groupName="Group_2";levelTwo[0].groupDescription="This is a test for level 2";childGp[0].groupStoreDetails="Local Database";levelTwo[0].groupStatus="STATIC";levelTwo[0].owner="superuser";levelOne[0].children(levelTwo);Step 8
Group[] levelThree = new Group[1];levelThree[0] = new Group();levelThree[0].groupType(gpType);//Parent group FQN for Group_3 will bePrime group:Prime portal:TestGroup:Group_1:Group_2levelThree[0].parentFQN="Prime group:Prime portal:TestGroup:Group_1:Group_2";levelThree[0].groupName="Group_3";levelThree[0].groupDescription="This is a test for level 3";childGp[0].groupStoreDetails="Local Database";levelThree[0].groupStatus="STATIC";levelThree[0].owner="superuser";levelTwo[0].children(levelThree);Step 9
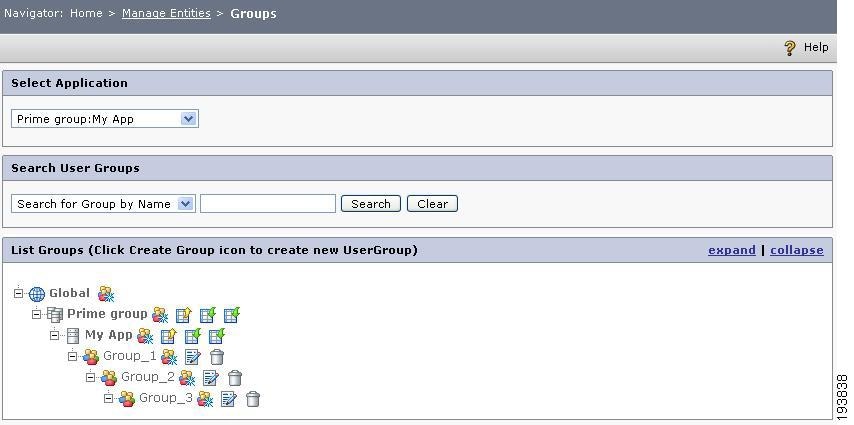
groupMgr.CreateGroup(gp, false, false);Step 10
Figure 3-3 Groups Page
Creating a Resource Type (Action)
In CEPM, you can create a resource type either as an Action or any other type (including Untype).
To create an action, follow these steps:
Step 1
IResource resourceMgr =
ServiceLocator.GetInstance().GetResourceManager("http://localhost:7070/cepm", "superuser",
"h1BYu+lcwcM=", "Default Domain", 10000);
Step 2
ResourceType resType = new ResourceType();Step 3
resType.name="resType";resType.description="ResourceTypeInfo";restype.applicationName="Global";Action [] acts =new Action[2];acts[0] =new Action();acts[0].actionName ="Read";acts[1] =new Action();acts[1].actionName ="Edit";;resType.actions=acts;Step 4
resourceMgr.CreateResType(resType);Step 5
Creating a Resource Type (Attributes)
To create a resource type Attributes, follow these steps:
Step 1
IResource resourceMgr =
ServiceLocator.GetInstance().GetResourceManager("http://localhost:7070/cepm", "superuser",
"h1BYu+lcwcM=", "Default Domain", 10000);
Step 2
ResourceType resType = new ResourceType();Step 3
resType.name="ResourceInfo";resType.description="ResourceInfo";Attribute att = new Attributeatt.attributeName="Location";att.attributeType="String";att.attributeValueType="Single";Attribute att1 = new Attributeatt1.attributeName="Address";att1.attributeType="String";att1.attributeValueType="Single";Attribute [] atts = new Attribute[2];atts[0]=att;atts[1]=att1;resType.attributes=atts;Step 4
resourceMgr.CreateResType(resType);This creates the resource type named resourceInfo with attributes such as Location and Address.
Step 5
Create Resource
This method is used to create a resource along with its child resource up to n-th level. The procedure to create a resource hierarchy is same as that to create roles.
To create a resource object, follow these steps:
Step 1
IResource resourceMgr =
ServiceLocator.GetInstance().GetResourceManager("http://localhost:7070/cepm", "superuser",
"h1BYu+lcwcM=", "Default Domain", 10000);
Step 2
Resource resource = new Resource();Step 3
resource.resourceName="TestRes";resource.resourceDescription="This is a test";resource.parentFQN="Prime group:Prime portal";resource.owner="superuser";resource.status="Active";resource.type="ResourceConstants.Regular";string resourTypeFQN = "Global:UNTYPE";ResourceType resourcetype = ResourceMgr.GetResourceType(resourTypeFQN);resource.resourceType=resourceType;Step 4
Resource[] levelOne = new Resource[2];levelOne[0] = new Resource();levelOne[0].resourceName="Res1";levelOne[0].resourceDescription="This is a test for level1";levelOne[0].parentFQN="Prime group:Prime portal:TestRes";levelOne[0].owner="superuser";levelOne[0].status="Active";levelOne[0].type="ResourceConstants.Regular";levelOne[0].resourceType=resourceType;levelOne[1] = new Resource();levelOne[1].resourceName="Res2";levelOne[1].resourceDescription="This is a test for level1";levelOne[1].parentFQN="Prime group:Prime portal:TestRes";levelOne[1].owner="superuser";levelOne[1].status="Active";levelOne[1].type="ResourceConstants.Regular";levelOne[1].resourceType=resourceType;resource.children(levelOne);Step 5
Resource[] levelTwo = new Resource[2];levelTwo[0] = new Resource();levelTwo[0].resourceName="Res3";levelTwo[0].resourceDescription="This is a test for level2";levelTwo[0].parentFQN="Prime group:Prime portal:TestRes:Res1";levelTwo[0].owner="superuser";levelTwo[0].status="Active";levelTwo[0].type="ResourceConstants.Regular";levelTwo[0].resourceType(resourceType);levelTwo[1] = new Resource();levelTwo[1].resourceName="Res4";levelTwo[1].resourceDescription="This is a test for level2";levelTwo[1].parentFQN="Prime group:Prime portal:TestRes:Res1";levelTwo[1].owner="superuser";levelTwo[1].status="Active";levelTwo[1].type="ResourceConstants.Regular";levelTwo[1].resourceType=resourceType;levelOne[0].children(levelTwo);Step 6
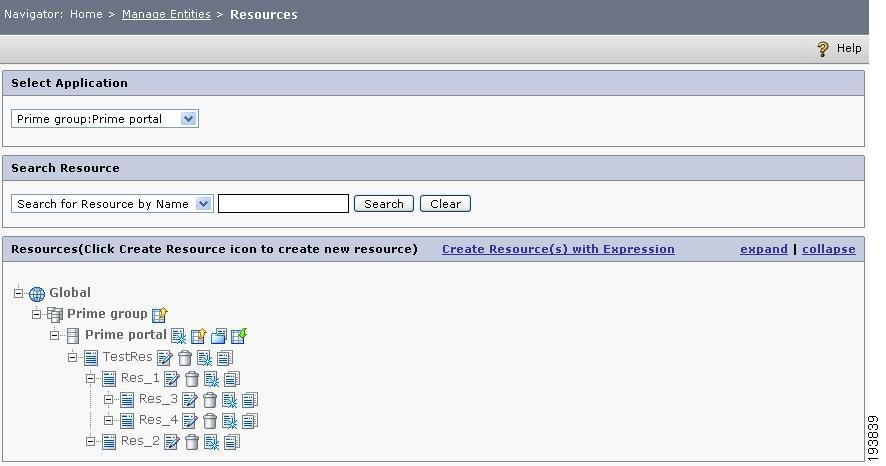
resourceMgr.CreateResource(resource, false, false);Step 7
Figure 3-4 Resources Page
Create Adhoc Resource Group
To create an Adhoc Resource Group, follow these steps:
Step 1
IResource resourceMgr =
ServiceLocator.GetInstance().GetResourceManager("http://localhost:7070/cepm", "superuser",
"h1BYu+lcwcM=", "Default Domain", 10000);
Step 2
Resource AdhocRG = new Resource();Step 3
AdhocRG.resourceName="TestARG";AdhocRG.resourceDescription="This is a test";AdhocRG.parentFQN(Prime Group:Prime Portal);AdhocRG.status="Active";AdhocRG.type(ResourceConstants.GROUP);AdhocRG.groupMembershipPolicy(ResourceConstants.ADHOC_MEMBERSHIP_POLICY);ResourceType resourceType = resourceMgr.GetResourceType="Prime group:ResType";AdhocRG.resourceType(resourceType);Step 4
resourceMgr.CreateResource(AdhocRG, false, false);Step 5
Add Members to the Adhoc Resource Group
You can assign resources of the same resource types to an Adhoc resource group. To add members to an Adhoc Resource Group, follow these steps:
Step 1
IResource resourceMgr =
ServiceLocator.GetInstance().GetResourceManager("http://localhost:7070/cepm", "superuser",
"h1BYu+lcwcM=", "Default Domain", 10000);
Step 2
Resource childRes1 = resourceMgr.GetResource("Prime group:Prime portal:Res1","Prime
group:ResType", -1);
Resource childRes2 = resourceMgr.GetResource("Prime group:Prime portal:Res2","Prime group:ResType", -1);Resource childRes3 = resourceMgr.GetResource("Prime group:Prime portal:Res3","Prime group:ResType", -1);Resource[] children = new Resource[3];children[0] = childRes1;children[1] = childRes2;children[2] = childRes3;Step 3
Resource AdhocRG = new Resource();Step 4
Resource AdhocRG = new Resource();AdhocRG.resourceName="TestARG";AdhocRG.resourceDescription="This is a test";AdhocRG.parentFQN="Prime Group:Prime Portal";AdhocRG.status="Active";AdhocRG.type(ResourceConstants.GROUP);AdhocRG.groupMembershipPolicy(ResourceConstants.ADHOC_MEMBERSHIP_POLICY);ResourceType resourceType = resourceMgr.GetResourceType="Prime group:ResType";AdhocRG.resourceType(resourceType);AdhocRG.assignedMembers(children);Step 5
resourceMgr.CreateResource(AdhocRG, false, false);Step 6
Create Rule Based Resource Group
To create a Rule-based Resource Group, first you need to create a rule and then create the resource group by assigning that rule to it. To do this:
To create the Rule Based Resource Group:
Step 1
IResource resourceMgr =
ServiceLocator.GetInstance().GetResourceManager("http://localhost:7070/cepm", "superuser",
"h1BYu+lcwcM=", "Default Domain", 10000);
Step 2
Rule rule = new Rule();Step 3
Rule rule = new Rule();rule.ruleElementType=RuleElement.RULE;rule.name="Rule1_12333";AnyAttribute lhs = new AnyAttribute();lhs.attrType=Operand.SUBJECT;AnyAttribute rhs = new AnyAttribute();rhs.attrType=Operand.ACTION;Condition con = new Condition();con.lhsOperand=lhs;Operator op = new Operator();op.operatorType=Operator.EQ;con.@operator=op;con.RhsOperand=rhs;Operator rule_op = new Operator();rule_op.operatorType=Operator.AND;rule.ruleElement=con;rule.ruleElement=rule_op;rule.ruleElement=con;Step 4
Rule cXrule = new Rule();Step 5
cXrule.ruleElementType=RuleElement.COMPLE_RULE;cXrule.name="CTX1_12324";cXrule.ruleElement(rule);Step 6
Resource RuleRG = new Resource();Step 7
RuleRG.resourceName="TestRBRG";RuleRG.resourceDescription="This is a test";RuleRG.parentFQN="Prime Group:Prime Portal";RuleRG.status="Active";RuleRG.type=ResourceConstants.GROUP;RuleRG.groupMembershipPolicy=ResourceConstants.RULEBASED_MEMBERSHIP_POLICY;RuleRG.Rule=cXrule;ResourceType resourceType = resourceMgr.GetResourceType("Global:Default");RuleRG.ResourceType=resType;Step 8
resourceMgr.CreateResource(RuleRG, false, false);Step 9
Map Users to Role
This method is used to map one or more users to a role. To map users with a role, follow these steps:
Step 1
IEntityMapping MapMgr =
ServiceLocator.GetInstance().GetEntityManager("http://localhost:7070/cepm", "superuser",
"h1BYu+lcwcM=", "Default Domain", 10000);
Step 2
User[] users = new User[1];User user = userMgr.GetUser(userNameFQN);users[0] = user;Step 3
Role role = roleMgr.GetRoleByRoleType(roleNameFQN, roleType, -1);Step 4
string contextFQN = "Global Context:Global Context";string roleBundleFQN = "Global:Default";Step 5
boolean transaction=false;boolean @override=false;Step 6
MapMgr.mapUsersToRole(users, role, contextFQN, roleBundleFQN, transaction, @override);Step 7
Map Users to Group
This method is used to map one or more users to a group. To map users with a group, follow these steps:
Step 1
Step 2
IEntityMapping MapMgr =
ServiceLocator.GetInstance().GetEntityManager("http://localhost:7070/cepm", "superuser",
"h1BYu+lcwcM=", "Default Domain", 10000);
Step 3
User[] users = new User[1];User user = userMgr.GetUser(userNameFQN);users[0] = user;Step 4
Group group = groupMgr.GetGroupByGroupType(groupNameFQN, groupType, -1);Step 5
string contextFQN = "Global Context:Global Context";Step 6
boolean transaction=false;boolean @override=false;Step 7
mapMgr.mapUsersToGroup(users, group, contextFQN, transaction, @override);Step 8
Map Groups to Role
This method is used to map one or more groups to a role. To map gorups with a role, follow these steps:
Step 1
IEntityMapping MapMgr =
ServiceLocator.GetInstance().GetEntityManager("http://localhost:7070/cepm", "superuser",
"h1BYu+lcwcM=", "Default Domain", 10000);
Step 2
Group[] groups = new Group[1];Group group = groupMgr.GetGroup(groupNameFQN);groups[0] = group;Step 3
Role role = roleMgr.GetRoleByRoleType(roleNameFQN, roleType, -1);Step 4
string contextFQN = "Global Context:Global Context";string roleBundleFQN = "Global:Default";Step 5
boolean transaction=false;boolean @override=false;Step 6
mapMgr.mapGroupsToRole(groups, role, contextFQN, roleBundleFQN, transaction, @override);Step 7
Creating Policy
This method is used to create a policy on a resource. You can create user-/group-/role- based policies on a specified resource by using this method. Following example shows how to create an Allow policy for the role called `Internal Dev' on the resource called `Send Trades'.
To create this policy:
Step 1
String targetFQN = "Prime group:Prime portal:Send Trades";Step 2
String entityFQN = "Prime group:Prime portal:Internal Dev";Step 3
String entity = com.cisco.epm.pap.api.vo.constants.ResourceConstants.ENTITY_TYPE_ROLE;For userbased policy, the constant should be ENTITY_TYPE_USER and for groupbased policy, it should be ENTITY_TYPE_GROUP.
Step 4
boolean permission = "true";Step 5
String contextFQN = "Global Context:Global Context";Step 6
String activeStatus = "Active";Step 7
IPolicy policyMgr =
ServiceLocator.GetInstance().GetPolicyManager("http://localhost:7070/cepm", "superuser",
"h1BYu+lcwcM=", "Default Domain", 10000);
policyMgr.CreatePolicy(targetFQN, entityFQN, entity, permission, contextFQN, activeStatus);Step 8
Import Data
This method is used to import data into CEPM. The data may include user, role, resource and other attributes. To import data:
Step 1
com.cisco.epm.pap.api.vo.EntityXmlVo dataOb =
com.cisco.epm.util.DataConverter.prepareObjectFromFilePath("C:\\temp","all");
Step 2
com.cisco.epm.pap.api.services.IImport importMgr =
ServiceLocator.GetInstance().GetImportManager("http://localhost:9090/cepm", "superuser",
"admin", "Default Domain", 1000000);
Step 3
importMgr.importData("Prime group:Prime portal",ImportExportConstants.USER,dataOb);Where,
•
•
Step 4
Export Data
This method is used to export data into CEPM. The data may include user, role, resource and other attributes. To export data:
Step 1
com.cisco.epm.pap.api.services.IExport exportMgr =
ServiceLocator.GetInstance().GetExportManager("http://localhost:9090/cepm", "superuser",
"admin", "Default Domain", 1000000);
Step 2
exportMgr.exportData("Prime group:Prime portal",ImportExportConstants.USER,dataOb);Where,
•
•
Step 3
com.cisco.epm.pap.api.vo.EntityXmlVo dataOb =
com.cisco.epm.util.DataConverter.prepareObjectFromFilePath("C:\\temp");
Step 4
Import Policies
This method is used to import entitlement policies into a specified resource. To do this:
Step 1
com.cisco.epm.util.DataConverter converter=new com.cisco.epm.util.DataConverter();Step 2
ResourcePolicySetWrapperVO dataOb =
db.prepareObjectFromFilePath("C:/cepm/ApplicationPolicies","Prime group:Prime portal");
Step 3
IImport ImportMgr = ServiceLocator.GetInstance().GetImportManager("http://localhost:7070/cepm", "superuser", "h1BYu+lcwcM=", "Default Domain", 10000);importMgr.importPolicies(dataOb);Step 4
Export Policies
This method is used to export policies of an application to specified location. To do this:
Step 1
IExport ExportMgr =
ServiceLocator.GetInstance().GetExportManager("http://localhost:7070/cepm", "superuser",
"h1BYu+lcwcM=", "Default Domain", 10000);
Step 2
ResourcePolicySetWrapperVO dataOb =
exportMgr.exportPolicies("C:/cepm/ApplicationPolicies", "All");
Step 3
DataConverter db = new DataConverter();Step 4
db.saveObjectInFilePath(dataOb, "C:/cepm/ApplicationPolicies");Step 5