-
Installation Guide for Cisco Secure ACS Solution Engine 4.1
-
Preface
-
Cisco 90-Day Limited Hardware Warranty Terms
-
Cisco Secure ACS Solution Engine Overview
-
Preparing for Installation
-
Installing and Configuring Cisco Secure ACS Solution Engine 4.1
-
Administering Cisco Secure ACS Solution Engine
-
Upgrading and Migrating to Cisco Secure ACS Solution Engine
-
Technical Specifications for the Quanta (1113)
-
Windows Service Advisement
-
Command Reference
-
Index
-
 Feedback
Table Of Contents
Upgrading and Migrating to Cisco Secure ACS Solution Engine 4.1
Performing a Full Upgrade From ACS SE 4.0.1 to ACS SE 4.1
Performing a Full Upgrade from ACS SE 3.3.3 to ACS SE 4.1
Migrating from ACS for Windows to ACS SE
Migrating ACS SE on the ACS 1111 or ACS 1112 Platform to ACS SE 4.1 on the Cisco 1113 Platform
Upgrading and Migrating to Cisco Secure ACS Solution Engine 4.1
This chapter describes how to:
•
Upgrade to Cisco Secure ACS Solution Engine (ACS SE) 4.1.
•
•
This chapter contains:
•
•
Upgrade Scenarios
Cisco Secure ACS Solution Engine 4.1 supports the following upgrade scenarios:
•
•
Migration Scenarios
•
•
Upgrade Paths
Depending on the ACS version you are upgrading from, there are different paths for upgrading to ACS SE 4.1. You can upgrade to ACS 4.1 from ACS version 3.2.x, 3.3.x, 3.3.3 or 4.0.1:
1.
The ACS 3.2.x or 3.3.x upgrade package contains three CDs:
–
–
–
Note
2.
The ACS SE 3.3.3 to 4.1 upgrade package includes:
–
–
Note
3.
The ACS SE 4.0 to 4.1 upgrade package includes two CDs:
–
–
Note
You can upgrade your exiting ACS appliance with the latest ACS software and appliance management software.
Table 5-1 describes various upgrade use cases that you can use to decide the appropriate upgrade path to follow.
Note
Note
Table 5-1 Upgrade Use Cases
Full Upgrade
To perform a full upgrade with data restore:
1.
For instructions on upgrading to ACS 3.3.3, see Release Notes for Cisco Secure Access Control Server Solution Engine 3.3 at:
2.
For a complete list of steps, see Performing a Full Upgrade from ACS SE 3.3.3 to ACS SE 4.1.
•
•
•
•
Full Upgrade
To perform a full upgrade with data restore, use the ACS SE 4.1 Upgrade CD:
For a complete list of steps, see Performing a Full Upgrade from ACS SE 3.3.3 to ACS SE 4.1.
•
•
•
•
Full Upgrade
To perform a full upgrade with data restore, use the ACS SE 4.1 Upgrade CD.
For a complete list of steps, see Performing a Full Upgrade From ACS SE 4.0.1 to ACS SE 4.1.
•
•
Upgrade Procedure
You can perform a full upgrade from:
•
•
Performing a Full Upgrade From ACS SE 4.0.1 to ACS SE 4.1
This section describes the procedure for performing a full upgrade from ACS SE 4.0.1 to ACS SE 4.1.
Before You Begin
Make a backup of your existing data and configuration.
To upgrade ACS SE 4.0.1 to ACS SE 4.1:
Step 1
Step 2
•
•
Step 3
a.
b.
The Administration Control page opens.
c.
The Add Administrator page opens.
d.
Note
Warning
Step 4
Step 5
a.
b.
c.
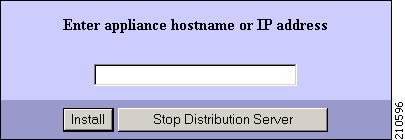
The download utility starts. You are prompted to enter the hostname or IP address of the appliance, as shown in Figure 5-1.
Figure 5-1 Appliance Prompt
d.
The web interface starts.
e.
f.
The Appliance Upgrade page opens, as shown in Figure 5-2.
Figure 5-2 Appliance Upgrade Page
g.
The Appliance Upgrade Form page opens, as shown in Figure 5-3. On this page you enter the IP address of the distribution server.
Figure 5-3 Appliance Upgrade Form with Text Box for the Distribution Server
h.
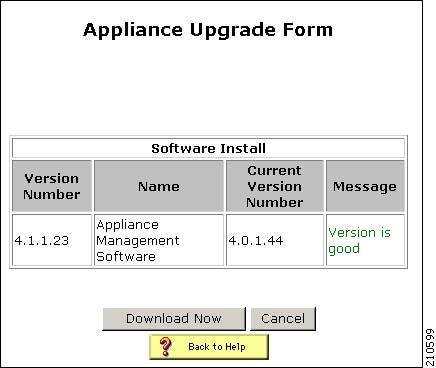
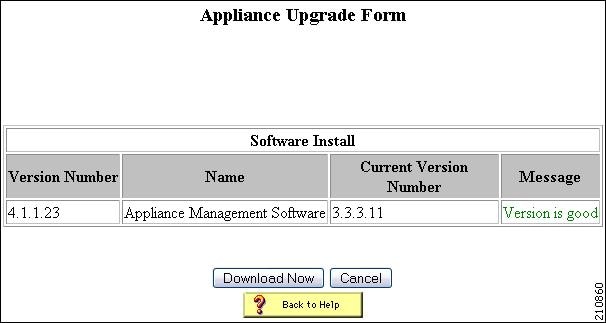
The Appliance Upgrade Form page opens, as shown in Figure 5-4. This page lists the current appliance-management software version number.
Figure 5-4 Appliance Upgrade Form
i.
The upgrade utility downloads the upgrade image.
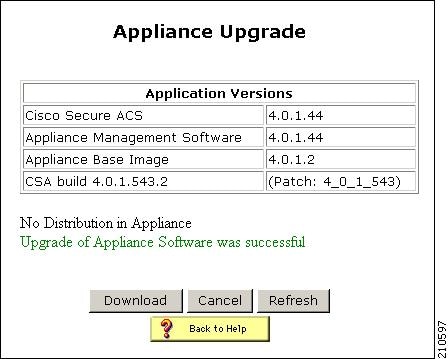
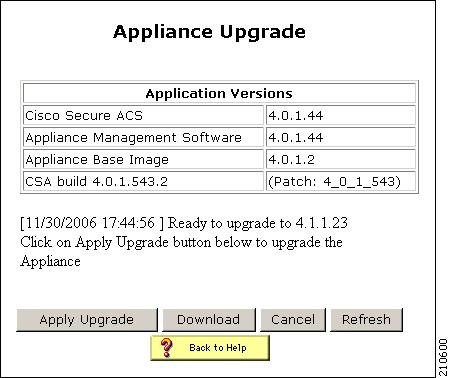
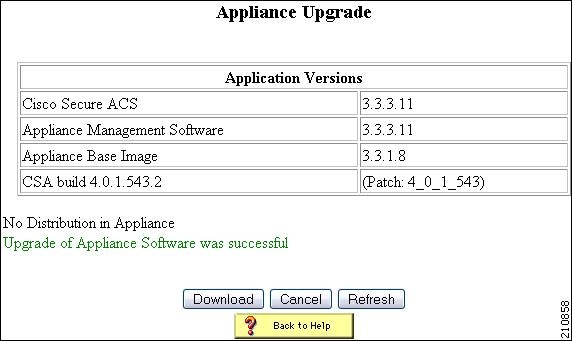
The Appliance Upgrade page opens, as shown in Figure 5-5. The Appliance Versions table provides information about the software version.
Figure 5-5 Appliance Upgrade Page
j.
The upgrade utility applies the management software upgrade.
Note
Step 6
a.
b.
The download utility starts. You are prompted to enter the hostname of IP address of the appliance, as shown in Figure 5-1.
c.
The ACS web interface starts.
d.
e.
The Appliance Upgrade page opens, as shown in Figure 5-2.
f.
The steps for downloading and installing the software upgrade package are the same as the steps for installing the management software as described in Step 5.
Note
Appliance upgrade in progress, this indicates that the upgrade progress is hanging.
If this condition occurs, start an ACS console session and enter the command download [hostAddress], where hostAddress can be any IP address. This action releases the ACS console from the upgrade process.Step 7
a.
b.
The download utility starts. You are prompted to enter the hostname of IP address of the appliance, as shown in Figure 5-1.
c.
The ACS web interface starts.
d.
e.
The Appliance Upgrade page opens, as shown in Figure 5-2.
f.
The steps for downloading and installing the MS Hotfixes package are the same as the steps for installing the management software as described in Step 5.
g.
Performing a Full Upgrade from ACS SE 3.3.3 to ACS SE 4.1
This section describes the procedure for performing a full upgrade from ACS SE 3.3.3 to ACS SE 4.1.
Before You Begin
Make a backup of your existing data and configuration. The first backup is for ensuring that you have the 3.3.3 original data backed up.
Caution
To upgrade ACS SE 3.3.3 to ACS SE 4.1:
Step 1
Step 2
•
•
Step 3
a.
b.
The Administration Control page opens.
c.
The Add Administrator page opens.
d.
Note
Warning
Step 4
Step 5
a.
b.
c.
The download utility starts. You are prompted to enter the hostname or IP address of the appliance, as shown in Figure 5-6.
Figure 5-6 Appliance Prompt
d.
The web interface starts.
e.
f.
The Appliance Upgrade page opens, as shown in Figure 5-7.
Figure 5-7 Appliance Upgrade Page
g.
The Appliance Upgrade Form page opens, as shown in Figure 5-8. On this page, you enter the IP address of the distribution server.
Figure 5-8 Appliance Upgrade Form with Text Box for the Distribution Server
h.
The Appliance Upgrade Form page opens, as shown in Figure 5-9. This page lists the current version number of the appliance-management software.
Figure 5-9 Appliance Upgrade Form
i.
The upgrade utility downloads the upgrade image.
The Appliance Upgrade page opens, as shown in Figure 5-10. The Appliance Versions table provides information about the software version.
Figure 5-10 Appliance Upgrade Page
j.
The upgrade utility applies the management software upgrade.
Note
Step 6
a.
b.
The download utility starts. You are prompted to enter the hostname of IP address of the appliance, as shown in Figure 5-6.
c.
The ACS web interface starts.
d.
e.
The Appliance Upgrade page opens, as shown in Figure 5-7.
f.
The steps for downloading and installing the software upgrade package are the same as the steps for installing the management software as described in Step 5.
Note
Appliance upgrade in progress, this indicates that the upgrade progress is hanging.
If this condition occurs, start an ACS console session and enter the command download [hostAddress], where hostAddress can be any IP address. This action releases the ACS console from the upgrade process.Step 7
a.
b.
The download utility starts. You are prompted to enter the hostname of IP address of the appliance, as shown in Figure 5-1.
c.
The ACS web interface starts.
d.
e.
The Appliance Upgrade page opens, as shown in Figure 5-7.
f.
The steps for downloading and installing the MS Hotfixes package are the same as the steps for installing the management software as described in Step 5.
g.
Step 8
To upgrade the ACS SE appliance to the latest Microsoft hotfixes, you must reimage the ACS SE device. Because reimaging destroys all of the existing data on the device, you must first back up your existing data and then restore it by using one of the following features:
•
•
Note
Step 9
•
•
For information on contacting the Cisco TAC, see Obtaining Technical Assistance, page xviii.
Note
For more information about reimaging the hard drive, see Re-imaging the Solution Engine Hard Drive, page 4-25.
Step 10
Step 11
•
•
Step 12
•
•
Migrating from ACS for Windows to ACS SE
Migrating from Cisco Secure ACS for Windows Server (ACS for Windows) to ACS SE uses the backup and restore features of ACS. Backup files produced by ACS for Windows are compatible with ACS SE, provided that both are using the same version of ACS software.
Before You Begin
Before upgrading or transferring data, back up your original ACS database and configuration, and save the backup file in a location on a drive that is not local to the computer on which ACS is running.
Note
To migrate from a Windows version of ACS to ACS SE:
Step 1
Step 2
Note
Step 3
Step 4
Step 5
The ACS SE contains the original configuration of the ACS for Windows version from which you migrated.
Step 6
Step 7
a.
b.
c.
Note
Migrating ACS SE on the ACS 1111 or ACS 1112 Platform to ACS SE 4.1 on the Cisco 1113 Platform
The ACS SE 4.1 release uses the Cisco 1113 platform. ACS SE on the Cisco 1113 platform can only run the ACS 4.0.1 software release or the ACS 4.1 software release. Table 5-2 indicates the Cisco Secure ACS software versions that each Cisco Secure ACS SE platform supports.
To migrate ACS software running on a previous SE appliance platform (the Cisco 1112 or the Cisco 1113) to run on the Cisco 1113 platform:
Step 1
Step 2
Step 3
a.
b.
For information on Steps 2 and 3, see Migrating from ACS for Windows to ACS SE.