Feedback
Table Of Contents
Configuring the Cisco IOS DHCP Relay Agent
Prerequisites for Configuring the Cisco IOS DHCP Relay Agent
Information About the DHCP Relay Agent
How to Configure the DHCP Relay Agent
Specifying the Packet Forwarding Address
Configuring Relay Agent Information Option Support
Relay Agent Information Option
Relay Agent Information Reforwarding Policy
Configuring Relay Agent Information Option Support per Interface
Configuring the Subscriber Identifier Suboption of the Relay Agent Information Option
Configuring DHCP Relay Class Support for Client Identification
Relay Class Support Usage Scenario
Configuring DHCP Relay Agent Support for MPLS VPNs
DHCP Relay Agent Support for MPLS VPNs
Troubleshooting the DHCP Relay Agent
Configuration Examples for the Cisco IOS DHCP Relay Agent
DHCP Relay Agent and Relay Agent Information Option Support: Example
DHCP Relay Agent and Relay Agent Information Option Support per Interface: Example
Subscriber Identifier Suboption Configuration: Example
DHCP Relay Class Support for Client Identification: Example
DHCP Relay Agent Support for MPLS VPNs: Example
DHCP Smart Relay Agent Forwarding: Example
Feature Information for the Cisco IOS DHCP Relay Agent
Configuring the Cisco IOS DHCP Relay Agent
First Published: May 2, 2005Last Updated: November 17, 2006Cisco routers running Cisco IOS software include Dynamic Host Configuration Protocol (DHCP) server and relay agent software. A DHCP relay agent is any host that forwards DHCP packets between clients and servers. This module describes the concepts and tasks needed to configure the Cisco IOS DHCP relay agent.
Finding Feature Information in This Module
Your Cisco IOS software release may not support all of the features documented in this module. To reach links to specific feature documentation in this module and to see a list of the releases in which each feature is supported, use the "Feature Information for the Cisco IOS DHCP Relay Agent" section.
Finding Support Information for Platforms and Cisco IOS Software Images
Use Cisco Feature Navigator to find information about platform support and Cisco IOS software image support. Access Cisco Feature Navigator at http://www.cisco.com/go/fn. You must have an account on Cisco.com. If you do not have an account or have forgotten your username or password, click Cancel at the login dialog box and follow the instructions that appear.
Contents
•
Prerequisites for Configuring the Cisco IOS DHCP Relay Agent
•
•
•
•
Prerequisites for Configuring the Cisco IOS DHCP Relay Agent
Before you configure the DHCP relay agent, you should understand the concepts documented in the "DHCP Overview" module.
The Cisco IOS DHCP server and relay agent are enabled by default. You can verify if they have been disabled by checking your configuration file. If they have been disabled, the no service dhcp command will appear in the configuration file. Use the service dhcp command to reenable the functionality if necessary.
The Cisco IOS DHCP relay agent will be enabled on an interface only when the ip helper-address is configured. This command enables the DHCP broadcast to be forwarded to the configured DHCP server.
Information About the DHCP Relay Agent
Before you configure the DHCP relay agent, you should understand the following concept:
DHCP Relay Agent Overview
A DHCP relay agent is any host that forwards DHCP packets between clients and servers. Relay agents are used to forward requests and replies between clients and servers when they are not on the same physical subnet. Relay agent forwarding is distinct from the normal forwarding of an IP router, where IP datagrams are switched between networks somewhat transparently. By contrast, relay agents receive DHCP messages and then generate a new DHCP message to send out on another interface. The relay agent sets the gateway address (giaddr field of the DHCP packet) and, if configured, adds the relay agent information option (option82) in the packet and forwards it to the DHCP server. The reply from the server is forwarded back to the client after removing option 82.
The Cisco IOS DHCP relay agent supports the use of unnumbered interfaces. For DHCP clients connected though the unnumbered interfaces, the DHCP relay agent automatically adds a static host route once the DHCP client obtains an address, specifying the unnumbered interface as the outbound interface. The route is automatically removed once the lease time expires or when the client releases the address.
How to Configure the DHCP Relay Agent
This section contains the following tasks:
•
•
•
•
•
•
•
•
Specifying the Packet Forwarding Address
Perform this task to configure the DHCP relay agent to forward packets to a DHCP server.
DHCP clients need to use User Datagram Protocol (UDP) broadcasts to send their initial DHCPDISCOVER messages because they don't have information about the network to which they are attached. If the client is on a network segment that does not include a server, UDP broadcasts normally are not forwarded because most routers are configured to not forward broadcast traffic.
You can remedy this situation by configuring the interface of your router that is receiving the broadcasts to forward certain classes of broadcasts to a helper address. You can use more than one helper address per interface.
When a router forwards these address assignment/parameter requests, it is acting as a DHCP relay agent. The Cisco router implementation of the DHCP relay agent is provided via the ip helper-address interface configuration command.
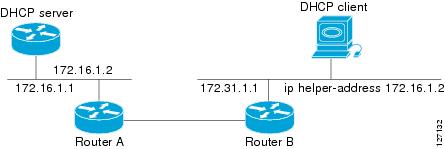
In Figure 1, the DHCP client broadcasts a request for an IP address and additional configuration parameters on its local LAN. Router B, acting as a DHCP relay agent, picks up the broadcast and generates a new DHCP message to send out on another interface. As part of this DHCP message, the relay agent inserts the IP address of the interface containing the ip helper-address command into the gateway IP address (giaddr) field of the DHCP packet. This IP address enables the DHCP server to determine which subnet should receive the offer and identify the appropriate IP address range to offer. The DHCP relay agent sends the local broadcast, via IP unicast, to the DHCP server address 172.16.1.2 specified by the ip helper-address interface configuration command.
Figure 1 Forwarding UDP Broadcasts to a DHCP Server Using a Helper Address
SUMMARY STEPS
1.
2.
3.
4.
DETAILED STEPS
Configuring Relay Agent Information Option Support
Perform this task to enable support for the DHCP relay agent information option.
Relay Agent Information Option
Automatic DHCP address allocation is typically based on an IP address, whether it be the gateway IP address (giaddr field of the DHCP packet) or the incoming interface IP address. In some networks, it is necessary to use additional information to further determine which IP addresses to allocate. By using the relay agent information option (option 82), the Cisco IOS relay agent can include additional information about itself when forwarding client-originated DHCP packets to a DHCP server.
Cisco IOS supports this functionality by using the ip dhcp relay information option command. The relay agent will automatically add the circuit identifier suboption and the remote ID suboption to the relay agent information option and forward them to the DHCP server.
The DHCP server can use this information to assign IP addresses, perform access control, and set quality of service (QoS) and security policies (or other parameter-assignment policies) for each subscriber of a service provider network.
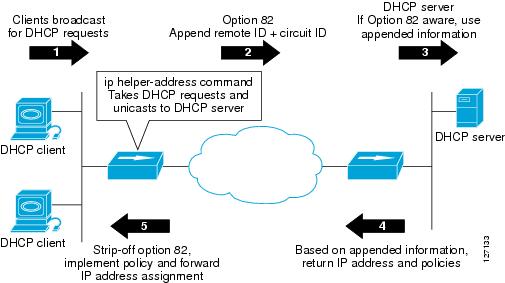
Figure 2 shows how the relay agent information option is inserted into the DHCP packet as follows:
1.
2.
3.
4.
5.
Figure 2 Relay Agent Information Option Operation
Relay Agent Information Reforwarding Policy
A DHCP relay agent may receive a message from another DHCP relay agent that already contains relay information. By default, the relay information from the previous relay agent is replaced. If this behavior is not suitable for your network, you can use the ip dhcp relay information policy {drop | keep | replace} global configuration command to change it.
To ensure the correct operation of the reforwarding policy, make sure to disable the relay agent information check by using the no ip dhcp relay information check global configuration command.
Prerequisites
It is important to understand how DHCP options work. See the "DHCP Overview" module for more information.
Restrictions
•
•
•
See the "Configuring Relay Agent Information Option Support per Interface" section for more information on per-interface support for the relay agent information option.
SUMMARY STEPS
1.
2.
3.
4.
5.
6.
7.
8.
DETAILED STEPS
Step 1
enable
Example:Router> enable
Enables privileged EXEC mode.
•
Step 2
configure terminal
Example:Router# configure terminal
Enters global configuration mode.
Step 3
ip dhcp relay information option
Example:Router(config)# ip dhcp relay information option
Enables the system to insert the DHCP relay agent information option (option-82 field) in forwarded BOOTREQUEST messages to a DHCP server.
•
Step 4
ip dhcp relay information check
Example:Router(config)# ip dhcp relay information check
(Optional) Configures DHCP to check that the relay agent information option in forwarded BOOTREPLY messages is valid.
•
Step 5
ip dhcp relay information policy {drop | keep | replace}
Example:Router(config)# ip dhcp relay information policy replace
(Optional) Configures the reforwarding policy for a DHCP relay agent (what a relay agent should do if a message already contains relay information).
•
Step 6
ip dhcp relay information trust-all
Example:Router(config)# ip dhcp relay information trust-all
(Optional) Configures all interfaces on a router as trusted sources of the DHCP relay information option.
•
•
•
Step 7
end
Example:Router(config)# end
Returns to privileged EXEC mode.
Step 8
show ip dhcp relay information trusted-sources
Example:Router# show ip dhcp relay information trusted-sources
(Optional) Displays all interfaces configured to be a trusted source for the DHCP relay information option.
Configuring Relay Agent Information Option Support per Interface
Perform this task to enable support for the DHCP relay agent information option (option 82) on a per interface basis.
The interface configuration allows the subscribers with different DHCP option 82 requirements on different interfaces to be reached from one Cisco router.
Prerequisites
It is important to understand how DHCP options work. See the "DHCP Overview" module for more information.
Read the "Relay Agent Information Option" and "Relay Agent Information Reforwarding Policy" sections to understand how DHCP processes the relay agent information option for global configurations.
Restrictions
•
•
•
SUMMARY STEPS
1.
2.
3.
4.
5.
6.
7.
8.
DETAILED STEPS
Step 1
enable
Example:Router> enable
Enables privileged EXEC mode.
•
Step 2
configure terminal
Example:Router# configure terminal
Enters global configuration mode.
Step 3
interface type number
Example:Router(config)# interface FastEthernet0/0
Configures an interface and enters interface configuration mode.
Step 4
ip dhcp relay information option-insert [none]
Example:Router(config-if)# ip dhcp relay information option-insert
Enables the system to insert the DHCP relay agent information option (option-82 field) in forwarded BOOTREQUEST messages to a DHCP server.
•
•
Step 5
ip dhcp relay information check-reply [none]
Example:Router(config-if)# ip dhcp relay information check-reply
Configures a DHCP server to validate the relay information option in forwarded BOOTREPLY messages.
•
•
Step 6
ip dhcp relay information policy-action {drop | keep | replace}
Example:Router(config-if)# ip dhcp relay information policy-action replace
Configures the information reforwarding policy for a DHCP relay agent (what a relay agent should do if a message already contains relay information).
•
Step 7
exit
Example:Router(config-if)# exit
Exits interface configuration mode.
Step 8
Repeat Steps 3 through 7 to configure relay agent information settings on different interfaces.
(Optional)
Configuring the Subscriber Identifier Suboption of the Relay Agent Information Option
Perform this task to enable an Internet service provider (ISP) to add a unique identifier to the subscriber-identifier suboption of the relay agent information option.
The unique identifier enables an ISP to identify a subscriber, to assign specific actions to that subscriber (for example, assignment of host IP address, subnet mask, and domain name system DNS), and to trigger accounting.
Before the introduction of this feature, if a subscriber moved, each ISP had to be informed of the change and all ISPs had to reconfigure the DHCP settings for the affected customers at the same time. Even if the service was not changed, every move involved administrative changes in the ISP environment. With the introduction of this feature, if a subscriber moves from one Network Access Server to another, there is no need for a change in the configuration on the part of the DHCP server or ISP.
Prerequisites
You should configure the unique identifier for each subscriber.
The new configurable subscriber-identifier option should be configured on the interface connected to the client. When a subscriber moves from one interface to the other, the interface configuration should also be changed.
The server should be able to recognize the new suboption.
SUMMARY STEPS
1.
2.
3.
4.
5.
DETAILED STEPS
Configuring DHCP Relay Class Support for Client Identification
Perform this task to configure DHCP relay class support for client identification.
Relay Class Support Overview
DHCP relay class support for client identification allows the Cisco IOS relay agent to forward client-generated DHCP messages to different DHCP servers based on the content of the following four options:
•
•
•
•
Each option identifies the type of client sending the DHCP message.
Relay pools provide a method to define DHCP pools that are not used for address allocation. These relay pools can specify that DHCP messages from clients on a specific subnet should be forwarded to a specific DHCP server. These relay pools can be configured with relay classes inside the pool that help determine the forwarding behavior.
For example, after receiving the option in the DHCP DISCOVER message, the relay agent will match and identify the relay class from the relay pool and then direct the DHCP DISCOVER message to the DHCP server associated with that identified relay class.
Relay Class Support Usage Scenario
In an example application, a Cisco router acting as a DHCP relay agent receives DHCP requests from two VoIP services (H323 and SIP). The requesting devices are identified by option 60.
Both VoIP services have a different back-office infrastructure so they cannot be serviced by the same DHCP server. Requests for H323 devices must be forwarded to the H323 server and requests from the SIP devices must be forwarded to the SIP server.
The solution is to configure the relay agent with relay classes that are configured to match option 60 values sent by the client devices. Based on the option value, the relay agent will match and identify the relay class, and forward the DHCP DISCOVER message to the DHCP server associated with that identified relay class.
Prerequisites
It is important to understand how DHCP options work. See the "DHCP Overview" module for more information.
You must know the hexadecimal value of each byte location in the options to be able to configure the option hex command. The format may vary from product to product. Contact the relay agent vendor for this information.
SUMMARY STEPS
1.
2.
3.
4.
5.
6.
7.
8.
9.
10.
11.
12.
DETAILED STEPS
Configuring DHCP Relay Agent Support for MPLS VPNs
Perform this task to configure DHCP relay agent support for MPLS VPNs.
DHCP Relay Agent Support for MPLS VPNs
DHCP relay support for Multiprotocol Label Switching (MPLS) Virtual Private Networks (VPNs) enables a network administrator to conserve address space by allowing overlapping addresses. The relay agent can support multiple clients on different VPNs, and many of these clients from different VPNs can share the same IP address.
Configuring VPNs involves an adjustment to the usual DHCP host IP address designation. VPNs use private address spaces that might not be unique across the Internet.
In some environments, a relay agent resides in a network element that also has access to one or more MPLS VPNs. A DHCP server that provides service to DHCP clients on those different VPNs must locate the VPN in which each client resides. The network element that contains the relay agent typically captures the VPN association of the DHCP client and includes this information in the relay agent information option of the DHCP packet.
DHCP relay support for MPLS VPNs allows the relay agent to forward this necessary VPN-related information to the DHCP server using the following three suboptions of the DHCP relay agent information option:
•
•
•
The VPN identifier suboption is used by the relay agent to tell the DHCP server the VPN for every DHCP request it passes on to the DHCP server, and it is also used to properly forward any DHCP reply that the DHCP server sends back to the relay agent. The VPN identifier suboption contains the VPN ID configured on the incoming interface to which the client is connected. If you configure the VRF name but not the VPN ID, the VRF name is used as the VPN identifier suboption. If the interface is in global routing space, the VPN suboptions are not added.
The subnet selection suboption allows the separation of the subnet where the client resides from the IP address used to communicate with the relay agent. In typical DHCP processing, the gateway address specifies both the subnet on which a DHCP client resides and the IP address that the server can use to communicate with the relay agent. Situations exist where the relay agent needs to specify the subnet on which a DHCP client resides that is different from the IP address the server can use to communicate with the relay agent. The subnet selection suboption is included in the relay agent information option and passed on to the DHCP server. The gateway address is changed to the outgoing interface of the relay agent toward the DHCP server. The DHCP server uses this gateway address to send reply packets back to the relay agent.
The server identifier override suboption value is copied in the reply packet from the DHCP server instead of the normal server ID address. The server identifier override suboption contains the incoming interface IP address, which is the IP address on the relay agent that is accessible from the client. Using this information, the DHCP client sends all renew and release packets to the relay agent. The relay agent adds all of the VPN suboptions and then forwards the renew and release packets to the original DHCP server.
After adding these suboptions to the DHCP relay agent information option, the gateway address is changed to the outgoing interface of the relay agent toward the DHCP server. When the packets are returned from the DHCP server, the relay agent removes the relay agent information options and forwards the packets to the DHCP client on the correct VPN.
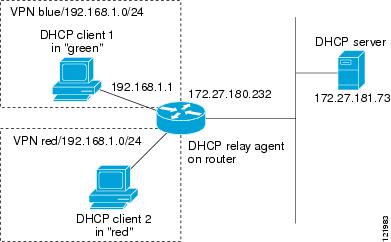
Figure 3 shows a VPN scenario where the DHCP relay agent and DHCP server can recognize the VPN that each client resides within. DHCP client 1 is part of VPN green and DHCP client 2 is part of VPN red and both have the same private IP address 192.168.1.0/24. Because the clients have the same IP address, the DHCP relay agent and DHCP server use the VPN identifier, subnet selection, and server identifier override suboptions of the relay agent information option to distinguish the correct VPN of the client.
Figure 3 Virtual Private Network DHCP Configuration
Prerequisites
Before configuring DHCP relay support for MPLS VPNs, you must configure standard MPLS VPNs.
Restrictions
•
•
•
SUMMARY STEPS
1.
2.
3.
4.
5.
6.
DETAILED STEPS
Setting the Gateway Address of the DHCP Broadcast to a Secondary Address Using Smart Relay Agent Forwarding
Perform this task to configure smart relay agent forwarding.
You only need to configure helper addresses on the interface where the UDP broadcasts that you want to forward to the DHCP server are being received, and you only need the ip dhcp smart-relay command configured if you have secondary addresses on that interface and you want the router to step through each IP network when forwarding DHCP requests. Without the smart relay agent configured, all requests are forwarded using the primary IP address on the interface.
If the ip dhcp smart-relay command is configured, the relay agent counts the number of times the client retries sending a request to the DHCP server when there is no DHCPOFFER message from the DHCP server. After three retries, the relay agent sets the gateway address to the secondary address. If the DHCP server still does not respond after three more retries, then the next secondary address is used as the gateway address.
This functionality is useful when the DHCP server cannot be configured to use secondary pools.
SUMMARY STEPS
1.
2.
3.
DETAILED STEPS
Troubleshooting the DHCP Relay Agent
Perform this task to troubleshoot the DHCP relay agent.
The show ip route dhcp command is useful to help you understand any problems with the DHCP relay agent adding routes to clients from unnumbered interfaces. All routes added to the routing table by the DHCP server and relay agent are displayed.
SUMMARY STEPS
1.
2.
3.
4.
5.
DETAILED STEPS
Configuration Examples for the Cisco IOS DHCP Relay Agent
This section provides the following configuration examples:
•
•
•
•
•
•
DHCP Relay Agent and Relay Agent Information Option Support: Example
The following example shows how to enable the DHCP server, the relay agent, and the insertion and removal of the DHCP relay information option (option 82). Note that the Cisco IOS DHCP server is enabled by default. In this example, the DHCP server was disabled:
!reenables the DHCP serverservice dhcpip dhcp relay information option!interface ethernet0/0ip address 192.168.100.1 255.255.255.0ip helper-address 10.55.11.3DHCP Relay Agent and Relay Agent Information Option Support per Interface: Example
The following example shows that for subscribers being serviced by the same aggregation router, the relay agent information option needs to be processed differently for Asynchronous Transfer Mode (ATM) subscribers than for Ethernet digital subscribers. For ATM subscribers, the relay agent information option is configured to be removed from the packet by the relay agent before forwarding to the client. For Ethernet subscribers, the connected device provides the relay agent information option, and it is configured to remain in the packet and be forwarded to the client.
ip dhcp relay information trust-allinterface Loopback0ip address 10.16.0.1 255.255.255.0!interface ATM3/0no ip address!interface ATM3/0.1ip helper-address 10.16.1.2ip unnumbered loopback0ip dhcp relay information option-insert!interface Loopback1ip address 10.18.0.1 255.255.255.0!interface Ethernet4no ip address!interface Ethernet4/0.1encap dot1q 123ip unnumbered loopback1ip helper-address 10.18.1.2ip dhcp relay information policy-action keepSubscriber Identifier Suboption Configuration: Example
The following example shows how to add a unique identifier to the subscriber-identifier suboption of the relay agent information option.
ip dhcp relay information option!interface Loopback0ip address 10.1.1.129 255.255.255.192!interface ATM4/0no ip address!interface ATM4/0.1 point-to-pointip helper-address 10.16.1.2ip unnumbered Loopback0ip dhcp relay information option subscriber-id newperson123atm route-bridged ippvc 88/800encapsulation aal5snapDHCP Relay Class Support for Client Identification: Example
In the following example, DHCP messages are received from DHCP clients on subnet 10.2.2.0. The relay agent will match and identify the relay class from the relay pool and forward the DHCP message to the appropriate DHCP server identified by the relay target command.
!ip dhcp class H323option 60 hex 010203!ip dhcp class SIPoption 60 hex 040506!! The following is the relay poolip dhcp pool redrelay source 10.2.2.0 255.255.255.0class H323relay target 172.16.2.1relay target 172.17.2.1!class SIPrelay target 172.18.2.1DHCP Relay Agent Support for MPLS VPNs: Example
In the following example, the DHCP relay agent receives a DHCP request on Ethernet interface 0/1 and sends the request to the DHCP server located at IP helper address 10.44.23.7, which is associated with the VRF named red:
ip dhcp relay information option vpn!interface ethernet 0/1ip helper-address vrf red 10.44.23.7!DHCP Smart Relay Agent Forwarding: Example
In the following example, the router will forward the DHCP broadcast received on Ethernet interface 0/0 to the DHCP server (10.55.11.3), inserting 192.168.100.1 in the giaddr field of the DHCP packet. If the DHCP server has a scope or pool configured for the 192.168.100.0/24 network, it will respond; otherwise it will not respond.
Because the ip dhcp smart-relay global configuration command is configured, if the router sends three requests using 192.168.100.1 in the giaddr field, and doesn't get a response, it will move on and start using 172.16.31.254 in the giaddr field instead. Without the smart relay functionality, the route only uses 192.168.100.1 in the giaddr field.
ip dhcp smart-relay!interface ethernet0/0ip address 192.168.100.1 255.255.255.0ip address 172.16.31.254 255.255.255.0ip helper-address 10.55.11.3!Additional References
The following sections provide references related to configuring the Cisco IOS DHCP relay agent.
Related Documents
Standards
MIBs
RFCs
Technical Assistance
Feature Information for the Cisco IOS DHCP Relay Agent
Table 1 lists the features in this module and provides links to specific configuration information. Only features that were introduced or modified in Cisco IOS Release 12.2(1) or a later release appear in the table.
For information on a feature in this technology that is not documented here, see the "DHCP Features Roadmap."
Not all commands may be available in your Cisco IOS software release. For details on when support for a specific command was introduced, see the command reference documentation.
Use Cisco Feature Navigator to find information about platform support and software image support. Cisco Feature Navigator enables you to determine which Cisco IOS and Catalyst OS software images support a specific software release, feature set, or platform. To access Cisco Feature Navigator, go to http://www.cisco.com/go/cfn. An account on Cisco.com is not required.
Note
Table 1 Feature Information for the Cisco IOS DHCP Relay Agent
DHCP Class Support for Client Identification
12.4(11)T
This feature enhances the DHCP class mechanism to support options 60, 77, 124, and 125. These options identify the type of client sending the DHCP message. The DHCP relay agent can make forwarding decisions based on the content of the options in the DHCP message sent by the client.
The following section provides information about this feature:
•
The following command was introduced by this feature: option hex
DHCPv4 Relay per Interface VPN ID Support
12.4(11)T
The DHCPv4 Relay per Interface VPN ID Support feature allows the Cisco IOS DHCP relay agent to be configured per interface to override the global configuration of the ip dhcp relay information option vpn command. This feature allows subscribers with different relay information option VPN ID requirements on different interfaces to be reached from one Cisco router.
The following section provides information about this feature:
•
The following command was introduced by this feature: ip dhcp relay information option-id
DHCP Relay Option 82 per Interface Support
12.4(6)T
12.2(31)SB2
This feature enables support for the DHCP relay agent information option (option 82) on a per interface basis. The interface configuration allows different DHCP servers, with different DHCP option 82 requirements to be reached from one Cisco router.
The following section provides information about this feature:
•
The following commands were introduced by this feature: ip dhcp relay information check-reply, ip dhcp relay information option-insert, and ip dhcp relay information policy-action
DHCP Subscriber Identifier Suboption of Option 82
12.3(14)T
12.2(28)SB
12.2(33)SRB
This feature enables an ISP to add a unique identifier to the subscriber-identifier suboption of the relay agent information option.
The following section provides information about this feature:
•
The following command was introduced by this feature: ip dhcp relay information option subscriber-id
DHCP Relay MPLS VPN Support
12.2(8)
12.2(28)SB
DHCP relay support for MPLS VPNs enables a network administrator to conserve address space by allowing overlapping addresses. The relay agent can support multiple clients on different VPNs, and many of these clients from different VPNs can share the same IP address.
The following section provides information about this feature:
•
The following commands were modified by this feature: ip dhcp relay information option and ip helper address
Glossary
client—A host trying to configure its interface (obtain an IP address) using DHCP or BOOTP protocols.
DHCP—Dynamic Host Configuration Protocol.
MPLS—Multiprotocol Label Switching. Emerging industry standard upon which tag switching is based.
relay agent—A router that forwards DHCP and BOOTP messages between a server and a client on different subnets.
server—DHCP or BOOTP server.
VPN—Virtual Private Network. Enables IP traffic to use tunneling to travel securely over a public TCP/IP network.
VRF—VPN routing and forwarding instance. A VRF consists of an IP routing table, a derived forwarding table, a set of interfaces that use the forwarding table, and a set of rules and routing protocols that determine what goes into the forwarding table. In general, a VRF includes the routing information that defines a customer VPN site that is attached to a PE router. Each VPN instantiated on the PE router has its own VRF.
Note
Any Internet Protocol (IP) addresses used in this document are not intended to be actual addresses. Any examples, command display output, and figures included in the document are shown for illustrative purposes only. Any use of actual IP addresses in illustrative content is unintentional and coincidental
.
Copyright © 2006 Cisco Systems, Inc. All rights reserved.
This module first published May 2, 2005. Last updated November 17, 2006.