Feedback Feedback
|
Table Of Contents
VPN Acceleration Module 2+ (SA-VAM2+)
Online Insertion and Removal (OIR)
Basic IPSec Configuration Example
Related Features and Technologies
Supported Standards, MIBs, and RFCs
Using the EXEC Command Interpreter
Selecting Appropriate Transforms
The Crypto Transform Configuration Mode
Ensuring That Access Lists Are Compatible with IPSec
Setting Global Lifetimes for IPSec Security Associations
Applying Crypto Map Sets to Interfaces
Verifying IPSec Configurations
Configuring IKE Pre-Shared Keys
Configuring an IPSec Transform Set
Applying crypto map to the Interface
Configuring IKE Policies Example
Configuring Compression Example
VPN Acceleration Module 2+ (SA-VAM2+)
Revised: July 10, 2006, OL-9843-02First Published: January 20, 2005Last Updated: July 10, 2006This feature module describes the Service Adapter VPN Acceleration Module 2+ (SA-VAM2+) feature. It includes the following sections:
•
Supported Standards, MIBs, and RFCs
Feature Overview
The VPN Acceleration Module 2+ (SA-VAM2+) is a single-width port adapter supported on the Cisco 7204VXR and Cisco 7206VXR routers with the NPE-225, NPE-400, the NPE-G1, or the NPE-G2 processor, and the Cisco 7301 router.
SA-VAM2+ features hardware acceleration for Advanced Encryption Standard (AES), Data Encryption Standard (DES), Triple DES (3DES), and IPv6 IPSec, providing increased performance for site-to-site and remote-access IPSec VPN services. The Cisco SA-VAM2+ provides hardware-assisted Layer 3 compression services with its encryption services, conserving bandwidth and lowering network connection costs over secured links, as well as full Layer 3 routing, quality of service (QoS), multicast and multiprotocol traffic, and broad support of integrated LAN/WAN media.
The SA-VAM2+ can be installed directly in the port adapter slots of the Cisco 7000VXR series routers and the Cisco 7301 router. Alternatively, you can install the SA-VAM2+ into a Port Adapter Jacket Card (product ID:C7200-JC-PA) that is inserted in the I/O controller slot of a Cisco 7200VXR router with an NPE-G1 or NPE-G2 processor, for additional bandwidth.
The SA-VAM2+ support in the Port Adapter Jacket Card allows you to take advantage of the increase in NPE-G1 and NPE-G2 performance, while maintaining VPN performance. You allow more bandwidth to the regular port adapter slots when you install the SA-VAM2+ in the Port Adapter Jacket Card. See the Port Adapter Jacket Card Installation Guide for more information.
The SA-VAM2+ provides hardware-accelerated support for the following multiple encryption functions:
•
•
•
•
•
•
•
•
•
•
•
Benefits
The SA-VAM2+ provides the following benefits:
•
Note
•
•
•
•
•
•
•
•
•
•
•
•
•
•
•
•
•
Hardware Requirements
Specific hardware prerequisites that ensure proper operation of the SA-VAM2+ follow:
•
•
•
Restrictions
The SA-VAM2+ has the following restrictions:
•
•
•
•
Online Insertion and Removal (OIR)
The Online Insertion and Removal (OIR) feature is described in this section.
SA-VAM2+
Online insertion and removal (OIR) is supported on the SA-VAM2+. Before removing the SA-VAM2+, we recommend that you shut down the interface so that there is no traffic running through the SA-VAM2+ when it is removed. Removing a SA-VAM2+ while traffic is flowing through the ports can cause system disruption.
Port Adapter Jacket Card
OIR on the Port Adapter Jacket Card is not supported; however, the SA-VAM2+ within the Port Adapter Jacket Card does support OIR. You must have the chassis powered off to install or remove the Port Adapter Jacket Card. See the Port Adapter Jacket Card Installation Guide for more information about the Port Adapter Jacket Card.
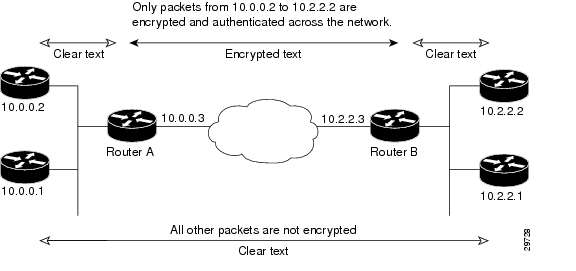
Basic IPSec Configuration Example
The following is an example of an IPSec configuration in which the security associations are established through IKE. In this example, an access list is used to restrict the packets that are encrypted and decrypted. In this example, all packets going from IP address 10.0.0.2 to IP address 10.2.2.2 are encrypted and decrypted and all packets going from IP address 10.2.2.2 to IP address 10.0.0.2 are encrypted and decrypted. Also, one IKE policy is created.
Figure 1 Basic IPSec Configuration
Router A Configuration
Specify the parameters to be used during an IKE negotiation:
crypto isakmp policy 15encryption deshash md5authentication pre-sharegroup 2lifetime 5000crypto isakmp key 1234567890 address 10.2.2.3crypto isakmp identity address
Note
A transform set defines how the traffic will be protected:
crypto ipsec transform-set auth1 ah-md5-hmac esp-des esp-md5-hmacmode tunnelA crypto map joins the transform set and specifies where the protected traffic is sent (the remote IPSec peer):
crypto map toRemoteSite 10 ipsec-isakmpset peer 10.2.2.3set transform-set auth1The crypto map is applied to an interface:
interface Serial0ip address 10.0.0.3crypto map toRemoteSiteAn IPSec access list defines which traffic to protect:
access-list 101 permit ip host 10.0.0.2 host 10.2.2.2access-list 101 permit ip host 10.0.0.3 host 10.2.2.3Router B Configuration
Specify the parameters to be used during an IKE negotiation:
crypto isakmp policy 15encryption deshash md5authentication pre-sharegroup 2lifetime 5000crypto isakmp key 1234567890 address 10.0.0.3crypto isakmp identity addressA transform set defines how the traffic will be protected:
crypto ipsec transform-set auth1 ah-md5-hmac esp-des ah-md5-hmacmode tunnelA crypto map joins the transform set and specifies where the protected traffic is sent (the remote IPSec peer):
crypto map toRemoteSite 10 ipsec-isakmpset peer 10.0.0.3set transform-set auth1The crypto map is applied to an interface:
interface Serial0ip address 10.2.2.3crypto map toRemoteSiteAn IPSec access list defines which traffic to protect:
access-list 101 permit ip host 10.2.2.2 host 10.0.0.2access-list 101 permit ip host 10.2.2.3 host 10.0.0.3Related Features and Technologies
The following features and technologies are related to the SA-VAM2+:
•
•
•
Related Documents
•
SA-VAM2+ Installation and Configuration Guide
•
Port Adapter Jacket Card Installation Guide
Supported Platforms
The VPN Acceleration Module 2+ (SA-VAM2+) feature runs on the following platforms:
•
•
Finding Support Information for Platforms and Cisco IOS Software Images
Use Cisco Feature Navigator to find information about platform support and Cisco IOS software image support. Access Cisco Feature Navigator at http://www.cisco.com/go/fn. You must have an account on Cisco.com. If you do not have an account or have forgotten your username or password, click Cancel at the login dialog box and follow the instructions that appear.
Supported Standards, MIBs, and RFCs
Standards
•
MIBs
The following MIBs were introduced or modified in this feature:
•
•
•
To locate and download MIBs for selected platforms, Cisco IOS releases, and feature sets, use Cisco MIB Locator found at the following URL:
http://tools.cisco.com/ITDIT/MIBS/servlet/index
If Cisco MIB Locator does not support the MIB information that you need, you can also obtain a list of supported MIBs and download MIBs from the Cisco MIBs page at the following URL:
http://www.cisco.com/public/sw-center/netmgmt/cmtk/mibs.shtml
To access Cisco MIB Locator, you must have an account on Cisco.com. If you have forgotten or lost your account information, send a blank e-mail to cco-locksmith@cisco.com. An automatic check will verify that your e-mail address is registered with Cisco.com. If the check is successful, account details with a new random password will be e-mailed to you. Qualified users can establish an account on Cisco.com by following the directions found at the following URL:
RFCs
•
•
Prerequisites
You must configure IPSec and IKE on the router and a crypto map to all interfaces that require encryption service from the SA-VAM2+. See the "Configuration Examples" section for configuration procedures.
Configuration Tasks
On power up if the enabled LED is on, the SA-VAM2+ is fully functional and does not require any configuration commands. However, for the SA-VAM2+ to provide encryption services, you must complete the steps in the following sections:
•
•
•
•
•
•
Optionally, you can configure certification authority (CA) interoperability (refer to the "Configuring Certification Authority Interoperability" chapter in the Security Configuration Guide).
Using the EXEC Command Interpreter
You modify the configuration of your router through the software command interpreter called the EXEC (also called enable mode). You must enter the privileged level of the EXEC command interpreter with the enable command before you can use the configure command to configure a new interface or change the existing configuration of an interface. The system prompts you for a password if one has been set.
The system prompt for the privileged level ends with a pound sign (#) instead of an angle bracket (>). At the console terminal, use the following procedure to enter the privileged level:
Step 1
Router> enablePassword:Step 2
When you enter the correct password, the system displays the privileged-level system prompt (#):Router#
Enabling the SA-VAM2+
The SA-VAM2+ is enabled by default.
To disable the SA-VAM2+, use the following commands, starting in global configuration mode:
Step 1
no crypto engine accelerator <slot number>
Disables the SA-VAM2+.
Step 2
crypto engine accelerator <slot number>
Enables the SA-VAM2+.
Configuring an IKE Policy
If you do not specify a value for a parameter, the default value is assigned. For information on default values, refer to the "IP Security and Encryption" chapter of the Security Command Reference publication.
To configure an IKE policy, use the following commands, beginning in global configuration mode:
For detailed information on creating IKE policies, refer to the "Configuring Internet Key Exchange Security Protocol" chapter in the Security Configuration Guide publication.
Verifying IKE Configurations
To view information about your IKE configurations, use show crypto isakmp policy EXEC command.
Note
The following sample output from the show crypto isakmp policy command displays a warning message after a user tries to configure an IKE encryption method that the hardware does not support:
Router# show crypto isakmp policyProtection suite of priority 1encryption algorithm: AES - Advanced Encryption Standard (256 bit keys).WARNING:encryption hardware does not support the configuredencryption method for ISAKMP policy 1hash algorithm: Secure Hash Standardauthentication method: Pre-Shared KeyDiffie-Hellman group: #1 (768 bit)lifetime: 3600 seconds, no volume limit
Configuring a Transform Set
See the Advanced Encryption Standard (AES) feature module for more information on configuring a transform set.
This section includes the following topics:
•
•
•
•
•
•
A transform set is an acceptable combination of security protocols, algorithms, and other settings to apply to IPSec protected traffic. During the IPSec security association (SA) negotiation, the peers agree to use a particular transform set when protecting a particular data flow.
Defining a Transform Set
A transform set is a combination of security protocols and algorithms. During the IPSec security association negotiation, peers agree to use a specific transform set to protect a particular data flow.
To define a transform set, use the following commands, starting in global configuration mode:
Step 1
Router(config)# crypto ipsec transform-set transform-set-name transform1 [transform2 [transform3]]
Defines a transform set and enters crypto transform configuration mode.
•
•
Step 2
Router(cfg-crypto-tran)# mode [tunnel | transport]
(Optional) Changes the mode associated with the transform set. The mode setting is only applicable to traffic whose source and destination addresses are the IPSec peer addresses; it is ignored for all other traffic. (All other traffic is in tunnel mode only.)
Step 3
end
Exits the crypto transform configuration mode to enabled mode.
Step 4
clear crypto sa
or
clear crypto sa peer {ip-address | peer-name}
or
clear crypto sa map map-name
or
clear crypto sa spi destination-address protocol spiClears existing IPSec security associations so that any changes to a transform set take effect on subsequently established security associations (SAs). (Manually established SAs are reestablished immediately.)
Entering the clear crypto sa command without parameters clears out the full SA database, which clears out active security sessions. You may also specify the peer, map, or entry keywords to clear out only a subset of the SA database.
Table 1 shows allowed transform combinations for the AH and ESP protocols.
Examples of acceptable transform combinations are as follows:
•
•
•
•
•
The parser will prevent you from entering invalid combinations; for example, once you specify an AH transform it will not allow you to specify another AH transform for the current transform set.
IPSec Protocols: AH and ESP
Both the AH and ESP protocols implement security services for IPSec.
AH provides data authentication and antireplay services.
ESP provides packet encryption and optional data authentication and antireplay services.
ESP encapsulates the protected data—either a full IP datagram (or only the payload)—with an ESP header and an ESP trailer. AH is embedded in the protected data; it inserts an AH header immediately after the outer IP header and before the inner IP datagram or payload. Traffic that originates and terminates at the IPSec peers can be sent in either tunnel or transport mode; all other traffic is sent in tunnel mode. Tunnel mode encapsulates and protects a full IP datagram, while transport mode encapsulates/protects the payload of an IP datagram. For more information about modes, refer to the mode (IPSec) command description.
Selecting Appropriate Transforms
The following tips may help you select transforms that are appropriate for your situation:
•
•
•
•
•
Note
•
Suggested transform combinations follow:
•
•
The Crypto Transform Configuration Mode
After you issue the crypto ipsec transform-set command, you are put into the crypto transform configuration mode. While in this mode, you can change the mode to tunnel or transport. (These are optional changes.) After you have made these changes, type exit to return to global configuration mode. For more information about these optional changes, refer to the match address (IPSec) and mode (IPSec) command descriptions.
Changing Existing Transforms
If one or more transforms are specified in the crypto ipsec transform-set command for an existing transform set, the specified transforms will replace the existing transforms for that transform set.
If you change a transform set definition, the change is only applied to crypto map entries that reference the transform set. The change will not be applied to existing SAs, but will be used in subsequent negotiations to establish new SAs. If you want the new settings to take effect sooner, you can clear all or part of the SA database by using the clear crypto sa command.
Transform Example
The following example defines two transform sets. The first transform set will be used with an IPSec peer that supports the newer ESP and AH protocols. The second transform set will be used with an IPSec peer that only supports the older transforms.
crypto ipsec transform-set newer esp-3des esp-sha-hmaccrypto ipsec transform-set older ah-rfc-1828 esp-rfc1829The following example is a sample warning message that is displayed when a user enters an IPSec transform that the hardware does not support:
crypto ipsec transform transform-1 esp-aes 256 esp-md5WARNING:encryption hardware does not support transformesp-aes 256 within IPSec transform transform-1Configuring IPSec
This section includes the following topics:
•
•
•
•
•
•
•
For IPSec configuration examples, refer to the "Configuring IPSec Example" section.
See the "Configuring IPSec Network Security" chapter of the Cisco IOS Security Configuration Guide publication for more information on configuring IPSec.
Ensuring That Access Lists Are Compatible with IPSec
IKE uses UDP port 500. The IPSec Encapsulating Security Payload (ESP) and Authentication Header (AH) protocols use protocol numbers 50 and 51. Ensure that your interface access lists are configured so that protocol numbers 50, 51, and UDP port 500 traffic are not blocked at interfaces used by IPSec. In some cases, you might need to add a statement to your access lists to explicitly permit this traffic.
Setting Global Lifetimes for IPSec Security Associations
You can change the global lifetime values which are used when negotiating new IPSec security associations. (These global lifetime values can be overridden for a particular crypto map entry).
These lifetimes only apply to security associations established via IKE. Manually established security associations do not expire.
To change a global lifetime for IPSec security associations, use one or more of the following commands in global configuration mode:
Creating Crypto Access Lists
Crypto access lists define which IP traffic will be protected by encryption. (These access lists are not the same as regular access lists, which determine what traffic to forward or block at an interface.) For example, access lists can be created to protect all IP traffic between Subnet A and Subnet Y or Telnet traffic between Host A and Host B.
To create crypto access lists, use the following command in global configuration mode:
Step 1
Router(config)# access-list access-list-number {deny | permit} protocol source source-wildcard destination destination-wildcard [log]
or
Router(config)# ip access-list extended name
Specifies conditions to determine which IP packets will be protected.1 (Enable or disable crypto for traffic that matches these conditions.)
We recommend that you configure "mirror image" crypto access lists for use by IPSec and that you avoid using the any keyword.
Step 2
Add permit and deny statements as appropriate.
Adds permit or deny statements to access lists.
Step 3
End
Exits the configuration command mode.
1 You specify conditions using an IP access list designated by either a number or a name. The access-list command designates a numbered extended access list; the ip access-list extended command designates a named access list.
For detailed information on configuring access lists, refer to the "Configuring IPSec Network Security" chapter in the Cisco IOS Security Configuration Guide publication.
Creating Crypto Map Entries
You can apply only one crypto map set to a single interface. The crypto map set can include a combination of IPSec/IKE and IPSec/manual entries. Multiple interfaces can share the same crypto map set if you want to apply the same policy to multiple interfaces.
To create crypto map entries that use IKE to establish the security associations, use the following commands, starting in global configuration mode:
To create crypto map entries that will use IKE to establish the security associations, use the following commands, starting in global configuration mode:
Creating Dynamic Crypto Maps
A dynamic crypto map entry is a crypto map entry with some parameters not configured.The missing parameters are later dynamically configured (as the result of an IPSec negotiation). Dynamic crypto maps are only available for use by IKE.
Dynamic crypto map entries are grouped into sets. A set is a group of dynamic crypto map entries all with the same dynamic-map-name, each with a different dynamic-seq-num.
To create a dynamic crypto map entry, use the following commands, starting in global configuration mode:
To add a dynamic crypto map set into a crypto map set, use the following command in global configuration mode:
Router(config)# crypto map map-name seq-num ipsec-isakmp dynamic dynamic-map-name
Adds a dynamic crypto map set to a static crypto map set.
Applying Crypto Map Sets to Interfaces
Apply a crypto map set to each interface through which IPSec traffic will flow. Crypto maps instruct the router to evaluate the interface traffic against the crypto map set and use the specified policy during connection or security association negotiation on behalf of traffic to be protected by crypto.
To apply a crypto map set to an interface, use the following command in interface configuration mode:
To specify redundant interfaces and name an identifying interface, use the following command in global configuration mode:
Router(config)# crypto map map-name local-address interface-id
Permits redundant interfaces to share the same crypto map, using the same local identity.
Verifying IPSec Configurations
Some configuration changes take effect only after subsequent security associations are negotiated. For the new settings to take effect immediately, clear the existing security associations.
To clear (and reinitialize) IPSec security associations, use one of the commands in Table 2 in global configuration mode:
The following steps provide information on verifying your configurations:
Step 1
Router# show crypto ipsec transform-setTransform set combined-des-md5: {esp-des esp-md5-hmac}will negotiate = {Tunnel,},Transform set t1: {esp-des esp-md5-hmac}will negotiate = {Tunnel,},Transform set t100: {ah-sha-hmac}will negotiate = {Transport,},Transform set t2: {ah-sha-hmac}will negotiate = {Tunnel,},{esp-des}will negotiate = {Tunnel,},
Note
The following sample output from the show crypto ipsec transform-set command displays a warning message after a user tries to configure an IPSec transform that the hardware does not support:
Router# show crypto ipsec transform-setTransform set transform-1:{esp-256-aes esp-md5-hmac}will negotiate = {Tunnel, },WARNING:encryption hardware does not support transformesp-aes 256 within IPSec transform transform-1
Step 2
Router# show crypto mapCrypto Map: "router-alice" idb: Ethernet0 local address: 172.21.114.123Crypto Map "router-alice" 10 ipsec-isakmpPeer = 172.21.114.67Extended IP access list 141access-list 141 permit ipsource: addr = 172.21.114.123/0.0.0.0dest: addr = 172.21.114.67/0.0.0.0Current peer: 172.21.114.67Security-association lifetime: 4608000 kilobytes/120 secondsPFS (Y/N): NTransform sets={t1,}Step 3
Router# show crypto ipsec sainterface: Ethernet0Crypto map tag: router-alice, local addr. 172.21.114.123local ident (addr/mask/prot/port): (172.21.114.123/255.255.255.255/0/0)remote ident (addr/mask/prot/port): (172.21.114.67/255.255.255.255/0/0)current_peer: 172.21.114.67PERMIT, flags={origin_is_acl,}#pkts encaps: 10, #pkts encrypt: 10, #pkts digest 10#pkts decaps: 10, #pkts decrypt: 10, #pkts verify 10#send errors 10, #recv errors 0local crypto endpt.: 172.21.114.123, remote crypto endpt.: 172.21.114.67path mtu 1500, media mtu 1500current outbound spi: 20890A6Finbound esp sas:spi: 0x257A1039(628756537)transform: esp-des esp-md5-hmac,in use settings ={Tunnel,}slot: 0, conn id: 26, crypto map: router-alicesa timing: remaining key lifetime (k/sec): (4607999/90)IV size: 8 bytesreplay detection support: Yinbound ah sas:outbound esp sas:spi: 0x20890A6F(545852015)transform: esp-des esp-md5-hmac,in use settings ={Tunnel,}slot: 0, conn id: 27, crypto map: router-alicesa timing: remaining key lifetime (k/sec): (4607999/90)IV size: 8 bytesreplay detection support: Youtbound ah sas:interface: Tunnel0Crypto map tag: router-alice, local addr. 172.21.114.123local ident (addr/mask/prot/port): (172.21.114.123/255.255.255.255/0/0)remote ident (addr/mask/prot/port): (172.21.114.67/255.255.255.255/0/0)current_peer: 172.21.114.67PERMIT, flags={origin_is_acl,}#pkts encaps: 10, #pkts encrypt: 10, #pkts digest 10#pkts decaps: 10, #pkts decrypt: 10, #pkts verify 10#send errors 10, #recv errors 0local crypto endpt.: 172.21.114.123, remote crypto endpt.: 172.21.114.67path mtu 1500, media mtu 1500current outbound spi: 20890A6Finbound esp sas:spi: 0x257A1039(628756537)transform: esp-des esp-md5-hmac,in use settings ={Tunnel,}slot: 0, conn id: 26, crypto map: router-alicesa timing: remaining key lifetime (k/sec): (4607999/90)IV size: 8 bytesreplay detection support: Yinbound ah sas:outbound esp sas:spi: 0x20890A6F(545852015)transform: esp-des esp-md5-hmac,in use settings ={Tunnel,}slot: 0, conn id: 27, crypto map: router-alicesa timing: remaining key lifetime (k/sec): (4607999/90)IV size: 8 bytesreplay detection support: Youtbound ah sas:For a detailed description of the information displayed by the show commands, refer to the "IP Security and Encryption" chapter of the Security Command Reference publication.
Configuring Compression
This section includes the following topics:
•
•
•
•
•
•
For IPSec configuration examples, refer to the "Configuring IPSec Example" section.
See the "Configuring IPSec Network Security" chapter of the Cisco IOS Security Configuration Guide publication for more information on configuring IPSec.
Configuring IKE Policy
To configure IKE policy, follow the steps in "Configuring an IKE Policy" section, using the commands in global configuration mode.
Configuring IKE Pre-Shared Keys
To specify pre-shared keys at a peer, use the following commands in global configuration mode:
Remember to repeat these tasks at each peer that uses pre-shared keys in an IKE policy.
Configuring an IPSec Transform Set
To define a transform set—an acceptable combination of security protocols and algorithms—use the crypto ipsec transform-set global configuration command. To delete a transform set, use the no form of the command.
Configuring Access Lists
To establish MAC address access lists, use the access-list global configuration command. To remove a single access list entry, use the no form of this command.
Configuring Crypto Maps
To create crypto map entries that use IKE to establish the security associations, use the following commands, starting in global configuration mode:
Applying crypto map to the Interface
To apply a crypto map set to an interface, use the following commands, starting in global configuration mode:
This completes the process for configuring compression on the SA-VAM2+.
Troubleshooting Tips
To verify that Cisco IOS software has recognized SA-VAM2+, enter the show diag command and check the output. For example, when the router has the SA-VAM2+ in slot 4, the following output appears:
Router# show diagSlot 6:VAM2+ Encryption/Compression engine, Port adapterPort adapter is analyzedPort adapter insertion time 00:01:32 agoEEPROM contents at hardware discovery:Hardware Revision :1.0PCB Serial Number :Part Number :73-8491-00Board Revision :RMA Test History :00RMA Number :0-0-0-0RMA History :00Deviation Number :0-0Product Number :SA-VAM2+Top Assy. Part Number :800-22836-00CLEI Code :EEPROM format version 4EEPROM contents (hex):0x00:04 FF 40 03 E4 41 01 00 C1 8B 00 00 00 00 00 000x10:00 00 00 00 00 82 49 21 2B 00 42 00 00 03 00 810x20:00 00 00 00 04 00 80 00 00 00 00 CB 94 53 41 2D0x30:56 41 4D 32 20 20 20 20 20 20 20 20 20 20 20 200x40:20 C0 46 03 20 00 59 34 00 C6 8A 00 00 00 00 000x50:00 00 00 00 00 FF FF FF FF FF FF FF FF FF FF FF0x60:FF FF FF FF FF FF FF FF FF FF FF FF FF FF FF FF0x70:FF FF FF FF FF FF FF FF FF FF FF FF FF FF FF FFTo see if the SA-VAM2+ is currently processing crypto packets, enter the show pas vam interface command. The following is sample output:
Router# show pas vam interfaceVPN Acceleration Module Version II + in slot : 3Statistics for Hardware VPN Module since the last clearof counters 314 seconds ago5290894 packets in 5290895 packets out1882478960 bytes in 1327439698 bytes out16850 paks/sec in 16850 paks/sec out47940 Kbits/sec in 33805 Kbits/sec out4222173 pkts compressed 0 pkts not compressed1190662374 bytes before compress 405331872 bytes after compress2.9:1 compression ratio 2.9:1 overall58 commands out 58 commands acknowledgedLast 5 minutes:4855704 packets in 4855705 packets out16185 paks/sec in 16185 paks/sec out46723079 bits/sec in 32921855 bits/sec outErrors:ppq full errors : 0 ppq rx errors : 0cmdq full errors : 0 cmdq rx errors : 0no buffer : 0 replay errors : 0dest overflow : 0 authentication errors : 0Other error : 0 RNG self test fail : 0DF Bit set : 0 Hash Miscompare : 0Unwrappable object : 0 Missing attribute : 0Invalid attrribute value: 0 Bad Attribute : 0Verification Fail : 0 Decrypt Failure : 0Invalid Packet : 0 Invalid Key : 0Input Overrun : 0 Input Underrun : 0Output buffer overrun : 0 Bad handle value : 0Invalid parameter : 0 Bad function code : 0Out of handles : 0 Access denied : 0Warnings:sessions_expired : 0 packets_fragmented : 0general : 0 compress_bypassed : 4HSP details:hsp_operations : 75 hsp_sessions : 6When the SA-VAM2+ processes packets, the "packets in" and "packets out" counter changes. Counter "packets out" represents the number of packets directed to the SA-VAM2+. Counter "packets in" represents the number of packets received from the SA-VAM2+.
Note
This ratio may fall below 1 when small packets are not compressible, resulting in the ratio representing unencrypted packets to the encrypted packets plus the IPSec header.To see if the IKE/IPSec packets are being redirected to the SA-VAM2+ for IKE negotiation and IPSec encryption and decryption, enter the show crypto eli command. The following is sample output when Cisco IOS software redirects packets to SA-VAM2+:
Router# show crypto eliHardware Encryption Layer : ACTIVENumber of crypto engines = 1 .CryptoEngine-0 (slot-5) details.Capability-IPSec :IPPCP, 3DES, AES, RSAIKE-Session : 0 active, 5120 max, 0 failedDH-Key : 0 active, 5120 max, 0 failedIPSec-Session : 0 active, 10230 max, 0 failedWhen the software crypto engine is active, the show crypto eli command yields no output.
During bootup or OIR, when the Cisco IOS software agrees to redirect crypto traffic to the SA-VAM2+, it prints a message similar to the following:
%ISA-6-INFO:Recognised crypto engine (0) at slot-1...switching to hardware crypto engineTo disable the SA-VAM2+, use the configuration mode no crypto engine accelerator <slot> command, as follows:
Router(config)# no crypto engine accelerator <slot>Router#3w4d:%ISA-6-SHUTDOWN:SA-VAM2+ shutting down3w4d:%ISA-6-INFO:Crypto Engine 0 in slot 1 going DOWN3w4d:...switching to software crypto engineMonitoring and Maintaining
Use the commands that follow to monitor and maintain the SA-VAM2+:
To clear (and reinitialize) IPSec security associations, use one of the following commands in global configuration mode:
To view information about your IPSec configuration, use one or more of the following commands in EXEC mode:
Configuration Examples
This section provides the following configuration examples:
•
•
Configuring IKE Policies Example
In the following example, two IKE policies are created, with policy 15 as the highest priority, policy 20 as the next priority, and the existing default priority as the lowest priority. It also creates a preshared key to be used with policy 20 with the remote peer whose IP address is 192.168.224.33.
crypto isakmp policy 15encryption 3deshash md5authentication rsa-siggroup 2lifetime 5000crypto isakmp policy 20authentication pre-sharelifetime 10000crypto isakmp key 1234567890 address 192.168.224.33Configuring IPSec Example
The following example shows a minimal IPSec configuration where the security associations will be established via IKE:
An IPSec access list defines which traffic to protect:
access-list 101 permit ip 10.0.0.0 0.0.0.255 10.2.2.0 0.0.0.255A transform set defines how the traffic will be protected. In this example, transform set "myset1" uses DES encryption and SHA for data packet authentication:
crypto ipsec transform-set myset1 esp-des esp-shaAnother transform set example is "myset2," which uses Triple DES encryptions and MD5 (HMAC variant) for data packet authentication:
crypto ipsec transform-set myset2 esp-3des esp-md5-hmacA crypto map joins together the IPSec access list and transform set and specifies where the protected traffic is sent (the remote IPSec peer):
crypto map toRemoteSite 10 ipsec-isakmpmatch address 101set transform-set myset2set peer 10.2.2.5The crypto map is applied to an interface:
interface Serial0ip address 10.0.0.2crypto map toRemoteSite
Note
Configuring Compression Example
The following example shows a simple configuration example for configuring compression.
To configure an IKE policy:
crypto isakmp policy 1hash md5authentication pre-sharegroup 2To configure an IKE pre-shared key:
crypto isakmp key 12abcjhrweit345 address 16.0.0.2To configure an IPSec transform set:
crypto ipsec transform-set proposal_01 esp-3des esp-md5-hmac comp-lzsTo configure an access list:
access-list 101 permit ip host 16.0.0.1 host 16.0.0.2To configure a crypto map:
crypto map MAXCASE 10 ipsec-isakmpset peer 16.0.0.2set transform-set proposal_01match address 101To apply crypto map to the interface:
interface FastEthernet1/0crypto map MAXCASECommand Reference
This section documents new commands. There are no new commands associated with the SA-VAM2+. All other commands used with this feature are documented in the Cisco IOS Release 12.3(12)M command reference publications.
Glossary
ACL—Access Control List
AH—Authentication Header
DPD—Dead Peer Detection
ESP—Encapsulating Security Payload
GRE—Generic Routing Encapsulation
HSRP—Hot Standby Routing Protocol
IKE—Internet Key Exchange. IKE establishes a shared security policy and authenticates keys for services (such as IPSec) that require keys. Before any IPSec traffic can be passed, each router/firewall/host must verify the identity of its peer. This can be done by manually entering preshared keys into both hosts or by a CA service.
IPSec—IP Security. A framework of open standards that provides data confidentiality, data integrity, and data authentication between participating peers. IPSec provides these security services at the IP layer. IPSec uses IKE to handle the negotiation of protocols and algorithms based on local policy and to generate the encryption and authentication keys to be used by IPSec. IPSec can protect one or more data flows between a pair of hosts, between a pair of security gateways, or between a security gateway and a host.
ISA—Integrated Services Adapter
ISAKMP—Internet Security Association Key Management Protocol
HA—High Availability
MM—IKE Main Mode
MODECFG—Mode Configuration
QM—IKE Quick Mode
SA—Security Association
SA-VAM2+—Service Adapter VPN Acceleration Module 2+
VAM—VPN Acceleration Module
VAM2+—VPN Acceleration Module 2+
VPN—Virtual Private Network
XAUTH—Extended Authentication