Feedback
Table Of Contents
Loading System Images and Configuration Files
System Image and Configuration File Load Task List
Retrieve System Images and Configuration Files
Retrieve System Images and Configuration File Task List
Copy System Images from a Network Server to Flash Memory
Copy from a TFTP Server to Flash Memory
Copy from an rcp Server to Flash Memory
Copy from a MOP Server to Flash Memory
Copy Configuration Files from a Network Server to the Access Server
Copy from a TFTP Server to the Access Server
Copy from an rcp Server to the Access Server
Change the Buffer Size for Loading Configuration Files
Verify the Image in Flash Memory
Display System Image and Configuration Information
Reexecute the Configuration Commands in Nonvolatile Memory
Clear the Configuration Information
Enter Global Configuration Mode and Select a Configuration Source
Configure the Access Server from the Terminal
Configure the Access Server from Memory
Configure the Access Server from the Network
Copy a Configuration File Directly to the Startup Configuration
Modify the Configuration Register Boot Field
How the Access Server Uses the Boot Field
Perform the Boot Field Modification Tasks
Specify the Startup System Image
Specify the Startup Configuration File
Download the Network Configuration File
Download the Host Configuration File
Store System Images and Configuration Files
Store System Images and Configuration Files Task List
Copy System Images from Flash Memory to a Network Server
Copy from Flash Memory to a TFTP Server
Copy from Flash Memory to an rcp Server
Copy Configuration Files from the Access Server to a Network Server
Copy from the Access Server to a TFTP Server
Copy from the Access Server to an rcp Server
Configure the Access Server as a Network Server
Configure an Access Server as a Network Server Task List
Configure an Access Server as a TFTP Server
Configure Flash Memory as a TFTP Server
Configure Flash Memory as a TFTP Server Task List
Configure the Client Access Server
Configure an Access Server as a RARP Server
Configure for Other Types of Servers
Configure for Other Types of Servers Task List
Specify Asynchronous Interface Extended BOOTP Requests
Specify MOP Server Boot Requests
Partition Flash Memory Using Dual Flash Bank
Dual Flash Bank Configuration Task List
Download a File into a Flash Partition
Manually Boot from Flash Memory
Configure the Access Server to Automatically Boot from Flash
Configure a Flash Partition as a TFTP Server
Use Flash Load Helper to Upgrade Software on Run-from-Flash Systems
Flash Load Helper Configuration Task List
Download a File Using Flash Load Helper
Configure for Remote Shell (rsh) and Remote Copy (rcp) Functions
Cisco's Implementation of Remote Shell (rsh) and Remote Copy (rcp)
Configure for rsh and rcp Task List
Configure an Access Server to Support Incoming rcp Requests and rsh Commands
Configure the Access Server to Accept rcp Requests from Remote Users
Configure the System to Allow Remote Users to Execute Commands Using rsh
Turn Off DNS Lookups for rcp and rsh
Configure the Remote Username for rcp Requests
Remotely Execute Commands Using rsh
Acquiring the New Access Server's IP Address
Resolving the IP Address to the Host Name
Downloading the New Access Server's Host Configuration File
Perform the AutoInstall Procedure
Modifying the Existing Access Server's Configuration
Connect the New Access Server to the Network
Manually Load a System Image from ROM Monitor
Manually Boot from Flash Memory
Manually Boot from a Network File
Use the System Image Instead of Reloading
Loading System Images and Configuration Files
This chapter describes how to load system images and configuration files. The system images contain the system software, and the configuration files contain commands for customizing the access server.
The instructions in this chapter describe how to copy system images from access servers to network servers (and vice versa), display and compare different configuration files, and list the system software version running on the access server.
This chapter also describes the AutoInstall procedure, which you can use to automatically configure and enable a new access server upon startup. It also explains how to manually load system images from ROM monitor so that you can successfully boot the access server when typical startup processes malfunction.
To benefit most from the instructions and organization in this chapter, your access server must contain a minimal configuration that allows you to interact with the system software. You can create a basic configuration file using the setup command facility.
For a complete description of the commands mentioned in this chapter, refer to the "System Image and Configuration File Load Commands" chapter in the Access and Communication Servers Command Reference publication.
Note
One or more commands in this chapter have changed from previous releases. Commands in this chapter that have been replaced by new commands continue to perform their normal functions in the current release but are no longer documented. Support for these commands will cease in a future release. See the Access and Communication Servers Command Reference publication for detailed command information.
Table 3-1 Mapping Old Commands to New Commands
System Image and Configuration File Load Task List
To load and maintain system images, configuration files, and microcode images needed for access server startup, complete the tasks in the following sections.
Note
The tasks in the first three sections are typical tasks for all access servers. Perform the tasks in the remaining sections as needed for your particular network environment.
•
•
•
•
•
•
•
•
Retrieve System Images and Configuration Files
If you have a minimal configuration that allows you to interact with the system software, you can retrieve other system images and configuration files from a network server and modify them for use in your particular network environment. This section describes tasks related to retrieving system images and configuration files for modification.
Retrieve System Images and Configuration File Task List
When retrieving system images and configuration files, you can perform the following tasks. None of the tasks are mandatory.
•
•
•
•
•
•
•
Copy System Images from a Network Server to Flash Memory
You can copy system images from a TFTP server, an rcp server, or a MOP server. The following sections describe these tasks:
•
•
•
Copy from a TFTP Server to Flash Memory
You can copy a system image from a network server to Flash memory using TFTP by completing the following tasks:
Step 1
See the section "Copy from Flash Memory to a TFTP Server" later in this chapter.
Step 2
copy tftp flash
Step 3
ip-address or name
Step 4
filename
Note
The server system image copied to the Flash memory of the Cisco 2500 series access server must be at least Software release 9.21 or later.
After you issue the copy tftp flash command, the system prompts you for the IP address (or domain name) of the server. This can be another access server serving ROM or Flash system software images. You are then prompted for the filename of the software image. When there is free space available in Flash memory, you are given the option of erasing the existing Flash memory before writing onto it. If no free Flash memory space is available, or if the Flash memory has never been written to, the erase routine is required before new files can be copied. The system will inform you of these conditions and prompt you for a response. Note that the Flash memory is erased at the factory before shipment.
If you attempt to copy a file into Flash memory that is already there, a prompt will tell you that a file with the same name already exists. This file is "deleted" when you copy the new file into Flash. The first copy of the file still resides within Flash memory, but is rendered unusable in favor of the newest version, and will be listed with the "deleted" tag when you use the show flash command. If you terminate the copy process, the newer file will be marked "deleted" because the entire file was not copied and is, therefore, not valid. In this case, the original file in Flash memory is valid and available to the system.
Following is sample output (copying a system image named igs-bfpx.102.1) of the prompt you will see when you use the copy tftp flash command and Flash memory is too full to copy the file. The filename igs-bfpx.102.1 can be in either lowercase or uppercase; the system will interpret IGS-BFPX.102.1 as igs-bfpx.102.1. If more than one file of the same name is copied to Flash, regardless of case, the last file copied will become the valid file.
env-chassis# copy tftp flashIP address or name of remote host [255.255.255.255]? dirtTranslating "DIRT"...domain server (255.255.255.255) [OK]Name of file to copy ? igs-bfpx.102.1Copy igs-bfpx.102.1 from 172.30.13.111 into flash memory? [confirm]Flash is filled to capacity.Erasure is needed before flash may be written.Erase flash before writing? [confirm]Erasing flash EPROMs bank 0Zeroing bank...zzzzzzzzzzzzzzzzVerify zeroed...vvvvvvvvvvvvvvvvErasing bank...eeeeeeeeeeeeeeeeErasing flash EPROMs bank 1Zeroing bank...zzzzzzzzzzzzzzzzVerify zeroed...vvvvvvvvvvvvvvvvErasing bank...eeeeeeeeeeeeeeeeErasing flash EPROMs bank 2Zeroing bank...zzzzzzzzzzzzzzzzVerify zeroed...vvvvvvvvvvvvvvvvErasing bank...eeeeeeeeeeeeeeeeErasing flash EPROMs bank 3Zeroing bank...zzzzzzzzzzzzzzzzVerify zeroed...vvvvvvvvvvvvvvvvErasing bank...eeeeeeeeeeeeeeeeLoading from 172.30.1.111:-[OK - 1906676/4194240 bytes]Verifying via checksum...vvvvvvvvvvvvvvvvvvvvvvvvvvvvvvvvvvvvvvvvvvvvvvvvvvvvvvvvvvvvvvvvvvvvvvvvvvvvvvvvvvvvvvvvvvvvvvvvvvvvvvvvvvvvvvvvvvvvvvvvvvvvvvvvvvvvvvvvvvvvvvvvvvvvvvvvvvvvvvvvvvvvvvvvvvvvvvvvvvvvvvvvvvvvvvvvvvvvvvvvvvvvvvvvvvvvvvvvvvvvvvvvvvvvvvvvvvvvvvvvvvvvvvvvvvvvvvvvvvvvvvvvvvvvvvvvvvvvvvvvvvvvvvvvvvvvvvvvvvvvvvvvvvvvvvvvvvvvvvvvvvvvvvvvvvvvvvvvvvvvvvvvvvvvvvvvvvvvvvvvvvvvvvvvvvvvvFlash verification successful. Length = 1906676, checksum = 0x12AD
Note
Following is sample output from copying a system image named igs-bfpx.102.1 into the current Flash configuration, in which a file of the name igs-bfpx.102.1 already exists:
env-chassis# copy tftp flashIP address or name of remote host [172.30.13.111]?Name of file to copy ? igs-bfpx.102.1File igs-bfpx.102.1 already exists; it will be invalidated!Copy igs-bfpx.102.1 from 172.30.13.111 into flash memory? [confirm]2287500 bytes available for writing without erasure.Erase flash before writing? [confirm]nLoading from 172.30.1.111:-[OK - 1906676/2287500 bytes]Verifying via checksum...vvvvvvvvvvvvvvvvvvvvvvvvvvvvvvvvvvvvvvvvvvvvvvvvvvvvvvvvvvvvvvvvvvvvvvvvvvvvvvvvvvvvvvvvvvvvvvvvvvvvvvvvvvvvvvvvvvvvvvvvvvvvvvvvvvvvvvvvvvvvvvvvvvvvvvvvvvvvvvvvvvvvvvvvvvvvvvvvvvvvvvvvvvvvvvvvvvvvvvvvvvvvvvvvvvvvvvvvvvvvvvvvvvvvvvvvvvvvvvvvvvvvvvvvvvvvvvvvvvvvvvvvvvvvvvvvvvvvvvvvvvvvvvvvvvvvvvvvvvvvvvvvvvvvvvvvvvvvvvvvvvvvvvvvvvvvvvvvvvvvvvvvvvvvvvvvvvvvvvvvvvvvvvvvvvvvvFlash verification successful. Length = 1902192, checksum = 0x12ADIn the following example, the Flash security jumper is not installed, so you cannot write files to Flash memory.
Everest# copy tftp flashFlash: embedded flash security jumper(12V)must be strapped to modify flash memory
Note
You can copy normal or compressed images to Flash memory. You can produce a compressed system image on any UNIX platform using the compress command. Refer to your UNIX platform's documentation for the exact usage of the compress command.
The following example shows sample output from copying a system image named IJ09140Z into the current Flash configuration.
router# copy tftp flashIP address or name of remote host [255.255.255.255]? server1Name of tftp filename to copy into flash []? IJ09140Zcopy IJ09140Z from 172.30.101.101 into flash memory? [confirm] <Return>xxxxxxxx bytes available for writing without erasure.erase flash before writing? [confirm] <Return>Clearing and initializing flash memory (please wait)Building configuration...Loading from 172.30.13.110: -... [OK - 324572/524212 bytes]Verifying checksum...VVVVVVVVVVVVVVVVVVVVVVVVVVVVVVVVVVVVVVVVVVVVVVVVVVVVVVVVVVVVVVVVVVVVV...Flash verification successful. Length = 1204637, checksum = 0x95D9The Building configuration... indicates that each Flash device is being cleared and initialized, one per device. Different access server platforms use different ways of indicating that Flash is being cleared. The spinning star (represented in the sample output by a dash) indicates the copy process. The characters/series of Vs indicates that a checksum is calculated. An O indicates an out-of-order packet. A period (.) indicates a timeout. The last line in the sample configuration indicates that the copy is successful.
Copy from an rcp Server to Flash Memory
You can copy a system image from a network server to Flash memory using rcp. For the rcp command to execute properly, an account must be defined on the network server for the remote username. You can override the default remote username sent on the rcp copy request by configuring the remote username. For example, if the system image resides in the home directory of a user on the server, you can specify that user's name as the remote username. The rcp protocol implementation copies the system image from the remote server relative to the directory of the remote username.
To copy a system image from an rcp server to Flash memory, complete the following task
s:
Note
The server system image copied to the Flash memory of the ASM-CS must be at least Software Release 9.0 or later. For Cisco 2500 series access servers, the system image must be at least, 10.2.
When you issue the copy rcp flash command, the system prompts you for the IP address (or domain name) of the server. This can be another access server serving ROM or Flash system software images. You are then prompted for the filename of the software image; when there is free space available in Flash memory, you are given the option of erasing the existing Flash memory before writing onto it. If no free Flash memory space is available, or if the Flash memory has never been written to, the erase routine is required before new files can be copied. The system will inform you of these conditions and prompt you for a response. If you accept the erasure, the system will prompt you again to confirm before erasing. Note that the Flash memory is erased at the factory before shipment.
If you attempt to copy a file into Flash memory that is already there, a prompt will tell you that a file with the same name already exists. This file is "deleted" when you copy the new file into Flash. The first copy of the file still resides within Flash memory, but is rendered unusable in favor of the newest version, and will be listed with the "deleted" tag when you use the show flash command. If you terminate the copy process, the newer file will be marked "deleted" because the entire file was not copied and is, therefore, not valid. In this case, the original file in Flash memory is valid and available to the system.
The following example copies a system image named IJ09140z from the netadmin1 directory on the remote server named SERVER1.CISCO.COM with an IP address of 172.30.101.101 to the access server's Flash memory. To ensure that enough Flash memory is available to accommodate the system image to be copied, the Cisco IOS software allows you to erase the contents of Flash memory first.
cs1# configure terminalcs1# ip rcmd remote-username netadmin1Ctrl-Zcs1# copy rcp flashSystem flash directory:File name/status 1 IJ09140Z [2076072 bytes used, 21080 bytes available]Address or name of remote host[UNKNOWN]? 172.30.101.101Name of file to copy? IJ09140ZCopy IJ09140z from SERVER1.CISCO.COM?[confirm]Checking for file `IJ09140Z' on SERVER1.CISCO.COM...[OK]Erase flash device before writing?[confirm]Are you sure?[confirm]Erasing device...ezeeze...erased.Connected to 172.30.101.101Loading 2076007 byte file IJ09140Z:--[OK]Verifying checksum... (0x87FD)...[OK]cs1#The spinning star (represented in the sample output by a dash) indicates that the copy process is taking place.
Note
You can copy normal or compressed images to Flash memory. You can produce a compressed system image on any UNIX platform using the compress command. Refer to your UNIX platform's documentation for the exact usage of the compress command.
Copy from a MOP Server to Flash Memory
You can copy a system image from a MOP server to Flash memory. To do so, perform the following task in EXEC mode:
The following example shows a sample output from the copy mop flash command. In this example, the system image junk, which already exists in Flash memory, is copied to Flash memory, and there is enough memory to copy the file without erasing any existing files.
Router# copy mop flashSystem flash directory:File Length Name/status1 984 junk [deleted]2 984 junk[2096 bytes used, 8386512 available, 8388608 total]Source file name? junkDestination file name [junk]?Erase flash device before writing? [confirm]Flash contains files. Are you sure you want to erase? [confirm]Copy 'junk' from serveras 'junk' into Flash WITH erase? [yes/no]yesErasing device... eeeeeeeeeeeeeeeeeeeeeeeeeeeeeeee ...erasedLoading junk from 1234.5678.9abc via Ethernet0: ![OK - 984/8388608 bytes]Verifying checksum... OK (0x14B3)Flash copy took 0:00:01 [hh:mm:ss]Copy Configuration Files from a Network Server to the Access Server
You can also copy configuration files from a TFTP server or an rcp server to the access server. You might use this process to restore a configuration file to the access server if you have backed up the file to a server. If you replace an access server and want to use the configuration file that you created for the original access server, you can restore that file instead of recreating it. You can also use this process to copy to the access server a different configuration that is stored on a network server.
The following sections describe these tasks:
•
•
Copy from a TFTP Server to the Access Server
You can copy a configuration file from a TFTP server to the running configuration or to the startup configuration. When you copy a configuration file to the running configuration, you copy to and run the file from RAM.
When you copy a configuration file to the startup configuration, you copy it to the nonvolatile random-access memory (NVRAM).
To copy a configuration file from a TFTP server to the access server, complete the following tasks:
Copy from an rcp Server to the Access Server
You can copy a configuration file from an rcp server to the local access server. As with TFTP, you can copy a configuration file to the running configuration or to the startup configuration. When you copy a configuration file to the running configuration, you copy to and run the file from RAM.
When you copy a configuration file to the startup configuration, you copy it to NVRAM.
The rcp protocol requires that a client send the remote username on each rcp request to a network server. When you issue a request to copy a configuration file from an rcp network server, the access server sends a default remote username unless you override the default by configuring a remote username. As the default value of the remote username, the Cisco IOS software sends the remote username associated with the current TTY process, if that name is valid. If the TTY username is invalid, the software uses the access server host name as both the remote and local usernames. You can also specify the path of an existing directory along with the remote username.
For the rcp copy request to execute successfully, an account must be defined on the network server for the remote username. If you copy the configuration file from a personal computer used as a file server, the remote host computer must support the remote shell protocol.
Copy a Configuration File to the Running Configuration
You can copy a configuration file from an rcp server to the running configuration.
A host configuration file contains commands that apply to one network server in particular. A network configuration file contains commands that apply to all network servers on a network.
To copy a configuration file from an rcp server to the running configuration, perform the following tasks:
The following example copies a host configuration file named host1-confg from the netadmin1 directory on the remote server with an IP address of 172.108.101.101, and loads and runs that file on the access server:
Router# configure terminalRouter(config)# ip rcmd remote-username netadmin1^ZRouter# copy rcp running-configHost or network configuration file [host]?Address of remote host [255.255.255.255]? 172.108.101.101Name of configuration file [Router-confg]? host1-confgConfigure using host1-confg from 172.108.101.101? [confirm]Connected to 172.108.101.101Loading 1112 byte file host1-confg:![OK]Router#%SYS-5-CONFIG: Configured from host1-config by rcp from 172.108.101.101Copy a Configuration File to the Startup Configuration
You can retrieve the commands stored in a configuration file on a server and write them to the startup configuration.
A host configuration file contains commands that apply to one network server in particular. A network configuration file contains commands that apply to all network servers on a network.
To copy a configuration file from an rcp server to the startup configuration, perform the following tasks:
The following example specifies a remote username of netadmin1. Then it copies a host configuration file host2-confg from the netadmin1 directory on the remote server with an IP address of 172.108.101.101 to the access server's NVRAM.
Rtr2# configure terminalRtr2# ip rcmd remote-username netadmin1^ZRtr2# copy rcp startup-configHost or network configuration file [host]?Address of remote host [255.255.255.255]? 172.108.101.101Name of configuration file[rtr2-confg]? host2-confgConfigure using rtr2-confg from 172.131.101.101?[confirm]Connected to 172.131.101.101Loading 1112 byte file rtr2-confg:![OK][OK]Rtr2#%SYS-5-CONFIG_NV:Non-volatile store configured from rtr2-config by rcp from 172.108.101.101Change the Buffer Size for Loading Configuration Files
The buffer that holds the configuration commands is generally the size of NVRAM. Complex configurations might need a larger configuration file buffer size. To change the buffer size, complete the following tasks:
In the following example, the buffer size is set to 50000 bytes:
Router1# configure terminalRouter1(config)# boot buffersize 50000^ZRouter1# copy running-config startup-configCompress Configuration Files
On access servers that are equipped with nonvolatile memory, you can compress configuration files. To compress configuration files, perform the following tasks:
Installing new ROMs is a one-time operation, and is only necessary if you do not already have Cisco Internetwork Operating System (Cisco IOS) Release 10.2 in ROM. Before you can load a configuration file that is larger than the size of nonvolatile memory, you must issue the service compress-config command. The configure terminal command works only if you have Cisco IOS Release 10.2 boot ROMs.
Verify the Image in Flash Memory
Before booting from Flash memory, verify that the checksum of the image in Flash memory matches the checksum listed in the README file that was distributed with the system software image. The checksum of the image in Flash memory is displayed at the bottom of the screen when you issue the copy tftp flash, copy rcp flash, or copy rcp bootflash commands. The README file was copied to the network server automatically when you installed the system software image on the server.
CautionIf the checksum value does not match the value in the README file, do not reboot the router. Instead, issue the copy request and compare the checksums again. If the checksum is repeatedly wrong, copy the original system software image bootstrap image back into Flash memory before you reboot the router from Flash memory. If you have a corrupted image in Flash memory and try to boot from Flash, the router will start the system image contained in ROM (assuming booting from a network server is not configured). If ROM does not contain a fully functional system image, the router will not function and must be reconfigured through a direct console port connection.
Display System Image and Configuration Information
Perform the following tasks in EXEC mode to display information about system software, system image files, and configuration files:
You can also use the o command in ROM monitor mode to list the configuration register settings on some models.
The Flash memory content listing does not include the checksum of individual files. To recompute and verify the image checksum after the image is copied into Flash memory, complete the following task in EXEC mode:
Recompute and verify the image checksum after the image is copied into Flash memory.
verify flash
When you enter this command, the screen prompts you for the filename to verify. By default, it prompts for the last (most recent) file in Flash memory. Press Return to recompute the default file checksum or enter the filename of a different file at the prompt. Note that the checksum for microcode images is always 0x0000. The following example illustrates how to use this command:
Router# verify flash

Name of file to verify [gsxx]?
Verifying via checksum...
vvvvvvvvvvvvvvvvvvvvvvvvvvvvv

Flash verification successful. Length = 1923712, checksum = 0xA0C1
Router#
Reexecute the Configuration Commands in Nonvolatile Memory
To reexecute the configuration commands in nonvolatile memory, perform the following task in EXEC mode:
Clear the Configuration Information
To clear the contents of your startup configuration, perform the following task in EXEC mode:
Perform General Startup Tasks
When modifying your network environment, you perform some general startup tasks. For example, to modify a configuration file, you enter configuration mode. You also modify the configuration register boot field to tell the access server if and how to load a system image upon startup. Also, instead of using the default system image and configuration file to start up, you can specify a particular system image and configuration file that the access server uses to start up.
General Startup Task List
General startup tasks include the following:
•
•
•
•
Additionally, you can take this startup option:
•
Enter Global Configuration Mode and Select a Configuration Source
To enter global configuration mode, enter the EXEC command configure at the privileged EXEC prompt. The access server responds with the following prompt asking you to specify the terminal or nonvolatile memory, or a file stored on a network server as the source of configuration commands:
Configuring from terminal, memory, or network [terminal]?These three methods are described in the next three sections:
•
•
•
The access server accepts one configuration command per line. You can enter as many configuration commands as you want.
You can add comments to a configuration file describing the commands you have entered. Precede a comment with an exclamation point (!). Comments are not stored in nonvolatile memory or in the active copy of the configuration file. In other words, comments do not appear when you list the active configuration with the show running-config EXEC command or list the configuration in nonvolatile memory with the show configuration EXEC command. Comments are stripped out of the configuration file when it is loaded to the access server. However, you can list the comments in configuration files stored on a TFTP or MOP server.
Configure the Access Server from the Terminal
To configure the access server from the terminal, complete the following tasks:
In the following example, the access server is configured from the terminal. The comment "The following command provides the access server host name" identifies the purpose of the next command line. The hostname command changes the access server name from cs1 to cs2. By pressing Ctrl-Z, the user quits configuration mode. The command write memory loads the configuration changes into nonvolatile memory.
cs1# configure terminalcs1(config)# !The following command provides the communication server host name.cs1(config)# hostname cs2Ctrl-Zcs2# copy running-config startup-configWhen the startup configuration is NVRAM, it stores the current configuration information in text format as configuration commands, recording only nondefault settings. The memory is checksummed to guard against corrupted data.
As part of its startup sequence, the access server startup software always checks for configuration information in nonvolatile memory. If nonvolatile memory holds valid configuration commands, the access server executes the commands automatically at startup. If the access server detects a problem with the nonvolatile memory or the configuration it contains, it enters setup mode and prompts for configuration. Problems can include a bad checksum for the information in nonvolatile memory or the absence of critical configuration information. See the publication Troubleshooting Internetworking Systems for troubleshooting procedures. See the Access and Communication Servers Getting Started Guide for details on setup.
Configure the Access Server from Memory
You can configure the access server from nonvolatile memory by reexecuting the configuration commands stored in nonvolatile memory. To do so, complete the following task in privileged EXEC mode:
Configure the Access Server from the Network
You can configure the access server by retrieving a configuration file from one of your network servers and loading it to the access server's running configuration. To do so, complete the following tasks:
In the following example, the access server is configured from the file tokyo-config at IP address 172.30.2.155:
Router# copy tftp running-configHost or network configuration file [host]?IP address of remote host [255.255.255.255]? 172.30.2.155Name of configuration file [tokyo-confg]?Configure using tokyo-confg from 172.30.2.155? [confirm] yBooting tokyo-confg from 172.30.2.155:!! [OK - 874/16000 bytes]Copy a Configuration File Directly to the Startup Configuration
You can copy a configuration file directly to your startup configuration without affecting the running configuration. This task loads a configuration file directly into NVRAM without affecting the running configuration.
To copy a configuration file directly to the startup configuration, perform the following task in EXEC mode:
Load a configuration file directly into NVRAM without affecting the running configuration.
copy [tftp | rcp] startup-config
Modify the Configuration Register Boot Field
The configuration register boot field determines whether or not the router loads an operating system image, and if so, where it obtains this system image. The following sections describe the access server's process for using the configuration register boot field, your process for setting this field, and the tasks you must perform to modify the configuration register boot field.
How the Access Server Uses the Boot Field
The lowest four bits of the 16-bit configuration register (bits 3, 2, 1, and 0) form the boot field. Bit zero (0) of the boot field specifies whether or not the access server loads an operating system image, according to the following criteria:
•
•
•
When loading a default system image from a network server, the router uses the configuration register settings to determine the default system image filename for booting from a network server. The router forms the default boot filename by starting with the word cisco and then appending the octal equivalent of the boot field number in the configuration register, followed by a hyphen (-) and the processor type name (cisconn-cpu). See the appropriate hardware installation guide for details on the configuration register and default filename.
Setting the Boot Field
You must correctly set the configuration register boot field to ensure that your access server loads the operating system image as you intend. To set the boot field, follow this general procedure:
Step 1
Step 2
•
•
•
For example, if the current configuration register setting is 0x2010 and you want to load a system image from boot ROMs rather than manually from ROM monitor mode, you would change the configuration register setting to 0x2011.
Step 3
Perform the Boot Field Modification Tasks
For the ASM-CS and Cisco 2500 series running Software Release 9.1 or later, you can change the configuration register boot field by completing the following tasks:
In the following example, the show version command indicates that the current configuration register is set so that the access server does not automatically load an operating system image. Instead, it enters ROM monitor mode and waits for user-entered ROM monitor commands. The new setting instructs the access server to a load a system image from commands in the startup configuration file or from a default system image stored on a network server.
Router1# show versionGS Software, Version 9.0(1)Copyright (c) 1986-1992 by cisco Systems, Inc.Compiled Fri 14-Feb-92 12:37System Bootstrap, Version 4.3Router1 uptime is 2 days, 10 hours, 0 minutesSystem restarted by reloadSystem image file is unknown, booted via tftp from 131.108.13.111Host configuration file is "thor-boots", booted via tftp from 131.108.13.111Network configuration file is "network-confg", booted via tftp from131.108.13.111CSC3 (68020) processor with 4096K bytes of memory.X.25 software.Bridging software.1 MCI controller (2 Ethernet, 2 Serial).2 Ethernet/IEEE 802.3 interface.2 Serial network interface.32K bytes of non-volatile configuration memory.Configuration register is 0x0Router1# configure terminalRouter1(config)# config-register 0xF^ZRouter1# reloadSpecify the Startup System Image
You can enter multiple boot commands in nonvolatile memory configuration to provide backup methods for loading a system image onto the access server. There are three ways to load a system image:
•
•
•
You can enter the different types of boot commands in any order in nonvolatile memory configuration. If you enter multiple boot commands, the access server tries them in the order they are entered.
Load from Flash Memory
Flash memory is available for the ASM-CS. With a CSC-MC+ Flash memory card and CSC-MCI controller and appropriate cables, system software images can be written to Flash memory for booting. Depending on the hardware platform, Flash memory might be available as EPROMs, single in-line memory modules (SIMMs), or memory cards. Check the appropriate hardware installation and maintenance guide for information about types of Flash memory available on a specific platform.
Software images can be stored, booted, and rewritten into Flash memory as necessary. Flash memory can reduce the effects of network failure by reducing dependency on files that can only be accessed over the network.
Flash memory allows you to do the following:
•
•
•
•
Note
Flash memory features include the following:
•
•
•
Note
Security Precautions
Take the following precautions when loading from Flash memory:
•
•
•
Flash Memory Configuration
The following list is an overview of how to configure your system to boot from Flash memory. It is not a step-by-step set of instructions; rather, it is an overview of the process of using the Flash capability.
Refer to the appropriate Cisco hardware installation and maintenance publication for complete instructions for installing the hardware and for information about the jumper settings required for your configuration.
Step 1
•
•
Step 2
Step 3
Step 4
Step 5
Step 6
Configure the Access Server to Automatically Boot from an Image in Flash Memory
Once you have successfully configured Flash memory, you might want to configure the system with the no boot system flash command to revert back to booting from ROM.
To configure the access server to boot automatically from an image in Flash memory, complete the following tasks:
Automatically booting from Flash memory requires changing the processor's configuration register. See the section entitled "Modifying the Configuration Register Boot Field" earlier in this chapter. Use the show version command to list the current configuration register setting.
If you enter more than one image filename, the access server tries them in the order entered.
If a filename already appears in the configuration file and you want to specify a new filename, remove the existing filename with the no boot system flash filename command.
Note
The following example shows how to configure the access server to automatically boot from an image in Flash memory on a Cisco 2500:
Router# configure terminalEnter configuration commands, one per line. End with CNTL/Z.Router(config)# boot system flash igs-bfpx.102.1Router(config)# config-register 0x2Ctrl-ZRouter# copy running-config startup-config########[ok]Router# reload[confirm]System Bootstrap, Version (3.3), SOFTWARECopyright (c) 1986-1995 by Cisco Systems2500 processor with 1024 Kbytes of main memoryBooting igs-bfpx.102.1 from Flash address spaceF3: 3911536+96836+319604 at 0x3000060Restricted Rights LegendUse, duplication, or disclosure by the Government issubject to restrictions as set forth in subparagraph(c) of the Commercial Computer Software - RestrictedRights clause at FAR sec. 52.227-19 and subparagraph(c) (1) (ii) of the Rights in Technical Data and ComputerSoftware clause at DFARS sec. 252.227-7013.Cisco Systems, Inc.170 West Tasman DriveSan Jose, California 95134-17063000 Software (IGS-BFPX), Version 10.2Copyright (c) 1986-1994 by Cisco Systems, Inc.Compiled Tue 05-Jul-94 16:14% System running from device (System flash) being initialized.Setting System flash access to read-only.SNMP Research SNMP Agent Resident Module Version 12.2.0.0Copyright 1989, 1990, 1991, 1992, 1993, 1994 SNMP Research, Inc.cisco 2500 (68030) processor (revision A) with 1024K/1024K bytes of memory.Processor board serial number 01244583X.25 software, Version 2.0, NET2, BFE and GOSIP compliant.Bridging software.SuperLAT software (copyright 1990 by Meridian Technology Corp).Authorized for Enterprise software set. (0x0)1 Ethernet/IEEE 802.3 interface.2 Serial network interfaces.16 terminal lines.32K bytes of non-volatile configuration memory.4096K bytes of processor board System flash. (Read only mode)Press RETURN to get started!Load from a Network Server
You can configure the access server to load a system image from a network server using TFTP, rcp, or MOP to copy the system image file.
To do this, the configuration register boot field must be set to the correct value. See "Modify the Configuration Register Boot Field" later in this chapter. Use the show version command to list the current configuration register setting.
If you do not boot from a network server using MOP and you do not specify the TFTP or rcp server, by default the system image that you specify is booted from a network server using TFTP.
Note
For increased performance and reliability, boot from a system image from a network server using rcp. The rcp protocol implementation uses the Transmission Control Protocol (TCP), which ensures reliable delivery of data.
If you boot the access server from a network server using rcp, the Cisco IOS software searches for the system image on the server relative to the directory of the remote username.You cannot explicitly specify a remote username when you issue the boot command. Instead, the host name configured for the access server is used.
You can also boot from a compressed image on a network server. One reason to use a compressed image is to ensure that there is enough memory available for storage. On access servers that do not contain a run-from-ROM image in EPROM, when the access server boots software from a network server, the image being booted and the running image both must fit into memory. If the running image is large, there might not be room in memory for the image being booted from the network server.
If there is not enough room in memory to boot a regular image from a network server, you can produce a compressed software image on any UNIX platform using the compress command. Refer to your UNIX platform's documentation for the exact usage of the compress command.
To specify the loading of a system image from a network server, complete the following tasks.
In the following example, the access server is configured to use rcp to netboot from the testme5.tester system image file on a network server at IP address 172.30.0.1:
Router# configure terminalRouter(config)# boot system rcp testme5.tester 172.30.0.1Ctrl-ZRouter# copy running-config startup-configLoad from ROM
To specify the use of the ROM system image as a backup to other boot instructions in the configuration file, complete the following tasks:
In the following example, the access server is configured to boot a Flash image called image1 first. If the Flash image fails, the access server boots the configuration file backup1 from a network server. If this method fails, then the system will boot from ROM.
Router# configure terminalRouter(config)# boot system flash image1Router(config)# boot system backup1 172.30.20.4Router(config)# boot system romCtrl-ZRouter# copy running-config startup-configUse a Fault-Tolerant Boot Strategy
Occasionally, network failures make netbooting impossible. To lessen the effects of network failure, consider the following boot strategy. After Flash is installed and configured, you might want to configure the access server to boot in the following order:
1
2
3
This boot order provides the most fault-tolerant alternative in the netbooting environment. Use the following commands in your configuration to allow you to boot first from Flash, then from a system file, and finally from ROM:
The order of the commands needed to implement this strategy is shown in the following example:
Router# configure terminalRouter(config)# boot system flash gsxxRouter(config)# boot system gsxx 172.30.101.101Router(config)# boot system romCtrl-ZRouter# copy running-config startup-config[ok]Router#Using this strategy, an access server used primarily in a netbooting environment has three alternative sources from which to boot. These alternative sources help lessen the negative effects of a failure with the TFTP file server and of the network in general.
Specify the Startup Configuration File
Configuration files can be stored on network servers. You can configure the access server to automatically request and receive two configuration files from the network server:
•
•
The first file the server attempts to load is the network configuration file. The network configuration file contains information that is shared among several access servers. For example, it can be used to provide mapping between IP addresses and host names.
The second file the server attempts to load is the host configuration file. This file contains commands that apply to one access server in particular. Both the network and host configuration files must reside on a network server reachable using TFTP, rcp, or MOP and be readable.
You can specify an ordered list of network configuration and host configuration filenames. The access server scans this list until it successfully loads the appropriate network or host configuration file.
Download the Network Configuration File
To configure the access server to download a network configuration file from a server upon restart, complete the following tasks.
For Step 2, if you do not specify a network configuration filename, the access server uses the default filename network-confg. If you do not specify a TFTP or rcp server, the access server assumes that you are using TFTP to transfer the file and that the server whose IP address you specify supports TFTP.
If you configure the access server to download the network configuration file from a network server using rcp, the Cisco IOS software searches for the system image on the server relative to the directory of the remote username. The access server host name is used as the remote username.
You can specify more than one network configuration file. The access server tries each of them in order until it loads one successfully. This procedure can be useful for keeping files with different configuration information loaded on a network server.
Download the Host Configuration File
To configure the access server to download a host configuration file from a server upon restart, complete the following tasks. Step 2 is optional. If you do not specify a host configuration filename, the access server uses its own name to form a host configuration filename by converting the access server name to all lowercase letters, removing all domain information, and appending -confg. If no host name information is available, the access server uses the default host configuration filename cs-confg.
You can specify more than one host configuration file. The access server tries them in order until it loads one successfully. This procedure can be useful for keeping files with different configuration information loaded on a network server.
In the following example, the access server is configured to boot from the host configuration file hostfile1 and from the network configuration file networkfile1:
Router# configure terminalRouter(config)# boot host hostfile1Router(config)# boot network networkfile1Router(config)# service configCtrl-ZRouter# copy running-config startup-configIf the network server fails to load a configuration file during startup, it tries again every ten minutes (default setting) until a host provides the requested files. With each failed attempt, the network server displays a message on the console terminal. If the network server is unable to load the specified file, it displays the following message:
Booting host-confg... [timed out]Refer to the Troubleshooting Internetworking Systems publication for troubleshooting procedures. If there are any problems with the configuration file pointed to in nonvolatile memory, or the configuration register is set to ignore nonvolatile memory, the access server will enter the setup command facility. See the Access and Communication Servers Getting Started Guide for details on the setup command.
Store System Images and Configuration Files
After modifying and saving your access server's unique configurations, you can store them on a network server to use as backup copies.
Store System Images and Configuration Files Task List
To store system images and configuration files, perform the following tasks:
•
•
Copy System Images from Flash Memory to a Network Server
You can copy system images from Flash memory to a TFTP server or to an rcp server. You can use this server copy of the system image as a backup copy, or you can use it to verify that the copy in Flash is the same as the original file on disk. The following sections describe these tasks:
•
•
Copy from Flash Memory to a TFTP Server
You can use TFTP to copy a system image back to a network server. This copy of the system image can serve as a backup copy and also can be used to verify that the copy in Flash is the same as on the original file on disk. In some implementations of TFTP, you must first create a "dummy" file on the TFTP server and give it read, write, and execute permissions before copying a file over it. Refer to your TFTP documentation for more information.To copy the system image to a network server, perform the following task:
The following example uses the show flash all command to determine the name of the system image file and the copy flash tftp command to copy the system image to a TFTP server. The name of the system image file (xk09140z) is listed near the end of the show flash all output.
Router# show flash allSystem flash directory:File name/statusaddr length fcksum ccksum1 igs-bfpx.102.10x40 4008404 0x35B3 0x35B3[4008468 bytes used, 185836 bytes available]4096K bytes of processor board System flash. (Read only mode)System flash chips could not be identified.Check the Vpp (12V) jumper installation (if present)and/or the chips/SIMMs installed.Flash chips supported by system :Code Chip-Sz Cmd-grp Chip-name89B4 0x20000 1 INTEL 28F01089BD 0x40000 1 INTEL 28F02001A7 0x20000 1 AMD 28F010012A 0x40000 1 AMD 28F0201CD0 0x40000 1 M5M 28F101P89A2 0x100000 2 INTEL 28F008SA2048K bytes of flash memory on embedded flash (in XX).ROM socket code bytes name0 U42 89BD 0x40000 INTEL 28F0201 U44 89BD 0x40000 INTEL 28F0202 U46 89BD 0x40000 INTEL 28F0203 U48 89BD 0x40000 INTEL 28F0204 U41 89BD 0x40000 INTEL 28F0205 U43 89BD 0x40000 INTEL 28F0206 U45 89BD 0x40000 INTEL 28F0207 U47 89BD 0x40000 INTEL 28F020security jumper(12V) is installed,flash memory is programmable.file offset length name0 0x40 1204637 xk09140z[903848/2097152 bytes free]Router# copy flash tftpIP address of remote host [255.255.255.255]? 172.30.13.110filename to write on tftp host? igs-bfpx.102.1writing igs-bfpx.102.1 -successful tftp write.To stop the copy process, press Ctrl-^. Refer to the Troubleshooting Internetworking Systems publication for procedures on how to resolve Flash memory problems.
Once you have configured Flash memory, you might want to configure the system (using the configure terminal command) with the no boot system flash configuration command to revert to booting from ROM (for example, if you do not yet need this functionality, if you choose to netboot, or if you do not have the proper image in Flash memory). After you enter the no boot system flash command, use the copy running-config startup-config command to save the new configuration command to nonvolatile memory.
Copy from Flash Memory to an rcp Server
You can also copy a system image from Flash memory to an rcp network server.
The rcp protocol requires that a client send the remote username on each rcp request to the server. When you copy an image from Flash memory to a network server using rcp, the Cisco IOS software sends the remote username associated with the current TTY (terminal) process, if that name is valid. If the TTY remote username is invalid, the software uses the host name as both the remote and local usernames.
Note
You can configure a different remote username to be sent to the server. The rcp protocol implementation writes the system image relative to the directory associated with the remote username on the network server, if the server has a directory structure (for example, UNIX directory structures).
For the rcp command to execute properly, an account must be defined on the destination server for the remote username.
To stop the copy process, press Ctrl-^. Refer to the Troubleshooting Internetworking Systems publication for procedures on how to resolve Flash memory problems.
If you copy the system image to a personal computer used as a file server, the computer must support the rcp protocol.
To copy the system image from Flash memory to a network server, perform the following tasks:
The following example copies the system image gsxx to a network server using rcp:
Router# configure terminalRouter(config)# ip rcmd remote-username netadmin1^Z Router# copy flash rcpSystem flash directory:File name/status 1 gsxx [2076072 bytes used, 21080 bytes available]Name of file to copy? gsxxAddress or name of remote host [UNKNOWN]? 131.108.1.111File name to write to? gsxxVerifying checksum for `gsxx' (file # 1)...[OK]Writing gsxx -Router#The spinning star (represented by a dash in the sample output) indicates that the copy process is taking place.
Copy Configuration Files from the Access Server to a Network Server
You can copy configuration files from the access server to a TFTP server or rcp server. You can do this to back up a current configuration file to a server before changing its contents, thereby allowing you to later restore the original configuration file from the server. The following sections describe these tasks:
•
•
Copy from the Access Server to a TFTP Server
Usually, the configuration file that you copy to must already exist on the TFTP server and be globally writable before the TFTP server allows you to write to it.
To store configuration information on a TFTP network server, complete the following tasks in the EXEC mode:
The command prompts you for the destination host's address and a filename, as the following example illustrates.
The following example copies a configuration file from an access server to a TFTP server:
Tokyo# copy running-config tftpRemote host [172.108.2.155]?Name of configuration file to write [tokyo-confg]?Write file tokyo-confg on host 172.108.2.155? [confirm] y#Writing tokyo-confg - [OK]Copy from the Access Server to an rcp Server
You can use rcp to copy configuration files from the local access server to a network server. You can copy a running configuration file or a startup configuration file to the server.
The rcp protocol requires that a client send the remote username on each rcp request to a server. When you issue a command to copy a configuration file from the access server to a server using rcp, the router sends a default remote username unless you override the default by configuring a remote username. As the default value of the remote username, the Cisco IOS software sends the remote username associated with the current TTY (terminal) process, if that name is valid.
Note
If the TTY remote username is invalid, the Cisco IOS software uses the host name as both the remote and local usernames. The rcp protocol implementation writes the configuration file relative to the directory associated with the remote username on the server, if the server has a directory structure, as do UNIX systems.
For the rcp copy request to execute successfully, an account must be defined on the network server for the remote username.
If you copy the configuration file to a personal computer used as a file server, the computer must support rcp.
To copy a startup configuration file or a running configuration file from the router to an rcp server, use one of following tasks:
•
•
Copy a Running Configuration File to an rcp Server
You can copy the running configuration file to an rcp server. The copied file can serve as a backup configuration file.
To store a running configuration file on a server, complete the following tasks:
The following example copies the running configuration file named Rtr2-confg to the netadmin1 directory on the remote host with an IP address of 172.108.101.101:
Rtr#2 configure terminalRtr2# ip rcmd remote-username netadmin1^ZRtr2# copy running-config rcpRemote host[]? 172.108.101.101Name of configuration file to write [Rtr2-confg]?Write file rtr2-confg on host 172.108.101.101?[confirm]###![OK]Connected to 172.108.101.101Rtr2#Copy a Startup Configuration File to an rcp Server
You can copy the contents of the startup configuration file to an rcp server. The copied file can be used as a backup configuration file.
To copy a startup configuration file to a network server using rcp, complete the following tasks:
The following example shows how to store a startup configuration file on a server by using rcp to copy the file:
Rtr2# configure terminalRtr2# ip rcmd remote-username netadmin2^ZRtr2# copy startup-config rcpRemote host[]? 172.108.101.101Name of configuration file to write [rtr2-confg]?Write file rtr2-confg on host 172.108.101.101?[confirm]![OK]Configure the Access Server as a Network Server
You can configure an access server as a network server to cut costs and time delays in your network. Typically, the access server configured as a server delivers operating system images from its Flash memory to other access servers or routers. You can also configure the access server to respond to other types of service requests, such as Reverse Address Resolution Protocol (RARP).
Configure an Access Server as a Network Server Task List
To configure the router as a server, perform any of the following tasks. The tasks are not mutually exclusive.
•
•
•
Configure an Access Server as a TFTP Server
As a TFTP server host, the access server responds to TFTP Read Request messages by sending a copy of the system image contained in ROM or one of the system images contained in Flash to the requesting host. The TFTP Read Request message must use one of the filenames that are specified in the access server's configuration.
You can specify multiple filenames by repeating the tftp-server command. The system sends a copy of the system image contained in ROM or one of the system images contained in Flash memory to any host that issues a TFTP read request with this filename.
If the specified filename1 or filename2 exists in Flash memory, a copy of the Flash image is sent. On systems that contain a complete image in ROM, the system sends the ROM image if the specified filename1 or filename2 is not found in Flash memory.
Images that run from ROM cannot be loaded over the network. Therefore, do not use TFTP to offer the ROMs on these images.
To specify TFTP server operation for an access server, complete the following tasks:
The TFTP session can sometimes fail. TFTP generates the following special characters to help you determine why a TFTP session fails:
•
•
•
The transfer session might still succeed even if TFTP generates these characters, but the output is useful for diagnosing the transfer failure. For troubleshooting procedures, refer to the Troubleshooting Internetworking Systems publication.
In the following example, the system uses TFTP to send a copy of the version-10.3 file located in Flash memory in response to a TFTP Read Request for that file. The requesting host is checked against access list 22.
tftp-server flash version-10.3 22Configure Flash Memory as a TFTP Server
Flash memory can be used as a TFTP file server for other access servers on the network. This feature allows you to boot a remote access server with an image that resides in the Flash server memory.
In the description that follows, one access server is referred to as the Flash server, and all other access servers are referred to as client access servers. Examples of configurations for the Flash server and client access servers include commands as necessary.
Configure Flash Memory as a TFTP Server Task List
To configure Flash memory as a TFTP server, perform the following tasks:
•
Perform Prerequisite Tasks
The Flash server and client access server must be able to reach one another before the TFTP function can be implemented. Verify this connection by pinging between the Flash server and client access server (in either direction) using the ping command, as in the following example:
router# ping 172.30.101.101 <Return>In this example, the IP address of 172.30.101.101 belongs to the client access server. Connectivity is indicated by !!!!!, and ... [timed out] or [failed] indicates no connection. If the connection fails, reconfigure the interface, check the physical connection between the Flash server and client access server, and ping again.
After you verify the connection, ensure that a TFTP-bootable image is present in Flash memory. This is the system software image the client access server will boot. Note the name of this software image so you can verify it after the first client boot.
Note
CautionFor full functionality, the software residing in the Flash memory must be the same type as the ROM software installed on the client access server. For example, if the server has X.25 software, and the client does not have X.25 software in ROM, the client will not have X.25 capabilities after booting from the server's Flash memory.
Configure the Flash Server
Perform the following task to configure the Flash server:
The following example illustrates how to configure the Flash server. This example gives the filename of the software image in the Flash server and one access list (labeled 1). The access list must include the network where the client access server resides. Thus, in the example, the network 172.30.101.0 and any client access servers on it are permitted access to the Flash server filename igs-bfpx.102.1.
Server# configure terminalEnter configuration commands, one per line.Edit with DELETE, CRTL/W, and CRTL/U; end with CTRL/ZServer# tftp-server flash igs-bfpx.102.1Server# access-list 1 permit 172.30.101.0 0.0.0.255Ctrl-ZServer# copy running-config startup-config <Return>[ok]Configure the Client Access Server
Configure the client access server to first load a system image from the Flash server. As a backup, configure the client access server to then load its own ROM image if the load from a Flash server fails.
Perform the following task to configure the Flash server:
CautionUsing the no boot system command in the following example will invalidate all other boot system commands currently in the client access server system configuration. Before proceeding, determine whether the system configuration stored in the client access server should first be saved (uploaded) to a TFTP file server to be used as a backup copy.
The following example illustrates how to use these commands:
Server# configure terminalEnter configuration commands, one per line.Edit with DELETE, CRTL/W, and CRTL/U; end with CTRL/ZServer# no boot systemServer# boot system gs7-k.11.0 172.36.98.11Server# boot system romServer# config register 0x010F^zServer# copy running-config startup-config[ok]Server# reloadIn this example, the no boot system command invalidates all other boot system commands currently in the configuration memory, and any boot system commands entered after this command will be executed first. The second command, boot system filename address, tells the client access server to look for the file gs7-k11.0 in the Flash server with an IP address of 172.36.98.11. If this fails, the client access server will boot from its system ROM upon the boot system rom command, which is included as a backup in case of a network problem. The copy running-config startup-config command copies the configuration to NVRAM.
CautionThe system software to be booted from the Flash server must reside in Flash memory on the server. If it is not in the Flash memory, the client access server will boot the Flash server's system ROM.
Use the show version command on the client access server to verify that the software image booted from the Flash server is the image present in Flash memory.
Following is sample output of the show version command:
env-chassis> show versionGS Software (GS7), Version 9.1.17Copyright (c) 1986-1992 by cisco Systems, Inc.Compiled Wed 21-Oct-92 22:49System Bootstrap, Version 4.6(0.15)Current date and time is Thu 10-22-1992 13:15:03Boot date and time is Thu 10-22-1992 13:06:55env-chassis uptime is 9 minutesSystem restarted by power-onSystem image file is "gs7-k.9.17", booted via tftp from 131.131.111.111RP1 (68040) processor with 16384K bytes of memory.X.25 software.Bridging software.1 Switch Processor.1 EIP controller (6 Ethernet).6 Ethernet/IEEE 802.3 interface.128K bytes of non-volatile configuration memory.4096K bytes of flash memory on embedded flash (in RP1).Configuration register is 0x010FThe important information in this example is contained in the first line (GS Software...) and in the line that begins with "System image file...." The "GS Software..." line shows the version of the operating system in the client router's RAM. The "System image file...." line show the filename of the system image loaded from the Flash server.
Note
Verify that the software shown in the first line of the show version output is the software residing in the Flash server memory.
Configure an Access Server as a RARP Server
You can configure the access server as a RARP server. This feature enables the access server to answer RARP requests, making diskless booting of various systems possible (for example, Sun workstations or PCs on networks where the client and server are on separate subnets).
To configure the access server as a RARP server, perform the following task in interface configuration mode:
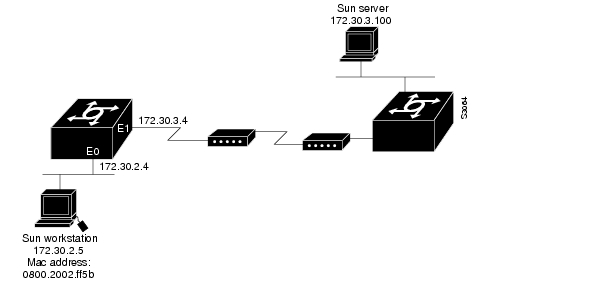
Figure 3-1 Configuring an Access Server as a RARP Server
In the following example, the access server is configured to act as a RARP server.
illustrates the network configuration.! Allow the access server to forward broadcast portmapper requestsip forward-protocol udp 111! Provide the access server with the IP address of the diskless sunarp 172.30.2.5 0800.2002.ff5b arpainterface ethernet 0! Configure the access server to act as a RARP server, using the Sun Server's! IP address in the RARP response packet.ip rarp-server 172.30.3.100! Portmapper broadcasts from this interface are sent to the Sun Server.ip helper-address 172.30.3.100The Sun client and server machine's IP addresses must use the same major network number due to a limitation of the current SunOS rpc.BOOTParamd daemon.
Configure for Other Types of Servers
You can configure the access server to work with various types of servers to forward different types of service requests.
Configure for Other Types of Servers Task List
You can configure the router to forward extended BOOTP requests over asynchronous interfaces and MOP server boot requests. The following sections describe these tasks. The tasks are not mutually exclusive.
•
•
Specify Asynchronous Interface Extended BOOTP Requests
The Boot Protocol (BOOTP) server for asynchronous interfaces supports the extended BOOTP requests specified in RFC 1084. The following command is useful when using the auxiliary port as an asynchronous interface. To configure extended BOOTP requests, perform the following task in global configuration mode:
You can display the extended BOOTP requests by performing the following task in EXEC mode:
Specify MOP Server Boot Requests
To change the access server's parameters for retransmitting boot requests to a MOP server, complete the following tasks:
By default, when the access server transmits a request that requires a response from a MOP boot server and the server does not respond, the message will be retransmitted after four seconds. If the MOP boot server and access server are separated by a slow serial link, it might take longer than four seconds for the access server to receive a response to its message. Therefore, you might want to configure the access server to wait longer than four seconds before retransmitting the message if you are using such a link.
In the following example, if the MOP boot server does not respond within ten seconds after the access server sends a message, the access server will retransmit the message:
mop retransmit-timer 10Perform Startup Tasks
You can perform the following optional startup tasks for the access server:
•
•
Partition Flash Memory Using Dual Flash Bank
Dual Flash bank allows you to partition the two banks of Flash memory into two separate, logical devices so that the access server can hold and maintain two different software images. No downtime is required to write software into Flash memory while running software that is in another bank of Flash memory.
Dual Flash bank is supported on low-end systems that have at least two banks of Flash memory, including systems that support a single SIMM that has two banks of Flash memory. The Cisco 2500 series supports dual Flash bank.
To use dual Flash bank, you must have at least two banks of Flash memory; a bank is a set of four chips. The minimum partition size is the size of a bank.
There are several benefits to partitioning Flash memory:
•
•
•
You might use load helper rather than dual Flash bank for one of the following reasons:
•
•
•
See the "Use Flash Load Helper to Upgrade Software on Run-from-Flash Systems" section in this chapter for information about using Flash load helper.
Understand Relocatable Images
Partitioning requires that run-from-Flash images be loaded into different Flash memory banks at different physical addresses. This means that images must be relocatable. A relocatable image is an image that contains special relocation information that allows the following:
•
•
Run-from-Flash systems used to run nonrelocatable images execute images that need to be stored in Flash memory at a specific address. This means that the image is stored at any other location in Flash memory, it could not be executed in Flash memory, nor could the image be executed from RAM. The relocatable image overcomes this limitation.
With Flash partitioning, the nonrelocatable run-from-Flash images will not work unless loaded into the first device as the first file. This requirement defeats the purpose of partitioning. However, relocatable images can be loaded into any Flash partition (and not necessarily as the first file within the partition) and executed in place.
Note that unless downloaded as the first file in the first partition, this download must be done by an image that recognizes relocatable images.
A relocatable image is an image that is Cisco IOS Release 10.0(6), 10.2(2), or later. All Cisco 2500 series access servers have relocatable images. Communication servers may have one of the following nonrelocatable images:
•
•
•
•
You can identify a relocatable image by its name. The naming convention for image names for storage on a UNIX system is as follows:
platform-capabilities-type
The letter "l" in the type field indicates a relocatable image. The following are examples of some relocatable image names:
•
•
•
Only the "igs" prefix images are available as relocatable images. Images distributed on floppy diskettes might have different naming conventions.
For backward compatibility, the relocatable images have been linked to execute as the first file in the first Flash memory bank. This makes the images similar to previous Flash images. Thus, if you download a relocatable image into a nonrelocatable image system, the image will run correctly from Flash memory.
Dual Flash Bank Configuration Task List
To use dual Flash bank, perform the tasks in one or more of the following sections:
•
•
•
•
See the "Clear the Configuration Information" section in this chapter for information about monitoring dual Flash bank.
To upgrade your software, you must erase Flash memory when you are prompted during the download. This is to ensure that the image is downloaded as the first file in Flash memory.
Partition Flash Memory
To partition Flash memory, perform the following task in global configuration mode:
This task will succeed only if the system has at least two banks of Flash memory and the partitioning does not cause an existing file in Flash memory to be split across the two partitions.
Download a File into a Flash Partition
To download a file into a Flash partition, perform one of the following tasks in EXEC mode:
The prompts displayed after you execute these tasks indicate the method by which the download can be done into each partition. The possible methods are as follows:
•
•
•
•
If the image download can be done into more than one partition, you are prompted for the partition number. Enter any of the following at the partition number prompt to obtain help:
•
•
•
•
Manually Boot from Flash Memory
To manually boot the access server from Flash memory, perform one of the following tasks in ROM monitor mode:
The result of booting a relocatable image from Flash memory depends on where and how the image was downloaded into Flash memory. describes the various ways an image might be downloaded and the corresponding result of booting from Flash memory.
Table 3-2 Downloading an Image and Booting from Flash
Configure the Access Server to Automatically Boot from Flash
To configure the access server to boot automatically from Flash memory, perform one of the following tasks in global configuration mode:
The result of booting a relocatable image from Flash memory depends on where and how the image was downloaded into Flash memory. , shown earlier, describes the various means ways an image might be downloaded and the corresponding results of booting from Flash memory.
Configure a Flash Partition as a TFTP Server
To configure a Flash partition as a TFTP server, perform one of the following tasks in global configuration mode:
Once you have specified TFTP server operation, exit configuration mode and save the configuration information to nonvolatile memory.
Use Flash Load Helper to Upgrade Software on Run-from-Flash Systems
The Flash load helper software option allows users to upgrade their system software on run-from-Flash systems. Flash load helper simplifies the upgrade procedure without requiring additional hardware; however, it requires some brief network downtime. A system image running from Flash can use Flash load helper only if the boot ROMs support Flash load helper. If the boot ROMs do not support Flash load helper, you must perform the Flash upgrade manually.
The Flash load helper software upgrade process is simple and does not require additional hardware; however, it does require some brief network downtime. A system image running from Flash can use Flash load helper only if the boot ROMs support Flash load helper. If the boot ROMs do not support Flash load helper, you must perform the Flash upgrade manually. See the "Manually Boot from Flash Memory" section in this chapter.
Flash load helper is an automated procedure that reloads the ROM-based image, downloads the software to Flash memory, and reboots to the system image in Flash memory. Flash load helper performs checks and validations to maximize the success of a Flash upgrade and minimize the chance of leaving Flash memory in either an erased state or with a file that cannot boot.
In run-from-Flash systems, the software image in the access server is stored in and executed from the Flash EPROM (as opposed to being executed from RAM). This method reduces memory cost. A run- from-Flash system requires enough Flash EPROM to hold the image and enough main system RAM to hold the access server tables and data structures. The system does not need the same amount of main system RAM as a run-from-RAM system because the full image does not reside in RAM. Run-from-Flash systems include the Cisco 2500 series.
Flash load helper includes the following features:
•
•
•
•
•
•
•
•
•
•
•
•
•
Flash load helper can also be used on systems with multiple banks of Flash memory that support Flash memory partitioning. Flash load helper enables you to download a new file into the same partition from which the system is executing an image.
For information about how to partition multiple banks of Flash memory so your system can hold two different images, see the "Partition Flash Memory Using Dual Flash Bank" section in this chapter.
Flash Load Helper Configuration Task List
Perform the tasks in the following sections to use and monitor Flash load helper:
•
Download a File Using Flash Load Helper
To download a new file to Flash memory using Flash load helper, check to make sure that your boot ROMs support Flash load helper, then perform the following tasks in privileged EXEC mode:
The following error message displays if you are in a Telnet session and the system is set for manual booting (the boot bits in the configuration register are zero):
ERR: Config register boot bits set for manual bootingIn case of any catastrophic failure in the Flash memory upgrade, this error message helps to minimize the chance of the system going down to the ROM monitor prompt and being taken out of the remote Telnet user's control.
The system tries to bring up at least the boot ROM image if it cannot boot an image from Flash memory. Before reinitiating the copy tftp flash command, you must set the boot bits to a nonzero value, using the config-register global configuration command.
The copy tftp flash command initiates a series of prompts to which you must provide responses. The dialog is similar to the following:
Router# copy tftp flash*************************** NOTICE ******************************* Flash load helper v1.0This process will accept the TFTP copy options and then terminate the current system image to use the ROM based image for the copy. Router functionality will not be available during that time. If you are logged in via telnet, this connection will terminate. Users with console access can see the results of the copy operation.******************************************************************If any terminals other than the one on which this command is being executed are active, the following message appears:
There are active users logged into the system.Proceed? [confirm] ySystem flash directory:File Length Name/status 1 2251320 abc/igs-kf.103 [2251384 bytes used, 1942920 available, 4194304 total]Enter the IP address or name of the remote host you are copying from:
Address or name of remote host [255.255.255.255]? 172.108.1.111Enter the name of the file you want to copy:
Source file name? abc/igs-kf.103Enter the name of the destination file:
Destination file name [default = source name]? <Return>Accessing file `abc/igs-kf.103' on 172.30.1.111....Loading from 172.30.13.111:Erase flash device before writing? [confirm] <Return>If you choose to erase Flash memory, the dialog continues as follows. The copy tftp flash operation verifies the request from the running image by trying to TFTP a single block via TFTP from the remote TFTP server. Then Flash load helper is executed, causing the system to reload to the ROM-based system image.
Erase flash device before writing? [confirm] yFlash contains files. Are you sure? [confirm] yIf the file does not seem to be a valid image for the system, a warning appears; you must issue confirmation.
Copy `abc/igs-kf.103' from TFTP serveras `abc/igs-kf.103' into Flash WITH erase? y%SYS-5-RELOAD: Reload requested%FLH: rxboot/igs-kf.103r from 172.30.1.111 to flash ...If you choose not to erase Flash memory, and there was file duplication, the dialog would have continued as follows:
Erase flash device before writing? [confirm] nCopy `abc/igs-kf.103' from TFTP serveras `abc/igs-kf.103' into Flash WITHOUT erase? yIf you choose not to erase Flash memory, and there was file duplication, the dialog would have continued as follows:
Erase flash device before writing? [confirm] nFile `abc/igs-kf.103' already exists; it will be invalidated!Invalidate existing copy of `abc/igs-kf' in flash memory? [confirm] yCopy `abc/igs-kf.103' from TFTP serveras `abc/igs-kf.103' into Flash WITHOUT erase? yIf the configuration has been modified but not yet saved, you are prompted to save the configuration:
System configuration has been modified. Save? [confirm]If you confirm to save the configuration, you might also receive this message:
Warning: Attempting to overwrite an NVRAM configuration previously written by a different
version of the system image. Overwrite the previous NVRAM configuration? [confirm]
Users with open Telnet connections are notified of the system reload, as follows:
**System going down for Flash upgrade**If the TFTP process fails, the copy operation is retried up to three times. If the failure happens in the middle of a copy (part of the file has been written to Flash memory), the retry does not erase Flash memory unless you specified an erase. The partly written file is marked as deleted and a new file is opened with the same name. If Flash memory runs out of free space in this process, the copy is terminated.
After Flash load helper finishes its copy (whether the copy operation is successful or not), it automatically attempts an autoboot or a manual boot, depending on the value of the boot bits in the configuration register. If the boot bits are zero, the system attempts a default boot from Flash memory (equivalent to a manual b flash command at the ROM monitor prompt) to load up the first bootable file in Flash memory.
If the boot bits are nonzero, the system attempts to boot based on the boot configuration commands. If no boot configuration commands exist, the system attempts a default boot from Flash memory, that is, it attempts to load the first bootable file in Flash memory.
Monitor Flash Load Helper
To view the system console output generated during the Flash load helper operation, use the image that has been booted up after the Flash memory upgrade. Perform the following task in privileged EXEC mode:
If you are a remote Telnet user performing the Flash upgrade without a console connection, this task allows you to retrieve console output when your Telnet connection has terminated due to the switch to the ROM image. The output indicates what happened during the download, and is particularly useful if the download fails.
Configure for Remote Shell (rsh) and Remote Copy (rcp) Functions
You can configure your access server for rsh and rcp functions. This feature allows you to execute commands on remote access servers or routers and to remotely copy system images and configuration files to and from a network server or an access server.
Cisco's Implementation of Remote Shell (rsh) and Remote Copy (rcp)
One of the first attempts to use the network as a resource in the UNIX community resulted in the design and implementation of the remote shell protocol, which included the remote shell (rsh) and remote copy (rcp). Rsh and rcp allows users to execute commands remotely and copy files to and from a file system residing on a remote host or server on the network. Cisco's implementation of rsh and rcp interoperates with standard implementations.
Using rsh
From the access server, you can use rsh to execute commands on remote systems to which you have access. When you issue the rsh command, a shell is started on the remote system. The shell allows you to execute commands on the remote system without having to log into the system. In other words, if you use rsh you do not need to connect to the system or access server and then disconnect after you execute a command if you use rsh. For example, you can use rsh to remotely look at the status of other access servers without connecting to the access server, executing the command, and then disconnecting from the access server. This is useful for looking at statistics on many different access servers.
Maintaining rsh Security
To gain access to a remote system running rsh, such as a UNIX host, you must be configured in the system's .rhosts file or its equivalent. On UNIX systems, the .rhosts file identifies trusted users who can remotely execute commands on the system.
You can enable rsh support on an access server to allow users on remote systems to execute commands on the access server. However, our implementation of rsh does not support an .rhosts file. Instead, you configure a local authentication database to control access to the access server by users attempting to execute commands remotely using rsh. A local authentication database is similar in concept and use to a UNIX .rhosts file. Each entry that you configure in the authentication database identifies the local user, the remote host, and the remote user.
Using rcp
The rcp copy commands rely on the rsh server (or daemon) on the remote system. To copy files using rcp, you do not need to create a server for file distribution, as you do with TFTP. You only need to have access to a server that supports the remote shell (rsh). (Most UNIX systems support rsh.) Because you are copying a file from one place to another, you must have read permission on the source file and write permission on the destination file. If the destination file does not exist, rcp creates it for you.
Although Cisco rcp implementation emulates the behavior of the UNIX rcp implementation—copying files among systems on the network—our command syntax differs from the UNIX rcp command syntax. Our rcp support offers a set of copy commands that use rcp as the transport mechanism. These rcp copy commands are similar in style to our TFTP copy commands, but they offer an alternative that provides faster performance and reliable delivery of data. This is because the rcp transport mechanism is built on and uses the Transmission Control Protocol/Internet Protocol (TCP/IP) stack, which is connection-oriented. You can use the Cisco rcp commands to copy system images and configuration files from the access server to a network server and vice versa.
You can also enable rcp support on the access server to allow users on remote systems to copy files to and from the access server.
Configure for rsh and rcp Task List
To configure the router for rsh and rcp, perform the following tasks:
•
•
•
Configure an Access Server to Support Incoming rcp Requests and rsh Commands
You configure a local authentication database to control access to the access server by remote users. A local authentication database is similar in concept and use to a UNIX .rhosts file. To allow remote users to execute rcp or rsh commands on the access server, configure entries for those users in the access server's authentication database.
Each entry configured in the authentication database identifies the local user, the remote host, and the remote user. To be allowed to remotely execute commands on the access server, the remote user must specify all three values—the local username, the remote host name, and the remote username. For rsh users, you can also grant a user permission to execute privileged EXEC commands remotely.
An entry that you configure in the access server authentication database differs from an entry in a UNIX .rhosts file in several ways, for example, the entry must include a local username. Because the .rhosts file on a UNIX system resides in a local user's home directory, an entry in a UNIX .rhosts file does not need to include the local username. The local username is determined from the user account. You must specify the local username along with the remote host name and the remote username in each authentication database entry that you configure. You can specify the access server host name as the local username.
To make the local username available to remote users, you need to communicate the username to the network administrator or the remote user. To allow a remote user to execute a command on the access server, the local username sent by the remote user needs to match the local username configured in the database entry.
The Cisco IOS software uses Domain Name System to authenticate the remote host's name and address. Because DNS can return several valid IP addresses for a host name, the Cisco IOS software checks the address of the requesting client against all of the IP addresses for the named host returned by DNS. If the address sent by the requester is considered invalid, because, it does not match any address listed with DNS for the host name, then the Cisco IOS software will reject the remote-command execution request.
If no DNS servers are configured for the access server, then the access server cannot authenticate the host with the authentication database. In this case, the Cisco IOS software will send a broadcast request to attempt to gain access to DNS services on another server. If DNS services are not available, you must use the no ip domain-lookup command to disable the access server's attempt to gain access to a DNS server by sending a broadcast request.
If DNS services are not available and, therefore, you bypass the DNS security check, the Cisco IOS software will accept the request to remotely execute a command only if all three values sent with the request match exactly the values configured for an entry in the local authentication file.
If DNS is enabled but you do not want to use DNS for rcmd queries, use the no ip rcmd domain-lookup command.
To ensure security, the access server is not enabled to support rcp requests from remote users by default. When the access server is not enabled to support rcp, the authorization database has no effect.
Configure the Access Server to Accept rcp Requests from Remote Users
To configure the access server to support incoming rcp requests, complete the following tasks, starting in privileged EXEC mode:
Note
To disable the access server from supporting incoming rcp requests, use the no ip rcmd rcp-enable command.
Note
The following example shows how to add two entries for remote users to the access server's authentication database and then enable the access server to support remote copy requests from remote users. The users, named netadmin1 on the remote host at IP address 172.30.15.55 and netadmin3 on remote host at IP address 131.108.101.101, are both allowed to connect to the access server and remotely execute rcp commands on it after the access server is enabled to support rcp. Both authentication database entries give the access server's host name commserver1 as the local username. The fourth command enables the access server to support rcp requests from remote users.
configure terminalip rcmd remote-host commserver1 172.30.15.55 netadmin1ip rcmd remote-host commserver1 172.30.101.101 netadmin3ip rcmd rcp-enableConfigure the System to Allow Remote Users to Execute Commands Using rsh
To configure the access server as an rsh server, complete the following tasks, starting in privileged EXEC mode:
Note
To disable the access server from supporting incoming rsh commands, use the no ip rcmd rsh-enable command.
Note
The following example shows how to add two entries for remote users to the access server's authentication database, and enable the access server to support rsh commands from remote users. The users, named rmtnetad1 and netadmin4, are both on the remote host at IP address 172.30.101.101. Although both users are on the same remote host, you must include a unique entry for each user. Both users are allowed to connect to the access server and remotely execute rsh commands on it after the access server is enabled for rsh. The user named netadmin4 is allowed to execute privileged EXEC mode commands on the access server. Both authentication database entries give the access server's host name commserver1 as the local username. The fourth command enables the access server to support rsh commands issued by remote users.
configure terminalip rcmd remote-host commserver1 172.30.101.101 rmtnetad1ip rcmd remote-host commserver1 172.30.101.101 netadmin4 enableip rcmd rsh-enableTurn Off DNS Lookups for rcp and rsh
To bypass the DNS security check when DNS services are configured but not available, perform the following task in global configuration mode:
The access server software will accept the request to remotely execute a command only if all three values sent with the request match exactly the values configured for an entry in the local authentication file.
Configure the Remote Username for rcp Requests
From the access server, you can use rcp to remotely copy files to and from network servers and hosts if those systems support rcp. You do not need to configure the access server to issue remote copy requests from the access server using rcp. However, to prepare to use rcp from the access server for remote copying, you can perform an optional configuration process to specify the remote username to be sent on each rcp request.
The rcp protocol requires a client to send the remote username on an rcp request. By default, the Cisco IOS software sends the remote username associated with the current TTY (terminal) process, if that name is valid, for rcp commands.
Note
If the username for the current TTY process is not valid, the Cisco IOS software sends the host name as the remote username. For boot commands using rcp, the Cisco IOS software sends the access server host name by default. You cannot explicitly configure the remote username.
When copying from the remote server, rcp searches for the system image or configuration file to be copied relative to the directory of the remote username. When copying to the remote server, rcp writes the system image or configuration file to be copied relative to the directory of the remote username. When booting an image, rcp searches for the image file on the remote server relative to the directory of the remote username.
To override the default remote username sent on rcp requests, complete the following tasks:
Step 1
configure terminal
Step 2
ip rcmd remote-username username
Step 3
Ctrl-Z
To remove the remote username and return to the default value, use the no ip rcmd remote-username command.
Remotely Execute Commands Using rsh
You can use rsh to execute commands remotely on network servers that support the remote shell protocol. To use this command, the .rhosts files on the network server must include an entry that permits you to remotely execute commands on that host.
The rsh command that you issue is remotely executed from the directory of the account for the remote user that you specify through the /user username parameter.
If you do not specify the /user keyword and argument, the access server sends a default remote username unless you override the default by configuring a remote username. As the default value of the remote username, the Cisco IOS software sends the remote username associated with the current TTY process, if that name is valid. If the TTY remote username is invalid, the Cisco IOS software uses the access server host name as the both the remote and local usernames.
To execute a command remotely on a network server using rsh, perform the following task from EXEC mode:
The following example shows how to execute commands remotely using rsh:
Router# exec Router# rsh mysys.cisco.com /u sharon ls -a...alias.cshrc.emacs.exrc.history.login.mailrc.newsrc.oldnewsrc.rhosts.twmrc.xsessionjazzRouter#Use the AutoInstall Procedure
This section provides information about AutoInstall, a procedure that allows you to configure a new access server automatically and dynamically. You use the AutoInstall procedure to connect a new access server to a network on which there is an existing preconfigured access server, turning on the new access server, and enable it with a configuration file that is automatically downloaded from a Trivial File Transfer Protocol (TFTP) server.
The following sections provide the requirements for AutoInstall and an overview of how the procedure works. To start the procedure, see "Perform the AutoInstall Procedure" later in this section.
AutoInstall Requirements
For the AutoInstall procedure to work, your system must meet the following requirements:
•
•
•
Note
•
•
•
•
•
•
•
ip helper 172.16.2.75
•
frame-relay map ip 172.21.177.100 100 dlci
•
•
Using a DOS-Based TFTP Server
Autoinstall over Frame Relay supports downloading configuration files from UNIX-based and DOS-based TFTP servers. AutoInstall over other WAN encapsulations and other booting mechanisms such as RARP and SLARP supports UNIX-based and DOS-based TFTP servers.
The DOS format of the UNIX network-confg file must be eight characters or less, with a three-letter extension. Therefore, when an attempt to load network-confg fails, AutoInstall automatically attempts to download cisconet.cfg from the TFTP server.
If cisconet.cfg exists and a download succeeds, then the server is assumed to be a DOS machine. The AutoInstall program will then attempt to resolve the host name for the access server through host commands in cisconet.cfg.
If cisconet.cfg does not exist or cannot be downloaded, or the program is unable to resolve a host name, DNS will attempt to resolve the host name of the access server. If it is unable to resolve the host name through DNS, the access server will attempt to download ciscortr.cfg. If host name is longer than eight characters, it will be truncated to eight characters. For example, an access server with a host name "australia" will be treated as "australi" and an attempt will be made to download australi.cfg.
The formats of the cisconet.cfg and ciscortr.cfg files are to be the same as those described for network-confg and host name-confg.
If neither network-confg nor cisconet.cfg exist and DNS is unable to resolve the host name, the program will attempt to load router-confg. If router-confg does not exist or cannot be downloaded, the program will attempt to load ciscortr.cfg. The cycle is repeated three times.
How AutoInstall Works
Once the requirements for using AutoInstall are met, the dynamic configuration of the new access server occurs in the following order:
1
2
3
4
Acquiring the New Access Server's IP Address
The new access server (Newcommserver) resolves the IP addresses of its interface by one of the following means:
•
•
•
The Existing access server responds in one of the following ways depending upon the request type:
•
Figure 3-2 Using SLARP to Acquire the New Access Server's IP Address
•
A BOOTP or RARP server must have already been set up to map Newcommserver's MAC address to its IP address. If the BOOTP server does not reside on the directly attached network segment, access servers between Newcommserver and the BOOTP server can be configured with the ip helper-address command to allow the request and response to be forwarded between segments, as shown in .
AutoInstall over Frame Relay is a special case in which BOOTP is used, but the access server Existing acts as a BOOTP server and responds to the incoming BOOTP request. Only a helper address and a Frame Relay map need to be set up. There is no need for a MAC-to-IP address map on the access server Existing.
Figure 3-3 Using BOOTP or RARP to Acquire the New Access Server's IP Address
As of Software Release 9.21, access servers can be configured to act as RARP servers.
As soon as one interface resolves its IP address, the access server attempts to resolve its host name. Therefore, only one IP address needs to be set up using either SLARP, BOOTP, or RARP.
Resolving the IP Address to the Host Name
The new access server resolves its IP address-to-host name mapping by sending a TFTP broadcast requesting the network-confg file, as shown in .
The network-confg file is a configuration file generally shared by several access servers. In this case, it is used to map the IP address of the new access server just obtained dynamically to the name of the new access server. The network-confg file must reside on a reachable TFTP server and must be globally readable.
The following is an example of a minimal network-confg file that maps the IP address of the new access server (172.108.10.2) to the name Newcommserver. The address of the new access server was learned via SLARP and is based on Existing's IP address of 172.108.10.1.
ip host newcommserver 172.108.10.2If you are not using AutoInstall over Frame Relay, the host portion of the address must be 1 or 2. AutoInstall over Frame Relay does not have this addressing constraint.
If Newcommserver does not receive a network-confg file, or if the IP address-to-host name mapping does not match the newly acquired IP address, Newcommserver sends a DNS broadcast. If DNS is configured and has an entry that maps Newcommserver's SLARP, BOOTP, or RARP-acquired IP address to its name, Newcommserver successfully resolves its name.
If DNS does not have an entry that maps Newcommserver's SLARP, BOOTP, or RARP-acquired address to its name, the new access server cannot resolve its host name. The new access server attempts to download a default configuration file as described in the next section, and failing that, enters setup mode (except with AutoInstall over Frame Relay, in which case the access server enters user EXEC mode).
Figure 3-4 Dynamically Resolving the New Access Server's IP Address-to-Host Name Mapping
Downloading the New Access Server's Host Configuration File
After the access server successfully resolves its host name, Newcommserver sends a TFTP broadcast requesting the file newcommserver-confg. The name newcommserver-confg must be in all lowercase, even if the true host name is not. If Newcommserver cannot resolve its host name, it sends a TFTP broadcast requesting the default host configuration file commserver-confg. The file is downloaded to Newcommserver, where the configuration commands take effect immediately.
When using AutoInstall over Frame Relay, you are put into setup mode while the AutoInstall process is running. If the configuration file is successfully installed, the setup process is terminated. If you expect the AutoInstall process to be successful, do not respond to the setup prompts. If you do not expect the AutoInstall process to be successful, create a configuration file by responding the setup prompts. The AutoInstall process is terminated transparently.
If you expect AutoInstall to succeed, you can also respond to the prompts as follows:
Would you like to enter the initial configuration dialog? [yes]: noWould you like to terminate autoinstall? [yes]: noYou will see the following display as the AutoInstall operation is completed:
Please Wait. AutoInstall being attempted!!!!!!!!!!!!!!!!!!!If the host configuration file contains only the minimal information, you must connect into Existing using Telnet then connect to Newcommserver, and then run the setup command to configure Newcommserver.
If the host configuration file is complete, Newcommserver should be fully operational. You can enter the enable command (with the system administrator password) at the system prompt on Newcommserver, and then issue the copy running-config startup-config command to save the information in the recently obtained configuration file into NVRAM. If a reload occurs, Newcommserver simply loads its configuration file from nonvolatile memory.
If the TFTP request fails, or if Newcommserver still has not obtained the IP addresses of all its interfaces, and those addresses are not contained in the host configuration file, then Newcommserver enters setup mode automatically. Setup mode prompts for manual configuration of the access server via the console. The new access server continues to issue broadcasts to attempt to learn its host name and obtain any unresolved interface addresses. The broadcast frequency will dwindle to every ten minutes after several attempts. Refer to the Access and Communication Servers Getting Started Guide for details on the setup command.
Perform the AutoInstall Procedure
To dynamically configure a new access server using AutoInstall, complete the following tasks. Steps 1, 2, and 3 are completed by the central administrator. Step 4 is completed by the person at the remote site.
Step 1
Step 2
Step 3
Step 4
Modifying the Existing Access Server's Configuration
You can use any of the following types of interface:
•
•
•
Use an HDLC-Encapsulated Serial Interface Connection
To set up AutoInstall via a serial line with HDLC encapsulation (the default), you must configure the existing access server. Perform the following steps, beginning in global configuration mode:
You must use a DTE interface on the new access server because there is no default clock rate for a DCE interface.
In the following example, the existing access server's configuration file contains the commands needed to configure the access server for AutoInstall on a serial line using HDLC encapsulation:
Router# configure terminalinterface serial 0ip address 172.31.10.1 255.255.255.0ip helper-address 172.31.20.5Ctrl-ZRouter(config)# copy running-config startup-configUse an Ethernet or Token Ring Interface Connection
To set up AutoInstall using an Ethernet or Token Ring interface, you must modify the configuration of the existing access server. Perform the following steps, beginning in global configuration mode.
Typically, the local-area network (LAN) interface and IP address are already configured on the existing access server. You might need to configure an IP helper address if the TFTP server is not on the same network as the new access server.
In the following example, the existing access server's configuration file contains the commands needed to configure the access server for AutoInstall on an Ethernet interface:
Router# configure terminalinterface Ethernet 0ip address 172.31.10.1 255.255.255.0ip helper-address 172.31.20.5Ctrl-ZRouter(config)# copy running-config startup-configUse a Frame Relay-Encapsulated Serial Interface Connection
To set up AutoInstall via a serial line with Frame Relay encapsulation, you must configure the existing access server. Perform the following tasks, beginning in global configuration mode:
You must use a DTE interface on the new access server because the network will always provide the clock signal.
In the following example, the existing access server's configuration file contains the commands needed to configure the access server for Frame Relay AutoInstall on a serial line:
Router# configure terminalinterface serial 0ip address 172.31.20.20 255.255.255.0encapsulation frame-relayframe-relay map ip 172.31.10.1 255.255.255.0 48ip helper-address 172.31.20.5Set up the TFTP Server
For AutoInstall to work correctly, the new access server must be able to resolve its host name and then download a name-confg or name-cfg file from a TFTP server. The new access server can resolve its host name by using a network-confg or cisconet.cfg file downloaded from a TFTP server or by using the DNS.
To set up a TFTP server to support AutoInstall, complete the following tasks. Step 2 includes two ways to resolve the new access server's host name. Use the first method if you want to use a network-config file to resolve the new access server's host name. Use the second method if you want to use the DNS to resolve the new access server's host name, starting in global configuration mode
.
The name-confg or name-cfg file can contain either the new access server's full configuration or a minimal configuration.
The minimal configuration file consists of a virtual terminal password and an enable password. It allows an administrator to use Telnet to connect to the new access server to configure it. If you are using BOOTP or RARP to resolve the address of the new access server, the minimal configuration file must also include the IP address to be obtained dynamically using BOOTP or RARP.
You can use the copy running-config tftp command to help you generate the configuration file that you will download during the AutoInstall process.
Note
You can save a minimal configuration under a generic newcommserver-confg file. Use the ip host command in the network-confg or cisconet.cfg file to specify newcommserver as the host name with the address you want to dynamically resolve. The new access server should then resolves its IP address, host name, and minimal configuration automatically. Use Telnet to connect to the new access server from the existing access server and use the setup facility to configure the rest of the interfaces.
For example, the line in the network-confg or cisconet.cfg file might be similar to the following:
ip host newcommserver 172.30.08.170.1The following host configuration file contains the minimum set of commands needed for AutoInstall using SLARP or BOOTP:
enable-password letmein ! line vty 0 password letmein !endThe preceding example shows a minimal configuration for connecting from an access server one hop away. From this configuration, use the setup facility to configure the rest of the interfaces. If the access server is more than one hop away, you also must include routing information in the minimal configuration.
The following minimal network configuration file maps the new access server's IP address, 172.30.10.2, to the host name Newcommserver. The new access server's address was learned via SLARP and is based on the existing access server's IP address of 172.30.10.1.
ip host newcommserver 172.30.10.2Set Up the BOOTP or RARP
If the new access server is connected to the existing access server using an Ethernet or Token Ring interface, you must configure a BOOTP or RARP server to map the new access server's MAC address to its IP address. If the new access server is connected to the existing access server using a serial line with HDLC encapsulation or if you are configuring AutoInstall over Frame Relay, the tasks in this section are not required.
To configure a BOOTP or RARP server, complete one of the following tasks:
Note
The following host configuration file contains the minimum set of commands needed for AutoInstall using RARP. It includes the IP address that will be obtained dynamically via BOOTP or RARP during the AutoInstall process. When RARP is used, this extra information is needed to specify the proper netmask for the interface.
interface ethernet 0 ip address 172.30.10.2 255.255.255.0 enable-password letmein ! line vty 0 password letmein !endConnect the New Access Server to the Network
Connect the new access server to the network using either an HDLC-encapsulated Frame Relay-encapsulated serial interface or an Ethernet or Token Ring interface. After the access server successfully resolves its host name, Newcommserver sends a TFTP broadcast requesting the file name-confg or cisconet.cfg. The access server name must be in all lowercase, even if the true host name is not. The file is downloaded to the new access server where the configuration commands take effect immediately. If the configuration file is complete, the new access server should be fully operational. To save the complete configuration to NVRAM, complete the following tasks in privileged EXEC mode:
Step 1
enable1 password
Step 2
copy running-config startup-config
1 This command is documented in the "User Interface Commands" chapter in the Access and Communication Servers Command Reference publication.
CautionVerify that the existing and new access servers are connected before entering the write memory EXEC command to save configuration changes. Use the ping EXEC command to verify connectivity. If an incorrect configuration file is downloaded, the new access server will load NVRAM configuration information before it can enter AutoInstall mode.
If the configuration file is a minimal configuration file, the new access server starts, but with only one interface operational. Complete the following steps to connect to the new access server and configure it, starting in EXEC mode:
Step 1
telnet Existing1
Step 2
telnet Newcommserver1
Step 3
enable password2
Step 4
setup3
1 These commands are documented in the "Terminal Service Connections" chapter in the Cisco Access Connection Guide.
2 This command is documented in the "User Interface Commands" chapter in the Access and Communication Servers Command Reference.
3 This command is documented in the Access and Communication Servers Getting Started Guide.
Manually Load a System Image from ROM Monitor
If your access server does not find a valid system image, or if its configuration file is corrupted at startup and the configuration register is set to enter ROM monitor mode, the system might enter ROM monitor mode. From this mode, you can manually load a system image from Flash, from a network server file, or from ROM.
You can also enter ROM monitor mode by restarting the access server and then pressing the Break key during the first 60 seconds of startup.
Manually Boot from Flash Memory
To manually boot from Flash memory, complete the following tasks:
In the following example, the access server is manually booted from Flash memory. Because no filename is specified, the first file in Flash memory will be loaded.
> b flashBooting igs-bfpx.11.0 from Flash address spaceF3: 3911536+96836+319604 at 0x3000060Restricted Rights LegendUse, duplication, or disclosure by the Government issubject to restrictions as set forth in subparagraph(c) of the Commercial Computer Software - RestrictedRights clause at FAR sec. 52.227-19 and subparagraph(c) (1) (ii) of the Rights in Technical Data and ComputerSoftware clause at DFARS sec. 252.227-7013.Cisco Systems, Inc.170 West Tasman DriveSan Jose, California 95134-17063000 Software (IGS-BFPX), Version 10.2Copyright (c) 1986-1995 by Cisco Systems, Inc.Compiled Tue 05-Jul-94 16:14% System running from device (System flash) being initialized.Setting System flash access to read-only.SNMP Research SNMP Agent Resident Module Version 12.2.0.0Copyright 1989, 1990, 1991, 1992, 1993, 1994 SNMP Research, Inc.Cisco 2500 (68030) processor (revision A) with 1024K/1024K bytes of memory.Processor board serial number 01244583X.25 software, Version 2.0, NET2, BFE and GOSIP compliant.Bridging software.SuperLAT software (copyright 1990 by Meridian Technology Corp).Authorized for Enterprise software set. (0x0)1 Ethernet/IEEE 802.3 interface.2 Serial network interfaces.16 terminal lines.32K bytes of non-volatile configuration memory.4096K bytes of processor board System flash. (Read only mode)Press RETURN to get started!In the following example, the boot flash command is used with the image filename
igs-bfpx.102.1. That is the file that will be loaded.> b flash igs-bfpx.102.1Booting igs-bfpx.102.1 from Flash address spaceF3: 3911536+96836+319604 at 0x3000060Restricted Rights LegendUse, duplication, or disclosure by the Government issubject to restrictions as set forth in subparagraph(c) of the Commercial Computer Software - RestrictedRights clause at FAR sec. 52.227-19 and subparagraph(c) (1) (ii) of the Rights in Technical Data and ComputerSoftware clause at DFARS sec. 252.227-7013.Cisco Systems, Inc.170 West Tasman DriveSan Jose, California 95134-17063000 Software (IGS-BFPX), Version 10.2Copyright (c) 1986-1994 by Cisco Systems, Inc.Compiled Tue 05-Jul-94 16:14% System running from device (System flash) being initialized.Setting System flash access to read-only.SNMP Research SNMP Agent Resident Module Version 12.2.0.0Copyright 1989, 1990, 1991, 1992, 1993, 1994 SNMP Research, Inc.Cisco 2500 (68030) processor (revision A) with 1024K/1024K bytes of memory.Processor board serial number 01244583X.25 software, Version 2.0, NET2, BFE and GOSIP compliant.Bridging software.SuperLAT software (copyright 1990 by Meridian Technology Corp).Authorized for Enterprise software set. (0x0)1 Ethernet/IEEE 802.3 interface.2 Serial network interfaces.16 terminal lines.32K bytes of non-volatile configuration memory.4096K bytes of processor board System flash. (Read only mode)Press RETURN to get started!Manually Boot from a Network File
To manually boot from a network file, complete the following tasks in EXEC mode:
In the following example, the access server is manually booted from the network file network1:
> b network1Manually Boot from ROM
To manually boot the access server from ROM, complete the following steps in EXEC mode:
Step 1
reload
Step 2
Break
Step 3
b
In the following example, the access server is manually booted from ROM:
> bUse the System Image Instead of Reloading
To return to EXEC mode from the ROM monitor to use the system image instead of reloading, perform the following task in ROM monitor mode: