
 Feedback
Contents
- Support for PAID PPID Privacy PCPID and PAURI Headers on the Cisco Unified Border Element
- Finding Feature Information
- Prerequisites for Support for PAID PPID Privacy PCPID and PAURI Headers on the Cisco UBE
- Restrictions for Support for PAID PPID Privacy PCPID and PAURI Headers on the Cisco UBE
- Configuring P-Header and Random-Contact Support on the Cisco Unified Border Element
- Configuring P-Header Translation on a Cisco Unified Border Element
- Configuring P-Header Translation on an Individual Dial Peer
- Configuring P-Called-Party-Id Support on a Cisco Unified Border Element
- Configuring P-Called-Party-Id Support on an Individual Dial Peer
- Configuring Privacy Support on a Cisco Unified Border Element
- Configuring Privacy Support on an Individual Dial Peer
- Configuring Random-Contact Support on a Cisco Unified Border Element
- Configuring Random-Contact Support for an Individual Dial Peer
- Feature Information for PAID PPID Privacy PCPID and PAURI Headers on the Cisco Unified Border Element
Support for PAID PPID Privacy PCPID and PAURI Headers on the Cisco Unified Border Element
The figure below shows a typical network topology where the Cisco Unified Border Element is configured to route messages between a call manager system (such as the Cisco Unified Call Manager) and a Next Generation Network (NGN).
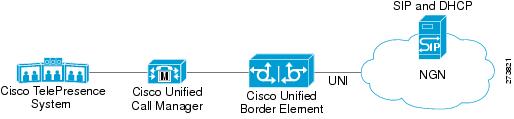
Devices that connect to an NGN must comply with the User-Network Interface (UNI) specification. The Cisco Unified Border Element supports the NGN UNI specification and can be configured to interconnect NGN with other call manager systems, such us the Cisco Unified Call Manager.
The Cisco Unified Border Element supports the following:
- the use of P-Preferred Identity (PPID), P-Asserted Identity (PAID), Privacy, P-Called Party Identity (PCPID), in INVITE messages
- the translation of PAID headers to PPID headers and vice versa
- the translation of From: or RPID headers to PAID or PPID headers and vice versa
- the configuration and/or pass through of privacy header values
- the use of the PCPID header to route INVITE messages
- the use of multiple PAURI headers in the response messages (200 OK) it receives to REGISTER messages
P-Preferred Identity and P-Asserted Identity Headers
NGN servers use the PPID header to identify the preferred number that the caller wants to use. The PPID is part of INVITE messages sent to the NGN. When the NGN receives the PPID, it authorizes the value, generates a PAID based on the preferred number, and inserts it into the outgoing INVITE message towards the called party.
However, some call manager systems, such as Cisco Unified Call Manager 5.0, use the Remote-Party Identity (RPID) value to send calling party information. Therefore, the Cisco Unified Border Element must support building the PPID value for an outgoing INVITE message to the NGN, using the RPID value or the From: value received in the incoming INVITE message. Similarly, CUBE supports building the RPID and/or From: header values for an outgoing INVITE message to the call manager, using the PAID value received in the incoming INVITE message from the NGN.
In non-NGN systems, the Cisco Unified Border Element can be configured to translate between PPID and PAID values, and between From: or RPID values and PAID/PPID values, at global and dial-peer levels.
In configurations where all relevant servers support the PPID or PAID headers, the Cisco Unified Border Element can be configured to transparently pass the header.
 Note | If the NGN sets the From: value to anonymous, the PAID is the only value that identifies the caller. |
The table below describes the types of INVITE message header translations supported by the Cisco Unified Border Element. It also includes information on the configuration commands to use to configure P-header translations.
The table below shows the P-header translation configuration settings only. In addition to configuring these settings, you must configure other system settings (such as the session protocol).
| Table 1 | P-header Configuration Settings |
Privacy
If the user is subscribed to a privacy service, the Cisco Unified Border Element can support privacy using one of the following methods:
The NGN dial plan can specify prefixes to enable privacy settings. For example, the dial plan may specify that if the caller dials a prefix of 184, the calling number is not sent to the called party.
The dial plan may also specify that the caller can choose to send the calling number to the called party by dialing a prefix of 186. Here, the Cisco Unified Border Element transparently passes the prefix as part of the called number in the INVITE message.
The actual prefixes for the network are specified in the dial plan for the NGN, and can vary from one NGN to another.
If the Privacy header is set to None, the calling number is delivered to the called party. If the Privacy header is set to a Privacy:id value, the calling number is not delivered to the called party.
If the incoming INVITE has a Privacy header or a RPID with privacy on, the outgoing INVITE can be set to Privacy: id. This behavior is enabled by configuring privacy pstn command globally or voice-class sip privacy pstn command on the selected dial-per.
Incoming INVITE can have multiple privacy header values, id, user, session, and so on. Configure the privacy-policy passthru command globally or voice-class sip privacy-policy passthru command to transparently pass across these multiple privacy header values.
Some NGN servers require a Privacy header to be sent even though privacy is not required. In this case the Privacy header must be set to none. The Cisco Unified Border Element can add a privacy header with the value None while forwarding the outgoing INVITE to NGN. Configure the privacy-policy send-always globally or voice-class sip privacy-policy send-always command in dial-peer to enable this behavior.
If the user is not subscribed to a privacy service, the Cisco Unified Border Element can be configured with no Privacy settings.
P-Called Party Identity
The Cisco Unified Border Element can be configured to use the PCPID header in an incoming INVITE message to route the call, and to use the PCPID value to set the To: value of outgoing INVITE messages.
The PCPID header is part of the INVITE messages sent by the NGN, and is used by Third Generation Partnership Project (3GPP) networks. The Cisco Unified Border Element uses the PCPID from incoming INVITE messages (from the NGN) to route calls to the Cisco Unified Call Manager.
Note | The PCPID header supports the use of E.164 numbers only. |
P-Associated URI
The Cisco Unified Border Element supports the use of PAURI headers sent as part of the registration process. After the Cisco Unified Border Element sends REGISTER messages using the configured E.164 number, it receives a 200 OK message with one or more PAURIs. The number in the first PAURI (if present) must match the contract number. The Cisco Unified Border Element supports a maximum of six PAURIs for each registration.
Note | The Cisco Unified Border Element performs the validation process only when a PAURI is present in the 200 OK response. |
The registration validation process works as follows:
- The Cisco Unified Border Element receives a REGISTER response message that includes PAURI headers that include the contract number and up to five secondary numbers.
- The Cisco Unified Border Element validates the contract number against the E.164 number that it is registering:
- If the values match, the Cisco Unified Border Element completes the registration process and stores the PAURI value. This allows administration tools to view or retrieve the PAURI if needed.
- If the values do not match, the Cisco Unified Border Element unregisters and then reregisters the contract number. The Cisco Unified Border Element performs this step until the values match.
Random Contact Support
The Cisco Unified Border Element can use random-contact information in REGISTER and INVITE messages so that user information is not revealed in the contact header.
To provide random contact support, the Cisco Unified Border Element performs SIP registration based on the random-contact value. The Cisco Unified Border Element then populates outgoing INVITE requests with the random-contact value and validates the association between the called number and the random value in the Request-URI of the incoming INVITE. The Cisco Unified Border Element routes calls based on the PCPID, instead of the Request-URI which contains the random value used in contact header of the REGISTER message.
The default contact header in REGISTER messages is the calling number. The Cisco Unified Border Element can generate a string of 32 random alphanumeric characters to replace the calling number in the REGISTER contact header. A different random character string is generated for each pilot or contract number being registered. All subsequent registration requests will use the same random character string.
The Cisco Unified Border Element uses the random character string in the contact header for INVITE messages that it forwards to the NGN. The NGN sends INVITE messages to the Cisco Unified Border Element with random-contact information in the Request URI. For example: INVITE sip:FefhH3zIHe9i8ImcGjDD1PEc5XfFy51G@10.12.1.46:5060.
The Cisco Unified Border Element will not use the To: value of the incoming INVITE message to route the call because it might not identify the correct user agent if supplementary services are invoked. Therefore, the Cisco Unified Border Element must use the PCPID to route the call to the Cisco Unified Call Manager. You can configure routing based on the PCPID at global and dial-peer levels.
- Finding Feature Information
- Prerequisites for Support for PAID PPID Privacy PCPID and PAURI Headers on the Cisco UBE
- Restrictions for Support for PAID PPID Privacy PCPID and PAURI Headers on the Cisco UBE
- Configuring P-Header and Random-Contact Support on the Cisco Unified Border Element
- Feature Information for PAID PPID Privacy PCPID and PAURI Headers on the Cisco Unified Border Element
Finding Feature Information
Your software release may not support all the features documented in this module. For the latest feature information and caveats, see the release notes for your platform and software release. To find information about the features documented in this module, and to see a list of the releases in which each feature is supported, see the Feature Information Table at the end of this document.
Use Cisco Feature Navigator to find information about platform support and Cisco software image support. To access Cisco Feature Navigator, go to www.cisco.com/go/cfn. An account on Cisco.com is not required.
Prerequisites for Support for PAID PPID Privacy PCPID and PAURI Headers on the Cisco UBE
Restrictions for Support for PAID PPID Privacy PCPID and PAURI Headers on the Cisco UBE
- To enable random-contact support, you must configure the Cisco Unified Border Element to support SIP registration with random-contact information. In addition, you must configure random-contact support in VoIP voice-service configuration mode or on the dial peer.
- If random-contact support is configured for SIP registration only, the system generates the random-contact information, includes it in the SIP REGISTER message, but does not include it in the SIP INVITE message.
- If random-contact support is configured in VoIP voice-service configuration mode or on the dial peer only, no random contact is sent in either the SIP REGISTER or INVITE message.
Configuring P-Header and Random-Contact Support on the Cisco Unified Border Element
To enable random contact support you must configure the Cisco Unified Border Element to support Session Initiation Protocol (SIP) registration with random-contact information, as described in this section.
To enable the Cisco Unified Border Element to use the PCPID header in an incoming INVITE message to route the call, and to use the PCPID value to set the To: value of outgoing INVITE messages, you must configure P-Header support as described in this section.
- Configuring P-Header Translation on a Cisco Unified Border Element
- Configuring P-Header Translation on an Individual Dial Peer
- Configuring P-Called-Party-Id Support on a Cisco Unified Border Element
- Configuring P-Called-Party-Id Support on an Individual Dial Peer
- Configuring Privacy Support on a Cisco Unified Border Element
- Configuring Privacy Support on an Individual Dial Peer
- Configuring Random-Contact Support on a Cisco Unified Border Element
- Configuring Random-Contact Support for an Individual Dial Peer
Configuring P-Header Translation on a Cisco Unified Border Element
To configure P-Header translations on a Cisco Unified Border Element, perform the steps in this section.
DETAILED STEPS
| Command or Action | Purpose | |
|---|---|---|
Step 1 |
enable
Example: Router> enable |
Enables privileged EXEC mode.
|
Step 2 |
configure
terminal
Example: Router# configure terminal |
Enters global configuration mode. |
Step 3 |
voice
service
voip
Example: Router(config)# voice service voip |
Enters VoIP voice-service configuration mode. |
Step 4 |
sip
Example: Router(conf-voi-serv)# sip |
Enters voice service VoIP SIP configuration mode. |
Step 5 |
asserted-id
header-type
Example: Router(conf-serv-sip)# asserted-id ppi |
Specifies the type of privacy header in the outgoing SIP requests and response messages. |
Step 6 |
exit
Example: Router(conf-serv-sip)# exit |
Exits the current mode. |
Configuring P-Header Translation on an Individual Dial Peer
DETAILED STEPS
| Command or Action | Purpose | |
|---|---|---|
Step 1 |
enable
Example: Router> enable |
Enables privileged EXEC mode.
|
Step 2 |
configure
terminal
Example: Router# configure terminal |
Enters global configuration mode. |
Step 3 |
dial-peer
voice
tag
voip
Example: Router(config)# dial-peer voice 2611 voip |
Defines the dial peer, specifies the method of voice encapsulation, and enters dial peer voice configuration mode. |
Step 4 |
voice-class
sip
asserted-id
header-type
Example: Router(config-dial-peer)# voice-class sip asserted-id ppi |
Specifies the type of privacy header in the outgoing SIP requests and response messages, on this dial peer. |
Step 5 |
exit
Example: Router(config-dial-peer)# exit |
Exits the current mode. |
Configuring P-Called-Party-Id Support on a Cisco Unified Border Element
To configure P-Called-Party-Id support on a Cisco Unified Border Element, perform the steps in this section.
DETAILED STEPS
| Command or Action | Purpose | |
|---|---|---|
Step 1 |
enable
Example: Router> enable |
Enables privileged EXEC mode.
|
Step 2 |
configure
terminal
Example: Router# configure terminal |
Enters global configuration mode. |
Step 3 |
voice
service
voip
Example: Router(config)# voice service voip |
Enters VoIP voice-service configuration mode. |
Step 4 |
sip
Example: Router(conf-voi-serv)# sip |
Enters voice service VoIP SIP configuration mode. |
Step 5 |
call-route
p-called-party-id
Example: Router(conf-serv-sip)# call-route p-called-party-id |
Enables the routing of calls based on the PCPID header. |
Step 6 |
random-request-uri
validate
Example: Router(conf-serv-sip)# random-request-uri validate |
Enables the validation of the random string in the Request URI of the incoming INVITE message. |
Step 7 |
exit
Example: Router(conf-serv-sip)# exit |
Exits the current mode. |
Configuring P-Called-Party-Id Support on an Individual Dial Peer
To configure P-Called-Party-Id support on an individual dial peer, perform the steps in this section.
DETAILED STEPS
| Command or Action | Purpose | |
|---|---|---|
Step 1 |
enable
Example: Router> enable |
Enables privileged EXEC mode.
|
Step 2 |
configure
terminal
Example: Router# configure terminal |
Enters global configuration mode. |
Step 3 |
dial-peer
voice
tag
voip
Example: Router(config)# dial-peer voice 2611 voip |
Defines the dial peer, specifies the method of voice encapsulation, and enters dial peer voice configuration mode. |
Step 4 |
voice-class
sip
call-route
p-called-party-id
Example: Router(config-dial-peer)# voice-class sip call-route p-called-party-id |
Enables the routing of calls based on the PCPID header on this dial peer. |
Step 5 |
voice-class
sip
random-request-uri
validate
Example: Router(config-dial-peer)# voice-class sip random-request-uri validate |
Enables the validation of the random string in the Request URI of the incoming INVITE message on this dial peer. |
Step 6 |
exit
Example: Router(config-dial-peer)# exit |
Exits the current mode. |
Configuring Privacy Support on a Cisco Unified Border Element
DETAILED STEPS
| Command or Action | Purpose | |
|---|---|---|
Step 1 |
enable
Example: Router> enable |
Enables privileged EXEC mode.
|
Step 2 |
configure
terminal
Example: Router# configure terminal |
Enters global configuration mode. |
Step 3 |
voice
service
voip
Example: Router(config)# voice service voip |
Enters VoIP voice-service configuration mode. |
Step 4 |
sip
Example: Router(conf-voi-serv)# sip |
Enters voice service VoIP SIP configuration mode. |
Step 5 |
privacy
privacy-option
Example: Router(conf-serv-sip)# privacy id |
Enables the privacy settings for the header. |
Step 6 |
privacy-policy
privacy-policy-option
Example: Router(conf-serv-sip)# privacy-policy passthru |
Specifies the privacy policy to use when passing the privacy header from one SIP leg to the next. |
Step 7 |
exit
Example: Router(conf-serv-sip)# exit |
Exits the current mode. |
Configuring Privacy Support on an Individual Dial Peer
DETAILED STEPS
| Command or Action | Purpose | |
|---|---|---|
Step 1 |
enable
Example: Router> enable |
Enables privileged EXEC mode.
|
Step 2 |
configure
terminal
Example: Router# configure terminal |
Enters global configuration mode. |
Step 3 |
dial-peer
voice
tag
voip
Example: Router(config)# dial-peer voice 2611 voip |
Defines the dial peer, specifies the method of voice encapsulation, and enters dial peer voice configuration mode. |
Step 4 |
voice-class
sip
privacy
privacy-option
Example: Router(config-dial-peer)# voice-class sip privacy id |
Enables the privacy settings for the header on this dial peer. |
Step 5 |
voice-class
sip
privacy-policy
privacy-policy-option
Example: Router(config-dial-peer)# voice-class sip privacy-policy passthru |
Specifies the privacy policy to use when passing the privacy header from one SIP leg to the next, on this dial peer. |
Step 6 |
exit
Example: Router(config-dial-peer)# exit |
Exits the current mode. |
Configuring Random-Contact Support on a Cisco Unified Border Element
To configure random-contact support on a Cisco Unified Border Element, perform the steps in this section.
DETAILED STEPS
| Command or Action | Purpose | |
|---|---|---|
Step 1 |
enable
Example: Router> enable |
Enables privileged EXEC mode.
|
Step 2 |
configure
terminal
Example: Router# configure terminal |
Enters global configuration mode. |
Step 3 |
sip-ua
Example: Router(config)# sip-ua |
Enters SIP user-agent configuration mode. |
Step 4 |
credentials
username
username
password
password
realm
domain-name
Example: Router(config-sip-ua)# credentials username 123456 password cisco realm cisco |
Sends a SIP registration message from the Cisco Unified Border Element. |
Step 5 |
registrar
ipv4:
destination-address
random-contact
expires
expiry
Example: Router(config-sip-ua)# registrar ipv4:10.1.2.2 random-contact expires 200 |
Enables the SIP gateways to register E.164 numbers on behalf of analog telephone voice ports (FXS), IP phone virtual voice ports (EFXS), and Skinny Client Control Protocol (SCCP) phones with an external SIP proxy or SIP registrar.
|
Step 6 |
exit
Example: Router(config-sip-ua)# exit |
Exits the current mode. |
Step 7 |
voice
service
voip
Example: Router(config)# voice service voip |
Enters VoIP voice-service configuration mode. |
Step 8 |
sip
Example: Router(conf-voi-serv)# sip |
Enters voice service VoIP SIP configuration mode. |
Step 9 |
random-contact
Example: Router(conf-serv-sip)# random-contact |
Enables random-contact support on a Cisco Unified Border Element. |
Step 10 |
exit
Example: Router(conf-serv-sip)# exit |
Exits the current mode. |
Configuring Random-Contact Support for an Individual Dial Peer
To configure configure random-contact support for an individual dial peer, perform the steps in this section.
DETAILED STEPS
| Command or Action | Purpose | |
|---|---|---|
Step 1 |
enable
Example: Router> enable |
Enables privileged EXEC mode.
|
Step 2 |
configure
terminal
Example: Router# configure terminal |
Enters global configuration mode. |
Step 3 |
sip-ua
Example: Router(config)# sip-ua |
Enters SIP user-agent configuration mode. |
Step 4 |
credentials
username
username
password
password
realm
domain-name
Example: Router(config-sip-ua)# credentials username 123456 password cisco realm cisco |
Sends a SIP registration message from the Cisco Unified Border Element. |
Step 5 |
registrar
ipv4:
destination-address
random-contact
expires
expiry
Example: Router(config-sip-ua)# registrar ipv4:10.1.2.2 random-contact expires 200 |
Enables the SIP gateways to register E.164 numbers on behalf of FXS, EFXS, and SCCP phones with an external SIP proxy or SIP registrar.
|
Step 6 |
exit
Example: Router(config-sip-ua)# exit |
Exits the current mode. |
Step 7 |
dial-peer
voice
tag
voip
Example: Router(config)# dial-peer voice 2611 voip |
Defines the dial peer, specifies the method of voice encapsulation, and enters dial peer voice configuration mode. |
Step 8 |
voice-class
sip
random-contact
Example: Router(config-dial-peer)# voice-class sip random-contact |
Enables random-contact support on this dial peer. |
Step 9 |
exit
Example: Router(config-dial-peer)# exit |
Exits the current mode. |
Feature Information for PAID PPID Privacy PCPID and PAURI Headers on the Cisco Unified Border Element
The following table provides release information about the feature or features described in this module. This table lists only the software release that introduced support for a given feature in a given software release train. Unless noted otherwise, subsequent releases of that software release train also support that feature.
Use Cisco Feature Navigator to find information about platform support and Cisco software image support. To access Cisco Feature Navigator, go to www.cisco.com/go/cfn. An account on Cisco.com is not required.
Feature History Table entry for the Cisco Unified Border Element.
| Table 2 | Feature Information for PAID, PPID, Privacy, PCPID, and PAURI Headers on the UBE |
|
Feature Name |
Releases |
Feature Information |
|---|---|---|
|
PAID, PPID, Privacy, PCPID, and PAURI Headers on the Cisco Unified Border Element |
12.4(22)YB 15.0(1)M |
This feature enables Cisco UBE platforms to support:
The following commands were introduced: call-route p-called-party-id, privacy-policy, random-contact, random-request-uri validate, voice-class sip call-route p-called-party-id, voice-class sip privacy-policy, voice-class sip random-contact, and voice-class sip random-request-uri validate. |
Feature History Table entry for the Cisco Unified Border Element (Enterprise) .
| Table 3 | Feature Information for PAID, PPID, Privacy, PCPID, and PAURI Headers on the Cisco UBE |
|
Feature Name |
Releases |
Feature Information |
|---|---|---|
|
PAID, PPID, Privacy, PCPID, and PAURI Headers on the Cisco Unified Border Element |
Cisco IOS XE Release 3.1S |
This feature enables Cisco UBE platforms to support:
The following commands were introduced: call-route p-called-party-id, privacy-policy, random-contact, random-request-uri validate, voice-class sip call-route p-called-party-id, voice-class sip privacy-policy, voice-class sip random-contact, and voice-class sip random-request-uri validate. |
Cisco and the Cisco logo are trademarks or registered trademarks of Cisco and/or its affiliates in the U.S. and other countries. To view a list of Cisco trademarks, go to this URL: www.cisco.com/go/trademarks. Third-party trademarks mentioned are the property of their respective owners. The use of the word partner does not imply a partnership relationship between Cisco and any other company. (1110R)
Any Internet Protocol (IP) addresses and phone numbers used in this document are not intended to be actual addresses and phone numbers. Any examples, command display output, network topology diagrams, and other figures included in the document are shown for illustrative purposes only. Any use of actual IP addresses or phone numbers in illustrative content is unintentional and coincidental.