
 Feedback
Contents
- Firewall Authentication Proxy for FTP and Telnet Sessions
- Finding Feature Information
- Restrictions for Firewall Authentication Proxy for FTP and Telnet Sessions
- Information About Firewall Authentication Proxy for FTP and Telnet Sessions
- Feature Design for FTP and Telnet Authentication Proxy
- FTP and Telnet Login Methods
- FTP Login
- Telnet Login
- Absolute Timeout
- How to Configure FTP or Telnet Authentication Proxy
- Configuring AAA
- What to Do Next
- Configuring the Authentication Proxy
- Verifying FTP or Telnet Authentication Proxy
- Monitoring and Maintaining FTP or Telnet Authentication Proxy Sessions
- Configuration Examples for FTP and Telnet Authentication Proxy
- Authentication Proxy Configuration Example
- AAA Server User Profile Examples
- TACACS+ User Profiles Example
- Livingston RADIUS User Profiles Example
- Ascend RADIUS User Profiles Example
- Additional References
- Feature Information for Firewall Authentication Proxy for FTP and Telnet Session
Firewall Authentication Proxy for FTP and Telnet Sessions
Before the introduction of the Firewall Authentication Proxy for FTP and Telnet Sessions feature, users could enable only HTTP when configuring authentication proxy. This feature introduces support for FTP and Telnet, providing users with three protocol options when configuring authentication proxy.
- Finding Feature Information
- Restrictions for Firewall Authentication Proxy for FTP and Telnet Sessions
- Information About Firewall Authentication Proxy for FTP and Telnet Sessions
- How to Configure FTP or Telnet Authentication Proxy
- Configuration Examples for FTP and Telnet Authentication Proxy
- Additional References
- Feature Information for Firewall Authentication Proxy for FTP and Telnet Session
Finding Feature Information
Your software release may not support all the features documented in this module. For the latest feature information and caveats, see the release notes for your platform and software release. To find information about the features documented in this module, and to see a list of the releases in which each feature is supported, see the Feature Information Table at the end of this document.
Use Cisco Feature Navigator to find information about platform support and Cisco software image support. To access Cisco Feature Navigator, go to www.cisco.com/go/cfn. An account on Cisco.com is not required.
Restrictions for Firewall Authentication Proxy for FTP and Telnet Sessions
- Authentication proxy is an IP-only feature; thus, it comes with only -o3 images.
- "proxyacl#<n>" is the only supported attribute in the authentication, authorization, and accounting (AAA) server's user configuration.
- Authentication proxy is subjected only to the traffic that passes through the router; traffic that is destined for the router continues to be authenticated by the existing authentication methods that are provided by Cisco IOS.
Information About Firewall Authentication Proxy for FTP and Telnet Sessions
Feature Design for FTP and Telnet Authentication Proxy
Authentication proxy for FTP and Telnet Sessions functions like authentication proxy for HTTP; that is, FTP and Telnet are independent components in the Cisco IOS software and can be enabled or disabled on the interface of an unauthenticated host.
Many of the authentication proxy for FTP or Telnet functions are similar to those used with HTTP, such as the interaction between the authentication proxy router and the AAA server during authentication. However, because of protocol differences, FTP and Telnet login methods are different from HTTP.
FTP and Telnet Login Methods
The figure below displays a typical authentication proxy topology.

Just as with HTTP, the authentication proxy router intercepts traffic that is sent from the client host. Upon receiving a FTP or Telnet packet, the router will look into its authentication cache to check whether the client host has already been authenticated. If it has been authenticated, the router will forward the client host's traffic to the FTP or Telnet server for additional authentication. If the IP address of the client host is not in the cache of the router, the router will try to authenticate the client host with the AAA server using the username and password of the router.
FTP Login
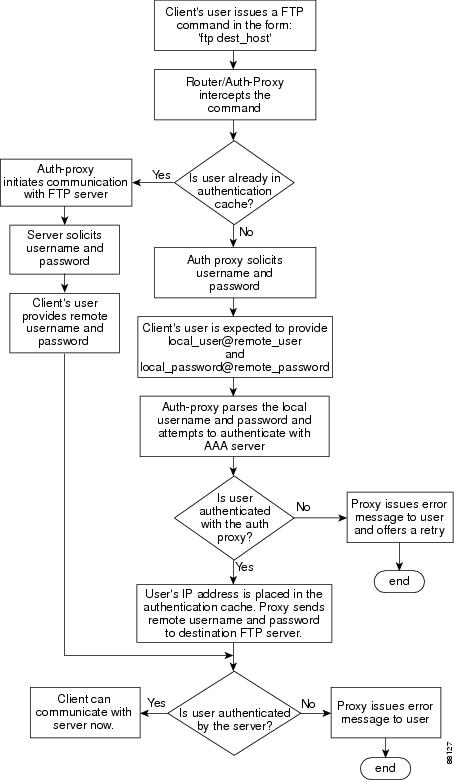
For FTP login, the client host will be prompted (by the authentication proxy router) for the username and password of the router; the client must respond with the username and password in the following format: "login: proxy_username@ftp_username" and "password: proxy_passwd@ftp_passwd :". The authentication proxy will use the proxy username and password to verify the client's profile against the AAA server's user database. After the client is successfully authenticated with the AAA server, the authentication proxy will pass the FTP (remote) username and password to the FTP server (destination server) for the application server authentication.
A flow chart that depicts an overview of the FTP authentication proxy process is shown in the figure below.
Telnet Login
For Telnet login, the client host will be prompted (by the authentication proxy router) for the username, followed by the password; the client must respond with the username and password in the following format: "login: proxy_username:" and "password: proxy_passwd):". The username and password will be verified against the AAA server's user database. After the client is successfully authenticated with the AAA server, the Telnet server (destination server) will prompt the client for the username and password of the Telnet server.
A flow chart that depicts an overview of the Telnet authentication proxy process is shown in the figure below.

If authentication with the AAA server fails, the proxy will inform the client accordingly. With Telnet, the proxy does not have any interest in the Telnet server's username and password. If the client is authenticated with the AAA server but fails with the Telnet server, the client will not have to authenticate with the AAA server the next time he or she logs into the network; the client's IP address will be stored in the authentication cache. The client will have to authenticate only with the Telnet server.
Absolute Timeout
An absolute timeout value has been added to allow users to configure a window during which the authentication proxy on the enabled interface is active. After the absolute timer expires, the authentication proxy will be disabled regardless of any activity. The absolute timeout value can be configured per protocol (through the ip auth-proxy name command) or globally (through the ip auth-proxy command). The default value of the absolute timeout is zero; that is, the absolute timer is turned off by default, and the authentication proxy is enabled indefinitely and is subject only to the timeout specified by the inactivity-timerkeyword.
 Note | The inactivity-timerkeyword deprecates the auth-cache-time keyword in the ip auth-proxy name and the ip auth-proxy commands. |
How to Configure FTP or Telnet Authentication Proxy
- Configuring AAA
- Configuring the Authentication Proxy
- Verifying FTP or Telnet Authentication Proxy
- Monitoring and Maintaining FTP or Telnet Authentication Proxy Sessions
Configuring AAA
To use authentication proxy, you must configure a AAA server for authentication. The authentication proxy service of the AAA server must also be configured for authorization. To configure these tasks, perform the following steps:
- access-list access-list-number permit deny tcp| ip | icmp host source eq tacacs host destination
DETAILED STEPS
Configuring the Authentication Proxy
DETAILED STEPS
Verifying FTP or Telnet Authentication Proxy
To verify your FTP or Telnet authentication proxy configuration, perform the following optional steps:
DETAILED STEPS
| Command or Action | Purpose | |
|---|---|---|
Step 1 |
enable
Example: Router> enable |
Enables higher privilege levels, such as privileged EXEC mode. Enter your password if prompted. |
Step 2 |
show
ip
auth-proxy
configuration
Example: Router# show ip auth-proxy configuration |
Displays the current authentication proxy configuration. |
Step 3 |
show ip auth-proxy cache Example: Router# show ip auth-proxy cache |
Displays the list of user authentication entries. The authentication proxy cache lists the host IP address, the source port number, the timeout value for the authentication proxy, and the state of the connection. If the authentication proxy state is ESTAB or INTERCEPT, the user authentication was successful. |
Monitoring and Maintaining FTP or Telnet Authentication Proxy Sessions
DETAILED STEPS
| Command or Action | Purpose | |
|---|---|---|
Step 1 |
enable
Example: Router> enable |
Enables higher privilege levels, such as privileged EXEC mode. Enter your password if prompted. |
Step 2 |
debug
ip
auth-proxy
detailed
| ftp | function-trace | object-creation | object-deletion | telnet | timers Example: Router# debug ip auth-proxy ftp |
Displays the authentication proxy configuration information on the router. |
Configuration Examples for FTP and Telnet Authentication Proxy
Authentication Proxy Configuration Example
The following example shows how to configure your router for authentication proxy:
aaa new-model
aaa authentication login default group tacacs+
aaa authorization exec default group tacacs+
aaa authorization auth-proxy default group tacacs+
enable password lab
!
ip inspect name pxy_test ftp
ip auth-proxy name pxy auth-cache-time 1
!
interface Ethernet0/0
 ip address 209.165.200.225 255.255.255.224
 ip access-group 105 in
 no ip directed-broadcast
 ip inspect pxy_test in
 ip auth-proxy pxy
 no shut
!
interface Ethernet0/1
 ip address 209.165.200.225 255.255.255.224
 ip access-group 102 in
 no ip directed-broadcast
no shut
!
ip http authentication aaa
!
access-list 102 permit any
access-list 102 permit tcp host 209.165.200.234 eq tacacs any
access-list 102 deny   tcp any any
access-list 102 deny   udp any any
access-list 102 permit ip any any
access-list 105 permit tcp any any eq www
access-list 105 permit ip any any
access-list 105 deny   tcp any any
access-list 105 deny   udp any any
dialer-list 1 protocol ip permit
dialer-list 1 protocol ipx permit
!
tacacs-server host 209.165.200.234
tacacs-server key cisco
!
line con 0
 transport input none
 login authentication special
line aux 0
line vty 0 4
 password lab
AAA Server User Profile Examples
This section includes examples of the authentication proxy user profile entries on the AAA servers. The "proxyacl" entries define the user access privileges. After the user has successfully used the authentication proxy to log in, these entries are transferred to the firewall router. Each entry in the profile must specify "permit" access for the service or application. The source address in each entry is set to "any", which is replaced with the IP address of the authenticating host when the profile is downloaded to the firewall. The privilege level must be set to 15 for all AAA users.
- TACACS+ User Profiles Example
- Livingston RADIUS User Profiles Example
- Ascend RADIUS User Profiles Example
TACACS+ User Profiles Example
The following example are sample TACACS+ user profiles:
default authorization = permit
key = cisco
user = http_1 {
  default service = permit
      login = cleartext test
         service = exec
        {
                 priv-lvl = 15
                 inacl#4="permit tcp any host 209.165.200.234 eq 23"
                 inacl#5="permit tcp any host 209.165.200.234 eq 20"
                 inacl#6="permit tcp any host 209.165.200.234 eq 21"
                 inacl#3="deny -1"

        }
      service = auth-proxy
          {
              priv-lvl=15
              proxyacl#4="permit tcp any host 209.165.201.1 eq 23"
              proxyacl#5="permit tcp any host 209.165.201.1 eq 20"
              proxyacl#6="permit tcp any host 209.165.201.1 eq 21"
              proxyacl#7="permit tcp any host 209.165.201.1 eq 25"
          }

}
user = http {
          login = cleartext test
      service = auth-proxy
         {
              priv-lvl=15
              proxyacl#4="permit tcp any host 209.165.201.1 eq 23"
              proxyacl#5="permit tcp any host 209.165.201.1 eq 20"
              proxyacl#6="permit tcp any host 209.165.201.1 eq 21"
          }
}
 user = proxy_1 {
          login = cleartext test
      service = auth-proxy
          {
              priv-lvl=14
        }
}

user = proxy_3 {
          login = cleartext test
      service = auth-proxy
          {
              priv-lvl=15
        }
}
Livingston RADIUS User Profiles Example
The following examples are sample user profiles for the Livingston RADIUS server:
#--------------- Proxy user ---------------------------------

http                   Password = "test" User-Service-Type=Outbound-User
       cisco-avpair = "auth-proxy:priv-lvl=15",
       cisco-avpair = "auth-proxy:proxyacl#3=permit tcp any any eq 23"

http_1                    Password = "test"
         User-Service-Type = Shell-User,
         User-Service-Type=Dialout-Framed-User,
         cisco-avpair = "shell:priv-lvl=15",
         cisco-avpair = "shell:inacl#4=permit tcp any host 209.165.200.234
eq 23
         cisco-avpair = "auth-proxy:priv-lvl=15",
         cisco-avpair = "auth-proxy:proxyacl#3=permit tcp any any eq 23"


http_fail               Password = "test" User-Service-Type=Outbound-User
       cisco-avpair = "auth-proxy:priv-lvl=14",
       cisco-avpair = "auth-proxy:proxyacl#3=permit tcp any any eq 23"

proxy  Password = "cisco" User-Service-Type=Outbound-User       cisco-avpair = "auth-proxy:proxyacl#4=permit tcp any any eq 20"
Ascend RADIUS User Profiles Example
The following examples are sample user profiles for the Ascend RADIUS server:
#--------------- Proxy user ---------------------------------

http                   Password = "test" User-Service=Dialout-Framed-User
       cisco-avpair = "auth-proxy:priv-lvl=15",
       cisco-avpair = "auth-proxy:proxyacl#3=permit tcp any any eq 23"

http_2                   Password = "test"
User-Service=Dialout-Framed-User
       cisco-avpair = "auth-proxy:priv-lvl=15",
       cisco-avpair = "auth-proxy:proxyacl#3=permit tcp any any eq 23",
       cisco-avpair = "shell:inacl#4=permit tcp any host 209.165.200.234 eq 25"

http_1                    Password = "test"
         User-Service=Dialout-Framed-User,
         cisco-avpair = "shell:inacl#4=permit tcp any host 209.165.200.234 eq 23",
         cisco-avpair = "auth-proxy:priv-lvl=15",
         cisco-avpair = "auth-proxy:proxyacl#3=permit tcp any any eq 23"

http_fail               Password = "test" User-Service=Dialout-Framed-User
       cisco-avpair = "auth-proxy:priv-lvl=14",
       cisco-avpair = "auth-proxy:proxyacl#3=permit tcp any any eq 23"

        cisco-avpair = "auth-proxy:proxyacl#1=permit tcp any any eq 23",
       cisco-avpair = "auth-proxy:proxyacl#3=permit tcp any any eq ftp",
       cisco-avpair = "auth-proxy:proxyacl#4=permit tcp any any eq 20"


#------------------------------------------------------------
proxy Password = "cisco" User-Service = Dialout-Framed-User

       cisco-avpair = "auth-proxy:priv-lvl=15",
       cisco-avpair = "auth-proxy:priv-lvl=15",
       cisco-avpair = "auth-proxy:proxyacl#1=permit tcp any any eq 26",
       cisco-avpair = "auth-proxy:proxyacl#3=permit tcp any any eq ftp",
Additional References
The following sections provide references related to the Firewall Authentication Proxy for FTP and Telnet Sessions feature.
Related Documents
|
Related Topic |
Document Title |
|---|---|
|
Additional authentication proxy configuration tasks |
Configuring Authentication Proxy |
|
Additional authentication proxy commands |
Cisco IOS Security Command Reference |
|
RADIUS and TACACS+ configuration information |
Configuring RADIUS and Configuring TACACS+ |
|
RADIUS and TACACS+ attribute information |
RADIUS Attributes Overview and RADIUS IETF Attributes and TACACS+ Attribute-Value Pairs |
|
Additional authentication proxy information |
Firewall Support of HTTPS Authentication Proxy |
MIBs
Technical Assistance
|
Description |
Link |
|---|---|
|
The Cisco Support website provides extensive online resources, including documentation and tools for troubleshooting and resolving technical issues with Cisco products and technologies. To receive security and technical information about your products, you can subscribe to various services, such as the Product Alert Tool (accessed from Field Notices), the Cisco Technical Services Newsletter, and Really Simple Syndication (RSS) Feeds. Access to most tools on the Cisco Support website requires a Cisco.com user ID and password. |
Feature Information for Firewall Authentication Proxy for FTP and Telnet Session
The following table provides release information about the feature or features described in this module. This table lists only the software release that introduced support for a given feature in a given software release train. Unless noted otherwise, subsequent releases of that software release train also support that feature.
Use Cisco Feature Navigator to find information about platform support and Cisco software image support. To access Cisco Feature Navigator, go to www.cisco.com/go/cfn. An account on Cisco.com is not required.
| Table 1 | Feature Information for Firewall Authentication Proxy for FTP and Telnet Sessions |
|
Feature Name |
Releases |
Feature Information |
|---|---|---|
|
Firewall Authentication Proxy for FTP and Telnet Sessions |
12.3(1) |
Before the introduction of the Firewall Authentication Proxy for FTP and Telnet Sessions feature, users could enable only HTTP when configuring authentication proxy. This feature introduces support for FTP and Telnet, providing users with three protocol options when configuring authentication proxy. This feature was introduced in Cisco IOS Release 12.3(1). The following commands were introduced or modified: debug ip auth-proxy, ip auth-proxy, ip auth-proxy auth-proxy-banner, ip auth-proxy name. |
Cisco and the Cisco logo are trademarks or registered trademarks of Cisco and/or its affiliates in the U.S. and other countries. To view a list of Cisco trademarks, go to this URL: www.cisco.com/go/trademarks. Third-party trademarks mentioned are the property of their respective owners. The use of the word partner does not imply a partnership relationship between Cisco and any other company. (1110R)
Any Internet Protocol (IP) addresses and phone numbers used in this document are not intended to be actual addresses and phone numbers. Any examples, command display output, network topology diagrams, and other figures included in the document are shown for illustrative purposes only. Any use of actual IP addresses or phone numbers in illustrative content is unintentional and coincidental.