
 Feedback
Contents
- Configuring Authentication
- Finding Feature Information
- Prerequisites for Configuring Authentication
- Restrictions for Configuring Authentication
- Information About Configuring Authentication
- Named Method Lists for Authentication
- Method Lists and Server Groups
- Method List Examples
- AAA Authentication General Configuration Procedure
- RADIUS Change of Authorization
- Change-of-Authorization Requests
- RFC 5176 Compliance
- CoA Request Response Code
- Session Identification
- CoA ACK Response Code
- CoA NAK Response Code
- CoA Request Commands
- Session Reauthentication
- Session Termination
- CoA Request Disable Host Port
- CoA Request Bounce-Port
- Domain Stripping
- How to Configure AAA Authentication Methods
- Configuring Login Authentication Using AAA
- Preventing an Access-Request with an Expired Username from Being Sent to the RADIUS Server
- Login Authentication Using Enable Password
- Login Authentication Using Kerberos
- Login Authentication Using Line Password
- Login Authentication Using the Local Password
- Login Authentication Using Group LDAP
- Login Authentication Using Group RADIUS
- Configuring RADIUS Attribute 8 in Access Requests
- Login Authentication Using Group TACACS
- Login Authentication Using the group group-name method
- Configuring PPP Authentication Using AAA
- PPP Authentication Using Kerberos
- PPP Authentication Using the Local Password
- PPP Authentication Using Group RADIUS
- Configuring RADIUS Attribute 44 in Access Requests
- PPP Authentication Using Group TACACS
- PPP Authentication Using group group-name
- Configuring AAA Scalability for PPP Requests
- Configuring ARAP Authentication Using AAA
- ARAP Authentication Allowing Authorized Guest Logins
- ARAP Authentication Allowing Guest Logins
- ARAP Authentication Using the Line Password
- ARAP Authentication Using the Local Password
- ARAP Authentication Using Group RADIUS
- ARAP Authentication Using Group TACACS
- ARAP Authentication Using Group group-name
- Configuring NASI Authentication Using AAA
- NASI Authentication Using Enable Password
- NASI Authentication Using the Line Password
- NASI Authentication Using the Local Password
- NASI Authentication Using Group RADIUS
- NASI Authentication Using Group TACACS
- NASI Authentication Using group group-name
- Specifying the Amount of Time for Login Input
- Enabling Password Protection at the Privileged Level
- Changing the Text Displayed at the Password Prompt
- Preventing an Access Request with a Blank Username from Being Sent to the RADIUS Server
- Configuring Message Banners for AAA Authentication
- Configuring a Login Banner
- Configuring a Failed-Login Banner
- Configuring AAA Packet of Disconnect
- Enabling Double Authentication
- How Double Authentication Works
- Configuring Double Authentication
- Accessing the User Profile After Double Authentication
- Enabling Automated Double Authentication
- Configuring Automated Double Authentication
- Troubleshooting Automated Double Authentication
- Configuring the Dynamic Authorization Service for RADIUS CoA
- Configuring the Device to Ignore Bounce and Disable RADIUS CoA Requests
- Configuring Domain Stripping at the Server Group Level
- Non-AAA Authentication Methods
- Configuring Line Password Protection
- Establishing Username Authentication
- Enabling CHAP or PAP Authentication
- Enabling PPP Encapsulation
- Enabling PAP or CHAP
- Inbound and Outbound Authentication
- Enabling Outbound PAP Authentication
- Refusing PAP Authentication Requests
- Creating a Common CHAP Password
- Refusing CHAP Authentication Requests
- Delaying CHAP Authentication Until Peer Authenticates
- Using MS-CHAP
- Defining PPP Authentication using MS-CHAP
- Authentication Examples
- RADIUS Authentication Examples
- TACACS Authentication Examples
- Kerberos Authentication Examples
- AAA Scalability Example
- Login and Failed Banner Examples
- AAA Packet of Disconnect Server Key Example
- Double Authentication Examples
- Configuration of the Local Host for AAA with Double Authentication Examples
- Configuration of the AAA Server for First-Stage PPP Authentication and Authorization Example
- Configuration of the AAA Server for Second-Stage Per-User Authentication and Authorization Examples
- Complete Configuration with TACACS Example
- Automated Double Authentication Example
- MS-CHAP Example
- Additional References
- Feature Information for Configuring Authentication
Configuring Authentication
Authentication provides a method to identify users, which includes the login and password dialog, challenge and response, messaging support, and encryption, depending on the selected security protocol. Authentication is the way a user is identified prior to being allowed access to the network and network services.
- Finding Feature Information
- Prerequisites for Configuring Authentication
- Restrictions for Configuring Authentication
- Information About Configuring Authentication
- How to Configure AAA Authentication Methods
- Non-AAA Authentication Methods
- Authentication Examples
- Additional References
- Feature Information for Configuring Authentication
Finding Feature Information
Your software release may not support all the features documented in this module. For the latest caveats and feature information, see Bug Search Tool and the release notes for your platform and software release. To find information about the features documented in this module, and to see a list of the releases in which each feature is supported, see the feature information table at the end of this module.
Use Cisco Feature Navigator to find information about platform support and Cisco software image support. To access Cisco Feature Navigator, go to www.cisco.com/go/cfn. An account on Cisco.com is not required.
Prerequisites for Configuring Authentication
The Cisco software implementation of authentication is divided into Authentication, Authorization, and Accounting (AAA) authentication and nonauthentication methods. Cisco recommends that, whenever possible, AAA security services be used to implement authentication.
Restrictions for Configuring Authentication
- The number of AAA method lists that can be configured is 250.
- If you configure one RADIUS server with the nonstandard option and another RADIUS server without the nonstandard option, the RADIUS-server host with the nonstandard option does not accept a predefined host. If you configure the same RADIUS server host IP address for a different UDP destination port for accounting requests by using the acct-port keyword and a UDP destination port for authentication requests by using the auth-port keyword with and without the nonstandard option, the RADIUS server does not accept the nonstandard option.
Information About Configuring Authentication
The following sections describe how AAA authentication is configured by defining a named list of authentication methods and then applying that list to various interfaces. This section also describes how AAA authentication is handled by using RADIUS Change in Authorization (CoA):
Named Method Lists for Authentication
A named list of authentication methods is first defined before AAA authentication can be configured, and the named list is then applied to various interfaces. The method list defines the types of authentication and the sequence in which they are performed; it must be applied to a specific interface before any of the defined authentication methods are performed. The only exception is the default method list (which is named "default"). The default method list is automatically applied to all interfaces, except those that have a named method list explicitly defined. A defined method list overrides the default method list.
A method list is a sequential list describing the authentication methods to be queried to authenticate a user. Method lists enable you to designate one or more security protocols to be used for authentication, thus ensuring a backup system for authentication in case the initial method fails. Cisco software uses the first listed method to authenticate users. If that method fails to respond, the Cisco software selects the next authentication method listed in the method list. This process continues until there is successful communication with a listed authentication method, or all methods defined in the method list are exhausted.
Note that the Cisco software attempts authentication with the next listed authentication method only when there is no response from the previous method. If authentication fails at any point in this cycle, that is, the security server or local username database responds by denying the user access, then the authentication process stops and no other authentication methods are attempted.
- Method Lists and Server Groups
- Method List Examples
- AAA Authentication General Configuration Procedure
Method Lists and Server Groups
A server group is a way to group existing Lightweight Directory Access Protocol (LDAP), RADIUS, or TACACS+ server hosts for use in method lists. The figure below shows a typical AAA network configuration that includes four security servers: R1 and R2 are RADIUS servers and T1 and T2 are TACACS+ servers. R1 and R2 make up the group of RADIUS servers. T1 and T2 make up the group of TACACS+ servers.

Using server groups, you can specify a subset of the configured server hosts and use them for a particular service. For example, server groups allow you to define R1 and R2 as one server group and T1 and T2 as a separate server group. For example, you can specify R1 and T1 in the method list for authentication login, while specifying R2 and T2 in the method list for PPP authentication.
Server groups can also include multiple host entries for the same server, as long as each entry has a unique identifier. The combination of an IP address and a UDP port number creates a unique identifier, allowing different ports to be individually defined as RADIUS hosts providing a specific AAA service. In other words, this unique identifier enables RADIUS requests to be sent to different UDP ports on a server at the same IP address. If two different host entries on the same RADIUS server are configured for the same service--for example, authentication--the second host entry acts as failover backup to the first one. Using this example, if the first host entry fails to provide accounting services, the network access server will try the second host entry configured on the same device for accounting services. (The RADIUS host entries will be tried in the order in which they are configured.)
See the "Configuring LDAP," "Configuring RADIUS," or "Configuring TACACS+" feature modules for more information about configuring server groups and configuring server groups based on Dialed Number Identification Service (DNIS) numbers.
Method List Examples
Suppose the system administrator has decided on a security solution, where all interfaces will use the same authentication methods to authenticate PPP connections. In the RADIUS group, R1 is contacted first for authentication information; if there is no response, R2 is contacted. If R2 does not respond, T1 in the TACACS+ group is contacted; if T1 does not respond, T2 is contacted. If all designated servers fail to respond, authentication falls to the local username database on the access server. To implement this solution, the system administrator can create a default method list by entering the following command:
aaa authentication ppp default group radius group tacacs+ local
In the above example, "default" is the name of the method list. The protocols included in this method list are listed after the name in the order in which they are queried. The default list is automatically applied to all interfaces.
When a remote user attempts to dial in to the network, the network access server first queries R1 for authentication information. If R1 authenticates the user, it issues a PASS response to the network access server and the user is allowed to access the network. If R1 returns a FAIL response, the user is denied access and the session is terminated. If R1 does not respond, then the network access server processes that as an ERROR and queries R2 for authentication information. This pattern continues through the remaining designated methods until the user is either authenticated or rejected or until the session is terminated.
Note that a FAIL response is significantly different from an ERROR. A FAIL means that the user has not met the criteria contained in the applicable authentication database to be successfully authenticated. Authentication ends with a FAIL response. An ERROR means that the security server has not responded to an authentication query. Because of this, no authentication has been attempted. Only when an ERROR is detected will AAA select the next authentication method defined in the authentication method list.
If the system administrator wants to apply a method list only to a particular interface or set of interfaces, the system administrator creates a named method list and then applies this named list to the applicable interfaces. The following example shows how the system administrator can implement an authentication method that will be applied only to interface 3:
aaa authentication ppp default group radius group tacacs+ local
aaa authentication ppp apple group radius group tacacs+ local none
 interface async 3
 ppp authentication chap list1
In the above example, "list1" is the name of the method list, and the protocols included in this method list are listed after the name in the order in which they are to be performed. After the method list has been created, it is applied to the appropriate interface. Note that the method list name (list1) in both the aaa authentication and the ppp authentication commands must match.
In the following example, the system administrator uses server groups to specify that only R2 and T2 are valid servers for PPP authentication. To do this, the administrator must define specific server groups with R2 (192.0.2.3) and T2 (192.0.2.17) as members. In the below example, the RADIUS server group "rad2only" is defined as follows using the aaa group server command:
aaa group server radius rad2only
 server 192.0.2.3
The TACACS+ server group "tac2only" is defined as follows by using the aaa group server command:
aaa group server tacacs+ tac2only
 server 192.0.2.17
The administrator then applies PPP authentication using the server groups. In the below example, the default methods list for PPP authentication follows the order: group rad2only, group tac2only, and local:
aaa authentication ppp default group rad2only group tac2only local
AAA Authentication General Configuration Procedure
To configure AAA authentication, perform the following tasks:
- Enable AAA by using the aaa new-model command in global configuration mode.
- Configure security protocol parameters, such as RADIUS, TACACS+, or Kerberos if you are using a security server. See "Configuring RADIUS," "Configuring TACACS+," and "Configuring Kerberos," respectively for more information.
- Define the method lists for authentication by using an AAA authentication command.
- Apply the method lists to a particular interface or line, if required.
RADIUS Change of Authorization
A standard RADIUS interface is typically used in a pulled model in which the request originates from a network attached device and the response is sent from the queried servers. The Cisco software supports the RADIUS Change of Authorization (CoA) extensions defined in RFC 5176 that are typically used in a pushed model and allow for the dynamic reconfiguring of sessions from external AAA or policy servers.
Use per-session CoA requests in:
- Session reauthentication
- Session termination
- Session termination with port shutdown
- Session termination with port bounce
- Security and Password--see the "Configuring Security with Passwords, Privilege Levels, and Login Usernames for CLI Sessions on Networking Devices" feature module for more information.
- Accounting---see the "Configuring Accounting" feature module for more information.
The following sections describe how RADIUS CoA messaging works:
Change-of-Authorization Requests
Change of Authorization (CoA) requests, as described in RFC 5176, are used in a pushed model to allow for session identification, host reauthentication, and session termination. The model comprises one request (CoA-Request) and two possible response codes:
The request is initiated from a CoA client (typically a RADIUS or policy server) and directed to the device that acts as a listener.
RFC 5176 Compliance
The Disconnect Request message, which is also referred to as Packet of Disconnect (POD), is supported by the device for session termination.
The table below shows the IETF attributes that are supported for this feature.
| Table 1 | Supported IETF Attributes |
|
Attribute Number |
Attribute Name |
|---|---|
|
24 |
State |
|
31 |
Calling-Station-ID |
|
44 |
Acct-Session-ID |
|
80 |
Message-Authenticator |
|
101 |
Error-Cause |
The table below shows the possible values for the Error-Cause attribute.
| Table 2 | Error-Cause Values |
|
Value |
Explanation |
|---|---|
|
201 |
Residual Session Context Removed |
|
202 |
Invalid EAP Packet (Ignored) |
|
401 |
Unsupported Attribute |
|
402 |
Missing Attribute |
|
403 |
NAS Identification Mismatch |
|
404 |
Invalid Request |
|
405 |
Unsupported Service |
|
406 |
Unsupported Extension |
|
407 |
Invalid Attribute Value |
|
501 |
Administratively Prohibited |
|
502 |
Request Not Routable (Proxy) |
|
503 |
Session Context Not Found |
|
504 |
Session Context Not Removable |
|
505 |
Other Proxy Processing Error |
|
506 |
Resources Unavailable |
|
507 |
Request Initiated |
|
508 |
Multiple Session Selection Unsupported |
CoA Request Response Code
The CoA Request response code can be used to issue a command to the device. The supported commands are listed in the "CoA Request Commands" section.
Session Identification
For disconnect and CoA requests targeted at a particular session, the device locates the session based on one or more of the following attributes:
- Acct-Session-Id (IETF attribute #44)
- Audit-Session-Id (Cisco vendor-specific attribute (VSA))
- Calling-Station-Id (IETF attribute #31, which contains the host MAC address)
Unless all session identification attributes included in the CoA message match the session, the device returns a Disconnect-NAK or CoA-NAK with the "Invalid Attribute Value" error-code attribute.
For disconnect and CoA requests targeted to a particular session, any one of the following session identifiers can be used:
- Accounting-Session-ID (IETF attribute #44)
- Audit-Session-ID (Cisco VSA)
- Calling-Station-ID (IETF attribute #31, which contains the MAC address)
If more than one session identification attribute is included in the message, all of the attributes must match the session or the device returns a Disconnect-negative acknowledgement (NAK) or CoA-NAK with the error code "Invalid Attribute Value."
CoA ACK Response Code
If the authorization state is changed successfully, a positive acknowledgment (ACK) is sent. The attributes returned within CoA ACK can vary based on the CoA Request.
The packet format for a CoA Request code as defined in RFC 5176 consists of the fields: Code, Identifier, Length, Authenticator, and Attributes in Type:Length:Value (TLV) format.
    0                   1                   2                   3
    0 1 2 3 4 5 6 7 8 9 0 1 2 3 4 5 6 7 8 9 0 1 2 3 4 5 6 7 8 9 0 1
   +-+-+-+-+-+-+-+-+-+-+-+-+-+-+-+-+-+-+-+-+-+-+-+-+-+-+-+-+-+-+-+-+
   |     Code      |  Identifier   |            Length             |
   +-+-+-+-+-+-+-+-+-+-+-+-+-+-+-+-+-+-+-+-+-+-+-+-+-+-+-+-+-+-+-+-+
   |                                                               |
   |                         Authenticator                         |
   |                                                               |
   |                                                               |
   +-+-+-+-+-+-+-+-+-+-+-+-+-+-+-+-+-+-+-+-+-+-+-+-+-+-+-+-+-+-+-+-+
   |  Attributes ...
   +-+-+-+-+-+-+-+-+-+-+-+-+-
The attributes field is used to carry Cisco VSAs.
CoA Request Commands
The commands supported on the device are shown in the table below. All CoA commands must include the session identifier between the device and the CoA client.
| Table 3 | CoA Commands Supported on the Device |
|
Command |
Cisco VSA |
|---|---|
|
Reauthenticate host |
Cisco:Avpair="subscriber:command=reauthenticate" |
|
Terminate session |
This is a standard disconnect request that does not require a VSA |
|
Bounce host port |
Cisco:Avpair="subscriber:command=bounce-host-port" |
|
Disable host port |
Cisco:Avpair="subscriber:command=disable-host-port" |
- Session Reauthentication
- Session Termination
- CoA Request Disable Host Port
- CoA Request Bounce-Port
- Domain Stripping
Session Reauthentication
To initiate session authentication, the AAA server sends a standard CoA-Request message that contains a Cisco VSA in the following form: Cisco:Avpair="subscriber:command=reauthenticate" and one or more session identification attributes.
The current session state determines the device's response to the message in the following scenarios:
- If the session is currently authenticated by IEEE 802.1x, the device responds by sending an Extensible Authentication Protocol over LAN (EAPoL)-RequestId message to the server.
- If the session is currently authenticated by MAC authentication bypass (MAB), the device sends an access request to the server, passing the same identity attributes used for the initial successful authentication.
- If session authentication is in progress when the device receives the command, the device terminates the process and restarts the authentication sequence, starting with the method configured to be attempted first.
Session Termination
A CoA Disconnect-Request command terminates the session without disabling the host port. This command causes reinitialization of the authenticator state machine for the specified host, but does not restrict the host's access to the network. If the session cannot be located, the device returns a Disconnect-NAK message with the "Session Context Not Found" error-code attribute. If the session is located, the device terminates the session. After the session has been completely removed, the device returns a Disconnect-ACK.
To restrict a host's access to the network, use a CoA Request with the Cisco:Avpair="subscriber:command=disable-host-port" VSA. This command is useful when a host is known to cause problems on the network and network access needs to be immediately blocked for the host. When you want to restore network access on the port, reenable it using a non-RADIUS mechanism.
CoA Request Disable Host Port
The RADIUS server CoA disable port command administratively shuts down the authentication port that is hosting a session, resulting in session termination. This command is carried in a standard CoA-Request message that has the following VSA:
Cisco:Avpair="subscriber:command=disable-host-port"
Because this command is session-oriented, it must be accompanied by one or more of the session identification attributes described in the "Session Identification" section. If the device cannot locate the session, it returns a CoA-NAK message with the "Session Context Not Found" error-code attribute. If the device locates the session, it disables the hosting port and returns a CoA-ACK message.
If the device fails before returning a CoA-ACK to the client, the process is repeated on the new active device when the request is re-sent from the client. If the device fails after returning a CoA-ACK message to the client but before the operation is complete, the operation is restarted on the new active device.
If the RADIUS server CoA disable port command must be ignored, see "Configuring the Device to Ignore Bounce and Disable RADIUS CoA Requests" module for more information.
CoA Request Bounce-Port
A RADIUS server CoA bounce port command sent from a RADIUS server can cause a link flap on an authentication port, which triggers DHCP renegotiation from one or more hosts connected to this port. This incident can occur when there is a VLAN change and the endpoint is a device (such as a printer) that does not have a mechanism to detect a change on this authentication port. The CoA bounce port command is carried in a standard CoA-Request message that contains the following VSA:
Cisco:Avpair="subscriber:command=bounce-host-port"
Because this command is session-oriented, it must be accompanied by one or more of the session identification attributes described in the Session Identification. If the session cannot be located, the device returns a CoA-NAK message with the "Session Context Not Found" error-code attribute. If the session is located, the device disables the hosting port for a period of 10 seconds, reenables it (port-bounce), and returns a CoA-ACK.
If the RADIUS server CoA bounce port command needs to be ignored, see the "Configuring the Device to Ignore Bounce and Disable RADIUS CoA Requests" module for more information.
Domain Stripping
 Note | Domain stripping will not be done in a TACACS configuration. |
The AAA Broadcast Accounting feature allows accounting information to be sent to multiple AAA servers at the same time, that is, accounting information can be broadcast to one or more AAA servers simultaneously. This functionality allows you to send accounting information to private and public AAA servers. It also provides redundant billing information for voice applications.
The Domain Stripping feature allows domain stripping to be configured at the server group level.
Per-server group configuration overrides the global configuration. If domain stripping is not enabled globally, but it is enabled in a server group, then it is enabled only for that server group. Also, if virtual routing and forwarding (VRF)-specific domain stripping is configured globally and in a server group for a different VRF, domain stripping is enabled in both the VRFs. VRF configurations are taken from server-group configuration mode. If server-group configurations are disabled in global configuration mode but are available in server-group configuration mode, all configurations in server-group configuration mode are applicable.
After the domain stripping and broadcast accounting are configured, you can create separate accounting records as per the configurations.
How to Configure AAA Authentication Methods
Note | AAA features are not available for use until you enable AAA globally using the aaa new-model command. |
- Configuring Login Authentication Using AAA
- Configuring PPP Authentication Using AAA
- Configuring AAA Scalability for PPP Requests
- Configuring ARAP Authentication Using AAA
- Configuring NASI Authentication Using AAA
- Specifying the Amount of Time for Login Input
- Enabling Password Protection at the Privileged Level
- Changing the Text Displayed at the Password Prompt
- Preventing an Access Request with a Blank Username from Being Sent to the RADIUS Server
- Configuring Message Banners for AAA Authentication
- Configuring AAA Packet of Disconnect
- Enabling Double Authentication
- Enabling Automated Double Authentication
- Configuring the Dynamic Authorization Service for RADIUS CoA
- Configuring the Device to Ignore Bounce and Disable RADIUS CoA Requests
- Configuring Domain Stripping at the Server Group Level
Configuring Login Authentication Using AAA
AAA security services facilitate a variety of login authentication methods. Use the aaa authentication login command to enable AAA authentication regardless of the supported login authentication methods you decide to use. With the aaa authentication login command, you create one or more lists of authentication methods that are tried at login. These lists are applied using the login authentication line command.
To configure login authentication by using AAA, use the following commands beginning in global configuration mode:
DETAILED STEPS
The list-name is a character string used to name the list you are creating. The method argument refers to the actual method the authentication algorithm tries. Additional methods of authentication are used only if the previous method returns an error, not if it fails. To specify that the authentication should succeed even if all methods return an error, enter none as the final method in the command line.
For example, to specify that authentication should succeed even if (in this example) the LDAP server returns an error, enter the following command:
aaa authentication login default group ldap none
For example, to specify that authentication should succeed even if (in this example) the TACACS+ server returns an error, enter the following command:
aaa authentication login default group tacacs+ none
Note | Because the none keyword enables any user logging in to be successfully authenticated, use it only as a backup method of authentication. |
To create a default list that is used when a named list is not specified in the login authentication command, use the default keyword followed by the methods that are to be used in default situations. The default method list is automatically applied to all interfaces.
For example, to specify RADIUS as the default method for user authentication during login, enter the following command:
aaa authentication login default group radius
The table below lists the supported login authentication methods.
| Table 4 | AAA Authentication Login Methods |
|
Keyword |
Description |
|---|---|
enable
|
Uses the enable password for authentication. |
krb5
|
Uses Kerberos 5 for authentication. |
krb5-telnet
|
Uses Kerberos 5 Telnet authentication protocol when using Telnet to connect to the device. If selected, this keyword must be listed as the first method in the method list. |
line
|
Uses the line password for authentication. |
local
|
Uses the local username database for authentication. |
local-case
|
Uses case-sensitive local username authentication. |
none
|
Uses no authentication. |
group ldap
|
Uses the list of all LDAP servers for authentication. |
group radius
|
Uses the list of all RADIUS servers for authentication. |
group tacacs
|
Uses the list of all TACACS+ servers for authentication. |
group group-name |
Uses a subset of RADIUS or TACACS+ servers for authentication as defined by the aaa group server radius or aaa group server tacacs+ command. |
- Preventing an Access-Request with an Expired Username from Being Sent to the RADIUS Server
- Login Authentication Using Enable Password
- Login Authentication Using Kerberos
- Login Authentication Using Line Password
- Login Authentication Using the Local Password
- Login Authentication Using Group LDAP
- Login Authentication Using Group RADIUS
- Configuring RADIUS Attribute 8 in Access Requests
- Login Authentication Using Group TACACS
- Login Authentication Using the group group-name method
Preventing an Access-Request with an Expired Username from Being Sent to the RADIUS Server
The following task is used to prevent an access-request with an expired username from being sent to the RADIUS server. The Easy VPN client is notified by the RADIUS server that its password has expired. The password-expiry feature also provides a generic way for the user to change the password.
Note | The radius-server vsa send authentication command must be configured to make the password-expiry feature work. |
DETAILED STEPS
Login Authentication Using Enable Password
Use the aaa authentication login command with the enable keyword to specify the enable password as the login authentication method. For example, to specify the enable password as the method of user authentication at login when no other method list has been defined, use the following command:
aaa authentication login default enable
Before you can use the enable password as the login authentication method, you need to define the enable password. For more information about defining enable passwords, refer to the chapter "Configuring Passwords and Privileges."
Login Authentication Using Kerberos
Authentication using Kerberos is different from most other authentication methods: the user's password is never sent to the remote access server. Remote users logging in to the network are prompted for a username. If the key distribution center (KDC) has an entry for that user, it creates an encrypted ticket granting ticket (TGT) with the password for that user and sends it back to the device. The user is then prompted for a password, and the device attempts to decrypt the TGT with that password. If it succeeds, the user is authenticated and the TGT is stored in the user's credential cache on the device.
Although krb5 uses the KINIT program, a user need not run the KINIT program to get a TGT to authenticate to the device. This is because KINIT has been integrated into the login procedure in the Cisco implementation of Kerberos.
Use the aaa authentication login command with the krb5 keyword to specify Kerberos as the login authentication method. For example, to specify Kerberos as the method of user authentication at login when no other method list has been defined, use the following command:
aaa authentication login default krb5
Before you can use Kerberos as the login authentication method, you must enable communication with the Kerberos security server. See the chapter "Configuring Kerberos" for more information about establishing communication with a Kerberos server.
Login Authentication Using Line Password
Use the aaa authentication login command with the line keyword to specify the line password as the login authentication method. For example, to specify the line password as the method of user authentication at login when no other method list has been defined, use the following command:
aaa authentication login default line
Before you can use a line password as the login authentication method, you must define a line password. For more information about defining line passwords, see the section "Configuring Line Password Protection."
Login Authentication Using the Local Password
Use the aaa authentication login command with the local keyword to specify that the Cisco device or access server will use the local username database for authentication. For example, to specify the local username database as the method of user authentication at login when no other method list has been defined, use the following command:
aaa authentication login default local
For information about adding users into the local username database, see the chapter "Establishing Username Authentication."
Login Authentication Using Group LDAP
Use the aaa authentication login command with the group ldap method to specify ldap as the login authentication method. For example, to specify ldap as the method of user authentication at login when no other method list has been defined, use the following command:
aaa authentication login default group ldap
Login Authentication Using Group RADIUS
Use the aaa authentication login command with the group radius method to specify RADIUS as the login authentication method. For example, to specify RADIUS as the method of user authentication at login when no other method list has been defined, use the following command:
aaa authentication login default group radius
Before you can use RADIUS as the login authentication method, you must enable communication with the RADIUS security server. See the chapter "Configuring RADIUS" for more information about establishing communication with a RADIUS server.
Configuring RADIUS Attribute 8 in Access Requests
After you have used the aaa authentication login command to specify RADIUS and your login host has been configured to request its IP address from the NAS, you can send attribute 8 (Framed-IP-Address) in access-request packets by using the radius-server attribute 8 include-in-access-req command in global configuration mode. This command makes it possible for NAS to provide the RADIUS server a hint of the user IP address in advance for user authentication. For more information about attribute 8, refer to the appendix "RADIUS Attributes" at the end of the book.
Login Authentication Using Group TACACS
Use the aaa authentication login command with the group tacacs+ method to specify TACACS+ as the login authentication method. For example, to specify TACACS+ as the method of user authentication at login when no other method list has been defined, use the following command:
aaa authentication login default group tacacs+
Before you can use TACACS+ as the login authentication method, you must enable communication with the TACACS+ security server. See the chapter "Configuring TACACS+" for more information about establishing communication with a TACACS+ server.
Login Authentication Using the group group-name method
Use the aaa authentication login command with the group group-name method to specify a subset of LDAP, RADIUS, or TACACS+ servers to be used as the login authentication method. To specify and define the group name and the members of the group, use the aaa group server command. For example, use the aaa group server command to first define the members of group loginrad:
aaa group server radius loginrad
 server 192.0.2.3
 server 192.0.2 17
 server 192.0.2.32
This command specifies RADIUS servers 192.0.2.3, 192.0.2.17, and 192.0.2.32 as members of the group loginrad.
To specify group loginrad as the method of user authentication at login when no other method list has been defined, use the following command:
aaa authentication login default group loginrad
Before you can use a group name as the login authentication method, you must enable communication with the RADIUS or TACACS+ security server. See the chapter "Configuring RADIUS" for more information about establishing communication with a RADIUS server. See the chapter "Configuring TACACS+" for more information about establishing communication with a TACACS+ server.
Configuring PPP Authentication Using AAA
Many users access network access servers through dialup that uses async or ISDN. Dialup that uses async or ISDN bypasses the CLI completely; instead, a network protocol (such as PPP or AppleTalk Remote Access (ARA)) starts as soon as the connection is established.
The AAA security services facilitate a variety of authentication methods for use on serial interfaces running PPP. Use the aaa authentication ppp command to enable AAA authentication regardless of which of the supported PPP authentication methods you decide to use.
To configure AAA authentication methods for serial lines using PPP, use the following commands in global configuration mode:
DETAILED STEPS
With the aaa authentication ppp command, you can create one or more lists of authentication methods that are tried when a user tries to authenticate by using PPP. These lists are applied by using the ppp authentication line configuration command.
To create a default list that is used when a named list is not specified in the ppp authentication command, use the default keyword followed by the methods you want used in default situations.
For example, to specify the local username database as the default method for user authentication, use the following command:
aaa authentication ppp default local
The list-name is any character string used to name the list you are creating. The method argument refers to the actual method the authentication algorithm tries. The additional methods of authentication are used only if the previous method returns an error, not if it fails. To specify that the authentication should succeed even if all methods return an error, specify none as the final method in the command line.
For example, to specify that authentication should succeed even if (in this example) the TACACS+ server returns an error, use the following command:
aaa authentication ppp default group tacacs+ none
Note | Because none allows all users logging in to authenticate successfully, it should be used as a backup method of authentication. |
The table below lists the supported login authentication methods.
| Table 5 | AAA Authentication PPP Methods |
|
Keyword |
Description |
|---|---|
|
if-needed |
Does not authenticate if the user has already been authenticated on a TTY line. |
|
krb5 |
Uses Kerberos 5 for authentication (can be used only for PAP authentication). |
|
local |
Uses the local username database for authentication. |
|
local-case |
Uses case-sensitive local username authentication. |
|
none |
Uses no authentication. |
|
group radius |
Uses the list of all RADIUS servers for authentication. |
|
group tacacs+ |
Uses the list of all TACACS+ servers for authentication. |
|
group group-name |
Uses a subset of RADIUS or TACACS+ servers for authentication as defined by the aaa group server radius or aaa group server tacacs+ command. |
- PPP Authentication Using Kerberos
- PPP Authentication Using the Local Password
- PPP Authentication Using Group RADIUS
- Configuring RADIUS Attribute 44 in Access Requests
- PPP Authentication Using Group TACACS
- PPP Authentication Using group group-name
PPP Authentication Using Kerberos
Use the aaa authentication ppp command with the krb5 method keyword to specify Kerberos as the authentication method for use on interfaces running PPP. For example, to specify Kerberos as the method of user authentication when no other method list has been defined, use the following command:
aaa authentication ppp default krb5
Before you can use Kerberos as the PPP authentication method, you must enable communication with the Kerberos security server. See the chapter "Configuring Kerberos" for more information about establishing communication with a Kerberos server.
Note | Kerberos login authentication works only with PPP PAP authentication. |
PPP Authentication Using the Local Password
Use the aaa authentication ppp command with the method keyword local to specify that the Cisco device or access server will use the local username database for authentication. For example, to specify the local username database as the method of authentication for use on lines running PPP when no other method list has been defined, use the following command:
aaa authentication ppp default local
For information about adding users into the local username database, see the section "Establishing Username Authentication."
PPP Authentication Using Group RADIUS
Use the aaa authentication ppp command with the group radius method to specify RADIUS as the login authentication method. For example, to specify RADIUS as the method of user authentication at login when no other method list has been defined, use the following command:
aaa authentication ppp default group radius
Before you can use RADIUS as the PPP authentication method, you must enable communication with the RADIUS security server. See the chapter "Configuring RADIUS" for more information about establishing communication with a RADIUS server.
Configuring RADIUS Attribute 44 in Access Requests
After you have used the aaa authentication ppp command with the group radius method to specify RADIUS as the login authentication method, you can configure your device to send attribute 44 (Acct-Session-ID) in access-request packets by using the radius-server attribute 44 include-in-access-req command in global configuration mode. This command allows the RADIUS daemon to track a call from the beginning to the end.
PPP Authentication Using Group TACACS
Use the aaa authentication ppp command with the group tacacs+ method to specify TACACS+ as the login authentication method. For example, to specify TACACS+ as the method of user authentication at login when no other method list has been defined, use the following command:
aaa authentication ppp default group tacacs+
Before you can use TACACS+ as the PPP authentication method, you must enable communication with the TACACS+ security server. See the chapter "Configuring TACACS+" for more information about establishing communication with a TACACS+ server.
PPP Authentication Using group group-name
Use the aaa authentication ppp command with the group group-name method to specify a subset of RADIUS or TACACS+ servers to be used as the login authentication method. To specify and define the group name and the members of the group, use the aaa group server command. For example, use the aaa group server command to first define the members of group ppprad:
aaa group server radius ppprad
 server 192.0.2.3
 server 192.0.2 17
 server 192.0.2.32
This command specifies RADIUS servers 192.0.2.3, 192.0.2.17, and 192.0.2.32 as members of the group ppprad.
To specify group ppprad as the method of user authentication at login when no other method list has been defined, use the following command:
aaa authentication ppp default group ppprad
Before you can use a group name as the PPP authentication method, you must enable communication with the RADIUS or TACACS+ security server. See the chapter "Configuring RADIUS" for more information about establishing communication with a RADIUS server, and the chapter "Configuring TACACS+" for more information about establishing communication with a TACACS+ server.
Configuring AAA Scalability for PPP Requests
You can configure and monitor the number of background processes allocated by the PPP manager in the NAS to deal with AAA authentication and authorization requests. Depending on the Cisco release, only one background process was allocated to handle all AAA requests for PPP. This meant that parallelism in AAA servers could not be fully exploited. The AAA Scalability feature enables you to configure the number of processes used to handle AAA requests for PPP, thus increasing the number of users that can be simultaneously authenticated or authorized.
To allocate a specific number of background processes to handle AAA requests for PPP, use the following command in global configuration mode:
|
Command or Action |
Purpose |
|---|---|
Device(config)# aaa processes number |
Allocates a specific number of background processes to handle AAA authentication and authorization requests for PPP. |
The number argument defines the number of background processes earmarked to process AAA authentication and authorization requests for PPP and can be configured for any value from 1 to 2147483647. Because of the way the PPP manager handles requests for PPP, this argument also defines the number of new users that can be simultaneously authenticated. This argument can be increased or decreased at any time.
Note | Allocating additional background processes can be expensive. You should configure the minimum number of background processes capable of handling the AAA requests for PPP. |
Configuring ARAP Authentication Using AAA
Using the aaa authentication arap command, you can create one or more lists of authentication methods that are tried when AppleTalk Remote Access Protocol (ARAP) users attempt to log in to the device. These lists are used with the arap authentication line configuration command.
Use the following commands starting in global configuration mode:
DETAILED STEPS
The list-name is any character string used to name the list you are creating. The method argument refers to the actual list of methods the authentication algorithm tries, in the sequence entered.
To create a default list that is used when a named list is not specified in the arap authentication command, use the default keyword followed by the methods you want to use in default situations.
The additional methods of authentication are used only if the previous method returns an error, not if it fails. To specify that the authentication should succeed even if all methods return an error, specify none as the final method in the command line.
Note | Because none allows all users logging in to be authenticated, it should be used as a backup method of authentication. |
The following table lists the supported login authentication methods.
| Table 6 | AAA Authentication ARAP Methods |
|
Keyword |
Description |
|---|---|
|
auth-guest |
Allows guest logins only if the user has already logged in to EXEC mode. |
|
guest |
Allows guest logins. |
|
line |
Uses the line password for authentication. |
|
local |
Uses the local username database for authentication. |
|
local-case |
Uses case-sensitive local username authentication. |
|
group radius |
Uses the list of all RADIUS servers for authentication. |
|
group tacacs+ |
Uses the list of all TACACS+ servers for authentication. |
|
group group-name |
Uses a subset of RADIUS or TACACS+ servers for authentication as defined by the aaa group server radius or aaa group server tacacs+ command. |
For example, to create a default AAA authentication method list used with ARAP, use the following command:
aaa authentication arap default if-needed none
To create the same authentication method list for ARAP and name the list MIS-access, use the following command:
aaa authentication arap MIS-access if-needed none
This section includes the following sections:
- ARAP Authentication Allowing Authorized Guest Logins
- ARAP Authentication Allowing Guest Logins
- ARAP Authentication Using the Line Password
- ARAP Authentication Using the Local Password
- ARAP Authentication Using Group RADIUS
- ARAP Authentication Using Group TACACS
- ARAP Authentication Using Group group-name
ARAP Authentication Allowing Authorized Guest Logins
Use the aaa authentication arap command with the auth-guest keyword to allow guest logins only if the user has already successfully logged in to the EXEC mode. This method must be the first listed in the ARAP authentication method list, but it can be followed by other methods. For example, to allow all authorized guest logins--logins by users who have already successfully logged in to the EXEC mode--as the default method of authentication, using RADIUS only if that method fails, use the following command:
aaa authentication arap default auth-guest group radius
ARAP Authentication Allowing Guest Logins
Use the aaa authentication arap command with the guest keyword to allow guest logins. This method must be the first listed in the ARAP authentication method list, but it can be followed by other methods if it does not succeed. For example, to allow all guest logins as the default method of authentication, using RADIUS only if that method fails, use the following command:
aaa authentication arap default guest group radius
ARAP Authentication Using the Line Password
Use the aaa authentication arap command with the keyword line to specify the line password as the authentication method. For example, to specify the line password as the method of ARAP user authentication when no other method list has been defined, use the following command:
aaa authentication arap default line
Before you can use a line password as the ARAP authentication method, you must define a line password. For more information about defining line passwords, refer to the section "Configuring Line Password Protection."
ARAP Authentication Using the Local Password
Use the aaa authentication arap command with the keyword local to specify that the Cisco device or access server will use the local username database for authentication. For example, to specify the local username database as the method of ARAP user authentication when no other method list has been defined, use the following command:
aaa authentication arap default local
For information about adding users to the local username database, refer to the section "Establishing Username Authentication."
ARAP Authentication Using Group RADIUS
Use the aaa authentication arap command with the group radius method to specify RADIUS as the ARAP authentication method. For example, to specify RADIUS as the method of user authentication at login when no other method list has been defined, use the following command:
aaa authentication arap default group radius
Before you can use RADIUS as the ARAP authentication method, you must enable communication with the RADIUS security server.
ARAP Authentication Using Group TACACS
Use the aaa authentication arap command with the group tacacs+ method to specify TACACS+ as the ARAP authentication method. For example, to specify TACACS+ as the method of user authentication at login when no other method list has been defined, use the following command:
aaa authentication arap default group tacacs+
Before you can use TACACS+ as the ARAP authentication method, you must enable communication with the TACACS+ security server. See the chapter "Configuring TACACS+" for more information about establishing communication with a TACACS+ server.
ARAP Authentication Using Group group-name
Use the aaa authentication arap command with the group group-name method to specify a subset of RADIUS or TACACS+ servers to use as the ARAP authentication method. To specify and define the group name and the members of the group, use the aaa group server command. For example, use the aaa group server command to first define the members of group araprad:
aaa group server radius araprad
 server 192.0.2.3
 server 192.0.2.17
 server 192.0.2.32
This command specifies RADIUS servers 192.0.2.3, 192.0.2.17, and 192.0.2.32 as members of the group araprad.
To specify group araprad as the method of user authentication at login when no other method list has been defined, use the following command:
aaa authentication arap default group araprad
Before you can use a group name as the ARAP authentication method, you must enable communication with the RADIUS or TACACS+ security server. See the chapter "Configuring RADIUS" for more information about establishing communication with a RADIUS server, and the chapter "Configuring TACACS+" for more information about establishing communication with a TACACS+ server.
Configuring NASI Authentication Using AAA
Using the aaa authentication nasi command, you can create one or more lists of authentication methods that are tried when NetWare Asynchronous Services Interface (NASI) users attempt to log in to the device. These lists are used with the nasi authentication line configuration command.
To configure NASI authentication using AAA, use the following commands starting in global configuration mode:
DETAILED STEPS
The list-name is any character string used to name the list you are creating. The method argument refers to the actual list of methods that the authentication algorithm tries, in the sequence entered.
To create a default list that is used when a named list is not specified in the aaa authentication nasi command, use the default keyword followed by the methods you want to use in default situations.
The additional methods of authentication are used only if the previous method returns an error, not if it fails. To specify that the authentication should succeed even if all methods return an error, specify none as the final method in the command line.
Note | Because none allows all users logging in to be authenticated, it should be used as a backup method of authentication. |
The table below lists the supported NASI authentication methods.
| Table 7 | AAA Authentication NASI Methods |
|
Keyword |
Description |
|---|---|
|
enable |
Uses the enable password for authentication. |
|
line |
Uses the line password for authentication. |
|
local |
Uses the local username database for authentication. |
|
local-case |
Uses case-sensitive local username authentication. |
|
none |
Uses no authentication. |
|
group radius |
Uses the list of all RADIUS servers for authentication. |
|
group tacacs+ |
Uses the list of all TACACS+ servers for authentication. |
|
group group-name |
Uses a subset of RADIUS or TACACS+ servers for authentication as defined by the aaa group server radius or aaa group server tacacs+ command. |
- NASI Authentication Using Enable Password
- NASI Authentication Using the Line Password
- NASI Authentication Using the Local Password
- NASI Authentication Using Group RADIUS
- NASI Authentication Using Group TACACS
- NASI Authentication Using group group-name
NASI Authentication Using Enable Password
Use the aaa authentication nasi command with the keyword enable to specify the enable password as the authentication method. For example, to specify the enable password as the method of NASI user authentication when no other method list has been defined, use the following command:
aaa authentication nasi default enable
Before you can use the enable password as the authentication method, you need to define the enable password. For more information about defining enable passwords, refer to the chapter "Configuring Passwords and Privileges."
NASI Authentication Using the Line Password
Use the aaa authentication nasi command with the keyword line to specify the line password as the authentication method. For example, to specify the line password as the method of NASI user authentication when no other method list has been defined, use the following command:
aaa authentication nasi default line
Before you can use a line password as the NASI authentication method, you must define a line password. For more information about defining line passwords, refer to the section "Configuring Line Password Protection."
NASI Authentication Using the Local Password
Use the aaa authentication nasi command with the keyword local to specify that the Cisco device or access server will use the local username database for authentication information. For example, to specify the local username database as the method of NASI user authentication when no other method list has been defined, use the following command:
aaa authentication nasi default local
For information about adding users to the local username database, refer to the chapter "Establishing Username Authentication."
NASI Authentication Using Group RADIUS
Use the aaa authentication nasi command with the group radius method to specify RADIUS as the NASI authentication method. For example, to specify RADIUS as the method of NASI user authentication when no other method list has been defined, use the following command:
aaa authentication nasi default group radius
Before you can use RADIUS as the NASI authentication method, you must enable communication with the RADIUS security server. See the chapter "Configuring RADIUS" for more information about establishing communication with a RADIUS server.
NASI Authentication Using Group TACACS
Use the aaa authentication nasi command with the group tacacs+ keyword to specify TACACS+ as the NASI authentication method. For example, to specify TACACS+ as the method of NASI user authentication when no other method list has been defined, use the following command:
aaa authentication nasi default group tacacs+
Before you can use TACACS+ as the authentication method, you must enable communication with the TACACS+ security server. See the chapter "Configuring TACACS+" for more information about establishing communication with a TACACS+ server.
NASI Authentication Using group group-name
Use the aaa authentication nasi command with the group group-name method to specify a subset of RADIUS or TACACS+ servers to be used as the NASI authentication method. To specify and define the group name and the members of the group, use the aaa group server command. For example, use the aaa group server command to first define the members of group nasirad:
aaa group server radius nasirad
 server 192.0.2.3
 server 192.0.2 17
 server 192.0.2.32
This command specifies RADIUS servers 192.0.2.3, 192.0.2.17, and 192.0.2.32 as members of the group nasirad.
To specify group nasirad as the method of user authentication at login when no other method list has been defined, use the following command:
aaa authentication nasi default group nasirad
Before you can use a group name as the NASI authentication method, you must enable communication with the RADIUS or TACACS+ security server. See the chapter "Configuring RADIUS" for more information about establishing communication with a RADIUS server and the chapter "Configuring TACACS+" for more information about establishing communication with a TACACS+ server.
Specifying the Amount of Time for Login Input
The timeout login response command allows you to specify how long the system will wait for login input (such as username and password) before timing out. The default login value is 30 seconds; with the timeout login response command, you can specify a timeout value from 1 to 300 seconds. To change the login timeout value from the default of 30 seconds, use the following command in line configuration mode:
Enabling Password Protection at the Privileged Level
Use the aaa authentication enable default command to create a series of authentication methods that are used to determine whether a user can access the privileged EXEC command level. You can specify up to four authentication methods. The additional methods of authentication are used only if the previous method returns an error, not if it fails. To specify that the authentication should succeed even if all methods return an error, specify none as the final method in the command line.
Use the following command in global configuration mode:
The method argument refers to the actual list of methods the authentication algorithm tries, in the sequence entered. The table below lists the supported enable authentication methods.
| Table 8 | AAA Authentication Enable Default Methods |
|
Keyword |
Description |
||
|---|---|---|---|
|
enable |
Uses the enable password for authentication. |
||
|
line |
Uses the line password for authentication. |
||
|
none |
Uses no authentication. |
||
|
group radius |
Uses the list of all RADIUS hosts for authentication.
|
||
|
group tacacs+ |
Uses the list of all TACACS+ hosts for authentication. |
||
|
group group-name |
Uses a subset of RADIUS or TACACS+ servers for authentication as defined by the aaa group server radius or aaa group server tacacs+ command. |
Changing the Text Displayed at the Password Prompt
Use the aaa authentication password-prompt command to change the default text that the Cisco software displays when prompting a user to enter a password. This command changes the password prompt for the enable password as well as for login passwords that are not supplied by remote security servers. The no form of this command returns the password prompt to the following default value:
Password:
The aaa authentication password-prompt command does not change any dialog that is supplied by a remote TACACS+ or RADIUS server.
The aaa authentication password-prompt command works when RADIUS is used as the login method. You will see the password prompt defined in the command shown even when the RADIUS server is unreachable. The aaa authentication password-prompt command does not work with TACACS+. TACACS+ supplies the NAS with the password prompt to be displayed to the users. If the TACACS+ server is reachable, the NAS gets the password prompt from the server and uses that prompt instead of the one defined in the aaa authentication password-prompt command. If the TACACS+ server is not reachable, the password prompt defined in the aaa authentication password-prompt command may be used.
Use the following command in global configuration mode:
Preventing an Access Request with a Blank Username from Being Sent to the RADIUS Server
The following configuration steps provide the ability to prevent an Access Request with a blank username from being sent to the RADIUS server. This functionality ensures that unnecessary RADIUS server interaction is avoided, and RADIUS logs are kept short.
Note | The aaa authentication suppress null-username command is available only in Cisco IOS XE Release 2.4 and Cisco IOS Release 12.2(33)SRD. |
DETAILED STEPS
| Command or Action | Purpose | |
|---|---|---|
Step 1 |
enable
Example: Device> enable |
Enables privileged EXEC mode. |
Step 2 |
configure
terminal
Example: Device# configure terminal |
Enters global configuration mode. |
Step 3 |
aaa
new-model
Example: Device(config)# aaa new-model |
Enables AAA globally. |
Step 4 |
aaa
authentication
suppress
null-username
Example: Device(config)# aaa authentication suppress null-username |
Prevents an access request with a blank username from being sent to the RADIUS server. |
Step 5 |
end
Example: Device(config)# end |
Returns to privileged EXEC mode. |
Configuring Message Banners for AAA Authentication
AAA supports the use of configurable, personalized login and failed-login banners. You can configure message banners that will be displayed when a user logs in to the system to be authenticated using AAA and when, for whatever reason, authentication fails.
Configuring a Login Banner
To create a login banner, you must configure a delimiting character that notifies the system that the following text string is to be displayed as the banner, and then the text string itself. The delimiting character is repeated at the end of the text string to signify the end of the banner. The delimiting character can be any single character in the extended ASCII character set, but once defined as the delimiter, that character cannot be used in the text string making up the banner.
To configure a banner that will be displayed whenever a user logs in (replacing the default message for login), use the following commands in global configuration mode:
DETAILED STEPS
| Command or Action | Purpose | |
|---|---|---|
Step 1 | Device(config)#
aaa
new-model
|
Enables AAA. |
Step 2 | Device(config)#
aaa
authentication
banner
delimiter
string
delimiter
|
Creates a personalized login banner. |
Step 3 | Device(config)#
end
|
Returns to privileged EXEC mode. |
The maximum number of characters that can be displayed in the login banner is 2996.
Configuring a Failed-Login Banner
To create a failed-login banner, you must configure a delimiting character, which notifies the system that the following text string is to be displayed as the banner, and then configure the text string itself. The delimiting character is repeated at the end of the text string to signify the end of the failed-login banner. The delimiting character can be any single character in the extended ASCII character set, but once defined as the delimiter, that character cannot be used in the text string making up the banner.
To configure a message that will be displayed whenever a user login fails (replacing the default message for failed login), use the following commands in global configuration mode:
DETAILED STEPS
| Command or Action | Purpose | |
|---|---|---|
Step 1 | Device(config)#
aaa
new-model
|
Enables AAA. |
Step 2 | Device(config)#
aaa
authentication
fail-message
delimiter
string
delimiter
|
Creates a message to be displayed when a user login fails. |
Step 3 | Device(config)#
end
|
Returns to the privileged EXEC mode. |
The maximum number of characters that can be displayed in the failed-login banner is 2996 characters.
Configuring AAA Packet of Disconnect
Packet of disconnect (POD) terminates connections on the network access server (NAS) when particular session attributes are identified. By using the session information obtained from AAA, the POD client residing on a UNIX workstation sends disconnect packets to the POD server running on the network access server. The NAS terminates any inbound user session with one or more matching key attributes. It rejects requests when required fields are missing or when an exact match is not found.
To configure POD, perform the following tasks in global configuration mode:
DETAILED STEPS
| Command or Action | Purpose | |
|---|---|---|
Step 1 | Device(config)#
aaa
accounting
network
default
Example: Enables AAA accounting records. | |
Step 2 | Device(config)#
aaa
accounting
delay-start
|
(Optional) Delays generation of the start accounting record until the Framed-IP-Address is assigned, allowing the use of the start accounting record in the POD packet. |
Step 3 | Device(config)#
aaa
pod
server
server-key
string
|
Enables POD reception. |
Step 4 | Device(config)#
radius-server
host
IP
address
non-standard
|
Declares a RADIUS host that uses a vendor-proprietary version of RADIUS. |
Step 5 | Device(config)#
end
|
Returns to the privileged EXEC mode. |
Enabling Double Authentication
Depending on the Cisco release, PPP sessions could be authenticated only by using a single authentication method: either PAP or CHAP. Double authentication requires remote users to pass a second stage of authentication (after CHAP or PAP authentication) before gaining network access.
This second ("double") authentication requires a password that is known to the user but not stored on the user's remote host. Therefore, the second authentication is specific to a user, not to a host. This provides an additional level of security that will be effective even if information from the remote host is stolen. In addition, this also provides greater flexibility by allowing customized network privileges for each user.
The second stage authentication can use one-time passwords such as token card passwords, which are not supported by CHAP. If one-time passwords are used, a stolen user password is of no use to the perpetrator.
- How Double Authentication Works
- Configuring Double Authentication
- Accessing the User Profile After Double Authentication
How Double Authentication Works
With double authentication, there are two authentication/authorization stages. These two stages occur after a remote user dials in and a PPP session is initiated.
In the first stage, the user logs in using the remote host name; CHAP (or PAP) authenticates the remote host, and then PPP negotiates with AAA to authorize the remote host. In this process, the network access privileges associated with the remote host are assigned to the user.
Note | Cisco suggests that the network administrator restrict authorization at this first stage to allow only Telnet connections to the local host. |
In the second stage, the remote user must Telnet to the network access server to be authenticated. When the remote user logs in, the user must be authenticated with AAA login authentication. The user must then enter the access-profile command to be reauthorized using AAA. When this authorization is complete, the user has been double authenticated, and can access the network according to per-user network privileges.
The system administrator determines the network privileges that the remote users will have after each stage of authentication by configuring appropriate parameters on a security server. To use double authentication, the user must activate it by using the access-profile command.
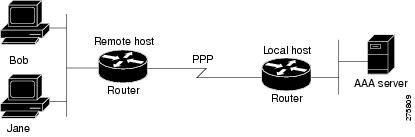
 Caution | Double authentication can cause certain undesirable events if multiple hosts share a PPP connection to a network access server, as shown in the figure below. First, if a user, Bob, initiates a PPP session and activates double authentication at the network access server (per the figure below), any other user will automatically have the same network privileges as Bob until Bob's PPP session expires. This happens because Bob's authorization profile is applied to the network access server's interface during the PPP session and any PPP traffic from other users will use the PPP session Bob established. Second, if Bob initiates a PPP session and activates double authentication, and then--before Bob's PPP session has expired--another user, Jane, executes the access-profile command (or, if Jane telnets to the network access server and theautocommand access-profile command is executed), a reauthorization will occur and Jane's authorization profile will be applied to the interface, replacing Bob's profile. This can disrupt or halt Bob's PPP traffic or grant Bob additional authorization privileges, which Bob should not have. |
Configuring Double Authentication
To configure double authentication, you must complete the following steps:
- Enable AAA by using the aaa-new model global configuration command. For more information about enabling AAA, refer to the chapter "AAA Overview."
- Use the aaa authentication command to configure your network access server to use login and PPP authentication method lists, and then apply those method lists to the appropriate lines or interfaces.
- Use the aaa authorization command to configure AAA network authorization at login. For more information about configuring network authorization, refer to the "Configuring Authorization" chapter.
- Configure security protocol parameters (for example, RADIUS or TACACS+). See the chapter "Configuring RADIUS" for more information about RADIUS and the chapter "Configuring TACACS+" for more information about TACACS+.
- Use access control list AV pairs on the security server that the user can connect to the local host only by establishing a Telnet connection.
- (Optional) Configure the access-profile command as an autocommand. If you configure the autocommand, remote users will not have to manually enter the access-profile command to access the authorized rights associated with their personal user profile. To learn about configuring autocommands, refer to the autocommand command in the Dial Technologies Command Reference: Network Services.
Note | If the access-profile command is configured as an autocommand, users will still have to telnet to the local host and log in to complete double authentication. |
Follow these rules when creating user-specific authorization statements (These rules relate to the default behavior of the access-profile command):
- Use valid AV pairs when configuring access control list AV pairs on the security server. For a list of valid AV pairs, refer to the chapter "Authentication Commands" in the CiscoISecurity Command Reference.
- If you want remote users to use the interface's existing authorization (which existed prior to the second stage authentication/authorization), but you want them to have different access control lists (ACLs), you should specify only ACL AV pairs in the user-specific authorization definition. This might be desirable if you set up a default authorization profile to apply to the remote host, but want to apply specific ACLs to specific users.
- When these user-specific authorization statements are later applied to the interface, they can either be added to the existing interface configuration or replace the existing interface configuration, depending on which form of the access-profile command is used to authorize the user. You should understand how the access-profile command works before configuring the authorization statements.
- If you are using ISDN or Multilink PPP, you must also configure virtual templates at the local host.
To troubleshoot double authentication, use the debug aaa per-user debug command. For more information about this command, refer to the CiscoDebug Command Reference.
Accessing the User Profile After Double Authentication
In double authentication, when a remote user establishes a PPP link to the local host using the local host name, the remote host is CHAP (or PAP) authenticated. After CHAP (or PAP) authentication, PPP negotiates with AAA to assign network access privileges associated with the remote host to the user. (Cisco suggests that privileges at this stage be restricted to allow the user to connect to the local host only by establishing a Telnet connection.)
When the user needs to initiate the second phase of double authentication, establishing a Telnet connection to the local host, the user enters a personal username and password (different from the CHAP or PAP username and password). This action causes AAA reauthentication to occur according to the personal username/password. The initial rights associated with the local host, though, are still in place. By using the access-profile command, the rights associated with the local host are replaced by or merged with those defined for the user in the user's profile.
To access the user profile after double authentication, use the following command in EXEC configuration mode:
|
Command or Action |
Purpose |
|---|---|
Device> access-profile [merge | replace] [ignore-sanity-checks] |
Accesses the rights associated for the user after double authentication. |
If you configured the access-profile command to be executed as an autocommand, it will be executed automatically after the remote user logs in.
Enabling Automated Double Authentication
You can make the double authentication process easier for users by implementing automated double authentication. Automated double authentication provides all of the security benefits of double authentication, but offers a simpler, more user-friendly interface for remote users. With double authentication, a second level of user authentication is achieved when the user telnets to the network access server or device and enters a username and password. With automated double authentication, the user does not have to Telnet to the network access server; instead, the user responds to a dialog box that requests a username and password or personal identification number (PIN). To use the automated double authentication feature, the remote user hosts must be running a companion client application. As of Cisco IOS Release 12.0, the only client application software available is the Glacier Bay application server software for PCs.
Note | Automated double authentication, like the existing double authentication feature, is for Multilink PPP ISDN connections only. Automated double authentication cannot be used with other protocols such as X.25 or SLIP. |
Automated double authentication is an enhancement to the existing double authentication feature. To configure automated double authentication, you must first configure double authentication by completing the following steps:
- Enable AAA by using the aaa-new model global configuration command. For more information about enabling AAA, refer to the chapter "AAA Overview."
- Use the aaa authentication command to configure your network access server to use login and PPP authentication method lists, and then apply those method lists to the appropriate lines or interfaces.
- Use the aaa authorization command to configure AAA network authorization at login. For more information about configuring network authorization, refer to the chapter "Configuring Authorization."
- Configure security protocol parameters (for example, RADIUS or TACACS+). See the chapter "Configuring RADIUS" for more information about RADIUS and the chapter "Configuring TACACS+" for more information about TACACS+.
- Use access control list AV pairs on the security server that the user can connect to the local host only by establishing a Telnet connection.
- Configure the access-profile command as an autocommand. If you configure the autocommand, remote users will not have to manually enter the access-profile command to access authorized rights associated with their personal user profile. To learn about configuring autocommands, refer to the autocommand command in the CiscoIOS Dial Technologies Command Reference.
Note | If the access-profile command is configured as an autocommand, users will still have to telnet to the local host and log in to complete double authentication. |
Follow these rules when creating user-specific authorization statements. (These rules relate to the default behavior of the access-profile command):
- Use valid AV pairs when configuring access control list AV pairs on the security server. For a list of valid AV pairs, refer to the AAA part of the Security Command Reference.
- If you want remote users to use the interface's existing authorization (that which existed prior to the second stage authentication/authorization), but you want them to have different access control lists (ACLs), you should specify only ACL AV pairs in the user-specific authorization definition. This might be desirable if you set up a default authorization profile to apply to the remote host, but want to apply specific ACLs to specific users.
- When these user-specific authorization statements are later applied to the interface, they can either be added to the existing interface configuration, or replace the existing interface configuration, depending on which form of the access-profile command is used to authorize the user. You should understand how the access-profile command works before configuring the authorization statements.
- If you are using ISDN or Multilink PPP, you must also configure virtual templates at the local host.
To troubleshoot double authentication, use the debug aaa per-user debug command. For more information about this command, refer to the Debug Command Reference.
After you have configured double authentication, you are ready to configure the automation enhancement.
Configuring Automated Double Authentication
To configure automated double authentication, use the following commands, starting in global configuration mode:
DETAILED STEPS
| Command or Action | Purpose | |
|---|---|---|
Step 1 | Device(config)#
ip
trigger-authentication
Example: |
Enables automation of double authentication. |
Step 2 |
Selects an ISDN BRI or ISDN PRI interface and enters interface configuration mode. | |
Step 3 | Device(config-if)#
ip
trigger-authentication
|
Applies automated double authentication to the interface. |
Step 4 | Device(config-if)#
end
|
Returns to the privileged EXEC mode. |
Troubleshooting Automated Double Authentication
To troubleshoot automated double authentication, use the following commands in privileged EXEC mode:
DETAILED STEPS
| Command or Action | Purpose | |
|---|---|---|
Step 1 | Device#
show
ip
trigger-authentication
|
Displays the list of remote hosts for which automated double authentication has been attempted (successfully or unsuccessfully). |
Step 2 | Device#
clear
ip
trigger-authentication
|
Clears the list of remote hosts for which automated double authentication has been attempted. This clears the table displayed by the show ip trigger-authentication command. |
Step 3 | Device#
debug
ip
trigger-authentication
|
Displays debug output related to automated double authentication. |
Configuring the Dynamic Authorization Service for RADIUS CoA
Use the following procedure to enable the device as an AAA server for the dynamic authorization service to support the CoA functionality that pushes the policy map in an input and output direction.
DETAILED STEPS
| Command or Action | Purpose | |||
|---|---|---|---|---|
Step 1 |
enable
Example: Device> enable |
Enables privileged EXEC mode. | ||
Step 2 |
configure
terminal
Example: Device# configure terminal |
Enters global configuration mode. | ||
Step 3 |
aaa
new-model
Example: Device(config)# aaa new-model |
Enables AAA. | ||
Step 4 |
aaa
server
radius
dynamic-author
Example: Device(config)# aaa server radius dynamic-author |
Sets up the local AAA server for the dynamic authorization service, which must be enabled to support the CoA functionality to push the policy map in an input and output direction and enter dynamic authorization local server configuration mode. In this mode, the RADIUS application commands are configured. | ||
Step 5 |
client
{ip_addr |
hostname} [server-key [0 |
7]
string]
Example: Device(config-locsvr-da-radius)#client 192.168.0.5 server-key cisco1 |
Configures the IP address or hostname of the AAA server client. Use the optional server-key keyword and string argument to configure the server key at the "client" level.
| ||
Step 6 |
domain
{delimiter
character |
stripping
[right-to-left]}
Example: Device(config-locsvr-da-radius)# domain stripping right-to-left Example: Device(config-locsvr-da-radius)# domain delimiter @ |
(Optional) Configures username domain options for the RADIUS application.
| ||
Step 7 |
port
port-num
Example: Device(config-locsvr-da-radius)# port 3799 |
Configures UDP port 3799 for CoA requests. | ||
Step 8 |
end
Example: Device(config-locsvr-da-radius)# end |
Returns to privileged EXEC mode. |
Configuring the Device to Ignore Bounce and Disable RADIUS CoA Requests
Use the following procedure to configure the device to ignore RADIUS server CoA requests in the form of a bounce port command or disable port command.
When an authentication port is authenticated with multiple hosts and there is a CoA request for one host to flap on this port or one host session to be terminated on this port, the other hosts on this port are also affected. This can trigger a DHCP renegotiation from one or more hosts in the case of a flap, or administratively shut down the authentication port hosting the session for one or more hosts, which may be undesirable.
DETAILED STEPS
| Command or Action | Purpose | |
|---|---|---|
Step 1 |
enable
Example: Device> enable |
Enables privileged EXEC mode. |
Step 2 |
configure
terminal
Example: Device# configure terminal |
Enters global configuration mode. |
Step 3 |
aaa
new-model
Example: Device(config)# aaa new-model |
Enables AAA. |
Step 4 |
authentication
command
bounce-port
ignore
Example: Device(config)# authentication command bounce-port ignore |
(Optional) Configures the device to ignore a RADIUS server bounce port command that causes a host to link flap on an authentication port, which causes DHCP renegotiation from one or more hosts connected to this port. |
Step 5 |
authentication
command
disable-port
ignore
Example: Device(config)# authentication command disable-port ignore |
(Optional) Configures the device to ignore a RADIUS server CoA disable port command that administratively shuts down the authentication port that hosts one or more host sessions. The shutting down of the port leads to session termination. |
Step 6 |
end
Example: Device(config)# end |
Returns to privileged EXEC mode. |
Configuring Domain Stripping at the Server Group Level
DETAILED STEPS
| Command or Action | Purpose | |
|---|---|---|
Step 1 |
enable
Example: Device> enable | |
Step 2 | configure
terminal
Example: Device# configure terminal |
Enters global configuration mode. |
Step 3 | aaa
group
server
radius
server-name
Example: Device(config)# aaa group server radius rad1 | |
Step 4 | domain-stripping
[strip-suffix
word]
[right-to-left
]
[prefix-delimiter
word]
[delimiter
word]
Example: Device(config-sg-radius)# domain-stripping delimiter username@example.com |
Configures domain stripping at the server group level. |
Step 5 | end
Example: Device(config-sg-radius)# end |
Exits server group RADIUS configuration mode and returns to the privileged EXEC mode. |
Non-AAA Authentication Methods
- Configuring Line Password Protection
- Establishing Username Authentication
- Enabling CHAP or PAP Authentication
- Using MS-CHAP
Configuring Line Password Protection
This task is used to provide access control on a terminal line by entering the password and establishing password checking.
Note | If you configure line password protection and then configure TACACS or extended TACACS, the TACACS username and password take precedence over line passwords. If you have not yet implemented a security policy, we recommend that you use AAA. |
DETAILED STEPS
| Command or Action | Purpose | |||
|---|---|---|---|---|
Step 1 |
enable
Example: Device> enable |
Enables privileged EXEC mode. | ||
Step 2 |
configure
terminal
Example: Device# configure terminal |
Enters global configuration mode. | ||
Step 3 |
line
[aux |
console |
tty |
vty]
line-number [ending-line-number]
Example: Device(config)# line console 0 |
Enters line configuration mode. | ||
Step 4 |
password
password
Example: Device(config-line)# secret word |
Assigns a password to a terminal or other device on a line. The password is case sensitive and can include spaces. For example, the password "Secret" is different than the password "secret," and "two words" is an acceptable password. | ||
Step 5 |
login
Example: Device(config-line)# login |
Enables password checking at login. Line password verification can be disabled by using the no version of this command.
| ||
Step 6 |
end
Example: Device(config-line)# end |
Returns to the privileged EXEC mode. |
Establishing Username Authentication
You can create a username-based authentication system, which is useful in the following situations:
- To provide a TACACS-like username and encrypted password-authentication system for networks that cannot support TACACS
- To provide special-case logins: for example, access list verification, no password verification, autocommand execution at login, and "no escape" situations
To establish username authentication, use the following commands in global configuration mode as needed for your system configuration:
DETAILED STEPS
| Command or Action | Purpose | |
|---|---|---|
Step 1 |
(Optional) Establishes username authentication with encrypted passwords. or (Optional) Establishes username authentication by access list. | |
Step 2 |
Device(config)#
username
name
[privilege
level]
|
(Optional) Sets the privilege level for the user. |
Step 3 |
Device(config)#
username
name
[autocommand
command]
|
(Optional) Specifies a command to be executed automatically. |
Step 4 |
Device(config)#
username
name
[noescape] [nohangup]
|
(Optional) Sets a "no escape" login environment. |
The noescape keyword prevents users from using escape characters on the hosts to which they are connected. The nohangup feature does not disconnect after using the autocommand.
Caution | Passwords will be displayed in clear text in your configuration unless you enable the service password-encryption command. For more information about the service password-encryption command, refer to the chapter "Passwords and Privileges Commands" in the Security Command Reference . |
Enabling CHAP or PAP Authentication
One of the most common transport protocols used in ISPs' dial solutions is the Point-to-Point Protocol PPP. Traditionally, remote users dial in to an access server to initiate a PPP session. After PPP has been negotiated, remote users are connected to the ISP network and to the Internet.
Because ISPs want only customers to connect to their access servers, remote users are required to authenticate to the access server before they can start up a PPP session. Normally, a remote user authenticates by typing in a username and password when prompted by the access server. Although this is a workable solution, it is difficult to administer and awkward for the remote user.
A better solution is to use the authentication protocols built into PPP. In this case, the remote user dials in to the access server and starts up a minimal subset of PPP with the access server. This does not give the remote user access to the ISP's network--it merely allows the access server to talk to the remote device.
PPP currently supports two authentication protocols: Password Authentication Protocol (PAP) and Challenge Handshake Authentication Protocol (CHAP). Both are specified in RFC 1334 and are supported on synchronous and asynchronous interfaces. Authentication using PAP or CHAP is equivalent to typing in a username and password when prompted by the server. CHAP is considered to be more secure because the remote user's password is never sent across the connection.
PPP (with or without PAP or CHAP authentication) is also supported in dialout solutions. An access server utilizes a dialout feature when it initiates a call to a remote device and attempts to start up a transport protocol such as PPP.
See "Configuring Interfaces" in the Configuration Fundamentals Configuration Guide for more information about CHAP and PAP.
Note | To use CHAP or PAP, you must be running PPP encapsulation. |
When CHAP is enabled on an interface and a remote device attempts to connect to it, the access server sends a CHAP packet to the remote device. The CHAP packet requests or "challenges" the remote device to respond. The challenge packet consists of an ID, a random number, and the host name of the local device.
When the remote device receives the challenge packet, it concatenates the ID, the remote device's password, and the random number, and then encrypts all of it using the remote device's password. The remote device sends the results back to the access server, along with the name associated with the password used in the encryption process.
When the access server receives the response, it uses the name it received to retrieve a password stored in its user database. The retrieved password should be the same password the remote device used in its encryption process. The access server then encrypts the concatenated information with the newly retrieved password--if the result matches the result sent in the response packet, authentication succeeds.
The benefit of using CHAP authentication is that the remote device's password is never transmitted in clear text. This prevents other devices from stealing it and gaining illegal access to the ISP's network.
CHAP transactions occur only at the time a link is established. The access server does not request a password during the rest of the call. (The local device can, however, respond to such requests from other devices during a call.)
When PAP is enabled, the remote device attempting to connect to the access server is required to send an authentication request. If the username and password specified in the authentication request are accepted, the Cisco software sends an authentication acknowledgment.
After you have enabled CHAP or PAP, the access server will require authentication from remote devices dialing in to the access server. If the remote device does not support the enabled protocol, the call will be dropped.
To use CHAP or PAP, you must perform the following tasks:
- Enabling PPP Encapsulation
- Enabling PAP or CHAP
- Inbound and Outbound Authentication
- Enabling Outbound PAP Authentication
- Refusing PAP Authentication Requests
- Creating a Common CHAP Password
- Refusing CHAP Authentication Requests
- Delaying CHAP Authentication Until Peer Authenticates
Enabling PPP Encapsulation
To enable PPP encapsulation, use the following command in interface configuration mode:
Enabling PAP or CHAP
To enable CHAP or PAP authentication on an interface configured for PPP encapsulation, use the following command in interface configuration mode:
|
Command or Action |
Purpose |
|---|---|
Device(config-if)# ppp authentication {protocol1 [protocol2...]} [if-needed] {default | list-name} [callin] [one-time] |
Defines the authentication protocols supported and the order in which they are used. In this command, protocol1, protocol2 represent the following protocols: CHAP, MS-CHAP, and PAP. PPP authentication is attempted first using the first authentication method, which is protocol1 . If protocol1 is unable to establish authentication, the next configured protocol is used to negotiate authentication. |
If you configure ppp authentication chap on an interface, all incoming calls on that interface that initiate a PPP connection will have to be authenticated using CHAP; likewise, if you configure ppp authentication pap, all incoming calls that start a PPP connection will have to be authenticated using PAP. If you configure ppp authentication chap pap, the access server will attempt to authenticate all incoming calls that start a PPP session with CHAP. If the remote device does not support CHAP, the access server will try to authenticate the call using PAP. If the remote device does not support either CHAP or PAP, authentication will fail and the call will be dropped. If you configure ppp authentication pap chap, the access server will attempt to authenticate all incoming calls that start a PPP session with PAP. If the remote device does not support PAP, the access server will try to authenticate the call using CHAP. If the remote device does not support either protocol, authentication will fail and the call will be dropped. If you configure the ppp authentication command with the callin keyword, the access server will only authenticate the remote device if the remote device initiated the call.
Authentication method lists and the one-time keyword are only available if you have enabled AAA--they will not be available if you are using TACACS or extended TACACS. If you specify the name of an authentication method list with the ppp authentication command, PPP will attempt to authenticate the connection using the methods defined in the specified method list. If AAA is enabled and no method list is defined by name, PPP will attempt to authenticate the connection using the methods defined as the default. The ppp authentication command with the one-time keyword enables support for one-time passwords during authentication.
The if-needed keyword is only available if you are using TACACS or extended TACACS. The ppp authenticationcommand with the if-needed keyword means that PPP will only authenticate the remote device using PAP or CHAP if they have not yet authenticated during the life of the current call. If the remote device authenticated via a standard login procedure and initiated PPP from the EXEC prompt, PPP will not authenticate via CHAP if ppp authentication chap if-needed is configured on the interface.
Caution | If you use a list-name that has not been configured with the aaa authentication pppcommand, you disable PPP on the line. |
For information about adding a username entry for each remote system from which the local device or access server requires authentication, see Establishing Username Authentication.
Inbound and Outbound Authentication
PPP supports two-way authentication. Normally, when a remote device dials in to an access server, the access server requests that the remote device prove that it is allowed access. This is known as inbound authentication. At the same time, the remote device can also request that the access server prove that it is who it says it is. This is known as outbound authentication. An access server also does outbound authentication when it initiates a call to a remote device.
Enabling Outbound PAP Authentication
To enable outbound PAP authentication, use the following command in interface configuration mode:
|
Command or Action |
Purpose |
|---|---|
Device(config-if)# ppp pap sent-username username password password |
Enables outbound PAP authentication. |
The access server uses the username and password specified by the ppp pap sent-username command to authenticate itself whenever it initiates a call to a remote device or when it has to respond to a remote device's request for outbound authentication.
Refusing PAP Authentication Requests
To refuse PAP authentication from peers requesting it, meaning that PAP authentication is disabled for all calls, use the following command in interface configuration mode:
|
Command or Action |
Purpose |
|---|---|
Device(config-if)# pap refuse |
Refuses PAP authentication from peers requesting PAP authentication. |
If the refuse keyword is not used, the device will not refuse any PAP authentication challenges received from the peer.
Creating a Common CHAP Password
For remote CHAP authentication only, you can configure your device to create a common CHAP secret password to use in response to challenges from an unknown peer; for example, if your device calls a rotary of devices (either from another vendor, or running an older version of the Cisco software) to which a new (that is, unknown) device has been added. The ppp chap password command allows you to replace several username and password configuration commands with a single copy of this command on any dialer interface or asynchronous group interface.
To enable a device calling a collection of devices to configure a common CHAP secret password, use the following command in interface configuration mode:
Refusing CHAP Authentication Requests
To refuse CHAP authentication from peers requesting it, meaning that CHAP authentication is disabled for all calls, use the following command in interface configuration mode:
|
Command or Action |
Purpose |
|---|---|
Device(config-if)# ppp chap refuse [callin] |
Refuses CHAP authentication from peers requesting CHAP authentication. |
If the callin keyword is used, the device will refuse to answer CHAP authentication challenges received from the peer, but will still require the peer to answer any CHAP challenges the device sends.
If outbound PAP has been enabled (using the ppp pap sent-username command), PAP will be suggested as the authentication method in the refusal packet.
Delaying CHAP Authentication Until Peer Authenticates
To specify that the device will not authenticate to a peer requesting CHAP authentication until after the peer has authenticated itself to the device, use the following command in interface configuration mode:
|
Command or Action |
Purpose |
|---|---|
Device(config-if)# ppp chap wait secret |
Configures the device to delay CHAP authentication until after the peer has authenticated itself to the device. |
This command (which is the default) specifies that the device will not authenticate to a peer requesting CHAP authentication until the peer has authenticated itself to the device. The no ppp chap wait command specifies that the device will respond immediately to an authentication challenge.
Using MS-CHAP
Microsoft Challenge Handshake Authentication Protocol (MS-CHAP) is the Microsoft version of CHAP and is an extension of RFC 1994. Like the standard version of CHAP, MS-CHAP is used for PPP authentication; in this case, authentication occurs between a PC using Microsoft Windows NT or Microsoft Windows 95 and a Cisco device or access server acting as a network access server.
MS-CHAP differs from the standard CHAP as follows:
- MS-CHAP is enabled by negotiating CHAP Algorithm 0x80 in LCP option 3, Authentication Protocol.
- The MS-CHAP Response packet is in a format designed to be compatible with Microsoft Windows NT 3.5 and 3.51, Microsoft Windows 95, and Microsoft LAN Manager 2.x. This format does not require the authenticator to store a clear or reversibly encrypted password.
- MS-CHAP provides an authenticator-controlled authentication retry mechanism.
- MS-CHAP provides an authenticator-controlled change password mechanism.
- MS-CHAP defines a set of "reason-for failure" codes returned in the Failure packet message field.
Depending on the security protocols you have implemented, PPP authentication using MS-CHAP can be used with or without AAA security services. If you have enabled AAA, PPP authentication using MS-CHAP can be used in conjunction with both TACACS+ and RADIUS. The table below lists the vendor-specific RADIUS attributes (IETF Attribute 26) that enable RADIUS to support MS-CHAP.
| Table 9 | Vendor-Specific RADIUS Attributes for MS-CHAP |
|
Vendor-ID Number |
Vendor-Type Number |
Vendor-Proprietary Attribute |
Description |
|---|---|---|---|
|
311 |
11 |
MSCHAP-Challenge |
Contains the challenge sent by a network access server to an MS-CHAP user. It can be used in both Access-Request and Access-Challenge packets. |
|
211 |
11 |
MSCHAP-Response |
Contains the response value provided by a PPP MS-CHAP user in response to the challenge. It is only used in Access-Request packets. This attribute is identical to the PPP CHAP Identifier. |
Defining PPP Authentication using MS-CHAP
To define PPP authentication using MS-CHAP, use the following commands in interface configuration mode:
DETAILED STEPS
| Command or Action | Purpose | |
|---|---|---|
Step 1 |
Device(config-if)#
encapsulation
ppp
|
Enables PPP encapsulation. |
Step 2 |
Device(config-if)#
ppp
authentication
ms-chap
[if-needed] [list-name |
default] [callin] [one-time]
|
Defines PPP authentication using MS-CHAP. |
If you configure ppp authentication ms-chap on an interface, all incoming calls on that interface that initiate a PPP connection will have to be authenticated using MS-CHAP. If you configure the ppp authentication command with the callin keyword, the access server will only authenticate the remote device if the remote device initiated the call.
Authentication method lists and the one-time keyword are only available if you have enabled AAA--they will not be available if you are using TACACS or extended TACACS. If you specify the name of an authentication method list with the ppp authentication command, PPP will attempt to authenticate the connection using the methods defined in the specified method list. If AAA is enabled and no method list is defined by name, PPP will attempt to authenticate the connection using the methods defined as the default. The ppp authentication command with the one-time keyword enables support for one-time passwords during authentication.
The if-needed keyword is only available if you are using TACACS or extended TACACS. The ppp authentication command with the if-needed keyword means that PPP will only authenticate the remote device via MS-CHAP if that device has not yet authenticated during the life of the current call. If the remote device authenticated through a standard login procedure and initiated PPP from the EXEC prompt, PPP will not authenticate through MS-CHAP if ppp authentication chap if-needed is configured.
Note | If PPP authentication using MS-CHAP is used with username authentication, you must include the MS-CHAP secret in the local username/password database. For more information about username authentication, refer to the "Establish Username Authentication" section. |
Authentication Examples
- RADIUS Authentication Examples
- TACACS Authentication Examples
- Kerberos Authentication Examples
- AAA Scalability Example
- Login and Failed Banner Examples
- AAA Packet of Disconnect Server Key Example
- Double Authentication Examples
- Automated Double Authentication Example
- MS-CHAP Example
RADIUS Authentication Examples
This section provides two sample configurations using RADIUS.
The following example shows how to configure the device to authenticate and authorize using RADIUS:
aaa authentication login radius-login group radius local
aaa authentication ppp radius-ppp if-needed group radius
aaa authorization exec default group radius if-authenticated
aaa authorization network default group radius
line 3
login authentication radius-login
interface serial 0
ppp authentication radius-ppp
The lines in this sample RADIUS authentication and authorization configuration are defined as follows:
- The aaa authentication login radius-login group radius local command configures the device to use RADIUS for authentication at the login prompt. If RADIUS returns an error, the user is authenticated using the local database.
- The aaa authentication ppp radius-ppp if-needed group radius command configures the Cisco software to use PPP authentication using CHAP or PAP if the user has not already logged in. If the EXEC facility has authenticated the user, PPP authentication is not performed.
- The aaa authorization exec default group radius if-authenticated command queries the RADIUS database for information that is used during EXEC authorization, such as autocommands and privilege levels, but only provides authorization if the user has successfully authenticated.
- The aaa authorization network default group radius command queries RADIUS for network authorization, address assignment, and other access lists.
- The login authentication radius-login command enables the radius-login method list for line 3.
- The ppp authentication radius-ppp command enables the radius-ppp method list for serial interface 0.
The following example shows how to configure the device to prompt for and verify a username and password, authorize the user's EXEC level, and specify it as the method of authorization for privilege level 2. In this example, if a local username is entered at the username prompt, that username is used for authentication.
If the user is authenticated using the local database, EXEC authorization using RADIUS will fail because no data is saved from the RADIUS authentication. The method list also uses the local database to find an autocommand. If there is no autocommand, the user becomes the EXEC user. If the user then attempts to use commands that are set at privilege level 2, TACACS+ is used to attempt to authorize the command.
aaa authentication login default group radius local
aaa authorization exec default group radius local
aaa authorization command 2 default group tacacs+ if-authenticated
radius-server host 192.0.2.3 auth-port 1645 acct-port 1646
radius-server attribute 44 include-in-access-req
radius-server attribute 8 include-in-access-req
The lines in this sample RADIUS authentication and authorization configuration are defined as follows:
- The aaa authentication login default group radius local command specifies that the username and password are verified by RADIUS or, if RADIUS is not responding, by the device's local user database.
- The aaa authorization exec default group radius localcommand specifies that RADIUS authentication information be used to set the user's EXEC level if the user authenticates with RADIUS. If no RADIUS information is used, this command specifies that the local user database be used for EXEC authorization.
- The aaa authorization command 2 default group tacacs+ if-authenticated command specifies TACACS+ authorization for commands set at privilege level 2, if the user has already successfully authenticated.
- The radius-server host 172.16.71.146 auth-port 1645 acct-port 1646 command specifies the IP address of the RADIUS server host, the UDP destination port for authentication requests, and the UDP destination port for accounting requests.
- The radius-server attribute 44 include-in-access-req command sends RADIUS attribute 44 (Acct-Session-ID) in access-request packets.
- The radius-server attribute 8 include-in-access-req command sends RADIUS attribute 8 (Framed-IP-Address) in access-request packets.
TACACS Authentication Examples
The following example shows how to configure TACACS+ as the security protocol to be used for PPP authentication:
aaa new-model
aaa authentication ppp test group tacacs+ local
interface serial 0
ppp authentication chap pap test
tacacs-server host 192.0.2.3
tacacs-server key goaway
The lines in this sample TACACS+ authentication configuration are defined as follows:
- The aaa new-model command enables the AAA security services.
- The aaa authentication command defines a method list, "test," to be used on serial interfaces running PPP. The keywords group tacacs+ means that authentication will be done through TACACS+. If TACACS+ returns an ERROR of some sort during authentication, the keyword local indicates that authentication will be attempted using the local database on the network access server.
- The interface command selects the line.
- The ppp authentication command applies the test method list to this line.
- The tacacs-server host command identifies the TACACS+ daemon as having an IP address of 192.0.2.3.
- The tacacs-server key command defines the shared encryption key to be "goaway."
The following example shows how to configure AAA authentication for PPP:
aaa authentication ppp default if-needed group tacacs+ local
In this example, the keyword default means that PPP authentication is applied by default to all interfaces. The if-needed keyword means that if the user has already authenticated by going through the ASCII login procedure, then PPP is not necessary and can be skipped. If authentication is needed, the keywords group tacacs+ means that authentication will be done through TACACS+. If TACACS+ returns an ERROR of some sort during authentication, the keyword local indicates that authentication will be attempted using the local database on the network access server.
The following example shows how to create the same authentication algorithm for PAP, but it calls the method list "MIS-access" instead of "default":
aaa authentication ppp MIS-access if-needed group tacacs+ local
interface serial 0
ppp authentication pap MIS-access
In this example, because the list does not apply to any interfaces (unlike the default list, which applies automatically to all interfaces), the administrator must select interfaces to which this authentication scheme should apply by using the interface command. The administrator must then apply this method list to those interfaces by using the ppp authentication command.
AAA Scalability Example
The following example shows a general security configuration using AAA with RADIUS as the security protocol. In this example, the network access server is configured to allocate 16 background processes to handle AAA requests for PPP.
aaa new-model
radius-server host alcatraz
radius-server key myRaDiUSpassWoRd
radius-server configure-nas
username root password ALongPassword
aaa authentication ppp dialins group radius local
aaa authentication login admins local
aaa authorization network default group radius local
aaa accounting network default start-stop group radius
aaa processes 16
line 1 16
 autoselect ppp
 autoselect during-login
 login authentication admins
 modem dialin
interface group-async 1
 group-range 1 16
 encapsulation ppp
 ppp authentication pap dialins
The lines in this sample RADIUS AAA configuration are defined as follows:
- The aaa new-model command enables AAA network security services.
- The radius-server host command defines the name of the RADIUS server host.
- The radius-server key command defines the shared secret text string between the network access server and the RADIUS server host.
- The radius-server configure-nas command defines that the Cisco device or access server will query the RADIUS server for static routes and IP pool definitions when the device first starts up.
- The username command defines the username and password to be used for the PPP Password Authentication Protocol (PAP) caller identification.
- The aaa authentication ppp dialins group radius local command defines the authentication method list "dialins," which specifies that RADIUS authentication, then (if the RADIUS server does not respond) local authentication will be used on serial lines using PPP.
- The aaa authentication login admins local command defines another method list, "admins," for login authentication.
- The aaa authorization network default group radius local command is used to assign an address and other network parameters to the RADIUS user.
- The aaa accounting network default start-stop group radius command tracks PPP usage.
- The aaa processes command allocates 16 background processes to handle AAA requests for PPP.
- The line command switches the configuration mode from global configuration to line configuration and identifies the specific lines being configured.
- The autoselect ppp command configures the Cisco IOS software to allow a PPP session to start up automatically on these selected lines.
- The autoselect during-login command is used to display the username and password prompt without pressing the Return key. After the user logs in, the autoselect function (in this case, PPP) begins.
- The login authentication admins command applies the "admins" method list for login authentication.
- The modem dialin command configures modems attached to the selected lines to only accept incoming calls.
- The interface group-async command selects and defines an asynchronous interface group.
- The group-range command defines the member asynchronous interfaces in the interface group.
- The encapsulation ppp command sets PPP as the encapsulation method used on the specified interfaces.
- The ppp authentication pap dialinscommand applies the "dialins" method list to the specified interfaces.
Login and Failed Banner Examples
The following example shows how to configure a login banner (in this case, the phrase "Unauthorized Access Prohibited") that will be displayed when a user logs in to the system. The asterisk (*) is used as the delimiting character. (RADIUS is specified as the default login authentication method.)
aaa new-model
aaa authentication banner *Unauthorized Access Prohibited*
aaa authentication login default group radius
This configuration produces the following login banner:
Unauthorized Access Prohibited
Username:
The following example shows how to additionally configure a failed login banner (in this case, the phrase "Failed login. Try again.") that will be displayed when a user tries to log in to the system and fails. The asterisk (*) is used as the delimiting character. (RADIUS is specified as the default login authentication method.)
aaa new-model
aaa authentication banner *Unauthorized Access Prohibited*
aaa authentication fail-message *Failed login. Try again.*
aaa authentication login default group radius
This configuration produces the following login and failed login banner:
Unauthorized Access Prohibited
Username:
Password:
Failed login. Try again.
AAA Packet of Disconnect Server Key Example
The following example shows how to configure POD (packet of disconnect), which terminates connections on the network access server (NAS) when particular session attributes are identified.
aaa new-model
aaa authentication ppp default radius
aaa accounting network default start-stop radius
aaa accounting delay-start
aaa pod server server-key xyz123
radius-server host 192.0.2.3 non-standard
radius-server key rad123
Double Authentication Examples
The examples in this section illustrate possible configurations to be used with double authentication. Your configurations could differ significantly, depending on your network and security requirements.
Note | These configuration examples include specific IP addresses and other specific information. This information is for illustration purposes only: your configuration will use different IP addresses, different usernames and passwords, and different authorization statements. |
- Configuration of the Local Host for AAA with Double Authentication Examples
- Configuration of the AAA Server for First-Stage PPP Authentication and Authorization Example
- Configuration of the AAA Server for Second-Stage Per-User Authentication and Authorization Examples
- Complete Configuration with TACACS Example
Configuration of the Local Host for AAA with Double Authentication Examples
These two examples show how to configure a local host to use AAA for PPP and login authentication, and for network and EXEC authorization. An example each is shown for RADIUS and for TACACS+.
In both the examples, the first three lines configure AAA with a specific server as the AAA server. The next two lines configure AAA for PPP and login authentication, and the last two lines configure network and EXEC authorization. The last line is necessary only if the access-profile command will be executed as an autocommand.
The following example shows device configuration with a RADIUS AAA server:
aaa new-model
radius-server host secureserver
radius-server key myradiuskey
aaa authentication ppp default group radius
aaa authentication login default group radius
aaa authorization network default group radius
aaa authorization exec default group radius
The following example shows device configuration with a TACACS+ server:
aaa new-model
tacacs-server host security
tacacs-server key mytacacskey
aaa authentication ppp default group tacacs+
aaa authentication login default group tacacs+
aaa authorization network default group tacacs+
aaa authorization exec default group tacacs+
Configuration of the AAA Server for First-Stage PPP Authentication and Authorization Example
This example shows a configuration on the AAA server. A partial sample AAA configuration is shown for RADIUS.
TACACS+ servers can be configured similarly. See Complete Configuration with TACACS Example for more information.
This example defines authentication/authorization for a remote host named "hostx" that will be authenticated by CHAP in the first stage of double authentication. Note that the ACL AV pair limits the remote host to Telnet connections to the local host. The local host has the IP address 10.0.0.2.
The following example shows a partial AAA server configuration for RADIUS:
hostx   Password = "welcome"
        User-Service-Type = Framed-User,
        Framed-Protocol = PPP,
        cisco-avpair = "lcp:interface-config=ip unnumbered ethernet 0",
        cisco-avpair = "ip:inacl#3=permit tcp any 172.21.114.0 0.0.0.255 eq telnet",
        cisco-avpair = "ip:inacl#4=deny icmp any any",
        cisco-avpair = "ip:route#5=10.0.0.0 255.0.0.0",
        cisco-avpair = "ip:route#6=10.10.0.0 255.0.0.0",
        cisco-avpair = "ipx:inacl#3=deny any"
Configuration of the AAA Server for Second-Stage Per-User Authentication and Authorization Examples
This section contains partial sample AAA configurations on a RADIUS server. These configurations define authentication and authorization for a user (Pat) with the username "patuser," who will be user-authenticated in the second stage of double authentication.
TACACS+ servers can be configured similarly. See Complete Configuration with TACACS Example for more information.
Three examples show sample RADIUS AAA configurations that could be used with each of the three forms of the access-profile command.
The first example shows a partial sample AAA configuration that works with the default form (no keywords) of the access-profile command. Note that only ACL AV pairs are defined. This example also sets up the access-profile command as an autocommand.
patuser   Password = "welcome"
          User-Service-Type = Shell-User,
          cisco-avpair = "shell:autocmd=access-profile"
          User-Service-Type = Framed-User,
          Framed-Protocol = PPP,
          cisco-avpair = "ip:inacl#3=permit tcp any host 10.0.0.2 eq telnet",
          cisco-avpair = "ip:inacl#4=deny icmp any any"
The second example shows a partial sample AAA configuration that works with the access-profile merge form of the access-profile command. This example also sets up the access-profile merge command as an autocommand.
patuser   Password = "welcome"
          User-Service-Type = Shell-User,
          cisco-avpair = "shell:autocmd=access-profile merge"
          User-Service-Type = Framed-User,
          Framed-Protocol = PPP,
          cisco-avpair = "ip:inacl#3=permit tcp any any"
          cisco-avpair = "ip:route=10.0.0.0 255.255.0.0",
          cisco-avpair = "ip:route=10.1.0.0 255.255.0.0",
          cisco-avpair = "ip:route=10.2.0.0 255.255.0.0"
The third example shows a partial sample AAA configuration that works with the access-profile replace form of the access-profile command. This example also sets up the access-profile replace command as an autocommand.
patuser   Password = "welcome"
          User-Service-Type = Shell-User,
          cisco-avpair = "shell:autocmd=access-profile replace"
          User-Service-Type = Framed-User,
          Framed-Protocol = PPP,
          cisco-avpair = "ip:inacl#3=permit tcp any any",
          cisco-avpair = "ip:inacl#4=permit icmp any any",
          cisco-avpair = "ip:route=10.10.0.0 255.255.0.0",
          cisco-avpair = "ip:route=10.11.0.0 255.255.0.0",
          cisco-avpair = "ip:route=10.12.0.0 255.255.0.0"
Complete Configuration with TACACS Example
This example shows TACACS+ authorization profile configurations both for the remote host (used in the first stage of double authentication) and for specific users (used in the second stage of double authentication). This TACACS+ example contains approximately the same configuration information as shown in the previous RADIUS examples.
This sample configuration shows authentication/authorization profiles on the TACACS+ server for the remote host "hostx" and for three users, with the usernames "pat_default," "pat_merge," and "pat_replace." The configurations for these three usernames illustrate different configurations that correspond to the three different forms of the access-profile command. The three user configurations also illustrate setting up the autocommand for each form of the access-profile command.
The figure below shows the topology. The example that follows the figure shows a TACACS+ configuration file.
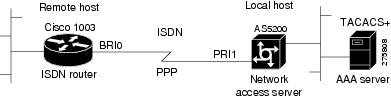
This sample configuration shows authentication/authorization profiles on the TACACS+ server for the remote host "hostx" and for three users, with the usernames "pat_default," "pat_merge," and "pat_replace."
key = "mytacacskey"
default authorization = permit
#-----------------------------Remote Host (BRI)-------------------------
#
# This allows the remote host to be authenticated by the local host
# during fist-stage authentication, and provides the remote host
# authorization profile.
#
#-----------------------------------------------------------------------
user = hostx
{
    login = cleartext "welcome"
    chap = cleartext "welcome"
    service = ppp protocol = lcp {
                interface-config="ip unnumbered ethernet 0"
    }
    service = ppp protocol = ip {
            # It is important to have the hash sign and some string after
            # it. This indicates to the NAS that you have a per-user
            # config.
            inacl#3="permit tcp any 172.21.114.0 0.0.0.255 eq telnet"
            inacl#4="deny icmp any any"
            route#5="10.0.0.0 255.0.0.0"
            route#6="10.10.0.0 255.0.0.0"
    }
    service = ppp protocol = ipx {
            # see previous comment about the hash sign and string, in protocol = ip
            inacl#3="deny any"
    }
}
#------------------- "access-profile" default user "only acls" ------------------
#
# Without arguments, access-profile removes any access-lists it can find
# in the old configuration (both per-user and per-interface), and makes sure
# that the new profile contains ONLY access-list definitions.
#
#--------------------------------------------------------------------------------
user = pat_default
{
        login = cleartext "welcome"
        chap = cleartext "welcome"
        service = exec
        {
                # This is the autocommand that executes when pat_default logs in.
                autocmd = "access-profile"
        }
        service = ppp protocol = ip {
                # Put whatever access-lists, static routes, whatever
                # here.
                # If you leave this blank, the user will have NO IP
                # access-lists (not even the ones installed prior to
                # this)!
                inacl#3="permit tcp any host 10.0.0.2 eq telnet"
                inacl#4="deny icmp any any"
        }
        service = ppp protocol = ipx {
                # Put whatever access-lists, static routes, whatever
                # here.
                # If you leave this blank, the user will have NO IPX
                # access-lists (not even the ones installed prior to
                # this)!
        }
}
#--------------------- "access-profile merge" user ---------------------------
#
# With the 'merge' option, first all old access-lists are removed (as before),
# but then (almost) all AV pairs are uploaded and installed. This will allow
# for uploading any custom static routes, sap-filters, and so on, that the user
# may need in his or her profile. This needs to be used with care, as it leaves
# open the possibility of conflicting configurations.
#
#-----------------------------------------------------------------------------
user = pat_merge
{
        login = cleartext "welcome"
        chap = cleartext "welcome"
        service = exec
        {
                # This is the autocommand that executes when pat_merge logs in.
                autocmd = "access-profile merge"
        }
        service = ppp protocol = ip
        {
                # Put whatever access-lists, static routes, whatever
                # here.
                # If you leave this blank, the user will have NO IP
                # access-lists (not even the ones installed prior to
                # this)!
                inacl#3="permit tcp any any"
                route#2="10.0.0.0 255.255.0.0"
                route#3="10.1.0.0 255.255.0.0"
                route#4="10.2.0.0 255.255.0.0"
        }
        service = ppp protocol = ipx
        {
                # Put whatever access-lists, static routes, whatever
                # here.
                # If you leave this blank, the user will have NO IPX
                # access-lists (not even the ones installed prior to
                # this)!
        }
}
#--------------------- "access-profile replace" user ----------------------------
#
# With the 'replace' option, ALL old configuration is removed and ALL new
# configuration is installed.
#
# One caveat: access-profile checks the new configuration for address-pool and
# address AV pairs. As addresses cannot be renegotiated at this point, the
# command will fail (and complain) when it encounters such an AV pair.
# Such AV pairs are considered to be "invalid" for this context.
#-------------------------------------------------------------------------------
user = pat_replace
{
        login = cleartex
t
"
welcome
"
        chap = cleartext "welcome"
        service = exec
        {
                # This is the autocommand that executes when pat_replace logs in.
                autocmd = "access-profile replace"
        }
        service = ppp protocol = ip
        {
                # Put whatever access-lists, static routes, whatever
                # here.
                # If you leave this blank, the user will have NO IP
                # access-lists (not even the ones installed prior to
                # this)!
                inacl#3="permit tcp any any"
                inacl#4="permit icmp any any"
                route#2="10.10.0.0 255.255.0.0"
                route#3="10.11.0.0 255.255.0.0"
                route#4="10.12.0.0 255.255.0.0"
        }
        service = ppp protocol = ipx
        {
                # put whatever access-lists, static routes, whatever
                # here.
                # If you leave this blank, the user will have NO IPX
                # access-lists (not even the ones installed prior to
                # this)!
        }
}
Automated Double Authentication Example
This example shows a complete configuration file for a Cisco 2509 router with automated double authentication configured. The configuration commands that apply to automated double authentication are preceded by descriptions with a double asterisk (**).
Current configuration:
!
version 11.3
no service password-encryption
!
hostname myrouter
!
!
! **The following AAA commands are used to configure double authentication:
!
! **The following command enables AAA:
aaa new-model
! **The following command enables user authentication via the TACACS+ AAA server:
aaa authentication login default group tacacs+
aaa authentication login console none
! **The following command enables device authentication via the TACACS+ AAA server:
aaa authentication ppp default group tacacs+
! **The following command causes the remote user's authorization profile to be
! downloaded from the AAA server to the Cisco 2509 router when required:
aaa authorization exec default group tacacs+
! **The following command causes the remote device's authorization profile to be
! downloaded from the AAA server to the Cisco 2509 router when required:
aaa authorization network default group tacacs+
enable password mypassword
!
ip host blue 172.21.127.226
ip host green 172.21.127.218
ip host red 172.21.127.114
ip domain-name example.com
ip name-server 172.16.2.75
! **The following command globally enables automated double authentication:
ip trigger-authentication timeout 60 port 7500
isdn switch-type basic-5ess
!
!
interface Ethernet0
 ip address 172.21.127.186 255.255.255.248
 no ip route-cache
 no ip mroute-cache
 no keepalive
 ntp disable
 no cdp enable
!
interface Virtual-Template1
 ip unnumbered Ethernet0
 no ip route-cache
 no ip mroute-cache
!
interface Serial0
 ip address 172.21.127.105 255.255.255.248
 encapsulation ppp
 no ip mroute-cache
 no keepalive
 shutdown
 clockrate 2000000
 no cdp enable
!
interface Serial1
 no ip address
 no ip route-cache
 no ip mroute-cache
 shutdown
 no cdp enable
!
! **Automated double authentication occurs via the ISDN BRI interface BRI0:
interface BRI0
 ip unnumbered Ethernet0
! **The following command turns on automated double authentication at this interface:
 ip trigger-authentication
! **PPP encapsulation is required:
 encapsulation ppp
 no ip route-cache
 no ip mroute-cache
 dialer idle-timeout 500
 dialer map ip 172.21.127.113 name myrouter 60074
 dialer-group 1
 no cdp enable
! **The following command specifies that device authentication occurs via PPP CHAP:
 ppp authentication chap
!
router eigrp 109
 network 172.21.0.0
 no auto-summary
!
ip default-gateway 172.21.127.185
no ip classless
ip route 172.21.127.114 255.255.255.255 172.21.127.113
! **Virtual profiles are required for double authentication to work:
virtual-profile virtual-template 1
dialer-list 1 protocol ip permit
no cdp run
! **The following command defines where the TACACS+ AAA server is:
tacacs-server host 171.69.57.35 port 1049
tacacs-server timeout 90
! **The following command defines the key to use with TACACS+ traffic (required):
tacacs-server key mytacacskey
snmp-server community public RO
!
line con 0
 exec-timeout 0 0
 login authentication console
line aux 0
 transport input all
line vty 0 4
 exec-timeout 0 0
 password lab
!
end
MS-CHAP Example
The following example shows how to configure a Cisco AS5200 Universal Access Server (enabled for AAA and communication with a RADIUS security server) for PPP authentication using MS-CHAP:
aaa new-model
aaa authentication login admins local
aaa authentication ppp dialins group radius local
aaa authorization network default group radius local
aaa accounting network default start-stop group radius
username root password ALongPassword
radius-server host alcatraz
radius-server key myRaDiUSpassWoRd
interface group-async 1
 group-range 1 16
 encapsulation ppp
 ppp authentication ms-chap dialins
line 1 16
 autoselect ppp
 autoselect during-login
 login authentication admins
 modem dialin
The lines in this sample RADIUS AAA configuration are defined as follows:
- The aaa new-model command enables AAA network security services.
- The aaa authentication login admins local command defines another method list, "admins", for login authentication.
- The aaa authentication ppp dialins group radius local command defines the authentication method list "dialins," which specifies that RADIUS authentication then (if the RADIUS server does not respond) local authentication will be used on serial lines using PPP.
- The aaa authorization network default group radius local command is used to assign an address and other network parameters to the RADIUS user.
- The aaa accounting network default start-stop group radius command tracks PPP usage.
- The username command defines the username and password to be used for the PPP Password Authentication Protocol (PAP) caller identification.
- The radius-server host command defines the name of the RADIUS server host.
- The radius-server key command defines the shared secret text string between the network access server and the RADIUS server host.
- The interface group-async command selects and defines an asynchronous interface group.
- The group-range command defines the member asynchronous interfaces in the interface group.
- The encapsulation ppp command sets PPP as the encapsulation method used on the specified interfaces.
- The ppp authentication ms-chap dialins command selects MS-CHAP as the method of PPP authentication and applies the "dialins" method list to the specified interfaces.
- The line command switches the configuration mode from global configuration to line configuration and identifies the specific lines being configured.
- The autoselect ppp command configures the Cisco software to allow a PPP session to start up automatically on these selected lines.
- The autoselect during-login command is used to display the username and password prompt without pressing the Return key. After the user logs in, the autoselect function (in this case, PPP) begins.
- The login authentication admins command applies the "admins" method list for login authentication.
- The modem dialin command configures modems attached to the selected lines to only accept incoming calls.
Additional References
Related Documents
MIBs
Technical Assistance
|
Description |
Link |
|---|---|
|
The Cisco Support and Documentation website provides online resources to download documentation, software, and tools. Use these resources to install and configure the software and to troubleshoot and resolve technical issues with Cisco products and technologies. Access to most tools on the Cisco Support and Documentation website requires a Cisco.com user ID and password. |
Feature Information for Configuring Authentication
The following table provides release information about the feature or features described in this module. This table lists only the software release that introduced support for a given feature in a given software release train. Unless noted otherwise, subsequent releases of that software release train also support that feature.
Use Cisco Feature Navigator to find information about platform support and Cisco software image support. To access Cisco Feature Navigator, go to www.cisco.com/go/cfn. An account on Cisco.com is not required.
| Table 10 | Feature Information for Configuring Authentication |
|
Feature Name |
Releases |
Feature Information |
|---|---|---|
|
AAA Per-User Scalability |
12.2(27)SB, 12.2(33)SR, 15.0(1)M |
This feature was introduced in Cisco IOS Release 12.2(27)SB. This feature was integrated into Cisco IOS Release 12.2(33)SR. This feature was integrated into Cisco IOS Release 15.0(1)M. |
|
Change of Authorization (CoA) |
12.2(33)SXI4, 15.2(2)T |
Depending on your release, the Cisco software supports the RADIUS Change of Authorization (CoA) extensions defined in RFC 5176. COA extensions are typically used in a pushed model and allow for the dynamic reconfiguring of sessions from external authentication, authorization, and accounting (AAA) or policy servers. The following commands were introduced: aaa server radius dynamic author, authentication command bounce-port ignore, authentication command disable-port ignore. |
|
Domain Stripping at the Server Group Level |
15.2(3)T |
The Domain Stripping feature allows domain stripping to be configured at the server group level. Per-server group configuration overrides the global configuration. The following sections provide information about this feature: The following command was introduced: domain-stripping. |
|
LDAP integration with Active Directory |
15.1(1)T |
This feature provides the authentication and authorization support for AAA. LDAP is a standard-based protocol used to access directories. It is based on a client server model similar to RADIUS. LDAP is deployed on Cisco devices to send authentication requests to a central LDAP server that contains all user authentication and network service access information. The following command was introduced: aaa authentication login default group ldap. |
Cisco and the Cisco logo are trademarks or registered trademarks of Cisco and/or its affiliates in the U.S. and other countries. To view a list of Cisco trademarks, go to this URL: www.cisco.com/go/trademarks. Third-party trademarks mentioned are the property of their respective owners. The use of the word partner does not imply a partnership relationship between Cisco and any other company. (1110R)
Any Internet Protocol (IP) addresses and phone numbers used in this document are not intended to be actual addresses and phone numbers. Any examples, command display output, network topology diagrams, and other figures included in the document are shown for illustrative purposes only. Any use of actual IP addresses or phone numbers in illustrative content is unintentional and coincidental.