
 Feedback
Contents
- Cisco IOS IPS 5.x Signature Format Support and Usability Enhancements
- Finding Feature Information
- Prerequisites for Cisco IOS IPS 5.x Signature Format Support and Usability Enhancements
- Restrictions for Cisco IOS IPS 5.x Signature Format Support and Usability Enhancements
- Information About Cisco IOS IPS 5.x Signature Format Support and Usability Enhancements
- Cisco IOS IPS Overview
- Cisco IOS IPS Signature Package
- Signature Categories
- Router Configuration Files and Signature Event Action Processor (SEAP)
- Additional Risk Rating Algorithms
- Preserving Configured Signature Tunings on the Local Router
- Signature Auto Update Configuration
- How to Use Cisco IOS IPS 5.x Signature Format Support and Usability Enhancements
- Retiring All Signatures and Selecting a Category of Signatures
- What to Do Next
- Configuring Cisco IOS IPS on Your Router
- Loading a Signature File into Cisco IOS IPS
- Prerequisites
- Flexible Signatures Ordered and Incremental
- Tuning Signature Parameters
- Tuning Signatures for a Signature ID
- Tuning Signatures per Category
- Setting the Target Value Rating
- Configuring Signature Auto Updates
- Configuring Signature Auto Updates from a Local Server
- Preparing SSL Certificates for Cisco.com Signature Auto Updates
- Creating a PKI Trustpoint for Auto Signature Updates
- Manually Configuring Signature Auto Updates from Cisco.com
- Configuring Signature Auto Updates to be Upgraded Automatically from Cisco.com
- Monitoring Cisco IOS IPS Signatures through Syslog Messages or SDEE
- SDEE Overview
- Troubleshooting Tips
- Configuration Examples for Cisco IOS IPS 5.x Signature Format Support and Usability Enhancements
- Cisco IOS IPS Configuration Example
- Configuring and Verifying SDEE on your Router Example
- Configuring IPS Signatures to be Upgraded Automatically from Cisco.com: Example
- Additional References
- Feature Information for Cisco IOS IPS 5.x Signature Format Support and Usability Enhancements
Cisco IOS IPS 5.x Signature Format Support and Usability Enhancements
The Cisco IOS Intrusion Prevention System (IPS) acts as an in-line intrusion prevention sensor that scans packets and sessions as they flow through the router to match any Cisco IOS IPS 5.x signature. These signatures are defined in Extensible Markup Language (XML) format and provide the following functionality:
- Automatic signature updates from local servers. Network administrators can either preserve the user's current configuration of signature actions or override the user's current configuration of signature actions with the current IPS configuration.
- Top-level signature categories to classify signatures for easy grouping and tuning. Group-wide parameters, such as signature event action, can be applied to a group through CLI, so the user does not have to modify each individual signature.
- Encrypted (NDA) signature support.
- Direct Download from CCO capability in IOS IPS feature allows an administrator to use the CLI to specify, download and upgrade to new signatures posted for the IOS directly from Cisco.com. An administrator can also configure the router through the CLI to receive future periodic signature downloads automatically to eliminate the manual maintenance efforts and costs of changing or tuning IPS signatures whenever a new update is posted.
- Finding Feature Information
- Prerequisites for Cisco IOS IPS 5.x Signature Format Support and Usability Enhancements
- Restrictions for Cisco IOS IPS 5.x Signature Format Support and Usability Enhancements
- Information About Cisco IOS IPS 5.x Signature Format Support and Usability Enhancements
- How to Use Cisco IOS IPS 5.x Signature Format Support and Usability Enhancements
- Configuration Examples for Cisco IOS IPS 5.x Signature Format Support and Usability Enhancements
- Additional References
- Feature Information for Cisco IOS IPS 5.x Signature Format Support and Usability Enhancements
Finding Feature Information
Your software release may not support all the features documented in this module. For the latest caveats and feature information, see Bug Search Tool and the release notes for your platform and software release. To find information about the features documented in this module, and to see a list of the releases in which each feature is supported, see the feature information table at the end of this module.
Use Cisco Feature Navigator to find information about platform support and Cisco software image support. To access Cisco Feature Navigator, go to www.cisco.com/go/cfn. An account on Cisco.com is not required.
Prerequisites for Cisco IOS IPS 5.x Signature Format Support and Usability Enhancements
System and Image Requirements for Cisco IOS IPS 5.x
- Cisco IOS IPS signatures. See the "Cisco IOS Signature Package" section for more information.
- Cisco IOS IPS system requirements depend on the type of deployment, the bandwidth requirements, and security requirements. The larger the number of signatures, the larger the amount of memory consumed.
- You must generate a RSA crypto key and load the public signature on your router for signature decryption.
This following cisco public key configuration can be cut and pasted directly into your router configuration:
crypto key pubkey-chain rsa
named-key realm-cisco.pub signature
key-string
30820122 300D0609 2A864886 F70D0101 01050003 82010F00 3082010A 02820101
00C19E93 A8AF124A D6CC7A24 5097A975 206BE3A2 06FBA13F 6F12CB5B 4E441F16
17E630D5 C02AC252 912BE27F 37FDD9C8 11FC7AF7 DCDD81D9 43CDABC3 6007D128
B199ABCB D34ED0F9 085FADC1 359C189E F30AF10A C0EFB624 7E0764BF 3E53053E
5B2146A9 D7A5EDE3 0298AF03 DED7A5B8 9479039D 20F30663 9AC64B93 C0112A35
FE3F0C87 89BCB7BB 994AE74C FA9E481D F65875D6 85EAF974 6D9CC8E3 F0B08B85
50437722 FFBE85B9 5E4189FF CC189CB9 69C46F9C A84DFBA5 7A0AF99E AD768C36
006CF498 079F88F8 A3B3FB1F 9FB7B3CB 5539E1D1 9693CCBB 551F78D2 892356AE
2F56D826 8918EF3C 80CA4F4D 87BFCA3B BFF668E9 689782A5 CF31CB6E B4B094D3
F3020301 0001
quit
 Note | You can also access the public key (realm-cisco.pub.key.txt) configuration at the following URL: http://www.cisco.com/cgi-bin/tablebuild.pl/ios-v5sigup. Ensure that you have your Cisco userid, and password to access this URL. |
- You must load one of the following images on your router to install Cisco IOS IPS 5.x: adventerprisek9, advsecurityk9, and advipservicesk9.
Note | To check the current system version, use the show subsys name ips command. IPS 4.x uses a version format of 2.xxx.xxx; IPS 5.x uses a version format of 3.xxx.xxx. |
Upgrading from Cisco IOS IPS 4.x to Cisco IOS IPS 5.x Signatures
Cisco IOS IPS 5.x format signatures are not backward compatible with Cisco IOS IPS 4.x. You must reconfigure your Cisco IOS IPS features for use with the IPS 5.x signature format command-line interface (CLI) and features.
When reconfiguring Cisco IOS IPS on a router to convert to the 5.x signature format, you must have the following Cisco IOS IPS 4.x information:
- Cisco IOS IPS rule name (which was specified through the ip ips name ips-name command)
- Interfaces for which the Cisco IOS IPS rule has been applied
To gather this information, issue the show ip ips configurationcommand, which displays a copy of the existing output.
Router# show ip ips configuration

Configured SDF Locations:
disk2:my-signatures.sdf
Builtin signatures are enabled but not loaded
Last successful SDF load time: 05:31:54 MST Sep 20 2003
IPS fail closed is disabled
Fastpath ips is enabled
Quick run mode is enabled
Event notification through syslog is enabled
Event notification through SDEE is enabled
Total Active Signatures: 13
Total Inactive Signatures: 0
Signature 50000:0 disable
Signature 50000:1 disable
Signature 50000:2 disable
IPS Rule Configuration
IPS name MYIPS
Interface Configuration
Interface GigabitEthernet0/1
Inbound IPS rule is MYIPS
Outgoing IPS rule is not set
Restrictions for Cisco IOS IPS 5.x Signature Format Support and Usability Enhancements
Do not enable all IPS signatures at once. The router may not be able to compile all of the signatures, resulting in high CPU and memory usage, degraded performance, or a system reload.
Backward Compatibility
Cisco IOS IPS 5.x format signatures are not backward compatible with Cisco IOS IPS 4.x SDFs.
Cisco 870 Series Platform Support
The 870 series platform with Cisco IOS IPS in Cisco IOS Release 12.4(11)T may experience lower performance relative to previous releases (CSCsg57228). The Cisco IOS IPS performance on the 870 series platform is enhanced in a later 12.4(11)T image rebuild.
On the 870 series platform, Cisco IOS IPS is supported only on the adv-ipservices and the adv-enterprise images. Cisco IOS IPS is the same on both images.
Information About Cisco IOS IPS 5.x Signature Format Support and Usability Enhancements
- Cisco IOS IPS Overview
- Cisco IOS IPS Signature Package
- Signature Categories
- Preserving Configured Signature Tunings on the Local Router
- Signature Auto Update Configuration
Cisco IOS IPS Overview
The Cisco IOS IPS acts as an in-line intrusion prevention sensor, watching packets and sessions as they flow through the router and scanning each packet to match any of the Cisco IOS IPS signatures. When it detects suspicious activity, it responds before network security can be compromised and logs the event through Cisco IOS syslog messages or Security Device Event Exchange (SDEE). The network administrator can configure Cisco IOS IPS to choose the appropriate response to various threats. The Signature Event Action Processor (SEAP) can dynamically control actions that are to be taken by a signature event on the basis of parameters such as fidelity, severity, or target value rating. These parameters have default values but can also be configured through CLI. When packets in a session match a signature, Cisco IOS IPS can take any of the following actions, as appropriate:
- Send an alarm to a syslog server or a centralized management interface
- Drop the packet
- Reset the connection
- Deny traffic from the source IP address of the attacker for a specified amount of time
- Deny traffic on the connection for which the signature was seen for a specified amount of time
Cisco developed its Cisco IOS software-based intrusion-prevention capabilities and Cisco IOS Firewall with flexibility in mind, so that individual signatures could be disabled in case of false positives. Generally, it is preferable to enable both the firewall and Cisco IOS IPS to support network security policies. However, each of these features may be enabled independently and on different router interfaces.
Cisco IOS IPS Signature Package
Note | Ensure that you have your Cisco userid, and password to access this URL. |
- The IOS-Sxxx-CLI.pkg file is listed on this web page. See the "Configuring Cisco IOS IPS on Your Router" for more information on creating a directory on the router flash directory where the required signature files and configurations are stored. Alternatively, you can use a Cisco USB flash drive connected to the router's USB port to store the signature files and configurations. The USB flash drive needs to remain connected to the router USB port if it is used as the IOS IPS configuration directory location. IOS IPS also supports any IOS File System as its configuration location with proper write access.
Signature Categories
Cisco IPS appliances and Cisco IOS IPS with Cisco 5.x format signatures operate with signature categories. All signatures are pregrouped into categories; the categories are hierarchical. An individual signature can belong to more than one category. Top-level categories help to define general types of signatures. Subcategories exist beneath each top-level signature category. (For a list of supported top-level categories, use your router CLI help (?).)
Router Configuration Files and Signature Event Action Processor (SEAP)
As of Cisco IOS Release 12.4(11)T, SDFs are no longer used by Cisco IOS IPS. Instead, routers access signature definition information through a directory that contains three configuration files--the default configuration, the delta configuration, and the SEAP configuration. Cisco IOS accesses this directory through the ip ips config location command.
Note | You must issue the ip ips config location command; otherwise, the configuration files are not saved to any location. |
SEAP is the control unit responsible for coordinating the data flow of a signature event. It allows for advanced filtering and signature overrides on the basis of the Event Risk Rating (ERR) feedback. ERR is used to control the level in which a user chooses to take actions in an effort to minimize false positives.
Signatures once stored in NVRAM, are now stored in the delta configuration file; thus, support for access control lists (ACLs) is no longer necessary.
Preserving Configured Signature Tunings on the Local Router
Most IPS devices and applications provide either a single default configuration or multiple default configurations. Using one of these default configurations is an ideal starting point for deploying IPS. When IOS IPS is deployed, parameters such as severity, active status or event actions of certain signatures need to be tuned to meet the requirements of an enterprise network traffic profile.
Once the ip ips enable-clidelta command is enabled, a local cli-delta.xmz file is generated containing the local tuning signatures configured through the CLI. The settings in the clidelta.xmz file take precedence when a globally administered delta signature update, contained in the iosips-sig-delta.xmz file, is sent from a central repository and applied to the configuration of the local router. See "Tuning Signatures per Signature ID" for more information about the configuration of this feature.
Signature Auto Update Configuration
- Manually configuring signature updates from Cisco.com. An administrator can use the CLI to specify, download and upgrade to a new signature package posted for the IOS directly from Cisco.com.
- Configuring the automatic signature updates to be initiated from a local file server.
- Configuring signature updates to be automatically updated from Cisco.com allows the administrator to configure the router to receive future periodic signature downloads automatically to eliminate the manual maintenance efforts and costs of changing or tuning IPS signatures whenever a new IPS signature update is posted. Automatic signature updates allow users to override the existing configuration and automatically keep signatures up to date on the basis of a preset time, which can be configured to a preferred setting. Time can be updated through the hardware clock or the configurable software clock (which ever option is available on your system). Although Network Time Protocol (NTP) is typically used for automated time synchronization, Cisco IOS IPS updates use the local clock resources as a reference for update intervals. Thus, NTP should be configured to update the local time server of the router, as appropriate.
How to Use Cisco IOS IPS 5.x Signature Format Support and Usability Enhancements
- Retiring All Signatures and Selecting a Category of Signatures
- Configuring Cisco IOS IPS on Your Router
- Loading a Signature File into Cisco IOS IPS
- Tuning Signature Parameters
- Setting the Target Value Rating
- Configuring Signature Auto Updates
- Monitoring Cisco IOS IPS Signatures through Syslog Messages or SDEE
Retiring All Signatures and Selecting a Category of Signatures
Router memory and resource constraints prevent a router from loading all Cisco IOS IPS signatures. Thus, it is recommended that you load only a selected set of signatures that are defined by the categories. Because the categories are applied in a "top-down" order, you should first retire all signatures, followed by "unretiring" specific categories. Retiring signatures enables the router to load information for all signatures, but the router does not build the parallel scanning data structure.
Retired signatures are not scanned by Cisco IOS IPS, so they do not fire alarms. If a signature is irrelevant to your network or if you want to save router memory, you should retire signatures, as appropriate.
DETAILED STEPS
What to Do Next
After you have configured the basic category, you should enable IPS on your router. See "Configuring Cisco IOS IPS on Your Router" for more information.
You can customize (or tune) either the entire category or individual signatures within a category to addresses the needs of your network. See "Tuning Signature Parameters", for more information.
Configuring Cisco IOS IPS on Your Router
After you have set up a "load definition" for the signatures to be copied to the idconf, you must configure an IPS rule name. Use this task to configure an IPS rule name and start the IPS configuration.
You can also use this task to configure a Cisco IOS IPS signature location, which tells Cisco IOS IPS where to save signature information.
The configuration location is used to restore the IPS configuration in case the router reboots or IPS is disabled or reenabled. Files, such as signature definition, signature-type definitions, and signature category information, are written in XML format, compressed, and saved to the specified IPS signature location.
DETAILED STEPS
Examples
The following sample output displays the number of signatures that have been loaded into each SME:
Router# show ip ips signature count
Cisco SDF release version S247.0
Trend SDF release version V1.2
Signature Micro-Engine: multi-string
Total Signatures: 7
Enabled: 7
Retired: 2
Compiled: 5
Signature Micro-Engine: service-http
Total Signatures: 541
Enabled: 284
Retired: 336
Compiled: 205
Signature Micro-Engine: string-tcp
Total Signatures: 487
Enabled: 332
Retired: 352
Compiled: 135
Signature Micro-Engine: string-udp
Total Signatures: 50
Enabled: 3
Retired: 23
Compiled: 27
Signature Micro-Engine: state
Total Signatures: 26
Enabled: 15
Retired: 23
Compiled: 3
Signature Micro-Engine: atomic-ip
Total Signatures: 140
Enabled: 87
Retired: 93
Compiled: 46
Inactive - invalid params: 1
Signature Micro-Engine: string-icmp
Total Signatures: 2
Enabled: 0
Retired: 1
Compiled: 1
Signature Micro-Engine: service-ftp
Total Signatures: 3
Enabled: 3
Compiled: 3
Signature Micro-Engine: service-rpc (INACTIVE)
Signature Micro-Engine: service-dns
Total Signatures: 1
Enabled: 1
Retired: 1
Signature Micro-Engine: normalizer
Total Signatures: 9
Enabled: 9
Compiled: 9
Total Signatures: 1266
Total Enabled Signatures: 741
Total Retired Signatures: 831
Total Compiled Signatures: 434
Total Signatures with invalid parameters: 1
Loading a Signature File into Cisco IOS IPS
Use this task to load signatures into Cisco IOS IPS. You may wish to load new signatures into Cisco IOS IPS if a signature (or signatures) with the current signatures are not providing your network with adequate protection from security threats.
Prerequisites
You must enable Cisco IOS IPS. See "Configuring Cisco IOS IPS on Your Router" before loading new signatures.
Flexible Signatures Ordered and Incremental
Each signature is compiled incrementally into the scanning tables at the same time. Thus, Cisco IOS IPS can deactivate signatures that fail to compile. (Prior to Cisco IOS Release 12.4(11)T, Cisco IOS IPS deactivated the entire signature microengine (SME) if a single signature failed to compile.)
Signatures are loaded into the scanning table on the basis of importance. Parameters such as signature severity, signature fidelity rating, and time lapsed since signatures were last released allow Cisco IOS IPS to compile the most important signatures first, followed by less important signatures, thereby, creating a load order and prioritizing which signatures are loaded first.
DETAILED STEPS
| Command or Action | Purpose | |
|---|---|---|
Step 1 |
enable
Example: Router> enable |
Enables privileged EXEC mode. |
Step 2 |
configure terminal
Example: Router# configure terminal |
Enters global configuration mode. |
Step 3 |
ip ips config location
url
Example: Router(config)# ip ips config location flash:/ips5 |
Specifies the location where Cisco IOS IPS saves the signature information, and, if necessary, access the signature configuration information. |
Step 4 |
interface
type
name
Example: Router(config)# interface gigbitEthernet 0/0 |
Identifies the interface in which to enable Cisco IOS IPS. |
Step 5 |
ip ips
ips-name {in |
out}
Example: Router(config-if)# ip ips MYIPS in |
Applies an IPS rule at an interface and automatically loads the signatures and builds the signature engines. |
Step 6 |
end
Example: Router(config-if)# end |
Exits interface configuration mode. |
Step 7 |
copy
url
idconf
Example: Router# copy tftp://tftp_server/sig.xml idconf |
Loads signatures into Cisco IOS IPS. After the signatures are loaded, all signature information is saved to the location specified through the ip ips config location command. |
Tuning Signature Parameters
You can tune signature parameters on the basis of a signature ID (for an individual signature), or you can tune signature parameters on the basis of a category (that is, all signatures that are within a specified category). To tune signature parameters, use the following tasks, as appropriate:
Note | Some changes to the signature definitions are not shown in the run time config because the changes are recorded in the sigdef-delta.xml file, which can be located through the ip ips config locationcommand. |
Tuning Signatures for a Signature ID
DETAILED STEPS
| Command or Action | Purpose | |||||
|---|---|---|---|---|---|---|
Step 1 |
enable
Example: Router> enable |
Enables privileged EXEC mode. | ||||
Step 2 |
configure terminal
Example: Router# configure terminal |
Enters global configuration mode. | ||||
Step 3 |
ip ips enable-clidelta
Example: Router(config)# ip ips enable-clidelta |
(Optional) Enables the signature tuning settings in the clidelta.xmz file on the router to take precedence over the signature settings in the IPS iosips-sig-delta.xmz file. | ||||
Step 4 |
ip ips signature-definition
Example: Router(config)# ip ips signature-definition |
Enters signature-definition-signature configuration mode. | ||||
Step 5 |
signature
signature-id [signature-id]
Example: Router(config-sigdef-sig)# signature 9000:0 |
Specifies a signature for which the CLI user tunings are changed and enters signature-definition-action configuration mode. | ||||
Step 6 |
engine
Example: Router(config-sigdef-action)# engine |
(Optional) Enters signature-definition-action-engine configuration mode, which allows you to change router actions for a specified signature. | ||||
Step 7 |
event-action
action
Example: Router(config-sigdef-action-engine)# event-action deny-attacker-inline |
Changes router actions for a specified signature. The action argument can be any of the following options:
| ||||
Step 8 |
exit
Example: Router(config-sigdef-action-engine)# exit |
Exits the signature-definition-action-engine configuration mode. This step is required only if the engine and event-action commands are issued. | ||||
Step 9 |
alert-severity {high |
medium |
low |
informational}
Example: Router(config-sigdef-action)# alert-severity medium |
(Optional) Changes the alert severity rating for a given signature. | ||||
Step 10 | fidelity-rating
rating
Example: Router(config-sigdef-action)# fidelity-rating 2 |
(Optional) Changes the signature fidelity rating for a given signature. | ||||
Step 11 |
status
Example: Router(config-sidef-action)# status |
(Optional) Enters the signature-definition-status configuration mode, which allows you to change the enabled status of a signature. | ||||
Step 12 |
enabled {true |
false }
Example: Router(config-sigdef-status)# enabled true |
(Optional) Changes the enabled status of a given signature or signature category. | ||||
Step 13 |
exit
Example: Router(config-sigdef-status)# exit |
Returns to EXEC mode. | ||||
Step 14 |
show ip ips signature
Example: Router# show ip ips signature |
(Optional) Verifies the signature changes that have been made. | ||||
Step 15 |
show ip ips sig-clidelta
Example: Router# show ip ips sig-clidelta |
(Optional) Displays the signature parameter tunings configured using the CLI, which are stored in the iosips-sig-clidelta.xmz signature file. |
Tuning Signatures per Category
Use this task to change default signature parameters for a category of signatures. Categories such as operating systems; Layer 2, Layer 3, or Layer 4 protocols; or service-based categories can be configured to provide wider changes to a group of signatures.
 Tip | Category configuration information is processed in the order that it is entered. Thus, it is recommended that the process of retiring all signatures. See "Retiring All Signatures and Selecting a Category of Signatures" before all other category tuning. If a category is configured more than once, the parameters entered in the second configuration are added to or replace the previous configuration. |
DETAILED STEPS
| Command or Action | Purpose | |||
|---|---|---|---|---|
Step 1 |
enable
Example: Router> enable |
Enables privileged EXEC mode. | ||
Step 2 |
configure terminal
Example: Router# configure terminal |
Enters global configuration mode. | ||
Step 3 |
ip ips signature-category
Example: Router(config)# ip ips signature-category |
Enters IPS category configuration mode. | ||
Step 4 |
category
category [subcategory]
Example: Router(config-ips-category)# category attack adware/spyware |
Specifies a category that is to be used for multiple signature actions or conditions and enters IPS category action configuration mode. | ||
Step 5 |
event-action
action
Example: Router(config-ips-category-action)# event-action produce-alert |
Changes router actions for a specified signature category. Theaction argument can be any of the following options:
| ||
Step 6 | alert-severity {high |
medium |
low |
informational}
Example: Router(config-ips-category-action)# alert-severity medium |
(Optional) Changes the alert severity rating for a given signature category. | ||
Step 7 | fidelity-rating
rating
Example: Router(config-ips-category-action)# fidelity-rating |
(Optional) Changes the signature fidelity rating for a signature given category. | ||
Step 8 |
enabled {true |
false}
Example: Router(config-ips-category-action)# enabled true |
(Optional) Changes the enabled status of a given signature or signature category. | ||
Step 9 |
retired {true |
false }
Example: Router(config-ips-category-action)# retired true |
(Optional) Specifies whether or not the router should retire a signature category. | ||
Step 10 |
end
Example: Router(config-ips-category-action)# end Example: |
Returns to EXEC mode. | ||
Step 11 |
show ip ips signature
Example: Router# show ip ips signature |
(Optional) Verifies the signature category changes that have been made. |
Setting the Target Value Rating
Use this task to set the target value rating, which allows users to develop security policies that can be more strict for some resources than others. The security policy is applied to a table of hosts that are protected by Cisco IOS IPS. A host can be a single IP address or a range of IP addresses with an associated target value rating.
Note | Changes to the target value rating is not shown in the run time config because the changes are recorded in the seap-delta.xml file, which can be located through the ip ips config location command. |
DETAILED STEPS
| Command or Action | Purpose | |
|---|---|---|
Step 1 |
enable
Example: Router> enable |
Enables privileged EXEC mode. |
Step 2 |
configure terminal
Example: Router# configure terminal |
Enters global configuration mode. |
Step 3 |
ip ips event-action-rules
Example: Router(config)# ip ips event-action-rules |
Enters the config-rule configuration mode, which allows users to change the target value rating. |
Step 4 |
target-value {mission-critical |
high |
medium |
low}
target-address ip-address [/nn |
to
ip-address]
Example: Router(config-rul)# target-value medium target-address 10.12.100.53 |
Sets the target value rating for a host to rate how important the system is to the network. |
Step 5 |
exit
Example: Router(config-rul)# exit |
Exits config-rule configuration mode. |
Configuring Signature Auto Updates
- Configuring Signature Auto Updates from a Local Server
- Preparing SSL Certificates for Cisco.com Signature Auto Updates
- Creating a PKI Trustpoint for Auto Signature Updates
- Manually Configuring Signature Auto Updates from Cisco.com
- Configuring Signature Auto Updates to be Upgraded Automatically from Cisco.com
Configuring Signature Auto Updates from a Local Server
Note | This functionality was introduced through the Cisco IOS IPS 5.x Signature Format and Usability Enhancements feature in Cisco IOS Release 12.4(11)T. |
DETAILED STEPS
| Command or Action | Purpose | |
|---|---|---|
Step 1 |
enable
Example: Router> enable |
Enables privileged EXEC mode. |
Step 2 |
configure terminal
Example: Router# configure terminal |
Enters global configuration mode. |
Step 3 |
key config-key password-encrypt
Example: Router(config-ips-auto-update)# key config-key password-encrypt |
Stores a type 6 encryption key in private NVRAM. |
Step 4 |
password encryption aes
Example: Router(config-ips-auto-update)# password encryption aes | |
Step 5 |
ip ips auto-update
Example: Router(config)# ip ips auto-update |
Enables automatic signature updates for Cisco IOS IPS and enters IPS auto-update configuration mode. |
Step 6 |
occur-at {[monthly |
weekly]
days minutes hours}
Example: Router(config-ips-auto-update)# occur-at weekly 4 23 23 |
(Optional) Defines a preset time for which the Cisco IOS IPS automatically obtains updated signature information. |
Step 7 |
username
name
password
password
Example: Router(config-ips-auto-update)# username myips password secret |
(Optional) Defines a username and password for the signature update function. |
Step 8 |
url
url
Example: Router(config-ips-auto-update)# url tftp://10.10.10.5/username1/ips-auto-update/ |
URL from the local server on which the router retrieves the Cisco IOS IPS signature configuration files. |
Step 9 |
exit
Example: Router(config-ips-auto-update)# exit Router(config)# exit |
Exits IPS auto-update and global configuration modes. |
Step 10 |
show ip ips auto-update
Example: Router# show ip ips auto-update |
Verifies the signature update configuration. |
Preparing SSL Certificates for Cisco.com Signature Auto Updates
Note | SSL certificates are typically valid for a 12 month period. Ensure that this task is repeated periodically to refresh the installed certificates. |
Note | The examples in this task use Internet Explorer browser. The certificate export process may be different if you are using a different browser. |
DETAILED STEPS
| Step 1 |
Open your browser and go to the Cisco IDA-server URL.
Example:https://www.cisco.com/cgi-bin/front.x/ida/locator/locator.pl | ||
| Step 2 | Enter your Cisco user ID and password. | ||
| Step 3 |
To display the website SSL certificate, click on the padlock icon to the right of the URL field and select
View Certificates from the drop-down menu.
Example: 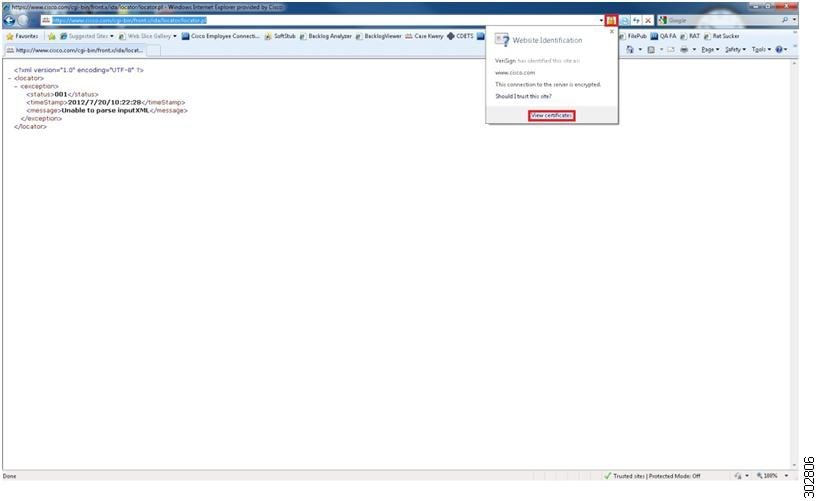
The Certificate pop-up window displays. | ||
| Step 4 |
In the Certificate pop-up window, click on the Certification Path tab to view the certification path.
Example: 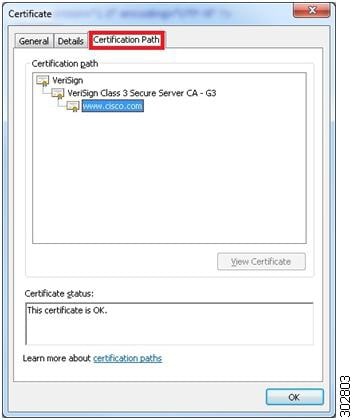
| ||
| Step 5 |
To manually export the root and sub-root certificates in the chain, highlight each level individually and then click on the
View Certificate button.
Example: 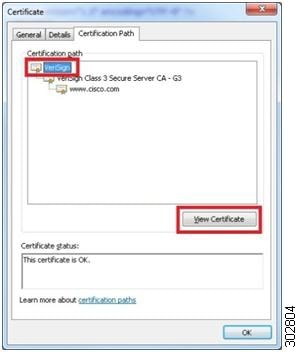
A new Certificate pop-up window displays. | ||
| Step 6 |
In the new Certificate pop-up window, click on the
Details tab and click on the
Copy to File button.
Example: 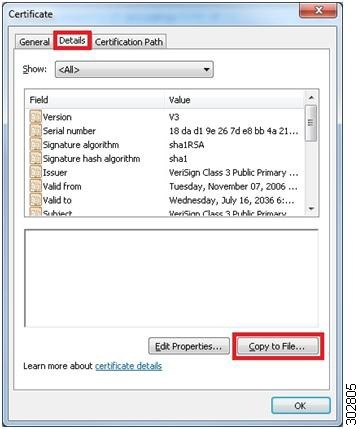
The Certificate Export Wizard pop-up window displays. | ||
| Step 7 | Click Next in the Certificate Export Wizard pop-up window. Select the Base-64 encoded X.509 (.CER) format and click Next. Specify a meaningful filename and export location. For this example, you can save the files root and sub-root locally to the desktop. Repeat steps 5 through 7 for any sub-root servers in the chain. |
What to Do Next
Now you are ready to configure the router so that the upgrading of IPS signatures can be configured automatically from Cisco.com. See the "Upgrading Signatures Automatically from Cisco.com" section for more information.
Creating a PKI Trustpoint for Auto Signature Updates
Use this task to create PKI trustpoints, which are required for manual and automatic signature updates from Cisco.com.
DETAILED STEPS
| Command or Action | Purpose | |
|---|---|---|
Step 1 |
enable
Example: Router> enable |
Enables privileged EXEC mode. |
Step 2 |
configure terminal
Example: Router# configure terminal |
Enters global configuration mode. |
Step 3 |
crypto pki trustpoint
name
Example: Router(config)# crypto pki trustpoint root |
Creates a trustpoint and enters ca-trustpoint configuration mode. |
Step 4 | enrollment terminal [pem]
Example: Router(ca-trustpoint)# enrollment terminal |
Specifies the manual cut-and-paste certificate enrollment. |
Step 5 | revocation-check none
Example: Router(ca-trustpoint)# revocation-check none |
Specifies that certificate checking of the revocation status is not required. |
Step 6 |
exit
Example: Router(ca-trustpoint)# exit |
Exits ca-trustpoint configuration mode and enters global configuration mode. |
Step 7 |
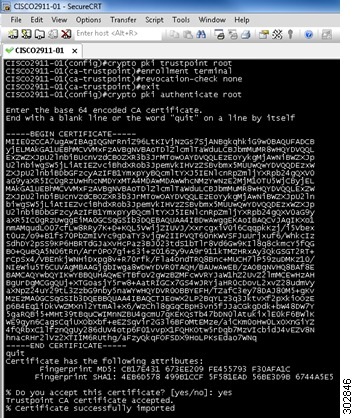
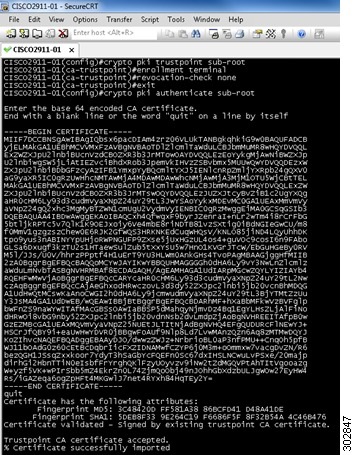
crypto pki authenticate
name
Example: Router(config)# crypto pki authenticate root Enter the base 64 encoded CA certificate. End with a blank |
Authenticates the CA server (by getting the certificate of the CA server). Once you enter the name of the CA, you are prompted to enter the base 64 encoded CA certificate that is in the .CER file that you created in the "Preparing SSL Certificates for Cisco.com Signature Auto Updates" section. To view the certificate in the .CER file, open the .CER file in a text editor such as Wordpad. Copy the certificate details directly into the terminal window. Once pasted, hit "Enter" to go to a new line and then type quit to exit. Type yes to accept the certificate. |
Manually Configuring Signature Auto Updates from Cisco.com
Note | This functionality was introduced through the Direct Download from CCO capability in IOS IPS feature in Cisco IOS Release 15.1(1)T. |
This task eliminates the need for an administrator to download the latest signature file from CCO manually to a local HTTP, FTP, or TFTP server and next download this signature file to the router (from that local HTTP, FTP, or TFTP server).
DETAILED STEPS
| Command or Action | Purpose | |
|---|---|---|
Step 1 |
enable
Example: Router> enable |
Enables privileged EXEC mode. |
Step 2 |
configure terminal
Example: Router# configure terminal |
Enters global configuration mode. |
Step 3 |
ida-client server url
url
Example: Router(config)# ida-client server url https://www.cisco.com/cgi-bin/front.x/ida/locator/locator.pl |
Specifies the IDA-server URL that the IDA client communicates with to download files from the Cisco.com server. Enter the following URL: https://www.cisco.com/cgi-bin/front.x/ida/locator/locator.pl |
Step 4 |
password encryption aes
Example: Router(config)# password encryption aes |
Enables the encryption of the password with a type 6 encrypted preshared key. |
Step 5 |
key config-key password-encrypt
Example: Router(config)# key config-key password-encrypt |
Configures the encrypted preshared key that is used to encrypt all other keys in the router. |
Step 6 |
exit
Example: Router(config)# exit |
Exits global configuration mode. |
Step 7 |
ips signature update cisco [version {next |
latest |
release-version} |
username
name
password
password]
Example: Router# ips signature update cisco Example: Router# ips signature update cisco username myips password secret |
Initiates a one-time download of an IPS signatures (signature package) from Cisco.com. (Optional) The version keyword with the next keyword specifies the next signature file package version from the current signature file on the router. (Optional) The version keyword with the with the latest keyword specifies the IOS IPS to search for the latest signature package. (Optional) The version keyword with the signature argument specifies a specific version of the signature package on Cisco.com (e.g. S293). (Optional) The username keyword and name argument and password keyword and password argument is for the automatic signature update function. |
Step 8 |
show ip ips configuration
Example: Router# show ip ips configuration |
Verifies that Cisco IOS IPS is properly configured. |
Step 9 |
show ip ips auto-update
Example: Router# show ip ips auto-update |
Verifies the signature update configuration. |
Configuring Signature Auto Updates to be Upgraded Automatically from Cisco.com
Note | The functionality that allows the router to upgrade signatures automatically from Cisco.com was introduced through the Direct Download from CCO capability in IOS IPS feature in Cisco IOS Release 15.1(1)T. |
The steps in this task create a new trustpoint (Certificate Authority (CA) server) for a certificate. Repeat the steps in this task to create additional trustpoint certificates. Use meaningful names to differentiate trustpoints. See the examples at the end of this task.
- Ensure that the router points to a reliable time source using Network Time Protocol (NTP). See the Cisco IOS Basic System Management Configuration Guide for more information.
- Ensure that DNS is enabled on the router to resolve domain names to IP addresses. See the Cisco IOS IP Addressing: DNS Configuration Guide for more information.
DETAILED STEPS
| Command or Action | Purpose | |
|---|---|---|
Step 1 |
enable
Example: Router> enable |
Enables privileged EXEC mode. |
Step 2 |
configure terminal
Example: Router# configure terminal |
Enters global configuration mode. |
Step 3 |
ida-client server url
url
Example: Router(config)# ida-client server url https://www.cisco.com/cgi-bin/front.x/ida/locator/locator.pl |
Specifies the IDA-server URL that the IDA client communicates with to download files from the Cisco.com server. Enter the following URL: https://www.cisco.com/cgi-bin/front.x/ida/locator/locator.pl |
Step 4 |
password encryption aes
Example: Router(config)# password encryption aes |
Enables the encryption of the password with a type 6 encrypted preshared key. |
Step 5 |
key config-key password-encrypt
Example: Router(config)# key config-key password-encrypt |
Configures the encrypted preshared key that is used to encrypt all other keys in the router. |
Step 6 |
ip ips auto-update
Example: Router(config)# ip ips auto-update |
Enables automatic signature updates for Cisco IOS IPS and enters IPS auto-update configuration mode. |
Step 7 |
occur-at {[monthly |
weekly]
days minutes hours}
Example: Router(config-ips-auto-update)# occur-at weekly 4 23 23 |
(Optional) Defines a preset time for which the Cisco IOS IPS automatically obtains updated signature information. |
Step 8 |
cisco
Example: Router(config-ips-auto-update)# cisco |
Enables automatic Cisco IOS IPS signature updates from Cisco.com. |
Step 9 |
username
name
password
password
Example: Router(config-ips-auto-update)# username myips password secret |
(Optional) Defines a username and password for the signature update function. |
Step 10 |
exit
Example: Router(config)# exit |
Exits global configuration mode. |
Step 11 |
show ip ips configuration
Example: Router# show ip ips configuration |
Verifies that Cisco IOS IPS is properly configured. |
Step 12 |
show ip ips auto-update
Example: Router# show ip ips auto-update |
Verifies the signature update configuration. |
Monitoring Cisco IOS IPS Signatures through Syslog Messages or SDEE
Cisco IOS IPS provides two methods to report IPS intrusion alerts--Cisco IOS logging (syslog) and SDEE. Perform this task to enable SDEE to report IPS intrusion alerts. See the "Troubleshooting and Fault Management" feature module for more information on configuring syslog messages.
SDEE Overview
SDEE is an application-level communication protocol that is used to exchange IPS messages between IPS clients and IPS servers. SDEE is always running, but it does not receive and process events from IPS unless SDEE notification is enabled. If SDEE notification is not enabled and a client sends a request, SDEE responds with a fault response message, indicating that notification is not enabled.
Storing SDEE Events in the Buffer
When SDEE notification is enabled (through the ip ips notify sdee command), 200 events can automatically be stored in the buffer. When SDEE notification is disabled, all stored events are lost. A new buffer is allocated when the notifications are reenabled.
When specifying the size of an events buffer, note the following functionality:
- It is circular. When the end of the buffer is reached, the buffer starts overwriting the earliest stored events. (If overwritten events have not yet been reported, a buffer overflow notice is received.)
- If a new, smaller buffer is requested, all events that are stored in the previous buffer is lost.
- If a new, larger buffer is requested, all existing events are saved.
To use SDEE, the HTTP server must be enabled (through the ip http server command). If the HTTP server is not enabled, the router cannot respond to the SDEE clients because it cannot not "see" the requests.
DETAILED STEPS
| Command or Action | Purpose | |||
|---|---|---|---|---|
Step 1 |
enable
Example: Router> enable |
Enables privileged EXEC mode. | ||
Step 2 |
configure terminal
Example: Router# configure terminal |
Enters global configuration mode. | ||
Step 3 |
ip ips notify sdee
Example: Router(config)# ip ips notify sdee |
Enables SDEE event notification on a router. | ||
Step 4 |
ip sdee events
events
Example: Router(config)# ip sdee events 500 |
(Optional) Sets the maximum number of SDEE events that can be stored in the event buffer.
| ||
Step 5 |
ip sdee subscriptions
subscriptions
Example: Router(config)# ip sdee subscriptions 1 |
(Optional) Sets the maximum number of SDEE subscriptions that can be open simultaneously. | ||
Step 6 |
ip sdee messages
messages
Example: Router(config)# ip sdee messages 500 |
(Optional) Sets the maximum number of SDEE messages that can be stored in the buffer at one time. | ||
Step 7 |
ip sdee alerts
alerts
Example: Router(config)# ip sdee alerts 2000 |
(Optional) Sets the maximum number of SDEE alerts that can be stored in the buffer at one time. | ||
Step 8 |
exit
Example: Router(config)# exit |
Exits global configuration mode. | ||
Step 9 | show ip sdee [alerts |
all |
errors |
events |
configuration |
status |
subscriptions]
Example: Router# show ip sdee configuration |
(Optional) Verifies SDEE configuration information and notification functionality. |
Configuration Examples for Cisco IOS IPS 5.x Signature Format Support and Usability Enhancements
- Cisco IOS IPS Configuration Example
- Configuring and Verifying SDEE on your Router Example
- Configuring IPS Signatures to be Upgraded Automatically from Cisco.com: Example
Cisco IOS IPS Configuration Example
The following example shows how to enable and verify Cisco IOS IPS on your router:
Router# mkdir
flash:/ips5
Create directory filename [ips5]?
Created dir flash:/ips5
Router#
Router#
Router#
Router# configure terminal
Enter configuration commands, one per line. End with CNTL/Z.
Router(config)# ip ips name MYIPS
Router(config)# ip ips config location
flash:/ips5
Router(config)# ip ips signature-category
Router(config-ips-category)# category all
Router(config-ips-category-action)# retired true
Router(config-ips-category-action)# exit
Router(config-ips-category)# category ios_ips advanced
Router(config-ips-category-action)# retired false
Router(config-ips-category-action)# exit

Router(config-ips-category)# exit
Do you want to accept these changes? [confirm]
Router(config)# d
*Nov 14 2006 17:16:42 MST: Applying Category configuration to signatures ..
Router(config)#
Router(config)# do show ip interface brief
Interface                IP-Address     OK?    Method  Status                 Protocol
GigabitEthernet0/0       10.0.20.120    YES    NVRAM   up                     up
GigabitEthernet0/1       10.12.100.120  YES    NVRAM   administratively down  down
NVI0                     unassigned     NO     unset   up                     up
Router(config)#
Router(config)# interface gigabits 0/0
Router(config-if)# ip ips MYIPS in
Router(config-if)#
*Nov 14 2006 17:17:07 MST: %IPS-6-ENGINE_BUILDS_STARTED: 17:17:07 MST Nov 14 2006
*Nov 14 2006 17:17:07 MST: %IPS-6-ENGINE_BUILDING: atomic-ip - 3 signatures - 1 of 13 engines
*Nov 14 2006 17:17:07 MST: %IPS-6-ENGINE_READY: atomic-ip - build time 0 ms - packets for this engine will be scanned
*Nov 14 2006 17:17:07 MST: %IPS-6-ALL_ENGINE_BUILDS_COMPLETE: elapsed time 0 ms
Router(config-if)#
Router(config-if)# ip ips MYIPS out
Router(config-if)#
Router(config-if)#
Router(config-if)#^Z
Router#
*Nov 14 2006 17:17:23 MST: %SYS-5-CONFIG_I: Configured from console by cisco on console
Router# wr
Building configuration...
[OK]
Router#
Router# show ip ips signature count
Cisco SDF release version S0.0
Signature Micro-Engine: multi-string (INACTIVE)
Signature Micro-Engine: service-http (INACTIVE)
Signature Micro-Engine: string-tcp (INACTIVE)
Signature Micro-Engine: string-udp (INACTIVE)
Signature Micro-Engine: state (INACTIVE)
Signature Micro-Engine: atomic-ip
     Total Signatures: 3
       Enabled: 0
       Compiled: 3
Signature Micro-Engine: string-icmp (INACTIVE)
Signature Micro-Engine: service-ftp (INACTIVE)
Signature Micro-Engine: service-rpc (INACTIVE)
Signature Micro-Engine: service-dns (INACTIVE)
Signature Micro-Engine: normalizer (INACTIVE)
Signature Micro-Engine: service-smb-advanced (INACTIVE)
Signature Micro-Engine: service-msrpc (INACTIVE)
     Total Signatures: 3
     Total Enabled Signatures: 0
     Total Retired Signatures: 0
     Total Compiled Signatures: 3
Router#
Router# copy flash:IOS-S258-CLI-kd.pkg idconf
*Nov 14 2006 17:19:47 MST: %IPS-6-ENGINE_BUILDS_STARTED: 17:19:47 MST Nov 14 2006
*Nov 14 2006 17:19:47 MST: %IPS-6-ENGINE_BUILDING: multi-string - 3 signatures - 1 of 13 engines
*Nov 14 2006 17:19:47 MST: %IPS-6-ENGINE_READY: multi-string - build time 4 ms - packets for this engine will be scanned
*Nov 14 2006 17:19:47 MST: %IPS-6-ENGINE_BUILDING: service-http - 611 signatures - 2 of 13 engines
*Nov 14 2006 17:20:00 MST: %IPS-6-ENGINE_READY: service-http - build time 12932 ms - packets for this engine will be scanned
*Nov 14 2006 17:20:00 MST: %IPS-6-ENGINE_BUILDING: string-tcp - 864 signatures - 3 of 13 engines
*Nov 14 2006 17:20:02 MST: %IPS-6-ENGINE_READY: string-tcp - build time 2692 ms - packets for this engine will be scanned
*Nov 14 2006 17:20:02 MST: %IPS-6-ENGINE_BUILDING: string-udp - 74 signatures - 4 of 13 engines
*Nov 14 2006 17:20:03 MST: %IPS-6-ENGINE_READY: string-udp - build time 316 ms - packets for this engine will be scanned
*Nov 14 2006 17:20:03 MST: %IPS-6-ENGINE_BUILDING: state - 28 signatures - 5 of 13 engines
*Nov 14 2006 17:20:03 MST: %IPS-6-ENGINE_READY: state - build time 24 ms - packets for this engine will be scanned
*Nov 14 2006 17:20:03 MST: %IPS-6-ENGINE_BUILDING: atomic-ip - 252 signatures - 6 of 13 engines
*Nov 14 2006 17:20:03 MST: %IPS-4-META_ENGINE_UNSUPPORTED: atomic-ip 2154:0 - this signature is a component of the unsupported META engine
*Nov 14 2006 17:20:03 MST: %IPS-6-ENGINE_READY: atomic-ip - build time 232 ms - packets for this engine will be scanned
*Nov 14 2006 17:20:03 MST: %IPS-6-ENGINE_BUILDING: string-icmp - 3 signatures - 7 of 13 e
Router# engines
*Nov 14 2006 17:20:03 MST: %IPS-6-ENGINE_READY: string-icmp - build time 12 ms - packets for this engine will be scanned
*Nov 14 2006 17:20:03 MST: %IPS-6-ENGINE_BUILDING: service-ftp - 3 signatures - 8 of 13 engines
*Nov 14 2006 17:20:03 MST: %IPS-6-ENGINE_READY: service-ftp - build time 8 ms - packets for this engine will be scanned
*Nov 14 2006 17:20:03 MST: %IPS-6-ENGINE_BUILDING: service-rpc - 75 signatures - 9 of 13 engines
*Nov 14 2006 17:20:03 MST: %IPS-6-ENGINE_READY: service-rpc - build time 80 ms - packets for this engine will be scanned
*Nov 14 2006 17:20:03 MST: %IPS-6-ENGINE_BUILDING: service-dns - 38 signatures - 10 of 13 engines
*Nov 14 2006 17:20:03 MST: %IPS-6-ENGINE_READY: service-dns - build time 20 ms - packets for this engine will be scanned
*Nov 14 2006 17:20:03 MST: %IPS-6-ENGINE_BUILDING: normalizer - 9 signatures - 11 of 13 engines
*Nov 14 2006 17:20:03 MST: %IPS-6-ENGINE_READY: normalizer - build time 0 ms - packets for this engine will be scanned
*Nov 14 2006 17:20:03 MST: %IPS-6-ENGINE_BUILDING: service-msrpc - 22 signatures - 12 of 13 engines
*Nov 14 2006 17:20:03 MST: %IPS-6-ENGINE_READY: service-msrpc - build time 8 ms - packets for this engine will be scanned
*Nov 14 2006 17:20:03 MST: %IPS-6-ALL_ENGINE_BUILDS_COMPLETE: elapsed time 16344 ms
Router#
Router#
Router# show ip ips signature count
Cisco SDF release version S258.0
Signature Micro-Engine: multi-string
     Total Signatures: 3
       Enabled: 3
       Retired: 3
Signature Micro-Engine: service-http
     Total Signatures: 611
       Enabled: 159
       Retired: 428
       Compiled: 183
Signature Micro-Engine: string-tcp
     Total Signatures: 864
       Enabled: 414
       Retired: 753
       Compiled: 111
Signature Micro-Engine: string-udp
     Total Signatures: 74
       Enabled: 1
       Retired: 44
       Compiled: 30
Signature Micro-Engine: state
     Total Signatures: 28
       Enabled: 16
       Retired: 25
       Compiled: 3
Signature Micro-Engine: atomic-ip
     Total Signatures: 252
       Enabled: 56
       Retired: 148
       Compiled: 103
       Inactive - invalid params: 1
Signature Micro-Engine: string-icmp
     Total Signatures: 3
       Enabled: 0
       Retired: 2
       Compiled: 1
Signature Micro-Engine: service-ftp
     Total Signatures: 3
       Enabled: 1
       Compiled: 3
Signature Micro-Engine: service-rpc
            Total Signatures: 75
       Enabled: 44
       Retired: 44
       Compiled: 31
Signature Micro-Engine: service-dns
     Total Signatures: 38
       Enabled: 30
       Retired: 5
       Compiled: 33
Signature Micro-Engine: normalizer
     Total Signatures: 9
       Enabled: 8
       Retired: 5
       Compiled: 4
Signature Micro-Engine: service-smb-advanced (INACTIVE)
Signature Micro-Engine: service-msrpc
     Total Signatures: 22
       Enabled: 22
       Retired: 22
Configuring and Verifying SDEE on your Router Example
The following example shows how to configure and verify SDEE on your router:
Router(config)# ip ips notify SDEE

Router(config)# ip sdee event 500
Router(config)# ip sdee subscriptions 1
Router(config)# ip sdee messages 500
Router(config)# ip sdee alerts 2000
router(config)# exit
*Nov 9 21:41:33.171: %SYS-5-CONFIG_I: Configured from console by cisco on console
Router# show ip sdee all
Configured concurrent subscriptions: 1
No currently open subscriptions.
Alert storage: 2000 alerts using 560000 bytes of memory
Message storage: 500 messages using 212000 bytes of memory
SDEE Events
Time Type Description
Router#
Configuring IPS Signatures to be Upgraded Automatically from Cisco.com: Example
The following example shows the part of the running configuration of a router that is configured to have IPS signatures automatically upgraded from Cisco.com. In this example, the distinct CA trustpoints "root" and "sub-root" are configured.
ida-client server url https://www.cisco.com/cgi-bin/front.x/ida/locator/locator.pl
ip domain name yourdomain.com
ip name-server 192.168.200.10
ip ips config location flash:/ips retries 1 timeout 1
ip ips notify SDEE
ip ips name IPS
!
ip ips signature-category
  category all
   retired true
  category ios_ips basic
   retired false
!
password encryption aes
!
crypto pki trustpoint root
 enrollment terminal
 revocation-check none
!
crypto pki trustpoint sub-root
 enrollment terminal
 revocation-check none
!
crypto pki certificate chain root
 certificate ca 18DAD19E267DE8BB4A2158CDCC6B3B4A
  308204D3 308203BB A0030201 02021018 DAD19E26 7DE8BB4A 2158CDCC 6B3B4A30
  0D06092A 864886F7 0D010105 05003081 CA310B30 09060355 04061302 55533117
  30150603 55040A13 0E566572 69536967 6E2C2049 6E632E31 1F301D06 0355040B
  13165665 72695369 676E2054 72757374 204E6574 776F726B 313A3038 06035504
  0B133128 63292032 30303620 56657269 5369676E 2C20496E 632E202D 20466F72
  20617574 686F7269 7A656420 75736520 6F6E6C79 31453043 06035504 03133C56
  65726953 69676E20 436C6173 73203320 5075626C 69632050 72696D61 72792043
  65727469 66696361 74696F6E 20417574 686F7269 7479202D 20473530 1E170D30
  36313130 38303030 3030305A 170D3336 30373136 32333539 35395A30 81CA310B
  30090603 55040613 02555331 17301506 0355040A 130E5665 72695369 676E2C20
  496E632E 311F301D 06035504 0B131656 65726953 69676E20 54727573 74204E65
  74776F72 6B313A30 38060355 040B1331 28632920 32303036 20566572 69536967
  6E2C2049 6E632E20 2D20466F 72206175 74686F72 697A6564 20757365 206F6E6C
  79314530 43060355 0403133C 56657269 5369676E 20436C61 73732033 20507562
  6C696320 5072696D 61727920 43657274 69666963 6174696F 6E204175 74686F72
  69747920 2D204735 30820122 300D0609 2A864886 F70D0101 01050003 82010F00
  3082010A 02820101 00AF2408 08297A35 9E600CAA E74B3B4E DC7CBC3C 451CBB2B
  E0FE2902 F95708A3 64851527 F5F1ADC8 31895D22 E82AAAA6 42B38FF8 B955B7B1
  B74BB3FE 8F7E0757 ECEF43DB 66621561 CF600DA4 D8DEF8E0 C362083D 5413EB49
  CA595485 26E52B8F 1B9FEBF5 A191C233 49D84363 6A524BD2 8FE87051 4DD18969
  7BC770F6 B3DC1274 DB7B5D4B 56D396BF 1577A1B0 F4A225F2 AF1C9267 18E5F406
  04EF90B9 E400E4DD 3AB519FF 02BAF43C EEE08BEB 378BECF4 D7ACF2F6 F03DAFDD
  75913319 1D1C40CB 74241921 93D914FE AC2A52C7 8FD50449 E48D6347 883C6983
  CBFE47BD 2B7E4FC5 95AE0E9D D4D143C0 6773E314 087EE53F 9F73B833 0ACF5D3F
  3487968A EE53E825 15020301 0001A381 B23081AF 300F0603 551D1301 01FF0405
  30030101 FF300E06 03551D0F 0101FF04 04030201 06306D06 082B0601 05050701
  0C046130 5FA15DA0 5B305930 57305516 09696D61 67652F67 69663021 301F3007
  06052B0E 03021A04 148FE5D3 1A86AC8D 8E6BC3CF 806AD448 182C7B19 2E302516
  23687474 703A2F2F 6C6F676F 2E766572 69736967 6E2E636F 6D2F7673 6C6F676F
  2E676966 301D0603 551D0E04 1604147F D365A7C2 DDECBBF0 3009F343 39FA02AF
  33313330 0D06092A 864886F7 0D010105 05000382 01010093 244A305F 62CFD81A
  982F3DEA DC992DBD 77F6A579 2238ECC4 A7A07812 AD620E45 7064C5E7 97662D98
  097E5FAF D6CC2865 F201AA08 1A47DEF9 F97C925A 0869200D D93E6D6E 3C0D6ED8
  E6069140 18B9F8C1 EDDFDB41 AAE09620 C9CD6415 3881C994 EEA28429 0B136F8E
  DB0CDD25 02DBA48B 1944D241 7A05694A 584F60CA 7E826A0B 02AA2517 39B5DB7F
  E784652A 958ABD86 DE5E8116 832D10CC DEFDA882 2A6D281F 0D0BC4E5 E71A2619
  E1F4116F 10B595FC E7420532 DBCE9D51 5E28B69E 85D35BEF A57D4540 728EB70E
  6B0E06FB 33354871 B89D278B C4655F0D 86769C44 7AF6955C F65D3208 33A454B6
  183F685C F2424A85 3854835F D1E82CF2 AC11D6A8 ED636A
        quit
crypto pki certificate chain sub-root
 certificate ca 6ECC7AA5A7032009B8CEBCF4E952D491
  308205EC 308204D4 A0030201 0202106E CC7AA5A7 032009B8 CEBCF4E9 52D49130
  0D06092A 864886F7 0D010105 05003081 CA310B30 09060355 04061302 55533117
  30150603 55040A13 0E566572 69536967 6E2C2049 6E632E31 1F301D06 0355040B
  13165665 72695369 676E2054 72757374 204E6574 776F726B 313A3038 06035504
  0B133128 63292032 30303620 56657269 5369676E 2C20496E 632E202D 20466F72
  20617574 686F7269 7A656420 75736520 6F6E6C79 31453043 06035504 03133C56
  65726953 69676E20 436C6173 73203320 5075626C 69632050 72696D61 72792043
  65727469 66696361 74696F6E 20417574 686F7269 7479202D 20473530 1E170D31
  30303230 38303030 3030305A 170D3230 30323037 32333539 35395A30 81B5310B
  30090603 55040613 02555331 17301506 0355040A 130E5665 72695369 676E2C20
  496E632E 311F301D 06035504 0B131656 65726953 69676E20 54727573 74204E65
  74776F72 6B313B30 39060355 040B1332 5465726D 73206F66 20757365 20617420
  68747470 733A2F2F 7777772E 76657269 7369676E 2E636F6D 2F727061 20286329
  3130312F 302D0603 55040313 26566572 69536967 6E20436C 61737320 33205365
  63757265 20536572 76657220 4341202D 20473330 82012230 0D06092A 864886F7
  0D010101 05000382 010F0030 82010A02 82010100 B187841F C20C45F5 BCAB2597
  A7ADA23E 9CBAF6C1 39B88BCA C2AC56C6 E5BB658E 444F4DCE 6FED094A D4AF4E10
  9C688B2E 957B899B 13CAE234 34C1F35B F3497B62 83488174 D188786C 0253F9BC
  7F432657 5833833B 330A17B0 D04E9124 AD867D64 12DC744A 34A11D0A EA961D0B
  15FCA34B 3BCE6388 D0F82D0C 948610CA B69A3DCA EB379C00 48358629 5078E845
  63CD1941 4FF595EC 7B98D4C4 71B350BE 28B38FA0 B9539CF5 CA2C23A9 FD1406E8
  18B49AE8 3C6E81FD E4CD3536 B351D369 EC12BA56 6E6F9B57 C58B14E7 0EC79CED
  4A546AC9 4DC5BF11 B1AE1C67 81CB4455 33997F24 9B3F5345 7F861AF3 3CFA6D7F
  81F5B84A D3F58537 1CB5A6D0 09E4187B 384EFA0F 02030100 01A38201 DF308201
  DB303406 082B0601 05050701 01042830 26302406 082B0601 05050730 01861868
  7474703A 2F2F6F63 73702E76 65726973 69676E2E 636F6D30 12060355 1D130101
  FF040830 060101FF 02010030 70060355 1D200469 30673065 060B6086 480186F8
  45010717 03305630 2806082B 06010505 07020116 1C687474 70733A2F 2F777777
  2E766572 69736967 6E2E636F 6D2F6370 73302A06 082B0601 05050702 02301E1A
  1C687474 70733A2F 2F777777 2E766572 69736967 6E2E636F 6D2F7270 61303406
  03551D1F 042D302B 3029A027 A0258623 68747470 3A2F2F63 726C2E76 65726973
  69676E2E 636F6D2F 70636133 2D67352E 63726C30 0E060355 1D0F0101 FF040403
  02010630 6D06082B 06010505 07010C04 61305FA1 5DA05B30 59305730 55160969
  6D616765 2F676966 3021301F 30070605 2B0E0302 1A04148F E5D31A86 AC8D8E6B
  C3CF806A D448182C 7B192E30 25162368 7474703A 2F2F6C6F 676F2E76 65726973
  69676E2E 636F6D2F 76736C6F 676F2E67 69663028 0603551D 11042130 1FA41D30
  1B311930 17060355 04031310 56657269 5369676E 4D504B49 2D322D36 301D0603
  551D0E04 1604140D 445C1653 44C1827E 1D20AB25 F40163D8 BE79A530 1F060355
  1D230418 30168014 7FD365A7 C2DDECBB F03009F3 4339FA02 AF333133 300D0609
  2A864886 F70D0101 05050003 82010100 0C8324EF DDC30CD9 589CFE36 B6EB8A80
  4BD1A3F7 9DF3CC53 EF829EA3 A1E697C1 589D756C E01D1B4C FAD1C12D 05C0EA6E
  B2227055 D9203340 3307C265 83FA8F43 379BEA0E 9A6C70EE F69C803B D937F47A
  6DECD018 7D494ACA 99C71928 A2BED877 24F78526 866D8705 404167D1 273AEDDC
  481D22CD 0B0B8BBC F4B17BFD B499A8E9 762AE11A 2D876E74 D388DD1E 22C6DF16
  B62B8214 0A945CF2 50ECAFCE FF62370D AD65D306 4153ED02 14C8B558 28A1ACE0
  5BECB37F 954AFB03 C8AD26DB E6667812 4AD99F42 FBE198E6 42839B8F 8F6724E8
  6119B5DD CDB50B26 058EC36E C4C875B8 46CFE218 065EA9AE A8819A47 16DE0C28
  6C2527B9 DEB78458 C61F381E A4C4CB66
        quit
crypto key pubkey-chain rsa
named-key realm-cisco.pub signature
key-string
30820122 300D0609 2A864886 F70D0101 01050003 82010F00 3082010A 02820101
00C19E93 A8AF124A D6CC7A24 5097A975 206BE3A2 06FBA13F 6F12CB5B 4E441F16
17E630D5 C02AC252 912BE27F 37FDD9C8 11FC7AF7 DCDD81D9 43CDABC3 6007D128
B199ABCB D34ED0F9 085FADC1 359C189E F30AF10A C0EFB624 7E0764BF 3E53053E
5B2146A9 D7A5EDE3 0298AF03 DED7A5B8 9479039D 20F30663 9AC64B93 C0112A35
FE3F0C87 89BCB7BB 994AE74C FA9E481D F65875D6 85EAF974 6D9CC8E3 F0B08B85
50437722 FFBE85B9 5E4189FF CC189CB9 69C46F9C A84DFBA5 7A0AF99E AD768C36
006CF498 079F88F8 A3B3FB1F 9FB7B3CB 5539E1D1 9693CCBB 551F78D2 892356AE
2F56D826 8918EF3C 80CA4F4D 87BFCA3B BFF668E9 689782A5 CF31CB6E B4B094D3
F3020301 0001
quit

ip ips auto-update
 occur-at weekly 0-6 10 0-23
 cisco
 username ccouserid password ccouserpw
!
interface GigabitEthernet0/0
 ip address 192.168.200.1 255.255.255.0
 ip ips IPS in
 duplex auto
 speed auto
Additional References
Technical Assistance
|
Description |
Link |
|---|---|
|
The Cisco Support and Documentation website provides online resources to download documentation, software, and tools. Use these resources to install and configure the software and to troubleshoot and resolve technical issues with Cisco products and technologies. Access to most tools on the Cisco Support and Documentation website requires a Cisco.com user ID and password. |
Feature Information for Cisco IOS IPS 5.x Signature Format Support and Usability Enhancements
The following table provides release information about the feature or features described in this module. This table lists only the software release that introduced support for a given feature in a given software release train. Unless noted otherwise, subsequent releases of that software release train also support that feature.
Use Cisco Feature Navigator to find information about platform support and Cisco software image support. To access Cisco Feature Navigator, go to www.cisco.com/go/cfn. An account on Cisco.com is not required.
| Table 1 | Feature Information for Cisco IOS 5.x Signature Format Support and Usability Enhancements |
|
Feature Name |
Releases |
Feature Information |
|---|---|---|
|
Cisco IOS IPS 5.x Signature Format and Usability Enhancements |
12.4(11)T |
This feature introduces support for Cisco IOS Intrusion Prevention System (IPS) version 5.0, which is a version-based signature definition XML format. Cisco IOS IPS 4.x format signatures are replaced by the 5.x format signatures that are used by all other Cisco IPS devices. The following commands were introduced or modified by this feature: alert-severity, category, copy idconf enabled (IPS), engine (IPS), event-action, fidelity-rating, ip ips auto-update, ip ips config location, ip ips event-action-rules, ip ips signature-category, ip ips signature-definition, occur-at (ips-auto-update), retired (IPS), show ip ips auto-update, signature, status, target-value url (ips-auto-update), username (ips-autoupdate). |
|
Direct Download from CCO capability in IOS IPS |
15.1(1)T |
The following commands were introduced or modified by this feature: cisco, ida-client server url, ip ips auto-update, ip signature update cisco, occur-at. |
|
Capability to save local delta changes on IOS routers |
15.1(2)T |
This feature was introduced to generate a local cli-delta.xmz file on the router containing the signature tuning settings configured through the CLI. This local file takes precedence when a globally administered delta signature update, contained in the IPS iosips-sig-delta.xmz file, is sent from a central repository and applied to the configuration of the local router. The following commands were introduced or modified: ip ips enable-clidelta, show ip ips sig-clidelta. |
|
Cisco IOS IPS with Lightweight Signatures |
15.2(1)T and 15.2(2)T |
This feature was deprecated in Cisco IOS Release 15.2(1)T and 15.2(2)T. The following commands were deprecated: ip ips inherit-obsolete tunings, ip ips memory regex chaining, ip ips memory threshold. |
Cisco and the Cisco logo are trademarks or registered trademarks of Cisco and/or its affiliates in the U.S. and other countries. To view a list of Cisco trademarks, go to this URL: www.cisco.com/go/trademarks. Third-party trademarks mentioned are the property of their respective owners. The use of the word partner does not imply a partnership relationship between Cisco and any other company. (1110R)
Any Internet Protocol (IP) addresses and phone numbers used in this document are not intended to be actual addresses and phone numbers. Any examples, command display output, network topology diagrams, and other figures included in the document are shown for illustrative purposes only. Any use of actual IP addresses or phone numbers in illustrative content is unintentional and coincidental.