
 Feedback
Contents
- Configuring the FlexVPN Client
- Finding Feature Information
- Restrictions for the FlexVPN Client
- Information About the FlexVPN Client
- IKEv2 FlexVPN Client
- Tunnel Activation
- Tracking-Based Tunnel Activation
- Backup Features
- Backup Gateways
- Reactivate Primary Peer
- Dial Backup (Primary or Backup Tunnels)
- Backup Group
- Dual FlexVPN Support
- Split DNS Support
- NAT
- Network List from the Server
- Default Route List from the Server
- How the FlexVPN Client learns about the Network List
- WINS NBMS and DOMAIN Name
- Event Tracing
- Extensible Authentication Protocol as a Local Authentication Method
- How to Configure the FlexVPN Client
- Configuring the IKEv2 VPN Client Profile
- Configuring the Tunnel Interface
- Configuring the FlexVPN Client
- Configuring EAP as the Local Authentication Method
- Configuration Examples for the FlexVPN Client
- Example: Configuring the FlexVPN Client
- Example: Configuring the IKEv2 FlexVPN Client Profile
- Example: Configuring EAP as a Local Authentication Method
- Additional References for Configuring the FlexVPN Server
- Feature Information for Configuring the FlexVPN Client
Configuring the FlexVPN Client
This module describes the FlexVPN client features and the Internet Key Exchange Version 2 (IKEv2) commands required to configure the FlexVPN client.
 Note | Security threats, as well as the cryptographic technologies to help protect against them, are constantly changing. For more information about the latest Cisco cryptographic recommendations, see the Next Generation Encryption (NGE) white paper. |
Finding Feature Information
Your software release may not support all the features documented in this module. For the latest caveats and feature information, see Bug Search Tool and the release notes for your platform and software release. To find information about the features documented in this module, and to see a list of the releases in which each feature is supported, see the feature information table at the end of this module.
Use Cisco Feature Navigator to find information about platform support and Cisco software image support. To access Cisco Feature Navigator, go to www.cisco.com/go/cfn. An account on Cisco.com is not required.
Restrictions for the FlexVPN Client
Restrictions for EAP as the Local Authentication Method
- Extensible Authentication Protocol (EAP) as the local authentication method, is supported only on the IKEv2 initiator, and as the remote authentication, is supported only on the IKEv2 responder.
- If EAP is specified as the local authentication method, the remote authentication method must be certificate based.
- If the authentication remote eap query-identity command is not configured on the FlexVPN server, the client cannot have an IPv4 or IPv6 address as the local identity because the IP address cannot be used as the username for the EAP authentication method.
Restrictions for Configuring the Dual-Stack Tunnel Interface in a VRF-Aware IPsec Scenario
When configuring a dual-stack tunnel interface in a VPN routing and forwarding (VRF)-aware IPsec scenario, you cannot use the ip vrf forwarding command to configure an Inside VPN routing and forwarding (IVRF) because this is not a valid configuration. Use the vrf forwarding vrf-name command to define the IVRF of the tunnel interface, where vrf-name argument is defined using the vrf definition command with IPv4 and IPv6 address families inside the definition.
Information About the FlexVPN Client
IKEv2 FlexVPN Client
The IKEv2 FlexVPN Client feature establishes a secure IPsec VPN tunnel between a FlexVPN client and a FlexVPN server. The IKEv2 FlexVPN Client feature provides the following benefits:
- Unified tunnel infrastructure
- IPv4/IPv6 proxy support over IPv4/IPv6 transport
- Backward compatibility with some features supported by EasyVPN
- Flexibility for running dynamic routing protocols
Each FlexVPN client is associated with a unique tunnel interface, which implies that the IPsec security association (SA) retrieved by the specific FlexVPN client is bound to the tunnel interface. The figure below shows the association between the FlexVPN client and the tunnel interface.
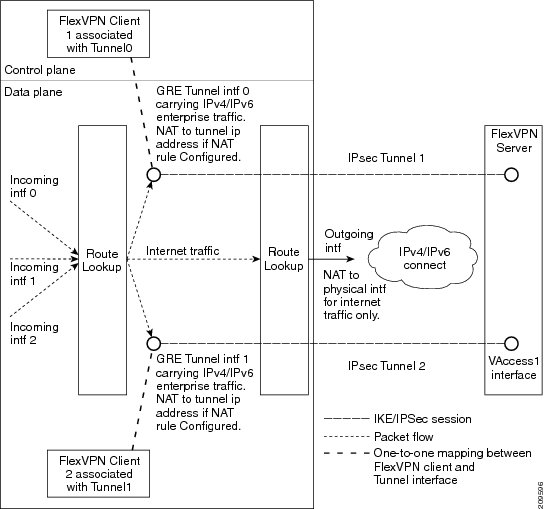
The sequence of operation is as follows:
- Routing--The FlexVPN server pushes the network list as part of the mode configuration response. The client adds routes on the tunnel interface to these networks. As part of the configuration mode set, the client sends the routes to its network. The IP address is configured on the tunnel interface so that the server can add routes to the client-side network.
- NAT--Network Address Translation (NAT) rules must be configured explicitly using route maps. If the rules match, the hosts behind the FlexVPN client are translated to the tunnel IP address. This IP address can be obtained as one of the attributes pushed during mode configuration by the FlexVPN server.
- Encapsulation and encryption--Generic routing encapsulation (GRE) and IPsec encapsulation modes are supported. GRE supports both IPv4 and IPv6 traffic. The traffic that reaches the tunnel interface is encapsulated by the GRE header, followed by IPsec protection. The encrypted traffic is then routed to the outgoing interface.
The features supported by the FlexVPN client are described in the following sections:
- Tunnel Activation
- Backup Features
- Dual FlexVPN Support
- Split DNS Support
- NAT
- How the FlexVPN Client learns about the Network List
- WINS NBMS and DOMAIN Name
- Event Tracing
- Extensible Authentication Protocol as a Local Authentication Method
Tunnel Activation
The FlexVPN client can be connected automatically or manually through user intervention. The FlexVPN client connects automatically to the tunnel when the FlexVPN configuration is complete. If the tunnel times out or fails, the tunnel automatically reconnects and retries the connection indefinitely. To configure an automatic tunnel connection, use the connect command with the auto keyword in the IKEv2 FlexVPN profile.
In a manual connection, the FlexVPN client waits for user intervention to execute a command before establishing a connection. When the client times out or fails to connect, subsequent connections require user intervention. To configure a manual connection, use the crypto ikev2 client flexvpn connect command with the flexvpn-name argument in privileged EXEC mode. To terminate the connection, use the clear crypto ikev2 client flexvpn connect command with the flexvpn-name argument.
Tracking-Based Tunnel Activation
The Tracking-Based Tunnel Activation feature is mainly used in backup scenarios. The FlexVPN client registers with the tracking system to obtain notifications for change in the state of an object. This notification prompts the client to perform an appropriate action for tunnel activation. The track keyword in the connect command informs the tracking process that the client is interested in tracking an object, which is identified by an object number. The tracking process, in turn, informs the client when the state of the objects changes.
If the track keyword is set to activate the tunnel when the object goes up, the client triggers the connection upon receiving the notification that the object is in the UP state. If the track keyword is set to activate the tunnel when the object goes down, the client triggers the connection upon receiving the notification that the object is in the DOWN state.
Backup Features
A FlexVPN client can connect to various peers or servers in a predetermined order. The list of peers is called the gateway list or backup gateway list and is built using the following lists:
The static backup gateway list is configured in the FlexVPN profile by providing a list of peers with a sequence number. The downloaded backup gateway list is downloaded dynamically and is obtained during the mode configuration response. The downloaded list complements the static gateway list to build the backup gateway list. The downloaded list is inserted after the peer from which the list is downloaded.
If an existing connection with a peer from the gateway list goes down, the client tries to establish a connection with the next peer in the gateway list. If a downloaded list is available and connection with a static peer fails, the client tries to connect, in sequence, with the peers from the downloaded list. If the client fails to establish a connection with all the peers in the downloaded list, the client tries to connect to the next peer in the static list, and the downloaded list is deleted.
Backup Gateways
Use the peer command to add a peer to the backup gateway list. To remove the backup gateway list, use the no peer command.
Peers are ordered by preference; the lower the sequence number, the higher the preference.
If a connection is established with a new peer and the peer is not a part of the downloaded list, the peer adds the downloaded list to the backup gateway list, and the existing backup gateway list is replaced with the new list.
You can configure a static peer and attach it to a track object. A peer is a "possible peer" if the track object of the peer is in the UP state.
Note | Peers that are not attached to a track object, including peers in the downloaded list, are classified as "possible peers" because these peers are always in the UP state. |
The peer selection process works as follows: when a connection is established, the gateway list is looked up and the first possible peer is selected. A peer is selected according to the following rule: a static peer can be associated with the track object with a desired status (UP or DOWN). If the status of the track object matches the configured status, the peer is said to be a "possible peer."
Note | If the peer is identified by either a Domain Name Service (DNS) name or a fully qualified domain name (FQDN), the name is resolved dynamically. |
The peer selection process is followed by the selection of a new peer or when the existing criteria fail, which happens in the following scenarios:
Reactivate Primary Peer
The Reactivate Primary Peer feature ensures that the highest-priority peer is always connected. If the track object of the highest-priority peer matches the object status, the existing connection with the lower-priority peer is disconnected, and the connection to the higher-priority peer is established. Use the peer reactivate command to enable this feature.
Note | A track object must be associated with statically configured peers. |
Dial Backup (Primary or Backup Tunnels)
The FlexVPN client registers with the tracking system to get notifications about the change in the state of the object. The connect track command is used to inform the tracking process that the client is interested in tracking an object, which is identified by the object number. The tracking process, in turn, informs the client when the state of this objects changes. This notification prompts the client to take further action to bring up or bring down the primary or backup connections when the state of the tracked object is UP or DOWN.
The Dial Backup feature can be configured as follows:
- When both primary and backup tunnels are FlexVPN tunnels,
- When one tunnel is the FlexVPN tunnel,
- The remaining tunnels can be on any secured connection.
- The primary connection is not FlexVPN, and the backup connection is FlexVPN.
- The client profile is configured using the connect track command with an object, which traces the ability to reach the primary peer through the primary outgoing interface.
Backup Group
The Backup Group feature allows the FlexVPN client to omit a peer when a FlexVPN client that belongs to a group has established a session with the same peer. When a FlexVPN client belonging to a group initiates a connection with a peer, the FlexVPN client validates if another FlexVPN client in the same group has established a session with the same peer. If a connection exists, the FlexVPN client omits this peer and validates the next peer in the sequence. Use the backup group command with the group-number argument to configure the backup group.
Dual FlexVPN Support
The Dual FlexVPN Support feature provides the ability to configure two FlexVPN tunnels that share the same inside and outside interfaces. The two FlexVPN tunnels use route injections to direct appropriate traffic through the corresponding tunnel interface. When the tunnel is up, the tunnel "learns" the network list from the server. If the server forwards a network list, FlexVPN installs specific routes to the destination networks in its routing table, directing the traffic to these networks out of the tunnel interface.
Note | Only one FlexVPN connection can be established with a default route through the tunnel interface. |
Split DNS Support
The Split DNS functionality enables the FlexVPN client to act as a Domain Name System (DNS) proxy. During FlexVPN negotiations, the DNS list is downloaded during mode configuration. This list is configured as a DNS view list on the inside interfaces associated with the FlexVPN profile. The view list is used to match requests based on the domain names with the DNS query and then forward the match requests to the DNS server. Other DNS queries are used to match the default view (global DNS configuration) and are forwarded to the ISP DNS.
If no inside interfaces are mentioned in the FlexVPN client profile, the DNS view is applied to all interfaces except the tunnel interface and the tunnel source interfaces of all configured profiles. When the DNS query request reaches the inside interface, the matching DNS view is obtained, and the request is forwarded to the DNS IP address.
NAT
The Network Address Translation (NAT) feature in FlexVPN enables traffic to be translated to an IP address based on the interface to which the traffic is routed. If a packet is received on one interface that is configured with the ip nat inside command and is being sent out another interface that is configured with the ip nat outside command, the packet is translated to the IP address configured on the second interface.
Network List from the Server
Routes for enterprise traffic are dynamically installed by a client through the tunnel interface. The traffic takes the default route via the outgoing physical interface. The enterprise traffic is translated to the tunnel IP address, and the Internet traffic is translated to the external outgoing interface IP address.
Default Route List from the Server
A default route must be configured on the device with the higher sequence number via the tunnel interface. The tunnel interface is configured with the ip nat outside command, and the IP address of the tunnel interface is assigned by the IP address sent by the client. The enterprise traffic from inside interfaces is translated to the sent address. NAT is achieved by configuring NAT rules with the help of route maps. The route maps define rules based on the outgoing interface, by which the globally configured NAT rules are applied based on routing.
IPv4 traffic going out the tunnel interface is translated to the sent IPv4 address.
Note | If NAT is not required, NAT rules associated with the tunnel interface must not be configured. |
How the FlexVPN Client learns about the Network List
The FlexVPN client learns about the list of networks behind a peer in one of the following ways:
- Mode configuration push--The FlexVPN server sends the list of network attributes as a configuration mode parameter to the client. The FlexVPN client installs the routes to these networks through the tunnel interface that has the highest metric. The client also communicates its networks to the server in the mode configuration SET/ACK exchange so that the server can add those routes via the virtual access interface.
- Running routing protocols--The FlexVPN client and server run routing protocols over the tunnel interface to establish network routes, which allows the client and the server the flexibility to add or remove networks without disconnecting the existing session. The tunnel addresses are communicated during mode configuration to establish routes with peers.
WINS NBMS and DOMAIN Name
The FlexVPN server pushes the domain name, Windows Internet Naming Service (WINS), or Network Behind Mobile Subscribers (NBMS) server attributes during mode configuration. These attributes are dynamically updated to the DHCP server that is running on the FlexVPN client.
Event Tracing
The Event Tracing feature is used for debugging purposes. Events posted to the FlexVPN client are logged, and the information is used for debugging. Event tracing is a combination of a fast mechanism that logs a few bytes of trace information in a buffer area and a display mechanism that extracts and decodes the debug data. The FlexVPN client maintains its buffer and can be enabled during normal operation.
Extensible Authentication Protocol as a Local Authentication Method
The FlexVPN client supports EAP as a local authentication method. Supported EAP authentication methods are Microsoft Challenge Handshake Authentication Protocol Version 2 (MSCHAPv2), message digest algorithm 5 (MD5), and Generic Token Card (GTC). The EAP authentication process is as follows:
- Use the authentication local eap command in IKEv2 profile configuration mode to authenticate the FlexVPN client by using EAP.
- After the FlexVPN client receives the IKE_AUTH response from the peer, enter the crypto eap credentials command.
- If the EAP-Identity Request is received in the IKE_AUTH response, the EAP username and password must be specified.
- If an EAP-Identity Request is not received in the IKE_AUTH response, only the password is specified because the local IKEv2 identity is used as the username.
How to Configure the FlexVPN Client
Configuring the IKEv2 VPN Client Profile
This task describes the IKEv2 commands required for configuring the FlexVPN client and the basic IKEv2 commands. Refer to the "Configuring Basic Internet Key Exchange Version 2 CLI Constructs" task in the "Configuring Internet Key Exchange Version 2 (IKEv2) and FlexVPN Site-to-Site" module for information about configuring the basic IKEv2 profile.
Refer to the "How to Configure the FlexVPN Client" section for information about configuring an IKEv2 profile for the FlexVPN server.
- Configuring the Tunnel Interface
- Configuring the FlexVPN Client
- Configuring EAP as the Local Authentication Method
Configuring the Tunnel Interface
DETAILED STEPS
Configuring the FlexVPN Client
DETAILED STEPS
Configuring EAP as the Local Authentication Method
Perform this task to configure Extensible Authentication Protocol (EAP) as the local authentication method on the FlexVPN client.
DETAILED STEPS
| Command or Action | Purpose | |||
|---|---|---|---|---|
Step 1 |
enable
Example: Device> enable |
Enables privileged EXEC mode. | ||
Step 2 |
configure terminal
Example: Device# configure terminal |
Enters global configuration mode. | ||
Step 3 |
crypto ikev2 profile
profile-name
Example: Device(config)# crypto ikev2 profile profile1 |
Defines an IKEv2 profile and enters IKEv2 profile configuration mode. | ||
Step 4 |
authentication local eap
Example: Device(config-ikev2-profile)# authentication local eap |
Specifies EAP as the local authentication method.
| ||
Step 5 |
end
Example: Device(config-ikev2-profile)# end |
Exits IKEv2 profile configuration mode and returns to privileged EXEC mode. |
Configuration Examples for the FlexVPN Client
Example: Configuring the FlexVPN Client
Example: Configuring the IKEv2 FlexVPN Client Profile
The following example shows how to configure the IKEv2 FlexVPN client profile:
crypto ikev2 client flexvpn flex
  peer 1 10.0.0.1
  connect manual
  client connect Tunnel0
!
crypto ikev2 authorization policy flex
 subnet-acl 199
 route set interface
 route accept any
!
crypto ikev2 keyring key
 peer dvti
  address 0.0.0.0 0.0.0.0
  pre-shared-key cisco
 !
crypto ikev2 profile prof
 match identity remote address 10.0.0.1 255.0.0.0
 authentication local pre-share
 authentication remote pre-share
 keyring key
 aaa authorization group psk list local-group-author-list flex
 config-mode set
!
crypto ipsec transform-set trans esp-aes
!
crypto ipsec profile ipsecprof
 set transform-set trans
 set pfs group2
 set ikev2-profile prof
!
interface Tunnel0
 ip address negotiated
 tunnel source Ethernet0/0
 tunnel destination dynamic
 tunnel mode ipsec ipv4
 tunnel protection ipsec-profile ipsecprof
!
interface Ethernet0/0
 ip address 172.16.0.1 255.240.0.0
 ip virtual-reassembly in
!
 ip route 0.0.0.0 0.0.0.0 2.2.2.2
access-list 199 permit ip 10.20.20.20 0.0.0.255 any
access-list 199 permit ip 10.30.30.30 0.0.0.255 any
Example: Configuring EAP as a Local Authentication Method
The following example shows how to configure EAP as a local authentication method:
crypto ikev2 profile profile1
 authentication remote rsa-sig
 authentication local eap
When the session is brought up, a prompt appears to enter the EAP credentials, as follows:
Enter the command "crypto eap credentials profile1"
Device# crypto eap credentials profile1

Enter the Username for profile profile1: cisco
Enter the password for username cisco
Additional References for Configuring the FlexVPN Server
Related Documents
Technical Assistance
|
Description |
Link |
|---|---|
|
The Cisco Support and Documentation website provides online resources to download documentation, software, and tools. Use these resources to install and configure the software and to troubleshoot and resolve technical issues with Cisco products and technologies. Access to most tools on the Cisco Support and Documentation website requires a Cisco.com user ID and password. |
Feature Information for Configuring the FlexVPN Client
The following table provides release information about the feature or features described in this module. This table lists only the software release that introduced support for a given feature in a given software release train. Unless noted otherwise, subsequent releases of that software release train also support that feature.
Use Cisco Feature Navigator to find information about platform support and Cisco software image support. To access Cisco Feature Navigator, go to www.cisco.com/go/cfn. An account on Cisco.com is not required.
| Table 1 | Feature Information for Configuring FlexVPN Client |
|
Feature Name |
Releases |
Feature Information |
|---|---|---|
|
IKEv2 Remote Access Hardware Client |
15.2(1)T |
The IKEv2 Remote Access Hardware Client feature provides support for remote access connectivity and the extensions necessary to support diverse solutions such as mobility, NAT traversal, reliability, and enhanced DoS attack resilience. The following sections provide information about this feature: The following commands were introduced or modified: backup group, client connect tunnel, client inside, connect, crypto ikev2 client flexvpn, interface, ip address, peer, peer reactivate, source, tunnel destination, tunnel mode, tunnel protection, and tunnel source. |
|
IPv6 Remote Access for IPsec VPN |
15.2(3)T |
The IPv6 Remote Access for IPsec VPN feature provides IPv6 support and support for EAP as the local authentication method for the IKEv2 FlexVPN client. The following sections provide information about this feature:
The following commands were modified: authentication (IKEv2 profile), peer. |
Cisco and the Cisco logo are trademarks or registered trademarks of Cisco and/or its affiliates in the U.S. and other countries. To view a list of Cisco trademarks, go to this URL: www.cisco.com/go/trademarks. Third-party trademarks mentioned are the property of their respective owners. The use of the word partner does not imply a partnership relationship between Cisco and any other company. (1110R)
Any Internet Protocol (IP) addresses and phone numbers used in this document are not intended to be actual addresses and phone numbers. Any examples, command display output, network topology diagrams, and other figures included in the document are shown for illustrative purposes only. Any use of actual IP addresses or phone numbers in illustrative content is unintentional and coincidental.