
 Feedback
Contents
- BGP Inbound Optimization Using Performance Routing
- Finding Feature Information
- Information About BGP Inbound Optimization Using Performance Routing
- BGP Inbound Optimization
- Prefix Traffic Class Learning Using PfR
- PfR Link Utilization Measurement
- PfR Link Policies
- PfR Entrance Link Selection Control Techniques
- PfR Map Operation for Inside Prefixes
- How to Configure BGP Inbound Optimization Using Performance Routing
- Configuring PfR to Automatically Learn Traffic Classes Using Inside Prefixes
- Manually Selecting Inside Prefixes for PfR Monitoring
- Modifying the PfR Link Utilization for Inbound Traffic
- Modifying the PfR Entrance Link Utilization Range
- Configuring and Applying a PfR Policy to Learned Inside Prefixes
- Configuring and Applying a PfR Policy to Configured Inside Prefixes
- Configuration Examples for BGP Inbound Optimization Using Performance Routing
- Example Configuring PfR to Automatically Learn Traffic Classes Using Inside Prefixes
- Example Manually Selecting Inside Prefixes for PfR Monitoring
- Example Modifying the PfR Link Utilization for Inbound Traffic
- Example Modifying the PfR Entrance Link Utilization Range
- Example Configuring and Applying a PfR Policy to Learned Inside Prefixes
- Example Configuring and Applying a PfR Policy to Configured Inside Prefixes
- Additional References
- Feature Information for BGP Inbound Optimization Using Performance Routing
BGP Inbound Optimization Using Performance Routing
The PfR BGP Inbound Optimization feature introduced support for the best entrance selection for traffic that originates from prefixes outside an autonomous system destined for prefixes inside the autonomous system. External BGP (eBGP) advertisements from an autonomous system to an Internet service provider (ISP) can influence the entrance path for traffic entering the network. PfR uses eBGP advertisements to manipulate the best entrance selection.
- Finding Feature Information
- Information About BGP Inbound Optimization Using Performance Routing
- How to Configure BGP Inbound Optimization Using Performance Routing
- Configuration Examples for BGP Inbound Optimization Using Performance Routing
- Additional References
- Feature Information for BGP Inbound Optimization Using Performance Routing
Finding Feature Information
Your software release may not support all the features documented in this module. For the latest feature information and caveats, see the release notes for your platform and software release. To find information about the features documented in this module, and to see a list of the releases in which each feature is supported, see the Feature Information Table at the end of this document.
Use Cisco Feature Navigator to find information about platform support and Cisco software image support. To access Cisco Feature Navigator, go to www.cisco.com/go/cfn. An account on Cisco.com is not required.
Information About BGP Inbound Optimization Using Performance Routing
- BGP Inbound Optimization
- Prefix Traffic Class Learning Using PfR
- PfR Link Utilization Measurement
- PfR Link Policies
- PfR Entrance Link Selection Control Techniques
- PfR Map Operation for Inside Prefixes
BGP Inbound Optimization
The PfR BGP Inbound Optimization feature introduced the ability to support inside prefixes. Using BGP, PfR can select inside prefixes to support best entrance selection for traffic that originates from prefixes outside an autonomous system destined for prefixes inside the autonomous system. Company networks advertise the inside prefixes over the Internet using an Internet service provider (ISP) and receive advertisements for outside prefixes from an ISP.
BGP inbound optimization provides the ability to manually configure or automatically learn inside prefixes. The resulting prefixes can be monitored using link utilization threshold or link utilization range techniques. Link policies defining traffic load or range performance characteristics can be applied against PfR-managed entrance links. BGP inbound optimization provides the ability to influence inbound traffic by manipulating eBGP advertisements to influence the best entrance selection for traffic bound for inside prefixes.
Prefix Traffic Class Learning Using PfR
The PfR master controller can be configured, using NetFlow Top Talker functionality, to automatically learn prefixes based on the highest outbound throughput or the highest delay time. Throughput learning measures prefixes that generate the highest outbound traffic volume. Throughput prefixes are sorted from highest to lowest. Delay learning measures prefixes with the highest round-trip response time (RTT) to optimize these highest delay prefixes to try to reduce the RTT for these prefixes. Delay prefixes are sorted from the highest to the lowest delay time.
PfR can automatically learn two types of prefixes:
- outside prefix--An outside prefix is defined as a public IP prefix assigned outside the company. Outside prefixes are received from other networks.
- inside prefix--An inside prefix is defined as a public IP prefix assigned to a company. An inside prefix is a prefix configured within the company network. The maximum number of inside prefixes that can be learned in a monitoring period is 30.
The PfR BGP Inbound Optimization feature introduced the ability to learn inside prefixes. Using BGP, PfR can select inside prefixes to support best entrance selection for traffic that originates from prefixes outside an autonomous system destined for prefixes inside the autonomous system. Company networks advertise the inside prefixes over the Internet using an Internet service provider (ISP) and receive advertisements for outside prefixes from an ISP.
PfR Link Utilization Measurement
Link Utilization Threshold
After an external interface is configured for a border router, PfR automatically monitors the utilization of the external link (an external link is an interface on a border router that typically links to a WAN). Every 20 seconds, by default, the border router reports the link utilization to the master controller. Both egress (transmitted) and ingress (received) traffic utilization values are reported to the master controller. If the exit or entrance link utilization is above the default threshold of 75 percent, the exit or entrance link is in an OOP state and PfR starts the monitoring process to find an alternative link for the traffic class. The link utilization threshold can be manually configured either as an absolute value in kilobytes per second (kbps) or as a percentage.
Link Utilization Range
PfR can also be configured to calculate the range of utilization over all the links. Both egress (transmitted) and ingress (received) traffic utilization values are reported to the master controller. In the figure below there are two border routers with exits links to the Internet through two ISPs. The master controller determines which link on one of the border routers--either BR1 or BR2 in the figure below--is used by a traffic class.
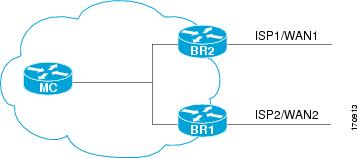
PfR range functionality attempts to keep the exit or entrance links within a utilization range, relative to each other to ensure that the traffic load is distributed. The range is specified as a percentage and is configured on the master controller to apply to all the exit or entrance links on border routers managed by the master controller. For example, if the range is specified as 25 percent, and the utilization of the exit link at BR1 (in the figure above) is 70 percent, then if the utilization of the exit link at BR2 (in the figure above) falls to 40 percent, the percentage range between the two exit links will be more than 25 percent and PfR will attempt to move some traffic classes to use the exit link at BR1 to even the traffic load. If BR1 (in the figure above) is being configured as an entrance link, the link utilization range calculations work in the same way as for an exit link, except that the utilization values are for received traffic, not transmitted traffic.
PfR Link Policies
PfR link policies are a set of rules that are applied against PfR-managed external links (an external link is an interface on a border router on the network edge). Link policies define the desired performance characteristics of the links. Instead of defining the performance of an individual traffic class entry that uses the link (as in traffic class performance policies), link policies are concerned with the performance of the link as a whole.
The BGP Inbound Optimization feature introduced support for selected entrance (ingress) link policies.
The following performance characteristics are managed by link policies:
- Traffic Load (Utilization)
- Range
- Cost--Cost policies are not supported by the BGP Inbound Optimization feature.For more details about cost policies, see the "Configuring Performance Routing Cost Policies" module.
Traffic Load
A traffic load (also referred to as utilization) policy consists of an upper threshold on the amount of traffic that a specific link can carry. Cisco IOS PfR supports per traffic class load distribution. Every 20 seconds, by default, the border router reports the link utilization to the master controller, after an external interface is configured for a border router. Both exit link and entrance link traffic load thresholds can be configured as an PfR policy. If the exit or entrance link utilization is above the configured threshold, or the default threshold of 75-percent, the exit or entrance link is in an OOP state and PfR starts the monitoring process to find an alternative link for the traffic class. The link utilization threshold can be manually configured either as an absolute value in kilobytes per second (kbps) or as a percentage. A load utilization policy for an individual interface is configured on the master controller under the border router configuration.

Range
A range policy is defined to maintain all links within a certain utilization range, relative to each other in order to ensure that the traffic load is distributed. For example, if a network has multiple exit links, and there is no financial reason to choose one link over another, the optimal choice is to provide an even load distribution across all links. The load-sharing provided by traditional routing protocols is not always evenly distributed, because the load-sharing is flow-based rather than performance- or policy-based. Cisco IOS PfR range functionality allows you to configure PfR to maintain the traffic utilization on a set of links within a certain percentage range of each other. If the difference between the links becomes too great, PfR will attempt to bring the link back to an in-policy state by distributing traffic classes among the available links. The master controller sets the maximum range utilization to 20-percent for all PfR-managed links by default, but the utilization range can be configured using a maximum percentage value. Both exit link and entrance link utilization ranges can be configured as a PfR policy.
PfR Entrance Link Selection Control Techniques
The PfR BGP inbound optimization feature introduced the ability to influence inbound traffic. A network advertises reachability of its inside prefixes to the Internet using eBGP advertisements to its ISPs. If the same prefix is advertised to more than one ISP, then the network is multihoming. PfR BGP inbound optimization works best with multihomed networks, but it can also be used with a network that has multiple connections to the same ISP. To implement BGP inbound optimization, PfR manipulates eBGP advertisements to influence the best entrance selection for traffic bound for inside prefixes. The benefit of implementing the best entrance selection is limited to a network that has more than one ISP connection.
To enforce an entrance link selection, PfR offers the following methods:
BGP Autonomous System Number Prepend
When an entrance link goes out-of-policy (OOP) due to delay, or in images prior to Cisco IOS Releases 15.2(1)T1 and 15.1(2)S, and PfR selects a best entrance for an inside prefix, extra autonomous system hops are prepended one at a time (up to a maximum of six) to the inside prefix BGP advertisement over the other entrances. In Cisco IOS Releases 15.2(1)T1, 15.1(2)S, and later releases, when an entrance link goes out-of-policy (OOP) due to unreachable or loss reasons, and PfR selects a best entrance for an inside prefix, six extra autonomous system hops are prepended immediately to the inside prefix BGP advertisement over the other entrances. The extra autonomous system hops on the other entrances increase the probability that the best entrance will be used for the inside prefix. When the entrance link is OOP due to unreachable or loss reasons, six extra autonomous system hops are added immediately to allow the software to quickly move the traffic away from the old entrance link. This is the default method PfR uses to control an inside prefix, and no user configuration is required.
BGP Autonomous System Number Community Prepend
When an entrance link goes out-of-policy (OOP) due to delay, or in images prior to Cisco IOS Releases 15.2(1)T1 and 15.1(2)S, and PfR selects a best entrance for an inside prefix, a BGP prepend community is attached one at a time (up to a maximum of six) to the inside prefix BGP advertisement from the network to another autonomous system such as an ISP. In Cisco IOS Releases 15.2(1)T1, 15.1(2)S, and later releases, when an entrance link goes out-of-policy (OOP) due to unreachable or loss reasons, and PfR selects a best entrance for an inside prefix, six BGP prepend communities are attached to the inside prefix BGP advertisement. The BGP prepend community will increase the number of autonomous system hops in the advertisement of the inside prefix from the ISP to its peers. Autonomous system prepend BGP community is the preferred method to be used for PfR BGP inbound optimization because there is no risk of the local ISP filtering the extra autonomous system hops. There are some issues, for example, not all ISPs support the BGP prepend community, ISP policies may ignore or modify the autonomous system hops, and a transit ISP may filter the autonomous system path. If you use this method of inbound optimization and a change is made to an autonomous system, you must issue an outbound reconfiguration using the clear ip bgp command.
PfR Map Operation for Inside Prefixes
The operation of a PfR map is similar to the operation of a route-map. A PfR map is configured to select an IP prefix list or PfR learn policy using a match clause and then to apply PfR policy configurations using a set clause. The PfR map is configured with a sequence number like a route-map, and the PfR map with the lowest sequence number is evaluated first.
The BGP Inbound Optimization feature introduced the inside keyword to the match ip address (PfR) command to identify inside prefixes. Inbound BGP only supports the passive mode which results in some configuration restrictions when using a PfR map. The following commands are not supported in a PfR map for inbound BGP; set active-probe, set interface, set mode monitor, set mode verify bidirectional, set mos threshold, set nexthop, set periodic, set probe frequency, and set traceroute reporting.
 Note | Match precedence priority is not supported in PfR maps. |
How to Configure BGP Inbound Optimization Using Performance Routing
- Configuring PfR to Automatically Learn Traffic Classes Using Inside Prefixes
- Manually Selecting Inside Prefixes for PfR Monitoring
- Modifying the PfR Link Utilization for Inbound Traffic
- Modifying the PfR Entrance Link Utilization Range
- Configuring and Applying a PfR Policy to Learned Inside Prefixes
- Configuring and Applying a PfR Policy to Configured Inside Prefixes
Configuring PfR to Automatically Learn Traffic Classes Using Inside Prefixes
Perform this task at a PfR master controller to configure PfR to automatically learn inside prefixes to be used as traffic classes. The traffic classes are entered in the MTC list. This task introduces the inside bgp (PfR) command used in PfR Top Talker and Top Delay configuration mode. This task configures automatic prefix learning of the inside prefixes (prefixes within the network). Optional configuration parameters such as learning period timers, maximum number of prefixes, and an expiration time for MTC list entries are also shown.
Before configuring this task, BGP peering for internal and external BGP neighbors must be configured.
DETAILED STEPS
Manually Selecting Inside Prefixes for PfR Monitoring
The PfR BGP inbound optimization feature introduced the ability to manually select inside prefixes to support best entrance selection for traffic that originates from prefixes outside an autonomous system destined for prefixes inside the autonomous system. Perform this task to manually select inside prefixes for PfR monitoring by creating an IP prefix list to define the inside prefix or prefix range. The prefix list is then imported into the Monitored Traffic Class (MTC) list by configuring a match clause in a PfR map.
DETAILED STEPS
| Command or Action | Purpose | |
|---|---|---|
Step 1 |
enable
Example: Router> enable |
Enables privileged EXEC mode. |
Step 2 |
configure
terminal
Example: Router# configure terminal |
Enters global configuration mode. |
Step 3 |
ip
prefix-list
list-name
[seq
seq-value]{deny
network/length |
permit
network/length}
Example: Router(config)# ip prefix-list INSIDE_PREFIXES seq 20 permit 192.168.1.0/24 |
Creates a prefix list to manually select prefixes for monitoring. |
Step 4 |
pfr-map
map-name
sequence-number
Example: Router(config)# pfr-map INSIDE_MAP 10 |
Enters PfR map configuration mode to create or configure a PfR map. |
Step 5 |
match
ip
address
prefix-list
name
[inside]
Example: Router(config-pfr-map)# match ip address prefix-list INSIDE_PREFIXES inside |
Creates a prefix list match clause entry in a PfR map to apply PfR policies. |
Step 6 |
end
Example: Router(config-pfr-map)# end |
Exits PfR map configuration mode and returns to privileged EXEC mode. |
Modifying the PfR Link Utilization for Inbound Traffic
The BGP Inbound Optimization feature introduced the ability to report inbound traffic utilization to the master controller. Perform this task at the master controller to modify the PfR entrance (inbound) link utilization threshold. After an external interface has been configured for a border router, PfR automatically monitors the utilization of entrance links on a border router every 20 seconds. The utilization is reported back to the master controller and, if the utilization exceeds 75 percent, PfR selects another entrance link for traffic classes on that link. An absolute value in kilobytes per second (kbps), or a percentage, can be specified.
DETAILED STEPS
| Command or Action | Purpose | |||
|---|---|---|---|---|
Step 1 |
enable
Example: Router> enable |
Enables privileged EXEC mode. | ||
Step 2 |
configure
terminal
Example: Router# configure terminal |
Enters global configuration mode. | ||
Step 3 |
pfr
master
Example: Router(config)# pfr master |
Enters PfR master controller configuration mode to configure a router as a master controller and to configure global operations and policies. | ||
Step 4 |
border
ip-address
[key-chain
key-chain-name]
Example: Router(config-pfr-mc)# border 10.1.1.2 |
Enters PfR-managed border router configuration mode to establish communication with a border router.
| ||
Step 5 |
interface
type
number
external
Example: Router(config-pfr-mc-br)# interface GigabitEthernet 0/0/0 external |
Configures a border router interface as an PfR-managed external interface and enters PfR border exit interface configuration mode.
| ||
Step 6 |
maximum
utilization
receive
{absolute
kbps |
percent
percentage}
Example: Router(config-pfr-mc-br-if)# maximum utilization receive percent 90 |
Sets the maximum receive utilization threshold for the configured PfR-managed link interface.
| ||
Step 7 |
end
Example: Router(config-pfr-mc-br-if)# end |
Exits PfR border exit interface configuration mode and returns to privileged EXEC mode. |
Modifying the PfR Entrance Link Utilization Range
Perform this task at the master controller to modify the maximum entrance link utilization range over all the border routers. By default, PfR automatically monitors the utilization of external links on a border router every 20 seconds, and the border router reports the utilization to the master controller. The BGP Inbound Optimization feature introduced the ability to report inbound traffic utilization to the master controller, and to specify a link utilization range for entrance links.
In this task, if the utilization range between all the entrance links exceeds 20 percent, the master controller tries to equalize the traffic load by moving some traffic classes to another entrance link. The maximum utilization range is configured as a percentage.
PfR uses the maximum utilization range to determine if links are in-policy. In this task, PfR will equalize inbound traffic across all entrance links by moving traffic classes from overutilized or out-of-policy exits to in-policy exits.
DETAILED STEPS
| Command or Action | Purpose | |
|---|---|---|
Step 1 |
enable
Example: Router> enable |
Enables privileged EXEC mode.
|
Step 2 |
configure
terminal
Example: Router# configure terminal |
Enters global configuration mode. |
Step 3 |
pfr
master
Example: Router(config)# pfr master |
Enters PfR master controller configuration mode to configure a router as a master controller and to configure global operations and policies. |
Step 4 |
max
range
receive
percent
percentage
Example: Router(config-pfr-mc)# max range receive percent 20 |
Specifies the upper limit of the receive utilization range between all the entrance links on the border routers.
|
Step 5 |
end
Example: Router(config-pfr-mc)# end |
Exits PfR master controller configuration mode and returns to privileged EXEC mode. |
Configuring and Applying a PfR Policy to Learned Inside Prefixes
Perform this task to apply a policy to learned inside prefix traffic class entries from the MTC list at the master controller. Support for optimizing inside prefixes was introduced in the BGP Inbound Optimization feature. The policy is configured using a PfR map and contains some set clauses.
Inbound BGP only supports the passive mode which results in some configuration restrictions when using a PfR map. The following commands are not supported in a PfR map for inbound BGP; set active-probe, set interface, set mode monitor, set mode verify bidirectional, set mos threshold, set nexthop, set periodic, set probe frequency, and set traceroute reporting.
Note | Policies applied in an PfR map do not override global policy configurations. |
DETAILED STEPS
| Command or Action | Purpose | |
|---|---|---|
Step 1 |
enable
Example: Router> enable |
Enables privileged EXEC mode. |
Step 2 |
configure
terminal
Example: Router# configure terminal |
Enters global configuration mode. |
Step 3 |
pfr-map
map-name
sequence-number
Example: Router(config)# pfr-map INSIDE_LEARN 10 |
Enters PfR map configuration mode to configure a PfR map to apply policies to selected IP prefixes. |
Step 4 |
match
pfr
learn
inside
Example: Router(config-pfr-map)# match pfr learn inside |
Creates a match clause entry in an PfR map to match PfR learned prefixes.
|
Step 5 |
set
delay
{relative
percentage |
threshold
maximum}
Example: Router(config-pfr-map)# set delay threshold 2000 |
Creates a set clause entry to configure the delay threshold.
|
Step 6 |
set
loss
{relative
average |
threshold
maximum}
Example: Router(config-pfr-map)# set loss relative 20 |
Creates a set clause entry to configure the relative or maximum packet loss limit that the master controller will permit for an exit link.
|
Step 7 |
set
unreachable
{relative
average |
threshold
maximum}
Example: Router(config-pfr-map)# set unreachable relative 10 |
Creates a set clause entry to configure the maximum number of unreachable hosts.
|
Step 8 |
end
Example: Router(config-pfr-map)# end |
(Optional) Exits PfR map configuration mode and returns to privileged EXEC mode. |
Configuring and Applying a PfR Policy to Configured Inside Prefixes
Perform this task to apply a policy to configured inside prefix traffic class entries from the MTC list at the master controller. Support for optimizing inside prefixes was introduced in the BGP Inbound Optimization feature. The policies are configured using a PfR map. This task contains prefix list configuration with different criteria in the set clauses.
Note | Policies applied in a PfR map do not override global policy configurations. |
DETAILED STEPS
| Command or Action | Purpose | |
|---|---|---|
Step 1 |
enable
Example: Router> enable |
Enables privileged EXEC mode. |
Step 2 |
configure
terminal
Example: Router# configure terminal |
Enters global configuration mode. |
Step 3 |
pfr-map
map-name
sequence-number
Example: Router(config)# pfr-map INSIDE_CONFIGURE 10 |
Enters PfR map configuration mode to create or configure a PfR map. |
Step 4 |
match
ip
address
{access-list
access-list-name|
prefix-list
prefix-list-name
[inside]
Example: Router(config-pfr-map)# match ip address prefix-list INSIDE_PREFIXES inside |
References an extended IP access list or IP prefix list as match criteria in a PfR map.
|
Step 5 |
set
delay
{relative
percentage |
threshold
maximum}
Example: Router(config-pfr-map)# set delay threshold 2000 |
Creates a set clause entry to configure the delay threshold.
|
Step 6 |
set
loss
{relative
average |
threshold
maximum}
Example: Router(config-pfr-map)# set loss relative 20 |
Creates a set clause entry to configure the relative or maximum packet loss limit that the master controller will permit for an exit link.
|
Step 7 |
set
unreachable
{relative
average |
threshold
maximum}
Example: Router(config-pfr-map)# set unreachable relative 10 |
Creates a set clause entry to configure the maximum number of unreachable hosts.
|
Step 8 |
end
Example: Router(config-pfr-map)# end |
Exits PfR map configuration mode and returns to privileged EXEC mode. |
Configuration Examples for BGP Inbound Optimization Using Performance Routing
- Example Configuring PfR to Automatically Learn Traffic Classes Using Inside Prefixes
- Example Manually Selecting Inside Prefixes for PfR Monitoring
- Example Modifying the PfR Link Utilization for Inbound Traffic
- Example Modifying the PfR Entrance Link Utilization Range
- Example Configuring and Applying a PfR Policy to Learned Inside Prefixes
- Example Configuring and Applying a PfR Policy to Configured Inside Prefixes
Example Configuring PfR to Automatically Learn Traffic Classes Using Inside Prefixes
The following example shows how to configure PfR to automatically learn prefixes inside the network:
Router> enable
Router#
configure terminal
Router(config)# pfr master
Router(config-pfr-mc)# learn
Router(config-pfr-mc-learn)# inside bgp
Router(config-pfr-mc-learn)# monitor-period 10
Router(config-pfr-mc-learn)# periodic-interval 20

Router(config-pfr-mc-learn)# prefixes 30
Router(config-pfr-mc-learn)# end
Example Manually Selecting Inside Prefixes for PfR Monitoring
The following example shows how to manually configure PfR to learn prefixes inside the network using a PfR map:
Router> enable
Router# configure terminal
Router(config)# ip prefix-list INSIDE_PREFIXES seq 20 permit 192.168.1.0/24
Router(config)# pfr-map INSIDE_MAP 10
Router(config-pfr-map)# match ip address prefix-list INSIDE_PREFIXES inside
Router(config-pfr-map)# end
Example Modifying the PfR Link Utilization for Inbound Traffic
The following example shows how to modify the PfR entrance link utilization threshold. In this example, the entrance utilization is set to 65 percent. If the utilization for this exit link exceeds 65 percent, PfR selects another entrance link for traffic classes that were using this entrance link.
Router(config)# pfr master
Router(config-pfr-mc)# border 10.1.2.1
Router(config-pfr-mc-br)# interface GigabitEthernet 0/0/0 external
Router(config-pfr-mc-br-if)# maximum receive utilization percentage 65
Router(config-pfr-mc-br-if)# end
Example Modifying the PfR Entrance Link Utilization Range
The following example shows how to modify the PfR entrance utilization range. In this example, the entrance utilization range for all entrance links is set to 15 percent.PfR uses the maximum utilization range to determine if entrance links are in-policy. PfR will equalize inbound traffic across all entrance links by moving prefixes from overutilized or out-of-policy exits to in-policy exits.
Router(config)# pfr master
Router(config-pfr-mc)# max range receive percent 15
Router(config-pfr-mc)# end
Example Configuring and Applying a PfR Policy to Configured Inside Prefixes
The following example shows how to create a PfR map named INSIDE_CONFIGURE and apply a PfR policy to manually configured inside prefixes:
enable
configure terminal
 pfr-map INSIDE_CONFIGURE 10
 match ip address prefix-list INSIDE_PREFIXES inside
 set delay threshold 2000
 set loss relative 20
 set unreachable relative 80
 end
Additional References
Related Documents
|
Related Topic |
Document Title |
|---|---|
|
Cisco IOS commands |
|
|
Cisco PfR commands: complete command syntax, command mode, command history, defaults, usage guidelines and examples |
|
|
Basic PfR configuration |
"Configuring Basic Performance Routing" module |
|
Concepts required to understand the Performance Routing operational phases |
"Understanding Performance Routing" module |
|
Advanced PfR configuration |
"Configuring Advanced Performance Routing" module |
|
IP SLAs overview |
IP SLAs Configuration Guide |
Technical Assistance
|
Description |
Link |
|---|---|
|
The Cisco Support and Documentation website provides online resources to download documentation, software, and tools. Use these resources to install and configure the software and to troubleshoot and resolve technical issues with Cisco products and technologies. Access to most tools on the Cisco Support and Documentation website requires a Cisco.com user ID and password. |
Feature Information for BGP Inbound Optimization Using Performance Routing
The following table provides release information about the feature or features described in this module. This table lists only the software release that introduced support for a given feature in a given software release train. Unless noted otherwise, subsequent releases of that software release train also support that feature.
Use Cisco Feature Navigator to find information about platform support and Cisco software image support. To access Cisco Feature Navigator, go to www.cisco.com/go/cfn. An account on Cisco.com is not required.
| Table 1 | Feature Information for BGP Inbound Optimization Using Performance Routing |
|
Feature Name |
Releases |
Feature Information |
|---|---|---|
|
OER BGP Inbound Optimization |
12.4(9)T 12.2(33)SRB |
PfR BGP inbound optimization supports best entrance selection for traffic that originates from prefixes outside an autonomous system destined for prefixes inside the autonomous system. External BGP (eBGP) advertisements from an autonomous system to an Internet service provider (ISP) can influence the entrance path for traffic entering the network. PfR uses eBGP advertisements to manipulate the best entrance selection. The following commands were introduced or modified by this feature: clear pfr master prefix, downgrade bgp (PfR), inside bgp (PfR), match ip address (PfR), match pfr learn, max range receive (PfR), maximum utilization receive (PfR), show pfr master prefix. |
|
expire after command1 |
12.3(14)T 12.2(33)SRB |
Theexpire after (PfR)command is used to set an expiration period for learned prefixes. By default, the master controller removes inactive prefixes from the central policy database as memory is needed. This command allows you to refine this behavior by setting a time or session based limit. The time based limit is configured in minutes. The session based limit is configured for the number of monitor periods (or sessions). |
Cisco and the Cisco logo are trademarks or registered trademarks of Cisco and/or its affiliates in the U.S. and other countries. To view a list of Cisco trademarks, go to this URL: www.cisco.com/go/trademarks. Third-party trademarks mentioned are the property of their respective owners. The use of the word partner does not imply a partnership relationship between Cisco and any other company. (1110R)
Any Internet Protocol (IP) addresses and phone numbers used in this document are not intended to be actual addresses and phone numbers. Any examples, command display output, network topology diagrams, and other figures included in the document are shown for illustrative purposes only. Any use of actual IP addresses or phone numbers in illustrative content is unintentional and coincidental.