
 Feedback
Contents
- Configuring IP SLAs DLSw+ Operations
- Finding Feature Information
- Prerequisites
- Information About IP SLAs DLSw+ Operations
- DLSw+ Operation
- How to Configure IP SLAs DLSw+ Operations
- Configuring IP SLAs DLSw+ Operations
- Configuring a Basic DLSw+ Operation on the Source Device
- Configuring an IP SLAs DLSw+ Operation with Optional Parameters on the Source Device
- Scheduling IP SLAs Operations
- Troubleshooting Tips
- What to Do Next
- Configuration Examples for IP SLAs DLSw+ Operations
- Example IP SLAs DLSw+ Operation Configuration
- Additional References
- Feature Information for Cisco IOS IP SLAs DLSw+ Operations
Configuring IP SLAs DLSw+ Operations
This module describes how to configure the IP Service Level Agreements (SLAs) Data Link Switching Plus (DLSw+) operation to measure and analyze the DLSw+ protocol stack and network response time between DLSw+ peers.
Finding Feature Information
Your software release may not support all the features documented in this module. For the latest caveats and feature information, see Bug Search Tool and the release notes for your platform and software release. To find information about the features documented in this module, and to see a list of the releases in which each feature is supported, see the feature information table at the end of this module.
Use Cisco Feature Navigator to find information about platform support and Cisco software image support. To access Cisco Feature Navigator, go to www.cisco.com/go/cfn. An account on Cisco.com is not required.
Prerequisites
A connected DLSw+ peer between the source and destination networking devices must be configured.
Information About IP SLAs DLSw+ Operations
DLSw+ Operation
The Cisco IOS IP SLAs DLSw+ operation measures the DLSw+ protocol stack and network response time between DLSw+ peers. DLSw+ is the enhanced Cisco version of RFC 1795. DLSw+ tunnels non-routable Layer 2 traffic such as Systems Network Architecture (SNA) traffic over IP backbones via TCP. The networking devices performing the tunneling of non-routable traffic into TCP/IP are referred to as DLSw+ peers. DLSw+ peers normally communicate through TCP port 2065. The destination networking device does not have to be a Cisco router if it supports RFC 1795.
In the figure below, Router A is configured as the source IP SLAs device and a DLSw+ operation is configured with Router B as the remote DLSw+ peer. Router A and Router B are configured as connected DLSw+ peers. The peer (destination device) does not have to run a Cisco IOS IP SLA-capable image.
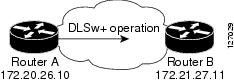
Network response time is computed by measuring the round-trip time (RTT) taken to connect to the remote DLSw+ peer using TCP. This operation does not use the IP SLAs Responder.
How to Configure IP SLAs DLSw+ Operations
Configuring IP SLAs DLSw+ Operations
 Note | There is no need to configure an IP SLAs responder on the destination device. |
Perform one of the following tasks:
- Configuring a Basic DLSw+ Operation on the Source Device
- Configuring an IP SLAs DLSw+ Operation with Optional Parameters on the Source Device
Configuring a Basic DLSw+ Operation on the Source Device
DETAILED STEPS
| Command or Action | Purpose | |
|---|---|---|
Step 1 |
enable
Example: Router> enable |
Enables privileged EXEC mode.
|
Step 2 |
configure
terminal
Example: Router# configure terminal |
Enters global configuration mode. |
Step 3 |
ip
sla
operation-number
Example: Router(config)# ip sla 10 |
Begins configuration for an IP SLAs operation and enters IP SLA configuration mode. |
Step 4 |
dlsw
peer-ipaddr
ip-address
Example: Router(config-ip-sla)# dlsw peer-ipaddr 172.21.27.11 |
Defines a DLSw+ operation and enters IP SLA DLSw+ configuration mode. |
Step 5 |
frequency
seconds
Example: Router(config-ip-sla-dlsw)# frequency 30 |
(Optional) Sets the rate at which a specified IP SLAs operation repeats. |
Step 6 |
end
Example: Router(config-ip-sla-dlsw)# end |
Exits to privileged EXEC mode. |
Configuring an IP SLAs DLSw+ Operation with Optional Parameters on the Source Device
DETAILED STEPS
| Command or Action | Purpose | |
|---|---|---|
Step 1 |
enable
Example: Router> enable |
Enables privileged EXEC mode.
|
Step 2 |
configure
terminal
Example: Router# configure terminal |
Enters global configuration mode. |
Step 3 |
ip
sla
operation-number
Example: Router(config)# ip sla 10 |
Begins configuration for an IP SLAs operation and enters IP SLA configuration mode. |
Step 4 |
dlsw
peer-ipaddr
ip-address
Example: Router(config-ip-sla)# dlsw peer-ipaddr 172.21.27.11 |
Defines a DLSw+ operation and enters IP SLA DLSw configuration mode. |
Step 5 |
history
buckets-kept
size
Example: Router(config-ip-sla-dlsw)# history buckets-kept 25 |
(Optional) Sets the number of history buckets that are kept during the lifetime of an IP SLAs operation. |
Step 6 |
history
distributions-of-statistics-kept
size
Example: Router(config-ip-sla-dlsw)# history distributions-of-statistics-kept 5 |
(Optional) Sets the number of statistics distributions kept per hop during an IP SLAs operation. |
Step 7 |
history
enhanced
[interval seconds] [buckets number-of-buckets] Example: Router(config-ip-sla-dlsw)# history enhanced interval 900 buckets 100 |
(Optional) Enables enhanced history gathering for an IP SLAs operation. |
Step 8 |
history
filter
{none | all | overThreshold | failures} Example: Router(config-ip-sla-dlsw)# history filter failures |
(Optional) Defines the type of information kept in the history table for an IP SLAs operation. |
Step 9 |
frequency
seconds
Example: Router(config-ip-sla-dlsw)# frequency 30 |
(Optional) Sets the rate at which a specified IP SLAs operation repeats. |
Step 10 |
history
hours-of-statistics-kept
hours
Example: Router(config-ip-sla-dlsw)# hours-of-statistics-kept 4 |
(Optional) Sets the number of hours for which statistics are maintained for an IP SLAs operation. |
Step 11 |
history
lives-kept
lives
Example: Router(config-ip-sla-dlsw)# history lives-kept 5 |
(Optional) Sets the number of lives maintained in the history table for an IP SLAs operation. |
Step 12 |
owner
owner-id
Example: Router(config-ip-sla-dlsw)# owner admin |
(Optional) Configures the Simple Network Management Protocol (SNMP) owner of an IP SLAs operation. |
Step 13 |
request-data-size
bytes
Example: Router(config-ip-sla-dlsw)# request-data-size 64 |
(Optional) Sets the protocol data size in the payload of an IP SLAs operation's request packet. |
Step 14 |
history
statistics-distribution-interval
milliseconds
Example: Router(config-ip-sla-dlsw)# history statistics-distribution-interval 10 |
(Optional) Sets the time interval for each statistics distribution kept for an IP SLAs operation. |
Step 15 |
tag
text
Example: Router(config-ip-sla-dlsw)# tag TelnetPollServer1 |
(Optional) Creates a user-specified identifier for an IP SLAs operation. |
Step 16 |
threshold
milliseconds
Example: Router(config-ip-sla-dlsw)# threshold 10000 |
(Optional) Sets the upper threshold value for calculating network monitoring statistics created by an IP SLAs operation. |
Step 17 |
timeout
milliseconds
Example: Router(config-ip-sla-dlsw)# timeout 10000 |
(Optional) Sets the amount of time an IP SLAs operation waits for a response from its request packet. |
Step 18 |
end
Example: Router(config-ip-sla-dlsw)# exit |
Exits to privileged EXEC mode. |
Scheduling IP SLAs Operations
- ip sla schedule operation-number [life {forever | seconds}] [start-time {[hh:mm:ss] [month day | day month] | pending | now | after hh:mm:ss}] [ageout seconds] [recurring]
- ip sla group schedule group-operation-number operation-id-numbers schedule-period schedule-period-range [ageout seconds] [frequency group-operation-frequency] [life {forever | seconds}] [start-time{hh:mm[:ss] [month day | day month] | pending | now | after hh:mm[:ss]}]
DETAILED STEPS
Troubleshooting Tips
- If the IP SLAs operation is not running and not generating statistics, add the verify-data command to the configuration of the operation (while configuring in IP SLA configuration mode) to enable data verification. When data verification is enabled, each operation response is checked for corruption. Use the verify-data command with caution during normal operations because it generates unnecessary overhead.
- Use the debug ip sla trace and debug ip sla error commands to help troubleshoot issues with an IP SLAs operation.
What to Do Next
To add proactive threshold conditions and reactive triggering for generating traps (or for starting another operation) to an IP SLAs operation, see the "Configuring Proactive Threshold Monitoring" section.
operation)
To display and interpret the results of an IP SLAs operation, use the show ip sla statistics command. Check the output for fields that correspond to criteria in your service level agreement to determine whether the service metrics are acceptable.
Configuration Examples for IP SLAs DLSw+ Operations
Example IP SLAs DLSw+ Operation Configuration
The following example shows the configuration for a DLSw+ operation from Router A to Router B, a remote DLSw+ peer. Router B is configured as a DLSw+ peer and Router A is specified as the remote (connected) DLSw+ peer. Router A is then configured as a DLSw+ peer with Router B as the connected DLSw+ peer, and the IP SLAs DLSw+ operation parameters are configured. The operation is scheduled to start immediately and run for 7200 seconds (2 hours).
Additional References
Related Documents
MIBs
Technical Assistance
|
Description |
Link |
|---|---|
|
The Cisco Support and Documentation website provides online resources to download documentation, software, and tools. Use these resources to install and configure the software and to troubleshoot and resolve technical issues with Cisco products and technologies. Access to most tools on the Cisco Support and Documentation website requires a Cisco.com user ID and password. |
Feature Information for Cisco IOS IP SLAs DLSw+ Operations
The following table provides release information about the feature or features described in this module. This table lists only the software release that introduced support for a given feature in a given software release train. Unless noted otherwise, subsequent releases of that software release train also support that feature.
Use Cisco Feature Navigator to find information about platform support and Cisco software image support. To access Cisco Feature Navigator, go to www.cisco.com/go/cfn. An account on Cisco.com is not required.
| Table 1 | Feature Information for Cisco IOS IP SLAs DLSw+ Operations |
|
Feature Name |
Releases |
Feature Information |
|---|---|---|
|
IP SLAs DLSw+ Operation |
12.3(14)T 15.0(1)S |
The Cisco IOS IP SLAs Data Link Switching Plus (DLSw+) operation allows you to schedule and measure the DLSw+ protocol stack and network response time between DLSw+ peers |
Cisco and the Cisco logo are trademarks or registered trademarks of Cisco and/or its affiliates in the U.S. and other countries. To view a list of Cisco trademarks, go to this URL: www.cisco.com/go/trademarks. Third-party trademarks mentioned are the property of their respective owners. The use of the word partner does not imply a partnership relationship between Cisco and any other company. (1110R)
Any Internet Protocol (IP) addresses and phone numbers used in this document are not intended to be actual addresses and phone numbers. Any examples, command display output, network topology diagrams, and other figures included in the document are shown for illustrative purposes only. Any use of actual IP addresses or phone numbers in illustrative content is unintentional and coincidental.