- Preface
- Introduction to Cisco WAAS
- Planning Your WAAS Network
- Using Device Groups and Device Locations
- Configuring Traffic Interception
- Configuring Network Settings
- Configuring Administrative Login Authentication, Authorization, and Accounting
- Creating and Managing Administrator User Accounts
- Creating and Managing IP Access Control Lists for WAAS Devices
- Configuring Other System Settings
- Using the WAE Device Manager GUI
- Configuring Wide Area File Services
- Configuring Application Acceleration
- Configuring and Managing WAAS Print Services
- Maintaining Your WAAS System
- Monitoring and Troubleshooting Your WAAS Network
- Configuring SNMP Monitoring
- Default Application Policies
- Index
Cisco Wide Area Application Services Configuration Guide (Software Version 4.0.19)
Bias-Free Language
The documentation set for this product strives to use bias-free language. For the purposes of this documentation set, bias-free is defined as language that does not imply discrimination based on age, disability, gender, racial identity, ethnic identity, sexual orientation, socioeconomic status, and intersectionality. Exceptions may be present in the documentation due to language that is hardcoded in the user interfaces of the product software, language used based on RFP documentation, or language that is used by a referenced third-party product. Learn more about how Cisco is using Inclusive Language.
- Updated:
- June 13, 2008
Chapter: Configuring Other System Settings
- Modifying Device Properties
- Enabling the Inetd RCP Services
- Enabling the Inetd FTP Service
- Configuring Date and Time Settings
- Configuring Secure Store Settings
- Secure Store Overview
- Enabling Secure Store Encryption on the Central Manager
- Enabling Secure Store Encryption on a Standby Central Manager
- Enabling Secure Store Encryption on a WAE Device
- Changing the Secure Store Encryption Key and Password
- Disabling Secure Store Encryption on a Central Manager or WAE Device
- Modifying the Default System Configuration Properties
- Configuring Faster Detection of Offline WAAS Devices
- Configuring Alarm Overload Detection
Configuring Other System Settings
This chapter describes how to perform other system tasks such as setting the system clock, modifying the default system configuration settings, enabling secure store, and enabling alarm overload detection, after you have done a basic configuration of your WAAS device.

Note ![]() Throughout this chapter, the term WAAS device is used to refer collectively to the WAAS Central Managers and WAEs in your network. The term WAE refers to WAE appliances and WAE Network Modules (the NME-WAE family of devices).
Throughout this chapter, the term WAAS device is used to refer collectively to the WAAS Central Managers and WAEs in your network. The term WAE refers to WAE appliances and WAE Network Modules (the NME-WAE family of devices).
This chapter contains the following sections:
•![]() Enabling the Inetd RCP Services
Enabling the Inetd RCP Services
•![]() Enabling the Inetd FTP Service
Enabling the Inetd FTP Service
•![]() Configuring Date and Time Settings
Configuring Date and Time Settings
•![]() Configuring Secure Store Settings
Configuring Secure Store Settings
•![]() Modifying the Default System Configuration Properties
Modifying the Default System Configuration Properties
•![]() Configuring Faster Detection of Offline WAAS Devices
Configuring Faster Detection of Offline WAAS Devices
•![]() Configuring Alarm Overload Detection
Configuring Alarm Overload Detection
Modifying Device Properties
The WAAS Central Manager GUI allows you to make the following changes to the properties of a WAE device:
•![]() Rename the device
Rename the device
•![]() Assign a new location to the device
Assign a new location to the device
•![]() Assign a NAT address to the device
Assign a NAT address to the device
•![]() Deactivate or activate the device
Deactivate or activate the device
You can also use the WAAS Central Manager GUI to check the status of a device to determine if it is online, pending, or inactive.
You can only rename a WAAS Central Manager device from the GUI.
To modify a device's properties, follow these steps:
Step 1 ![]() From the WAAS Central Manager GUI, choose Devices > Devices.
From the WAAS Central Manager GUI, choose Devices > Devices.
Step 2 ![]() Click the Edit icon next to the device that you want to modify.
Click the Edit icon next to the device that you want to modify.
The Device Home window appears.
Step 3 ![]() In the Contents pane, choose Activation.
In the Contents pane, choose Activation.
The Device Activation window appears with fields for editing the properties of the selected device.
For a WAAS Central Manager device, the only fields that you can change in this window are the name and NetBIOS name of the device. In addition, the device IP address and role are displayed.
Step 4 ![]() Under the General Configuration heading, set or modify the following device properties:
Under the General Configuration heading, set or modify the following device properties:
•![]() To change the hostname of the device, enter a new name in the Name field. This name must conform to the following rules:
To change the hostname of the device, enter a new name in the Name field. This name must conform to the following rules:
–![]() The name must use only alphanumeric characters and hyphens (-).
The name must use only alphanumeric characters and hyphens (-).
–![]() The first and last character must be a letter or a digit.
The first and last character must be a letter or a digit.
–![]() Maximum length is 30 characters.
Maximum length is 30 characters.
–![]() Names are case insensitive.
Names are case insensitive.
–![]() The following characters are considered illegal and cannot be used when naming a device:
The following characters are considered illegal and cannot be used when naming a device:
@, #, $,%, ^, &, *, (), |, \""/, <>.
•![]() To activate or deactivate the device, check or uncheck the Activate check box.When this box is checked, the device is activated for centralized management through the WAAS Central Manager GUI.
To activate or deactivate the device, check or uncheck the Activate check box.When this box is checked, the device is activated for centralized management through the WAAS Central Manager GUI.
You can also click the Deactivate icon in the task bar to deactivate the device. Deactivating a device allows you to replace the device in the event of a hardware failure without losing all of its configuration settings.
•![]() To change the NetBIOS name of the device, enter the new NetBIOS name for the device in the provided field.
To change the NetBIOS name of the device, enter the new NetBIOS name for the device in the provided field.
Note ![]() If the WAE is operating in nontransparent mode and print services is enabled, you must configure identical names for the NetBIOS name and the hostname of the device that you enter in the Name field.
If the WAE is operating in nontransparent mode and print services is enabled, you must configure identical names for the NetBIOS name and the hostname of the device that you enter in the Name field.
Step 5 ![]() Under the Locality heading, set or change the location by choosing a new location from the Location drop-down list. To create a new location for this device, see the "Creating Locations" section on page 3-15.
Under the Locality heading, set or change the location by choosing a new location from the Location drop-down list. To create a new location for this device, see the "Creating Locations" section on page 3-15.
Step 6 ![]() Under the NAT Configuration heading, configure the NAT settings using the following fields:
Under the NAT Configuration heading, configure the NAT settings using the following fields:
•![]() Check the Use WAE's primary IP Address check box to enable the WAAS Central Manager to use the IP address configured on the primary interface of the device to communicate with devices in the WAAS network that are behind a NAT firewall.
Check the Use WAE's primary IP Address check box to enable the WAAS Central Manager to use the IP address configured on the primary interface of the device to communicate with devices in the WAAS network that are behind a NAT firewall.
•![]() Allow the WAAS Central Manager to communicate with devices in the WAAS network that are behind the NAT firewall using an explicitly configured IP address, by entering the NAT address of the device in the NAT Address field.
Allow the WAAS Central Manager to communicate with devices in the WAAS network that are behind the NAT firewall using an explicitly configured IP address, by entering the NAT address of the device in the NAT Address field.
•![]() In the Port field, enter the port number for the NAT address.
In the Port field, enter the port number for the NAT address.
Note ![]() If the WAAS Central Manager cannot contact a device using the primary IP address, it attempts to communicate using the NAT IP address.
If the WAAS Central Manager cannot contact a device using the primary IP address, it attempts to communicate using the NAT IP address.
Step 7 ![]() In the Comments field, enter any comments that you want to appear for this device.
In the Comments field, enter any comments that you want to appear for this device.
Step 8 ![]() Click Submit.
Click Submit.
Enabling the Inetd RCP Services
Remote Copy Protocol (RCP) lets you download, upload, and copy configuration files between remote hosts and a switch. Unlike TFTP, which uses User Datagram Protocol (UDP), a connectionless protocol, RCP uses TCP, which is connection oriented. Inetd (an Internet daemon) is a program that listens for connection requests or messages for certain ports and starts server programs to perform the services associated with those ports. RCP copies files between devices.
RCP is a subset of the UNIX rshell service, which allows UNIX users to execute shell commands on remote UNIX systems. It is a UNIX built-in service. This service uses TCP as the transport protocol and listens for requests on TCP port 514. RCP service can be enabled on WAAS devices that use WAAS software.
To enable RCP services on a WAAS device, follow these steps:
Step 1 ![]() From the WAAS Central Manager GUI, choose Devices > Devices or Devices > Device Groups.
From the WAAS Central Manager GUI, choose Devices > Devices or Devices > Device Groups.
Step 2 ![]() Click the Edit icon next to the device or device group for which you want to enable RCP services.
Click the Edit icon next to the device or device group for which you want to enable RCP services.
Step 3 ![]() In the Contents pane, choose General Settings > Miscellaneous > Inetd RCP. The Inetd RCP Settings window appears.
In the Contents pane, choose General Settings > Miscellaneous > Inetd RCP. The Inetd RCP Settings window appears.
Step 4 ![]() Check the Inetd Rcp Enable check box. By default, this option is disabled.
Check the Inetd Rcp Enable check box. By default, this option is disabled.
Note ![]() The Inetd daemon listens for FTP, RCP, and TFTP services. For Inetd to listen to RCP requests, it must be explicitly enabled for RCP service.
The Inetd daemon listens for FTP, RCP, and TFTP services. For Inetd to listen to RCP requests, it must be explicitly enabled for RCP service.
Step 5 ![]() Click Submit to save your changes.
Click Submit to save your changes.
A "Click Submit to Save" message appears in red next to the Current Settings line when there are pending changes to be saved after you have applied default or device group settings. You can also revert to the previously configured settings by clicking the Reset button. The Reset button is visible only when you have applied default or group settings to change the current device settings but you have not yet submitted the changes.
If you try to leave this window without saving the modified settings, a warning dialog box prompts you to submit the changes. This dialog box only appears if you are using the Internet Explorer browser.
Enabling the Inetd FTP Service
To enable the Inetd FTP service, follow these steps:
Step 1 ![]() From the WAAS Central Manager GUI, choose Devices > Devices or Devices > Device Groups.
From the WAAS Central Manager GUI, choose Devices > Devices or Devices > Device Groups.
Step 2 ![]() Click the Edit icon next to the device or device group on which you want to enable the Inetd FTP service.
Click the Edit icon next to the device or device group on which you want to enable the Inetd FTP service.
Step 3 ![]() From the Contents pane, choose General Settings > Miscellaneous > Inetd FTP. The Inetd FTP Settings window appears.
From the Contents pane, choose General Settings > Miscellaneous > Inetd FTP. The Inetd FTP Settings window appears.
Step 4 ![]() Check the Inetd Enable FTP Service check box to enable Inetd FTP service on the device or device group. By default, this option is disabled.
Check the Inetd Enable FTP Service check box to enable Inetd FTP service on the device or device group. By default, this option is disabled.
Step 5 ![]() Click Submit to save your changes.
Click Submit to save your changes.
A "Click Submit to Save" message appears in red next to the Current Settings line when there are pending changes to be saved after you have applied default or device group settings. You can also revert to the previously configured settings by clicking the Reset button. The Reset button is visible only when you have applied default or group settings to change the current device settings but you have not yet submitted the changes.
If you try to leave this window without saving the modified settings, a warning dialog box prompts you to submit the changes. This dialog box only appears if you are using the Internet Explorer browser.
Configuring Date and Time Settings
This section explains how to configure date and time settings for your WAAS network devices and contains the following topics:
•![]() Configuring Time Zone Settings
Configuring Time Zone Settings
Configuring NTP Settings
The WAAS Central Manager GUI allows you to configure the time and date settings using a Network Time Protocol (NTP) host on your network. NTP allows the synchronization of time and date settings for the different geographical locations of the devices in your WAAS network.
To configure NTP settings, follow these steps:
Step 1 ![]() From the WAAS Central Manager GUI, choose Devices > Devices or Devices > Device Groups.
From the WAAS Central Manager GUI, choose Devices > Devices or Devices > Device Groups.
Step 2 ![]() Click the Edit icon next to the device or device group that you want to configure. The Contents pane appears on the left.
Click the Edit icon next to the device or device group that you want to configure. The Contents pane appears on the left.
Step 3 ![]() From the Contents pane, choose General Settings > Miscellaneous > Date/Time > NTP. The NTP Settings window appears.
From the Contents pane, choose General Settings > Miscellaneous > Date/Time > NTP. The NTP Settings window appears.
Step 4 ![]() Check the Enable check box to enable NTP settings. By default, this option is disabled.
Check the Enable check box to enable NTP settings. By default, this option is disabled.
Step 5 ![]() In the NTP Server field, enter a hostname or IP address.
In the NTP Server field, enter a hostname or IP address.
Step 6 ![]() Click Submit.
Click Submit.
Configuring Time Zone Settings
If you have an outside source on your network that provides time services (such as a Network Time Protocol [NTP] server), you do not need to set the system clock manually. When manually setting the clock, enter the local time.
Note ![]() Two clocks exist in the system: the software clock and the hardware clock. The software uses the software clock. The hardware clock is used only at startup to initialize the software clock.
Two clocks exist in the system: the software clock and the hardware clock. The software uses the software clock. The hardware clock is used only at startup to initialize the software clock.
To configure the time zone on a device or device group, follow these steps:
Step 1 ![]() From the WAAS Central Manager GUI, choose Devices > Devices or Devices > Device Groups.
From the WAAS Central Manager GUI, choose Devices > Devices or Devices > Device Groups.
Step 2 ![]() Click the Edit icon next to the device or device group for which you want to configure the time zone.
Click the Edit icon next to the device or device group for which you want to configure the time zone.
Step 3 ![]() In the Contents pane, choose General Settings > Miscellaneous > Date/Time > Time Zone. The Time Zone Settings window appears.
In the Contents pane, choose General Settings > Miscellaneous > Date/Time > Time Zone. The Time Zone Settings window appears.
Step 4 ![]() To configure a standard time zone, follow these steps:
To configure a standard time zone, follow these steps:
a. ![]() Under the Time Zone Settings section, click the Standard Time Zone radio button. The default is UTC (offset = 0) with no summer time configured. When you configure a standard time zone, the system is automatically adjusted for the UTC offset, and the UTC offset need not be specified.
Under the Time Zone Settings section, click the Standard Time Zone radio button. The default is UTC (offset = 0) with no summer time configured. When you configure a standard time zone, the system is automatically adjusted for the UTC offset, and the UTC offset need not be specified.
The standard convention for time zones uses a Location/Area format in which Location is a continent or a geographic region of the world and Area is a time zone region within that location.
b. ![]() From the drop-down list, choose a location for the time zone. (For an explanation of the abbreviations in this list, see Table 9-1.)
From the drop-down list, choose a location for the time zone. (For an explanation of the abbreviations in this list, see Table 9-1.)
The window refreshes, displaying all area time zones for the chosen location in the second drop-down list.
c. ![]() Choose an area for the time zone. The UTC offset is automatically set for standard time zones.
Choose an area for the time zone. The UTC offset is automatically set for standard time zones.
Summer time is built-in for some standard time zones (mostly time zones within the United States), and will result an automatic change in the UTC offset during summer time. For a list of standard time zones that can be configured and their UTC offsets, see Table 9-2.
Step 5 ![]() To configure a customized time zone on the device, follow these steps:
To configure a customized time zone on the device, follow these steps:
a. ![]() Under the Time Zone Settings section, click the Customized Time Zone radio button.
Under the Time Zone Settings section, click the Customized Time Zone radio button.
b. ![]() In the Customized Time Zone field, specify the name of the time zone. The time zone entry is case-sensitive and can contain up to 40 characters including spaces. If you specify any of the standard time zone names, an error message is displayed when you click Submit.
In the Customized Time Zone field, specify the name of the time zone. The time zone entry is case-sensitive and can contain up to 40 characters including spaces. If you specify any of the standard time zone names, an error message is displayed when you click Submit.
c. ![]() For UTC Offset, choose the + or - sign from the first drop-down list to specify whether the configured time zone is ahead or behind UTC. Also, choose the number of hours (0-23) and minutes (0-59) offset from UTC for the customized time zone. The range for the UTC offset is from -23:59 to 23:59, and the default is 0:0.
For UTC Offset, choose the + or - sign from the first drop-down list to specify whether the configured time zone is ahead or behind UTC. Also, choose the number of hours (0-23) and minutes (0-59) offset from UTC for the customized time zone. The range for the UTC offset is from -23:59 to 23:59, and the default is 0:0.
Step 6 ![]() To configure customized summer time, follow these steps under the Customized Summer Time Savings section.
To configure customized summer time, follow these steps under the Customized Summer Time Savings section.
Note ![]() You can specify a customized summer time for both standard and customized time zones.
You can specify a customized summer time for both standard and customized time zones.
a. ![]() To configure absolute summer time, click the Absolute Dates radio button.
To configure absolute summer time, click the Absolute Dates radio button.
You can configure a start date and end date for summer time in absolute dates or recurring dates. Absolute date settings apply only once and must be set every year. Recurring dates apply repeatedly for many years.
b. ![]() In the Start Date and End Date fields, specify the month (January through December), day (1-31), and year (1993-2032) on which summer time must start and end in mm/dd/yyyy format. Make sure that the end date is always later than the start date.
In the Start Date and End Date fields, specify the month (January through December), day (1-31), and year (1993-2032) on which summer time must start and end in mm/dd/yyyy format. Make sure that the end date is always later than the start date.
Alternatively, click the Calendar icon next to the Start Date and End Date fields to display the Date Time Picker popup window. By default the current date is highlighted in yellow. In the Date Time Picker popup window, use the left or right arrow icons to choose the previous or following years, if required. Choose a month from the drop-down list. Click a day of the month. The chosen date is highlighted in blue. Click Apply. Alternatively, click Set Today to revert to the current day. The chosen date will be displayed in the Start Date and End Date fields.
c. ![]() To configure recurring summer time, click the Recurring Dates radio button.
To configure recurring summer time, click the Recurring Dates radio button.
d. ![]() From the Start Day drop-down list, choose a day of the week (Monday-Sunday) to start.
From the Start Day drop-down list, choose a day of the week (Monday-Sunday) to start.
e. ![]() From the Start Week drop-down list, choose an option (first, 2nd, 3rd, or last) to set the starting week. For example, choose first to configure summer time to recur beginning the first week of the month or last to configure summer time to recur beginning the last week of the month.
From the Start Week drop-down list, choose an option (first, 2nd, 3rd, or last) to set the starting week. For example, choose first to configure summer time to recur beginning the first week of the month or last to configure summer time to recur beginning the last week of the month.
f. ![]() From the Start Month drop-down list, choose a month (January-December) to start.
From the Start Month drop-down list, choose a month (January-December) to start.
g. ![]() From the End Day drop-down list, choose a day of the week (Monday-Sunday) to end.
From the End Day drop-down list, choose a day of the week (Monday-Sunday) to end.
h. ![]() From the End Week drop-down list, choose an option (first, 2nd, 3rd, or last) to set the ending week. For example, choose first to configure summer time to end beginning the first week of the month or last to configure summer time to stop beginning the last week of the month.
From the End Week drop-down list, choose an option (first, 2nd, 3rd, or last) to set the ending week. For example, choose first to configure summer time to end beginning the first week of the month or last to configure summer time to stop beginning the last week of the month.
i. ![]() From the End Month drop-down list, choose a month (January-December) to end.
From the End Month drop-down list, choose a month (January-December) to end.
Step 7 ![]() From the Start Time drop-down lists, choose the hour (0-23) and minute (0-59) at which daylight saving time should start. From the End Time drop-down lists, choose the hour (0-23) and minute (0-59) at which daylight saving time should end.
From the Start Time drop-down lists, choose the hour (0-23) and minute (0-59) at which daylight saving time should start. From the End Time drop-down lists, choose the hour (0-23) and minute (0-59) at which daylight saving time should end.
Start Time and End Time fields for summer time are the times of the day when the clock is changed to reflect summer time. By default, both start and end times are set at 00:00.
Step 8 ![]() In the Offset field, specify the minutes offset from UTC (0-1439). (See Table 9-2.)
In the Offset field, specify the minutes offset from UTC (0-1439). (See Table 9-2.)
The summer time offset specifies that the number of minutes that the system clock moves forward at the specified start time and backward at the end time.
Step 9 ![]() Click the No Customized Summer Time Configured radio button to not specify a summer or daylight saving time for the corresponding time zone.
Click the No Customized Summer Time Configured radio button to not specify a summer or daylight saving time for the corresponding time zone.
Step 10 ![]() Click Submit to save the settings.
Click Submit to save the settings.
A "Click Submit to Save" message appears in red next to the Current Settings line when there are pending changes to be saved after you have applied default or device group settings. You can also revert to the previously configured settings by clicking the Reset button. The Reset button is visible only when you have applied default or group settings to change the current device settings but have not yet submitted the changes.
If you attempt to leave this window without saving the modified settings, a warning dialog box prompts you to submit the changes. This dialog box only appears if you are using the Internet Explorer browser.
UTC was formerly known as Greenwich Mean Time (GMT). The offset time (number of hours ahead or behind UTC) as displayed in the table is in effect during winter time. During summer time or daylight saving time, the offset may be different from the values in the table and is calculated and displayed accordingly by the system clock.
Configuring Secure Store Settings
Secure store encryption provides stronger encryption and key management for your WAAS system. The WAAS Central Manager and WAE devices use secure store encryption for handling passwords, managing encryption keys, and for data encryption.
This section contains the following topics:
•![]() Enabling Secure Store Encryption on the Central Manager
Enabling Secure Store Encryption on the Central Manager
•![]() Enabling Secure Store Encryption on a Standby Central Manager
Enabling Secure Store Encryption on a Standby Central Manager
•![]() Enabling Secure Store Encryption on a WAE Device
Enabling Secure Store Encryption on a WAE Device
•![]() Changing the Secure Store Encryption Key and Password
Changing the Secure Store Encryption Key and Password
•![]() Disabling Secure Store Encryption on a Central Manager or WAE Device
Disabling Secure Store Encryption on a Central Manager or WAE Device
Secure Store Overview
When you enable secure store encryption on the Central Manager or a WAE device, the WAAS system uses strong encryption algorithms and key management policies to protect certain data on the system. This data includes encryption keys used by applications in the WAAS system, CIFS passwords, and user login passwords.
To enable secure store encryption you must enter a password on the Central Manager. This password is used to generate the key encryption key according to secure standards. The WAAS system uses the key encryption key to encrypt and store other keys generated on the Central Manager or WAE devices. These other keys are used for WAAS functions including disk encryption or to encrypt and store WAFS user credentials.
When secure store is enabled on the Central Manager, the data is encrypted using a 256-bit key encryption key generated from the password you enter and using SHA1 hashing and an AES 256-bit algorithm. When secure store is enabled on a WAE device the data is encrypted using a 256-bit key encryption key generated using SecureRandom, a cryptographically strong pseudorandom number generator.
To implement secure store your system must meet the following requirements:
•![]() You must have a Central Manager configured for use in your network.
You must have a Central Manager configured for use in your network.
•![]() Your WAE devices must be registered with the Central Manager.
Your WAE devices must be registered with the Central Manager.
•![]() Your WAE devices must be online (have an active connection) with the Central Manager. This requirement applies only if you are enabling secure store on WAE devices.
Your WAE devices must be online (have an active connection) with the Central Manager. This requirement applies only if you are enabling secure store on WAE devices.
•![]() All Central Managers and WAE devices must be running WAAS software version 4.0.19.
All Central Managers and WAE devices must be running WAAS software version 4.0.19.
Note ![]() Console terminal access to the Central Manager is required when secure store is enabled on the Central Manager.
Console terminal access to the Central Manager is required when secure store is enabled on the Central Manager.
To implement strong store encryption, perform the following procedures:
Step 1 ![]() Enable strong storage encryption on your primary Central Manager. See Enabling Secure Store Encryption on the Central Manager.
Enable strong storage encryption on your primary Central Manager. See Enabling Secure Store Encryption on the Central Manager.
Step 2 ![]() Enable strong storage encryption on any standby Central Managers. See Enabling Secure Store Encryption on a Standby Central Manager.
Enable strong storage encryption on any standby Central Managers. See Enabling Secure Store Encryption on a Standby Central Manager.
Step 3 ![]() Enable strong storage encryption on WAE devices or WAE device groups. See Enabling Secure Store Encryption on a WAE Device. (Secure store must be enabled on the Central Manager before you enable it on the WAE devices.)
Enable strong storage encryption on WAE devices or WAE device groups. See Enabling Secure Store Encryption on a WAE Device. (Secure store must be enabled on the Central Manager before you enable it on the WAE devices.)
You can enable secure store independently on the Central Manager and on the WAE devices. To ensure full protection of your encrypted data, enable secure store on both the Central Manager and the WAE devices. You must enable secure store on the Central Manager first.
Note ![]() When secure store is enabled and you reboot the Central Manager, you must enter the secure store password and be connected to the console terminal.
When secure store is enabled and you reboot the Central Manager, you must enter the secure store password and be connected to the console terminal.
When secure store is enabled, the following system characteristics are affected:
•![]() Passwords stored in the Central Manager database are encrypted using strong encryption techniques.
Passwords stored in the Central Manager database are encrypted using strong encryption techniques.
•![]() If a primary Central Manager fails, secure store key management will be handled by the standby Central Manager. (Secure store mode must be enabled manually on the standby Central Manager.)
If a primary Central Manager fails, secure store key management will be handled by the standby Central Manager. (Secure store mode must be enabled manually on the standby Central Manager.)
•![]() CIFS prepositioning credentials are encrypted using the strong encryption key on the Central Manager and the WAE devices.
CIFS prepositioning credentials are encrypted using the strong encryption key on the Central Manager and the WAE devices.
•![]() Backup scripts will backup the secure store mode status of the device at the time of backup. Backup is supported only on the Central Manager.
Backup scripts will backup the secure store mode status of the device at the time of backup. Backup is supported only on the Central Manager.
•![]() Restore scripts will verify if the backup file has secure store mode enabled. If the backup file is in secure store mode, you must enter the pass phrase to verify and restore the device. Restore is supported only on the Central Manager.
Restore scripts will verify if the backup file has secure store mode enabled. If the backup file is in secure store mode, you must enter the pass phrase to verify and restore the device. Restore is supported only on the Central Manager.
•![]() When you enable secure store on a WAE device, the system initializes and retrieves a new encryption key from the Central Manager. The WAE uses this key to encrypt data such as CIFS prepositioning credentials and information on the disk (if disk encryption is also enabled).
When you enable secure store on a WAE device, the system initializes and retrieves a new encryption key from the Central Manager. The WAE uses this key to encrypt data such as CIFS prepositioning credentials and information on the disk (if disk encryption is also enabled).
•![]() When you reboot the WAE after enabling secure store, the WAE retrieves the key from the Central Manager automatically, allowing normal access to the data that is stored in WAAS persistent storage.
When you reboot the WAE after enabling secure store, the WAE retrieves the key from the Central Manager automatically, allowing normal access to the data that is stored in WAAS persistent storage.
•![]() If secure store is active, you cannot downgrade to an earlier version of WAAS software that does not support secure store mode. You must disable secure store mode before installing the previous version of WAAS software.
If secure store is active, you cannot downgrade to an earlier version of WAAS software that does not support secure store mode. You must disable secure store mode before installing the previous version of WAAS software.
•![]() While secure store encrypts certain system information, it does not encrypt the data on the hard drives. To protect the data disks, you must enable disk encryption separately. See Using Disk Encryption, page 14-26.
While secure store encrypts certain system information, it does not encrypt the data on the hard drives. To protect the data disks, you must enable disk encryption separately. See Using Disk Encryption, page 14-26.
Enabling Secure Store Encryption on the Central Manager
To enable secure store encryption on the Central Manager, use the CLI to execute the cms secure-store init and cms secure-store open EXEC mode commands:
Step 1 ![]() Enter the cms secure-store init command.
Enter the cms secure-store init command.
The Central Manager responds with the "please enter pass phrase" message.
Step 2 ![]() Type a password and press Enter. At the prompt, retype the password to confirm it.
Type a password and press Enter. At the prompt, retype the password to confirm it.
Secure store is initialized. However, data on the Central Manager is not yet encrypted with the secure store encryption. The system continues to use the previous encryption mode.
Step 3 ![]() Enter the cms secure-store open command to activate secure store encryption.
Enter the cms secure-store open command to activate secure store encryption.
The Central Manager responds with the "please enter pass phrase" message.
Step 4 ![]() Type the password and press Enter.
Type the password and press Enter.
The Central Manager encrypts the data using secure store encryption.
When the Central Manager is rebooted while secure store encryption is active, you are prompted to enter the password. This allows applications to access the encrypted data. If you do not enter the correct password the WAAS device continues to boot, but applications that use the encrypted data will not function normally.
If you do not enter the password during reboot, you can use the cms secure-store open command to activate secure store encryption after the reboot.
Note ![]() When you enable secure store on the primary Central Manager, you should enable secure store on the standby Central manager as well. See Enabling Secure Store Encryption on a Standby Central Manager.
When you enable secure store on the primary Central Manager, you should enable secure store on the standby Central manager as well. See Enabling Secure Store Encryption on a Standby Central Manager.
You can check the status of secure store encryption by entering the show cms secure-store command.
Enabling Secure Store Encryption on a Standby Central Manager
Note ![]() A standby Central Manager provides limited encryption key management support. If the primary Central Manager fails the standby Central Manager provides only encryption key retrieval to the WAE devices, but does not provide new encryption key initialization. Do not enable disk encryption or secure store on WAE devices when the primary Central Manager is not available.
A standby Central Manager provides limited encryption key management support. If the primary Central Manager fails the standby Central Manager provides only encryption key retrieval to the WAE devices, but does not provide new encryption key initialization. Do not enable disk encryption or secure store on WAE devices when the primary Central Manager is not available.
To enable secure store encryption on a standby Central Manager, first enable secure store on the primary Central Manager and then use the CLI to execute the cms secure-store open EXEC mode command on the standby Central Manager:
Step 1 ![]() Enable secure store encryption on the primary Central Manager. See Enabling Secure Store Encryption on the Central Manager.
Enable secure store encryption on the primary Central Manager. See Enabling Secure Store Encryption on the Central Manager.
Step 2 ![]() Wait until the standby Central Manager replicates the data from the primary Central Manager.
Wait until the standby Central Manager replicates the data from the primary Central Manager.
The replication should occur in 60 seconds (default) or as configured for your system.
Step 3 ![]() Enter the cms secure-store open command on the standby Central Manager to activate secure store encryption.
Enter the cms secure-store open command on the standby Central Manager to activate secure store encryption.
The standby Central Manager responds with the "please enter pass phrase" message.
Step 4 ![]() Type the password and press Enter.
Type the password and press Enter.
The standby Central Manager encrypts the data using secure store encryption.
Note ![]() Repeat steps 3 and 4 for each standby Central Manager on your system.
Repeat steps 3 and 4 for each standby Central Manager on your system.
You can check the status of secure store encryption by entering the show cms secure-store command.
Enabling Secure Store Encryption on a WAE Device
Note ![]() Before you enable secure store on a WAE device you must enable secure store on the Central Manager.
Before you enable secure store on a WAE device you must enable secure store on the Central Manager.
To enable secure store encryption on a WAE device, follow these steps:
Step 1 ![]() From the WAAS Central Manager GUI, choose Devices > Devices (or Device Groups).
From the WAAS Central Manager GUI, choose Devices > Devices (or Device Groups).
Step 2 ![]() Click the Edit icon next to the device or device group for which you want to enable secure store.
Click the Edit icon next to the device or device group for which you want to enable secure store.
Note ![]() The secure store status must be the same for all WAE devices in a device group. Either all WAE devices in the group must have secure store enabled, or all must have secure store disabled. Before you add a WAE device to a device group, set its secure store status to match the others. See Working with Device Groups, page 3-2.
The secure store status must be the same for all WAE devices in a device group. Either all WAE devices in the group must have secure store enabled, or all must have secure store disabled. Before you add a WAE device to a device group, set its secure store status to match the others. See Working with Device Groups, page 3-2.
Step 3 ![]() From the navigation pane, choose General Settings > Storage > Secure Store. The Secure Store Settings window appears, as shown in Figure 9-1.
From the navigation pane, choose General Settings > Storage > Secure Store. The Secure Store Settings window appears, as shown in Figure 9-1.
Figure 9-1 Example of Secure Store Settings Window
Step 4 ![]() Check the Initialize CMS Secure Store box and then click Submit.
Check the Initialize CMS Secure Store box and then click Submit.
Secure store is initialized on the WAE, and a new encryption key is initialized on the Central Manager. However, secure store encryption is not yet activated and the WAE continues to use the previous encryption mode.
Step 5 ![]() Check the Open CMS Secure Store box then click Submit to activate secure store encryption.
Check the Open CMS Secure Store box then click Submit to activate secure store encryption.
The WAE encrypts the data using secure store encryption.
Note ![]() Only check one box at a time before you click Submit. Each secure store checkbox must be submitted individually.
Only check one box at a time before you click Submit. Each secure store checkbox must be submitted individually.
To enable secure store from the CLI, use the cms secure-store init EXEC command followed by the cms secure-store open command.
Note ![]() If you assign an additional WAE to a device group that has secure store encryption enabled, the new WAE will not acquire the settings of the device group.
If you assign an additional WAE to a device group that has secure store encryption enabled, the new WAE will not acquire the settings of the device group.
Note ![]() When you enable or disable secure store on a device group, the changes do not take effect on all WAE devices simultaneously. When you view the WAE devices be sure to give the Central Manager enough time to update the status of each WAE device.
When you enable or disable secure store on a device group, the changes do not take effect on all WAE devices simultaneously. When you view the WAE devices be sure to give the Central Manager enough time to update the status of each WAE device.
Changing the Secure Store Encryption Key and Password
The secure store encryption password is used by the Central Manager to generate the encryption key for the encrypted data. You can change the secure store encryption password and the encryption key using the CLI EXEC mode command cms secure-store change.
To change the password and generate a new encryption key on the Central Manager, do the following:
Step 1 ![]() Enter the cms secure-store change command.
Enter the cms secure-store change command.
The Central Manager responds with the "please enter pass phrase" message.
Step 2 ![]() Type the new password and press Enter. At the prompt, retype the password to confirm it.
Type the new password and press Enter. At the prompt, retype the password to confirm it.
The WAAS device re-encrypts the stored data using a new encryption key derived from the new password.
To generate a new encryption key for a WAE device use the WAAS Central Manager GUI and do the following:
Step 1 ![]() Choose Devices > Devices > General Settings > Storage > Secure Store.
Choose Devices > Devices > General Settings > Storage > Secure Store.
Step 2 ![]() Check the Change CMS Secure Store box and then click Submit.
Check the Change CMS Secure Store box and then click Submit.
A new encryption key is generated in the Central Manager. The Central Manager replaces the encryption key in the WAE with the new key. The WAE re-encrypts the stored data using the new encryption key.
To configure the secure store encryption key from the CLI, use the cms secure-store change EXEC command.
Disabling Secure Store Encryption on a Central Manager or WAE Device
To disable secure store encryption on a Central Manager or WAE device, follow these steps:
Step 1 ![]() From the WAAS Central Manager GUI, choose Devices > Devices (or Device Groups).
From the WAAS Central Manager GUI, choose Devices > Devices (or Device Groups).
Step 2 ![]() Click the Edit icon next to the device or device group for which you want to disable secure store.
Click the Edit icon next to the device or device group for which you want to disable secure store.
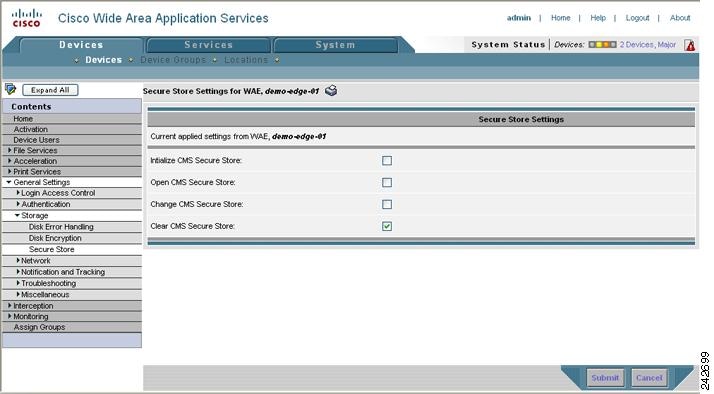
Step 3 ![]() From the navigation pane, choose General Settings > Storage > Secure Store. The Secure Store Settings window appears, as shown in Figure 9-2.
From the navigation pane, choose General Settings > Storage > Secure Store. The Secure Store Settings window appears, as shown in Figure 9-2.
Figure 9-2 Example of Disabling Secure Store
Step 4 ![]() Check the Clear CMS Secure Store box and then click Submit to disable secure store encryption and return to standard encryption.
Check the Clear CMS Secure Store box and then click Submit to disable secure store encryption and return to standard encryption.
You can also enter the cms secure-store clear command to disable secure store encryption and return to standard encryption.
To disable secure store from the CLI, use the cms secure-store clear EXEC command.
Note ![]() When you disable secure store on the primary Central Manager, you should disable secure store on the standby Central manager as well.
When you disable secure store on the primary Central Manager, you should disable secure store on the standby Central manager as well.
Modifying the Default System Configuration Properties
The WAAS software comes with preconfigured system properties that you can modify to alter the default behavior of the system. These properties are located on the System tab (Configuration page) of the WAAS Central Manager GUI.
Table 9-3 describes the system configuration properties that you can modify.
To view or modify the value of a system property, follow these steps:
Step 1 ![]() From the WAAS Central Manager GUI, choose System > Configuration. The Config Properties window appears.
From the WAAS Central Manager GUI, choose System > Configuration. The Config Properties window appears.
Step 2 ![]() Click Page 2 to see the second page of this window.
Click Page 2 to see the second page of this window.
Step 3 ![]() Click the Edit icon next to the system property that you want to change. The Modifying Config Property window appears.
Click the Edit icon next to the system property that you want to change. The Modifying Config Property window appears.
Step 4 ![]() From a drop-down list, enter a new value or choose a new parameter, depending on the system property that you want to change.
From a drop-down list, enter a new value or choose a new parameter, depending on the system property that you want to change.
Step 5 ![]() Click Submit to save the settings
Click Submit to save the settings
Configuring Faster Detection of Offline WAAS Devices
You can detect offline WAAS devices more quickly if you enable the fast detection of offline devices. A WAAS device is declared as offline when it has failed to contact the WAAS Central Manager for a getUpdate (get configuration poll) request for at least two polling periods. (See the "About Faster Detection of Offline Devices" section for more information about this feature.)
To configure fast detection of offline WAAS devices, follow these steps:
Step 1 ![]() From the WAASA Central Manager GUI, choose System > Configuration. The Config Properties window appears.
From the WAASA Central Manager GUI, choose System > Configuration. The Config Properties window appears.
Step 2 ![]() In the Contents pane, choose Fast Device Offline Detection. The Configure Fast Offline Detection window appears.
In the Contents pane, choose Fast Device Offline Detection. The Configure Fast Offline Detection window appears.
Note ![]() The fast detection of offline devices feature is in effect only when the WAAS Central Manager receives the first UDP heartbeat packet and a getUpdate request from a device.
The fast detection of offline devices feature is in effect only when the WAAS Central Manager receives the first UDP heartbeat packet and a getUpdate request from a device.
Step 3 ![]() Check the Enable check box to enable the WAAS Central Manager to detect the offline status of devices quickly.
Check the Enable check box to enable the WAAS Central Manager to detect the offline status of devices quickly.
Step 4 ![]() In the Heartbeat Rate (Seconds) field, specify how often devices should transmit a UDP heartbeat packet to the WAAS Central Manager. The default is 30 seconds.
In the Heartbeat Rate (Seconds) field, specify how often devices should transmit a UDP heartbeat packet to the WAAS Central Manager. The default is 30 seconds.
Step 5 ![]() In the Heartbeat Fail Count field, specify the number of UDP heartbeat packets that can be dropped during transmission from devices to the WAAS Central Manager before a device is declared offline. The default is 1.
In the Heartbeat Fail Count field, specify the number of UDP heartbeat packets that can be dropped during transmission from devices to the WAAS Central Manager before a device is declared offline. The default is 1.
Step 6 ![]() In the Heartbeat UDP Port field, specify the port number using which devices will send UDP heartbeat packets to the primary WAAS Central Manager. The default is port 2000.
In the Heartbeat UDP Port field, specify the port number using which devices will send UDP heartbeat packets to the primary WAAS Central Manager. The default is port 2000.
The Maximum Offline Detection Time field displays the product of the failed heartbeat count and heartbeat rate.
Maximum Offline Detection Time = Failed heartbeat count * Heartbeat rate
If you have not enabled the fast detection of offline devices feature, then the WAAS Central Manager waits for at least two polling periods to be contacted by the device for a getUpdate request before declaring the device to be offline. However, if you enable the fast detection of offline devices feature, then the WAAS Central Manager waits until the value displayed in the Maximum Offline Detection Time field is exceeded.
If the WAAS Central Manager receives the Cisco Discovery Protocol (CDP) from a device, then the WAAS Central Manager GUI displays the device as offline after a time period of 2* (heartbeat rate) * (failed heartbeat count).
Step 7 ![]() Click Submit.
Click Submit.
About Faster Detection of Offline Devices
Communication between the WAAS device and WAAS Central Manager using User Datagram Protocol (UDP) allows faster detection of devices that have gone offline. UDP heartbeat packets are sent at a specified interval from each device to the primary WAAS Central Manager in a WAAS network. The primary WAAS Central Manager tracks the last time that it received a UDP heartbeat packet from each device. If the WAAS Central Manager has not received the specified number of UDP packets, it displays the status of the nonresponsive devices as offline. Because UDP heartbeats require less processing than a getUpdate request, they can be transmitted more frequently, and the WAAS Central Manager can detect offline devices much faster.
You can enable or disable this feature, specify the interval between two UDP packets, and configure the failed heartbeat count. Heartbeat packet rate is defined as the interval between two UDP packets. Using the specified heartbeat packet rate and failed heartbeat count values, the WAAS Central Manager GUI displays the resulting offline detection time as a product of heartbeat rate and failed heartbeat count. If the fast detection of offline devices is enabled, the WAAS Central Manager detects devices that are in network segments that do not support UDP and uses getUpdate (get configuration poll) request to detect offline devices.
By default, the feature to detect offline devices more quickly is not enabled.
Configuring Alarm Overload Detection
WAAS devices can track the rate of incoming alarms from the Node Health Manager. If the rate of incoming alarms exceeds the high-water mark (HWM), then the WAAS device enters an alarm overload state. This situation occurs when multiple applications raise alarms at the same time to report error conditions. When a WAAS device is in an alarm overload state, the following occurs:
•![]() SNMP traps for subsequent alarm raise and clear operations are suspended. The trap for the raise alarm-overload alarm and the clear alarm-overload alarm are sent; however, traps related to alarm operations between the raise alarm-overload alarm and the clear alarm-overload alarm operations are suspended.
SNMP traps for subsequent alarm raise and clear operations are suspended. The trap for the raise alarm-overload alarm and the clear alarm-overload alarm are sent; however, traps related to alarm operations between the raise alarm-overload alarm and the clear alarm-overload alarm operations are suspended.
•![]() Alarm overload raise and clear notifications are not blocked. The alarm overload state is communicated to SNMP and the Configuration Management System (CMS). However, in the alarm overload state, SNMP and the CMS are not notified of individual alarms. The information is only available by using the CLI.
Alarm overload raise and clear notifications are not blocked. The alarm overload state is communicated to SNMP and the Configuration Management System (CMS). However, in the alarm overload state, SNMP and the CMS are not notified of individual alarms. The information is only available by using the CLI.
•![]() The WAAS device remains in an alarm overload state until the rate of incoming alarms decreases to the point that the alarm rate is less than the low-water mark (LWM).
The WAAS device remains in an alarm overload state until the rate of incoming alarms decreases to the point that the alarm rate is less than the low-water mark (LWM).
•![]() If the incoming alarm rate falls below the LWM, the WAAS device comes out of the alarm overload state and begins to report the alarm counts to SNMP and the CMS.
If the incoming alarm rate falls below the LWM, the WAAS device comes out of the alarm overload state and begins to report the alarm counts to SNMP and the CMS.
When the WAAS device is in an alarm overload state, the Node Health Manager continues to record the alarms being raised on the WAAS device and keeps a track of the incoming alarm rate. Alarms that have been raised on a WAAS device can be listed using the show alarm CLI commands that are described in the Cisco Wide Area Application Services Command Reference.
To configure alarm overload detection for a WAAS device (or device group), follow these steps:
Step 1 ![]() From the WAAS Central Manager GUI, choose Devices > Devices (or Devices > Device Groups). The Devices (or Device Groups) window appears.
From the WAAS Central Manager GUI, choose Devices > Devices (or Devices > Device Groups). The Devices (or Device Groups) window appears.
Step 2 ![]() Click the Edit icon next to the device (or device group) for which you want to configure the alarm overload state.
Click the Edit icon next to the device (or device group) for which you want to configure the alarm overload state.
Step 3 ![]() In the Contents pane, choose General Settings > Notification and Tracking > Alarm Overload Detection. The Alarm Overload Detection Settings window appears.
In the Contents pane, choose General Settings > Notification and Tracking > Alarm Overload Detection. The Alarm Overload Detection Settings window appears.
Step 4 ![]() Uncheck the Enable Alarm Overload Detection check box if you do not want to configure the WAAS device (or device group) to suspend alarm raise and clear operations when multiple applications report error conditions. This check box is checked by default.
Uncheck the Enable Alarm Overload Detection check box if you do not want to configure the WAAS device (or device group) to suspend alarm raise and clear operations when multiple applications report error conditions. This check box is checked by default.
Step 5 ![]() In the Alarm Overload Low Water Mark (Clear) field, enter the number of incoming alarms per second below which the WAAS device comes out of the alarm overload state.
In the Alarm Overload Low Water Mark (Clear) field, enter the number of incoming alarms per second below which the WAAS device comes out of the alarm overload state.
The low-water mark is the level up to which the number of alarms must drop before alarms can be restarted. The default value is 1. The low-water mark value should be less than the high-water mark value.
Step 6 ![]() In the Alarm Overload High Water Mark (Raise) field, enter the number of incoming alarms per second above which the WAAS device enters the alarm overload state. The default value is 10.
In the Alarm Overload High Water Mark (Raise) field, enter the number of incoming alarms per second above which the WAAS device enters the alarm overload state. The default value is 10.
Step 7 ![]() Click Submit to save the settings.
Click Submit to save the settings.
To configure alarm overload detection from the CLI, you can use the alarm overload-detect global configuration command.
 Feedback