- Cisco StadiumVision Director Software Installation and Upgrade Guide
- Preface
- Getting Started Installing or Upgrading Cisco StadiumVision Director
- Upgrading a Cisco StadiumVision Director Server From Release 2.4 SP1 to Release 3.0
- Installing Cisco StadiumVision Director Software From a DVD
- Using the TUI Upgrade Utility
- Upgrading the CIMC and BIOS Firmware on a Cisco StadiumVision Director Platform 2 Server
- Migrating the Cisco StadiumVision Director Server Environment to Platform 2 from the Cisco ADE 2140 Series Appliance
- Installing Additional Hard Drives in the Cisco StadiumVision Director Platform 2 Server
- Appendix A: Post-Upgrade Checklist
- Appendix B: Port Reference
Cisco StadiumVision Director Software Installation and Upgrade Guide, Release 3.0
Bias-Free Language
The documentation set for this product strives to use bias-free language. For the purposes of this documentation set, bias-free is defined as language that does not imply discrimination based on age, disability, gender, racial identity, ethnic identity, sexual orientation, socioeconomic status, and intersectionality. Exceptions may be present in the documentation due to language that is hardcoded in the user interfaces of the product software, language used based on RFP documentation, or language that is used by a referenced third-party product. Learn more about how Cisco is using Inclusive Language.
- Updated:
- August 1, 2012
Chapter: Installing Additional Hard Drives in the Cisco StadiumVision Director Platform 2 Server
Installing Additional Hard Drives in the Cisco StadiumVision Director Platform 2 Server
The Cisco StadiumVision Director Platform 2 server ships with two 300 GB hard drives configured with RAID 1 mirroring for redundancy. This module describes how to install two additional 300 GB hard drives (SV-FRU2-HD3G=) for another RAID 1 volume in the Cisco StadiumVision Director Platfrom 2 Server which are recommended for running Cisco StadiumVision Director Release 3.0, and required for the Self-Service Content feature.
It includes the following topics:
Prerequisites
Be sure that the following requirements are met before you upgrade your server:
•![]() Your current CIMC/BIOS firmware version is a minimum of 1.4(2).
Your current CIMC/BIOS firmware version is a minimum of 1.4(2).
•![]() You have installed Cisco StadiumVision Director Release 3.0 on your Platform 2 servers.
You have installed Cisco StadiumVision Director Release 3.0 on your Platform 2 servers.
•![]() You have physical access to the server.
You have physical access to the server.
•![]() A monitor and keyboard are connected to the Cisco StadiumVision Director server.
A monitor and keyboard are connected to the Cisco StadiumVision Director server.
•![]() You can log into the server with a SNETAC account at the console or over the network with SSH.
You can log into the server with a SNETAC account at the console or over the network with SSH.
•![]() You have two new StadiumVision Platform 2 300 GB R2 Disk Spare drives (SV-FRU2-HD3G= ).
You have two new StadiumVision Platform 2 300 GB R2 Disk Spare drives (SV-FRU2-HD3G= ).
Installation Tasks
To install additional hard drives, complete the following tasks:
•![]() Installing the Hard Drives Into the Server Chassis (required)
Installing the Hard Drives Into the Server Chassis (required)
•![]() Creating a New Logical Volume Using the LSI MegaRAID Utility (required)
Creating a New Logical Volume Using the LSI MegaRAID Utility (required)
•![]() Extending the Original RAID Volume to Create a Single Group (required)
Extending the Original RAID Volume to Create a Single Group (required)
Installing the Hard Drives Into the Server Chassis
This task describes how to physically install two additional 300 GB drives into the Cisco StadiumVision Director Platform 2 server.
To install the hard drives into the server chassis, complete the following steps:
Step 1 ![]() Log into the Cisco StadiumVision Director server with the "installer" credentials either directly at the console or over the network using SSH.
Log into the Cisco StadiumVision Director server with the "installer" credentials either directly at the console or over the network using SSH.

Note ![]() Unless the values have been changeed, the default userid is "installer" with password "cisco!123."
Unless the values have been changeed, the default userid is "installer" with password "cisco!123."
Step 2 ![]() When the StadiumVision Director Configuration menu for the Text Utility Interface (TUI) appears, type m and press Enter to shut down the server.
When the StadiumVision Director Configuration menu for the Text Utility Interface (TUI) appears, type m and press Enter to shut down the server.
Step 3 ![]() Amessage appears asking you to confirm the shutdown.
Amessage appears asking you to confirm the shutdown.
WARNING: THIS WILL SHUTDOWN THE SERVER!! Are you sure?
PRESS Y TO CONTINUE, PRESS N TO CANCEL
Type Y.
The server begins to shut down and a series of messages are displayed:
System is shutting down. You will be logged out shortly.
Broadcast message from root (pts/0) (Tue May 8 21:28:00 2012):
The system is going DOWN for system halt in 1 minute!
Note ![]() If the server reboots instead of powers down it is probably running an older firmware. For more information, see the "Upgrading the CIMC and BIOS Firmware on a Cisco StadiumVision Director Platform 2 Server".
If the server reboots instead of powers down it is probably running an older firmware. For more information, see the "Upgrading the CIMC and BIOS Firmware on a Cisco StadiumVision Director Platform 2 Server".
Step 4 ![]() Install the new 300 GB hard drives into Slot 2 and Slot 3 of the server chassis.
Install the new 300 GB hard drives into Slot 2 and Slot 3 of the server chassis.
For information about physically installing the hard drives on the Platform 2 server, see the "Maintaining the Server" chapter of the Cisco UCS C200 Installation and Service Guide.
Creating a New Logical Volume Using the LSI MegaRAID Utility
This task creates another RAID 1 logical volume composed of the two new drives.
For more information about RAID on the Cisco StadiumVision Director Platform 2 server, such as the meaning of the beep codes, see the "RAID Controller Considerations" chapter of the Cisco UCS C200 Installation and Service Guide.
Note ![]() It is recommended that you have a mouse or other similar device attached to the sever so that you can perform the installation steps more easily.
It is recommended that you have a mouse or other similar device attached to the sever so that you can perform the installation steps more easily.
To create a new logical volume using the LSI MegaRAID utility, complete the following steps:
Step 1 ![]() Power on the Cisco StadiumVision Director server where you physically installed the two new hard drives.
Power on the Cisco StadiumVision Director server where you physically installed the two new hard drives.
Step 2 ![]() Press Ctrl-H to open the LSI MegaRAID utility when prompted.
Press Ctrl-H to open the LSI MegaRAID utility when prompted.
Note ![]() Be sure to press Ctrl-H when prompted by the LSI MegaRAID utility. If you miss the prompt or reach the boot menu before seeing it, press Ctrl-Alt-Del to reboot the server and try again.
Be sure to press Ctrl-H when prompted by the LSI MegaRAID utility. If you miss the prompt or reach the boot menu before seeing it, press Ctrl-Alt-Del to reboot the server and try again.
Step 3 ![]() Create a new logical volume with the two new drives in a RAID 1 configuration by completing the following steps:
Create a new logical volume with the two new drives in a RAID 1 configuration by completing the following steps:

Note ![]() Only drives in "Unconfigured Good" state are available for RAID configuration. New drives must show up as unconfigured before you proceed.
Only drives in "Unconfigured Good" state are available for RAID configuration. New drives must show up as unconfigured before you proceed.
a. ![]() Select Add Configuration and click Next.
Select Add Configuration and click Next.
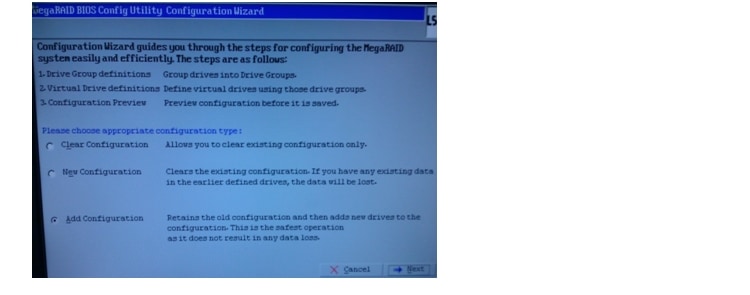
b. ![]() Select Automatic configuration with the Redundancy when possible option. Click Next.
Select Automatic configuration with the Redundancy when possible option. Click Next.

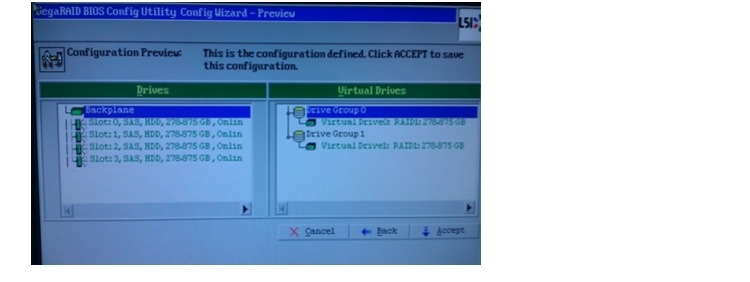
c. ![]() The Configuration Preview screen is displayed showing the 4 hard drives in 2 drive groups. Click Accept.
The Configuration Preview screen is displayed showing the 4 hard drives in 2 drive groups. Click Accept.

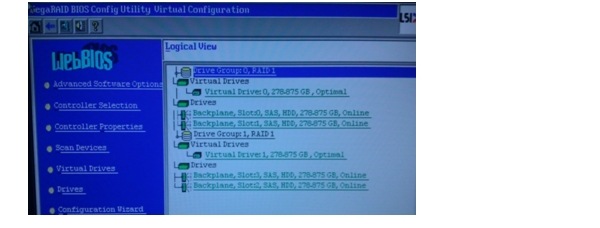
d. ![]() The Logical View screen shows the 4 hard drives online, including the two new drives in Slot 2 and Slot 3.
The Logical View screen shows the 4 hard drives online, including the two new drives in Slot 2 and Slot 3.
Step 4 ![]() Exit the MegaRAID utility.
Exit the MegaRAID utility.
Extending the Original RAID Volume to Create a Single Group
This task describes how to extend at the OS level the original logical volume on which Cisco StadiumVision Director is installed to include the new RAID 1 volume. This will create a volume group where Cisco StadiumVision Director sees the four drives as one volume with a total of 600 GB storage.
It requires that you use root shell access.
Prerequisites
Be sure that the following requirements are met before you can login to the server with an authenticated account:
•![]() A Cisco representative has obtained a secure token from an internal credential server for the Cisco StadiumVision Director server to be upgraded.
A Cisco representative has obtained a secure token from an internal credential server for the Cisco StadiumVision Director server to be upgraded.

•![]() The authentication token must be pasted into Cisco StadiumVision Director when the Cisco representative logs in with the SNE TAC account and establishes a new temporary user account with privileges to perform system tasks. The account will be usable for 90 days.
The authentication token must be pasted into Cisco StadiumVision Director when the Cisco representative logs in with the SNE TAC account and establishes a new temporary user account with privileges to perform system tasks. The account will be usable for 90 days.
To extend the original RAID volume to create a single group, complete the following steps:
Step 1 ![]() Use a directly connected console, or use an SSH client from a laptop computer that is connected to the Cisco StadiumVision Server network to run a secure login to the Cisco StadiumVision Director server using the IP address for your server.
Use a directly connected console, or use an SSH client from a laptop computer that is connected to the Cisco StadiumVision Server network to run a secure login to the Cisco StadiumVision Director server using the IP address for your server.
Step 2 ![]() Enter the userid and password for the authenticated system account set up by your Cisco representative.
Enter the userid and password for the authenticated system account set up by your Cisco representative.
Step 3 ![]() Mount the new volume using the following command, where "sdb" is where the Linux system references the new RAID disks if you used the standard server configuration steps:
Mount the new volume using the following command, where "sdb" is where the Linux system references the new RAID disks if you used the standard server configuration steps:
sudo pvcreate /dev/sdb
Step 4 ![]() Extend the existing volume:
Extend the existing volume:
sudo vgextend volGroup00 /dev/sdb
Step 5 ![]() Display the Free PE / Size on the volume:
Display the Free PE / Size on the volume:
sudo vgdisplay
Note ![]() The Free PE value will be used to extend the volume size in the next step.
The Free PE value will be used to extend the volume size in the next step.

Step 6 ![]() Extend the existing volume by the amount of the Free PE size value seen in the output of the vgdisplay command. In this example, the value is "8923":
Extend the existing volume by the amount of the Free PE size value seen in the output of the vgdisplay command. In this example, the value is "8923":
sudo lvextend -l +8923 /dev/volGroup00/rootVol00
Step 7 ![]() Resize the volume:
Resize the volume:
sudo resize2fs /dev/volGroup00/rootVol00
Note ![]() This step will take some time to complete.
This step will take some time to complete.
Step 8 ![]() After completion, verify that the extra "free PE / Size" is now available to the filesystem using the following command:
After completion, verify that the extra "free PE / Size" is now available to the filesystem using the following command:
df -Tah /"
 Feedback