使用 Cisco IDS Unix Director 避开 IDS PIX
简介
本文描述如何在Cisco IDS UNIX Director(以前称为Netranger Director)和Sensor的帮助下配置PIX上的避开功能。本文档假设传感器和指挥交换机工作正常,并且传感器的嗅探接口设置为跨接到PIX外部接口。
先决条件
要求
本文档没有任何特定的前提条件。
使用的组件
本文档中的信息基于以下软件和硬件版本。
-
思科IDS UNIX导向器2.2.3
-
思科IDS UNIX传感器3.0.5
-
Cisco Secure PIX,带6.1.1
注意:如果使用6.2.x版本,可以使用安全外壳协议(SSH)管理,但不能使用Telnet。有关更多信息,请参阅Cisco Bug ID CSCdx55215(仅限注册客户)。
本文档中的信息都是基于特定实验室环境中的设备编写的。本文档中使用的所有设备最初均采用原始(默认)配置。如果您使用的是真实网络,请确保您已经了解所有命令的潜在影响。
规则
有关文件规则的更多信息请参见“ Cisco技术提示规则”。
配置
本部分提供用于配置本文档所述功能的信息。
Cisco IDS UNIX Director和传感器用于管理Cisco Secure PIX进行分流。考虑此配置时,请记住以下概念:
-
安装传感器并确保传感器正常工作。
-
确保嗅探器接口跨越到PIX的外部接口。
注意:要查找有关本文档中所用命令的其他信息,请参阅命令查找工具(仅限注册客户)。
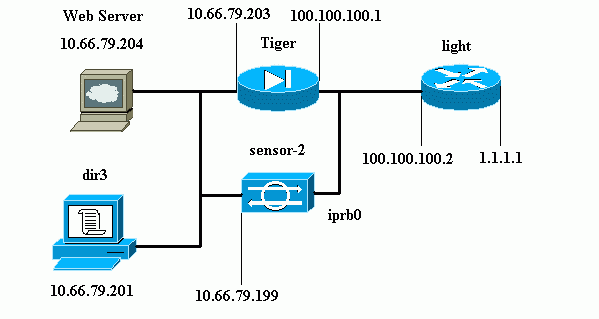
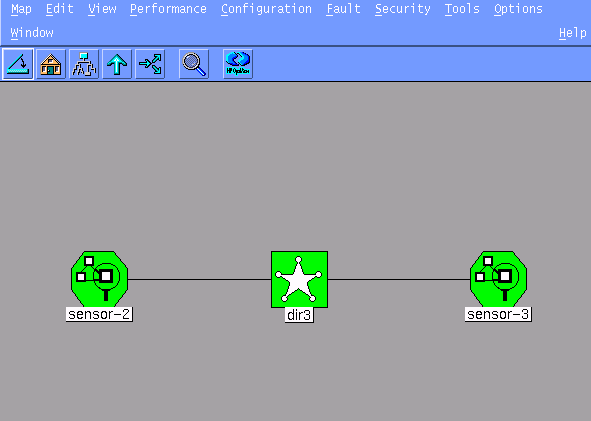
网络图
本文档使用此网络设置。
配置
本文档使用以下配置。
| 路由器灯 |
|---|
Current configuration : 906 bytes ! version 12.2 service timestamps debug uptime service timestamps log uptime no service password-encryption ! hostname light ! enable password cisco ! username cisco password 0 cisco ip subnet-zero ! ! ! ip ssh time-out 120 ip ssh authentication-retries 3 ! call rsvp-sync ! ! ! fax interface-type modem mta receive maximum-recipients 0 ! controller E1 2/0 ! ! ! interface FastEthernet0/0 ip address 100.100.100.2 255.255.255.0 duplex auto speed auto ! interface FastEthernet0/1 ip address 1.1.1.1 255.255.255.0 duplex auto speed auto ! interface BRI4/0 no ip address shutdown ! interface BRI4/1 no ip address shutdown ! interface BRI4/2 no ip address shutdown ! interface BRI4/3 no ip address shutdown ! ip classless ip route 0.0.0.0 0.0.0.0 100.100.100.1 ip http server ip pim bidir-enable ! ! dial-peer cor custom ! ! line con 0 line 97 108 line aux 0 line vty 0 4 login ! end |
| PIX Tiger |
|---|
PIX Version 6.1(1) nameif gb-ethernet0 intf2 security10 nameif gb-ethernet1 intf3 security15 nameif ethernet0 outside security0 nameif ethernet1 inside security100 enable password 2KFQnbNIdI.2KYOU encrypted passwd 9jNfZuG3TC5tCVH0 encrypted hostname Tiger fixup protocol ftp 21 fixup protocol http 80 fixup protocol h323 1720 fixup protocol rsh 514 fixup protocol rtsp 554 fixup protocol smtp 25 fixup protocol sqlnet 1521 fixup protocol sip 5060 fixup protocol skinny 2000 names !--- Allows ICMP traffic and HTTP to pass through the PIX !--- to the Web Server. access-list 101 permit icmp any host 100.100.100.100 access-list 101 permit tcp any host 100.100.100.100 eq www pager lines 24 logging on logging buffered debugging interface gb-ethernet0 1000auto shutdown interface gb-ethernet1 1000auto shutdown interface ethernet0 auto interface ethernet1 auto mtu intf2 1500 mtu intf3 1500 mtu outside 1500 mtu inside 1500 ip address intf2 127.0.0.1 255.255.255.255 ip address intf3 127.0.0.1 255.255.255.255 ip address outside 100.100.100.1 255.255.255.0 ip address inside 10.66.79.203 255.255.255.224 ip audit info action alarm ip audit attack action alarm no failover failover timeout 0:00:00 failover poll 15 failover ip address intf2 0.0.0.0 failover ip address intf3 0.0.0.0 failover ip address outside 0.0.0.0 failover ip address inside 0.0.0.0 pdm history enable arp timeout 14400 global (outside) 1 interface nat (inside) 1 0.0.0.0 0.0.0.0 0 0 !--- Static NAT for the Web Server. static (inside,outside) 100.100.100.100 10.66.79.204 netmask 255.255.255.255 0 0 access-group 101 in interface outside route outside 0.0.0.0 0.0.0.0 100.100.100.2 1 route inside 10.66.0.0 255.255.0.0 10.66.79.193 1 timeout xlate 3:00:00 timeout conn 1:00:00 half-closed 0:10:00 udp 0:02:00 rpc 0:10:00 h323 0:05:00 s0 timeout uauth 0:05:00 absolute aaa-server TACACS+ protocol tacacs+ aaa-server RADIUS protocol radius aaa-server LOCAL protocol tacacs+ no snmp-server location no snmp-server contact snmp-server community public no snmp-server enable traps floodguard enable no sysopt route dnat !--- Allows Sensor Telnet to the PIX from the inside interface. telnet 10.66.79.199 255.255.255.255 inside telnet timeout 5 ssh timeout 5 terminal width 80 Cryptochecksum:b4c820ba31fbb3996ca8891503ebacbc : end |
配置传感器
以下步骤介绍如何配置传感器。
-
使用用户名root和密码attackTelnet至10.66.79.199。
-
输入sysconfig-sensor。
-
输入此信息:
-
IP地址:10.66.79.199
-
IP网络掩码:255.255.255.224
-
IP Host Name(IP主机名):sensor-2
-
默认路由:10.66.79.193
-
网络访问控制
10.
-
通信基础架构
传感器主机ID:49
传感器组织ID:900
Sensor Host Name(传感器主机名):sensor-2
传感器组织名称:cisco
传感器IP地址:10.66.79.199
IDS Manager主机ID:50
IDS管理器组织ID:900
IDS Manager主机名:dir3
IDS Manager组织名称:cisco
IDS Manager IP Address(IDS管理器IP地址):10.66.79.201
-
-
保存配置。然后,传感器重新启动。
将传感器添加到指挥交换机
完成以下步骤,将传感器添加到指挥交换机中。
-
使用用户名netrangr和密码攻击Telnet至10.66.79.201。
-
输入ovw&以启动HP OpenView。
-
在主菜单中,选择Security > Configure。
-
在Netranger Configuration菜单中,选择File > Add Host,然后单击Next。
-
输入此信息,然后单击Next。
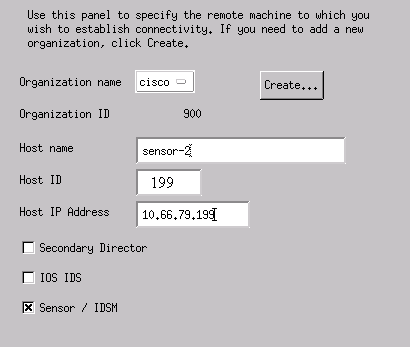
-
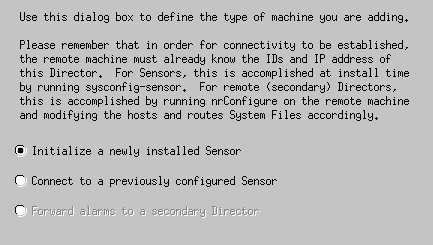
保留默认设置,然后单击Next。
-
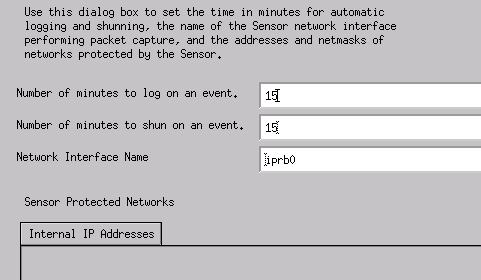
更改日志和shun minutes,或者保留为默认值(如果值可以接受)。将Network Interface名称更改为嗅探器接口的名称。在本示例中,它是“iprb0”。它可以是“spwr0”或其他任何名称,具体取决于传感器类型和连接传感器的方式。
-
单击Next,直到有一个选项可用于单击Finish。
传感器现在已成功添加到指挥交换机中。在主菜单中,显示sensor-2,如本示例所示。
配置PIX的规避
要配置PIX的避开功能,请完成以下步骤。
-
在主菜单中,选择Security > Configure。
-
在Netranger Configuration菜单中,突出显示sensor-2,然后双击它。
-
打开Device Management。
-
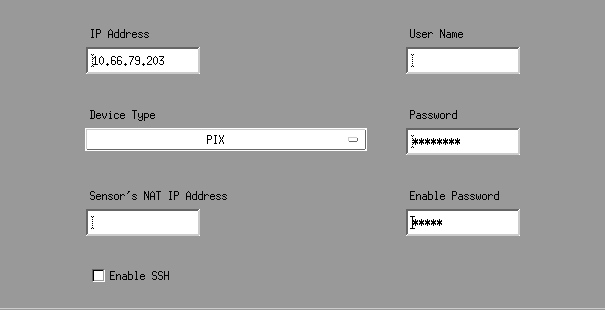
单击Devices > Add,然后输入信息,如本示例所示。单击 OK 以继续。Telnet和启用密码均为“Cisco”。
-
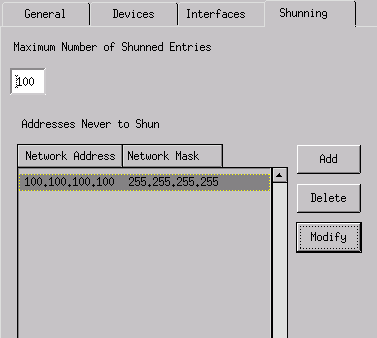
单击Shunning > Add。在“Addresses Never to Shun”下添加主机100.100.100.100。 单击 OK 以继续。
-
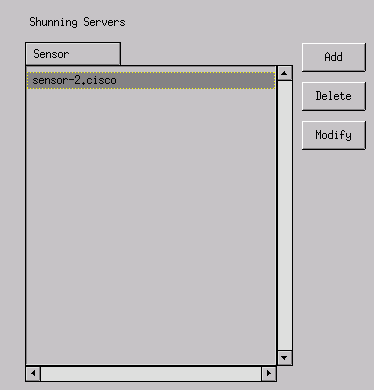
单击Shunning > Add,然后选择sensor-2.cisco作为回避服务器。配置到此部分完成。关闭Device Management窗口。
-
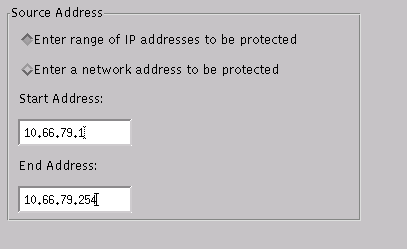
打开Intrusion Detection窗口并单击Protected Networks。将10.66.79.1到10.66.79.254添加到受保护的网络中。
-
单击配置文件,然后选择手动配置 > 修改签名。选择Large ICMP Traffic和ID: 2151,单击Modify,然后将Action从None更改为Shun and Log。单击 OK 以继续。

-
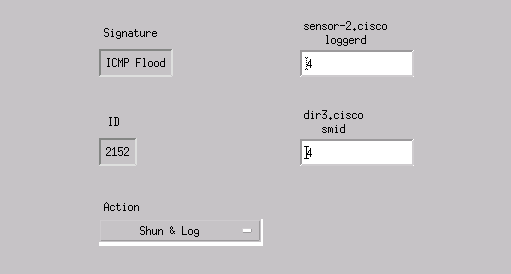
选择ICMP Flood and ID: 2152,点击Modify,然后将Action从None更改为Shun and Log。单击 OK 以继续。
-
此部分配置已完成。单击OK关闭Intrusion Detection窗口。
-
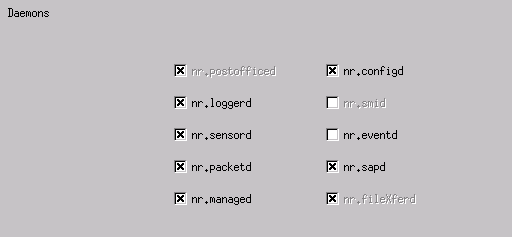
打开System Files文件夹并打开Daemons窗口。确保已启用以下守护程序:
-
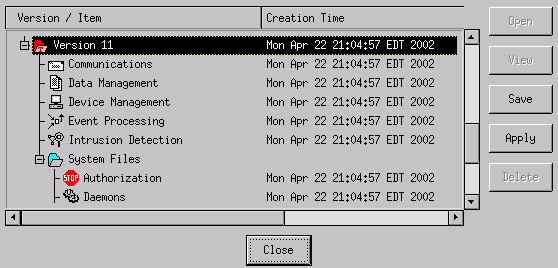
单击OK以继续,然后选择您刚修改的版本。单击Save > Apply。等待系统告知您传感器已完成,重新启动服务,然后关闭Netranger配置的所有窗口。
验证
本部分提供的信息可帮助您确认配置是否正常工作。
攻击前
Tiger(config)# show telnet
10.66.79.199 255.255.255.255 inside
Tiger(config)# who
        0: 10.66.79.199

Tiger(config)# show xlate
1 in use, 1 most used
Global 100.100.100.100 Local 10.66.79.204 static

Light#ping 100.100.100.100

Type escape sequence to abort.
Sending 5, 100-byte ICMP Echos to 100.100.100.100, timeout is 2 seconds:
!!!!!
Success rate is 100 percent (5/5), round-trip min/avg/max = 112/195/217 ms

Light#telnet 100.100.100.100 80
Trying 100.100.100.100, 80 ... Open
发起攻击和回避
Light#ping
Protocol [ip]:
Target IP address: 100.100.100.100
Repeat count [5]: 100000
Datagram size [100]: 18000
Timeout in seconds [2]:
Extended commands [n]:
Sweep range of sizes [n]:
Type escape sequence to abort.
Sending 100000, 18000-byte ICMP Echos to 100.100.100.100, timeout is 2 seconds:
!....................
Success rate is 4 percent (1/21), round-trip min/avg/max = 281/281/281 ms

Light#telnet 100.100.100.100 80
Trying 100.100.100.100, 80 ...
% Connection timed out; remote host not responding

Tiger(config)# show shun
Shun 100.100.100.2 0.0.0

Tiger(config)# show shun stat
intf2=OFF, cnt=0
intf3=OFF, cnt=0
outside=ON, cnt=2604
inside=OFF, cnt=0
intf4=OFF, cnt=0
intf5=OFF, cnt=0
intf6=OFF, cnt=0
intf7=OFF, cnt=0
intf8=OFF, cnt=0
intf9=OFF, cnt=0
Shun 100.100.100.2 cnt=403, time=(0:01:00).0 0 0
15分钟后,由于避开设置为15分钟,因此恢复正常。
Tiger(config)# show shun

Tiger(config)# show shun stat
intf2=OFF, cnt=0
intf3=OFF, cnt=0
outside=OFF, cnt=4437
inside=OFF, cnt=0
intf4=OFF, cnt=0
intf5=OFF, cnt=0
intf6=OFF, cnt=0
intf7=OFF, cnt=0
intf8=OFF, cnt=0
intf9=OFF, cnt=0

Light#ping 100.100.100.100

Type escape sequence to abort.
Sending 5, 100-byte ICMP Echos to 100.100.100.100, timeout is 2 seconds:
!!!!!
Success rate is 100 percent (5/5), round-trip min/avg/max = 1/3/4 ms

Light#telnet 100.100.100.100 80
Trying 100.100.100.100, 80 ... Open
故障排除
目前没有针对此配置的故障排除信息。
相关信息
修订历史记录
| 版本 | 发布日期 | 备注 |
|---|---|---|
1.0 |
23-Jul-2002 |
初始版本 |
 反馈
反馈