Configuración y reclamación de Nexus independiente para la conectividad entre puntos de vista
Lenguaje no discriminatorio
El conjunto de documentos para este producto aspira al uso de un lenguaje no discriminatorio. A los fines de esta documentación, "no discriminatorio" se refiere al lenguaje que no implica discriminación por motivos de edad, discapacidad, género, identidad de raza, identidad étnica, orientación sexual, nivel socioeconómico e interseccionalidad. Puede haber excepciones en la documentación debido al lenguaje que se encuentra ya en las interfaces de usuario del software del producto, el lenguaje utilizado en función de la documentación de la RFP o el lenguaje utilizado por un producto de terceros al que se hace referencia. Obtenga más información sobre cómo Cisco utiliza el lenguaje inclusivo.
Acerca de esta traducción
Cisco ha traducido este documento combinando la traducción automática y los recursos humanos a fin de ofrecer a nuestros usuarios en todo el mundo contenido en su propio idioma. Tenga en cuenta que incluso la mejor traducción automática podría no ser tan precisa como la proporcionada por un traductor profesional. Cisco Systems, Inc. no asume ninguna responsabilidad por la precisión de estas traducciones y recomienda remitirse siempre al documento original escrito en inglés (insertar vínculo URL).
Contenido
Introducción
En este documento se describen los pasos necesarios para habilitar y solicitar switches Nexus independientes en Intersight para mejorar la compatibilidad con Cisco TAC.
Prerequisites
Debe tener una cuenta en Intersight.com, no se necesita licencia para realizar solicitudes de Cisco NX-OS®. Si necesita crear una nueva cuenta de Intersight, consulte Creación de cuenta.
Requirements
Cisco recomienda que tenga conocimiento sobre estos temas:
En el switch Nexus independiente, NXDC tiene estas directrices y limitaciones:
- Cisco NX-OS debe ejecutar la versión 10.2(3)F o posterior
- DNS se debe configurar en el reenvío y routing virtual (VRF) adecuado
svc.intersight.com debe resolverse y permitir las conexiones HTTPS salientes iniciadas en el puerto 443. Esto se puede comprobar conopenssl y rizar. Las solicitudes de Protocolo de mensajes de control de Internet (ICMP) se omiten.- Si se requiere un proxy para una conexión HTTPS con
svc.intersight.com, el proxy se puede configurar en la configuración del conector del dispositivo del switch Nexus (NXDC). Para la configuración de proxy, consulte Configuración de NXDC.
Componentes Utilizados
Componentes UtilizadosLa información que contiene este documento se basa en las siguientes versiones de software y hardware.
- Cisco Nexus N9K-C93240YC-FX2
- Cisco NX-OS 10.3(4a)M
La información que contiene este documento se creó a partir de los dispositivos en un ambiente de laboratorio específico. Todos los dispositivos que se utilizan en este documento se pusieron en funcionamiento con una configuración verificada (predeterminada). Si tiene una red en vivo, asegúrese de entender el posible impacto de cualquier comando.
Antecedentes
AntecedentesCisco Intersight es una plataforma de operaciones en la nube que consta de capacidades modulares opcionales de infraestructura avanzada, optimización de cargas de trabajo y servicios de Kubernetes. Visite Intersight Overview para obtener más información.
Los dispositivos se conectan al portal Intersight a través de un NXDC que está integrado en la imagen de Cisco NX-OS de cada sistema. A partir de Cisco NX-OS versión 10.2(3)F, se admite la función Device Connector, que proporciona una forma segura para que los dispositivos conectados envíen información y reciban instrucciones de control desde el portal Cisco Intersight mediante una conexión a Internet segura.
Ventajas de conectividad
Ventajas de conectividadLa conectividad Intersight proporciona estas funciones y ventajas para las plataformas basadas en Cisco NX-OS:
- Recopilación automatizada de
show tech-support details mediante la resolución rápida de problemas (RPR para las solicitudes de servicio TAC abiertas) - Recopilación remota a demanda de
show tech-support details - Las funciones futuras incluyen:
- Apertura de TAC SR proactivos en función de fallos de telemetría o hardware
- Recopilación remota a petición de comandos show individuales y más
Verificación de conectividad
Verificación de conectividad
Nota: se suprimen las respuestas de ping (se descartan los paquetes ICMP).
Para verificar la seguridad de la capa de transporte (TLS) y la conectividad HTTPS, se recomienda habilitar bash y ejecutar openssl y curl comandos en el VRF (ip netns exec <VRF>) deseado.
! Enable bash

config terminal ; feature bash ; end

! Verify TLS

run bash ip netns exec management openssl s_client -connect svc.intersight.com:443

! Verify https

run bash ip netns exec management curl -v -I -L -k https://svc.intersight.com:443

run bash ip netns exec management curl -v -I -L -k https://svc.intersight.com:443  --proxy [protocol://]host[:port]
Verificación de TLS con OpenSSL Client
Verificación de TLS con OpenSSL ClientCon OpenSSL, puede comprobar la conectividad TLS con svc.intersight.com:443. Cuando se realice correctamente, recupere el certificado público firmado por el servidor y muestre la cadena de la autoridad certificadora.
Nota: El siguiente ejemplo ejecuta el openssl s_client comando en la administración VRF. Reemplace el valor deseado en la ip netns exec <VRF> construcción.
Switch# run bash ip netns exec management openssl s_client -connect svc.intersight.com:443 CONNECTED(00000004) depth=2 C = US, O = Amazon, CN = Amazon Root CA 1 verify return:1 depth=1 C = US, O = Amazon, CN = Amazon RSA 2048 M01 verify return:1 depth=0 CN = us-east-1.intersight.com verify return:1 --- Certificate chain 0 s:CN = us-east-1.intersight.com i:C = US, O = Amazon, CN = Amazon RSA 2048 M01 1 s:C = US, O = Amazon, CN = Amazon RSA 2048 M01 i:C = US, O = Amazon, CN = Amazon Root CA 1 2 s:C = US, O = Amazon, CN = Amazon Root CA 1 i:C = US, ST = Arizona, L = Scottsdale, O = "Starfield Technologies, Inc.", CN = Starfield Services Root Certificate Authority - G2 3 s:C = US, ST = Arizona, L = Scottsdale, O = "Starfield Technologies, Inc.", CN = Starfield Services Root Certificate Authority - G2 i:C = US, O = "Starfield Technologies, Inc.", OU = Starfield Class 2 Certification Authority --- Server certificate -----BEGIN CERTIFICATE----- MIIGfzCCBWegAwIBAgIQD859tBjpT+QUyVOXqkG2pzANBgkqhkiG9w0BAQsFADA8 MoKXXrXrkESkWgbQadlEo3H545Zsix+mu83r7Gmv5L3+WFKzfUmLgeB2+z1Dk0Kg UlNBIDIwNDggTTAxMB4XDTIzMDQwNTAwMDAwMFoXDTI0MDUwMzIzNTk1OVowIzEh MB8GA1UEAxMYdXMtZWFzdC0xLmludGVyc2lnaHQuY29tMIIBIjANBgkqhkiG9w0B AoKXXrXrkESkWgbQadlEo3H545Zsix+mu83r7Gmv5L3+WFKzfUmLgeB2+z1Dk0Kn BDM+MCNnvmgNDlGnU6/t1jOC780QpKXr2ksbGC0FzHfMvNjEk9kMCUe179dummrs pOOFzvIrJGqYvkIXT5WLtiU9aP3+VSEWQO1kTeDHoDfLLJLON42cKjskYt0jCTwE poKXXrXrkESkWgbQadlEo3H545Zsix+mu83r7Gmv5L3+WFKzfUmLgeB2+z1Dk0KI elf3tYBhuQK3y4DoSqg1/gptnUOlNwSqMu4zXjI7neGyHnzjsPUyI8qilXbPS9tV KoKXXrXrkESkWgbQadlEo3H545Zsix+mu83r7Gmv5L3+WFKzfUmLgeB2+z1Dk0Kw HwYDVR0jBBgwFoAUgbgOY4qJEhjl+js7UJWf5uWQE4UwHQYDVR0OBBYEFM7X7s7c NoKXXrXrkESkWgbQadlEo3H545Zsix+mu83r7Gmv5L3+WFKzfUmLgeB2+z1Dk0Kp Z2h0LmNvbYIac3ZjLXN0YXRpYzEuaW50ZXJzaWdodC5jb22CGioudXMtZWFzdC0x LoKXXrXrkESkWgbQadlEo3H545Zsix+mu83r7Gmv5L3+WFKzfUmLgeB2+z1Dk0K1 Y3MtY29ubmVjdC5jb22CE3N2Yy51Y3MtY29ubmVjdC5jb22CDmludGVyc2lnaHQu Y29tghJzdmMuaW50ZXJzaWdodC5jb20wDgYDVR0PAQH/BAQDAgWgMB0GA1UdJQQW MBQGCCsGAQUFBwMBBggrBgEFBQcDAjA7BgNVHR8ENDAyMDCgLqAshipodHRwOi8v YoKXXrXrkESkWgbQadlEo3H545Zsix+mu83r7Gmv5L3+WFKzfUmLgeB2+z1Dk0KI BgZngQwBAgEwdQYIKwYBBQUHAQEEaTBnMC0GCCsGAQUFBzABhiFodHRwOi8vb2Nz coKXXrXrkESkWgbQadlEo3H545Zsix+mu83r7Gmv5L3+WFKzfUmLgeB2+z1Dk0Ku cjJtMDEuYW1hem9udHJ1c3QuY29tL3IybTAxLmNlcjAMBgNVHRMBAf8EAjAAMIIB fgYKKwYBBAHWeQIEAgSCAW4EggFqAWgAdwDuzdBk1dsazsVct520zROiModGfLzs 3oKXXrXrkESkWgbQadlEo3H545Zsix+mu83r7Gmv5L3+WFKzfUmLgeB2+z1Dk0K5 CSFqTpBjlOdOLQ4YuQIhAO10VDrLJMM+9EtOwmZd8Q1MRHJlOlr2VWmOTF6GGkCV AHUAc9meiRtMlnigIH1HneayxhzQUV5xGSqMa4AQesF3crUAAAGHUp9iOwAABAMA RjBEAiAFPPLvt7TN7mTRnQZ+FZLGR/G04KQqSjYuszDNPArT3wIgf/sQbQqNjCk7 joFUuL9cEPYfNm7n1nZIFIRAK6UqwG0AdgBIsONr2qZHNA/lagL6nTDrHFIBy1bd LoKXXrXrkESkWgbQadlEo3H545Zsix+mu83r7Gmv5L3+WFKzfUmLgeB2+z1Dk0K8 MXtts5t/C5lYw5peGAIgK0eFmxTptEfMkBZti39vepUxb5meDvKaZdtXVvFpkCMw DQYJKoZIhvcNAQELBQADggEBANl6HKZ9P6AIufr7qdNCcW+DXClY6dqX1KN0sCh+ UoKXXrXrkESkWgbQadlEo3H545Zsix+mu83r7Gmv5L3+WFKzfUmLgeB2+z1Dk0KM z5R1VV+81gN2HHiuUsEOFwHDbbhiGBJiJteFm0blpruKHennx8HQYfC7bup4N5JH YoKXXrXrkESkWgbQadlEo3H545Zsix+mu83r7Gmv5L3+WFKzfUmLgeB2+z1Dk0Kb LKFl6c+EN0Y76YaCV8doujG3qD/bO9VDx7dhvbSEECYuzbYyPDGnb7Drmhny0Eki smLUZ3TVcCvPc+1dE/jrbBzPeIY7jGr8eL7masFCuZZn2lM= -----END CERTIFICATE----- subject=CN = us-east-1.intersight.com issuer=C = US, O = Amazon, CN = Amazon RSA 2048 M01 --- No client certificate CA names sent Peer signing digest: SHA256 Peer signature type: RSA Server Temp Key: ECDH, P-256, 256 bits --- SSL handshake has read 5754 bytes and written 442 bytes Verification: OK --- New, TLSv1.2, Cipher is ECDHE-RSA-AES128-GCM-SHA256 Server public key is 2048 bit Secure Renegotiation IS supported Compression: NONE Expansion: NONE No ALPN negotiated SSL-Session: Protocol : TLSv1.2 Cipher : ECDHE-RSA-AES128-GCM-SHA256 Session-ID: 66D0B69FAA7EB69FAA7EC54C9764966ED9A1289650B69FAA7EB69FAA7E9A5FD5ADE Session-ID-ctx: Master-Key: B69FAA7E45891555D83DFCAEB69FAA7EB69FAA7EA3A99E7689ACFB69FAA7EAD7FD93DB69FAA7EB1AF821 PSK identity: None PSK identity hint: None SRP username: None TLS session ticket lifetime hint: 86400 (seconds) TLS session ticket: 0000 - 36 12 b2 36 b3 53 07 29-54 ac 56 f0 06 83 4f b1 6..6.S.)T.V...O. 0010 - 49 35 51 40 22 07 bd 7e-59 d7 7e 44 29 ff c6 2a I5Q@"..~Y.~D)..* 0020 - ec bc 11 e1 d3 5d 69 e8-7a d2 f1 c2 08 f6 5b 8f .....]i.z.....[. 0030 - 2c 5b 5e 50 e3 e2 8f e7-c4 44 8f e4 6d 45 d2 64 ,[^P.....D..mE.d 0040 - 93 98 f5 e8 b0 f7 1d 00-26 4b 88 ea 2d 7d 42 58 ........&K..-}BX 0050 - 05 9f 71 3a fe ac f0 15-a5 5c 1d 74 74 bf 32 1b ..q:.....\.tt.2. 0060 - d8 a8 23 84 08 cc f9 3e-54 ..#....>T Start Time: 1707515659 Timeout : 7200 (sec) Verify return code: 0 (ok) Extended master secret: yes --- Verificación de disponibilidad de HTTPS
Verificación de disponibilidad de HTTPSPara verificar la conectividad HTTPS, utilice el comando curl con el comando -v verbose flag (muestra si se utiliza o no un proxy).
Nota: Para comprobar el impacto de activar o desactivar un proxy, puede agregar las opciones --proxy [protocol://]host[:port] o --noproxy [protocol://]host[:port].
La construcción ip netns exec <VRF> se utiliza para ejecutar curl en el VRF deseado; por ejemplo, ip netns exec management para la gestión de VRF.
run bash ip netns exec management curl -v -I -L -k https://svc.intersight.com:443

run bash ip netns exec management curl -v -I -L -k https://svc.intersight.com:443  --proxy [protocol://]host[:port]
 # run bash ip netns exec management curl -v -I -L -X POST https://svc.intersight.com:443 --proxy http://proxy.esl.cisco.com:80
Trying 10.201.255.40:80...
* Connected to proxy.esl.cisco.com (10.201.255.40) port 80 * CONNECT tunnel: HTTP/1.1 negotiated
* allocate connect buffer
* Establish HTTP proxy tunnel to svc.intersight.com:443
> CONNECT svc.intersight.com:443 HTTP/1.1
> Host: svc.intersight.com:443
> User-Agent: curl/8.4.0
> Proxy-Connection: Keep-Alive
>
< HTTP/1.1 200 Connection established HTTP/1.1 200 Connection established
< snip >
Configurar
ConfigurarReclamar el dispositivo en intersight.com
Reclamar el dispositivo en intersight.comPara reclamar un nuevo objetivo en Intersight, realice los pasos mencionados.
En el dispositivo Nexus
En el dispositivo NexusEjecute el comando Cisco NX-OS show system device-connector claim-info.
Nota: para las versiones anteriores a NX-OS 10.3(4a), utilice el comando "show intersight Claims-info"
       Nota: Nexus genera mapas de información de justificantes de venta en los siguientes campos de justificantes de venta de Intersight:
       Número de serie = ID de reclamación de intercepción
       Device-ID Security Token = Código de reclamación de intercepción
# show system device-connector claim-info SerialNumber: FDO23021ZUJ SecurityToken: 9FFD4FA94DCD Duration: 599 Message: Claim state: Not ClaimedLa duración indicada aquí se expresa en segundos.
En Intersight Portal
En Intersight Portal1. En el plazo de 10 minutos inicie sesión en Intersight con los privilegios de administrador de cuenta, administrador de dispositivo o técnico de dispositivo.
2. En la lista desplegable Selector de Servicios, seleccione Sistema.

3. Acceda a ADMIN > Targets > Claim a New Target.
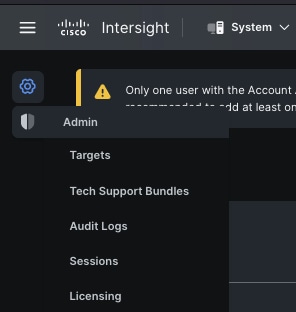
3.1. Haga clic en Reclamar un nuevo destino como se muestra en la imagen.

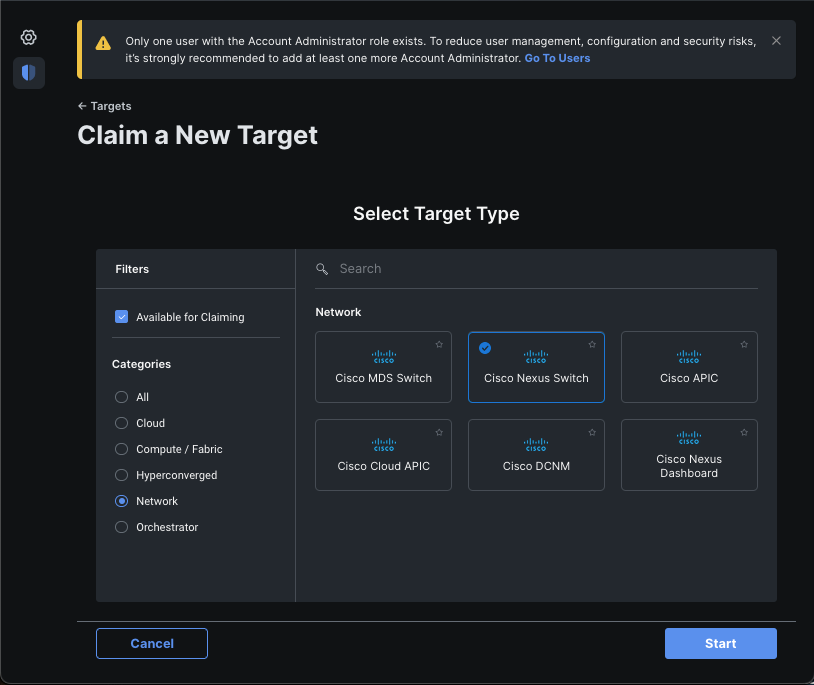
4. Seleccione Disponible para Reclamación y elija el tipo de destino (por ejemplo, Red) que desea reclamar. Haga clic en Start (Inicio).
5. Introduzca los detalles necesarios y haga clic en Reclamar para completar el proceso de reclamación.
Nota: el token de seguridad del switch se utiliza como código de reclamación y el número de serie del switch es el ID de dispositivo.
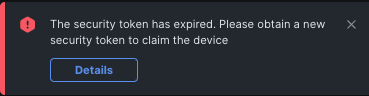
Nota: El token de seguridad caduca. Debe completar la reclamación antes o el sistema le solicitará que vuelva a generar una.
Reclamación de uno a varios dispositivos Nexus independientes en intersight.com mediante Ansible®
Reclamación de uno a varios dispositivos Nexus independientes en intersight.com mediante Ansible®Para reclamar uno o varios dispositivos Nexus, se puede ejecutar un cuaderno Ansible.
- El inventario y el cuaderno de campaña se pueden clonar desde https://github.com/datacenter/ansible-intersight-nxos.
- En el Ansible
inventory.yaml, elansible_connection tipo se estableceansible.netcommon.network_cli en para enviar comandos al switch Nexus. Esto se puede cambiar aansible.netcommon.httpapi para permitir la conectividad a través de NXAPI. - La conexión de Ansible al extremo de Intersight requiere una clave de API, que se puede generar desde su cuenta de intersight.com.
Configuración de Nexus NXAPI (solo se utiliza si se utiliza ansible.netcommon.httpapi)
Configuración de Nexus NXAPI (solo se utiliza si se utiliza ansible.netcommon.httpapi)
Nota: En el caso de que se configure un proxy de nivel de sistema (HTTP(S)_PROXY) y Ansible no debe utilizar un proxy para conectarse con el extremo Nexus NXAPI, es deseable establecer ansible_httpapi_use_proxy: False (el valor predeterminado es True).
# configure terminal # cfeature nxapi # nxapi port 80 # no nxapi https port 443 # end # show nxapi nxapi enabled NXAPI timeout 10 NXAPI cmd timeout 300 HTTP Listen on port 80 HTTPS Listen on port 443 Certificate Information: Issuer: issuer=C = US, ST = CA, L = San Jose, O = Cisco Systems Inc., OU = dcnxos, CN = nxos Expires: Feb 10 22:30:38 2024 GMT Para verificar independientemente la conectividad HTTP con el punto final de NXAPI, puede intentar enviar un mensaje show clock. En el siguiente ejemplo, el switch autentica al cliente mediante la autenticación básica. También es posible configurar el servidor NXAPI para autenticar clientes basados en el certificado de usuario X.509.
Nota: El hash de autenticación básica se obtiene de la codificación base64 de username:password. En este ejemplo, la codificación admin:cisco!123 base64 es YWRtaW46Y2lzY28hMTIz.
curl -v --noproxy '*' \ --location 'http://10.1.1.3:80/ins' \ --header 'Content-Type: application/json' \ --header 'Authorization: Basic YWRtaW46Y2lzY28hMTIz' \ --data '{ "ins_api": { "version": "1.0", "type": "cli_show", "chunk": "0", "sid": "sid", "input": "show clock", "output_format": "json" } }' Respuesta de rizo:
* Trying 10.1.1.3... * TCP_NODELAY set * Connected to 10.1.1.3 (10.1.1.3) port 80 (#0) > POST /ins HTTP/1.1 > Host: 10.1.1.3 > User-Agent: curl/7.61.1 > Accept: */* > Content-Type: application/json > Authorization: Basic YWRtaW56Y2lzY28hBNIz > Content-Length: 297 > * upload completely sent off: 297 out of 297 bytes < HTTP/1.1 200 OK < Server: nginx/1.19.6 < Date: Fri, 09 Feb 2024 23:17:10 GMT < Content-Type: text/json; charset=UTF-8 < Transfer-Encoding: chunked < Connection: keep-alive < Set-Cookie: nxapi_auth=dzqnf:xRYwR0l1Tra64VfOMVuD4oI4=; Secure; HttpOnly; < anticsrf: /i3vzCvxhOr4w2IrKP+umbDnzHQ= < Strict-Transport-Security: max-age=31536000; includeSubDomains < X-Frame-Options: SAMEORIGIN < X-Content-Type-Options: nosniff < Content-Security-Policy: block-all-mixed-content; base-uri 'self'; default-src 'self'; script-src 'self' 'nonce-zHx12KP1tervan1s6lrFQz7N6PF0rh'; style-src 'self' 'nonce-zHx12KP1tervan1s6lrFQz7N6P40rh'; img-src 'self'; connect-src 'self'; font-src 'self'; object-src 'self'; media-src 'self'; form-action 'self'; frame-ancestors 'self'; < { "ins_api": { "type": "cli_show", "version": "1.0", "sid": "eoc", "outputs": { "output": { "input": "show clock", "msg": "Success", "code": "200", "body": { "simple_time": "23:17:10.814 UTC Fri Feb 09 2024\n", "time_source": "NTP" } } } } * Connection #0 to host 10.1.1.3 left intact }% Generar claves de API de Intersight
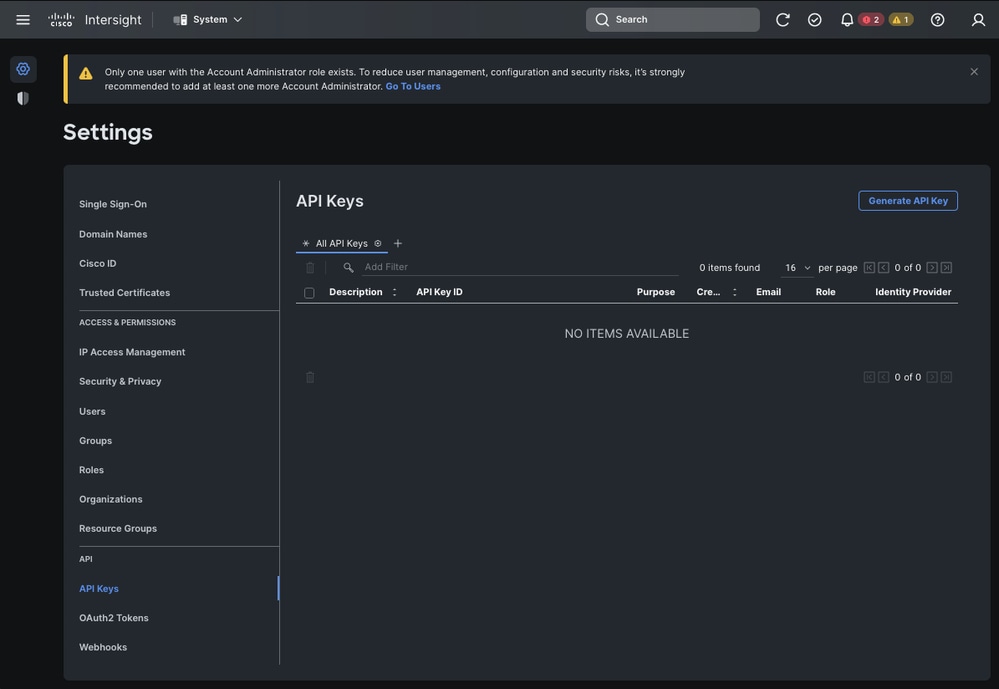
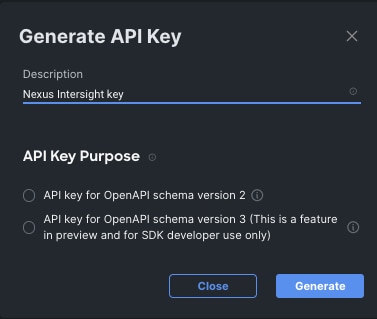
Generar claves de API de IntersightConsulte la sección README.md para obtener información sobre cómo obtener la clave de API de la Intersight System > Settings > API keys > Generate API Key.
Ejemplo: Ansible inventory.yaml
Ejemplo: Ansible inventory.yaml
Nota: En el siguiente ejemplo, ansible se configuró para ignorar la configuración de proxy del sistema operativo con ansible_httpapi_use_proxy: False. Si necesita que el servidor Ansible utilice un proxy para alcanzar el switch, puede quitar esa configuración o establecerla en True (valor predeterminado).
Nota: El ID de clave de la API es una cadena. La clave privada de la API incluye la ruta de acceso completa a un archivo que contiene la clave privada. Para el entorno de producción, se recomienda utilizar la bóveda Ansible.
 ---
all:
  hosts:
    switch1:
      ansible_host: "10.1.1.3"
      intersight_src: "mgmt0"
      intersight_vrf: "management"

  vars:
      ansible_user: "admin"
      ansible_password: "cisco!123"
      ansible_connection: ansible.netcommon.network_cli
      ansible_network_os: cisco.nxos.nxos
      ansible_httpapi_use_proxy: False
      remote_tmp: "/bootflash"
      proxy_env:
         - no_proxy: "10.1.1.3/24"
      intersight_proxy_host: 'proxy.cisco.com'
      intersight_proxy_port: '80'


      api_key_id: "5fcb99d97564612d33fdfcal/5fcb99d97564612d33fdf1b2/65c6c09d756461330198ce7e"
      api_private_key: "/home/admin/ansible-intersight-nxos/my_intersight_private_key.txt"
...
Ejemplo: playbook.yaml Ejecución
Ejemplo: playbook.yaml EjecuciónPara obtener más información sobre la programación de dispositivos Nexus independientes con Ansible, consulte la Applications/Using Ansible sección sobre Cisco NX-OS de la Guía de programación de Cisco Nexus serie 9000 en NX-OS para su versión actual.
❯ ansible-playbook -i inventory.yaml playbook.yaml PLAY [all] ********************************************************************************************************************************************************* TASK [Enable feature intersight] *********************************************************************************************************************************** [WARNING]: To ensure idempotency and correct diff the input configuration lines should be similar to how they appear if present in the running configuration on device changed: [switch1] TASK [Configure proxy] ********************************************************************************************************************************************* ok: [switch1] TASK [Unconfigure proxy] ******************************************************************************************************************************************* skipping: [switch1] TASK [Configure src interface] ************************************************************************************************************************************* ok: [switch1] TASK [Unconfigure src interface] *********************************************************************************************************************************** skipping: [switch1] TASK [Configure src vrf] ******************************************************************************************************************************************* ok: [switch1] TASK [Unconfigure src vrf] ***************************************************************************************************************************************** skipping: [switch1] TASK [Await connection to Intersight] ****************************************************************************************************************************** FAILED - RETRYING: [switch1]: Await connection to Intersight (10 retries left). FAILED - RETRYING: [switch1]: Await connection to Intersight (9 retries left). FAILED - RETRYING: [switch1]: Await connection to Intersight (8 retries left). FAILED - RETRYING: [switch1]: Await connection to Intersight (7 retries left). FAILED - RETRYING: [switch1]: Await connection to Intersight (6 retries left). FAILED - RETRYING: [switch1]: Await connection to Intersight (5 retries left). FAILED - RETRYING: [switch1]: Await connection to Intersight (4 retries left). ok: [switch1] TASK [Get show system device-connector claim-info] ***************************************************************************************************************** ok: [switch1] TASK [Set claiminfoDict] ******************************************************************************************************************************************* ok: [switch1] => (item=SerialNumber: FDO21112E2L) ok: [switch1] => (item= SecurityToken: 0A70886FE1B8) ok: [switch1] => (item= Duration: 599) ok: [switch1] => (item= Message: ) ok: [switch1] => (item= Claim state: Not Claimed) TASK [claim device - PROXY] **************************************************************************************************************************************** skipping: [switch1] TASK [claim device - NO PROXY] ************************************************************************************************************************************* changed: [switch1] PLAY RECAP ********************************************************************************************************************************************************* switch1 : ok=8 changed=2 unreachable=0 failed=0 skipped=4 rescued=0 ignored=0 Verificación
VerificaciónPara verificar la reclamación de un nuevo destino, realice lo siguiente:
En el switch Nexus
En el switch NexusVersiones anteriores a 10.3(4a)M
Versiones anteriores a 10.3(4a)M# run bash sudo cat /mnt/pss/connector.db
Nexus# run bash sudo cat /mnt/pss/connector.db { "AccountOwnershipState": "Claimed", "AccountOwnershipUser": "bpaez@cisco.com", "AccountOwnershipTime": "2024-04-25T22:37:25.173Z", "AccountOwnershipId": "TAC-DCRS", "DomainGroupMoid": "6620503275646133014ec978", "AccountMoid": "6620503275646133014ec977", "CloudDns": "svc.ucs-connect.com", "CloudDnsList": [ "svc.intersight.com", "svc-static1.intersight.com", "svc.ucs-connect.com", "svc-static1.ucs-connect.com" ], "CloudCert": "", "UserCloudCerts": {}, "Identity": "662adb256f72613901e8bc19", "AccessKeyId": "98facfdbf3855bcfd340f2bbb0c388f8", "AccessKey": "", "PrivateAccessKey": "-----BEGIN RSA PRIVATE KEY----- -CUT- 5Do\nD18Ta5YvuIYFLZrYlHLyCDOhS5035AUEGNtEceiPhQjOCvRumyJD\n-----END RSA PRIVATE KEY-----\n", "CloudEnabled": true, "ReadOnlyMode": false, "LocalConfigLockout": false, "TunneledKVM": false, "HttpProxy": { "ProxyHost": "proxy.cisco.com", "ProxyPort": 8080, "Preference": 0, "ProxyType": "Manual", "Targets": [ { "ProxyHost": "proxy.cisco.com", "ProxyPort": 8080, "Preference": 0 } ] }, "LogLevel": "info", "DbVersion": 1, "AutoUpgradeAdminState": "Automatic"Versiones que comienzan con 10.3(4a)M
Versiones que comienzan con 10.3(4a)M# show system device-connector claim-info
N9k-Leaf-2# show system device-connector claim-info SerialNumber: FDO23021ZUJ SecurityToken: Duration: 0 Message: Cannot fetch claim code for already claimed device Claim state: Claimed Claim time: 2024-02-09T15:38:57.561Z Claimed by: brvarney@cisco.com Account: ACI-DCRS-TAC Site name: Site ID:# show system internal intersight info
# show system internal intersight info Intersight connector.db Info: ConnectionState :Connected ConnectionStateQual : AccountOwnershipState :Claimed AccountOwnershipUser :brvarney@cisco.com AccountOwnershipTime :2024-02-09T15:38:57.561Z AccountOwnershipId :ACI-DCRS-TAC DomainGroupMoid :5eb2e1e47565612d3079fe9a AccountMoid :5eb2e1e47565612d3079fe92 CloudDns :svc.ucs-connect.com CloudDnsList: 1. :svc.ucs-connect.com 2. :svc.intersight.com 3. :svc-static1.intersight.com 4. :svc-static1.ucs-connect.com Identity :65c647116f72513501e75530 CloudEnabled :true ReadOnlyMode :false LocalConfigLockout :false TunneledKVM :false HttpProxy: ProxyHost :proxy.cisco.com ProxyPort :8080 Preferenc :0 ProxyType :Manual Target[1]: ProxyHost :proxy.cisco.com ProxyPort :8080 Preference :0 LogLevel :info DbVersion :1 AutoUpgradeAdminState :Automatic Ansible
AnsibleEs posible agregar una tarea al final del playbook.yamlpara obtener la información de la intercepción del switch.
- name: Get intersight info nxos_command: commands: - show system internal intersight info register: intersightInfo_claimed retries: 10 delay: 10 until: intersightInfo.stdout is search("Connecte") - name: Display intersight info vars: msg: |- output from {{ inventory_hostname }}: {{ intersightInfo_claimed.stdout | join("") }} debug: msg: "{{ msg.split('\n') }}" Este es el resultado correspondiente:
TASK [Get intersight info] *************************************************************************************************** ok: [switch1] TASK [Display intersight info] *********************************************************************************************** ok: [switch1] => { "msg": [ "output from switch1:", "Intersight connector.db Info:", "ConnectionState :Connected", "ConnectionStateQual :", "AccountOwnershipState :Claimed", "AccountOwnershipUser :vricci@cisco.com", "AccountOwnershipTime :2024-02-10T01:00:28.516Z", "AccountOwnershipId :vricci", "DomainGroupMoid :5fcb98d97565612d33fdf1ae", "AccountMoid :5fcb98d97565612d33fdf1ac", "CloudDns :svc.intersight.com", "CloudDnsList: ", " 1. :svc.intersight.com", " 2. :svc-static1.intersight.com", " 3. :svc.ucs-connect.com", " 4. :svc-static1.ucs-connect.com", "Identity :65c6caac6f72613901f841c1", "CloudEnabled :true", "ReadOnlyMode :false", "LocalConfigLockout :false", "TunneledKVM :false", "HttpProxy: ", " ProxyHost :proxy.cisco.com", " ProxyPort :80", " Preferenc :0", " ProxyType :Manual", " Target[1]: ", " ProxyHost :proxy.cisco.com", " ProxyPort :80", " Preference :0", "LogLevel :info", "DbVersion :1", "AutoUpgradeAdminState :Automatic" ] } Desactivar el conector de dispositivo
Desactivar el conector de dispositivo| Comando o acción | Propósito | |
|---|---|---|
| Paso 1 |
no feature intersight Ejemplo: |
Inhabilita el proceso de intersight y elimina toda la configuración de NXDC y el almacén de registros. |
Historial de revisiones
| Revisión | Fecha de publicación | Comentarios |
|---|---|---|
2.0 |
02-Apr-2024 |
Se ha añadido la sección "Desactivar el conector del dispositivo" |
1.0 |
22-Feb-2024 |
Versión inicial |
Con la colaboración de ingenieros de Cisco
- Branden VarneyTechnical Leader
- Vincent RicciTechnical Leader
- Yogesh RamdossPrincipal Engineer
 Comentarios
Contacte a Cisco
- Abrir un caso de soporte

- (Requiere un Cisco Service Contract)