Release Notes for Cisco Aironet Client Adapter Install Wizard, 1.1 for Windows
Available Languages
Table Of Contents
Release Notes for Cisco Aironet Client Adapter Install Wizard, 1.1 for Windows
Customized Installation Images (Notice to IT Professionals)
Firmware Is Upgraded Automatically
Using Client Adapters with Both Windows and Windows CE Devices
Uninstalling Software Components
Inserting and Removing Client Adapters
Windows Wireless Network Connection Icon Shows Unavailable Connection (Windows XP Only)
Cisco Aironet Software Requires Completion of Encryption Authorization Form
Disable Firmware Checking Parameter Added to Install Wizard
Ability to Specify When Client Scans for a Better Access Point
Support for Fast Secure Roaming
New EAP-SIM Supplicant Available
Installing or Upgrading Client Adapter Software
Finding the Install Wizard Version
Finding the Firmware and Driver Versions
Getting Bug Information on Cisco.com
Obtaining Technical Assistance
Obtaining Additional Publications and Information
Release Notes for Cisco Aironet Client Adapter Install Wizard, 1.1 for Windows
Contents
This document contains the following sections:
•
Installing or Upgrading Client Adapter Software
•
•
Introduction
This document describes system requirements, important notes, new and changed information, installation and upgrade procedures, and caveats for client adapter Install Wizard version 1.1 and the following software included in the Install Wizard file:
•
•
•
•
•
•
•
•

Note
System Requirements
You need the following in order to install Install Wizard version 1.1:
•
–
–
–
•
Note
Note
Note
•
•
Note
35 MB of hard disk space.
•
•
•
–
–
•
–
–
–
Note
•
Note
•
Important Notes
Customized Installation Images (Notice to IT Professionals)

Caution
Firmware Is Upgraded Automatically
The Install Wizard automatically upgrades the client adapter firmware to the version included in the Install Wizard file.
Note
Using Client Adapters with Both Windows and Windows CE Devices
If you insert a client adapter that has been upgraded to firmware version 5.20.17 into a Windows CE device, the adapter functions only if the device is running Windows CE client adapter driver and client utility version 2.30 or greater.
Uninstalling Software Components
All profiles are deleted if you use the Uninstall All Components option on the Cisco Aironet Wireless LAN Client Adapter Installation Wizard screen to uninstall the client adapter software. Cisco recommends that you use the Profile Manager's export feature to save your profiles before uninstalling the software.
Inserting and Removing Client Adapters
The following rules apply when inserting and removing client adapters:
•
•
Windows Wireless Network Connection Icon Shows Unavailable Connection (Windows XP Only)
If your computer is running Windows XP and you configured your client adapter using ACU, the Windows Wireless Network Connection icon in the Windows system tray may be marked with a red X and show an unavailable connection even though a wireless connection exists. This condition is caused by a conflict between ACU and Windows XP's wireless network settings. Simply ignore the Windows icon and use the ACM icon to check the status of your client adapter's wireless connection.
Cisco Aironet Software Requires Completion of Encryption Authorization Form
In order to access Cisco Aironet software from the Software Center on Cisco.com, you must fill out a form to receive authorization to download encrypted software. Registered Cisco.com users are required to fill out the form only once, but public users must do so once each session, each time software is downloaded. A form is automatically created for public users. The form for registered Cisco.com users is at the following URL:
http://www.cisco.com/cgi-bin/Software/Crypto/crypto_main.pl
Supporting Documentation
Version OL-1394-06 of the Cisco Aironet Wireless LAN Client Adapters Installation and Configuration Guide for Windows pertains specifically to versions of the software that are included in Install Wizard version 1.1. If you are using, installing, or upgrading to previous versions of client adapter software, refer to a previous version of this manual for information and instructions.
New and Changed Information
Disable Firmware Checking Parameter Added to Install Wizard
A new parameter called Disable Firmware Checking has been added to the Custom Installation screen of the Install Wizard. This parameter affects the firmware that is bundled with the driver, not the firmware that is included in the Install Wizard.
The Disable Firmware Checking parameter controls whether the driver (whenever it loads) installs the firmware with which it is bundled. (The driver loads each time you insert a client adapter or reboot your computer.) The parameter can be set to one of the following values:
•
•
Caution
Note
Ability to Specify When Client Scans for a Better Access Point
The Scan For A Better Access Point parameter on ACU's RF Network screen now enables you to specify when the client begins scanning (see Figure 1).
Figure 1 RF Network Screen
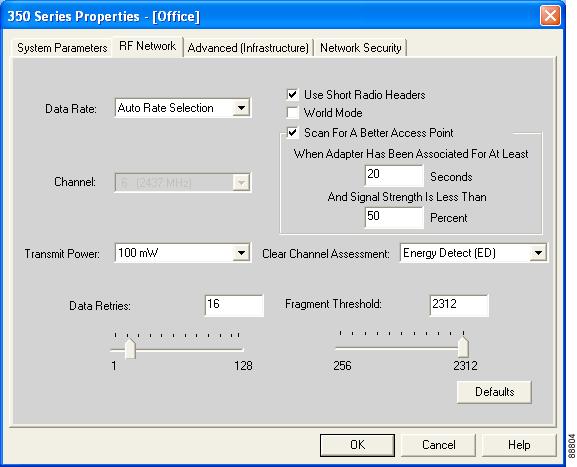
If you check the Scan For A Better Access Point check box, the client looks for a better access point if the signal strength of its associated access point is less than the specified value after the specified time and switches associations if it finds one.
Example: If the default values of 20 seconds and 50% are used, the client begins monitoring the strength of the signal received from its associated access point 20 seconds after becoming associated. The monitoring continues once per second. If the client detects a signal strength reading below 50%, it scans for a better access point.
Support for Fast Secure Roaming
Some applications that run on a client device may require fast roaming between access points. Voice applications, for example, require seamless roaming to prevent delays and gaps in conversation. Support for fast secure roaming is now available for LEAP-enabled clients in client adapter firmware version 5.20.17.
During normal operation, LEAP-enabled clients mutually authenticate with a new access point by performing a complete LEAP authentication, including communication with the main RADIUS server. However, when you configure your wireless LAN for fast secure roaming, LEAP-enabled clients securely roam from one access point to another without the need to reauthenticate with the RADIUS server. Using Cisco Centralized Key Management (CCKM), an access point that is configured for wireless domain services (WDS) uses a fast rekeying technique that enables client devices to roam from one access point to another in under 150 milliseconds (ms). Fast secure roaming ensures that there is no perceptible delay in time-sensitive applications such as wireless Voice over IP (VoIP), enterprise resource planning (ERP), or Citrix-based solutions.
This feature does not need to be enabled on the client adapter; it is supported automatically in client adapter firmware version 5.20.17. However, it must be enabled on the access point.
Note
Note
New EAP-SIM Supplicant Available
A new EAP-SIM supplicant is available for download from the ftpeng FTP server. This new supplicant is an upgrade to the one included in the Install Wizard file. It provides new features, supports more recent versions of the EAP-SIM draft standard, and can be used with standard GSM-SIM cards as well as Gemplus SIM+ smartcards.
The new supplicant overwrites any previous EAP-SIM supplicant settings. If you plan to install the Cisco Aironet Install Wizard file after the new supplicant is installed, either perform an express installation or make sure the EAP-SIM option is not selected on the Custom Installation screen. Otherwise, the EAP-SIM supplicant included in the Install Wizard file overwrites the new supplicant's settings.
You can access the new EAP-SIM supplicant at the following URL:
ftp://ftpeng.cisco.com/ftp/pwlan/eapsim/CiscoEapSim.dll
Installing or Upgrading Client Adapter Software
Follow the steps below to use Install Wizard version 1.1 to install or upgrade client adapter software on a computer running Windows 98, 98 SE, 2000, Me, or XP. If your computer is running Windows NT, follow the installation instructions in version OL-1394-06 of the Cisco Aironet Wireless LAN Client Adapters Installation and Configuration Guide for Windows.
Note
Step 1
http://www.cisco.com/public/sw-center/sw-wireless.shtml
Step 2
Note
Step 3
Step 4
Step 5
Step 6
Step 7
Step 8
Step 9
Caution
Step 10
Step 11
Note
Step 12
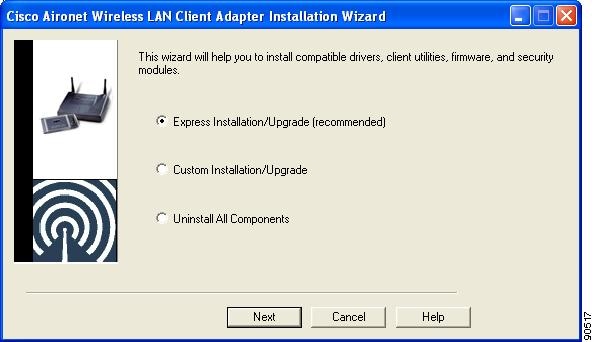
Figure 2 Cisco Aironet Wireless LAN Client Adapter Installation Wizard Screen
Step 13
Note
•
•
Step 14
Note
Step 15
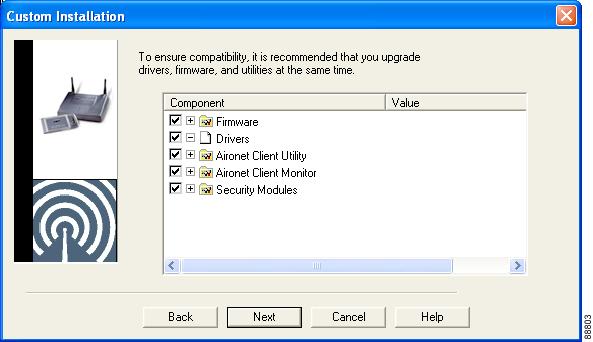
Figure 3 Custom Installation Screen
Step 16
a.
Note
Note
b.
c.
d.
Table 1 Software Components and Their Parameters
Firmware
Installs the firmware version included in the Install Wizard file.
Default: Checked
Disable Firmware Checking
The Disable Firmware Checking parameter affects the firmware that is bundled with the driver, not the firmware that is included in the Install Wizard. It controls whether the driver (whenever it loads) installs the firmware with which it is bundled.
Note
Options: Yes or No
Default: Yes
Yes
Prevents the driver from installing the firmware with which it is bundled, enabling the client adapter to retain its current firmware version.
No
Causes the driver to install the firmware with which it is bundled if that firmware is newer than the firmware that is currently installed in the client adapter.
Note
Drivers
Installs the driver version included in the Install Wizard file.
Default: Checked
Aironet Client Utility
Installs the ACU version included in the Install Wizard file.
Default: Checked
Installation Path
Determines the path where the ACU software will be installed. You can change the default by entering a new path.
Default: C:\Program Files\Cisco Systems\Aironet Client Utility
Program Folder
Determines the program folder where the ACU software will be installed. You can change the default by entering a new folder name.
Default: Cisco Systems
Place Icon on Desktop
Causes the installation program to add an ACU icon to your computer's desktop to provide quick access to the utility.
Options: Yes or No
Default: Yes
Allow Non-Administrator Users to Save Settings to the Registry
Enables users without administrative rights to modify profiles in ACU and save them to the registry on computers running Windows NT, 2000, or XP.
Options: Yes or No
Default: Yes
Note
Aironet Client Monitor
Installs the ACM version included in the Install Wizard file.
Default: Checked
Installation Path
Determines the path where the ACM software will be installed. You can change the default by entering a new path.
Default: C:\Program Files\Cisco Systems\Aironet Client Monitor
Program Folder
Determines the program folder where the ACM software will be installed. You can change the default by entering a new folder name.
Default: Cisco Systems
Auto Start
Determines whether ACM starts automatically every time Windows boots.
Options: Yes or No
Default: Yes
Note
Start After Install
Determines whether ACM starts automatically after ACM is installed.
Options: Yes or No
Default: Yes
Note
Program Feature Overrides
Determines which ACM components are enabled. If any components are not selected now and you later want to use them, you must run this installation program again and enable them.
Components: See the table below
Options per component: Enable or Disable
Default per component: Enable
About Box (Help)
Displays the ACM version number and enables you to access the online help.
Exit Program
Closes ACM for all client adapters.
Launch Aironet Client Utility
Activates ACU, if it is installed.
Troubleshooting
Activates the troubleshooting utility, which enables you to identify and resolve configuration and association problems with your client adapter.
Preferences
Enables you to determine when ACM runs and to select the options that appear on the ACM pop-up menu.
Turn Radio On/Off
Turns the client adapter's radio on or off.
Reauthenticate
Forces your client adapter to try to reauthenticate using the username and password of the current profile.
Select Profile
Enables you to select the active profile for your client adapter.
Auto Profile Selection
Causes the client adapter's driver to automatically select a profile from the list of profiles that were set up in ACU to be included in auto profile selection.
Other Configuration Application
Enables an application other than ACU to configure the client adapter.
Show Connection Status
Provides information on the current status of your client adapter.
Menu Options (Defaults)
Determines which options are displayed on the ACM pop-up menu.
Menu options: About Box (Help), Exit Program, Launch Aironet Client Utility, Troubleshooting, Turn Radio On/Off, Reauthenticate, Select Profile, Show Connection Status
Options per menu option: Show or Hide
Default per menu option: Show
Security Modules
LEAP
Installs the LEAP supplicant version included in the Install Wizard file. Installing the LEAP supplicant enables you to create a profile in ACU that uses LEAP authentication. If this option is not selected now and you later want to create a profile that uses LEAP, you must run this installation program again and select this option.
Default: Checked
Note
Allow Saved LEAP User Name and Password
Enables you to create a profile in ACU that uses a saved (rather than temporary) username and password for LEAP authentication. When such a profile is selected, the saved username and password are used to start the LEAP authentication process, and you are not prompted to enter them.
Options: Yes or No
Default: Yes
EAP-SIM
Installs the EAP-SIM supplicant version included in the Install Wizard file. Installing the EAP-SIM supplicant enables the client to support EAP-SIM authentication. If this option is not selected now and you later want to use EAP-SIM, you must run this installation program again and select this option.
Default: Unchecked
Note
Note
PEAP
Installs the PEAP supplicant version included in the Install Wizard file. Installing the PEAP supplicant enables the client to support PEAP authentication. If this option is not selected now and you later want to use PEAP, you must run this installation program again and select this option.
Default: Unchecked
Note
Note
e.
Step 17
•
The Found New Hardware screen appears. Depending on your computer's operating system, you may have to click Next. The driver and other software components are installed. Then an ACM icon appears in the Windows system tray (unless you changed the default value during installation). Perform one of the following:
–
Note
–
•
Note
•
Step 18
•
Note
•
Note
Step 19
•
•
•
Step 20
Finding Version Numbers
Follow the instructions in this section to find the version numbers of your client adapter's software components.
Finding the Install Wizard Version
Follow the steps below to find the version of the Install Wizard that is currently installed for your client adapter.
Step 1
Step 2
Step 3
Step 4
Step 5
Finding the Firmware and Driver Versions
To find the firmware and driver versions that are currently installed for your client adapter, click the ACU Status icon. The Firmware Version field on the Status screen shows the current firmware version, and the NDIS Driver Version field shows the current driver version.
Finding the ACU Version
To find the version of ACU that is currently installed for your client adapter, click the ACU About icon. The About Aironet Client Utility screen shows the current ACU version.
Finding the ACM Version
To find the version of ACM that is currently installed for your client adapter, right-click the ACM icon and select the About option. The About screen shows the current ACM version.
Caveats
This section describes open caveats for the software components in this release.
Open Caveats
Open Install Wizard Caveats
The following caveats have not been resolved in Install Wizard version 1.1.
•
If you designate a non-writable drive (such as your computer's CD-ROM drive) as the destination folder for ACU, the Install Wizard stops and does not complete. No error message or warning is displayed. To resolve this problem, terminate the Install Wizard using the Windows task manager or reboot your computer.
•
If you install more than one Cisco Aironet client adapter on a Windows NT computer, an IRQ error message appears after the second adapter is installed and the computer reboots. To resolve this problem, you must guarantee a unique IRQ assignment for each card.
•
If you select the Uninstall All Components option on the Cisco Aironet Wireless LAN Client Adapter Installation Wizard screen, some components may not be uninstalled.
•
Random crashes may occur if the client adapter is used with Sniffer Pro versions earlier than 4.7. To resolve this problem, unbind the Sniffer Protocol driver from your client adapter or update your version of Sniffer Pro.
Open ACU Caveats
The following caveats have not been resolved in ACU version 6.1.
•
When you start to enter a value in the Packet Size text field on the Linktest screen, the following message appears, "Please enter an integer between 64 and 2048." Click OK and use the slider to change the parameter's value.
•
The Cisco logo on the main ACU screen shows the wrong version number of the utility. However, the About Aironet Client Utility screen, which is accessible from the About icon, displays the correct ACU version number. Also, the ACU icon that appears on your computer's desktop looks as it did prior to the 6.0 release.
•
The client remains associated when the profile it is using is removed from the Auto Selected Profiles list in ACU's profile manager. To work around this issue, select the desired profile using the Use Selected Profile option.
•
If you repeatedly enter the wrong username or password for LEAP authentication, the LEAP Authentication Status screen may appear multiple times.
•
If you click the Start button on the Site Survey or Linktest screen and then remove the client adapter, ACU fails to operate.
Open Driver Caveats
The following caveat has not been resolved in mini PCI and PC-Cardbus card driver version 3.5.
•
The Compaq EVO N180 locks up while performing continuous FTP transfers. To work around this problem, reboot your computer. To completely resolve the problem, upgrade the BIOS in your EVO N180 device.
Open Security Module Caveats
The following caveats have not been resolved in LEAP security module version 6.0, PEAP security module version 1.01, and EAP-SIM security module version 1.0.
•
The LEAP login screen may not appear after logging into Windows or may appear briefly and then disappear. Select Reauthenticate from the ACU Commands drop-down menu.
•
When you select a LEAP profile as the active profile or set a LEAP profile to the highest priority in auto profile selection, the LEAP login screen may take approximately 30 seconds to appear.
•
The final step of the LEAP authentication process may take a long time to complete; however, no harm is caused. Simply minimize the LEAP Authentication Status screen and continue working.
•
After you enter your old and new passwords on the PEAP Change Password screen, you are prompted to enter them again.
•
If you leave your computer idle while it is using PEAP authentication, you may receive three PEAP login screens upon resume. To resolve this problem, cancel the first two login screens and use the last one (which is on top) to log in.
•
FTP transfers may fail occasionally during roaming when EAP-TLS or PEAP is used on a
Windows XP computer.•
ACU and the Windows Network Connection icon on the Windows XP taskbar may indicate a connection status when EAP-SIM authentication is still in the pending state or the authentication server fails to respond. This is a Microsoft issue and requires a fix to Windows XP.
•
The Toshiba Satellite Pro 6000 Series detects an inserted smartcard reader but is unable to allocate resources. A fix for this issue is available from Microsoft. Refer to Microsoft Knowledge Base Article #Q310772 at the following URL for details:
http://support.microsoft.com/default.aspx?scid=KB;EN-US;q310772
•
If you are using EAP-SIM authentication on a computer running Windows XP, your smartcard reader may not be recognized after Windows resumes from hibernation, and one or more error messages may appear. To resolve this problem, reboot your computer or configure it so that it does not enter hibernate mode.
Getting Bug Information on Cisco.com
If you are a Cisco registered user, you can use the Cisco TAC Software Bug Toolkit, which consists of three tools (Bug Navigator, Bug Watcher, and Search by Bug ID Number) that help you to identify existing bugs (or caveats) in Cisco software products.
Access the TAC Software Bug Toolkit at the following URL:
http://www.cisco.com/cgi-bin/Support/Bugtool/launch_bugtool.pl
Troubleshooting
For the most up-to-date, detailed troubleshooting information, refer to the Cisco TAC website at
http://www.cisco.com/en/US/support/index.html
Select Hardware Support > Wireless Devices. Then select your product and Troubleshooting to find information on the problem you are experiencing.
Related Documentation
For more information about Cisco Aironet client adapters for Windows, refer to version OL-1394-06 of the Cisco Aironet Wireless LAN Client Adapters Installation and Configuration Guide for Windows at the following URL:
http://www.cisco.com/univercd/cc/td/doc/product/wireless/airo_350/350cards/windows
Obtaining Documentation
Cisco provides several ways to obtain documentation, technical assistance, and other technical resources. These sections explain how to obtain technical information from Cisco Systems.
Cisco.com
You can access the most current Cisco documentation on the World Wide Web at this URL:
http://www.cisco.com/univercd/home/home.htm
You can access the Cisco website at this URL:
International Cisco websites can be accessed from this URL:
http://www.cisco.com/public/countries_languages.shtml
Documentation CD-ROM
Cisco documentation and additional literature are available in a Cisco Documentation CD-ROM package, which may have shipped with your product. The Documentation CD-ROM is updated regularly and may be more current than printed documentation. The CD-ROM package is available as a single unit or through an annual or quarterly subscription.
Registered Cisco.com users can order a single Documentation CD-ROM (product number DOC-CONDOCCD=) through the Cisco Ordering tool:
http://www.cisco.com/en/US/partner/ordering/ordering_place_order_ordering_tool_launch.html
All users can order monthly or quarterly subscriptions through the online Subscription Store:
http://www.cisco.com/go/subscription
Ordering Documentation
You can find instructions for ordering documentation at this URL:
http://www.cisco.com/univercd/cc/td/doc/es_inpck/pdi.htm
You can order Cisco documentation in these ways:
•
http://www.cisco.com/en/US/partner/ordering/index.shtml
•
Documentation Feedback
You can submit comments electronically on Cisco.com. On the Cisco Documentation home page, click Feedback at the top of the page.
You can e-mail your comments to bug-doc@cisco.com.
You can submit comments by using the response card (if present) behind the front cover of your document or by writing to the following address:
Cisco Systems
Attn: Customer Document Ordering
170 West Tasman Drive
San Jose, CA 95134-9883We appreciate your comments.
Obtaining Technical Assistance
Cisco provides Cisco.com, which includes the Cisco Technical Assistance Center (TAC) website, as a starting point for all technical assistance. Customers and partners can obtain online documentation, troubleshooting tips, and sample configurations from the Cisco TAC website. Cisco.com registered users have complete access to the technical support resources on the Cisco TAC website, including TAC tools and utilities.
Cisco.com
Cisco.com offers a suite of interactive, networked services that let you access Cisco information, networking solutions, services, programs, and resources at any time, from anywhere in the world.
Cisco.com provides a broad range of features and services to help you with these tasks:
•
•
•
•
•
To obtain customized information and service, you can self-register on Cisco.com at this URL:
http://tools.cisco.com/RPF/register/register.do
Technical Assistance Center
The Cisco TAC is available to all customers who need technical assistance with a Cisco product, technology, or solution. Two types of support are available: the Cisco TAC website and the Cisco TAC Escalation Center. The type of support that you choose depends on the priority of the problem and the conditions stated in service contracts, when applicable.
We categorize Cisco TAC inquiries according to urgency:
•
•
•
•
Cisco TAC Website
The Cisco TAC website provides online documents and tools to help troubleshoot and resolve technical issues with Cisco products and technologies. To access the Cisco TAC website, go to this URL:
All customers, partners, and resellers who have a valid Cisco service contract have complete access to the technical support resources on the Cisco TAC website. Some services on the Cisco TAC website require a Cisco.com login ID and password. If you have a valid service contract but do not have a login ID or password, go to this URL to register:
http://tools.cisco.com/RPF/register/register.do
If you are a Cisco.com registered user, and you cannot resolve your technical issues by using the Cisco TAC website, you can open a case online at this URL:
http://www.cisco.com/tac/caseopen
If you have Internet access, we recommend that you open P3 and P4 cases online so that you can fully describe the situation and attach any necessary files.
Cisco TAC Escalation Center
The Cisco TAC Escalation Center addresses priority level 1 or priority level 2 issues. These classifications are assigned when severe network degradation significantly impacts business operations. When you contact the TAC Escalation Center with a P1 or P2 problem, a Cisco TAC engineer automatically opens a case.
To obtain a directory of toll-free Cisco TAC telephone numbers for your country, go to this URL:
http://www.cisco.com/warp/public/687/Directory/DirTAC.shtml
Before calling, please check with your network operations center to determine the Cisco support services to which your company is entitled: for example, SMARTnet, SMARTnet Onsite, or Network Supported Accounts (NSA). When you call the center, please have available your service agreement number and your product serial number.
Obtaining Additional Publications and Information
Information about Cisco products, technologies, and network solutions is available from various online and printed sources.
•
http://www.cisco.com/en/US/products/products_catalog_links_launch.html
•
•
http://www.cisco.com/go/packet
•
http://www.cisco.com/go/iqmagazine
•
http://www.cisco.com/en/US/about/ac123/ac147/about_cisco_the_internet_protocol_journal.html
•
http://www.cisco.com/en/US/learning/le31/learning_recommended_training_list.html
This document is to be used in conjunction with the documents listed in the "Related Documentation" section.
CCIP, CCSP, the Cisco Arrow logo, the Cisco Powered Network mark, Cisco Unity, Follow Me Browsing, FormShare, and StackWise are trademarks of Cisco Systems, Inc.; Changing the Way We Work, Live, Play, and Learn, and iQuick Study are service marks of Cisco Systems, Inc.; and Aironet, ASIST, BPX, Catalyst, CCDA, CCDP, CCIE, CCNA, CCNP, Cisco, the Cisco Certified Internetwork Expert logo, Cisco IOS, the Cisco IOS logo, Cisco Press, Cisco Systems, Cisco Systems Capital, the Cisco Systems logo, Empowering the Internet Generation, Enterprise/Solver, EtherChannel, EtherSwitch, Fast Step, GigaStack, Internet Quotient, IOS, IP/TV, iQ Expertise, the iQ logo, iQ Net Readiness Scorecard, LightStream, MGX, MICA, the Networkers logo, Networking Academy, Network Registrar, Packet, PIX, Post-Routing, Pre-Routing, RateMUX, Registrar, ScriptShare, SlideCast, SMARTnet, StrataView Plus, Stratm, SwitchProbe, TeleRouter, The Fastest Way to Increase Your Internet Quotient, TransPath, and VCO are registered trademarks of Cisco Systems, Inc. and/or its affiliates in the U.S. and certain other countries.
All other trademarks mentioned in this document or Web site are the property of their respective owners. The use of the word partner does not imply a partnership relationship between Cisco and any other company. (0304R)
Copyright © 2003 Cisco Systems, Inc.
All rights reserved.
 Feedback
Contact Cisco
- Open a Support Case

- (Requires a Cisco Service Contract)