Release Notes for Cisco Aironet 350 and CB20A Client Adapter Install Wizard 1.8 for Windows
Available Languages
Table Of Contents
Release Notes for Cisco Aironet 350 and CB20A Client Adapter Install Wizard 1.8 for Windows
PEAP-GTC Authentication Does Not Complete with the 350 Driver
Customized Installation Images (Notice to IT Professionals)
Firmware Is Upgraded Automatically
Reboot Required When Uninstalling ACU
Uninstalling Software Components
Inserting and Removing Client Adapters
New EAP-SIM Supplicant Available
Windows Wireless Network Connection Icon Shows Unavailable Connection (Windows XP Only)
Installing or Upgrading Client Adapter Software
Finding the Install Wizard Version
Finding the Firmware and Driver Versions
Getting Bug Information on Cisco.com
Obtaining Documentation and Submitting a Service Request
Release Notes for Cisco Aironet 350 and CB20A Client Adapter Install Wizard 1.8 for Windows
Contents
This document contains the following sections:
•
Installing or Upgrading Client Adapter Software
•
Introduction
This document describes system requirements, important notes, installation and upgrade procedures, and caveats for client adapter Install Wizard version 1.8 and the following software included in the Install Wizard file:
•
•
•
•
•
•
•
•
•

Note
Purpose
Software version 1.8 is the final maintenance release for the Cisco Aironet 350 and CB20A Client Adapter Install Wizard for Windows. See the "Resolved Caveats" section for a list of caveats that have been resolved in version 1.8.
System Requirements
You need the following in order to install Install Wizard 1.8 and use its software components:
•
–
–
Note
•
Note
Note
•
•
Note
35 MB of hard disk space.
•
–
–
Note
•
•
–
–
•
–
–
–
Note
http://www.cisco.com/cgi-bin/tablebuild.pl/access-registrar-encrypted
•
–
–
–
–
–
–
–
•
Note
•
Important Notes
PEAP-GTC Authentication Does Not Complete with the 350 Driver
When using the 350 driver for authentication with a unified PEAP-GTC SSID, the user is prompted to click on toolbar balloon message to authenticate to the network. When the user clicks on the Click here to select a certifcate or other credentials for connection to the network <SSID name> message, the balloon goes away, but no prompt is displayed.
This issue is a C/A root certificate issue. The server certicate can be a size up to 2048 and use either an RSA or a DSA signature algorithm. The C/A root certificate must be 1024 or smaller and must use an RSA signature algorithm. Any certificate that is of a bigger size or that uses a different signature algorithm causes the 350 to fail.
Customized Installation Images (Notice to IT Professionals)

Caution
Firmware Is Upgraded Automatically
The Install Wizard automatically upgrades the client adapter firmware to the version included in the Install Wizard file.
Note
Reboot Required When Uninstalling ACU
Caution
Uninstalling Software Components
All profiles are deleted if you use the Uninstall All Components option on the Cisco Aironet Wireless LAN Client Adapter Installation Wizard screen to uninstall the client adapter software. Cisco recommends that you use the Profile Manager's export feature to save your profiles before uninstalling the software.
Inserting and Removing Client Adapters
The following rules apply when inserting and removing client adapters:
•
•
New EAP-SIM Supplicant Available
A new EAP-SIM supplicant is available for download from Cisco.com. This new supplicant is an upgrade to the one included in the Install Wizard file. It provides new features, supports more recent versions of the EAP-SIM draft standard, and can be used with standard GSM-SIM cards as well as Gemplus SIM+ smartcards.
The new supplicant overwrites any previous EAP-SIM supplicant settings. If you plan to install the Cisco Aironet Install Wizard file after the new supplicant is installed, either perform an express installation or make sure that the EAP-SIM option is not selected on the Custom Installation screen. Otherwise, the EAP-SIM supplicant included in the Install Wizard file overwrites the new supplicant's settings.
You can access the latest EAP-SIM supplicant at the following URL:
http://www.cisco.com/cgi-bin/tablebuild.pl/access-registrar-encrypted
Windows Wireless Network Connection Icon Shows Unavailable Connection (Windows XP Only)
If your computer is running Windows XP and you configured your client adapter using ACU, the Windows Wireless Network Connection icon in the Windows system tray may be marked with a red X and show an unavailable connection even though a wireless connection exists. This condition is caused by a conflict between ACU and Windows XP's wireless network settings. Simply ignore the Windows icon and use the ACM icon to check the status of your client adapter's wireless connection.
Supporting Documentation
The Cisco Aironet 350 and CB20A Wireless LAN Client Adapters Installation and Configuration Guide for Windows (part number OL-1394-10) provides detailed installation, configuration, and troubleshooting information for Install Wizard 1.8 and its software components:
Installing or Upgrading Client Adapter Software
Follow these steps to use Install Wizard 1.8 to install or upgrade client adapter software on a computer running Windows 2000 or XP.
Note
Note
Step 1
http://tools.cisco.com/support/downloads/pub/Redirect.x?mdfid=278875243
Step 2
Step 3
Step 4
Step 5
Step 6
Step 7
Step 8
Step 9
Step 10
Step 11
Step 12
Step 13
Caution
Step 14
Step 15
Note
Step 16
Figure 1 Cisco Aironet Wireless LAN Client Adapter Installation Wizard Screen
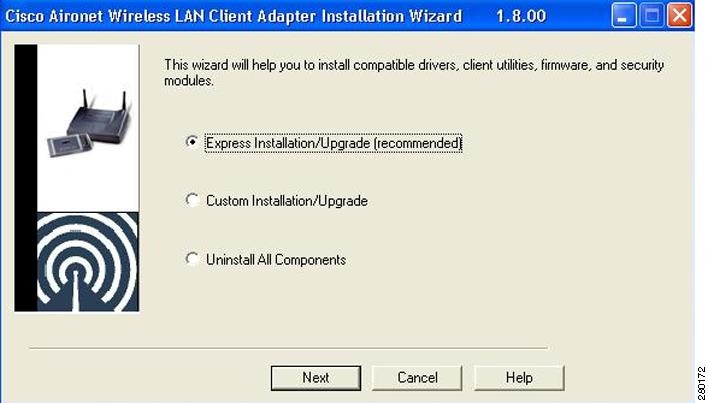
Step 17
Note
•
•
Step 18
Note
Step 19
Figure 2 Custom Installation Screen
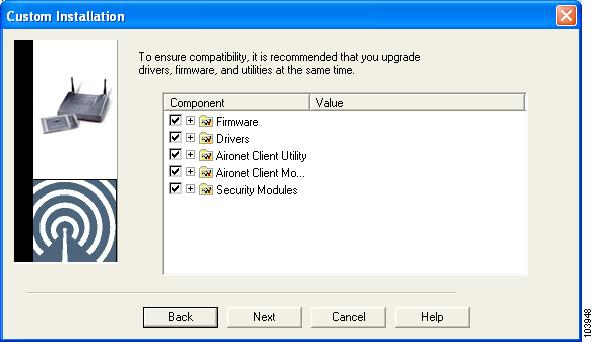
Step 20
a.
Note
Note
b.
c.
d.
Table 1 Software Components and Their Parameters
Firmware
Installs the firmware version included in the Install Wizard file.
Default: Checked
Disable Firmware Checking
The Disable Firmware Checking parameter affects the firmware that is bundled with the driver, not the firmware that is included in the Install Wizard. It controls whether the driver (whenever it loads) installs the firmware with which it is bundled.
Note
Options: Yes or No
Default: Yes
Yes
Prevents the driver from installing the firmware with which it is bundled, enabling the client adapter to retain its current firmware version.
No
Causes the driver to install the firmware with which it is bundled if that firmware is newer than the firmware that is currently installed in the client adapter.
Note
Drivers
Installs the driver version included in the Install Wizard file.
Default: Checked
Set Quiet Mode?
Specifies whether the client becomes quiet (to passively scan or listen) when its associated access point is turned off. In quiet mode, the client generates radio frequency energy only in direct response to an access point transmission. When the access point is turned back on, it starts sending beacons, which the client hears and can now respond to.
This parameter applies to individual cards rather than profiles. It can be set differently for different cards and remains in effect across ACU sessions and computer reboots.
Options: Yes or No
Default: No
Note
Aironet Client Utility
Installs the ACU version included in the Install Wizard file.
Default: Checked
Installation Path
Determines the path where the ACU software will be installed. You can change the default by entering a new path.
Default: C:\Program Files\Cisco Systems\Aironet Client Utility
Program Folder
Determines the program folder where the ACU software will be installed. You can change the default by entering a new folder name.
Default: Cisco Systems
Place Icon on Desktop
Causes the installation program to add an ACU icon to your computer's desktop to provide quick access to the utility.
Options: Yes or No
Default: Yes
Allow Non-Administrator Users to Save Settings to the Registry
Enables users without administrative rights to modify profiles in ACU and save them to the registry.
Options: Yes or No
Default: Yes
Aironet Client Monitor
Installs the ACM version included in the Install Wizard file.
Default: Checked
Installation Path
Determines the path where the ACM software will be installed. You can change the default by entering a new path.
Default: C:\Program Files\Cisco Systems\Aironet Client Monitor
Program Folder
Determines the program folder where the ACM software will be installed. You can change the default by entering a new folder name.
Default: Cisco Systems
Auto Start
Determines whether ACM starts automatically every time Windows boots.
Options: Yes or No
Default: Yes
Note
Start After Install
Determines whether ACM starts automatically after ACM is installed.
Options: Yes or No
Default: Yes
Note
Program Feature Overrides
Determines which ACM components are enabled. If any components are not selected now and you later want to use them, you must run this installation program again and enable them.
Components: See the table below
Options per component: Enable or Disable
Default per component: Enable
About Box (Help)
Displays the ACM version number and enables you to access the online help.
Exit Program
Closes ACM for all client adapters.
Launch Aironet Client Utility
Activates ACU, if it is installed.
Troubleshooting
Activates the troubleshooting utility, which enables you to identify and resolve configuration and association problems with your client adapter.
Preferences
Enables you to determine when ACM runs and to select the options that appear on the ACM pop-up menu.
Turn Radio On/Off
Turns the client adapter's radio on or off.
Reauthenticate
Forces your client adapter to try to reauthenticate using the username and password of the current profile.
Select Profile
Enables you to select the active profile for your client adapter.
Auto Profile Selection
Causes the client adapter's driver to automatically select a profile from the list of profiles that were set up in ACU to be included in auto profile selection.
Other Configuration Application
Enables an application other than ACU to configure the client adapter.
Show Connection Status
Provides information on the current status of your client adapter.
Menu Options (Defaults)
Determines which options are displayed on the ACM pop-up menu.
Menu options: About Box (Help), Exit Program, Launch Aironet Client Utility, Troubleshooting, Turn Radio On/Off, Reauthenticate, Select Profile, Show Connection Status
Options per menu option: Show or Hide
Default per menu option: Show
Security Modules
LEAP
Installs the LEAP supplicant included in the Install Wizard file. Installing the LEAP supplicant enables you to create a profile in ACU that uses LEAP authentication. If this option is not selected now and you later want to create a profile that uses LEAP, you must run this installation program again and choose this option.
Default: Checked
Note
Allow Saved LEAP User Name and Password
Enables you to create a profile in ACU that uses a saved (rather than temporary) username and password for LEAP authentication. When such a profile is selected, the saved username and password are used to start the LEAP authentication process, and you are not prompted to enter them.
Options: Yes or No
Default: Yes
EAP-SIM
Installs the EAP-SIM supplicant included in the Install Wizard file. Installing the EAP-SIM supplicant enables the client to support EAP-SIM authentication. If this option is not selected now and you later want to use EAP-SIM, you must run this installation program again and choose this option.
Default: Unchecked
Note
Note
PEAP
Installs the PEAP supplicant included in the Install Wizard file. Installing the PEAP supplicant enables the client to support PEAP authentication. If this option is not selected now and you later want to use PEAP, you must run this installation program again and choose this option.
Default: Unchecked
Note
Note
EAP-FAST
Installs the EAP-FAST supplicant included in the Install Wizard file. Installing the EAP-FAST supplicant enables you to create a profile in ACU that uses EAP-FAST authentication. If this option is not selected now and you later want to create a profile that uses EAP-FAST, you must run this installation program again and choose this option.
Default: Checked
Note
Note
Allow Saved EAP-FAST User Name and Password
Enables you to create a profile in ACU that uses a saved (rather than temporary) username and password for EAP-FAST authentication. When such a profile is used, the saved username and password are used to start the EAP-FAST authentication process, and you are not prompted to enter them.
Options: Yes or No
Default: Yes
Note
Allow Auto-Provisioning?
Enables a protected access credentials (PAC) file to be obtained automatically as needed (for instance, when a PAC expires, when the client adapter accesses a different server, when the EAP-FAST username cannot be matched to a previously provisioned PAC, etc.).
Options: Yes or No
Default: Yes
Note
e.
Step 21
•
Note
•
•
The Found New Hardware screen appears. Depending on your computer's operating system, you may have to click Next. The driver and other software components are installed. Then an ACM icon appears in the Windows system tray (unless you changed the default value during installation). Perform one of the following:
–
Note
–
Step 22
•
Note
•
Note
Step 23
•
•
Step 24
Finding Version Numbers
Follow the instructions in this section to find the version numbers of your client adapter's software components.
Finding the Install Wizard Version
Follow these steps to find the version of the Install Wizard that is currently installed for your client adapter.
Step 1
Step 2
Step 3
Step 4
Step 5
Finding the Firmware and Driver Versions
To find the firmware and driver versions that are currently installed for your client adapter, click the ACU Status icon. The Firmware Version field on the Status screen shows the current firmware version, and the NDIS Driver Version field shows the current driver version.
Finding the ACU Version
To find the version of ACU that is currently installed for your client adapter, click the ACU About icon. The About Aironet Client Utility screen shows the current ACU version.
Finding the ACM Version
To find the version of ACM that is currently installed for your client adapter, right-click the ACM icon and click the About option. The About screen shows the current ACM version.
Caveats
This section describes the resolved and open caveats for the software components in Install Wizard 1.8.
Resolved Caveats
The following caveats are resolved in the software components of Install Wizard release 1.8.
•
The 350 client adapter has 4.25.30 firmware version 4.25.30 and driver version 8.2.3. When the wakeup process is started from the GoBook keyboard, the device starts to wake up but then hangs at a black or a blank screen with the cursor stuck in the upper left corner.
•
After a client was successfully authenticated (configured for open authentication with a WEP key), the ACU still shows that the authentication process has started. The status page shows that the client is authenticating. However, the client already got a DHCP IP address and can ping the wired network.
•
If the user imports a PAC from an EAP-FAST profile, the PAC can be saved as a private PAC (with the correct EAP-FAST settings). When the PAC is saved as a private PAC, it is not found by the login module because on Novell networks, the login module does not know the Windows user name. The login module must look for the PAC in the global area.
•
If the user clicks on the Start button of the Site Survey/Link Test window and removes the client adapter, the ACU fails.
•
ACU does not send a response to the ACS. The EAP conversation is not finished, and the failed attempts log is not updated.
•
When an EAP-FAST login fails, the client adapter does not add an entry to the ACS error log explaining why the login failed.
•
By design, the client adapter reauthenticates whenever the active profile is changed. However, it is possible to change the profile without realizing it. If you open the RF Network screen in ACU for the active profile and click OK, the profile may change even though you did not make any changes. For an active infrastructure profile, ACU shows the currently in-use channel in the Channel drop-down box. If this value is different than the one saved in the profile, clicking OK to exit the screen results in a profile change and causes the client to reauthenticate.
•
With the PEAP-GTC supplicant code (CiscoEapPeap.dll) from Install Wizard version 1.6, the Wireless Zero Config service must close because of an unexpected problem. This issue is seen when the access point is controlled by a controller that is running release 3.0.107 or 3.1.105. This issue is not seen on an autonomous IOS access point.
•
The user sometimes must wait long periods to log on to the network when using ACU release 6.3 EAP-FAST with WPA and TKIP. These periods can be up to an hour.
•
After running some automated scripts, the client cannot make successful WPA+PSK authentications.
•
If the access point is not in protection mode, the 350 client adapter cannot pass traffic.
•
The PEAP-GTC module shipped with ACU sends the wrong PEAP version (0 instead of 1) after tunnel establishment. Authentication is not impacted. However, this issue affects the PEAP type that is reported by the ACS.
•
An external supplicant is not always able to verify the WPA four-way handshake. The driver does not always provide the necessary verification information in the BSSID list element that corresponds with the access point that the client is currently associated to. In particular, the BSSID list element might not include the WPA IE from the last beacon or probe response. The supplicant fails the third message in the four-way handshake.
•
The user has a Windows 2000 or Windows XP device with a 350 client. The user is prompted to change the Windows password every 30 days. The password change prompt window is hidden behind the EAP-FAST authentication status window. This issue also occurs when the user is authenticating with LEAP.
•
When the Secure Services Client (SSC) first queries the 350 after driver installation and reboot, the 350 returns an error. The SSC returns to default capabilities, which do not include WPA. Because WPA is not included, the SSC cannot connect to access point that uses WPA and TKIP. After a second reboot, a correct list is returned by the 350.
Getting Bug Information on Cisco.com
If you are a Cisco registered user, you can use the Cisco TAC Software Bug Toolkit, which consists of three tools (Bug Navigator, Bug Watcher, and Search by Bug ID Number) that help you to identify existing bugs (or caveats) in Cisco software products.
Access the TAC Software Bug Toolkit at the following URL:
http://www.cisco.com/cgi-bin/Support/Bugtool/launch_bugtool.pl
Troubleshooting
For the most up-to-date, detailed troubleshooting information, refer to the Cisco TAC website at
http://www.cisco.com/en/US/support/index.html
Click Product Support > Wireless. Then choose your product and Troubleshooting to find information on the problem you are experiencing.
Related Documentation
For more information about Cisco Aironet 350 and CB20A client adapters for Windows, refer to the following documents:
•
•
http://www.cisco.com/en/US/products/hw/wireless/ps4555/prod_release_notes_list.html
Obtaining Documentation and Submitting a Service Request
For information on obtaining documentation, submitting a service request, and gathering additional information, see the monthly What's New in Cisco Product Documentation, which also lists all new and revised Cisco technical documentation, at:
http://www.cisco.com/en/US/docs/general/whatsnew/whatsnew.html
Subscribe to the What's New in Cisco Product Documentation as a Really Simple Syndication (RSS) feed and set content to be delivered directly to your desktop using a reader application. The RSS feeds are a free service and Cisco currently supports RSS version 2.0.
This document is to be used in conjunction with the documents listed in the "Related Documentation" section.
CCDE, CCVP, Cisco Eos, Cisco StadiumVision, the Cisco logo, DCE, and Welcome to the Human Network are trademarks; Changing the Way We Work, Live, Play, and Learn is a service mark; and Access Registrar, Aironet, AsyncOS, Bringing the Meeting To You, Catalyst, CCDA, CCDP, CCIE, CCIP, CCNA, CCNP, CCSP, Cisco, the Cisco Certified Internetwork Expert logo, Cisco IOS, Cisco Press, Cisco Systems, Cisco Systems Capital, the Cisco Systems logo, Cisco Unity, Collaboration Without Limitation, Enterprise/Solver, EtherChannel, EtherFast, EtherSwitch, Event Center, Fast Step, Follow Me Browsing, FormShare, GigaDrive, HomeLink, Internet Quotient, IOS, iPhone, IP/TV, iQ Expertise, the iQ logo, iQ Net Readiness Scorecard, iQuick Study, IronPort, the IronPort logo, LightStream, Linksys, MediaTone, MeetingPlace, MGX, Networkers, Networking Academy, Network Registrar, PCNow, PIX, PowerPanels, ProConnect, ScriptShare, SenderBase, SMARTnet, Spectrum Expert, StackWise, The Fastest Way to Increase Your Internet Quotient, TransPath, WebEx, and the WebEx logo are registered trademarks of Cisco Systems, Inc. and/or its affiliates in the United States and certain other countries.
All other trademarks mentioned in this document or Website are the property of their respective owners. The use of the word partner does not imply a partnership relationship between Cisco and any other company. (0801R)
Copyright © 2008 Cisco Systems, Inc.
All rights reserved.
 Feedback
Contact Cisco
- Open a Support Case

- (Requires a Cisco Service Contract)