Administrator Guide: Cisco Aironet Client Utility Auto Configuration for Mac OS X, Version 1.0.0
Bias-Free Language
The documentation set for this product strives to use bias-free language. For the purposes of this documentation set, bias-free is defined as language that does not imply discrimination based on age, disability, gender, racial identity, ethnic identity, sexual orientation, socioeconomic status, and intersectionality. Exceptions may be present in the documentation due to language that is hardcoded in the user interfaces of the product software, language used based on RFP documentation, or language that is used by a referenced third-party product. Learn more about how Cisco is using Inclusive Language.
- Updated:
- May 4, 2007
Chapter: Using PropertyListEditor
- Overview
- Using PropertyListEditor
- Activating PropertyListEditor
- Starting the First Profile Name
- Entering New Profile Names
- Entering Profile Parameters
- Entering Root Parameters
- Saving the Configuration Script
- Opening an Existing Configuration Script File
- Exiting PropertyListEditor
- PropertyListEditor Screen Examples
- XML Format Example
Creating a Configuration Script File
This chapter describes how to use the Apple XML editor, PropertyListEditor, provided in the
Mac OS X developer package to create a configuration script file. The following topics are covered in this chapter:
•![]() Activating PropertyListEditor
Activating PropertyListEditor
•![]() Starting the First Profile Name
Starting the First Profile Name
•![]() Saving the Configuration Script
Saving the Configuration Script
•![]() Opening an Existing Configuration Script File
Opening an Existing Configuration Script File
•![]() PropertyListEditor Screen Examples
PropertyListEditor Screen Examples
Overview
This document describes basic procedures for using the Mac OS X Apple XML editor, PropertyListEditor, to create a Mac OS X client utility configuration script file in XML format.

Note ![]() This document provides only basic operating procedures for the PropertyListEditor and does not describe XML formatting.
This document provides only basic operating procedures for the PropertyListEditor and does not describe XML formatting.
The basic procedures for creating a configuration script file using an XML editor consists of the following operations:
•![]() Activating the XML editor
Activating the XML editor
•![]() Adding location profile names
Adding location profile names
•![]() Adding profile parameters to each location profile
Adding profile parameters to each location profile
•![]() Adding root parameters
Adding root parameters
•![]() Saving the configuration script file in XML format
Saving the configuration script file in XML format
•![]() Exiting the XML editor
Exiting the XML editor
Using PropertyListEditor
PropertyListEditor allows someone without XML programming knowledge to create an XML formatted script file. The editor uses a simple graphical interface to enter the needed information.
The configuration script used for the Mac OS X client utility contains two main components:
•![]() Dictionary—a structure that defines a list of elements and sub-structures, such as a location profile.
Dictionary—a structure that defines a list of elements and sub-structures, such as a location profile.
•![]() String—an element containing a value, such as a parameter
String—an element containing a value, such as a parameter
The XML components are arranged in a tree structure similar to a disk file system. The disk file system starts from a root directory that contains individual disk files and sub-directories. In XML, the dictionaries are analogous to file directories and the strings are analogous to disk files. Both formatting methods also start from a root structure. The following example shows the XML component structure (tabs are used for clarity):
Root Dictionary
String (root parameter)
Dictionary (profile 1)
String 1 (profile parameter 1)
String 2 (profile parameter 2)
String n (profile parameter n)
Dictionary (profile n)
String 1 (profile parameter 1)
String 2 (profile parameter 2)
String n (profile parameter n)
Activating PropertyListEditor
Follow the steps below to activate PropertyListEditor:
Step 1 ![]() Double-click Applications in the Developer folder located in the root directory of your Mac OS X hard disk.
Double-click Applications in the Developer folder located in the root directory of your Mac OS X hard disk.
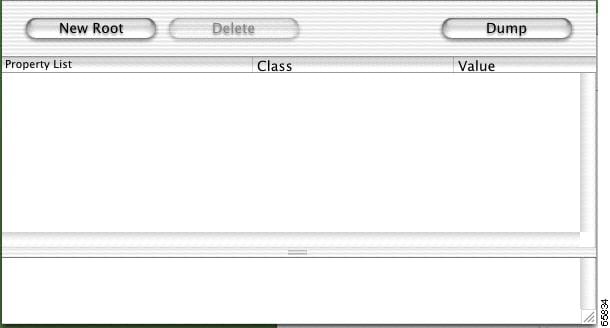
Step 2 ![]() Double-click PropertyListEditor to activate the XML editor. The PropertyListEditor screen displays (see Figure 3-1).
Double-click PropertyListEditor to activate the XML editor. The PropertyListEditor screen displays (see Figure 3-1).
Figure 3-1 PropertyListEditor Screen
Starting the First Profile Name
Follow the steps below to enter the first location profile name:
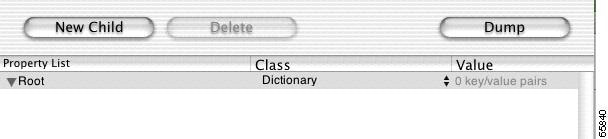
Step 1 ![]() Click New Root on the PropertyListEditor screen.
Click New Root on the PropertyListEditor screen.
Step 2 ![]() If the triangle on the left side of Root is not pointing down, click the triangle. The triangle changes to point down and the New Sibling button changes to New Child (see Figure 3-2).
If the triangle on the left side of Root is not pointing down, click the triangle. The triangle changes to point down and the New Sibling button changes to New Child (see Figure 3-2).
Figure 3-2 Root Screen
Step 3 ![]() Click New Child.
Click New Child.
Step 4 ![]() Enter the name of a location profile in the entry box, such as Office. Press Return.
Enter the name of a location profile in the entry box, such as Office. Press Return.
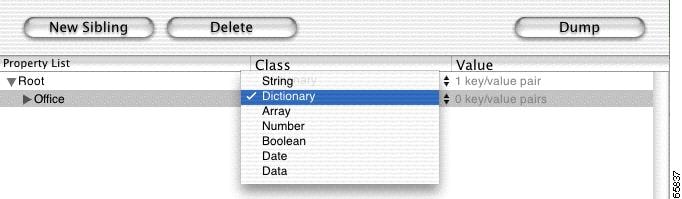
Step 5 ![]() Click String on the Office parameter line and select Dictionary from the drop-down list (see Figure 3-3).
Click String on the Office parameter line and select Dictionary from the drop-down list (see Figure 3-3).
Figure 3-3 Class Drop-Down List
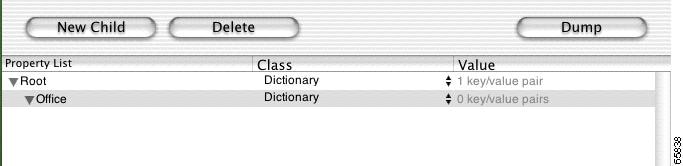
You have created the first location profile structure for your wireless network. This structure identifies a specific wireless network and contains the location profile parameters for that network.
To add additional profile names for other wireless networks, go to the "Entering New Profile Names" section. To add parameters to a location profile, go to the "Entering Profile Parameters" section.
Entering New Profile Names
Follow the steps below to enter a new profile name:
Step 1 ![]() Click Root to highlight the line.
Click Root to highlight the line.
Step 2 ![]() If the triangle on the left side of Root is not pointing down, click the triangle. The triangle changes to point down and the New Sibling button changes to New Child (see Figure 3-2).
If the triangle on the left side of Root is not pointing down, click the triangle. The triangle changes to point down and the New Sibling button changes to New Child (see Figure 3-2).
Step 3 ![]() Click New Child.
Click New Child.
Step 4 ![]() In the highlighted entry box, enter a location profile name, such as Factory.
In the highlighted entry box, enter a location profile name, such as Factory.
Step 5 ![]() Click String on the highlighted parameter line and select Dictionary from the Class drop down list (see Figure 3-3).
Click String on the highlighted parameter line and select Dictionary from the Class drop down list (see Figure 3-3).
Step 6 ![]() Repeat Step 1 through Step 4 for all location profile names.
Repeat Step 1 through Step 4 for all location profile names.
To add profile parameters to each location profile, go to the "Entering Profile Parameters" section.
Entering Profile Parameters
Follow the steps below to enter location profile parameters:
Step 1 ![]() Click the location profile name, such as Office, to highlight the line.
Click the location profile name, such as Office, to highlight the line.
Step 2 ![]() If the triangle on the left side of highlighted location profile name is not pointing down, click the triangle. The triangle changes to point down and the New Sibling button changes to New Child (see Figure 3-4).
If the triangle on the left side of highlighted location profile name is not pointing down, click the triangle. The triangle changes to point down and the New Sibling button changes to New Child (see Figure 3-4).
Figure 3-4 Profile Name Screen
Step 3 ![]() Click New Child.
Click New Child.
Step 4 ![]() In the highlighted entry box enter a location profile parameter, such as Authentication Type. Press Return.
In the highlighted entry box enter a location profile parameter, such as Authentication Type. Press Return.
Note ![]() All profile parameters must be set to the String Class.
All profile parameters must be set to the String Class.
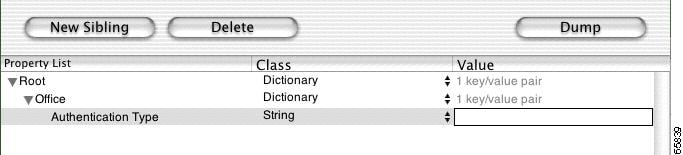
Step 5 ![]() To highlight the line, click on the location profile parameter, such as Authentication Type.
To highlight the line, click on the location profile parameter, such as Authentication Type.
Step 6 ![]() Double click the Value segment of the highlighted line and enter the value for the profile parameter, such as Open (see Figure 3-5). Press Return.
Double click the Value segment of the highlighted line and enter the value for the profile parameter, such as Open (see Figure 3-5). Press Return.
Figure 3-5 Profile Parameters Screen
Step 7 ![]() To enter another profile parameter, click the location profile name, such as Office, to highlight the line.
To enter another profile parameter, click the location profile name, such as Office, to highlight the line.
Step 8 ![]() Repeat Steps 3 through 7 for each additional parameter in the location profile.
Repeat Steps 3 through 7 for each additional parameter in the location profile.
Step 9 ![]() If you have multiple location profiles, repeat Steps 1 through 8 for each location profile.
If you have multiple location profiles, repeat Steps 1 through 8 for each location profile.
To add root parameters, go to the "Entering Root Parameters" section.
Entering Root Parameters
Follow the steps below to enter root parameters:
Step 1 ![]() Click Root to highlight the line.
Click Root to highlight the line.
Step 2 ![]() If the triangle on the left side of Root is not pointing down, click the triangle. The triangle changes to point down and the New Sibling button changes to New Child (see Figure 3-2).
If the triangle on the left side of Root is not pointing down, click the triangle. The triangle changes to point down and the New Sibling button changes to New Child (see Figure 3-2).
Step 3 ![]() Click New Child.
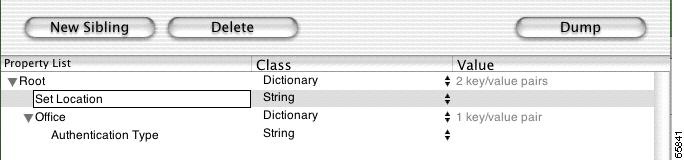
Click New Child.
Step 4 ![]() In the highlighted entry box, enter a root parameter, such as Set Location (see Figure 3-6). The root parameter line is a String Class.
In the highlighted entry box, enter a root parameter, such as Set Location (see Figure 3-6). The root parameter line is a String Class.
Figure 3-6 Root Parameter Screen
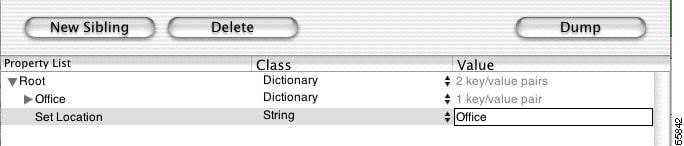
Step 5 ![]() Double click the Value segment of the highlighted line and enter the value for the parameter, such as Office (see Figure 3-7). Press Return.
Double click the Value segment of the highlighted line and enter the value for the parameter, such as Office (see Figure 3-7). Press Return.
Figure 3-7 Root Parameter Value Screen
Step 6 ![]() Repeat Steps 1 to 5 for all root parameters.
Repeat Steps 1 to 5 for all root parameters.
To save your configuration script file, go to the "Saving the Configuration Script" section.
Saving the Configuration Script
When you have completed the entry of the configuration script parameters, you must save the script in XML format in the root directory of your Macintosh hard disk. To save the configuration script file, follow the steps below:
Step 1 ![]() On the PropertyListEditor main menu bar, select Save As from the File drop-down menu.
On the PropertyListEditor main menu bar, select Save As from the File drop-down menu.
Step 2 ![]() Enter Startup.dict in the Save As entry box.
Enter Startup.dict in the Save As entry box.
Step 3 ![]() Select the Mac OS X root directory in the Where entry box.
Select the Mac OS X root directory in the Where entry box.
Step 4 ![]() Select XML property list format from the File Format list box.
Select XML property list format from the File Format list box.
Step 5 ![]() Click Save.
Click Save.
Step 6 ![]() If you receive a message indicating the file already exists, click Replace.
If you receive a message indicating the file already exists, click Replace.
Opening an Existing Configuration Script File
Follow the steps below to open an existing XML script file:
Step 1 ![]() Select Open from the File drop-down menu of the PropertyListEditor.
Select Open from the File drop-down menu of the PropertyListEditor.
Step 2 ![]() Locate and select the desired folder and file on the Mac OS X Open screen. Click Open.
Locate and select the desired folder and file on the Mac OS X Open screen. Click Open.
The XML script file is now open for editing using the PropertyListEditor.
Exiting PropertyListEditor
To exit PropertyListEditor, perform the following steps:
Step 1 ![]() Click PropertyListEditor on the main menu bar and select Quit PropertyListEditor from the drop-down menu. Press Return.
Click PropertyListEditor on the main menu bar and select Quit PropertyListEditor from the drop-down menu. Press Return.
Step 2 ![]() If you receive a message asking if you want to save the changes, click one of the following buttons:
If you receive a message asking if you want to save the changes, click one of the following buttons:
a. ![]() Save to save your changes prior to exiting
Save to save your changes prior to exiting
b. ![]() Don't Save to exit without saving any changes
Don't Save to exit without saving any changes
c. ![]() Cancel to return to the XML editor.
Cancel to return to the XML editor.
PropertyListEditor Screen Examples
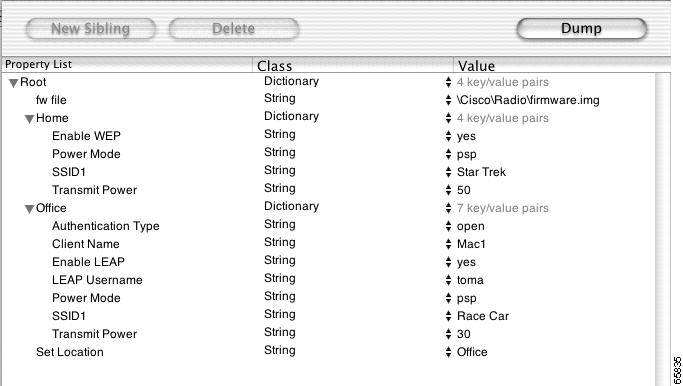
Figure 3-8 shows a PropertyListEditor screen containing two location profiles.
Figure 3-8 Example XML Editor Screen
XML Format Example
Figure 3-9 shows a profile example in XML format.
Figure 3-9 XML Format Example

 Feedback