Using the Command-Line Interface
Available Languages
Table Of Contents
Using the Command-Line Interface
Using no and default Forms of Commands
Changing the Command History Buffer Size
Disabling the Command History Feature
Enabling and Disabling Editing Features
Editing Commands Through Keystrokes
Editing Command Lines that Wrap
Searching and Filtering Output of show and more Commands
Opening the CLI with Secure Shell
Opening the CLI Using the Console Port
Using the Command-Line Interface
This chapter describes the IOS command-line interface (CLI) that you can use to configure your access point/bridge. It contains these sections:
•
Using no and default Forms of Commands
•
IOS Command Modes
The Cisco IOS user interface is divided into many different modes. The commands available to you depend on which mode you are currently in. Enter a question mark (?) at the system prompt to obtain a list of commands available for each command mode.
When you start a session on the access point/bridge, you begin in user mode, often called user EXEC mode. Only a limited subset of the commands are available in user EXEC mode. For example, most of the user EXEC commands are one-time commands, such as show commands, which show the current configuration status, and clear commands, which clear counters or interfaces. The user EXEC commands are not saved when the access point/bridge reboots.
To have access to all commands, you must enter privileged EXEC mode. Normally, you must enter a password to enter privileged EXEC mode. From this mode, you must enter privileged EXEC mode before you can enter the global configuration mode.
Using the configuration modes (global, interface, and line), you can make changes to the running configuration. If you save the configuration, these commands are stored and used when the access point/bridge reboots. To access the various configuration modes, you must start at global configuration mode. From global configuration mode, you can enter interface configuration mode and line configuration mode.
Table 4-1 describes the main command modes, how to access each one, the prompt you see in that mode, and how to exit the mode. The examples in the table use the host name BR.
Getting Help
You can enter a question mark (?) at the system prompt to display a list of commands available for each command mode. You can also obtain a list of associated keywords and arguments for any command, as shown in Table 4-2.
Abbreviating Commands
You have to enter only enough characters for the access point/bridge to recognize the command as unique. This example shows how to enter the show configuration privileged EXEC command:
bridge# show confUsing no and default Forms of Commands
Most configuration commands also have a no form. In general, use the no form to disable a feature or function or reverse the action of a command. For example, the no shutdown interface configuration command reverses the shutdown of an interface. Use the command without the keyword no to re-enable a disabled feature or to enable a feature that is disabled by default.
Configuration commands can also have a default form. The default form of a command returns the command setting to its default. Most commands are disabled by default, so the default form is the same as the no form. However, some commands are enabled by default and have variables set to certain default values. In these cases, the default command enables the command and sets variables to their default values.
Understanding CLI Messages
Table 4-3 lists some error messages that you might encounter while using the CLI to configure your access point/bridge.
Using Command History
The IOS provides a history or record of commands that you have entered. This feature is particularly useful for recalling long or complex commands or entries, including access lists. You can customize the command history feature to suit your needs as described in these sections:
•
•
Changing the Command History Buffer Size
By default, the access point/bridge records ten command lines in its history buffer. Beginning in privileged EXEC mode, enter this command to change the number of command lines that the access point/bridge records during the current terminal session:
bridge# terminal history [size number-of-lines]The range is from 0 to 256.
Beginning in line configuration mode, enter this command to configure the number of command lines the access point/bridge records for all sessions on a particular line:
bridge(config-line)# history [size number-of-lines]The range is from 0 to 256.
Recalling Commands
To recall commands from the history buffer, perform one of the actions listed in Table 4-4:
Table 4-4 Recalling Commands
Press Ctrl-P or the up arrow key.
Recall commands in the history buffer, beginning with the most recent command. Repeat the key sequence to recall successively older commands.
Press Ctrl-N or the down arrow key.
Return to more recent commands in the history buffer after recalling commands with Ctrl-P or the up arrow key. Repeat the key sequence to recall successively more recent commands.
show history
While in privileged EXEC mode, list the last several commands that you just entered. The number of commands that are displayed is determined by the setting of the terminal history global configuration command and history line configuration command.
1 The arrow keys function only on ANSI-compatible terminals such as VT100s.
Disabling the Command History Feature
The command history feature is automatically enabled.
To disable the feature during the current terminal session, enter the terminal no history privileged EXEC command.
To disable command history for the line, enter the no history line configuration command.
Using Editing Features
This section describes the editing features that can help you manipulate the command line. It contains these sections:
•
•
•
Enabling and Disabling Editing Features
Although enhanced editing mode is automatically enabled, you can disable it.
To re-enable the enhanced editing mode for the current terminal session, enter this command in privileged EXEC mode:
bridge# terminal editingTo reconfigure a specific line to have enhanced editing mode, enter this command in line configuration mode:
bridge(config-line)# editingTo globally disable enhanced editing mode, enter this command in line configuration mode:
bridge(config-line)# no editingEditing Commands Through Keystrokes
Table 4-5 shows the keystrokes that you need to edit command lines.
Table 4-5 Editing Commands Through Keystrokes
Move around the command line to make changes or corrections.
Ctrl-B or the left arrow key
Move the cursor back one character.
Ctrl-F or the right arrow key
Move the cursor forward one character.
Ctrl-A
Move the cursor to the beginning of the command line.
Ctrl-E
Move the cursor to the end of the command line.
Esc B
Move the cursor back one word.
Esc F
Move the cursor forward one word.
Ctrl-T
Transpose the character to the left of the cursor with the character located at the cursor.
Recall commands from the buffer and paste them in the command line. The access point/bridge provides a buffer with the last ten items that you deleted.
Ctrl-Y
Recall the most recent entry in the buffer.
Esc Y
Recall the next buffer entry.
The buffer contains only the last 10 items that you have deleted or cut. If you press Esc Y more than ten times, you cycle to the first buffer entry.
Delete entries if you make a mistake or change your mind.
Delete or Backspace
Erase the character to the left of the cursor.
Ctrl-D
Delete the character at the cursor.
Ctrl-K
Delete all characters from the cursor to the end of the command line.
Ctrl-U or Ctrl-X
Delete all characters from the cursor to the beginning of the command line.
Ctrl-W
Delete the word to the left of the cursor.
Esc D
Delete from the cursor to the end of the word.
Capitalize or lowercase words or capitalize a set of letters.
Esc C
Capitalize at the cursor.
Esc L
Change the word at the cursor to lowercase.
Esc U
Capitalize letters from the cursor to the end of the word.
Designate a particular keystroke as an executable command, perhaps as a shortcut.
Ctrl-V or Esc Q
Scroll down a line or screen on displays that are longer than the terminal screen can display.
Note
Return
Scroll down one line.
Space
Scroll down one screen.
Redisplay the current command line if the access point/bridge suddenly sends a message to your screen.
Ctrl-L or Ctrl-R
Redisplay the current command line.
1 The arrow keys function only on ANSI-compatible terminals such as VT100s.
Editing Command Lines that Wrap
You can use a wraparound feature for commands that extend beyond a single line on the screen. When the cursor reaches the right margin, the command line shifts ten spaces to the left. You cannot see the first ten characters of the line, but you can scroll back and check the syntax at the beginning of the command.
To scroll back to the beginning of the command entry, press Ctrl-B or the left arrow key repeatedly. You can also press Ctrl-A to immediately move to the beginning of the line.

Note
In this example, the access-list global configuration command entry extends beyond one line. When the cursor first reaches the end of the line, the line is shifted ten spaces to the left and redisplayed. The dollar sign ($) shows that the line has been scrolled to the left. Each time the cursor reaches the end of the line, the line is again shifted ten spaces to the left.
bridge(config)# access-list 101 permit tcp 131.108.2.5 255.255.255.0 131.108.1bridge(config)# $ 101 permit tcp 131.108.2.5 255.255.255.0 131.108.1.20 255.25bridge(config)# $t tcp 131.108.2.5 255.255.255.0 131.108.1.20 255.255.255.0 eqbridge(config)# $108.2.5 255.255.255.0 131.108.1.20 255.255.255.0 eq 45After you complete the entry, press Ctrl-A to check the complete syntax before pressing the Return key to execute the command. The dollar sign ($) appears at the end of the line to show that the line has been scrolled to the right:
bridge(config)# access-list 101 permit tcp 131.108.2.5 255.255.255.0 131.108.1$The software assumes you have a terminal screen that is 80 columns wide. If you have a width other than that, use the terminal width privileged EXEC command to set the width of your terminal.
Use line wrapping with the command history feature to recall and modify previous complex command entries. For information about recalling previous command entries, see the "Editing Commands Through Keystrokes" section.
Searching and Filtering Output of show and more Commands
You can search and filter the output for show and more commands. This is useful when you need to sort through large amounts of output or if you want to exclude output that you do not need to see.
To use this functionality, enter a show or more command followed by the pipe character (|), one of the keywords begin, include, or exclude, and an expression that you want to search for or filter out:
command | {begin | include | exclude} regular-expression
Expressions are case sensitive. For example, if you enter | exclude output, the lines that contain output are not displayed, but the lines that contain Output are displayed.
This example shows how to include in the output display only lines where the expression protocol appears:
bridge# show interfaces | include protocolVlan1 is up, line protocol is upVlan10 is up, line protocol is downGigabitEthernet0/1 is up, line protocol is downGigabitEthernet0/2 is up, line protocol is upAccessing the CLI
You can open the access point/bridge's CLI using Telnet, Secure Shell (SSH), through the access point/bridge's RJ-45 console port located on the power injector.
Opening the CLI with Telnet
Follow these steps to open the CLI with Telnet. These steps are for a PC running Microsoft Windows with a Telnet terminal application. Check your PC operating instructions for detailed instructions for your operating system.
Step 1
If Telnet is not listed in your Accessories menu, select Start > Run, type Telnet in the entry field, and press Enter.
Step 2
Note
Step 3
Step 4
Opening the CLI with Secure Shell
Secure Shell Protocol is a protocol that provides a secure, remote connection to networking devices set up to use it. Secure Shell (SSH) is a software package that provides secure login sessions by encrypting the entire session. SSH features strong cryptographic authentication, strong encryption, and integrity protection. For more information about SSH, see Tectia Corporation's website.
SSH provides more security for remote connections than Telnet by providing strong encryption when a device is authenticated. See the "Configuring the Access Point/Bridge for Secure Shell" section on page 5-17 for detailed instructions on setting up the access point/bridge for SSH access.
Opening the CLI Using the Console Port
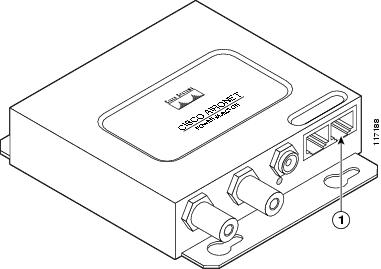
If you need to configure the access point/bridge locally (without connecting to a wired LAN), you can connect a PC to power injector's serial port using a DB-9 to RJ-45 serial cable. Follow these steps to open the CLI by connecting to the serial port:
Step 1
Figure 4-1 Serial Port Connector
Note
Step 2
Step 3
Step 4
Step 5
When the CLI activates, you can enter CLI commands to configure the access point/bridge.
 Feedback