Use this guide to set up the app and use some key features.
After setup, learn more by viewing the user guides in the Cisco Jabber Settings menu.
Set Up
The steps to set up Cisco Jabber vary, depending on how your administrator set up your account.
Your administrator must let you know which one of the following sign-in methods to use:
Setup URL
Simple sign-in
Manual sign-in to Cisco WebEx Messenger
Manual sign-in to Cisco Unified Communications Manager IM and Presence Service
Manual sign-in to Phone Services only
Prepare for
Setup
After you download
Cisco Jabber for Android from Google Play and install it,
perform the following steps to prepare for setup:
Get your setup
information.
Your system
administrator must give you the sign-in method and account information.
Note
Cisco Unified Communications Manager IM and Presence Service is formerly known as
Cisco Unified Presence.
Sign-In Method
Account Information
URL
URL (that you use to start the setup process)
username
password
Simple
username and domain (for example,
username@example.com)
password
Manual
Cisco WebEx Messenger
username and domain (for example,
username@example.com)
password
Manual
Cisco Unified Communications Manager IM and Presence Service
username and domain (for example,
username@example.com)
password
server address
Manual
Phone Services only
TFTP server address
CCMCIP server address
username and domain (for example,
username@example.com)
password
Stop other Voice over
Internet Protocol (VoIP) calling applications.
To prevent
conflicts that can cause unpredictable behavior, run one VoIP calling
application at a time.
Connect to your corporate
network.
If your system
administrator set you up with either a Phone Services account or an Instant
Messaging account that uses
Cisco Unified Communications Manager IM and Presence Service, you must connect to your corporate
network before using
Cisco Jabber.
Inside your corporate
network: Set up the device to connect directly to the corporate Wi-Fi
network.
Outside your corporate
network: Use one of the following methods.
Expressway for Mobile and
Remote Access: If your system administrator set up your account with remote
access through a Cisco Expressway collaboration gateway,
Cisco Jabber will automatically connect to your
collaboration tools when you are outside the corporate firewall.
VPN. A VPN must be configured if remote access
through a collaboration gateway is not available. Download Cisco AnyConnect
from the Google Play Store and ask your administrator for VPN settings.
Certificate
Validation
When you set up and
use
Cisco Jabber, you may be prompted to validate
your server certificates to connect to your services.
Depending on your
account setup, you may need to verify server certificates for the following
services:
Instant
Messaging
Phone Services
Voicemail
Directory
Expressway
Mobile and Remote Access
SSO IDP certification for SSO deployments
Note
Depending on how
your administrator sets up the servers, you may have to validate multiple
certificates for Instant Messaging and Phone Services.
If you decline a
certificate, the following occurs:
Instant
Messaging
You cannot sign
in to
Cisco Jabber.
Phone Services
An invalid certificate notification will be shown.
If the
system has only one server, you cannot sign in to
Cisco Jabber.
If the
system has two servers and you decline one certificate, you can accept the
second certificate and sign in to that particular server.
You cannot sign in to
Cisco Jabber.
Voicemail
An invalid certificate notification will be shown.
You can sign in to
Cisco Jabber but you cannot access the Voicemail
service. You must sign out of
Cisco Jabber and then sign back in to view the
certificate validation message again.
Set up with
URL
Procedure
Step 1
On your
Android device, tap the setup URL that your administrator provided.
Step 2
After
Cisco Jabber opens, read the end user license
agreement and terms of service, and then tap
Accept.
Step 3
Review the
In
Cisco Jabber screens, and then tap
Get
Started Now.
Step 4
Click the provided URL.
Step 5
Enter your
password.
Step 6
Tap
Sign
In.
Step 7
If prompted to
validate your server certificates, contact your administrator to verify that
you should accept the certificates.
After you
sign in,
Cisco Jabber opens.
Cisco Jabber displays the
Contacts screen after you sign in if you have been
configured for both Instant Messaging and Presence and Voice and Video Calling.
Cisco Jabber displays the
Keypad screen after you sign in if you have been
configured for Voice and Video Calling only.
Procedure
Step 1
To navigate,
follow one of these steps:
On most
screens, swipe to the right.
Where
available, tap
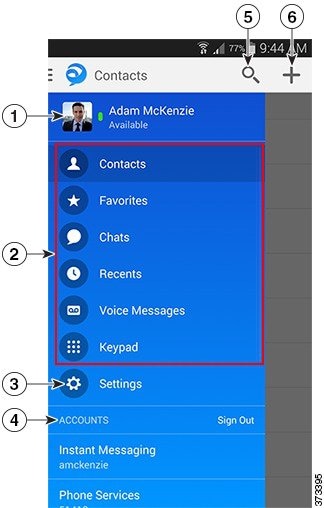
Step 2
Tap the
following items to use the navigation drawer.
Note
Depending on
your account setup, you may not see all the features shown here.
1.
View and edit your availability status.
2.
Access your features.
3.
Edit your settings.
4.
View account information or sign out of your account.
5.
Search for contacts or make a call.
6.
Add contacts.
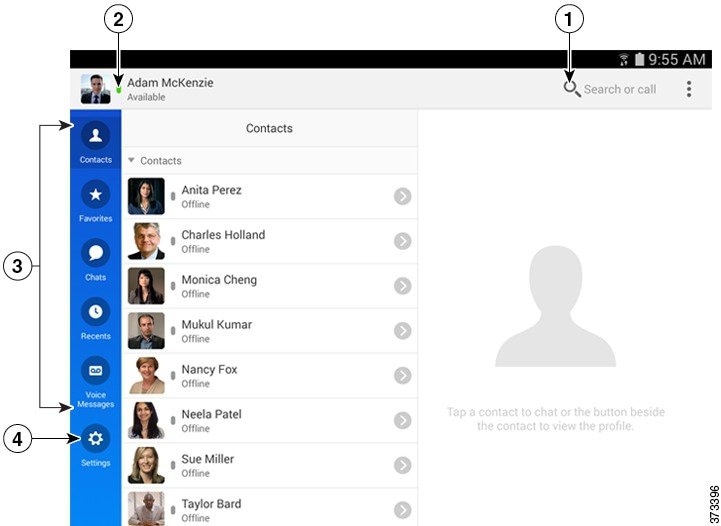
For Tablet
Cisco Jabber displays the
Contacts screen after you sign in.
Procedure
Use the
navigation bar on the left to select the area of the application to use.
Note
Depending on
your account setup, you may not see all the features shown here.
1.
Search for contacts or make a call.
2.
View and edit your availability status.
3.
Access your features.
4.
Edit your settings.
Add Contact from
Directory
Procedure
Step 1
On the
Contacts screen, tap
.
Step 2
To search for
a contact, follow these steps:
Enter a
name or user ID in the
Search box to search your corporate directory,
Recents, and Contacts.
Tap the
desired contact in the search results.
Step 3
(Optional)
Assign the contact to a group.
Step 4
(Optional) To
add the contact to your Favorites list, tap the
Add to
Favorites switch to turn it on.
Step 5
Tap
Done.
Make Call from Contacts
Procedure
Step 1
On the
Contacts screen, tap
the photo or avatar for the desired contact in the list.
Step 2
Select a phone
number.
Step 3
If using Dial
via Office, follow these steps:
Tap
Answer to accept the call.
If
prompted, press a number on the keypad.
After you
accept the call, the corporate calling system calls the number you dialed. The
Dial via Office call opens in the native phone application.
Start Chat from
Contacts
Procedure
On the
Contacts screen, tap the name of the contact to
start a chat with that contact.
Troubleshoot
Send Problem
Report
Use this procedure to send a problem report using the
Cisco Jabber
settings.
Tip
You can also send a report by tapping the
"Send problem report" link in an error message.
Before You Begin
Set up an
email application on your device.
Obtain the
email address for problem reports from your system administrator.
Procedure
Step 1
On the
Settings screen, under
Help, tap
Problem Reporting.
Step 2
If you can
reproduce your problem, tap the
Detailed Logging switch to turn it on.
Step 3
Tap
Send
Problem Report.
Cisco Jabber opens your Email application with a
new message that contains a prefilled subject line and attached log files.
Step 4
Enter a
description of the problem in the body of the email message and send it to your
system administrator.
Tip
Include the
time that the problem occurred. Check your Recents list to find that time.
What to Do Next
Important:
To save battery
power and storage space, tap the
Detailed
Logging switch to turn it off after you no longer need it.
Sign-In
Issues
If you cannot sign
in, try the following troubleshooting tips.
Procedure
Step 1
Check that you
are using a supported device and operating system. For information about
supported devices and operating systems, see the
Cisco Jabber for Android Release Notes for your
release.
Step 2
Check that you
are using the correct release of
Cisco Jabber for Android.
You can
download the latest release of
Cisco Jabber for Android from the Google Play Store.
Step 3
Check that
your VPN is connected (if VPN is required). If your VPN is not connected and
you are not using Expressway Remote and Mobile Access, contact your system
administrator for configuration details.
Step 4
If you are
using Phone Services, check the network connection between your device and the
corporate network as follows:
Open your
Internet browser.
Try to
access the administration pages for your corporate calling system by entering
the following URL in your Internet browser: http://Cisco Unified
Communications Manager server name or IP address/ucmuser.
Examples:
http://xyzhostname/ucmuser
http://209.165.200.224/ucmuser
Contact
your system administrator if you do not have the address for your company's
Cisco Unified
Communications Manager server.
If you
cannot access the administration pages for your corporate calling system, try
again from a different network access point. If you still cannot access the
administration pages for your corporate calling system, contact your system
administrator to find out if there is a network issue.
Step 5
If you are
using
Cisco Unified Communications Manager IM and Presence Service Service, check the network
connection between your device and the server as follows:
Open a
ping utility to ping the
Cisco Unified Communications Manager IM and Presence Service server.
Enter
the Fully Qualified Domain Name or IP address of the server in one of the
following formats:
presence server name.domain.com
ip address.domain.com
If you
cannot ping the server, contact your system administrator.
Step 6
If you are using a tablet, contact your system administrator to
ensure it has been set up for use. Some tablet services require additional
configuration that may not have been performed.
Step 7
If you still
cannot set up
Cisco Jabber for Android, send a problem report to your
system administrator.
If
Cisco Jabber for Android
fails, Cisco recommends that you clear the application data and force-stop the application before restarting.
Procedure
Step 1
Open the
Android
Settings application.
Step 2
Depending on
your operating system, tap either
Apps or
Application manager.
Step 3
Tap
Cisco Jabber.
Step 4
Tap Clear data.
Step 5
Tap
Force
stop.
THE SPECIFICATIONS AND INFORMATION REGARDING THE PRODUCTS IN THIS
MANUAL ARE SUBJECT TO CHANGE WITHOUT NOTICE. ALL STATEMENTS, INFORMATION, AND
RECOMMENDATIONS IN THIS MANUAL ARE BELIEVED TO BE ACCURATE BUT ARE PRESENTED
WITHOUT WARRANTY OF ANY KIND, EXPRESS OR IMPLIED. USERS MUST TAKE FULL
RESPONSIBILITY FOR THEIR APPLICATION OF ANY PRODUCTS.
THE SOFTWARE LICENSE AND LIMITED WARRANTY FOR THE ACCOMPANYING PRODUCT
ARE SET FORTH IN THE INFORMATION PACKET THAT SHIPPED WITH THE PRODUCT AND ARE
INCORPORATED HEREIN BY THIS REFERENCE. IF YOU ARE UNABLE TO LOCATE THE SOFTWARE
LICENSE OR LIMITED WARRANTY, CONTACT YOUR CISCO REPRESENTATIVE FOR A COPY.
NOTWITHSTANDING ANY OTHER WARRANTY HEREIN, ALL DOCUMENT FILES AND
SOFTWARE OF THESE SUPPLIERS ARE PROVIDED “AS IS" WITH ALL FAULTS. CISCO AND THE
ABOVE-NAMED SUPPLIERS DISCLAIM ALL WARRANTIES, EXPRESSED OR IMPLIED, INCLUDING,
WITHOUT LIMITATION, THOSE OF MERCHANTABILITY, FITNESS FOR A PARTICULAR PURPOSE
AND NONINFRINGEMENT OR ARISING FROM A COURSE OF DEALING, USAGE, OR TRADE
PRACTICE.
IN NO EVENT SHALL CISCO OR ITS SUPPLIERS BE LIABLE FOR ANY INDIRECT,
SPECIAL, CONSEQUENTIAL, OR INCIDENTAL DAMAGES, INCLUDING, WITHOUT LIMITATION,
LOST PROFITS OR LOSS OR DAMAGE TO DATA ARISING OUT OF THE USE OR INABILITY TO
USE THIS MANUAL, EVEN IF CISCO OR ITS SUPPLIERS HAVE BEEN ADVISED OF THE
POSSIBILITY OF SUCH DAMAGES.
Any Internet Protocol (IP) addresses and phone numbers used in this document are not intended to be actual addresses and phone numbers. Any examples, command display output, network topology diagrams, and other figures included in the document are shown for illustrative purposes only. Any use of actual IP addresses or phone numbers in illustrative content is unintentional and coincidental.
Cisco and the Cisco logo are trademarks or registered trademarks of Cisco and/or its affiliates in the U.S. and other countries. To view a list of Cisco trademarks, go to this URL: http://www.cisco.com/go/trademarks. Third-party trademarks mentioned are the property of their respective owners. The use of the word partner does not imply a partnership relationship between Cisco and any other company. (1110R)


 .
.
