Installation and Configuration Guide for Cisco Unified Communications for RTX Release 8.6
Bias-Free Language
The documentation set for this product strives to use bias-free language. For the purposes of this documentation set, bias-free is defined as language that does not imply discrimination based on age, disability, gender, racial identity, ethnic identity, sexual orientation, socioeconomic status, and intersectionality. Exceptions may be present in the documentation due to language that is hardcoded in the user interfaces of the product software, language used based on RFP documentation, or language that is used by a referenced third-party product. Learn more about how Cisco is using Inclusive Language.
- Updated:
- February 18, 2013
Chapter: Configuring RTX Server
- Configuring the Basics on the RTX Server
- How to Enable LDAP Synchronization and Authentication
- Overview of LDAP Synchronization and Authentication
- Overview of Manager for Cisco UC for RTX
- Installing Manager for Cisco UC for RTX
- Adding RTX Server Information
- Specifying LDAP Synchronization Settings
- Selecting Synchronization and Authentication Types
- Synchronizing and Authenticating Users
- (Optional) Restoring RTX Users
- How to Configure Cisco UC for RTX Features
- About Registry Settings
- Location of Registry Settings
- TFTP, CTIManager, and CCMCIP Server Registry Settings
- Cisco WebEx Site Registry Settings
- Voicemail and Visual Voicemail Registry Settings
- Video Registry Settings
- Account Credential Synchronization Registry Settings
- Microsoft Office Integration Settings
- Other Registry Settings
Configuring RTX Server
•![]() Configuring the Basics on the RTX Server
Configuring the Basics on the RTX Server
•![]() How to Enable LDAP Synchronization and Authentication
How to Enable LDAP Synchronization and Authentication
•![]() How to Configure Cisco UC for RTX Features
How to Configure Cisco UC for RTX Features
Configuring the Basics on the RTX Server
You perform basic configurations on the RTX server before you synchronize users from an LDAP server.
For information on how to configure RTX server, see the RTX Administrator's Manual at
http://rtx.tencent.com/rtx/support/index.shtml
What to Do Next
How to Enable LDAP Synchronization and Authentication
Related Topics
How to Configure Cisco Unified Communications Manager Server
How to Enable LDAP Synchronization and Authentication
Overview of LDAP Synchronization and Authentication
It is recommended that the usernames and directory numbers match in the following servers:
•![]() RTX server
RTX server
•![]() Cisco Unified Communications Manager server
Cisco Unified Communications Manager server
To achieve this goal, you enable LDAP synchronization when you configure Cisco Unified Communications Manager in the Enabling LDAP Synchronization, page 2-8. When this task is completed, you enable LDAP synchronization on the RTX server to import the same source data on which you build the Cisco Unified Communications Manager user database.
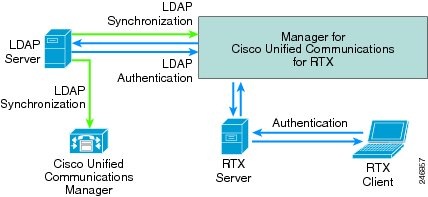
If you synchronize the RTX server with an LDAP server, you may also want to enable LDAP authentication. If you enable LDAP authentication on the RTX server, an LDAP server provides authentication services to the RTX server by proxy. For example, the RTX server can forward authentication requests from RTX clients to an LDAP server, and the LDAP server responds to the request.
It is recommended that you synchronize the office phone number and the mobile phone number of a contact during the LDAP synchronization. When the synchronization is completed, neither you nor users need to make any changes to these phone numbers.
Figure 3-1 shows LDAP synchronization and authentication between Manager for Cisco UC for RTX and the LDAP server.
Figure 3-1 LDAP Synchronization and Authentication
Overview of Manager for Cisco UC for RTX
Manager for Cisco UC for RTX allows you to
•![]() enable LDAP synchronization and authentication on the RTX server
enable LDAP synchronization and authentication on the RTX server
•![]() configure Cisco UC for RTX features
configure Cisco UC for RTX features
You can download Manager for Cisco UC for RTX from Cisco.com. You must install the Manager for Cisco UC for RTX on the RTX server.
For information on how to configure Cisco UC for RTX features, see the "How to Configure Cisco UC for RTX Features" section.
To enable LDAP synchronization and authentication, you must perform the following tasks:
1. ![]() Installing Manager for Cisco UC for RTX
Installing Manager for Cisco UC for RTX
2. ![]() Adding RTX Server Information
Adding RTX Server Information
3. ![]() Specifying LDAP Synchronization Settings
Specifying LDAP Synchronization Settings
4. ![]() Selecting Synchronization and Authentication Types
Selecting Synchronization and Authentication Types
5. ![]() Synchronizing and Authenticating Users
Synchronizing and Authenticating Users
Installing Manager for Cisco UC for RTX
Procedure
Step 1 ![]() Download Manager for Cisco UC for RTX installation package from Cisco.com and save it locally on RTX server.
Download Manager for Cisco UC for RTX installation package from Cisco.com and save it locally on RTX server.

Note ![]() See the Release Notes for Cisco Unified Communications for RTX Release 8.6 for the download URL of Cisco UC for RTX.
See the Release Notes for Cisco Unified Communications for RTX Release 8.6 for the download URL of Cisco UC for RTX.
Step 2 ![]() Run cucrtxManager.exe in the zip file and accept any warning that you see.
Run cucrtxManager.exe in the zip file and accept any warning that you see.
Step 3 ![]() Follow the installation wizard to complete the installation.
Follow the installation wizard to complete the installation.
Adding RTX Server Information
Procedure
Step 1 ![]() Open Manager for Cisco UC for RTX.
Open Manager for Cisco UC for RTX.
Step 2 ![]() Select Service Status in the left navigation pane.
Select Service Status in the left navigation pane.
Step 3 ![]() Select Stop All Services if any service is running.
Select Stop All Services if any service is running.
Step 4 ![]() Select RTX Server under Service Settings.
Select RTX Server under Service Settings.
Step 5 ![]() Enter the IP address or the fully qualified domain name of the RTX server in the IP Address field.
Enter the IP address or the fully qualified domain name of the RTX server in the IP Address field.
Note ![]() You must stop all services before you apply changes to the IP address or the fully qualified domain name of the RTX server.
You must stop all services before you apply changes to the IP address or the fully qualified domain name of the RTX server.
Step 6 ![]() Enter the port number in the APP Port field.
Enter the port number in the APP Port field.
Step 7 ![]() Enter the port number in the SDK Port field.
Enter the port number in the SDK Port field.
Step 8 ![]() Select Apply.
Select Apply.
Specifying LDAP Synchronization Settings
Procedure
Step 1 ![]() Open Manager for Cisco UC for RTX.
Open Manager for Cisco UC for RTX.
Step 2 ![]() Select LDAP Sync. and Auth. under Service Settings in the left navigation pane.
Select LDAP Sync. and Auth. under Service Settings in the left navigation pane.
Step 3 ![]() Select Add on the upper right to add a new LDAP server.
Select Add on the upper right to add a new LDAP server.
Step 4 ![]() Enter a setting ID for the LDAP server setting.
Enter a setting ID for the LDAP server setting.
Step 5 ![]() Select the LDAP server type.
Select the LDAP server type.
Step 6 ![]() Enter the IP address and the port number of the LDAP server.
Enter the IP address and the port number of the LDAP server.
Step 7 ![]() Select the LDAP protocol version.
Select the LDAP protocol version.
Step 8 ![]() Check the SSL check box if you use an SSL connection to the LDAP server.
Check the SSL check box if you use an SSL connection to the LDAP server.
Step 9 ![]() Enter LDAP manager distinguished name and password.
Enter LDAP manager distinguished name and password.
For example, as the username, enter CN=Administrator,CN=Users,DC=children1,DC=CUCRTX_AD_1,DC=com.
Step 10 ![]() Enter the organization unit which you synchronize as a department in the "Synchronizing and Authenticating Users" section.
Enter the organization unit which you synchronize as a department in the "Synchronizing and Authenticating Users" section.
For example, as the organization unit, enter OU=ou22,DC=children1,DC=CUCRTX_AD_1,DC=com.
Step 11 ![]() Enter the department name that you want to display at the top level in the RTX company structure. Then select Next.
Enter the department name that you want to display at the top level in the RTX company structure. Then select Next.
Wait while the Manager for Cisco UC for RTX retrieves data from the LDAP server.
Note ![]() Users that you synchronize from the LDAP server are listed under the top-level department on the RTX server.
Users that you synchronize from the LDAP server are listed under the top-level department on the RTX server.
Step 12 ![]() Expand the domain name or the organization unit.
Expand the domain name or the organization unit.
Step 13 ![]() Check the check box of the departments or the users that you want to synchronize from the LDAP server. Then select Next.
Check the check box of the departments or the users that you want to synchronize from the LDAP server. Then select Next.
Step 14 ![]() Enter the name of the LDAP OU attribute that you want to map to the RTX department name.
Enter the name of the LDAP OU attribute that you want to map to the RTX department name.
Step 15 ![]() Enter the name of LDAP server user fields to specify how they are mapped to RTX server user fields. Then select OK.
Enter the name of LDAP server user fields to specify how they are mapped to RTX server user fields. Then select OK.
Step 16 ![]() If you have multiple LDAP servers, repeat Step 3 to Step 15.
If you have multiple LDAP servers, repeat Step 3 to Step 15.
Selecting Synchronization and Authentication Types
Procedure
Step 1 ![]() Open Manager for Cisco UC for RTX.
Open Manager for Cisco UC for RTX.
Step 2 ![]() Select LDAP Sync. and Auth. under Service Settings in the left navigation pane.
Select LDAP Sync. and Auth. under Service Settings in the left navigation pane.
Step 3 ![]() Select one of the following two synchronization types:
Select one of the following two synchronization types:
•![]() Overwrite—Replaces all the existing users on the RTX server with selected users on the LDAP server.
Overwrite—Replaces all the existing users on the RTX server with selected users on the LDAP server.
•![]() Incremental—Adds all of the selected users on the LDAP server to the RTX server. The synchronization updates users (with same usernames) on the RTX server with information on the LDAP server.
Incremental—Adds all of the selected users on the LDAP server to the RTX server. The synchronization updates users (with same usernames) on the RTX server with information on the LDAP server.
Step 4 ![]() Check if you want to perform just one synchronization. If not, specify a synchronization interval (no less than 6 hours) and the next synchronization time.
Check if you want to perform just one synchronization. If not, specify a synchronization interval (no less than 6 hours) and the next synchronization time.
Step 5 ![]() Select either of the following two authentication types:
Select either of the following two authentication types:
•![]() Local—The RTX server authenticates RTX users.
Local—The RTX server authenticates RTX users.
•![]() LDAP Authentication—The LDAP server authenticates RTX users.
LDAP Authentication—The LDAP server authenticates RTX users.
Step 6 ![]() Select Apply.
Select Apply.
Synchronizing and Authenticating Users
Procedure
Step 1 ![]() Open Manager for Cisco UC for RTX.
Open Manager for Cisco UC for RTX.
Step 2 ![]() Select Server Status in the left navigation pane.
Select Server Status in the left navigation pane.
Step 3 ![]() Right-click the service, LDAP_Synchronization, and select Start Service.
Right-click the service, LDAP_Synchronization, and select Start Service.
Note ![]() Before Manager for Cisco UC for RTX performs the LDAP synchronization, it automatically does a backup for the existing RTX users on the RTX server. For information on how to restore the RTX users, see the "(Optional) Restoring RTX Users" section.
Before Manager for Cisco UC for RTX performs the LDAP synchronization, it automatically does a backup for the existing RTX users on the RTX server. For information on how to restore the RTX users, see the "(Optional) Restoring RTX Users" section.
Note ![]() To view the latest department structure on the RTX server after the synchronization, restart RTX Server Manager.
To view the latest department structure on the RTX server after the synchronization, restart RTX Server Manager.
Step 4 ![]() Right-click the service, LDAP_Authentication, and select Start Service.
Right-click the service, LDAP_Authentication, and select Start Service.
Related Topics
•![]() Configuring the Basics on the RTX Server
Configuring the Basics on the RTX Server
•![]() How to Configure Cisco Unified Communications Manager Server
How to Configure Cisco Unified Communications Manager Server
(Optional) Restoring RTX Users
Procedure
Step 1 ![]() Stop all the services in Manager for Cisco UC for RTX.
Stop all the services in Manager for Cisco UC for RTX.
Step 2 ![]() Select File > Restore > RTX Users.
Select File > Restore > RTX Users.
Step 3 ![]() Select the backup file to which you want to restore the RTX users for the RTX server.
Select the backup file to which you want to restore the RTX users for the RTX server.
Note ![]() The maximum number of saved backup files is twenty. Manager for Cisco UC for RTX automatically removes old backup files when you have more than twenty saved backup files.
The maximum number of saved backup files is twenty. Manager for Cisco UC for RTX automatically removes old backup files when you have more than twenty saved backup files.
Step 4 ![]() Select Restore.
Select Restore.
How to Configure Cisco UC for RTX Features
You can use the Manager for Cisco UC for RTX to configure features (for example, visual voicemail) on user computers.
When a user starts Cisco UC for RTX, Cisco UC for RTX automatically copies these settings to local disk and applies these settings.
To configure Cisco UC for RTX Features, perform the following tasks:
•![]() Adding Roles According to Your Needs on RTX Server
Adding Roles According to Your Needs on RTX Server
•![]() Specifying Feature Settings Using Manager for Cisco UC for RTX
Specifying Feature Settings Using Manager for Cisco UC for RTX
•![]() Deploying Feature Settings to Client Computer
Deploying Feature Settings to Client Computer
Note ![]() If you do not want to use Manager for Cisco UC for RTX to configure features, you can use batch files. Run a batch file on each client computer to specify all the registry settings before users start Cisco UC for RTX. You create the batch file to meet your feature requirements based on the template that is available on Cisco.com. For detailed information on registry settings, see the "About Registry Settings" section.
If you do not want to use Manager for Cisco UC for RTX to configure features, you can use batch files. Run a batch file on each client computer to specify all the registry settings before users start Cisco UC for RTX. You create the batch file to meet your feature requirements based on the template that is available on Cisco.com. For detailed information on registry settings, see the "About Registry Settings" section.
Adding Roles According to Your Needs on RTX Server
Administrators add roles with different privilege levels on the RTX server. The default role is user. Users that you have synchronized from the LDAP server or manually added on the RTX server, have the default role of the user.
Manager for Cisco UC for RTX imports these roles from RTX server. You can configure Cisco UC for RTX features for each role. See the following three scenarios, which describe circumstances in which you need different user roles.
Scenario 1
Your company is geographically scattered. Users in Shanghai and Beijing are managed by different Cisco Unified Communications Managers.
Add two roles for users in Shanghai and Beijing respectively, for example, BJ_User, and SH_User. Then for each role, you specify the IP address of Cisco Unified Communications Manager in the Manager for Cisco UC for RTX.
Scenario 2
Your deploy the Cisco UC for RTX in a department or a division.
Add one role for Cisco UC for RTX users, for example, UC_User. Then for this role, you enable and configure Cisco UC for RTX features.
Scenario 3
Cisco UC for RTX features are distributed differently among executives, managers, and individual contributors.
Add one role for each type of employee. Configure Cisco UC for RTX features for each role. For example, you can specify that executives and managers are allowed to make video calls.
For information on how to add a role, see the RTX Administrator's Manual at
http://rtx.tencent.com/rtx/support/index.shtml
Adding RTX Users to Roles
You add roles in the "Adding Roles According to Your Needs on RTX Server" section. You must add users to each role.
Scenario 1
Add RTX users in Beijing site to the BJ_User role. Add users in Shanghai site to the SH_User role.
Scenario 2
Add RTX users that are Cisco UC for RTX users to the UC_User role.
Scenario 3
Add RTX users who are executives to the UC_Executives role. Add RTX users who are managers to the UC_Manager role. Add RTX users who are individual contributors to the UC_Contributor role.
For information on how to add users to a role, see the RTX Administrator's Manual at
http://rtx.tencent.com/rtx/support/index.shtml
Specifying Feature Settings Using Manager for Cisco UC for RTX
Procedure
Step 1 ![]() Open Manager for Cisco UC for RTX.
Open Manager for Cisco UC for RTX.
Step 2 ![]() Select Cisco UC for RTX Feature Settings under Server Settings in the left navigation pane.
Select Cisco UC for RTX Feature Settings under Server Settings in the left navigation pane.
Step 3 ![]() Select the role for which you specify the Cisco UC for RTX feature settings in the middle pane.
Select the role for which you specify the Cisco UC for RTX feature settings in the middle pane.
For example, if you deploy Cisco UC for RTX to all the employees, select the default role, user. If you deploy Cisco UC for RTX to a department or a division, select the UC_User role that you added in previous Scenario 2.
Note ![]() You define roles on the RTX server. The default role is user. To synchronize roles from the RTX server on Manager for Cisco UC for RTX, select the plus symbol of All Role to collapse the role list. Then select the symbol again to expand it.
You define roles on the RTX server. The default role is user. To synchronize roles from the RTX server on Manager for Cisco UC for RTX, select the plus symbol of All Role to collapse the role list. Then select the symbol again to expand it.
Step 4 ![]() Check Enable Cisco UC for RTX features for this role.
Check Enable Cisco UC for RTX features for this role.
Note ![]() If a RTX user has two or more roles for which administrators specified different Cisco UC for RTX feature settings, the feature settings of the role that appears at the lowest level of the role list take effect.
If a RTX user has two or more roles for which administrators specified different Cisco UC for RTX feature settings, the feature settings of the role that appears at the lowest level of the role list take effect.
Step 5 ![]() Enter the IP address or fully qualified domain name of the primary TFTP server in your Cisco Unified Communications system in the TFTP Server 1 field.
Enter the IP address or fully qualified domain name of the primary TFTP server in your Cisco Unified Communications system in the TFTP Server 1 field.
Step 6 ![]() (Optional) Enter the IP address or fully qualified domain name of any other TFTP servers.
(Optional) Enter the IP address or fully qualified domain name of any other TFTP servers.
Step 7 ![]() Enter the IP address or fully qualified domain name of the primary CCMCIP server in the CCMCIP Server 1 field.
Enter the IP address or fully qualified domain name of the primary CCMCIP server in the CCMCIP Server 1 field.
Step 8 ![]() (Optional) Enter the IP address or fully qualified domain name of any other CCMCIP servers.
(Optional) Enter the IP address or fully qualified domain name of any other CCMCIP servers.
Step 9 ![]() (Optional) Enter the IP address or fully qualified domain name of the primary CTIManager server in the CTI Server field.
(Optional) Enter the IP address or fully qualified domain name of the primary CTIManager server in the CTI Server field.
Note ![]() Leave CTI Server blank if users do not use Cisco UC for RTX to control their desk phones.
Leave CTI Server blank if users do not use Cisco UC for RTX to control their desk phones.
Step 10 ![]() (Optional) Enter the IP address or fully qualified domain name of any other CTIManager servers.
(Optional) Enter the IP address or fully qualified domain name of any other CTIManager servers.
Step 11 ![]() Enter the voicemail pilot number.
Enter the voicemail pilot number.
Step 12 ![]() (Optional) Check the check box if you want users to use Cisco UC for RTX username and password as credentials for visual voicemail in the Visual Voicemail area.
(Optional) Check the check box if you want users to use Cisco UC for RTX username and password as credentials for visual voicemail in the Visual Voicemail area.
Step 13 ![]() Enter the IP address or fully qualified domain name of the Cisco Unity Connection server in the Server Address field.
Enter the IP address or fully qualified domain name of the Cisco Unity Connection server in the Server Address field.
Step 14 ![]() Select the connection protocol of the Cisco Unity Connection server.
Select the connection protocol of the Cisco Unity Connection server.
Note ![]() To allow users to listen to secure voice messages, select TLS as the connection protocol.
To allow users to listen to secure voice messages, select TLS as the connection protocol.
Step 15 ![]() Enter the port.
Enter the port.
Step 16 ![]() Enter the Inbox Name of voice messages on the Cisco Unity Connection server.
Enter the Inbox Name of voice messages on the Cisco Unity Connection server.
Step 17 ![]() Enter the Trash Name of voice messages on the Cisco Unity Connection server.
Enter the Trash Name of voice messages on the Cisco Unity Connection server.
Step 18 ![]() Check the Enable video calls check box to allow users to make video calls.
Check the Enable video calls check box to allow users to make video calls.
Step 19 ![]() Check the Enable users to select whether to show their video automatically check box to allow users to select whether they do so.
Check the Enable users to select whether to show their video automatically check box to allow users to select whether they do so.
Step 20 ![]() Check the Enable users to optimize video quality for their computers check box to allow users to optimize their video quality.
Check the Enable users to optimize video quality for their computers check box to allow users to optimize their video quality.
Step 21 ![]() This step depends on your preference. Check the check box to allow users to use their Cisco UC for RTX username and password as credentials for meeting in the Meeting area. If you have applied an account on Cisco WebEx Meetings Server site, uncheck the check box to allow users to manually set up their credentials for meeting in the Meeting area.
This step depends on your preference. Check the check box to allow users to use their Cisco UC for RTX username and password as credentials for meeting in the Meeting area. If you have applied an account on Cisco WebEx Meetings Server site, uncheck the check box to allow users to manually set up their credentials for meeting in the Meeting area.
Step 22 ![]() Enter the Cisco WebEx site name or the Cisco WebEx Meetings Server address.
Enter the Cisco WebEx site name or the Cisco WebEx Meetings Server address.
Step 23 ![]() Check the Microsoft Office integration check box to enable the integration.
Check the Microsoft Office integration check box to enable the integration.
Step 24 ![]() Select Apply.
Select Apply.
Step 25 ![]() Repeat Step 3 to Step 24 if you want to configure Cisco UC for RTX features for more than one role.
Repeat Step 3 to Step 24 if you want to configure Cisco UC for RTX features for more than one role.
Deploying Feature Settings to Client Computer
Procedure
Step 1 ![]() Open Manager for Cisco UC for RTX.
Open Manager for Cisco UC for RTX.
Step 2 ![]() Select Server Status.
Select Server Status.
Step 3 ![]() Right-click the third service, Feature_Deployment, and select Start Service.
Right-click the third service, Feature_Deployment, and select Start Service.
About Registry Settings
•![]() Location of Registry Settings
Location of Registry Settings
•![]() TFTP, CTIManager, and CCMCIP Server Registry Settings
TFTP, CTIManager, and CCMCIP Server Registry Settings
•![]() Cisco WebEx Site Registry Settings
Cisco WebEx Site Registry Settings
•![]() Voicemail and Visual Voicemail Registry Settings
Voicemail and Visual Voicemail Registry Settings
•![]() Account Credential Synchronization Registry Settings
Account Credential Synchronization Registry Settings
•![]() Microsoft Office Integration Settings
Microsoft Office Integration Settings
Location of Registry Settings
You specify the configuration for Client Services Framework in the following registry key:
HKEY_CURRENT_USER\Software\Cisco Systems, Inc.\Unified Communications\cucrtx
TFTP, CTIManager, and CCMCIP Server Registry Settings
Table 3-1 lists the registry subkeys that you must use to specify the TFTP, CCMCIP, and CTIManager server configurations.
Cisco WebEx Site Registry Settings
Table 3-2 lists the registry subkeys that you must use to specify the meeting center configuration.
|
|
|
|---|---|
WebConfServer |
Enter the Cisco WebEx site name in your Cisco Unified Communications system. |
Voicemail and Visual Voicemail Registry Settings
Table 3-3 lists the registry subkeys that you must use to specify the voicemail and visual voicemail configuration.
Video Registry Settings
Table 3-4 lists the registry subkeys that you must use to specify video values.
Account Credential Synchronization Registry Settings
Client Services Framework includes settings that enable you to manage the credentials of Cisco Unified Communications back-end services. You can use these settings to configure the source of credentials for each service.
For example, you might have separate directories for your phone system, voicemail system, and meeting system. If you do not set the appropriate values for these services, your users have to perform the following steps to specify accounts:
Step 1 ![]() Select the menu button list in the RTX title bar.
Select the menu button list in the RTX title bar.
Step 2 ![]() Select Cisco UC Settings > Accounts.
Select Cisco UC Settings > Accounts.
Step 3 ![]() Enter their username and password for each service.
Enter their username and password for each service.
Table 3-5 lists the registry subkeys that you must use to specify account credential synchronization.
Microsoft Office Integration Settings
Table 3-6 lists the registry subkey that you must use to enable or disable Microsoft Office integration.
Other Registry Settings
Table 3-7 lists the registry subkey that you must use to make local registry settings take effect.
 Feedback