Cisco Unified Communications Self Care Portal User Guide, Release 10.0.0
Bias-Free Language
The documentation set for this product strives to use bias-free language. For the purposes of this documentation set, bias-free is defined as language that does not imply discrimination based on age, disability, gender, racial identity, ethnic identity, sexual orientation, socioeconomic status, and intersectionality. Exceptions may be present in the documentation due to language that is hardcoded in the user interfaces of the product software, language used based on RFP documentation, or language that is used by a referenced third-party product. Learn more about how Cisco is using Inclusive Language.
- Updated:
- November 27, 2013
Chapter: Unified Communications Self Care Portal
Unified Communications Self Care Portal
This document describes how to use Unified Communications Self-Care Portal to configure user settings for your Cisco Unified IP Phones and Jabber applications. Using Unified Communications Self Care Portal, you can configure settings such as speed dial numbers, contact lists, phone services, and voicemail notifications.
This document contains the following sections:
Unified Communications Self Care Settings
This user guide documents all of the configuration settings available in Unified Communications Self-Care Portal. This guide assumes that your phone supports all the available settings and that your network administrator has configured Unified Communications Self-Care Portal to display all user settings.
Note that some settings that appear in this guide may not appear when you set up your phone in Unified Communications Self-Care Portal due to the following factors:
- Phone Capabilities—If a particular feature is not available for your particular phone model, that feature does not appear when you set up your phone in Unified Communications Self-Care Portal. For example, if your phone does not support Do Not Disturb, that feature does not appear as an available setting.
- Enterprise Parameters—Your network administrator can set enterprise parameters in Cisco Unified Communications Manager that limit the settings that users can configure in Unified Communications Self-Care Portal. For example, network administrators can configure Unified Communications Self-Care Portal to remove all call forwarding options. With this configuration, Unified Communications Self-Care Portal does not display call forwarding options.
If a setting that is in this guide does not appear when you configure your user settings in Unified Communications Self-Care Portal, check your phone documentation to ensure that the feature is available on your phone. If the feature is available for your phone, ask one of your network administrators to check the enterprise parameters within Cisco Unified Communications Manager to make sure that the feature is available for configuration by end users.
The Graphical User Interface
Unified Communications Self-Care Portal uses a web-based graphical interface with six main tabs. Each tab contains a link to different options that the user can configure. The tabs are as follows:
- Phones—The settings under this tab allow you to view and configure your phone settings such as speed dial numbers, ring settings, call history, and call forwarding settings.
- Voicemail—The settings under this tab allow you to set up your voicemail preferences.
- IM & Availability—The settings under this tab allow you to set up your Do Not Disturb and IM & Presence status.
- Conferencing—The settings under this tab allow you to set up conferencing options.
- General Settings—The settings under this tab allow you to configure settings such as user locales and passwords.
- Downloads—The settings under this section allow you to download plugins and applications for your phones.
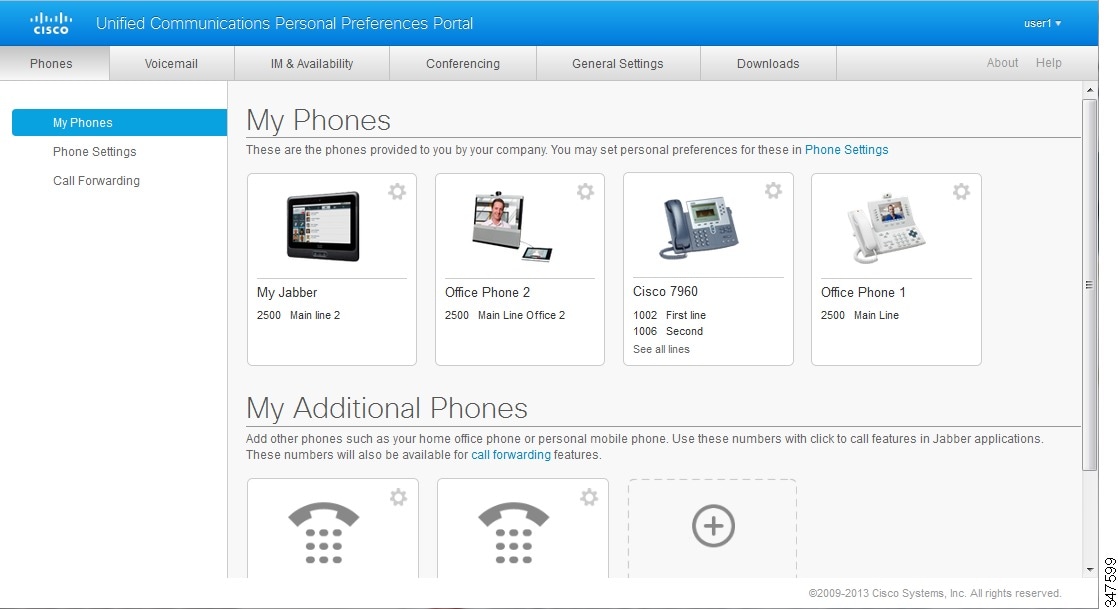
The following graphic displays the main screen.
Common features and icons
The Unified Communications Self Care Portal uses the following icons to execute common functions.
Icon |
Description |
|---|---|
|
Add New—Click this icon to add a new item, such as a new phone, new service, or a new speed dial number. |
|
Delete—Click this icon to delete this setting. |
|
Edit Settings—Click this icon to edit an existing setting. |
|
Linked—When the Linked icon displays, phone settings for this particular phone setting are linked. If you update one of your phones, Unified Communications Self Care Portal applies the same update to your other phones. Click the icon to change the status to unlinked so that you can apply unique settings for each phone. |
|
Unlinked—When the Unlinked icon displays, each of your phones can have unique settings for this phone setting. Click the icon to change the status to linked so that your phones share the same setup for this phone setting. |


Phones
The settings that appear under the Phones tab allow you to view and configure settings for each of your Cisco Unified IP Phones and Jabber devices. The Phones tab is split into three main sections:
- My Phones—Under My Phones, you can view a summary of all of your phones and add new phones.
- Phone Settings—Under Phone Settings, you can configure phone settings such as speed dial numbers, ring settings, and voicemail notifications.
- Call forwarding—Under Call forwarding, you can configure call forwarding options for your phones.
My Phones
The My Phones window displays a summarized view of your company phones and any additional phones where you can be reached when you are not at your desk. The My Phones window is split between two main headings:
- My Phones
-
The My Phones section displays phones that have been provided by your company. In the My Phones window, you can edit phone and line descriptions for your company phones. The settings that you apply under Phone Settings apply exclusively to company phones..
- My Additional Phones
-
Additional phones are phones that were not provided by your company, but which you may want to add to the list of numbers where you can be reached when you are not at your desk. You can enable your additional phones for Single Number Reach accessibility, Mobility softkey access, or Extend and Connect control by Jabber. However, you cannot configure phone settings for additional phones.
- Edit company phone
- Download phone manual
- Set up an additional phone
- Enable Single Number Reach on an additional phone
- Set up ring schedule for Single Number Reach
- Set additional phone for mobility calls
Edit company phone
In the My Phones view you can view and edit line labels and phone descriptions for your company phones. To edit company phones, perform the following procedure:
Download phone manual
To download the manual for one of your company phones, perform the following procedure:
| Step 1 | Click the Phones tab. |
| Step 2 | In the left navigation pane, click My Phones. |
| Step 3 | Click on the phone. |
| Step 4 | Click Download Manual. |
Set up an additional phone
Unified Communications Self Care Portal allows you to setup additional phones such as a home office phone, or a mobile phone, to the phones that were provided by your company. Additional phones provide an additional number where you can be reached if you are not at your desk.
To set up an additional phone, perform the following steps:
Enable Single Number Reach on an additional phone
If you set up an additional phone, such as a home office phone, to go along with your company-provisioned phones, you can enable Single Number Reach on your additional phone so that when someone dials your company phone, your additional phone also rings.
To enable Single Number Reach on an additional phone, perform the following steps:
Set up ring schedule for Single Number Reach
For additional phones with Single Number Reach enabled, a ring schedule allows you to dictates the days and times when the additional phone can be dialed. For example, you can set up a schedule that dictates that only during regular office hours will someone be able to reach you at home by dialing your office number.
To set up a ring schedule, perform the following procedure:
Set additional phone for mobility calls
If you set up one of your additional phones as a mobile phone, you can transfer calls from one of your company phones to the mobile phone by pressing the Mobility softkey on your company phone.
To set up an additional phone as a mobile phone, perform the following steps:
Phone Settings
The Phone Settings window allows you to set up phone settings for your company phones.
By default, the phone settings for your various company phones are linked. Under the default setting, each of your phones will have an identical configuration for a particular phone setting. Follow the Link and unlink phone settings procedure to link or unlink your phones for various phone settings.
Please note that the options available under Phone Settings apply only to your company phones. You cannot configure phone settings for your additional phones.
- Link and unlink phone settings
- Set up speed dial numbers
- Set up phone services
- Set up voicemail notifications
- Set up call history
- Set up phone contacts
Link and unlink phone settings
For phone settings, you can link the settings for your phones. When you link phones on a particular phone setting, Unified Communications Self Care Portal applies your configuration for that phone setting to all of your phones. For example, if you have three phones and you link your speed dial numbers for the three phones, all three phones share the same speed dial configuration. If you update a speed dial number for one of the phones, Unified Communications Self Care Portal automatically applies that speed dial number for the other phones as well. To apply a unique phone setting on a linked phone, unlink the phones.
Unified Communications Self Care links and unlinks each phone setting separately. As a result, you can link settings for one specific phone setting, such as speed dial numbers, while leaving another phone setting, such as voicemail notifications, unlinked. By default, all phone settings are linked.
You can link or unlink settings by clicking the Linked/Unlinked icon. The icon displays the current state of whether your phones are linked or unlinked.
The following graphic displays how a set of phones with linked Services appears in the user interface. Since Services are currently linked, the Linked icon displays and the settings apply to all three phones. You can click the Linked icon to unlink the phones and apply unique settings for each phone.

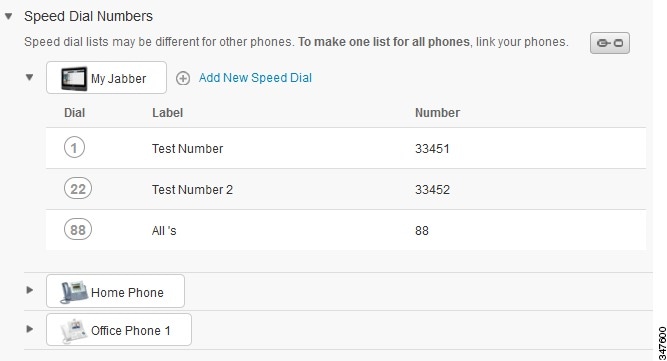
The following graphic displays how a set of phones with unlinked Speed Dial Numbers settings appears in the user interface. In this case, the displayed settings apply to My Jabber only. Since the settings are unique for each phone, the Unlinked icon displays. You can click the icon to apply the same settings for all three phones.
|
|
 Note |
The Filter control, which appears in the top right corner of the configuration window, sets which phone you want to view. It has no impact on whether phone settings are linked. If you view the settings of a phone whose settings are linked, and you update that phone's settings, Unified Communications Self Care Portal also updates the linked phones. |
Set up speed dial numbers
To set up speed dial numbers, perform the following procedure:
Set up phone services
The Services option allows you to add phone services such as a company directory, visual voicemail, or weather forecasts, to your Cisco Unified IP phones and Jabber applications. The list of available services depends on which phone model you are configuring.
To add a service, perform the following steps:
| Step 1 | Click the Phones tab. |
| Step 2 | Click Phone Settings. |
| Step 3 | Click Services to expand the Services view. |
| Step 4 | Do the following: |
| Step 5 | From the Service drop-down list box, select the service that you want to add. |
| Step 6 | In the Display Name text box, enter the label that you want to use to identify the service on your phones. |
| Step 7 | Enter any required parameters. |
| Step 8 | Click OK. |
Set up voicemail notifications
Voicemail notifications allow you to set up how you want your phone to notify you that there are new messages. For example, you can configure your phones to provide screen prompts or flash a message waiting light to notify you that you have new messages.
To set up voicemail notifications, perform the following procedure:
| Step 1 | Click the Phones tab. |
| Step 2 | Click Phone Settings. |
| Step 3 | Click Voicemail Notification Settings. |
| Step 4 | For each of your phones, check the notification options that you want to apply to your phones. |
| Step 5 | Click Save. |
Set up call history
Call history allows you to log missed calls for each of your phones. To set up call history:
| Step 1 | Click the Phones tab. |
| Step 2 | Click Phone Settings. |
| Step 3 | Click Call History. |
| Step 4 | Check the Log Missed Calls check box for each phone line that you want to save the call history. |
| Step 5 | Click Save. |
Set up phone contacts
Phone contacts allow you to store phone numbers and email addresses for your phone contacts. From your phones, you can browse your list of contacts and place calls directly from the contact list without having to type in the number each time.
To set up your phone contact list, perform the following procedure:
Note |
Each user has one phone contact list for all their phones. There is no option to link and unlink the phone contact list. |
| Step 1 | Click the Phones tab. |
| Step 2 | In the left navigation pane, click Phone Settings. |
| Step 3 | Click Create New Contact. The Add New Phone Contact window appears. |
| Step 4 | Complete the fields with the contact information for the contact. |
| Step 5 | Click OK. |
Call forwarding options
Call forwarding user options allow you to set up your Cisco Unified IP phones and Jabber devices to forward calls to another number.
Set forward all calls
To set up your phone to forward all incoming calls to another number, perform the following procedure:
| Step 1 | Click the Phones tab. |
| Step 2 | In the left navigation pane, click Call Forwarding. |
| Step 3 | Click the phone number on which you want to set up call forwarding. |
| Step 4 | Check the Forward calls to: check box. |
| Step 5 | From the Forward calls to drop-down list box, enter the phone number to which you want to forward all calls. |
| Step 6 | Click Save. |
Set advanced call forwarding options
With Unified Communications Self Care Portal, you can set up advanced call forwarding options, such as call forwarding behavior that is different for internal calls than for external calls. To set up advanced call forwarding, perform the following procedure:
| Step 1 | Click the Phones tab. |
| Step 2 | In the left navigation pane, click Call Forwarding. |
| Step 3 | Choose the phone number on which you want to set up call forwarding. |
| Step 4 | Click Advanced calling rules. |
| Step 5 | Use the drop-down list boxes to configure call forwarding options for both internal and external calls. |
| Step 6 | Click Save. |
Additional settings
This section documents the non-phone related settings, such as Voicemail, Conferencing, and General Settings..
- Set voicemail preferences
- Turn on Do Not Disturb status
- Turn on IM & Presence status for your phones
- Schedule a conference
- Set phone language
- Set client password
- Set phone services PIN
- Download plugins
Set voicemail preferences
To set voicemail preferences in Unified Communications Self Care Portal, click the Voicemail tab and then the Dial Voicemail Preferences IVR button. Cisco Web Dialer dials the Voicemail Preferences IVR, where you can set up voicemail preferences for your phones.
Turn on Do Not Disturb status
If Do Not Disturb is turned on, your phones do not ring when someone dials your number. To turn on Do Not Disturb status for all of your phones, perform the following procedure:
| Step 1 | Click the IM & Availability tab. | ||
| Step 2 | Click Do Not Disturb. | ||
| Step 3 | Check the Enable check box. | ||
| Step 4 |
Complete any additional Do Not Disturb settings.
|
||
| Step 5 |
Click Save. Do Not Disturb is turned on for all of your company phones. |
Turn on IM & Presence status for your phones
In Unified Communications Self Care Portal, you can turn on Cisco Unified IM and Presence status so that your phones will update your status when you are in a meeting. To turn on Cisco Unified IM and Presence status, perform the following procedure:
| Step 1 | Click the IM & Availability tab. |
| Step 2 | Click Status Policy. |
| Step 3 | Check the Automatically update status when there is a meeting on my calendar check box. |
| Step 4 | Click Save. |
Schedule a conference
The Conferencing tab in Unified Communications Self Care Portal allows you to schedule conferences. Depending on the user profile that your administrator has set up for you, you can set up conferences through either Cisco TelePresence Management Suite or Cisco WebEx. If your user profile does not include the ability to schedule conferences, no option to schedule a meeting will appear.
To schedule a conference click the Conferencing tab and then click the Schedule a Meeting button.
Set phone language
To set the language for your Cisco Unified IP Phones or Jabber application, perform the following procedure:
| Step 1 | Click the General Settings tab. |
| Step 2 | Click Language. |
| Step 3 | Select an option from the Display Language drop-down list box and click Save. |
Set client password
To reset the password that you use to log into Unified Communications Self Care Portal, perform the following steps:
| Step 1 | Click the General Settings tab. |
| Step 2 | Click Client/Portal Password. |
| Step 3 | In the New Password text box, enter the password. |
| Step 4 | In the Confirm New Password text box, enter the password. |
| Step 5 | Click Save. |
Set phone services PIN
The Phone Services PIN is used for Extension Mobility and for self-provisioning of new phones. To reset the Phone Services PIN, perform the following steps:
| Step 1 | Click the General Settings tab. |
| Step 2 | Click the Phone Services PIN. |
| Step 3 | In the New Phone Pin text box, enter the PIN. |
| Step 4 | In the Confirm New Phone Pin text box, enter the PIN. |
| Step 5 | Click Save. |
Download plugins
Application plug-ins extend the functionality of your Cisco Unified IP Phones and Jabber devices. To download plugins for your phone, perform the following procedure:
| Command or Action | Purpose | |
|---|---|---|
| Step 1 | Click the Downloads tab. | |
| Step 2 | Select the plugin that you want to download. | |
| Step 3 | Click Download. |
 Feedback