Migration Utilities for Microsoft Users
Migration Utilities for Microsoft Users Introduction
Migration Utility application combines the functionality previously provided in the:
-
Export Contact List application
-
Disable Account application
-
Delete Account application
You need full administrator privileges on the Windows Lync server / Skype for Business (S4B) 2015 server to run this application.
You can download the Migration Utilities for Microsoft Users (MUMUv3.2.exe) from the following link on cisco.com. Click download Migration Utilities for Microsoft Users
 Note |
This is the latest update for Migration Utilities to support for Skype for Business 2015 users. |
Migration Utilities for Microsoft Users Requirements
The Migration Utilities for Microsft Users run on any single Lync/OCS/S4B 2015 front-end server.
Requirement:
While attempting to run the Migration Utilities for Microsoft Users you may receive the following error: Application failed to initialize properly. The reason for this error is that you are attempting to run the user migration tools without the .NET 2.0 Framework installed.
Each of the user migration tools that Cisco provides requires that at least version 2.0 of the .NET Framework is installed
on the server where you are running the tool.
The .NET 2.0 Framework comes installed as standard on Windows Server 2003 R2 or newer.
Required Permissions
Ensure that you run the Migration Utilities for Microsoft Users application as an administrator with full read and write access to the OCS/Lync/S4B 2015 database. You also need read and write access to Active Directory, because the utility attempts to read and modify OCS/Lync/S4B 2015 related attributes for users during the migration.
Migration Utilities for Microsoft Users Overview
|
Field |
Description |
|---|---|
|
Server Version |
The version of the server from which you are migrating. |
|
Server Edition |
The edition of the server from which you are migrating. |
|
LDAP Server |
Hostname of your LDAP server. |
|
User Selection |
Load the User List file containing the SIPURIs of the users you want to migrate. |
|
User Migration |
User migration process.
|
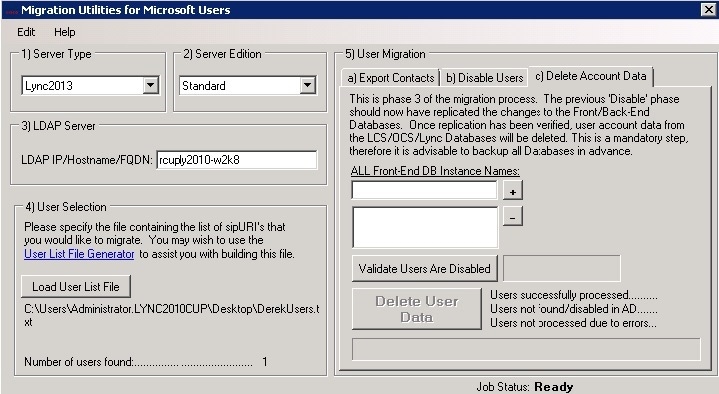
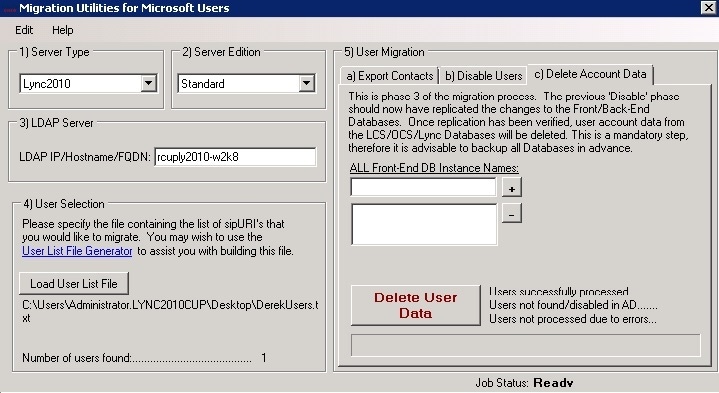
Important Note for Lync 2010 Users
If you are migrating users on Lync 2010 Stand Edition, there is no option to click the Validate Users Are Disabled button. When Lync2010 is chosen from the Server Type drop-down list, the UI appear as follows:
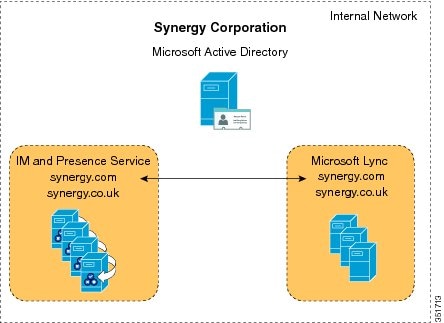
Domain Examples
Single Domain Example
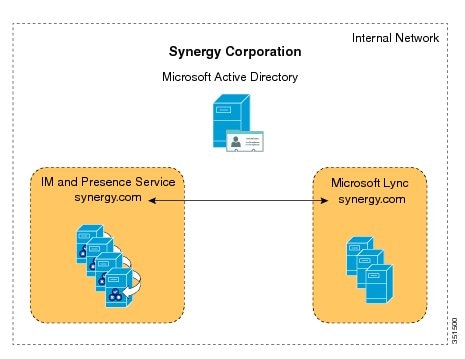
Note |
Presence domains must be identical. For example, user1@abc.synergy.com cannot share IM and Availability with any of the federated users configured for intradomain federation on synergy.com. Move user1 from the abc.synergy.com presence domain to the synergy.com domain to enable user1 to participate in Partitioned Intradomain Federation in this example. |
Multiple Domain Example
The IM and Presence Service node and the Microsoft Lync/S4B 2015 server are able to exchange Availability and IM using Intradomain Federation because those domains are configured on both systems.
Multiple Domain Misconfiguration Example
In this example, users on the domains called synergy.com and synergy.co.uk are properly configured for partitioned intradomain federation and can exchange IM and Availability. However, users within the domain called synergy.online.com on the Lync/S4B 2015 server are unable to exchange Availability and IM with users in the federated IM and Presence Service system because the synergy.online.com domain is not configured on the IM and Presence Service node.
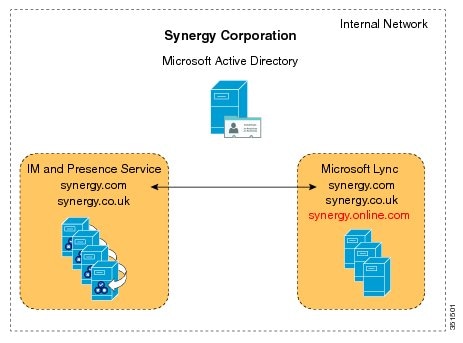
To enable synergy.online.com users to exchange Availability and IM with users in the federated IM and Presence Service system, add a domain called synergy.online.com to the IM and Presence Service node.
Note |
You can configure additional presence domains on the IM and Presence Service system even if no users are initially assigned to those domains. |
Subscription to Microsoft Lync/S4B 2015 or Microsoft Office Communicator User
If the Microsoft server user has previously accepted a subscription from this IM and Presence Server user, the subscription is auto-accepted.
Pre Migration Tasks
Cisco recommends that you perform the following tasks before you begin to migrate users from Lync/OCS/S4B 2015 to IM and Presence Service.
Pre Migration Task Flow
Ensure the following tasks are completed before you begin migrating users with the Migration Utilities Application:
SUMMARY STEPS
- Maintaining User Identity During Migration
- Set Unlimited Contact Lists and Watchers
- Enable Automatic Authorization of Subscription Requests
- Disable new Subscriber Notification Popups on Microsoft Lync
DETAILED STEPS
| Command or Action | Purpose | |
|---|---|---|
| Step 1 |
During migration from Lync/OCS/LCS/S4B 2015 to Cisco Unified Presence Microsoft Lync/S4B 2015 and Microsoft Office Communicator users should maintain the same identity (URI). |
|
| Step 2 |
Set unlimited values for the Maximum Contact List Size and Maximum Watchers settings. |
|
| Step 3 |
Enable automatic authorization of subscription requests to improve user experience during migration. |
|
| Step 4 |
Disable new Subscriber Notification Popups on Microsoft Lync |
If you do not want Lync/S4B 2015 users to receive new subscriber notification popups you can disable Lync/S4B 2015 popups.
You have two options when disabling these notification popups:
|
Maintaining User Identity During Migration
During migration from Lync/OCS/LCS/S4B 2015 to Cisco Unified Presence Microsoft Lync/S4B 2015 and Microsoft Office Communicator users should maintain the same identity (URI). Maintaining the same identity during migration has the following benefits:
-
It allows for the user’s availability state to be maintained, because the user’s identity does not change.
-
It also allows for much simpler migration of a user’s contact lists, because the contact lists can be directly imported from Lync/OCS/LCS/S4B 2015 to Cisco Unified Presence.
The IM and Presence Service IM addresses can be set to match the OCS/Lync/S4B 2015 SIP URI (msRTCSIP-PrimaryUserAddress) so that the user's identity is maintained throughout the migration. If that is not possible, then user rename is required.
IM and Presence Service URIs are composed by joining the Cisco Unified Communications Manager user ID with the IM and Presence Service domain as follows:
<userid>@<domain>
Contact Rename Feature
The IM and Presence Service Bulk Administration Tool allows you to rename the contact IDs in the contact lists of Cisco Unified Presence users in a phased manner. This means that you can update the Cisco Unified Presence contact lists each time that Lync/OCS/LCS/S4B 2015 URIs are changed.
Note |
If you need to update IM and Presence Service contact lists, you must perform the update before the Lync/OCS/LCS/S4B 2015 users (with the changed URIs) are licensed for IM and Presence Service. |
Note |
This migration tool is only required when the IM Address format on IM and Presence Service differs from the Microsoft server. The IM and Presence Service BAT supports migrations where the SIP URI formats on IM and Presence Service and the Microsoft server differ. |
Set Unlimited Contact Lists and Watchers
Procedure
| Step 1 |
Sign in to the Cisco Unified IM and Presence Administration user interface.
|
| Step 2 |
For Maximum Contact List Size (per user), check the No Limit check box. |
| Step 3 |
For Maximum Watchers (per user), check the No Limit check box. |
| Step 4 |
Click Save. |
| Step 5 |
Restart the Cisco XCP Router on all IM and Presence Service nodes in the cluster. To restart the Cisco XCP Router, log in to the Cisco Unified IM and Presence Serviceability user interface and choose . |
Enable Automatic Authorization of Subscription Requests
Procedure
| Step 1 |
Sign in to the Cisco Unified IM and Presence Administration user interface.
|
| Step 2 |
Check the check box for Allow users to view the availability of other users without being prompted for approval. |
| Step 3 |
Click Save. |
| Step 4 |
Restart the Cisco XCP Router on all IM and Presence Service nodes in the cluster. To restart the Cisco XCP Router, log in to the Cisco Unified IM and Presence Serviceability user interface. Choose . |
Subscriber Notification Pop-ups
When you migrate users from Microsoft Lync/S4B 2015 to IM and Presence Service, users that remain on Lync/S4B 2015 may receive subscription notification pop-ups from some of those migrated users. Such a notification only occurs when:
-
the migrated user has the Microsoft Lync/S4B 2015 user in their contact list
and
-
the Microsoft Lync/S4B 2015 user does not have that same migrated user in their contact list
If the Microsoft Lync/S4B 2015 user has the migrated contact in their contact list also, then there is no notification pop-up. When an individual notification pop-up has been handled by the Microsoft Lync/S4B 2015 user, it will not re-appear.
If you do not want Lync/S4B 2015 users to receive new subscriber notification pop-ups you can disable Lync/S4B 2015 pop-ups. You have two options when disabling these notification pop-ups:
-
you can disable pop-ups for the entire duration of user migration
-
you can disable pop-ups only during the migration of a batch of users
If you disable pop-ups, then all pop-ups for all Lync/S4B 2015 users will be disabled until you re-enable them.
Note |
Disabling and enabling Microsoft Lync/S4B 2015 pop-ups requires a restart of the Lync/S4B 2015 front-end services. |
Disable Microsoft Lync Pop-ups
If you want to disable all pop-ups for all Microsoft Lync users, complete the following procedure before you begin the user migration or the migration of a batch of users.
Procedure
| Step 1 |
On the Lync front-end server choose .
|
||
| Step 2 |
Enter the following powershell command:
|
||
| Step 3 |
Choose . |
Restore Microsoft Lync Pop-up Behavior
To restore the previous client behavior for notification pop-ups for Microsoft Lync users complete the following procedure after user migration is complete or after the migration of a batch of users is complete.
Procedure
| Step 1 |
Enter the following command to restore client pop-up behavior on Lync:
|
| Step 2 |
Choose . |
| Step 3 |
Right-click the service Lync front end server and choose Restart. |
Verify Microsoft Server SIP URI Format for Migrating Users
Before you migrate each batch of Microsoft server users to IM and Presence, verify the following:
-
If any Lync/OCS/S4B 2015 URIs do not match the UserID@Default_Domain IM address format, you must modify the URIs of the migrating users. You can modify a batch of Microsoft server URIs before you migrate each batch of Microsoft server users to IM and Presence Service.
-
You must configure IM and Presence Service for interdomain federation with the Microsoft servers and set up the email for federation feature if the Microsoft server users are on a different domain.
-
Check that the format of the current IM address scheme for IM and Presence Service matches the format that the Microsoft server uses.
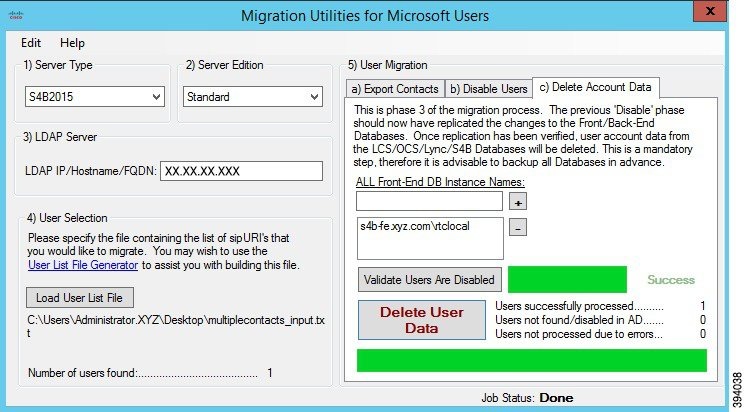
User Migration on Migration Utilities Application
Before you begin
Ensure that you have administrative privileges on the Lync/OCS/S4B 2015 front end server, which are required to perform this procedure.
Procedure
| Step 1 |
From the Lync/OCS/S4B 2015 front end server, launch the Migration Utilities for Microsoft Users application. |
||||||||||||
| Step 2 |
Choose the version of the server from which you are migrating users, from the Server Version drop-down list. |
||||||||||||
| Step 3 |
Choose the edition of the server from which you are migrating users, from the Server Edition drop-down list. |
||||||||||||
| Step 4 |
Enter the IP address, FQDN, or hostname of the LDAP server in the LDAP IP/Hostname/FQDN field. |
||||||||||||
| Step 5 |
In the User Selection pane, click Load User List File and browse to the location of the user file, containing the SIPURIs of the users that you are migrating.
|
||||||||||||
| Step 6 |
In the User Migration pane, complete the following steps: The following is an example of the information which the produced export file contains:
|
Reset Maximum Contact List Size and Maximum Watcher Size
Before migrating users from Lync/OCS/S4B 2015 to IM and Presence Service, Cisco recommends that you set the Maximum Contact List Size and Maximum Watchers settings on IM and Presence Service to unlimited. This ensures that each migrated user contact list is fully imported to IM and Presence Service.
After all users have been migrated to IM and Presence Service, reset the Maximum Contact List Size and Maximum Watchers settings on IM and Presence Service to the desired values. The system default value is 200 for Maximum Contact List Size and 200 for Maximum Watchers size.
Note |
If you are performing a phased migration of users from the Microsoft server to IM and Presence Service, do not reset the Maximum Contact List Size and Maximum Watchers values until all users have been migrated. |
The following procedure describes how to set values for the Maximum Contact List Size and Maximum Watchers settings.
Note |
If you have a multi-cluster deployment, you must perform this procedure on each cluster. When you change Presence settings, they are applied to all nodes in the cluster; therefore you need to set them only on the IM and Presence Service publisher node within any given cluster. |
Procedure
| Step 1 |
Log in to the Cisco Unified IM and Presence Administration user interface. Choose . |
| Step 2 |
For Maximum Contact List Size (per user), uncheck the check box for No Limit and enter the desired limit. |
| Step 3 |
For Maximum Watchers (per user), uncheck the check box for No Limit and enter the desired limit. |
| Step 4 |
Click Save. |
| Step 5 |
Restart the Cisco XCP Router on all IM and Presence Service nodes in the cluster. To restart the Cisco XCP Router, log in to the Cisco Unified IM and Presence Serviceability user interface and choose . |
Migration Utilities for Microsoft Users Troubleshooting
User Migration Tracing
This section describes phases which are involved for user migration tracing.
With each run the Migration Utility for Microsoft Users application generates a single log file called: MigrationUtilitiesForMicrosoftUsers<Timestamp>.txt. The log file contains details about any failures or errors that have occurred. The log file is saved to the same location
as the tool itself.
Export Contact List Phase
The Export Contact List tool allows an administrator to export contact lists in bulk from Lync/OCS/S4B 2015 for migrating users.
Some common reasons why errors can occur include:
-
Users specified are not associated with the Microsoft server/pool that the tool is being run against.
-
User input fields not populated properly.
The following is an example of log output for the Export Contact List phase:
>>------------------- 18/05/2011 16:59:38 ------------------->>Version: 2.1
[DEBUG] Enter>> ExportContacts.LdapConnection.CreateLdapDirectoryEntry
[DEBUG] Enter>> ExportContacts.LdapConnection.CreateDirectoryEntry
[DEBUG] Enter>> ExportContacts.LdapConnection.checkLdapPrefix
[DEBUG] Exit>> ExportContacts.LdapConnection.checkLdapPrefix
[DEBUG] Exit>> ExportContacts.LdapConnection.CreateDirectoryEntry
[DEBUG] Current line item is: sip:ExampleUser@dtstfedcup2.com
[DEBUG] Exit>> ExportContacts.ExportContactsUtilities.getAllSipUriFromStandardFile
[DEBUG] Enter>> ExportContacts.ExportContactsUtilities.getAndPrintContactsForUsers
[DEBUG] Total number of users found is: 1
[DEBUG] Processing user number: 1
[INFO]  Preparing to get contacts for User [sip:ExampleUser@dtstfedcup2.com]
[DEBUG] Enter>> ExportContacts.OcsWmiConnection.getContactsAndGroupsForUser
[DEBUG] Enter>> ExportContacts.OcsWmiConnection.getUserInstanceID
[DEBUG] Searching for userInstanceId [SELECT * FROM MSFT_SIPESUserSetting WHERE PrimaryURI = 'sip:ExampleUser@dtstfedcup2.com']
[DEBUG] Enter>> ExportContacts.OcsWmiConnection.GetScope
[DEBUG] Exit>> ExportContacts.OcsWmiConnection.GetScope
[DEBUG] Search results returned
[DEBUG] Found user with PrimaryURI : sip:ExampleUser@dtstfedcup2.com, InstanceId : {7D777FD5-A8F6-8243-B4D6-7F331008C58C}
[DEBUG] Exit>> ExportContacts.OcsWmiConnection.getUserInstanceID
[DEBUG] Enter>> ExportContacts.OcsWmiConnection.getContacts
[DEBUG] Searching for contacts [SELECT * FROM MSFT_SIPESUserContactData WHERE UserInstanceID = '{7D777FD5-A8F6-8243-B4D6-7F331008C58C}']
[DEBUG] Enter>> ExportContacts.OcsWmiConnection.GetScope
[DEBUG] Exit>> ExportContacts.OcsWmiConnection.GetScope
[DEBUG] Search results returned
[DEBUG] Found contact:  SIPURI : [SIP:lyncContact@dtstfedcup2.com] with GroupId: [1]
[DEBUG] Found contact:  SIPURI : [SIP:ExampleUser@dtstfedcup2.com] with GroupId: [1]
[DEBUG] Exit>> ExportContacts.OcsWmiConnection.getContacts
[DEBUG] Enter>> ExportContacts.OcsWmiConnection.getGroups
[DEBUG] Searching for groups [SELECT * FROM MSFT_SIPESUserContactGroupData WHERE UserInstanceID = '{7D777FD5-A8F6-8243-B4D6-7F331008C58C}']
[DEBUG] Enter>> ExportContacts.OcsWmiConnection.GetScope
[DEBUG] Exit>> ExportContacts.OcsWmiConnection.GetScope
[DEBUG] Search results returned
[DEBUG] Found group:  groupName : [General] with GroupId: [1]
[DEBUG] Exit>> ExportContacts.OcsWmiConnection.getGroups
[INFO]  User Processed Successfully
[DEBUG] Exit>> ExportContacts.OcsWmiConnection.getContactsAndGroupsForUser
[DEBUG] Enter>> ExportContacts.ExportContactsUtilities.PrintContactsForUser
[DEBUG] Exit>> ExportContacts.ExportContactsUtilities.PrintContactsForUser
[DEBUG] Exit>> ExportContacts.ExportContactsUtilities.getAndPrintContactsForUsers
[INFO]  Summary:
[INFO]  1 users successfully processed
[INFO]  0 users not found
[INFO]  0 users could not be processed due to errors
<<------------------- 18/05/2011 16:59:41 -------------------<<
Disable Account Phase
The Disable Account tool connects to Active Directory (AD) and updates the users’ Lync/OCS/S4B 2015 attributes to disable their Microsoft server account.
Some common reasons why errors can occur with this tool include:
-
User does not exist in the Microsoft server database
-
The administrator who is running the tool does not have read/write permissions for the AD
-
The administrator did not allow enough time for the changes applied to AD by this tool to propagate down to the Microsoft server database. The migration may fail if the administrator moves on to the next migration step without validating that the changes have taken effect in the Microsoft server database.
The following is an example of log output for the Disable Account phase:
>>------------------- 18/05/2011 17:02:07 ------------------->>Version: 2.0
[DEBUG] Enter>> DisableAccount.LdapConnection.CreateLdapDirectoryEntry
[DEBUG] Enter>> DisableAccount.LdapConnection.CreateDirectoryEntry
[DEBUG] Enter>> DisableAccount.LdapConnection.checkLdapPrefix
[DEBUG] Exit>> DisableAccount.LdapConnection.checkLdapPrefix
[DEBUG] Exit>> DisableAccount.LdapConnection.CreateDirectoryEntry
[DEBUG] Enter>> DisableAccount.AccountDisable.DisableUsersInFile
[DEBUG] Enter>> DisableAccount.AccountDisable.GetSipUriFromLine
[DEBUG] Exit>> DisableAccount.AccountDisable.GetSipUriFromLine
[INFO]  Preparing to Disable Communications Server Account for User [sip:ExampleUser@dtstfedcup2.com]
[DEBUG] Enter>> DisableAccount.LdapConnection.DisableAccount
[INFO]  Searching for user [sip:ExampleUser@dtstfedcup2.com]
[INFO]  Search results returned
[DEBUG] Enter>> DisableAccount.LdapConnection.CreateLdapDirectoryEntry
[DEBUG] Enter>> DisableAccount.LdapConnection.CreateDirectoryEntry
[DEBUG] Enter>> DisableAccount.LdapConnection.checkLdapPrefix
[DEBUG] Exit>> DisableAccount.LdapConnection.checkLdapPrefix
[DEBUG] Exit>> DisableAccount.LdapConnection.CreateDirectoryEntry
[INFO]  Found user with PrimaryURI : sip:ExampleUser@dtstfedcup2.com, DisplayName : Example User, Enabled : True
[DEBUG] Committed changes to the AD
[INFO]  User Account Disabled
[DEBUG] Exit>> DisableAccount.LdapConnection.DisableAccount
[DEBUG] Enter>> DisableAccount.AccountDisable.GetSipUriFromLine
[DEBUG] Exit>> DisableAccount.AccountDisable.DisableUsersInFile
[INFO]  Summary:
[INFO]  1 users successfully processed
[INFO]  0 users not found
[INFO]  0 users could not be processed due to errors
<<------------------- 18/05/2011 17:02:08 -------------------<<
For more information about using the Disable Account phase, see topics related to disabling Microsoft server accounts for migrating users.
Delete Account Phase
The Delete Account phase allows you to delete migrating users so that presence requests for these users are later routed to IM and Presence Service while ensuring the deleted users are not removed from the contact list of any users that remain on Lync/OCS/S4B 2015.
Some common reasons why errors can occur with this tool include:
-
Incorrect database instance name specified
-
User does not exist in the Microsoft server database
The following is an example of log output for the Delete Account tool:
>>------------------- 02/12/2013 15:13:50 ------------------->>
Version: 10.x.x-xx
[DEBUG] Enter>> DeleteAccount.DbConnectionFactory.GetCommSvrDbCon
[DEBUG] Enter>> DeleteAccount.DbConnectionFactory.GetConnection
[DEBUG] Attempting to Open connection with String : Server=lyncServer\rtclocal;Database=rtc;Trusted_Connection=yes;
[DEBUG] Connection Opened Ok
[DEBUG] Exit>> DeleteAccount.DbConnectionFactory.GetConnection
[DEBUG] Enter>> DeleteAccount.DbConnectionFactory.tableExists
[DEBUG] SQL is [SELECT id FROM sysobjects WHERE name = 'Resource']
[DEBUG] Found id [1077578877]
[DEBUG] Exit>> DeleteAccount.DbConnectionFactory.tableExists
[INFO]  Found the Resource Table, appears to be a valid Communications Server Database
[DEBUG] Enter>> DeleteAccount.DbConnectionFactory.tableExists
[DEBUG] SQL is [SELECT id FROM sysobjects WHERE name = 'Endpoint']
[DEBUG] No result
[DEBUG] Exit>> DeleteAccount.DbConnectionFactory.tableExists
[DEBUG] Enter>> DeleteAccount.DbConnectionFactory.tableExists
[DEBUG] SQL is [SELECT id FROM sysobjects WHERE name = 'Container']
[DEBUG] Found id [1202103323]
[DEBUG] Exit>> DeleteAccount.DbConnectionFactory.tableExists
[DEBUG] Enter>> DeleteAccount.DbConnectionFactory.tableExists
[DEBUG] SQL is [SELECT id FROM sysobjects WHERE name = 'HomedResource']
[DEBUG] No result
[DEBUG] Exit>> DeleteAccount.DbConnectionFactory.tableExists
[DEBUG] Enter>> DeleteAccount.DbConnectionFactory.tableExists
[DEBUG] SQL is [SELECT id FROM sysobjects WHERE name = 'CertificateStore']
[DEBUG] Found id [1826105546]
[DEBUG] Exit>> DeleteAccount.DbConnectionFactory.tableExists
[INFO]  Found the CertificateStore table, dealing with a version of Lync.
[DEBUG] Enter>> DeleteAccount.DbConnectionFactory.tableExists
[DEBUG] SQL is [SELECT id FROM sysobjects WHERE name = 'ForestDirectory']
[DEBUG] Found id [853578079]
[DEBUG] Exit>> DeleteAccount.DbConnectionFactory.tableExists
[INFO]  Found the ForestDirectory table, Creating Lync2013 Connection
[DEBUG] Exit>> DeleteAccount.DbConnectionFactory.GetCommSvrDbCon
[DEBUG] Enter>> DeleteAccount.CommSvrDbConnection.CheckConnection
[DEBUG] Enter>> DeleteAccount.CommSvrDbConnection.GetConnection
[DEBUG] Exit>> DeleteAccount.CommSvrDbConnection.GetConnection
[DEBUG] Exit>> DeleteAccount.CommSvrDbConnection.CheckConnection
[DEBUG] Enter>> DeleteAccount.DeleteUserData.DisableUsersInFile
[DEBUG] Enter>> DeleteAccount.DeleteUserData.GetUserAtHostFromLine
[DEBUG] Exit>> DeleteAccount.DeleteUserData.GetUserAtHostFromLine
[INFO]  Preparing to Delete Communications Server Data for User [lyncUser@lyncDomain.net]
[DEBUG] Enter>> DeleteAccount.DeleteUserData.DeleteOcsUserData
[DEBUG] Enter>> DeleteAccount.CommSvrDbConnection.GetResourceIdForUser
[DEBUG] Enter>> DeleteAccount.CommSvrDbConnection.GetConnection
[DEBUG] Exit>> DeleteAccount.CommSvrDbConnection.GetConnection
[DEBUG] Enter>> DeleteAccount.CommSvrDbConnection.SqlEscape
[DEBUG] Exit>> DeleteAccount.CommSvrDbConnection.SqlEscape
[DEBUG] Exit>> DeleteAccount.CommSvrDbConnection.GetResourceIdForUser
[INFO]  Found user [lyncUser06@cork.com] with ResourceId [1010], proceeding to delete data
[DEBUG] Enter>> DeleteAccount.Lync2013DbConnection.DeleteResourceDirectory
[DEBUG] Enter>> DeleteAccount.CommSvrDbConnection.GetConnection
[DEBUG] Exit>> DeleteAccount.CommSvrDbConnection.GetConnection
[DEBUG] Ran dbo.RtcpDeleteHomedResourceTransaction for resource [1010]
[DEBUG] Deleted CachedContainerMember for resource [1010]
[DEBUG] Deleted ContainerMemberUser for resource [1010]
[DEBUG] Deleted PromptedSubscriber for resource [1010]
[DEBUG] Deleted Delegate for resource [1010]
[DEBUG] Ran RtcpDeleteConferenceParticipantByEnterpriseId for resource [1010]
[DEBUG] Deleted UserPolicy for resource [1010]
[DEBUG] Deleted ResourcePhone for resource [1010]
[DEBUG] Deleted RtcItem for resource [1010]
[DEBUG] Deleted PUIDDirectory for resource [1010]
[DEBUG] Deleted ResourceDirectory for resource [1010]
[DEBUG] Committing transaction for resource [1010]
[INFO]  Completed Updates for resource [1010]
[DEBUG] Exit>> DeleteAccount.Lync2013DbConnection.DeleteResourceDirectory
[DEBUG] Exit>> DeleteAccount.DeleteUserData.DeleteOcsUserData
[DEBUG] Enter>> DeleteAccount.DeleteUserData.GetUserAtHostFromLine
[DEBUG] Exit>> DeleteAccount.DeleteUserData.GetUserAtHostFromLine
[DEBUG] Exit>> DeleteAccount.DeleteUserData.DisableUsersInFile


Summary:
	Users successfully processed:      1
	Users not found:                   0
	Users not processed due to errors: 0
<<------------------- 02/12/2013 15:13:50 -------------------<<
For more information about using the Delete Account tool, see topics related to deleting user data from the database for migrating users.
IM and Presence Service BAT Contact List Import
The IM and Presence Service Bulk Administration Tool (BAT) tool writes the results of the contact list import job to a log file. The log file contains the following information:
-
The number of contacts that were successfully imported.
-
The number of internal server errors that were encountered while trying to import the contacts.
-
The number of contacts that were not imported (ignored). The log file lists a reason for each ignored contact at the end of the log file.
-
The number of contacts in the CSV file that were unprocessed due to an error that caused the BAT job to finish early. This error rarely occurs.
To access this log file, complete the following procedure:
-
In Cisco Unified CM IM and Presence Administration, choose .
-
Click Find, and then choose the Job ID of the contact list import job.
-
Click the Log File Name link to open the log.
If you require further detail on any BAT job, see the Bulk Provisioning Service debug logs. You can access these logs at the following location: /var/log/active/cm/trace/bps/log4j/bps000*.txt
You can enable debug logging for the Bulk Provisioning Service on the Cisco Unified IM and Presence Serviceability user interface.
Configure Bulk Provisioning Logging on IM and Presence Service
The following procedure describes how to configure Bulk Provisioning Service logging on IM and Presence Service.
 Caution |
Debug level tracing can affect system performance. Enable debug level tracing only when required and reset to default log settings after the investigation is complete. |
Procedure
| Step 1 |
In Cisco Unified IM and Presence Serviceability, choose . |
| Step 2 |
Choose the IM and Presence Service node and click Go. |
| Step 3 |
Choose Database and Admin Services from the Service Group drop-down list and click Go. |
| Step 4 |
Choose the Bulk Provisioning Service from the Service drop-down list and click Go. |
| Step 5 |
Choose Trace On. |
| Step 6 |
In the Trace Filter Settings, choose the Debug Trace Level. If you want to enable debug level on the traces, choose Debug. |
| Step 7 |
Click Save. |
IM and Presence Service Bulk Tool Contact Rename
The IM and Presence Service Bulk Administration Tool (BAT) allows you to rename the contact ID (JID) in user contact lists from one format to another. For example, you can rename a user’s contact ID from firstname.lastname@domain.com to userid@domain.com and the BAT updates each user’s contact list with the new contact ID.
The Bulk Administration Tool writes the results of the contact rename job to a log file. The log file contains the following information:
-
The number of contacts that have been successfully retrieved.
-
The number of internal server errors that were encountered while trying to retrieve the contacts.
-
The number of contact rename records that were ignored. The log file lists a reason for each record at the end of the log file.
-
The number of contact rename records in the CSV file that were unprocessed due to an error that caused the bulk job to finish early. This error rarely occurs.
-
The number of users that were notified of their contact changes.
-
The number of users that could not be notified of their contact changes.
To access this log file, complete the following procedure:
-
In Cisco Unified CM IM and Presence Administration, choose .
-
Click Find and choose the Job ID of the contact rename job.
-
Click the Log File Name link to open the log.
The following are common reasons why errors occur:
-
The Cisco XCP Router service is stopped on a node in the cluster.
-
The format of the uploaded CSV file is incorrect. You must ensure that the format of the file is correct and that the file header is present. For more information about the file format, see the related topic regarding the rename of contact IDs.
If you require more detail about any bulk administration job, see the Bulk Provisioning Service debug logs. You can access these logs at the following location: /var/log/active/cm/trace/bps/log4j/bps000*.txt.
You can enable debug logging for the Bulk Provisioning Service on the Cisco Unified Serviceability user interface. For more information, see topics related to debug logging and configuring BAT provisioning service logging.
Common User Migration Problems
Application Failed to Initialize Properly - Error Occurs When Running Any of the User Migration Tools
Troubleshooting Steps
While attempting to run any of the user migration tools you may receive the following error: "Application failed to initialize properly". The reason for this error is that you are attempting to run the user migration tools without the .NET 2.0 Framework installed. Each of the user migration tools that Cisco provides requires that at least version 2.0 of the .NET Framework is installed on the server where you are running the tool.
The .NET 2.0 Framework comes installed as standard on Windows Server 2003 R2 or newer.
Log Summary Shows Connection Problems to Database Instance
Troubleshooting Steps
To export contact lists from a Lync/S4B 2015 server you must include the database instance parameter. If you omit the database instance parameter or enter an incorrect database parameter, an error is written to the Export Contact List log. Check the log to determine whether you omitted the database parameter or entered an incorrect parameter.
Follow these steps to find the database instance for each server/pool:
-
Open a powershell window on a front-end server in the pool.
-
Run the following cmdlet:
Get-CsManagementConnection
The database instance name is the value of the Data Source parameter in the command output.
Export Contact List Phase - Log Shows getAndPrintContactsForUsers Error
Troubleshooting Steps
If you run the export tool for Lync/S4B 2015 users and see the following error in the log, “Error occurred in getAndPrintContactsForUsers”, then the Export Contact List tool cannot connect to the Lync/S4B 2015 database. Verify that the user account running the tool has the appropriate read permissions for the Lync/S4B 2015 database. Verify that dbo execution account privileges are granted to the RTC database. If this doesn't solve the issue, verify that there are no typographic errors in the database instance name.
Export Contact List Phase - Log Summary Shows Several Users as Not Found or Not Processed
Troubleshooting Steps
-
If you are using a SIP URI file as the input, check that the users are valid (exist in Active Directory [AD] and Lync/OCS/S4B 2015) and that they are entered correctly in the input file with the “sip:” prefix.
-
If you are not using an IM and Presence Service exported file or a SIP URI file as the input, or if you are using the OU input file.
Export Contact List Phase - Progress Bar not Shown and Output File of Exported Contacts not Produced
Troubleshooting Steps
-
Check for the following error in the Export Contact List log: “Unable to connect to LDAP using IP/FQDN/Hostname: [some_ip_or_hostname].”
-
If the error exists, check that the address supplied for the Active Directory (AD) server is correct.
-
If the address supplied is valid, then ping the AD server to check that there is network connectivity between it and the Lync/OCS/S4B 2015 server.
-
If there is connectivity, ensure that the user has the required privileges to access the AD server.
-
Disable Account Phase - Log Shows Unable Connect to LDAP Using IP/FQDN/Hostname
Troubleshooting Steps
-
Check that the address supplied for the Active Directory (AD) server is correct.
-
If the address supplied is valid, ping the AD server to check that there is network connectivity between it and the Lync/OCS/S4B 2015 server.
-
If there is connectivity, ensure that user has the required privileges to access the AD server.
Delete Account Phase - Unable to Find Microsoft Server Database or Server Instance
Troubleshooting Steps
-
The Delete Account tool must be run against each database instance to ensure that the account is correctly deleted.
-
For OCS, follow these steps to find the database instance for each server/pool:
-
On the OCS management console, choose the pool name under the Enterprise Pools (Enterprise Edition) or the server name under Standard Edition Servers (Standard Edition).
-
In the right pane, choose the Database tab.
-
The database instance name is the first item under General Settings.
-
-
For Lync, follow these steps to find the database instance for each server/pool:
-
Open a powershell window on a front-end server in the pool.
-
Run the following cmdlet:
Get-CsManagementConnection -
The database instance name is the value of the Data Source parameter in the returned output.
-
 Feedback