Cisco Unity Connection Connection Mini Web Inbox(Release 12.x)
Published May, 2017
About the Cisco Unity Connection Mini Web Inbox
Cisco Unity Connection allows you to deliver SMTP-based HTML notifications for a new voice message to the end users. These notifications can be sent via SMTP as an HTML format embedded in the email. The administrator can assign a template to the users or allow users to select a template. The users get the flexibility to receive the HTML notifications that can include customized icons, header, and footer along with the link to access Cisco Unity Connection Mini Web Inbox
The users can get the notifications based on the following notification template types:
-
Template with the HTML text and links to Connection Mini Web Inbox
-
Template with customized icons, message status - MWI, Message State
-
Templates can include text/images for header, footer, logo etc
Connection Mini Web Inbox is a player that allows user to play the voice messages over computer or mobile devices/tablets. With Connection Mini Web Inbox, user can play, reply, reply all, forward, or delete the voice messages using a phone or a computer. To access the Mini Web Inbox, you must click the links as displayed in the email notification.
The HTML notifications on the computer and mobile support both non plug-in based Web email clients and desktop email clients, like Microsoft Outlook and IBM Lotus Notes.
On mobile, Connection Mini Web Inbox is supported via telephone record and playback (TRAP) connections on all native browsers for IPhone. It is recommended to access the HTML notifications and launch Connection Mini Web Inbox only through the native browsers of mobile devices. Any email clients or other Web browsers are not recommended for use.
Preferably, the Connection Mini Web Inbox must always be opened from a notification email as it takes certain URL parameters.
 Note |
To access the Connection Mini Web Inbox, you must be on the corporate network or connected via Virtual Private Network (VPN) to the corporate network. The email notification content including the MWI status, message status, and custom graphics, will be visible through the authentication and/or non-authentication mode when the user is on the corporate network or connected to it using the VPN. |
Cisco Unity Connection Mini Web Inbox Support for the IPv6 and IPv4 Modes
The SMTP outbound proxy is supported over IPv4 mode only. Therefore, Cisco Unity Connection will send HTML notifications to an Email server over SMTP in IPv4 mode only. The administrator must ensure that the HTML notifications are working over IPv4.
The administrator and the users can receive the notifications and play the voice messages on supported email clients on both the IPV4 mode and the IPv6 mode. The Connection Mini Web Inbox URLs sent over as HTML email, can be opened in either the IPv6 mode or the IPv4 mode depending upon the DNS entry configured in DNS Server to resolve Cisco Unity Connection in either IPv6 and IPv4.
Note |
Connection Mini Web Inbox over computer is supported for both, IPv4 and IPv6 mode. However, Connection Mini Web Inbox over mobile supports only IPv4 mode. For more information on how to configure the IPv6 address, refer to . |
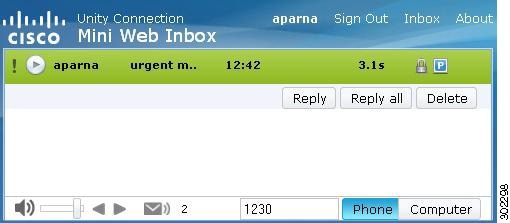
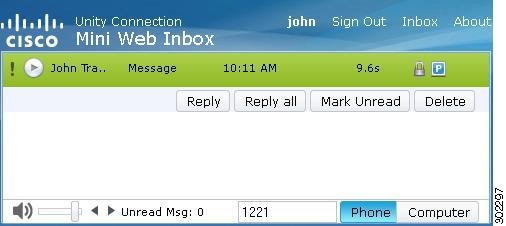
The following screen capture displays the Connection Mini Inbox on computer:
Note |
If you are using local computer to play secure messages or have selected the Private option for the Require Secure Messaging field on the Class of Service page of the Cisco Unity Connection Administration, you will get a warning message as “You must play such voice message using the phone playback and record functionality”. |
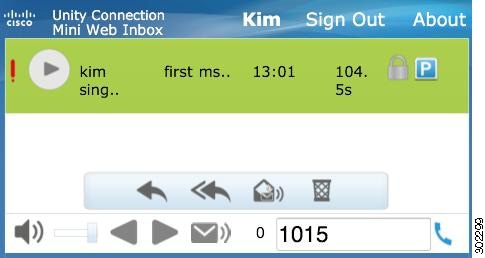
The following screen capture displays the Connection Mini Inbox on mobile:
Note |
If you change the mobile view from portrait to landscape, you must restore the Connection Mini Web Inbox window by double tapping on it in order to get the full view of the Mini Web Inbox. |
Must Haves for Connection Mini Web Inbox
| Configuration Steps | Related Topics and Documentation | |
|---|---|---|
| Step 1 | Ensure that you have read Compatibility Matrix for Connection Mini Web Inbox and have required browser and platform. | For information on compatible browser and platform, refer to Compatibility Matrix |
| Step 2 | Make sure the signed SSL certificates are installed to access the voice message via Connection Mini Web Inbox. | For more information on how to configure the trusted certificate on Cisco Unity Connection, refer to the Using SSL to Secure Client/Server Connections chapter of the Security Guide for Cisco Unity Connection Release 12.x, available at https://www.cisco.com/c/en/us/td/docs/voice_ip_comm/connection/12x/security/b_12xcucsecx.html.. |
| Step 3 | Make sure the user workstation is configured to access Connection mini Web Inbox. | For more information on how to configure the Connection Mini Web Inbox, refer to the . |
| Step 4 | You must perform the following steps in Internet Explorer to get
the view of updated Connection Mini Web Inbox:
|
|
| Step 5 | If you are clicking
Start
Recording in the Connection Mini Web Inbox for the first time while
replying or forwarding a message, the
Adobe Flash
Player Settings window gets displayed. Perform the following steps:
|
|
Compatibility Matrix for Cisco Unity Connection Mini Web Inbox
For more information on operating system and browser support for Connection Mini Web Inbox, refer to Compatibility Matrix for Cisco Unity Connection Mini Web Inbox.
Mini Web Inbox Controls on Computer
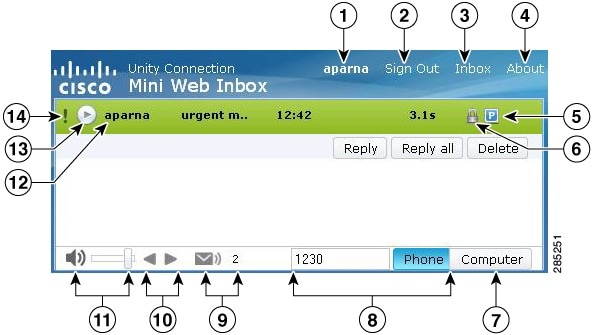
| 1 | Displays the account with which you are signed in. |
| 2 | Sign out of Connection Mini Web Inbox. |
| 3 | Opens the message in Connection Web Inbox. |
| 4 | View Mini Web Inbox Information. |
| 5 | Denotes that the message has been marked as private. |
| 6 | Denotes that the message has been marked as secure. |
| 7 | Uses the computer microphone and speakers or other default audio device to play audio. |
| 8 | Connection calls you at the extension you enter in the text box to make a recording or to play audio. You can speak and listen through the phone handset or speakerphone. |
| 9 | Displays the unread message count. |
| 10 | Denotes the next and previous functionality. |
| 11 | Change the audio playback volume. |
| 12 | Displays the account name of the sender. |
| 13 | Click this play button to start playing a message. |
| 14 | Denotes that the message has been marked as urgent. |
Mini Web Inbox Controls on Mobile
The following screen capture displays the Connection Mini Inbox on mobile:
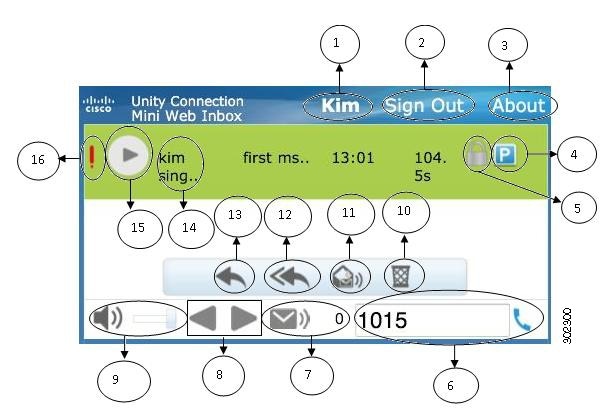
| 1 | Displays the account with which you are signed in. |
| 2 | Sign out of Connection Mini Web Inbox. |
| 3 | View Connection Mini Web Inbox Information. |
| 4 | Denotes that the message has been marked as private. |
| 5 | Denotes that the message has been marked as secure. |
| 6 | Connection calls you at the extension you enter in the text box to make a recording or to play audio. You can speak and listen through the phone handset or speakerphone. |
| 7 | Displays the unread message count. |
| 8 | Denotes next and previous functionality. |
| 9 | Change the audio playback volume. |
| 10 | Click to delete the message. |
| 11 | Click to mark the particular message as unread. |
| 12 | Click to send reply to all the recipients. |
| 13 | Click to send reply to the sender. |
| 14 | Displays the account name of the sender. |
| 15 | Click this play button to start playing a message. |
| 16 | Denotes that the message has been marked as urgent. |
Next and Previous Option
The next and previous functionality is used to traverse through only existing voice messages available in the inbox. The voice message is not auto-played when the user is traversing using the next and previous functionality. This functionality can be used on both, computer and mobile. When the user reaches at the start or end of the list, Connection will give the warning message stating that there are no messages.
If the user deletes the message, the navigation through the next and previous messages available in the inbox can still be done using the Connection Mini Web Inbox. The Connection Mini Web Inbox window gets update with the Undelete option. Once the user moves to next or previous message, the deleted message will be removed from the list. Note that if a user manually refreshes the browser or reopens the notification link from the email, the next and previous functionality will not be available for the user.
Play Option
User accesses the notified voice message by clicking the hyper links that is given in the email notification for launching the Connection Mini Web Inbox. Connection Mini Web Inbox auto plays the notified voice message when the mini player is launched from the message notification. When the user plays a message, the attached forwarded messages also get played in a chain. The unread message count in Connection Mini Web Inbox gets auto-refreshed after playing a voice message.
When the voice message is getting played, all the other message action buttons, including Reply, Reply all, Delete, Mark Unread, are disabled. The user can only pause or stop the voice message while listening to it.
Reply Option
User can reply to a voice message by following any of the actions given below:
-
Clicking the Reply link as displayed in the email notification,
-
Replying through the Computer button if accessing the Connection Mini Web Inbox via computer, or
-
Replying through the Phone button given in the Connection Mini Web Inbox via computer or mobile
Note that when an outside caller leaves a voice message, the user will not get the Reply option.
The user can reply to a voice message by recording through the computer option or using the phone recording and playback functionality, depending upon the option selected at the time of playing a message. If a user wants to toggle between the Computer or Phone options on computer while replying to a message, the user needs to go back to the main Connection Mini Web Inbox window and re-select the Computer or Phone option. The toggling between the Computer or Phone options is not allowed from the Reply window. In addition, the toggling is supported when the voice message is not in the playing state either from computer or mobile.
Auto-Inherit Properties
Note |
The recording on MAC OS is supported via telephone record and playback functionality only. The computer based recording is not supported. |
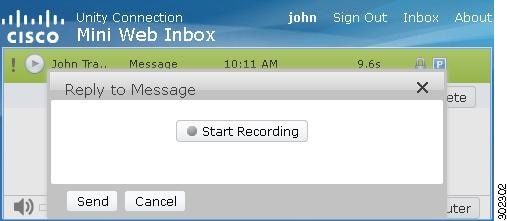
To Reply to a Voice Message using the Computer Recording
Connection Mini Web Inbox on PC supports the Computer option to play and reply that uses the computer microphone and speakers or other default audio device. If you are accessing the Connection Mini Web Inbox on mobile, the Computer option will not be available as the mobile based mini player supports only telephone record and playback functionality.
Procedure
| Step 1 |
Click the Reply link given in the email notification or click the Reply button given in the Connection Mini Web Inbox. The Reply to Message window opens. The To and Sub fields along with the message properties gets inherited from the parent voice message. User does not have an option to append or edit these fields.
|
||
| Step 2 |
Click Start Recording.
|
||
| Step 3 |
Record the voice message and when done, click Stop Recording. The duration of recording is displayed on the window.
|
||
| Step 4 |
Click Send to send the message. The voice message is sent to recipient with an ‘RE:’ added to original subject of the message. |
To Reply to a Voice Message using the Phone Recording and Playback Feature
You can reply to a voice message using the Phone option that is available on computer, as well as mobile.
Procedure
| Step 1 |
Click the Reply link given in the email notification or click the Reply button given in the Connection Mini Web Inbox. The Reply to Message window opens. The To and Sub fields along with the message properties gets inherited from the parent voice message. User does not have an option to append or edit these fields.
|
||
| Step 2 |
Click Phone to enter an editable number or use the auto-populated number depending on the settings done for each user for HTML notification out dial number. You can enter either the phone number or URI in this field. In addition,
check if there are any restriction rules are set by the administrator to block
some number. For more information on the restriction rules refer to
.
|
||
| Step 3 |
Click Start Recording.
|
||
| Step 4 |
Record the voice message and when done, click Stop Recording. The duration of the recording is displayed on the window.
|
||
| Step 5 |
Click Send to send the message. The voice message is sent to recipient with an ‘RE:’ added to original subject of the message. |
Reply All Option
Connection Mini Web Inbox allows users to reply all to a voice message by following any of the actions given below:
-
Clicking the Reply all link as displayed in the email notification or
-
Replying through the Computer button if accessing the Connection Mini Web Inbox through computer, or
-
Replying all through the Phone button given in the Connection Mini Web Inbox via computer or mobile
Note that when an outside caller leaves a voice message, the user will not get the Reply All option.
The user can reply to a voice message by recording through the computer option or using the phone recording and playback functionality, depending upon the option selected at the time of playing a message. If a user wants to toggle between the Computer or Phone options on computer while replying to a message, the user needs to go back to the main Connection Mini Web Inbox window and re-select the Computer or Phone option. The toggling between the Computer or Phone options is not allowed from the Reply window. In addition, the toggling is supported when the voice message is not in the playing state either from computer or mobile.
Auto-Inherit Properties
The replied message auto inherits the urgent, secured, and private properties of the original message. If the original message was private, secure, or private and secure, the replied message will also be of the same type. The user is not allowed to edit or provide the private and secured properties from the Connection Mini Web Inbox.
Note |
The recording on MAC OS is supported via telephone record and playback functionality only. The computer based recording is not supported. |
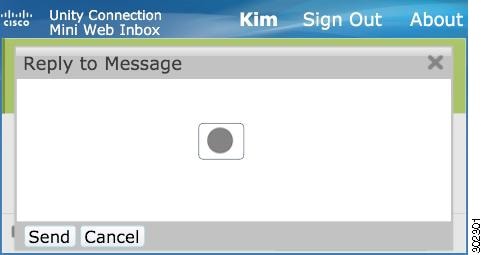
To Use the Reply all Link to a Voice Message using the Computer Recording
Connection Mini Web Inbox on PC supports the Computer option to reply all the recipients of the voice message that uses the computer microphone and speakers or other default audio device. If you are accessing the Connection Mini Web Inbox on mobile, the Computer option will not be available as the mobile based mini player supports only telephone record and playback functionality.
SUMMARY STEPS
- Click the Reply all link given in the email notification or click the Reply All button given in the Connection Mini Web Inbox. The Reply to Message window opens.
- Click Start Recording.
- Record the voice message and when done, click Stop Recording. The duration of the recording is displayed on the window.
- Click Send to send the message. The voice message is sent to recipient with an ‘RE:’ added to original subject of the message.
DETAILED STEPS
| Step 1 |
Click the Reply all link given in the email notification or click the Reply All button given in the Connection Mini Web Inbox. The Reply to Message window opens. The To and Sub fields along with the message properties gets inherited from the parent voice message. The user does not have an option to append or edit these fields. The CC and BCC fields do not get inherited from the actual message.
|
||
| Step 2 |
Click Start Recording. If you are clicking on Start Recording for the first time, the Adobe Flash Player Settings window gets displayed.
|
||
| Step 3 |
Record the voice message and when done, click Stop Recording. The duration of the recording is displayed on the window.
|
||
| Step 4 |
Click Send to send the message. The voice message is sent to recipient with an ‘RE:’ added to original subject of the message. |
To Use Reply All Via the Phone Recording and Playback Feature
You can reply to a voice message using the Phone option that is available on computer, as well as mobile.
Procedure
| Step 1 |
Click the Reply all link given in the email notification or click the Reply all button given in the Connection Mini Web Inbox. The Reply to Message window opens. The To and Sub fields along with the message properties gets inherited from the parent voice message. The user does not have an option to append or edit these fields. The CC and BCC fields do not get inherited from the actual message.
|
||
| Step 2 |
Click Phone to enter an editable number or use the auto-populated number depending on the settings done for each user for HTML notification out dial number. You can enter either E.164 DN or URI in this field. In addition, check if there is any restriction rules are set by the administrator to block some number. For more information on the restriction rules refer to .
|
||
| Step 3 |
Click Start Recording.
|
||
| Step 4 |
Record the voice message and when done, click Stop Recording. The duration of the recording is displayed on the window.
|
||
| Step 5 |
Click Send to send the message. The voice message is sent to the recipient with an ‘RE:’ added to the original subject of the message. |
Forward Option
User can forward a voice message and can attach any further introduction or message to the existing message by following any of the actions given below:
-
Click the Forward link as displayed in the email notification,
-
Forward the message through the Computer button if accessing the Connection Mini Web Inbox through computer, or
-
Forward the message through the Phone button given in the Connection Mini Web Inbox via computer or mobile
The user can forward a voice message by recording through the computer option or using the phone recording and playback functionality, depending upon the option selected at the time of playing a message. If a user wants to toggle between the Computer or Phone options on computer while forwarding a message, the user needs to go back to the main Connection Mini Web Inbox window and re-select the Computer or Phone option. The toggling between the Computer or Phone options is not allowed from the Forward Message window. In addition, the toggling is supported when the voice message is not in the playing state either from computer or mobile.
Auto-Inherit Properties
The forward message auto inherits the secured and urgent properties of the original message. If the original message was urgent, secure, or urgent and secure, the forward message will also be of the same type. The user is not allowed to edit or provide the private and secured properties from the Connection Mini Web Inbox. Also, a private message cannot be forwarded.
Note |
The recording on MAC OS is supported via telephone record and playback functionality only. The computer based recording is not supported. |
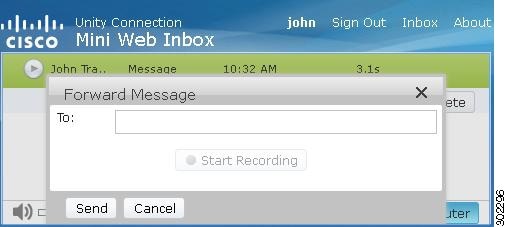
To Forward a Voice Message using the Computer Recording
Connection Mini Web Inbox on PC supports the Computer option to forward a voice message that uses the computer microphone and speakers or other default audio device. If you are accessing the Connection Mini Web Inbox on mobile, the Computer option will not be available as the mobile based mini player supports only telephone record and playback functionality.
Procedure
| Step 1 |
Click the Forward link given in the email notification or click the Forward bbutton given in the Connection Mini Web Inbox. The Forward Message window opens with the To text field.
The Sub field along with the message properties is populated automatically in the background. User does not have an option to append or edit the subject.
|
||||
| Step 2 |
Enter an email address to which you want to forward the message in the To field. |
||||
| Step 3 |
Click Start Recording.
|
||||
| Step 4 |
Record the voice message and when done, click Stop Recording. The duration of the recording is displayed on the window.
|
||||
| Step 5 |
Click Send to send the message. The voice message is sent to the recipient with an ‘Fw:’ added to the original subject of the message. |
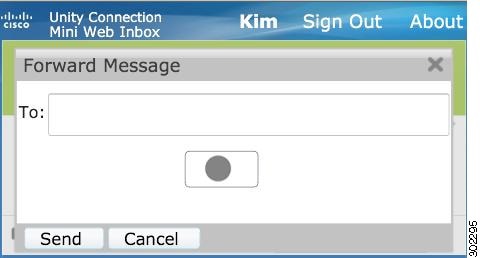
To Forward a Voice Message using the Phone Recording and Playback Feature
You can forward a voice message using the Phone option that is available on computer, as well as mobile.
Procedure
| Step 1 |
Click the Forward link given in the email notification or click the Forward button given in the Connection Mini Web Inbox. The Forward Message window opens with the To text field. The Sub field along with the message properties is populated automatically in the background. User does not have an option to append or edit the field.
|
||
| Step 2 |
Enter an email address to which you want to forward the message in the To field. |
||
| Step 3 |
Click Phoneto enter an editable number or use the auto-populated number depending on the settings done for each user for HTML notification out dial number. The number entered here must be E.164 compliant. In addition, check if there is any restriction rules are set by the administrator to block some number. For more information on the restriction rules refer to System Administration Guide for Cisco Unity Connection Release 12.x available at, https://www.cisco.com/c/en/us/td/docs/voice_ip_comm/connection/12x/administration/guide/b_12xcucsag.html.
|
||
| Step 4 |
Click Start Recording.
|
||
| Step 5 |
Record the voice message and when done, click Stop Recording. The duration of the recording is displayed on the window.
|
||
| Step 6 |
Click Send to send the message. The voice message is sent to the recipient with an ‘Fw:’ added to the original subject of the message. |
Mark Unread Option
Connection Mini Web Inbox allows the users to mark an already read voice message as unread by following either of the action given below:
-
Clicking the Mark Unread link as displayed in the email notification or
-
Clicking the Mark Unread button given in the Connection Mini Web Inbox
To mark a voice message unread, do the following:
Procedure
|
Click the Mark Unread link given in the email notification or click the Mark Unread button given in the Connection Mini Web Inbox. The message is marked as unread. The unread message count given below in the Connection Mini Web Inbox gets increased by one count. |
Delete Option
Connection Mini Web Inbox allows the users to delete a voice message by following any of the action given below:
-
Clicking the Delete link as displayed in the email notification or
-
Clicking the Delete button given in the Connection Mini Web Inbox
To delete a voice message, do the following:
Procedure
|
Click the Delete link given in the email notification or click the Delete button given in the Connection Mini Web Inbox. If the administrator has configured the Delete Messages Without Saving to Deleted Items Folder message option in the Class of Service template, a confirmation message appears to permanently delete the voice message. If the above delete messages settings are not configured, the message gets marked as delete with the red cross icon and moved to the Deleted folder. The Undelete option is visible if the user manually refreshes the window or again opens the notification link from the email. The deleted voice message will now get open from the deleted items folder in the Connection Mini Web Inbox. The user is not allowed to perform any other operation other than the play and undelete option on the deleted message. 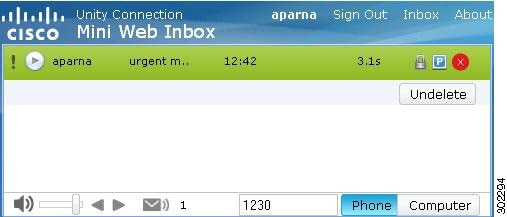 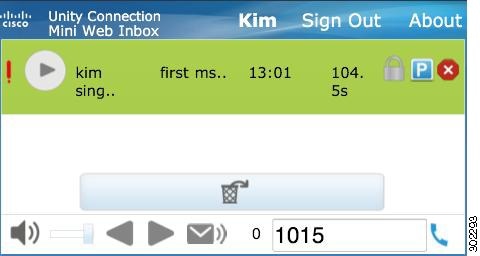 |
Sign Out Option
Once the user signs out from the Connection Mini Web Inbox, he must click the mini player link in the notification email to access the mini player again.
Notable Behavior for Support of Types of Messages in Connection Mini Web Inbox
Connection Mini Web Inbox supports voice and urgent messages. However, the HTML notifications and mini player does not support the following message types:
-
Dispatch Messages
-
Fax
-
Transcription
-
Calendar Notifications
Limitations
Limitations of Connection Mini Web Inbox:
-
IPhone supports recording till 210 seconds only.
-
If the user records a voice message with more than 210 seconds, say 250 seconds, then the user will not be able to send the recorded voice message and the warning message “Maximum recording of 210 seconds is supported on IPhone.” is displayed.
-
While playing a voice message the progress bar in the mini player gets hanged after 3 mins and 59 secs. However, the user will still be able to hear the entire message.
-
Make sure the required SSL certificates are installed on your IPhone.
-
If you have entered wrong authentication credential details when the authentication mode is selected, you need to clear the browser cache.
-
When recording from mobile if the user has given the same mobile number as the outdial number, the Reply to Message window is minimized in your mobile. You are still allowed to record the message, however, after reopening the Reply to Message window the timer may take few seconds to update the actual recording time.
-
When playing a message from mobile if the user has given the same mobile number as the outdial number, the Mini Web Inbox window is minimized in your mobile. The message is played as usual, however, if you reopen the Mini Web Inbox window during the message the progress bar may take few seconds to show the actual progress.
-
When playing a message from mobile if the user has given the same mobile number as the outdial number, the Mini Web Inbox window is minimized in your mobile. The message is played as usual, however, if you reopen the Mini Web Inbox window after the message the progress bar will not get updated to show the actual status of message.
 Feedback