- Preface
- Live WMV Stream from Cisco TelePresence Content Server to Cisco Show and Share
- Live WMV Stream from Cisco TelePresence Content Server to Cisco MXE 3500 to Cisco Digital Media Player
- Video On Demand from Cisco TelePresence Content Server to Cisco Cisco Show and Share
- Transcode and Add Pulse Video Analytics to Video Content on Cisco Show and Share
Capture Transform Share: How to Configure Cisco TCS for WMV Streaming to Cisco Show and Share and DMP
Bias-Free Language
The documentation set for this product strives to use bias-free language. For the purposes of this documentation set, bias-free is defined as language that does not imply discrimination based on age, disability, gender, racial identity, ethnic identity, sexual orientation, socioeconomic status, and intersectionality. Exceptions may be present in the documentation due to language that is hardcoded in the user interfaces of the product software, language used based on RFP documentation, or language that is used by a referenced third-party product. Learn more about how Cisco is using Inclusive Language.
- Updated:
- May 31, 2012
Chapter: Transcode and Add Pulse Video Analytics to Video Content on Cisco Show and Share
Transcode and Add Pulse Video Analytics to Video Content on Cisco Show and Share
When Cisco MXE 3500 integration is enabled in Cisco Show and Share, videos uploaded to Cisco Show and Share are delivered to the Cisco MXE 3500 for transcoding. When the transcoding is complete, the transcoded videos are returned to Cisco Show and Share.
•![]() Register the Cisco MXE 3500 in the Cisco DMM
Register the Cisco MXE 3500 in the Cisco DMM
•![]() Configure Cisco Show and Share to Use the Cisco MXE 3500
Configure Cisco Show and Share to Use the Cisco MXE 3500
Prerequisites
•![]() Cisco Show and Share Release 5.2.1 or later.
Cisco Show and Share Release 5.2.1 or later.
•![]() Cisco Media Experience Engine 3500 (MXE 3500) Release 3.2 or later.
Cisco Media Experience Engine 3500 (MXE 3500) Release 3.2 or later.
•![]() Administrator login credentials for the Cisco Show and Share and Cisco MXE 3500.
Administrator login credentials for the Cisco Show and Share and Cisco MXE 3500.
•![]() Cisco MXE Release 3.3 and Cisco Show and Share Release 5.3 are required for Pulse video analytics.
Cisco MXE Release 3.3 and Cisco Show and Share Release 5.3 are required for Pulse video analytics.
•![]() For Pulse Analytics, the Cisco MXE 3500 must have a Pulse feature license installed.
For Pulse Analytics, the Cisco MXE 3500 must have a Pulse feature license installed.
Guidelines and Limitations
•![]() You can only configure one Cisco MXE 3500 or Cisco MXE 3500 cluster in Cisco Show and Share.
You can only configure one Cisco MXE 3500 or Cisco MXE 3500 cluster in Cisco Show and Share.
•![]() There is no co-location requirement for Cisco Show and Share and Cisco MXE 3500 hardware. The appliances can be deployed anywhere in the network provided that they can communicate by using FTP (TCP port 21) and HTTP (TCP port 80). Cisco Show and Share uses FTP to submit user videos to Cisco MXE 3500 and retrieve transcoded versions, and uses HTTP to submit transcoding job requests. If network loading or bandwidth are a concern with large video files, Cisco Show and Share and the Cisco MXE 3500 should be co-located.
There is no co-location requirement for Cisco Show and Share and Cisco MXE 3500 hardware. The appliances can be deployed anywhere in the network provided that they can communicate by using FTP (TCP port 21) and HTTP (TCP port 80). Cisco Show and Share uses FTP to submit user videos to Cisco MXE 3500 and retrieve transcoded versions, and uses HTTP to submit transcoding job requests. If network loading or bandwidth are a concern with large video files, Cisco Show and Share and the Cisco MXE 3500 should be co-located.
•![]() The Cisco MXE 3500 licenses, Standalone and Resource Manager, both work for this integration. Other than the functional differences between the two licenses, there are no specific configuration limitations.
The Cisco MXE 3500 licenses, Standalone and Resource Manager, both work for this integration. Other than the functional differences between the two licenses, there are no specific configuration limitations.
•![]() When integrating Cisco Show and Share with a Cisco MXE 3500 cluster (resource nodes managed by a resource manager), observe these guidelines:
When integrating Cisco Show and Share with a Cisco MXE 3500 cluster (resource nodes managed by a resource manager), observe these guidelines:
–![]() Verify that the resource nodes (RNs) have full control access to the \\mxe_ip_address\dms shared folder on the Resource Manager (RM) appliance. mxe_ip_address is the IP address of the standalone or the RM appliance.
Verify that the resource nodes (RNs) have full control access to the \\mxe_ip_address\dms shared folder on the Resource Manager (RM) appliance. mxe_ip_address is the IP address of the standalone or the RM appliance.
–![]() When configuring the host setting, we recommend using the IP address for the RM. Verify that the RNs can reach the RM IP address.
When configuring the host setting, we recommend using the IP address for the RM. Verify that the RNs can reach the RM IP address.
•![]() Configure the FTP client settings on Cisco Show and Share to communicate with Cisco MXE 3500.
Configure the FTP client settings on Cisco Show and Share to communicate with Cisco MXE 3500.
•![]() If Pulse video analytics is enabled, the processing time to add keywords and speaker identification is approximately 1.5 times the length of the video. A one-hour video takes approximately one and one-half hours to process.
If Pulse video analytics is enabled, the processing time to add keywords and speaker identification is approximately 1.5 times the length of the video. A one-hour video takes approximately one and one-half hours to process.
•![]() In Cisco Show and Share Release 5.3, videos are transcoded to MP4 format using the H.264 video codec. You can configure the transcoding process to produce up to three versions of the video using different resolutions:
In Cisco Show and Share Release 5.3, videos are transcoded to MP4 format using the H.264 video codec. You can configure the transcoding process to produce up to three versions of the video using different resolutions:
–![]() 360p—Low resolution. The Cisco Show And Share mobile client displays videos in this resolution. Viewers can also select this resolution for smoother playback over slow connections.
360p—Low resolution. The Cisco Show And Share mobile client displays videos in this resolution. Viewers can also select this resolution for smoother playback over slow connections.
–![]() 480p—Medium resolution. Videos transcoded to this resolution are also transcoded to 360p.
480p—Medium resolution. Videos transcoded to this resolution are also transcoded to 360p.
–![]() 720p—High resolution. Videos transcoded to this resolution are also transcoded to 480p and 360p.
720p—High resolution. Videos transcoded to this resolution are also transcoded to 480p and 360p.
|
|
|
|
|
|
|
|
||
360p |
480x360 |
640x360 |
400 kbps |
480p |
640x480 |
853x480 |
768 kbps |
720p |
960x720 |
1280x720 |
1300 kbps |

Note ![]() Cisco Show and Share does not upscale a video. For example, if you set transcoding for all three resolutions, and upload a video at 480p, Cisco Show and Share will only produce the 480p and 360p versions of the video.
Cisco Show and Share does not upscale a video. For example, if you set transcoding for all three resolutions, and upload a video at 480p, Cisco Show and Share will only produce the 480p and 360p versions of the video.
•![]() Integrating Cisco MXE 3500 Release 3.3 that has Pulse video analytics enabled with Cisco Show and Share Release 5.3 adds keywords and speaker identification to video content. In Cisco Show and Share, viewers click on the keyword or speaker to go to the corresponding location in the video. Pulse Video Analytics is a licensed feature on Cisco MXE 3500 Release 3.3.
Integrating Cisco MXE 3500 Release 3.3 that has Pulse video analytics enabled with Cisco Show and Share Release 5.3 adds keywords and speaker identification to video content. In Cisco Show and Share, viewers click on the keyword or speaker to go to the corresponding location in the video. Pulse Video Analytics is a licensed feature on Cisco MXE 3500 Release 3.3.
•![]() In Cisco Show and Share Release 5.2.x, videos are transcoded to Flash video 8 (.flv) format with the following specifications:
In Cisco Show and Share Release 5.2.x, videos are transcoded to Flash video 8 (.flv) format with the following specifications:
–![]() Bitrate: 400 bps
Bitrate: 400 bps
–![]() Frame rate: 30 fps
Frame rate: 30 fps
–![]() Maximum height: 268 pixels
Maximum height: 268 pixels
–![]() Maximum width: 480 (for 16:9 ratio), 360 (for 4:3 ratio)
Maximum width: 480 (for 16:9 ratio), 360 (for 4:3 ratio)
Configure the Cisco MXE 3500
•![]() Configuring Cisco Show and Share Integration and dmsftp
Configuring Cisco Show and Share Integration and dmsftp
•![]() Disabling API Authentication on Cisco MXE 3500
Disabling API Authentication on Cisco MXE 3500
•![]() Configuring Pulse Video Analytics
Configuring Pulse Video Analytics
Configuring Cisco Show and Share Integration and dmsftp
Note ![]() In a clustered deployment, perform all configuration steps on the RM appliance.
In a clustered deployment, perform all configuration steps on the RM appliance.
Step 1 ![]() SSH to mxe_IP_address, where mxe_IP_address is the hostname or IP address for the Cisco MXE 3500.
SSH to mxe_IP_address, where mxe_IP_address is the hostname or IP address for the Cisco MXE 3500.
Step 2 ![]() When the Welcome to the Media Experience Engine screen displays, press Alt+F1 to log in to the Linux administration utility.
When the Welcome to the Media Experience Engine screen displays, press Alt+F1 to log in to the Linux administration utility.
Step 3 ![]() Log in as admin. The configuration menu appears.
Log in as admin. The configuration menu appears.
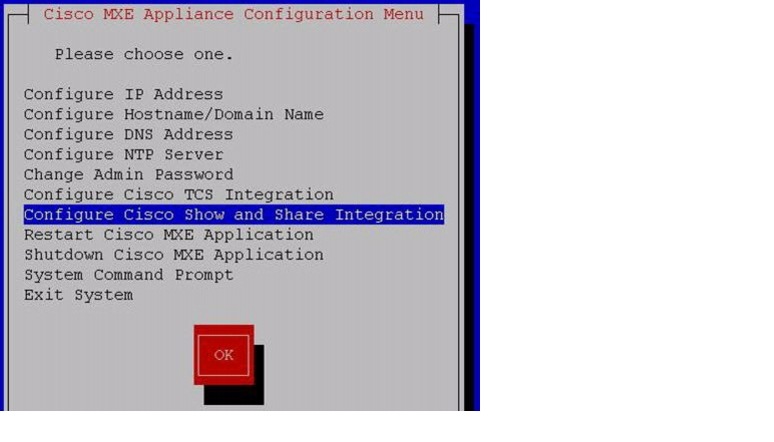
Step 4 ![]() Select Configure Cisco Show and Share Integration, and click OK.
Select Configure Cisco Show and Share Integration, and click OK.
Figure 1 Configure Cisco Show and Share Integration
Step 5 ![]() In the Configure Cisco Show and Share Integration screen, select Enable Cisco Show and Share Integration.
In the Configure Cisco Show and Share Integration screen, select Enable Cisco Show and Share Integration.
Figure 2 Configure Cisco Show and Share FTP Account
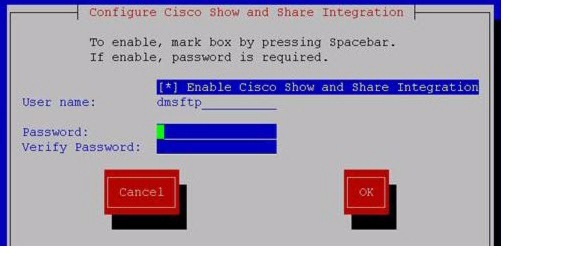
Step 6 ![]() Enter a password for dmsftp in the Password field.
Enter a password for dmsftp in the Password field.
Step 7 ![]() Reenter the password in the Verify Password field.
Reenter the password in the Verify Password field.
Step 8 ![]() Click OK.
Click OK.
Disabling API Authentication on Cisco MXE 3500
You must disable API basic authentication in the Cisco MXE 3500 to integrate with Cisco Show and Share.
Step 1 ![]() Log into the Cisco MXE 3500 web UI (http://mxe_IP_address/mxeui) by using an admin account.
Log into the Cisco MXE 3500 web UI (http://mxe_IP_address/mxeui) by using an admin account.
Step 2 ![]() From the Toolbox, click Administration > API Admin.
From the Toolbox, click Administration > API Admin.
Step 3 ![]() In the Configure Authentication Mode section, click Edit.
In the Configure Authentication Mode section, click Edit.
Step 4 ![]() Choose Unauthenticated Mode.
Choose Unauthenticated Mode.
This option specifies that the MXE REST API does not require any authentication. No API components are blocked, giving users unrestricted access to all and any API components.
Step 5 ![]() Click Save.
Click Save.
Note![]() •
•![]() Cisco MXE 3500 uses the mode that you configure upon save.
Cisco MXE 3500 uses the mode that you configure upon save.
•![]() The Cisco MXE 3500 web UI and APIs will not be accessible for 1-2 minutes while the authentication mode change is applied.
The Cisco MXE 3500 web UI and APIs will not be accessible for 1-2 minutes while the authentication mode change is applied.
Configuring Pulse Video Analytics
For information on how to configure Pulse Video Analytics on Cisco MXE 3500, see the Administration Guide for Cisco Media Experience Engine 3500 on Cisco.com.
Register the Cisco MXE 3500 in the Cisco DMM
Note ![]() Cisco MXE 3500 must be registered in Cisco DMM for Cisco Show and Share to use Cisco MXE 3500.
Cisco MXE 3500 must be registered in Cisco DMM for Cisco Show and Share to use Cisco MXE 3500.
Step 1 ![]() Log into Cisco DMM (http://dmm_server_name:8080) as superuser or as an administrator.
Log into Cisco DMM (http://dmm_server_name:8080) as superuser or as an administrator.
Step 2 ![]() Click Administration.
Click Administration.
Step 3 ![]() Choose Settings > External Servers > MXE. The Media Experience Engine settings page appears.
Choose Settings > External Servers > MXE. The Media Experience Engine settings page appears.
Figure 3 Media Experience Engine Settings
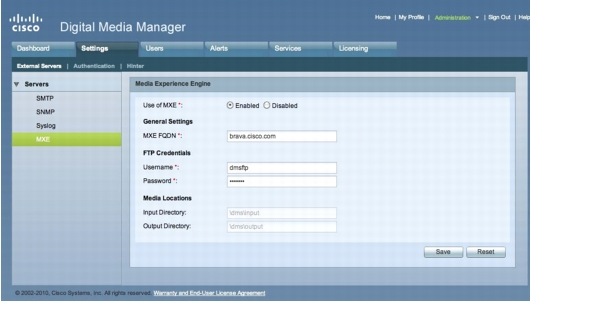
Step 4 ![]() Select Enabled in the Use of MXE field. Enter the Cisco MXE 3500 fully qualified domain name or IP address in the MXE FQDN field, for example mxe.cisco.com.
Select Enabled in the Use of MXE field. Enter the Cisco MXE 3500 fully qualified domain name or IP address in the MXE FQDN field, for example mxe.cisco.com.
Step 5 ![]() Enter the FTP credentials that you configured on the Cisco MXE 3500:
Enter the FTP credentials that you configured on the Cisco MXE 3500:
|
|
|
|---|---|
Username |
Enter dmsftp. |
Password |
The dmsftp account password that you entered in the "Configuring Cisco Show and Share Integration and dmsftp" procedure. |
Step 6 ![]() Click Save. Cisco DMM verifies the connection to the Cisco MXE 3500. If it cannot contact the Cisco MXE 3500, an error message appears.
Click Save. Cisco DMM verifies the connection to the Cisco MXE 3500. If it cannot contact the Cisco MXE 3500, an error message appears.
Step 7 ![]() If you receive an error, verify your settings.
If you receive an error, verify your settings.
Configure Cisco Show and Share to Use the Cisco MXE 3500
Step 1 ![]() Log into Cisco Show and Share with admin or superuser privileges.
Log into Cisco Show and Share with admin or superuser privileges.
Step 2 ![]() Choose Administration from the global navigation.
Choose Administration from the global navigation.
Step 3 ![]() Choose Setup > MXE Settings (Show and Share Release 5.3) or Media Experience Engine (Show and Share Release 5.2.x). The Media Experience Engine Settings page displays.
Choose Setup > MXE Settings (Show and Share Release 5.3) or Media Experience Engine (Show and Share Release 5.2.x). The Media Experience Engine Settings page displays.
Figure 4 Media Experience Engine Settings Page Release 5.3
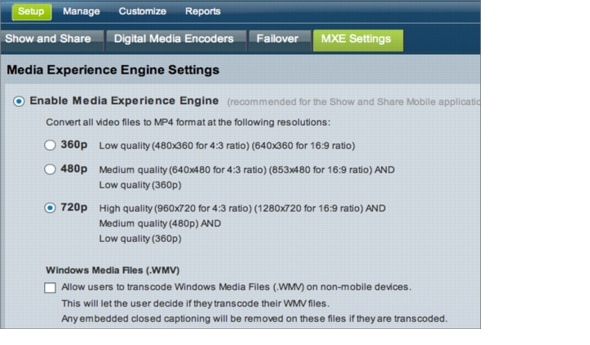
Figure 5 Media Experience Engine Settings Page Release 5.2.1
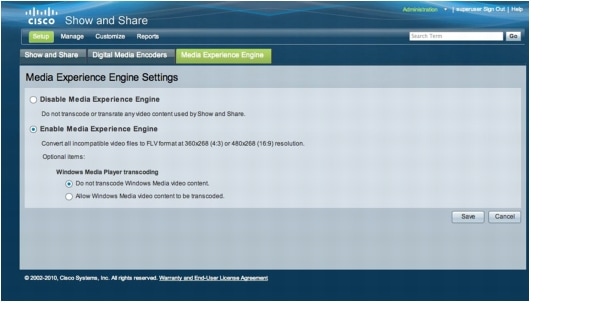
Step 4 ![]() Select Enable Media Experience Engine.
Select Enable Media Experience Engine.
Step 5 ![]() Depending on the Cisco Show and Share Release, do one of the following:
Depending on the Cisco Show and Share Release, do one of the following:
•![]() For Cisco Show and Share Release 5.3
For Cisco Show and Share Release 5.3
•![]() For Cisco Show and Share Release 5.2.x
For Cisco Show and Share Release 5.2.x
For Cisco Show and Share Release 5.3
a. ![]() Select one of the following resolutions:
Select one of the following resolutions:
–![]() 360p—Produces one video at 360p resolution
360p—Produces one video at 360p resolution
–![]() 480p—Produces two videos at 360p and 480p resolution respectively
480p—Produces two videos at 360p and 480p resolution respectively
–![]() 720p—Produces three videos, at 360p, 480p, and 720p resolution respectively
720p—Produces three videos, at 360p, 480p, and 720p resolution respectively
Note ![]() If you select 720p, videos are automatically transcoded to 480p and 360p. Similarly if you select 480p, videos are automatically transcoded to 360p.
If you select 720p, videos are automatically transcoded to 480p and 360p. Similarly if you select 480p, videos are automatically transcoded to 360p.
Note ![]() Cisco Show and Share does not upscale a video. If you select 720p and upload a video at 480p, Cisco Show and Share will only produce the 480p and 360p versions of the video.
Cisco Show and Share does not upscale a video. If you select 720p and upload a video at 480p, Cisco Show and Share will only produce the 480p and 360p versions of the video.
b. ![]() (Optional) Select Windows Media Files (.WMV)
(Optional) Select Windows Media Files (.WMV)
c. ![]() Click Save.
Click Save.
For Cisco Show and Share Release 5.2.x
a. ![]() Select one of the following choices:
Select one of the following choices:
–![]() Do not transcode Windows Media video content. Prevents Windows media files (.wmv, .wma, .asx, and .asf) from being transcoded. They will be handled natively by Cisco Show and Share. Users will not be able to use the built-in video editor with these file types. This option is enabled by default.
Do not transcode Windows Media video content. Prevents Windows media files (.wmv, .wma, .asx, and .asf) from being transcoded. They will be handled natively by Cisco Show and Share. Users will not be able to use the built-in video editor with these file types. This option is enabled by default.
–![]() Allow Windows media content to be transcoded. Allows Windows media files to be transcoded by the Cisco MXE. Users that are uploading Windows media files are given the option to skip transcoding and have the files processed natively by Cisco Show and Share. They would want to skip transcoding if their media contained embedded closed captioning. When Windows media video content is transcoded, any embedded Closed Captioning is lost.
Allow Windows media content to be transcoded. Allows Windows media files to be transcoded by the Cisco MXE. Users that are uploading Windows media files are given the option to skip transcoding and have the files processed natively by Cisco Show and Share. They would want to skip transcoding if their media contained embedded closed captioning. When Windows media video content is transcoded, any embedded Closed Captioning is lost.
b. ![]() Click Save.
Click Save.
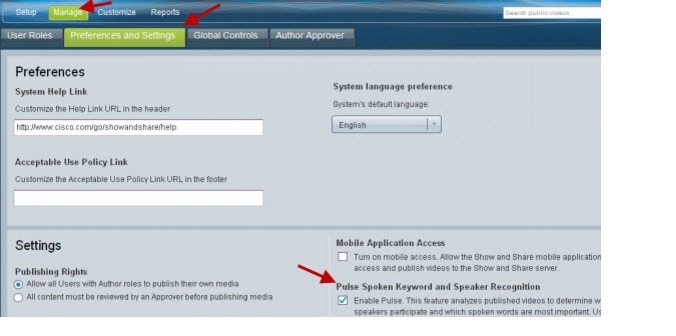
Step 6 ![]() Enable Pulse—For Cisco Show and Share Release 5.3 only
Enable Pulse—For Cisco Show and Share Release 5.3 only
a. ![]() Choose Manage > Preferences and Settings.
Choose Manage > Preferences and Settings.
b. ![]() Under Settings, check Pulse Spoken Keyword and Speaker Recognition.
Under Settings, check Pulse Spoken Keyword and Speaker Recognition.
c. ![]() Click Apply.
Click Apply.
Figure 6 Enable Pulse in Cisco Show and Share Release 5.3
Testing the Integration
Cisco Show and Share now automatically submits transcoding jobs to the Cisco MXE 3500.
Step 1 ![]() Upload a video to Cisco Show and Share, and save it as a draft.
Upload a video to Cisco Show and Share, and save it as a draft.
Step 2 ![]() Log in to the Cisco MXE 3500 user interface.
Log in to the Cisco MXE 3500 user interface.
Step 3 ![]() Choose Monitoring > Job Status. A job will be running without a Job Profile Name.
Choose Monitoring > Job Status. A job will be running without a Job Profile Name.
Step 4 ![]() Select the job.
Select the job.
Step 5 ![]() The Tasks tab displays the job details. When the Cleanup task is complete, the Cisco MXE 3500 has completed the transcoding and deleted the submitted video from the C:\dms\input folder.
The Tasks tab displays the job details. When the Cleanup task is complete, the Cisco MXE 3500 has completed the transcoding and deleted the submitted video from the C:\dms\input folder.
Step 6 ![]() On Cisco Show and Share, the status of the uploaded video will change from Processing - Draft to Draft. You can now publish the transcoded video in the Cisco Show and Share video portal.
On Cisco Show and Share, the status of the uploaded video will change from Processing - Draft to Draft. You can now publish the transcoded video in the Cisco Show and Share video portal.
Figure 7 Job Details in Cisco MXE 3500

User Experience
1. ![]() Upload Video to the Cisco Show and Share video portal.
Upload Video to the Cisco Show and Share video portal.

Tip ![]() If you have Pulse video analytics enabled, upload the video as Draft. This allows you to review and edit the Speaker names before publishing the video.
If you have Pulse video analytics enabled, upload the video as Draft. This allows you to review and edit the Speaker names before publishing the video.
The status shows as Processing-Draft. If you select the Go to Publish Page option when the video is uploaded, the status shows as Processing-Publish.
Cisco Show and Share submits the video by using FTP to the Cisco MXE 3500 for transcoding. The Cisco MXE 3500 transcodes the video; if Pulse video analytics is enabled, Cisco MXE 3500 also applies keyword tags and speaker IDs to the video content.
Cisco Show and Share uses the MXE API to submit and poll the status of the job it submitted. When the Cisco MXE 3500 completes processing the video, Cisco Show and Share uses FTP to copy the transcoded video to the Cisco Show and Share video portal.
2. ![]() After the status changes to Draft, click on Edit Video to review and edit or tag the speaker names.
After the status changes to Draft, click on Edit Video to review and edit or tag the speaker names.
If the Go to Publish Page option is selected during video upload, the status changes to Published. The video is automatically published to Cisco Show and Share. To review and edit the speaker names, click Manage Video, then Save as Draft. In the draft copy, click Edit Video to edit or identify the speaker names.
Once a speaker is identified, the system recognizes and automatically identifies the speaker in subsequent videos.
3. ![]() Publish the enhanced video content for sharing.
Publish the enhanced video content for sharing.
 Feedback