- Welcome to DMS-Admin
- DMS-Admin Dashboard
- Licenses
- Server Operations
- Analyze Cisco DMS System Logs
- Allow or Disallow Video Transcoding
- Cisco Hinter for RTSP
- Authentication and Federated Identity
- Users and Groups
- Events and Notifications
- Configure Failover
- Welcome to Centralized DMP Management
- DMP Dashboard
- Register DMPs
- Organize DMPs in Groups
- Configure DMP Wi-Fi Settings
- Touchscreens, Projectors, and Displays
- DMP Remote Control and Its Emulation
- DMP User Permissions
- Media Assets and Embedded Software
- Schedule Media to Play and Commands to Run
- Content Distribution and Delivery
- Touchscreens, Projectors, and Displays
- Playlists
- Proof of Play
- Plan for and Manage Emergencies
- Welcome to Cisco Cast
- Redistribute Live TV
- Video on Demand
- Electronic Program Guide
- Look and Feel
User Guide for Cisco Digital Media Manager 5.3.x
Bias-Free Language
The documentation set for this product strives to use bias-free language. For the purposes of this documentation set, bias-free is defined as language that does not imply discrimination based on age, disability, gender, racial identity, ethnic identity, sexual orientation, socioeconomic status, and intersectionality. Exceptions may be present in the documentation due to language that is hardcoded in the user interfaces of the product software, language used based on RFP documentation, or language that is used by a referenced third-party product. Learn more about how Cisco is using Inclusive Language.
- Updated:
- March 11, 2014
Chapter: Authentication and Federated Identity
- Concepts
- Export the Root CA X.509 Certificate from Your Active Directory Server
- Configure DMM to Trust the Active Directory Root CA
- Choose an Authentication Method
- Configure LDAP (Active Directory) Settings
- Define LDAP (Active Directory) Filters
- Define LDAP (Active Directory) Bookmarks
- Define the LDAP (Active Directory) Synchronization Schedule
- Manage LDAP (Active Directory) Attributes
- Configure Automatic LDAP (Active Directory) Synchronization
- Derive LDAP (Active Directory) Group Membership Dynamically from a Query
- Configure Federation Services for SSO
- Configure Active Directory Federation Services for Cisco Show and Share Release 5.3.12
Authentication and Federated Identity
Revised: September 2013
OL-15762-04

|
We prepared this material with specific expectations of you.
|
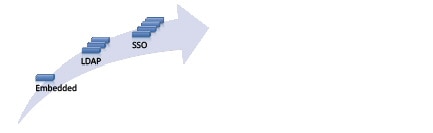
 Embedded Mode
 LDAP Mode
 Federation Mode
Concepts
- Overview
- Glossary
- Understand the Requirement to Authenticate Users
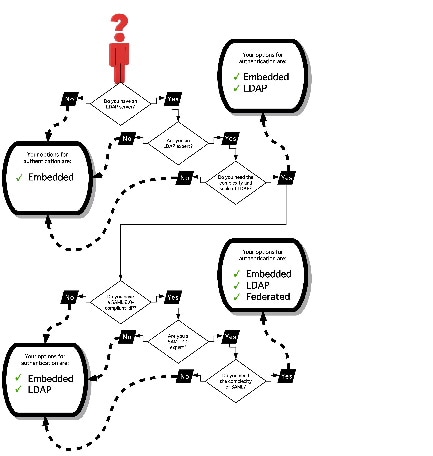
- Decide Which Authentication Method to Use
- LDAP and Active Directory Concepts
- Federated Identity and Single Sign-on (SSO) Concepts
- Migration Between Authentication Methods
Overview
User authentication features of DMS-Admin help you to:
- Authenticate all user sessions. ( We prevent you from disabling mandatory authentication, even though we allowed this in Cisco DMS 5.1.x and prior releases. )
- Choose and configure an authentication method.
- Import user account settings from an Active Directory server.
• Synchronize user groups from an Active Directory server. Microsoft Active Directory is the only LDAP implementation that we support in this release.
- Use federation services with a SAML 2.0-compliant IdP to support SP-initiated “single sign-on” login authentication in your network (following an initial synchronization to a Microsoft Active Directory Server that populates the DMM user database).

Note We support your use of one — and only one — IdP server with Cisco DMS 5.3.
Glossary

Timesaver Go to terms that start with... [ A | C | D | F | I | L | O | P | R | S | U | X ].
|
Microsoft implementation of LDAP. A central authentication server and user store. Active Directory is the only LDAP implementation that we support in this release.
|
|
|
A domain-straddling combination of Active Directory trees within an organization that operates multiple Internet domains. Thus, the forest at “Amalgamated Examples, LLC” might straddle all trees across example.com, example.net, and example.org.
Or, to use Cisco as a real-world case-study, one forest could straddle
cisco.com
and
webex.com
, among others.
Cisco Show and Share Release 5.3.12 does support Active Directory forests. See this white paper on Cisco.com:
http://www.cisco.com/en/US/prod/collateral/video/ps9901/ps6682/white_paper_c11-727483.html |
|
|
.
When you use poor syntax here for the first time while your DMM appliance runs DMS 5.3, we show you, the administrator, this error message: “Invalid username or password.” But if you used and validated poor syntax here before upgrading to Cisco DMS 5.3, we do not repeat the validation process. Therefore — even though we do not show an error message to anyone — LDAP users simply cannot log in. Note An LDAP expression must never include a space immediately to either side of a “=” sign. Similarly, it must never include a space immediately to either side of an “objectClass” attribute. Otherwise, validation fails. |
|
|
The process to verify if a directory service entity has correctly claimed its own identity.
|
|
certification authority
. Authority that issues and manages security credentials and public keys, which any directory service entity relies upon to encrypt and decrypt messages exchanged with any other directory service entity. As part of a public key infrastructure (PKI), a CA checks with a registration authority (RA) to verify information that certificate requestors provide. After the RA verifies requestor information, the CA can then issue a certificate.
|
|
|
common name
. An attribute-value pair that names one directory service entity but indicates nothing about its context or position in a hierarchy. For example, you might see
cn=administrator
. But
cn=administrator
is so commonplace in theory that it might possibly recur many times in an Active Directory forest, while referring to more than just one directory service entity. An absence of context means that you cannot know which device, site, realm, user group, or other entity type requires the implied “administration” or understand why such “administration” should occur.
Therefore, use of a standalone CN is limited in the LDIF grammar. Absent any context, a standalone CN is only ever useful as an RDN.
Note An LDAP expression must never include a space immediately to either side of a “=” sign. Similarly, it must never include a space immediately to either side of an “objectClass” attribute. Otherwise, validation fails.
|
|

|
domain component
. An attribute to designate one constituent part of a
fully-qualified domain name
(FQDN). Suppose for example that you manage a server whose FQDN is
americas.example.com
. In this case, you would link together three DC attribute-value pairs:
DC=Americas,DC=example,dc=com.
Note An LDAP expression must never include a space immediately to either side of a “=” sign. Similarly, it must never include a space immediately to either side of an “objectClass” attribute. Otherwise, validation fails.
|
|
|
Uniquely encrypted digital representation of one directory service entity, whether physical or logical. This trustworthy representation certifies that the entity is not an imposter when it sends or receives data through a secured channel. The CA normally issues the certificate upon request by the entity or its representative. The requestor is then held accountable as the “certificate holder.” To establish and retain credibility, a certificate must conform to requirements set forth in International Organization for Standardization (ISO) standard X.509. Most commonly, a digital certificate includes the following.
|
|
|
Any single, named unit at any level within a nested hierarchy of named units, relative to a network. An entity’s essence depends upon its context. This context, in turn, depends upon interactions between at least two service providers — one apiece for the naming service and the directory service — in your network. Theoretically, an entity might represent any tangible thing or logical construct.
|
|
|
distinguished name
. A sequence of attributes that help a CA to distinguish a particular directory service entity uniquely for authentication. Distinct identity in this case arises from a text string of comma-delimited attribute-value pairs. Each attribute-value pair conveys one informational detail about the entity or its context. The comma-delimited string
is
the actual DN. It consists of the entity’s own CN, followed by at least one OU, and then concludes with at least one DC. For example:
Note An LDAP expression must never include a space immediately to either side of a “=” sign. Similarly, it must never include a space immediately to either side of an “objectClass” attribute. Otherwise, validation fails.
Thus, each DN represents more than merely one isolated element. A DN also associates the element to its specific context within the Active Directory user base that your IdP depends upon.
might change over the lifespan of its corresponding entity. For example, when you move entries in a tree, you might introduce new OU attributes or deprecate old ones that are elements of a DN. However, you can assign to any entity a reliable and unambiguous identity that persists beyond such changes to its context. To accomplish this, merely include a universally unique identifier (UUID) among the entity’s set of operational attributes.
|


|
identity provider
. One SAML 2.0-compliant server (synchronized to at least one Active Directory user base), that authenticates user session requests upon demand for SPs in one network subdomain. Furthermore, an IdP normalizes data from a variety of directory servers (user stores).
Users send their login credentials to an IdP over HTTPS, so the IdP can authenticate them to whichever SPs they are authorized to use. As an example, consider how an organization could use three IdPs.

If your IdP fails, you can switch your authentication mode to LDAP or Embedded. |

|
Lightweight Directory Access Protocol
. A highly complex data model and communications protocol for user authentication. LDAP provides management and browser applications with access to directories whose data models and access protocols conform to X.500 series (ISO/IEC 9594) standards.
Note Microsoft Active Directory is the only LDAP implementation that we support in this release.
|
|
|
• Restart Web Services (Tomcat) in AAI.
|
|
|
LDAP Data Interchange Format
. A strict grammar that SPs and IdPs use to classify and designate named elements and levels in Active Directory.
|

|
SAML 2.0-compliant identity and access management server platform written in Java. OpenAM is open source software available under the Common Development and Distribution (CDDL) license. OpenAM is derived from and replaces OpenSSO Enterprise, which also used CDDL licensing. See
http://www.forgerock.com/openam.html
.
|
|
|
organizational unit
. An LDIF classification type for a logical container within a hierarchical system. In LDIF grammar, the main function of an OU value is to distinguish among superficially identical CNs that might otherwise be conflated. For example:
Note An LDAP expression must never include a space immediately to either side of a “=” sign. Similarly, it must never include a space immediately to either side of an “objectClass” attribute. Otherwise, validation fails.
|

|
SAML 2.0-compliant identity and access management server platform written in Java. PingFederate is proprietary, commercial software. See
http://www.pingidentity.com
.
|

|
relative distinguished name
. The CN for a directory service entity, as used exclusively (and still without any explicit context) by the one IdP that has synchronized this entity against an Active Directory user base. When an IdP encounters any RDN attribute in an LDIF reference, the IdP expects implicitly that its SAML 2.0-synchronized federation is the only possible context for the CN. It expects this because an IdP cannot authenticate — and logically should never encounter — a directory service entity whose RDN is meaningful to any other federation.
|

|
A SAML 2.0-compliant architecture for federated identity-based authentication and authorization.
|
|
|
single sign on
. (And sometimes
“single sign
off
.
”
) The main user-facing benefit of federation mode is that SPs begin — and end, in some implementations — user sessions on behalf of their entire federation. SSO is a convenience for users, who can log in only once per day as their work takes them between multiple servers that are related but independent. Furthermore, SSO is a convenience to IT staff, who spend less time on user support, password fatigue, compliance audits, and so on.
|

| Note An LDAP expression must never include a space immediately to either side of a “=” sign. Similarly, it must never include a space immediately to either side of an “objectClass” attribute. Otherwise, validation fails. | |
| Note An LDAP expression must never include a space immediately to either side of a “=” sign. Similarly, it must never include a space immediately to either side of an “objectClass” attribute. Otherwise, validation fails. | |
|
A user filter limits the scope of an agreement to import filtered records from an Active Directory user base.
Note An LDAP expression must never include a space immediately to either side of a “=” sign. Similarly, it must never include a space immediately to either side of an “objectClass” attribute. Nor can a group name include any spaces. Otherwise, validation fails.
|

|
A standard for public key infrastructure. X.509 specifies, among other things, standard formats for public key certificates and a certification path validation algorithm. |

Understand the Requirement to Authenticate Users
Although Cisco DMS always authenticates users, we support three authentication methods.
• Embedded authentication is completely native to Cisco DMS. It does not depend on any external servers.
• LDAP authentication causes Cisco DMS products to rely on one — and only one — Microsoft Active Directory server and a Microsoft Internet Information Server (IIS). Thus, setup and operation with this method are more complex than with embedded authentication.
• Federation mode — also known as single sign-on (SSO) causes Cisco DMS products to rely on a SAML 2.0-compliant IdP in combination with a Microsoft Active Directory server and IIS. Thus, setup and operation with this method are more complex than with LDAP authentication.
Note You must choose one of these methods. The method that you use determines which login screen your users will see.

Tip • After a user session times out, we prompt the affected user to log in twice.
- Migration from one mode to another takes as long as 1 minute to finish (CSCtn22370).
- An unresponsive Active Directory server can hang a login prompt for 20 minutes without any error message.
|
FEDERATION (SSO) MODE 1
|
||
|---|---|---|

|

|
IdP-specific login screen 
|
LDAP and Active Directory Concepts
Note Microsoft Active Directory is the only LDAP implementation that we support in this release.
LDAP is Highly Complex
Caution LDAP-related features of Cisco DMS are meant for use by qualified and experienced administrators of Microsoft Active Directory. Unless you are an Active Directory and LDAP expert, we recommend that you use embedded authentication.
Plan Ahead
- Install and configure Active Directory and Internet Information Services (IIS) before you try to configure LDAP authentication mode or federation mode in DMS-Admin.
Tip We support IIS 6 on Windows Server 2003.
- Pair your DMM appliance and your Show and Share appliance in AAI before you configure Cisco DMS to use LDAP authentication. Otherwise, video tutorials for Show and Share are not loaded onto your Show and Share appliance.
- Make sure that you have generated or imported certificates as necessary and activated SSL on the Active Directory server before you try to configure SSL encryption.
Synchronization Concepts
• Synchronization (Replication) Overview
Synchronization (Replication) Overview
Note Microsoft Active Directory is the only LDAP implementation that we support in this release.
When you choose LDAP authentication or SSO authentication, user account data originates from your Active Directory server. However, Cisco DMS does not synchronize (replicate) this data automatically, in real time. Instead, we cache it. Therefore, you must resynchronize user account data when you think it is appropriate to do so. You can:
Note Features of Digital Signs and Show and Share Administration help you to manage user access privileges and permissions for Cisco DMS.
DMS-Admin synchronizes all user accounts in the Active Directory “user base” that your filter specifies, except users whose accounts are disabled on your Active Directory server.
Synchronization Types
Note Microsoft Active Directory is the only LDAP implementation that we support in this release.
We support four types of Active Directory synchronization in LDAP mode or federation mode.
Runs a one-time synchronization for a new filter that you never synchronized previously. |
Runs an incremental, fast update to find and make up for any differences between user accounts that match your Active Directory filter and your local copy of those user accounts. |
Overwrites your local copy of user accounts that correspond to your Active Directory filter with new copies of those user accounts. In addition, deletes your local copy of each user account that has been deleted from Active Directory since the last time that you ran a synchronization. |
Deletes your local copy of user accounts that correspond to a defined Active Directory filter and deletes the entry for that filter from DMS-Admin. |
Understand Synchronization of a DMM Group to an LDAP Filter
Note Microsoft Active Directory is the only LDAP implementation that we support in this release.
• In most cases, you can associate one LDAP filter apiece to one DMM user group. Likewise, in most cases, you can associate one DMM user group apiece to one LDAP filter. The Digital Signs user group is an exception to both of these principles. It is built-in to Cisco DMS.
- After you associate a DMM user group to an LDAP filter, you cannot use features on the Users tab to delete the DMM user group until after you delete the LDAP filter. However, even when you delete an LDAP filter, there is no requirement to delete its associated DMM user group. Furthermore, there is no way for you to delete the Digital Signs user group. It is built-in to Cisco DMS.
Understand Manual Synchronization
Note Microsoft Active Directory is the only LDAP implementation that we support in this release.
Manual synchronization mode requires you to choose Administration > Settings > Authentication > Synchronize Users > LDAP Bookmarks during all future synchronizations. Afterward, you must click Update.
Manual synchronization mode deletes your schedule for automatic synchronizations.
Understand Automatic Synchronization
Note Microsoft Active Directory is the only LDAP implementation that we support in this release.
Automatic synchronization mode automates and schedules incremental updates to user accounts that match Active Directory filters that you defined in DMS-Admin. When you use automatic synchronization mode, new fields and elements become available to you. These help you to configure the settings for automatic synchronization.
See the “Understand Synchronization of a DMM Group to an LDAP Filter” section .
Guidelines for Synchronization
Note Microsoft Active Directory is the only LDAP implementation that we support in this release.
We recommend that you synchronize your LDAP bookmarks periodically. Synchronization ensures that user and group membership associations are current and correct.
The Initial option is CPU-intensive for your DMM appliance and might lower performance temporarily. We recommend that you use it during off-peak hours only. |
|
We recommend that you use the Update option whenever:
|
|
option is CPU-intensive for your DMM appliance and might lower its performance temporarily. We recommend that you use this option during off-peak hours only.
|
|
|
Caution The Delete option is destructive by design. We advise that you use it sparingly and with great caution. Among other effects, your deletion of an LDAP bookmark can affect user access to videos in Show and Share.
Note Typically, the deletion process takes about 1 minute to finish. However, when there are more than 50,000 users in the Active Directory database, this process might run in the background and take about 30 minutes to finish. In this case, the user interface in DMS-Admin can show that a bookmark was deleted even though the actual process has not finished. If you observe this behavior, simply allow 30 minutes for the operation to finish.
|
Understand LDAP Attributes
Note Microsoft Active Directory is the only LDAP implementation that we support in this release.
Ordinarily, DMS-Admin will not import any user account record from your Active Directory server when the value in it is blank for any of these attributes:
- Login User Name — This required value always must be unique.
- First Name — This required value might be identical for multiple users.
- Last Name — This required value might also be identical for multiple users.
However, you can import and synchronize all of the Active Directory user account records that match your filters. You can do this even when some of the user account records are incomplete because one or more of their attributes have blank values.
To prevent these undefined attributes from blocking the import of the user accounts they are meant to describe, you can enter generic values for most attributes in the Values to Use by Default column. DMS-Admin takes the generic values that you enter, and then inserts them automatically where they are needed.
Tip Nonetheless, you cannot enter a default value for the Login User Name attribute. Usernames are unique.
Guidelines for LDAP Filters
Note Microsoft Active Directory is the only LDAP implementation that we support in this release.
- Use “OU” values to impose rough limits on a filter
- Use “memberOf” values to pinpoint a filter more precisely
- Use “objectClass” values to match all user records
Use “OU” values to impose rough limits on a filter
• Never use a filter that defines the user base at the domain level. For example, this filter is not acceptable.
• Instead, use filters that define the user base at a lower level, as this one does.
• LDAP returns matched records from all levels within the user base that your filter defines.
|
3.Research Triangle Park, NC, does not have any physical connection to San José, CA. 4.Milpitas, CA and Sunnyvale, CA, are suburbs of San José, CA, which affects them directly and in multiple ways. |
Use “memberOf” values to pinpoint a filter more precisely
• But what if you did not want to include any members of Milpitas or Sunnyvale? If your Active Directory server considered these cities (organizational units) to be subsets of San José, how could you exclude their members? To do so, you would use the
attribute. It stops LDAP from matching records at any lower level than the one you name explicitly. In this scenario for example, you would use
to match only the direct members of the “SanJose” OU.
Password Concepts
• Understand the Effects of a Changed Password in Active Directory
• Understand the Effects of a Blank Password in Active Directory
Understand the Effects of a Changed Password in Active Directory
Note Microsoft Active Directory is the only LDAP implementation that we support in this release.
After you change a user password on your Active Directory server, there is no requirement to resynchronize the affected user account in DMS-Admin.
Understand the Effects of a Blank Password in Active Directory
Note Microsoft Active Directory is the only LDAP implementation that we support in this release.
• Even though it is possible in Active Directory to use a blank value for a password, Cisco DMS does not allow it.
• When you choose LDAP authentication, any user whose Active Directory password is blank is prevented from logging in to any component of Cisco DMS.
- Access is enabled or restored after the password is populated on the Active Directory server.
Understand Authentication Property Sheets for LDAP
Note Microsoft Active Directory is the only LDAP implementation that we support in this release.
The Authentication page contains four tabbed property sheets.


|
5.In most production environments, you can expect to use the Select Mode property sheet only one time. |
IdP Requirements
To use federation (SSO) mode in Cisco DMS, you must have access to an IdP that meets our requirements. Your IdP must meet ALL OF THESE CRITERIA IN COMBINATION:
–![]() Web Browser SSO Profile
Web Browser SSO Profile
–![]() Enhanced Client or Proxy (ECP) Profile
Enhanced Client or Proxy (ECP) Profile
- Generate assertions in which the SAML “UID” attribute is mapped to the local portion of an authenticated user’s username.
- Generate SAML responses that are no larger than 16K bytes. (CSCua10799)
- Use a digital certificate from a well-known CA (but only if you will use HTTPS).
- Include a “<SingleSignOnService>” entry with SOAP binding in its IdP metadata. For example:
<SingleSignOnService Location=http://idp.example.com/idp/SSO.sml2” Binding=”urn:oasis:names:tc:SAML:2.0:bindings:SOAP”/>
In practice, these requirements limit your IdP to ones that we certify and NO OTHER. We certify OpenAM, PingFederate, and Shibboleth. (CSCua29696)
Configuration Workflow to Activate Federation (SSO) Mode
1.![]() Configure and set up an Active Directory server.
Configure and set up an Active Directory server.
2.![]() Configure and set up a SAML 2.0-compliant IdP.
Configure and set up a SAML 2.0-compliant IdP.
Note When you use a “fresh install” of Cisco DMS 5.3 (as opposed to an upgrade), your DMM appliance is configured to use embedded authentication mode by default. But when you upgrade a DMM server that was already configured for an earlier Cisco DMS release, it might use either embedded mode or LDAP mode.
3.![]() Obtain a digital certificate from a trusted CA and install it on your IdP.
Obtain a digital certificate from a trusted CA and install it on your IdP.
4.![]() Use DMS-Admin to configure Cisco DMS for federation mode.
Use DMS-Admin to configure Cisco DMS for federation mode.
5.![]() Export SAML 2.0-compliant metadata from your DMM server and import it into your IdP.
Export SAML 2.0-compliant metadata from your DMM server and import it into your IdP.
6.![]() Export SAML 2.0-compliant metadata from your IdP and import it into your DMM server.
Export SAML 2.0-compliant metadata from your IdP and import it into your DMM server.
7.![]() Configure Active Directory exactly as you would in LDAP mode.
Configure Active Directory exactly as you would in LDAP mode.
8.![]() Click
Update
to save your work, and then advance to the Synchronize Users property sheet.
Click
Update
to save your work, and then advance to the Synchronize Users property sheet.
9.![]() Synchronize DMM with your Active Directory server to populate the DMM user database.
Synchronize DMM with your Active Directory server to populate the DMM user database.
Note You MUST configure at least one LDAP bookmark.
10.![]() Synchronize users exactly as you would in LDAP mode.
Synchronize users exactly as you would in LDAP mode.
Note Whenever you change any setting or value on your IdP or any of your SPs, you must reestablish their pairing to restore mutual trust among them.
Authentication Scenarios for User Sessions in Federation (SSO) Mode
SSO Scenario 1 — Trusted + Valid + Authorized
|
1. Your federation will not approve or deny this request until it knows more. |
|
|
2. |
|
|
3. |
|
|
4. |
SSO Scenario 2 — Trusted + Valid + NOT Authorized
|
1. Your federation will not approve or deny this request until it knows more. |
|
|
2. |
|
|
3. |
|
|
4. |
SSO Scenario 3 — Nothing Known
|
1. Your federation will not approve or deny this request until it knows more. |
|
|
2. |
|
|
3. |
|
|
4.
|
Migration Between Authentication Methods
• Understand Migration (from Either LDAP or SSO) to Embedded
Understand Migration (from Either LDAP or SSO) to Embedded
When you migrate from LDAP (via Active Directory) or federation mode to embedded authentication mode, you must explicitly choose whether to keep local copies of the:
• User accounts that were associated to LDAP filters.
- Groups and policies that were associated to LDAP filters.
Note • Unless you choose explicitly to keep the local copy of a user, a group, or a policy, we discard the local copy.
• Migration from one mode to another takes as long as 1 minute to finish (CSCtn22370).
The result varies according to the combination of your choices.
|
|||
|
6.This security feature protects your network and user data. If anyone gains unauthorized access to the exported file and tries to use it, Active Directory rejects the invalid passwords. |
Understand Migration (from Embedded) to Either LDAP or SSO
Note • Before you migrate from embedded authentication mode to federation mode, you must install a digital certificate from a trusted CA on your IdP server. Otherwise, you cannot migrate to federation mode at all.
• After you migrate from embedded authentication mode to either LDAP (Active Directory) mode or federation mode, the locked property sheets become unlocked. You must use them.
• Migration from one mode to another takes as long as 1 minute to finish (CSCtn22370).
Procedures
• Export the Root CA X.509 Certificate from Your Active Directory Server
- Configure DMM to Trust the Active Directory Root CA
- Choose an Authentication Method
- Configure LDAP (Active Directory) Settings
- Configure Federation Services for SSO
- Configure Active Directory Federation Services for Cisco Show and Share Release 5.3.12
Export the Root CA X.509 Certificate from Your Active Directory Server
Step 2![]() Click
Download a CA certificate
.
Click
Download a CA certificate
.
Step 3![]() Choose the current CA certificate.
Choose the current CA certificate.
The X.509 certificate that you export must be DER-encoded, and it can be binary or printable (Base64). However, when you use Base64, the certificate file must include these lines:
Step 5![]() Click
Download CA certificate
.
Click
Download CA certificate
.
Step 6![]() Save this certificate in a file.
Save this certificate in a file.
For example, you might call the certificate ADcertificate.cer .
Step 7![]() Stop. You have completed this procedure.
Stop. You have completed this procedure.
Configure DMM to Trust the Active Directory Root CA
Step 2![]() Enter the details for your Active Directory server.
Enter the details for your Active Directory server.
Tip Be sure to use the logical port where your Active Directory server listens for SSL connections. The port number, by default, is 636.
Step 3![]() Upload the root CA certificate file that you saved locally.
Upload the root CA certificate file that you saved locally.
a.![]() Click
Upload
, and then click
Add
.
Click
Upload
, and then click
Add
.
b.![]() Browse to the file on a local volume.
Browse to the file on a local volume.
c.![]() Click the filename and press
Enter
.
Click the filename and press
Enter
.
d.![]() Click
OK
to save your work and dismiss the dialog box.
Click
OK
to save your work and dismiss the dialog box.
Step 4![]() As prompted, use DMS-Admin to restart Web Services (Tomcat).
As prompted, use DMS-Admin to restart Web Services (Tomcat).
The installed certificate cannot take effect until after you restart Tomcat.
Step 5![]() Stop. You have completed this procedure.
Stop. You have completed this procedure.
Choose an Authentication Method
Step 2![]() Use elements on the Select Mode property sheet to choose an authentication mode.
Use elements on the Select Mode property sheet to choose an authentication mode.
Note Migration from one mode to another takes as long as 1 minute to finish (CSCtn22370).
The authentication settings that you changed are now in effect.
Step 4![]() Stop. You have completed this procedure.
Stop. You have completed this procedure.
-
OPTIONAL —
Did you choose LDAP (Active Directory) or SSO?
Proceed to the “Define LDAP (Active Directory) Filters” section
Configure LDAP (Active Directory) Settings
- Define LDAP (Active Directory) Filters
- Define LDAP (Active Directory) Bookmarks
- Define the LDAP (Active Directory) Synchronization Schedule
- Manage LDAP (Active Directory) Attributes
- Configure Automatic LDAP (Active Directory) Synchronization
- Derive LDAP (Active Directory) Group Membership Dynamically from a Query
Define LDAP (Active Directory) Filters
• Choose LDAP or federation as your authentication method.
a.![]() Use elements on the Define Filter property sheet to define, validate, and add one LDAP filter.
Use elements on the Define Filter property sheet to define, validate, and add one LDAP filter.
c.![]() Repeat this step for each filter to be added.
Repeat this step for each filter to be added.
The authentication settings that you changed are now in effect.
Step 4![]() Stop. You have completed this procedure.
Stop. You have completed this procedure.
Define LDAP (Active Directory) Bookmarks
• Choose LDAP or SSO as your authentication method.
- Define LDAP filters.
Tip Is the Synchronize Users tab disabled (dimmed), so that you cannot click it? If so, refresh your browser.
Step 2![]() Do any or all of the following.
Do any or all of the following.
- Would you like to import user accounts to Cisco DMS because they correspond to an Active Directory filter that you will define? If so:
–![]() Choose the synchronization type for these user accounts.
Choose the synchronization type for these user accounts.
–![]() Specify which default access privileges you will assign to them.
Specify which default access privileges you will assign to them.
- Should Cisco DMS synchronize user accounts that correspond to a defined Active Directory filter? If so, use the synchronization type that you chose.
- Would you like to sever your ties to a User Base or Active Directory server? If so:
–![]() Delete from Cisco DMS all user accounts that correspond to a defined Active Directory filter.
Delete from Cisco DMS all user accounts that correspond to a defined Active Directory filter.
–![]() Delete the entry for that filter from DMS-Admin.
Delete the entry for that filter from DMS-Admin.
-
Would you like to create a new group in DMM?
AND
Populate it automatically with user accounts that correspond to an Active Directory
filter that you defined previously?
If so, delete the entry for that filter from DMS-Admin, and then recreate it while associating it to the new group.
Step 4![]() Validate the DMM group name.
Validate the DMM group name.
Note Please wait. Your request might take as long as 1 minute to process (CSCtn22370).
The authentication settings that you changed are now in effect.
Step 6![]() Stop. You have completed this procedure.
Stop. You have completed this procedure.
-
OPTIONAL —
Would you like to associate a set of imported users with a new group?
Proceed to the “Derive LDAP (Active Directory) Group Membership Dynamically from a Query” section. -
OPTIONAL —
Would you like to configure the schedule for synchronization?
Proceed to the “Define the LDAP (Active Directory) Synchronization Schedule” section.
Define the LDAP (Active Directory) Synchronization Schedule
• Choose LDAP or SSO as your authentication method.
- Define LDAP filters.
• Define LDAP bookmarks.
Step 2![]() Choose between manual synchronization and automatic synchronization.
Choose between manual synchronization and automatic synchronization.
Note You will not see any of the elements that the “Elements for Bookmarks” table describes until after you define at least one filter on the Define Filter property sheet.
The authentication settings that you changed are now in effect.
Step 4![]() Stop. You have completed this procedure.
Stop. You have completed this procedure.
-
OPTIONAL —
Would you like to associate attribute names in DMS-Admin and Active Directory?
If so, proceed to the “Manage LDAP (Active Directory) Attributes” section. - OPTIONAL — Should Cisco DMS expect that your Active Directory server uses factory-preset attribute names? If so, proceed to the “Manage LDAP (Active Directory) Attributes” section.
- OPTIONAL — Should Cisco DMS expect that your Active Directory server uses custom attribute names? If so, proceed to the “Manage LDAP (Active Directory) Attributes” section.
Manage LDAP (Active Directory) Attributes
• Choose LDAP or SSO as your authentication method.
- Define LDAP filters.
• Define LDAP bookmarks.
• Configure the LDAP synchronization schedule.
Tip Is the Manage Attributes tab disabled (dimmed), so that you cannot click it? If so, refresh your browser.
Step 2![]() Use elements on the Manage Attributes property sheet to:
Use elements on the Manage Attributes property sheet to:
- Set the associations between DMS-Admin attribute names and their corresponding Active Directory attribute names.
- Use the predefined and typical names for Active Directory attributes (shown in grey text) or edit those attribute names so they match the names that your Active Directory server uses.
- Enter the values to use by default in DMS-Admin when a user account attribute is not defined on your Active Directory server.
You must enter a value for each mandatory attribute. You cannot enter a value to use by default for user names, because each user name is unique.
The authentication settings that you changed are now in effect.
Step 4![]() Stop. You have completed this procedure.
Stop. You have completed this procedure.
Configure Automatic LDAP (Active Directory) Synchronization
 ) to choose the start date for synchronization.
Step 2![]() Choose the hour and minute when synchronization should begin, and then choose either
AM
or
PM
as the period.
Choose the hour and minute when synchronization should begin, and then choose either
AM
or
PM
as the period.
Step 3![]() From the Repeat Interval list, choose the interval of recurrence:
From the Repeat Interval list, choose the interval of recurrence:
If so, check the Synchronize users immediately check box.
The authentication settings that you changed are now in effect.
Step 6![]() Stop. You have completed this procedure.
Stop. You have completed this procedure.
Derive LDAP (Active Directory) Group Membership Dynamically from a Query
You can populate a user group with the returned output from a User Base DN query. However, a group of this kind differs in important ways from a group that you populate manually.
Note • Membership of such groups is dynamic — based on shared characteristics among the group of Active Directory users who match your query.
• We update and clean these groups automatically during synchronization. Their membership will change after synchronization runs, when the corresponding records in Active Directory show that a user's membership should start or stop.
• An imported Active Directory group is always read-only in DMS-Admin. By protecting it, we ensure that it is always correct, relative to the original and subject to any delay between synchronizations. For this reason, you cannot edit their memberships rolls manually.
• When you try to delete a user from a group of this type, DMS-Admin shows an error message.

• Choose LDAP as your authentication method.
Step 3![]() Use elements on the Define Filter property sheet to define, validate, and add one LDAP filter.
Use elements on the Define Filter property sheet to define, validate, and add one LDAP filter.
Step 4![]() Would you like to add users to a group that exists already?
If so, choose that group name from the User Group (in DMM) list.
Would you like to add users to a group that exists already?
If so, choose that group name from the User Group (in DMM) list.
OR
Would you like to create and populate an entirely new group?
If so, choose
Create a New User Group
from the User Group (in DMM) list. Then, use the Group Name field to enter a name for the new group.
Step 5![]() Would you like to check your filter’s syntax?
If so, click
Validate
.
Would you like to check your filter’s syntax?
If so, click
Validate
.
Step 7![]() Stop. You have completed this procedure.
Stop. You have completed this procedure.
IdP Configuration Examples
This section includes configuration examples from IdP implementations that have passed internal Cisco tests for interoperability with Cisco DMS.
Note • We provide these rough examples as a courtesy only. We do not endorse any IdP by name, including any whose setup we mention by name in these examples. Likewise, we do not influence the development of any IdP. We do not know when or how its configuration workflows, daily operation, or overall quality might change in the future. For these reasons, we cannot know beforehand when or how the natural course of its ongoing development might invalidate one or more of the examples in this section. Therefore: Obtain all necessary IdP documentation from your IdP vendor, not Cisco.
• You are free to choose, configure, and use an IdP at your own discretion — and your own risk. We do not develop, maintain, or support any IdP. Nor do we warrant that your choice of IdP is free of defects, non-infringing, or fit for any purpose.
Example: Configure OpenAM to Interoperate with Cisco DMS
- Obtain a digital identity certificate from a well-known CA, install it on your IdP host system, and then enable SSL.
Configure OpenAM to use a datastore from Active Directory, unless it already does so. |
. Otherwise, we cannot learn which usernames are valid. In turn, ordinary users cannot log in to Cisco DMS. To prevent this outcome, you must replicate and synchronize a datastore between your new Active Directory server and your existing LDAP server. Afterward, Cisco DMS can synchronize with the Active Directory datastore.
a.
b. You might enter values for some of the attributes (like these ones, for example)...
LDAP Server:
... while leaving other attribute values undefined.
Attribute Name Mapping:
c.
d.
e. |
|
Install Enhanced Client or Proxy (ECP), a SAML profile plugin, if you will make API system calls to OpenAM7. |
a.
b.
c.
d.
e.
f.
h. |
|
Export SP metadata from Cisco DMS. |
Export metadata from each SP that will participate in your OpenAM CoT. Tip For Cisco DMS, see the “Export SP Metadata from DMM” topic. |
|
Import SP metadata from Cisco DMS. |
a.
c.
d.
e. |
|
Make sure that OpenAM is configured to issue the Principal attribute. |
a.
b.
c.
e. The Assertion Content tab is selected automatically.
f.
g.
i. This will cause OpenAM to pass the user IDs of logged-in users to DMM and your other SPs. |
|
See the “Import IdP Metadata into DMM” topic. |
||
wget --no-check-certificate https:// <IdP_serverip> : <service_port> /opensso/saml2/jsp/exportmetadata.jsp -O dms_idp_config.xml |
||
Example: Configure Shibboleth to Interoperate with Cisco DMS
- Obtain a digital identity certificate from a well-known CA, install it on your IdP host system, and then enable SSL.
a.
b.
c.
$ unzip shibboleth-identityprovider-2.3.0-bin.zip
d.
Respond appropriately to these prompts. Shibboleth is now installed and you have completed its basic configuration. Your new Shibboleth system contains these subfolders.
|
||
Export SP metadata from Cisco DMS. |
Export metadata from each SP that will participate in your Shibboleth CoT. Tip For Cisco DMS, see the “Export SP Metadata from DMM” topic. |
|
Import SP metadata from Cisco DMS. |
Use SFTP or another method to save imported metadata where Shibboleth will access it: /opt/shibboleth-idp/metadata/ . |
|
Use SSH, remote desktop, VNC, or a direct console connection to log in remotely to the system where you installed Shibboleth. |
||
a.
b. |
||
a.
c.
<resolver:AttributeEncoder xsi:type="enc:SAML2String" name="urn:oid:0.9.2342.19200300.100.1.1" friendlyName="uid" />
<resolver:AttributeEncoder xsi:type="enc:SAML2StringNameID" nameFormat="urn:oasis:names:tc:SAML:2.0:nameid-format:transient" />
e.
<resolver:DataConnector id="myLDAP" xsi:type="dc:LDAPDirectory" xmlns="urn:mace:shibboleth:2.0:resolver:dc"
|
||
a.
b. |
||
a.
c. |
||
a.
c.
e.
f.
g. Be sure to use your Shibboleth hostname in the local filename. For example, you might name this local copy idp-shibboleth.xml . |
||
See the “Import IdP Metadata into DMM” topic. > tag. |
||
cp /opt/shibboleth-idp/war/idp.war /usr/local/tomcat/webapps/ |
||
|
b. |
||
Example: Configure PingFederate to Interoperate with Cisco DMS
• Install PingFederate and configure it with at least one Adapter instance to your authentication server, such as LDAP or OAM.

Export SP metadata from Cisco DMM. |
Export metadata from each SP that will participate in your PingFederate CoT. Tip For Cisco DMS, see the “Export SP Metadata from DMM” topic. |
|
Import SP metadata into PingFederate. |
a.
b.
c.
d.
e.
f. |
|
a.
b.
c.
d.
e.
g.
h. The username attribute that you need next is probably part of the adapter contract. Therefore:
j.
k.
–
– |
||
a.
b.
c.
d.
e. |
||
a.
b.
c.
d.
e.
f.
g.
h. If the Primary list does not include your DMM certificate, do the following. 1. Click Manage Certificates on the Signature Verification/Signature Verification Certificate page. 2. Click Choose File on the Import Certificate/Import Certificate page, and then navigate to the X509 digital certificate file (*.cer) that you output from DMM. 3. Click Open , and then click Next THREE TIMES. 4. Check the Make this the active certificate check box on the Import Certificate/Summary page, and then click Done .
i.
j.
k.
l. |
||
Set the Connection Status to Active on the SP Connection/Activation & Summary page, and then click Save . |
||
Export SP Metadata from DMM
Before you can use Cisco DMS in federation mode, you must export data from DMS-Admin in the form of an SP configuration file. Later, you will import this file into your IdP.
Step 3![]() Choose
Administration > Security > Authentication
.
Choose
Administration > Security > Authentication
.
Step 4![]() Check the Federation check box.
Check the Federation check box.
Step 6![]() Save the exported file to your client PC or laptop computer as
dms_sp_config.xml
.
Save the exported file to your client PC or laptop computer as
dms_sp_config.xml
.
Note See the technical documentation or tutorials for your IdP to understand how it imports SP configuration files. Alternatively, see the topic for your IdP platform in this chapter’s “IdP Configuration Examples” section.
Step 7![]() Stop. You have completed this procedure.
Stop. You have completed this procedure.
Import IdP Metadata into DMM
Before you can use Cisco DMS in federation mode, you must export data from your IdP in the form of an IdP configuration file. This topic explains how to use the exported file after you generate and save it.
- See the technical documentation or tutorials for your IdP to understand how it exports configuration files for an SP (such as DMM) to import. Alternatively, see the topic for your IdP platform this chapter’s “IdP Configuration Examples” section.
- Rename the exported IdP configuration file idp_ <type> .xml . For example:
Step 3![]() Choose
Administration > Security > Authentication
.
Choose
Administration > Security > Authentication
.
Step 4![]() Click
Federation
to choose it as your authentication mode.
Click
Federation
to choose it as your authentication mode.
Step 6![]() Choose and upload the IdP file (
idp_
<type>
.xml
) that you saved previously.
Choose and upload the IdP file (
idp_
<type>
.xml
) that you saved previously.
Step 7![]() Enter the necessary LDAP information to use your Active Directory server.
Enter the necessary LDAP information to use your Active Directory server.
Step 8![]() Stop. You have completed this procedure.
Stop. You have completed this procedure.
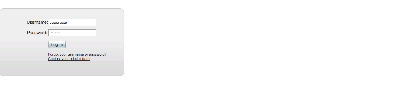
Bypass External Authentication During Superuser Login, as Needed
Your DMM server features a special login form, which rejects every username except superuser . You use this special form whenever Cisco DMS runs in federation mode or an error has prevented migration from one authentication mode to another.
a.![]() Enter
superuser
in the Username field.
Enter
superuser
in the Username field.
b.![]() Enter the corresponding password in the Password field.
Enter the corresponding password in the Password field.
Step 2![]() Stop. You have completed this procedure.
Stop. You have completed this procedure.
Configure Active Directory Federation Services for Cisco Show and Share Release 5.3.12
This section describes how to install and configure Active Directory Federation Services (AD FS) 2.0 for use with Cisco Show and Share Release 5.3.12. This section contains the following sections:
- Installing Active Directory Federation Services
- Integrating Active Directory Federation Services with Cisco DMM
- Testing Single Sign On
AD FS 2.0 is a software component that you can install on Windows Server operating systems to provide users with single sign-on access to systems and applications located across organizational boundaries. It uses a claims-based access control authorization model to maintain application security and implement federated identity.
By enabling AD FS, users can log in to the identity provider (IdP) which is AD FS. After logging in, they can access resources at one or more service providers (known as relying parties) without needing to log in at each service provider (SP). Users can also access system resources by initiating a SP login.
Note The Cisco Show and Share iOS mobile application is not supported when the AD FS feature is enabled in Show and Share Release 5.3.12.
AD FS 2.0 integrates with Active Directory Domain Services, using it as an identity provider. AD FS can interact with other Security Assertion Markup Language (SAML) 2.0-compliant federation services as federation partners.
AD FS 2.0 is a downloadable Windows Server 2008 update that is the successor to AD FS 1.0.
SAML version 2.0 is the standard for cross-domain web single sign-on in the enterprise space. Microsoft introduced SAML support in AD FS version 2.0.
Note Windows Server 2008 R2 includes AD FS 1.0, which does not support SAML 2.0. You need to download the AD FS 2.0 release to web (RTW) package.
Installing Active Directory Federation Services
Step 1![]() Start with Windows Server 2008 (R2) Domain Joined.
Start with Windows Server 2008 (R2) Domain Joined.
Step 2![]() Create a DNS name for AD FS and point it to your AD FS server. For example,
adfs-bbb.local
.
Create a DNS name for AD FS and point it to your AD FS server. For example,
adfs-bbb.local
.
Step 3![]() Download
and install Active Directory Federation Services 2.0 RTW.
Download
and install Active Directory Federation Services 2.0 RTW.
Step 4![]() In the IIS manager, create a SSL certificate for your DNS name, or use SelfSSL from the IIS 6.0 resource kit to create a self-signed certificate. Bind the SSL certificate with HTTPS port 443.
In the IIS manager, create a SSL certificate for your DNS name, or use SelfSSL from the IIS 6.0 resource kit to create a self-signed certificate. Bind the SSL certificate with HTTPS port 443.
Step 5![]() Run the AD FS Server Configuration Wizard to complete the following:
Run the AD FS Server Configuration Wizard to complete the following:
a.![]() Create a new Federation Service
.
Create a new Federation Service
.
b.![]() Choose
Stand-alone federation server
.
Choose
Stand-alone federation server
.
c.![]() Select the certificate
that you created for your DNS name.
Select the certificate
that you created for your DNS name.
Step 6![]() Create a service principal name for the DNS name so that Kerberos authentication between the browser and the AD FS IIS instance works correctly:
Create a service principal name for the DNS name so that Kerberos authentication between the browser and the AD FS IIS instance works correctly:
Step 7![]() These certificates are automatically generated by the AD FS 2.0 installation process on the AD FS server:
These certificates are automatically generated by the AD FS 2.0 installation process on the AD FS server:
Export the Service Communication certificate, name the file idp01.cer and save it.
Integrating Active Directory Federation Services with Cisco DMM
To build a federation between two parties you need to establish a trust by exchanging some metadata. The metadata for the AD FS 2.0 instance is entered through the Federation Metadata.xml file into the DMM configuration. The DMM metadata is downloaded as an XML file that is used by AD FS 2.0.
For this configuration, there are two network domains:
- Network A ( https://dmm-aaa.cisco.com ) is the Cisco DMM
- Network B ( https://adfs-bbb.local.cisco.com ) is the Microsoft Active Directory Domain and holds the Identity Provider
SAML 2.0 defines several roles for parties involved in single sign-on:
- Service provider/relying party (DMM)
- Identity provider (AD FS server)
- User that authenticates to access services
This is the process for an IdP-initiated login into dmm.cisco.com:
1.![]() The user authenticates to the AD FS server by using Integrated Windows Authentication (Kerberos tokens over HTTP) and requests login to dmm.cisco.com.
The user authenticates to the AD FS server by using Integrated Windows Authentication (Kerberos tokens over HTTP) and requests login to dmm.cisco.com.
2.![]() AD FS returns a SAML assertion to the user’s browser
AD FS returns a SAML assertion to the user’s browser
3.![]() The browser automatically submits the assertion to dmm.cisco.com, which logs the user in.
The browser automatically submits the assertion to dmm.cisco.com, which logs the user in.
Configure Active Directory Federation Services
Step 1![]() Generate a template with the Microsoft AD FS server details. You can access a Microsoft AD FS web page to generate XML files. Generate the AD FS output by navigating to:
Generate a template with the Microsoft AD FS server details. You can access a Microsoft AD FS web page to generate XML files. Generate the AD FS output by navigating to:
https://< adfs-bbb.local.cisco.com >/federationmetadata/2007-06/federationmetadata.xml
Step 2![]() (Optional) If using a self-signed certificate, import the Service Communication certificate that was generated by the AD FS server AAI interface. Navigate to
AAI > Certificate Management
. Select
IMPORT_ADFS_CERTS
.
(Optional) If using a self-signed certificate, import the Service Communication certificate that was generated by the AD FS server AAI interface. Navigate to
AAI > Certificate Management
. Select
IMPORT_ADFS_CERTS
.
Step 3![]() Log in to DMM as superuser. Navigate to
Administration > Security > Select Mode
.
Log in to DMM as superuser. Navigate to
Administration > Security > Select Mode
.
Step 4![]() Click the SP Configuration File
Export
button to export the
dms_config_sp
file.
Click the SP Configuration File
Export
button to export the
dms_config_sp
file.
Step 5![]() Navigate to
AD FS management console > Service > Claim Description > Add
. In the Claim description and identifier fields, enter
uid
. Click
OK
.
Navigate to
AD FS management console > Service > Claim Description > Add
. In the Claim description and identifier fields, enter
uid
. Click
OK
.

Add a New Relying Party Trust
Step 1![]() Click
Add Relying Party Trust
in the Actions window.
Click
Add Relying Party Trust
in the Actions window.
Step 2![]() In the Overview window, click
Required: add a trusted
In the Overview window, click
Required: add a trusted![]() relying party
to start the setup wizard. Enter these When the welcome screen appears, click
Start
.
relying party
to start the setup wizard. Enter these When the welcome screen appears, click
Start
.
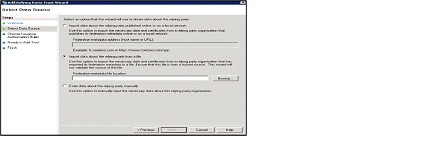
Step 3![]() Run the AD FS Relying Party Trust Wizard to complete the following:
Run the AD FS Relying Party Trust Wizard to complete the following:
a.![]() Select Data Source: choose
Import data about the relying party from a file
and browse to select the Federation metadata file.
Select Data Source: choose
Import data about the relying party from a file
and browse to select the Federation metadata file.
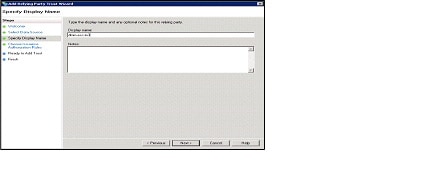
b.![]() Specify Display Name: enter relying party display name.
Specify Display Name: enter relying party display name.
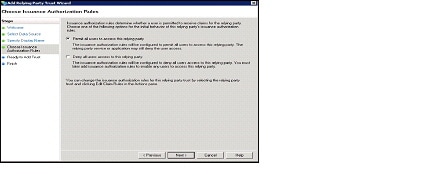
c.![]() Issuance Authorization Rules: choose
Permit all users to access this relying party
.
Issuance Authorization Rules: choose
Permit all users to access this relying party
.
Step 4![]() After importing the metadata, review the following properties:
After importing the metadata, review the following properties:
a.![]() On the Encryption Tab, verify that the encryption Certificate is selected.
On the Encryption Tab, verify that the encryption Certificate is selected.
b.![]() On the Signature Tab, verify that the signing Certificate is selected.
On the Signature Tab, verify that the signing Certificate is selected.
c.![]() On the Advanced Tab, make sure that the SHA1 algorithm is selected.
On the Advanced Tab, make sure that the SHA1 algorithm is selected.
Add a New Rule
Step 1![]() In the Claim Rules editor select the
Issuance Transform Rules
tab. Click
Add Rule
.
In the Claim Rules editor select the
Issuance Transform Rules
tab. Click
Add Rule
.
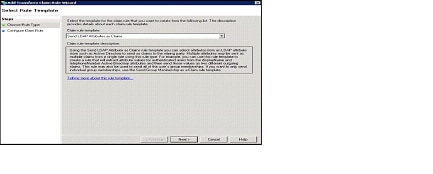
Step 2![]() In the Choose Rule Type window, choose
Send LDAP Attributes as Claims
in the Claim rules template drop-down list. Click
Next
.
In the Choose Rule Type window, choose
Send LDAP Attributes as Claims
in the Claim rules template drop-down list. Click
Next
.
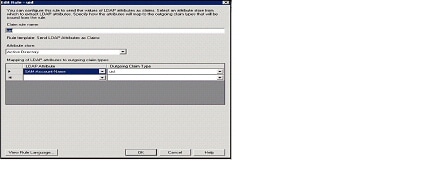
Step 3![]() In the Edit Rule window:
In the Edit Rule window:
b.![]() Enter
uid
in the Claim rule name field.
Enter
uid
in the Claim rule name field.
c.![]() In the LADP Attribute drop-down list, choose
SAM-Account-Name
.
In the LADP Attribute drop-down list, choose
SAM-Account-Name
.
d.![]() In the Outgoing Claim Type drop-down list, choose
uid
.
In the Outgoing Claim Type drop-down list, choose
uid
.
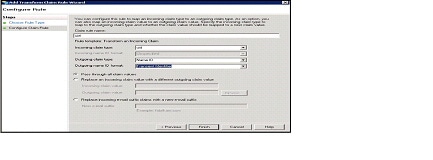
Step 4![]() In the Claim rule template drop-down list, choose
Transform an Incoming Claim
and click
Next
.
In the Claim rule template drop-down list, choose
Transform an Incoming Claim
and click
Next
.
Step 5![]() In the Configure Claim Rule window:
In the Configure Claim Rule window:
a.![]() In the Outgoing claim type, choose
NameID
.
In the Outgoing claim type, choose
NameID
.
b.![]() In the Outgoing name ID format, choose
Transient Identifier
.
In the Outgoing name ID format, choose
Transient Identifier
.
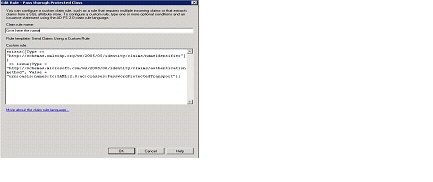
Step 6![]() Click
Add Rule
. Choose
Send Claims Using a Custom Rule
and click
Next
. In the Edit Rule window:
Click
Add Rule
. Choose
Send Claims Using a Custom Rule
and click
Next
. In the Edit Rule window:
a.![]() Enter the
Claim rule name
.
Enter the
Claim rule name
.
b.![]() In the Custom Rule area, enter:
In the Custom Rule area, enter:
exists([Type == "http://schemas.xmlsoap.org/ws/2005/05/identity/claims/nameidentifier"]) => issue (Type = "http://schemas.microsoft.com/ws/2008/06/identity/claims/authenticationmethod", Value = "urn:oasis:names:tc:SAML:2.0:ac:classes:PasswordProtectedTransport");
Note For the form-based authentication, you need to provide the appropriate value in the relying party response by checking for the presence of NameID and then parsing urn:oasis:names:tc:SAML:2.0:ac:classes:PasswordProtectedTransport in the SAML response.
Configure Cisco DMM
- Confirm that LDAP is configured.
- Make sure that the DMM Authentication Attribute is set to minimum to enable form-based authentication.
- The SPAuthnContextMapper is configured for the DMM (Service Provider) and maps the parameters in the incoming HTTP requests to an authentication context. For more information about the AuthncontextComparisonType attributes, go to:
http://docs.oracle.com/cd/E19681-01/820-3748/ggidh/index.html
Step 1![]() Log in to the Cisco DMM as superuser. Navigate to
Administration > Security
.
Log in to the Cisco DMM as superuser. Navigate to
Administration > Security
.
Step 2![]() Click the
Save LDAP
User
Groups and Policies
check box.
Click the
Save LDAP
User
Groups and Policies
check box.
Step 3![]() Import the
federationmetadata.xml
file.
Import the
federationmetadata.xml
file.
Step 4![]() Select Authentication Attributes. (The Authentication Attributes option is visible after importing the federationmetadata.xml file.)
Select Authentication Attributes. (The Authentication Attributes option is visible after importing the federationmetadata.xml file.)
Enable SP-Initiated Login
With identity provider (IdP)-initiated login you will configure a link on the company intranet that users click to access the Cisco DMM. A service provider (SP)-initiated login happens when a user clicks a direct link to Cisco DMM. For SP-initiated login to work, you need to set the AD FS Secure Hash Algorithm parameter to SHA-1. This is because the DMM uses the SHA-1 algorithm when signing SAML requests, and AD FS defaults to SHA-256.
Step 1![]() Log in to DMM as superuser. Navigate to
Relying Party Trust > DMM Properties > Advanced
tab.
Log in to DMM as superuser. Navigate to
Relying Party Trust > DMM Properties > Advanced
tab.
Step 2![]() Set the secure hash algorithm to
SHA1
.
Set the secure hash algorithm to
SHA1
.
If you do not change the secure hash algorithm, the following message will appear in the AD FS event log:
2 SAML request is not signed with expected signature algorithm. SAML request is signed with signature algorithm http://www.w3.org/2001/04/xmldsig-more#rsa-sha256 . Expected signature algorithm is http://www.w3.org/2000/09/xmldsig#rsa-sha1
Testing Single Sign On
Before testing the AD FS single sign-on solution, confirm that the user exists in both the AD FS and DMM user database. In the DMM, navigate to in User tab. The user should appear in the DMM user database list.
Testing the Configuration
For an SP-initiated login, you can navigate directly to the entity ID. For example, https://dmm-aaa.cisco.com .
For an IdP-initiated login, access dmm-server.cisco.com which will navigate to adfs.aaa.local.cisco.com and ask for authentication. After logging in to the AD FS server, it will directly navigate to the DMM Administration page.
Step 1![]() Bookmark a link from inside
dmm-aaa.cisco.com
then log out of the system
Bookmark a link from inside
dmm-aaa.cisco.com
then log out of the system![]() .
.
Step 2![]() Reload your browser and select the bookmark. You should be redirected to your IdP, authenticated and then redirected back to the bookmarked link.
Reload your browser and select the bookmark. You should be redirected to your IdP, authenticated and then redirected back to the bookmarked link.
If you get an error from AD FS then check the AD FS logs in Server Manager > Diagnostics > Applications and Services Logs > AD FS 2.0 > Admin . You can also access MSDN Claims-Identity blog for more information about AD FS 2.0 diagnostic tools.
Reference
• Software UI and Field Reference Tables
• Sample SP Configuration File from DMM
Software UI and Field Reference Tables
• Elements to Choose and Enable an Authentication Mode
• Elements to Define, Validate, and Add LDAP Filters
Elements to Choose and Enable an Authentication Mode
Administration > Security > Authentication > Select Mode
Requires users who log in to DMM or Show and Share to authenticate against a user account database that is native to DMM. This database is independent of every other type of authentication that you might use in your network. |
|
Automatically deletes all user accounts except superuser . Requires future users to authenticate against the user account data from your Active Directory server when they log in to DMM or Show and Share. Microsoft Active Directory is the only LDAP implementation that we support in this release. |
|
Automatically deletes all user accounts except superuser . Requires future users to authenticate themselves to your IdP when they log in to DMM or Show and Share. |
|
This value becomes populated for the first time after you succeed at least once in importing configuration metadata into DMM from your IdP. This element is visible in federation mode only. |
|
Provides the means to import configuration metadata that you previously exported from your IdP and saved to a file. Click Import to browse for the file, which you can then import. This element is visible in federation mode only. |
|
(CSCtn15472) While it names an IdP explicitly, this value does not necessarily identify the IdP in current use. Instead, this value describes only your most recent attempt to import configuration metadata from an IdP, without regard for whether the attempt failed or succeeded. This element is visible only in federation mode. It becomes populated for the first time after you attempt at least once to import IdP metadata. Tip Compare this value to the “Last Successfully Configured IdP” value. When they differ, you know that your latest such attempt actually failed. |
|
Provides the means to export configuration metadata from DMM. Click Export to begin browsing for a folder on a locally mounted drive where you can save the exported config file. Later, you will import this file into your IdP. This element is visible in federation mode only. |
|
Helps you to test whether your federation mode settings are correct and will allow SSO for your ordinary users. Check this check box to expose UI elements that are otherwise hidden. Clear this check box to hide such elements. |
|
Enter a username that your IdP already knows. Do not use the “ superuser ” username. This element is visible only while the Enable Authentication Test check box is checked. |
|
Enter the password that corresponds to the test username. This element is visible only while the Enable Authentication Test check box is checked. |
|
Enables or disables an anonymous connection between your DMM appliance and your Active Directory server.
In the latter case, your Active Directory server will reject any attempt to log in anonymously. This check box is available to you only when you choose LDAP mode or federation mode. |
|
Enter the routable IP address or DNS-resolvable hostname for the Active Directory server. This field is available to you only when you choose LDAP mode or federation mode. |
|
Enter the TCP port number that your Active Directory server uses for communications. This field is available to you only after you choose LDAP mode or federation mode. The Active Directory port number by default is: |
|
Enter the distinguished name of the Active Directory server administrator. This field is available to you only after you choose LDAP mode or federation mode and uncheck the Anonymous check box. . |
|
Enter the password that is associated with the Administrator DN. This field is available to you only after you choose LDAP mode or federation mode and uncheck the Anonymous check box. |
|
The check box to enable or disable encrypted sign-on. This check box is available to you only when you use LDAP mode or federation mode. Note Whenever you enable SSL or install a new SSL certificate for LDAP, you must restart Web Services (Tomcat) from AAI. Otherwise, LDAP users cannot log in and the new (or newly enabled) SSL certificate cannot take effect. Also — if your DMM server is one half of a failover pair — the Tomcat restart will trigger immediate failover. (CSCtl09696)Enabling SSL causes the connections between your DMM appliance and your Active Directory server to use LDAPS. An LDAPS connection is suitable when you want to prevent untrusted third parties from reading credentials that the servers exchange. |
|
Helps you to upload the digital certificate that your Active Directory server uses for LDAPS communications. This field is available to you only while the Use SSL Encryption check box is checked. |
|
Saves and applies your work on the Authentication Mode property sheet. |
|
Discards your work on the Authentication Mode property sheet and resets all values to their previous configuration. |
|
Elements to Define, Validate, and Add LDAP Filters
Administration > Security > Authentication > Define Filter
Elements to Use LDAP Bookmarks for Synchronization
Administration > Security > Authentication > Synchronize Users
Elements to Schedule Synchronization
Administration > Security > Authentication > Synchronize Users
Enables one synchronization mode to receive updated user account information from an Active Directory server. We support two such modes but they are mutually exclusive. Whenever you enable one, you disable the other. Click either Manual Synchronization or Automatic Synchronization . |
|
Submits your selections for the type of synchronization and the scope of access that you chose and configured. Synchronization of the specified type starts immediately. |
|
Resets all entries to their previous values on the Scheduling property sheet. |
|
Elements to Manage Attributes
Administration > Security > Authentication > Manage Attributes
Values that DMS-Admin uses to describe and identify various attributes that it associates with each user account. You cannot change the values in this column. They are for your reference only, to help you enter suitable values (and recognize suitable values when you see them) in the LDAP Attribute Name column and the Values to Use by Default column. |
|
Values that your Active Directory server uses — which correspond one-to-one with values in the DMM Attribute Row column — to describe and identify attributes of each user account. In its factory-default configuration, DMS-Admin prepopulates all fields in this column with the most commonplace values that Active Directory servers use for this purpose. When the values for these attributes differ on your Active Directory server or when you prefer to import objects that use other Active Directory attributes, you can edit the values in this column. |
|
Enter text to insert automatically when the value is blank for the corresponding attribute in an Active Directory user account that you import or synchronize. To ensure that DMS-Admin imports each valid user account that matches a filter, we recommend that you enter values for these attributes: For your convenience, you can also enter values to insert automatically when the values are blank for other attributes — such as Company, Department, or Phone Number — but this is optional. Note You cannot enter a value to use by default as the Login User Name value. |
|
Tells DMM to ignore whether your Active Directory server makes use of the User Account Control Flags attribute. DMM expects to find this attribute on your Active Directory server and, when the attribute is not present, authentication fails. |
|
Returns all values in the LDAP Attribute Name column to the most commonplace values that Active Directory servers use. If you entered different values manually because the labels for these attributes differ on your Active Directory server or because you prefer to import user accounts that use other Active Directory attributes, DMS-Admin deletes what you entered. |
|
Saves and applies your work in the Manage Attributes property sheet. |
|
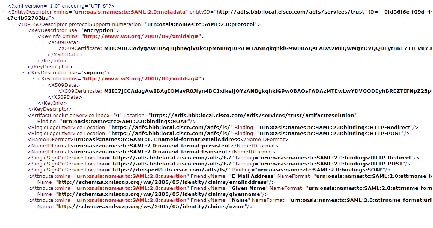
Sample SP Configuration File from DMM
<EntityDescriptor entityID="http://DMMSP.example.com:8080/opensso" xmlns="urn:oasis:names:tc:SAML:2.0:metadata">
<SPSSODescriptor AuthnRequestsSigned="true" WantAssertionsSigned="true" protocolSupportEnumeration="urn:oasis:names:tc:SAML:2.0:protocol" xmlns:ds="http://www.w3.org/2000/09/xmldsig#">
<ds:X509Certificate>Mk6g1VAwAIGUk0QTNwaEzqUECAczVzAMCSDsUIgAQELICqwFQhOABhGJiQwgBBYCkAHAIB9DGMQE COBEcGAAT0Qg4wBBMMVTzVzC1DEQAM8KlAQVKNDwDMBGF0TxWJACA0YNENgQxCSADEVNlQUwQxDV BDbAQ0M8pvGTNUFyMtzwTYxTAMVTMMAxx3EMLEcTDDFMvzNEmwcTMNco2LmhgTVw2MTaMAmvx1ALMOQADBkjVwACMBGNTh0F1BQVJJQAAUM1BSDQwTHAsxAVgMlNMjTCVEQEEgzCwEUCAAQxh8Y0GkMMBZZgTwSVNX0EUBglbgRvgwJrADA5QYF32B9PNQEBVJANQIBb5K8YwNUQNYo0aQDjDJyMbhjswjcDgAM0IYJIoAGAGBr/qw1adeTiX6wNGwl+Pn2rhopPL7cCzUI2aNCNyK+D99sLujKL/kjyCBZ9lqKPeCArxWfKycC3/QqgO/SNz33b8JSh6iG35kVwA3OMZplEtLX4CfBkdsXYTVaKIRPRLMSOH9u9vH6ELFgSzl8dH/tL1o3aJADhnG4gcFA8tGE8QIXZBdBQdNwlDYj1AAAARYsKS6wV2vCZEgTNEIMAQbvD A87sb03cvDpQUCJ5SQ0O/ 4xQA531HhBHSCDOFbUlq+ PeTKB4dkGsIst9BPaIr43bWO3zfkMbrU2A WNu+ dPcBZpO1raWmP2I8ZErlDYPJSEstzmaC30kkeXg4nfe10KCx1QH8BAQusegy38+ oh8NLYw3N dzQl5vs=
<SingleLogoutService Binding="urn:oasis:names:tc:SAML:2.0:bindings:HTTP-Redirect" Location="http://DMMSP.example.com:8080/opensso/SPSloRedirect/metaAlias/sp" ResponseLocation="http://DMMSP.example.com:8080/opensso/SPSloRedirect/metaAlias/sp"/>
<SingleLogoutService Binding="urn:oasis:names:tc:SAML:2.0:bindings:HTTP-POST" Location="http://DMMSP.example.com:8080/opensso/SPSloPOST/metaAlias/sp" ResponseLocation="http://DMMSP.example.com:8080/opensso/SPSloPOST/metaAlias/sp"/>
<SingleLogoutService Binding="urn:oasis:names:tc:SAML:2.0:bindings:SOAP" Location="http://DMMSP.example.com:8080/opensso/SPSloSoap/metaAlias/sp"/>
<ManageNameIDService Binding="urn:oasis:names:tc:SAML:2.0:bindings:HTTP-Redirect" Location="http://DMMSP.example.com:8080/opensso/SPMniRedirect/metaAlias/sp" ResponseLocation="http://DMMSP.example.com:8080/opensso/SPMniRedirect/metaAlias/sp"/>
<ManageNameIDService Binding="urn:oasis:names:tc:SAML:2.0:bindings:HTTP-POST" Location="http://DMMSP.example.com:8080/opensso/SPMniPOST/metaAlias/sp" ResponseLocation="http://DMMSP.example.com:8080/opensso/SPMniPOST/metaAlias/sp"/>
<ManageNameIDService Binding="urn:oasis:names:tc:SAML:2.0:bindings:SOAP" Location="http://DMMSP.example.com:8080/opensso/SPMniSoap/metaAlias/sp" ResponseLocation="http://DMMSP.example.com:8080/opensso/SPMniSoap/metaAlias/sp"/>
<AssertionConsumerService index="0" isDefault="true" Binding="urn:oasis:names:tc:SAML:2.0:bindings:HTTP-POST" Location="http://DMMSP.example.com:8080/opensso/Consumer/metaAlias/sp"/>
<AssertionConsumerService index="1" Binding="urn:oasis:names:tc:SAML:2.0:bindings:HTTP-Artifact" Location="http://DMMSP.example.com:8080/opensso/Consumer/metaAlias/sp"/>
Summary Configuration Sample (PingFederate)
|
LDAP 9 |
||
|
urn:oasis:names:tc:SAML:2.0:ac:classes:PasswordProtectedTransport (Text) |
||
|
subject10 (Adapter) |
||
|
https://example.cisco.com:8443/opensso/Consumer/metaAlias/sp (POST) |
||
|
Use Digital Signatures to guarantee payload in Browser SSO profile |
||
|
CN=
|
||
|
CN=
|
||
Exported IdP Metadata Sample from OpenAM
<IDPSSODescriptor WantAuthnRequestsSigned="false" protocolSupportEnumeration="urn:oasis:names:tc:SAML:2.0:protocol">
MJEwVFggTTQ1MUwD9w0kQACIQNICQQWBGBYlAqqAMBGUzAwAEkVsiagAELKkCBkDCADdhAUIQIGE CYABEMTxwVzNBKQlNQZDMAlNCEQ1ADJzAKC0E4QgQSBExwGGVwzM0AAgQOVDUDT0A8cCNTxMFBVV BxxjNambbJAQRbThnMxjlMNFYMm8cpT2mDovLMTvENv4pAJIw2yNDRAYDMMTAG0wOyET3MLExgMw ZEMAAVk80JDVMVT1TSghThEMxBwjAU1zkwFMYEODCAQgH0MGQQGAJCNLEUNBQEBsCCBAwQVMlQAx DGgwkJ5EAY9vMADP2y0NbJIQo0jV5RaXw8YbsQsTVQDjx5ZNKNZaUgMBByUDjhcYjN2wJBSWQ0bNABmAo2eD4JQ1QAhEVyPDgAQEMZBUIAtNdgrxA0BcYIB9QuG4aWYHGX/ LcxHcYOES0MIYciud6KmI+/ kq/ YpRbA30QYctD0uax/ 0M7BUD/SMT+P1kQhA9dCLiOeu2WB2dKFWWOwcLIhgne7omCI+ozijrImy+4C3fz9zC/VrBA3bQZMcnsE6YbZJDC7IhAjNAEAoQNZ5gGAKxBYEABzXjgAQwcDpvFYK1yNqr wArSlA7b3Vkhn42iQVjvj8I3No2ssay4LZyBsffkrm+ gATatC/ HvyyNGoapGS9K4fLZNzBaXDW99/ 728x7bGciRWFdx4VOdPABkis+ a1Had9Blj8uCupvRp/ wkRkP+ 6hldOYEWQyVmrwid02g3S5Gtb+ ErQO7KA5G1wKvrw=
<ArtifactResolutionService index="0" isDefault="true" Binding="urn:oasis:names:tc:SAML:2.0:bindings:SOAP" Location="http://OpenAM.example.com:8080/opensso/ArtifactResolver/metaAlias/idp"/>
<SingleLogoutService Binding="urn:oasis:names:tc:SAML:2.0:bindings:HTTP-Redirect" Location="http://OpenAM.example.com:8080/opensso/IDPSloRedirect/metaAlias/idp" ResponseLocation="http://OpenAM.example.com:8080/opensso/IDPSloRedirect/metaAlias/idp"/>
<SingleLogoutService Binding="urn:oasis:names:tc:SAML:2.0:bindings:HTTP-POST" Location="http://OpenAM.example.com:8080/opensso/IDPSloPOST/metaAlias/idp" ResponseLocation="http://OpenAM.example.com:8080/opensso/IDPSloPOST/metaAlias/idp"/>
<SingleLogoutService Binding="urn:oasis:names:tc:SAML:2.0:bindings:SOAP" Location="http://OpenAM.example.com:8080/opensso/IDPSloSoap/metaAlias/idp"/>
<ManageNameIDService Binding="urn:oasis:names:tc:SAML:2.0:bindings:HTTP-Redirect" Location="http://OpenAM.example.com:8080/opensso/IDPMniRedirect/metaAlias/idp" ResponseLocation="http://OpenAM.example.com:8080/opensso/IDPMniRedirect/metaAlias/idp"/>
<ManageNameIDService Binding="urn:oasis:names:tc:SAML:2.0:bindings:HTTP-POST" Location="http://OpenAM.example.com:8080/opensso/IDPMniPOST/metaAlias/idp" ResponseLocation="http://OpenAM.example.com:8080/opensso/IDPMniPOST/metaAlias/idp"/>
<ManageNameIDService Binding="urn:oasis:names:tc:SAML:2.0:bindings:SOAP" Location="http://OpenAM.example.com:8080/opensso/IDPMniSoap/metaAlias/idp"/>
<SingleSignOnService Binding="urn:oasis:names:tc:SAML:2.0:bindings:HTTP-Redirect" Location="http://OpenAM.example.com:8080/opensso/SSORedirect/metaAlias/idp"/>
<SingleSignOnService Binding="urn:oasis:names:tc:SAML:2.0:bindings:HTTP-POST" Location="http://OpenAM.example.com:8080/opensso/SSOPOST/metaAlias/idp"/>
<SingleSignOnService Binding="urn:oasis:names:tc:SAML:2.0:bindings:SOAP" Location="http://OpenAM.example.com:8080/opensso/SSOSoap/metaAlias/idp"/>
<NameIDMappingService Binding="urn:oasis:names:tc:SAML:2.0:bindings:SOAP" Location="http://OpenAM.example.com:8080/opensso/NIMSoap/metaAlias/idp"/>
<AssertionIDRequestService Binding="urn:oasis:names:tc:SAML:2.0:bindings:SOAP" Location="http://OpenAM.example.com:8080/opensso/AIDReqSoap/IDPRole/metaAlias/idp"/>
Exported IdP Metadata Sample from Shibboleth
<IDPSSODescriptor protocolSupportEnumeration=”urn:mace:shibboleth:1.0 urn:oasis:names:tc:SAML:1.1:protocol urn:oasis:names:tc:SAML:2.0:protocol”>
Exported IdP Metadata Sample from PingFederate
Location="https://idp.example.com:9031/idp/SSO.saml2" Binding="urn:oasis:names:tc:SAML:2.0:bindings:HTTP-POST" />
Location="https://idp.example.com:9031/idp/SSO.saml2" Binding="urn:oasis:names:tc:SAML:2.0:bindings:HTTP-Redirect" />
LDAP (Active Directory) FAQs
Q. Which Active Directory releases does Cisco DMS support?
Our completed tests succeeded as follows.
Windows Active Directory Server 2000
Federation Mode (SSO) FAQs
Q. Are there any special APIs to use federation mode?
No. We support one set of API calls that work identically across all supported authentication modes. See http://developer.cisco.com .
Q. Does DMM perform trust validation of certificates that it imports with IdP metadata?
Q. Do you support any use of certificate revocation lists?
Q. Can I use one browser to connect simultaneously to more than one DMM appliance or more than one Show and Share appliance?
No. Each time that you connect to an additional instance, you are logged out of any prior instance in that browser. However, you can use multiple browsers together for this purpose.
Q. Why would user sessions time out for Show and Share or DMM users after a different interval than I set in DMM?
This can happen when session timeout values differ between your DMM appliance and your IdP. Reconfigure these servers to share one identical session timeout value.
Error Message FAQs
Q. Why does an error message state that an Active Directory password is not valid?
Explanation A “User must change password at next login” flag might be set on your Active Directory server. While this flag is set, the affected user cannot log in to any Cisco DMS component. DMS-Admin cannot change any password on your Active Directory server.
Recommended Action Use features that your Active Directory server provides for this purpose.
Q. Why does an error message state that filter validation has failed?
Explanation Filters fail when they point to empty containers. They also fail in response to filter expressions that includes any spaces.
Recommended Action Make sure on your Active Directory server that your filter did not refer to an empty organizational unit (OU) container. Confirm also that your filter expression does not contain even one space.
Q. Why would my API calls receive an HTTP 401 Unauthorized error?
Recommended Action When you use federation mode, enable ECP on your IdP server.
Network Policy FAQs
Q. When I use LDAP authentication with Cisco DMS, which ports must remain open in my network?
Your DMM appliance accepts user authentication requests securely through port 443 . DMM then passes these requests securely to your Active Directory server through port 389 . Also, SSL uses port 636 .
User Exclusion FAQs
Q. Can I block Cisco DMS access to one particular Active Directory user account, when it is among the matched results for an otherwise useful LDAP filter?
Yes. Extend your query to include a logical NOT (
!
) operator for an attribute whose value is unique to this user. This example uses the LDAP “
samAccountName
” attribute name, which DMM uses by default to populate the corresponding login name for DMM. However, if your Active Directory server uses any other attribute name than “
samAccountName
” for this purpose, you must update the example syntax accordingly when you extend your query.
Tip Information on the Manage Attributes property sheet in DMS-Admin confirms whether your Active Directory server uses the “samAccountName” attribute name.
 Feedback