Cisco TelePresence Content Server Release 7.2 Administration and User Guide
Bias-Free Language
The documentation set for this product strives to use bias-free language. For the purposes of this documentation set, bias-free is defined as language that does not imply discrimination based on age, disability, gender, racial identity, ethnic identity, sexual orientation, socioeconomic status, and intersectionality. Exceptions may be present in the documentation due to language that is hardcoded in the user interfaces of the product software, language used based on RFP documentation, or language that is used by a referenced third-party product. Learn more about how Cisco is using Inclusive Language.
- Updated:
- November 15, 2015
Chapter: TLS_Support
Introduction
Session Initiation Protocol (SIP) is used for signaling and controlling multimedia communication sessions. Transport Layer Security (TLS) is cryptographic protocol providing communication security over network. Cisco Content Sever 7.2 provides support for secure SIP call signaling messages via Cisco Unified Communications Manager (CUCM) using TLS over TCP.
This chapter describes configuring Cisco Content Server 7.2 and CUCM for secure SIP signaling using TLS.For supported CUCM versions with TCS 7.2, please refer:
http://www.cisco.com/c/en/us/support/conferencing/telepresence-content-server/products-release-notes-list.html
Configure TelePresence Content Server for secure SIP signaling
To configure TCS with CUCM for secure SIP signaling, follow these steps:
1. Certificates
2. Configure Secure SIP on TelePresence Content Server
Certificates
For enabling TLS, install X.509 certificate on both Content Server 7.2 and CUCM. This certificate can be CA signed or Self Signed certificate.
For CA signed certificate, generate Private Key and Certificate Signing Request (CSR) using OpenSSL and sign it with authorized CA.Using Private Key and CA signed certificate, execute the following commands:
- openssl pkcs12 -inkey <private_key.key> -in <CA_signed_Certificate.pem> -export -out <cert.pfx>
- openssl pkcs12 -in <cert.pfx> -nodes -out <tcs.pem>
Upload tcs.pem on TCS from Site Settings page and CA_signed_Certificate.pem on CUCM.
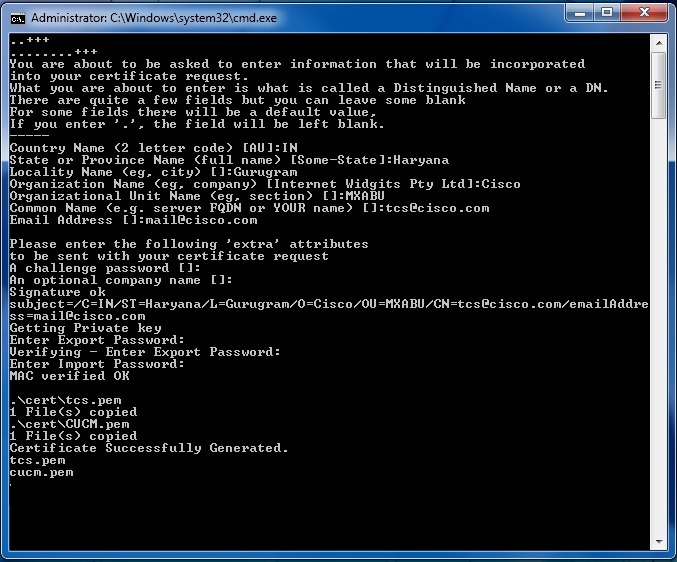
For Self-Signed Certificate, use TCSCertGen.cmd available in SIPTLS_SS_Certificate_Generator directory of TCS 7.2 package downloaded from CCO. TCSCertGen.cmd uses OpenSSL to generate self-signed certificate.Open command prompt as an administrator and do the following:
Step 1 Go to the SIPTLS_SS_Certificate_Generator directory path where TCS 7.2 package is placed
Step 2 Launch TCSCertGen.cmd for generating Self-Signed Certificate.
Step 3 Provide information like Location, Password to protect certificate and Common Name

Note Common Name is the name of system where Content Server 7.2 is installed.
TCSCertGen.cmd generates two certificates CUCM.pem (to be uploaded on CUCM) and tcs.pem (to be uploaded on TCS).
Configure Secure SIP on TelePresence Content Server
To configure secure SIP over TCP, follow these steps:
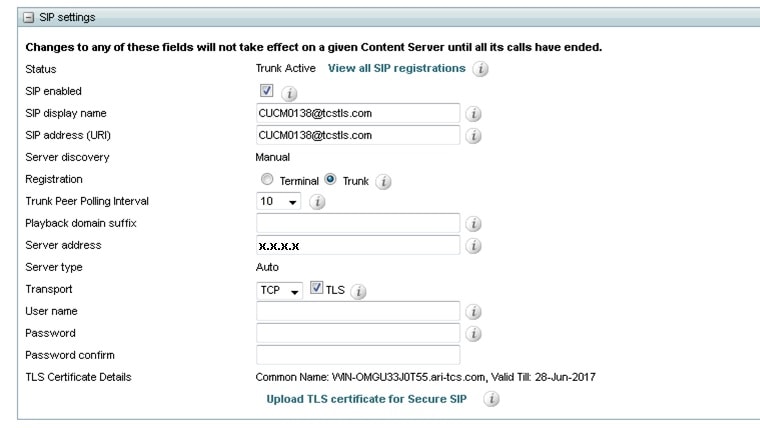
Step 3 Navigate to Management > Configuration > Site Settings.
Step 4 In SIP settings section, check SIP enabled checkbox.
Step 5 Enter SIP display name and SIP address (URI)
Step 6 Select Trunk as SIP Registration mode.
Note Secure SIP signaling is supported only when TCS is registered in Trunk mode with CUCM
Step 7 Select Trunk Polling Interval
Step 8 Enter CUCM address in Server address
Step 9 Select Transport protocol as TCP and check TLS checkbox.
Note Secure SIP signaling is supported when packets are sent using TLS over TCP
Step 10 To upload certificate (here tcs.pem generated in Certificates section), click on Upload TLS certificate for Secure SIP link and browse to the certificate path.(When certificate is not uploaded on Content Server, TLS Certificate Details field displays “TLS certificate not available”).
Figure 17-2 TLS Certificate upload window
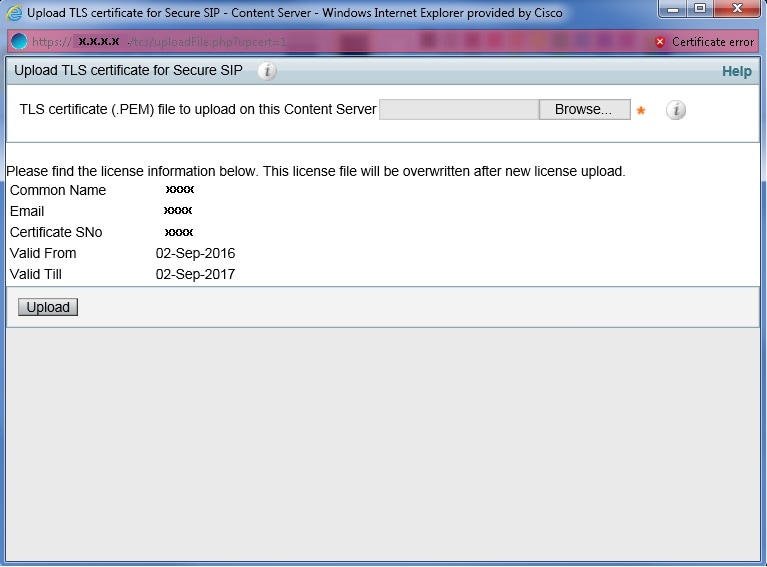
Note When certificate is successfully uploaded, Certificate upload successful message is displayed.
Step 11 After uploading certificate TLS Certificate Details field displays, Common Name and Validity date of the installed certificate.
Figure 17-3 SIP Settings for enabling TLS
Configurations on CUCM for Secure SIP signaling
To configure CUCM for secure SIP signaling, follow these steps:
1. Configure SIP Trunk Security Profile
Configure SIP Trunk Security Profile
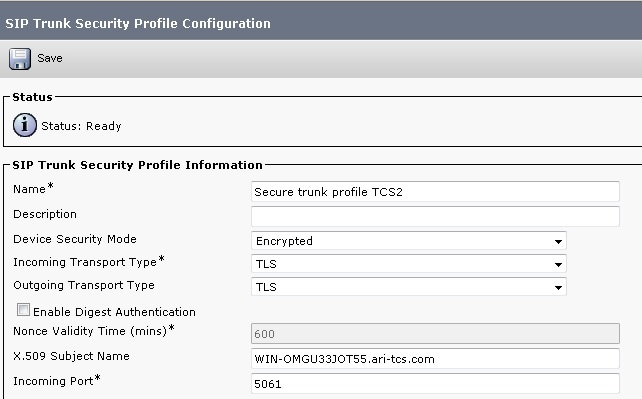
Follow the steps below for configuring SIP Trunk Security Profile for enabling TLS on SIP signaling messages:
Step 1 Login to the Cisco Unified Communication Manager Administration Interface.
Step 2 Navigate to System > Security > SIP Trunk Security Profile > Add New.
Step 3 Enter Name for SIP Trunk Security Profile.
Step 4 Select Device Security Mode as Encrypted.
Step 5 Select Incoming Transport Type and Outgoing Transport Type as TLS.
Step 6 Enter Common Name/FQDN name mentioned while generating Certificates as X.509 Subject Name
Note X.509 Subject Name should be same as the Common Name/FQDN as mentioned while generating the certificate
Step 7 Enter 5061 as Incoming Port.
Figure 17-4 Configure SIP Security Profile on CUCM
Configure SIP Trunk
For configuring SIP trunk, follow these steps:
Step 1 Login to the Cisco Unified Communication Manager Administration Interface.
Step 2 Navigate to Device > Trunk.
Step 3 For configuring new Trunk, see steps at Create the SIP Trunk or Click on Find button to find existing Trunk configured on CUCM
Step 4 On Trunk Configuration page, in SIP Information section
- Change Destination Port to 5061
- Select SIP Trunk Security Profile created in Configure SIP Trunk Security Profile
Figure 17-5 Configure SIP Trunk on CUCM

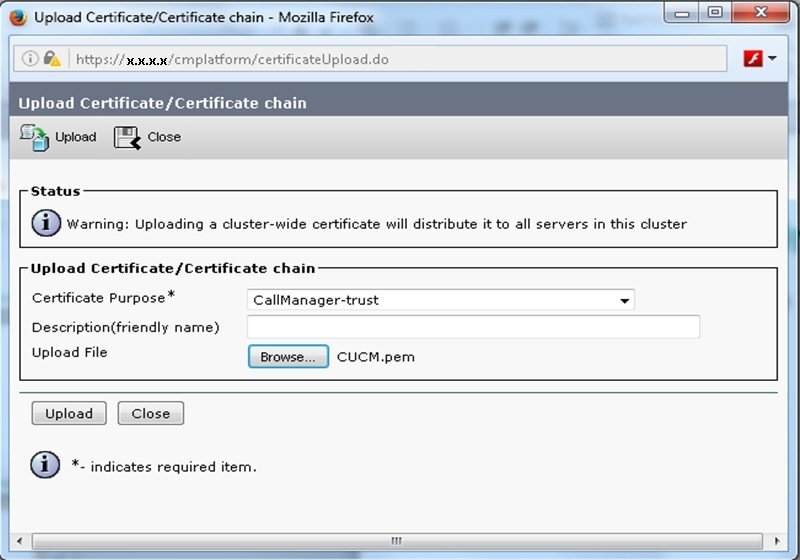
Upload certificate on CUCM
For secure SIP call signaling, upload certificate (generated in Certificates section, here CA_signed_Certificate.pem/CUCM.pem) on CUCM, follow these steps:
Step 1 From Cisco Unified OS Administration, navigate to System > Security > Certificate Management > Upload Certificate/Certificate Chain.
Step 2 On upload certificate page:
- Select Certificate Purpose as Call Manager-trust.
- For uploading certificate click on Browse and navigate to the Certificate generated in Certificates section
- Click on Upload.
Figure 17-6 Upload certificate on CUCM
 Feedback