Cisco TelePresence Content Server Release 5.2 Release Notes
Available Languages
Table Of Contents
Cisco TelePresence Content Server Release 5.2 Release Notes
New Features and Functionality in 5.2
Integration with the Cisco Media Experience Engine 3500
Automated creation of personal recording aliases
Improved lookup for access control lists
Ad-hoc recording of a PIN protected MCU conference
Support for a static URL for live streaming of MPEG-4 for Flash content from a Wowza Media Server
PIN protection for watching a recording using a videoconference endpoint
Content Server and Cisco Show and Share Compatibility Matrix
Localization and Internationalization
Prerequisites and Software Dependencies
Checking for Updates and Getting Help
Updates to the Administration and User Guide and Online Help
Obtaining Documentation and Submitting a Service Request
Getting Information About Accessibility and Cisco Products
Cisco TelePresence Content Server Release 5.2 Release Notes
Revised April 18, 2012Contents
•
New Features and Functionality in 5.2
•
•
•
•
Introduction
These release notes describe the changes and improvements included in the Cisco TelePresence Content Server (Content Server) software version 5.2.
New Features and Functionality in 5.2
This release includes the following new features and functionality:
•
•
•
•
•
•
Integration with the Cisco Media Experience Engine 3500
You can now make a recording with the Content Server and upload it automatically to a Cisco Media Experience Engine 3500 server for further transformation and publishing. The recording will be copied to Media Experience Engine 3500 using FTP on completion of a call and then transformed based on the profile selected in the server configuration.
To enable seamless integration with a Cisco Media Experience Engine 3500 server, a Site Manager needs to set up a media server configuration first. Navigate to Management > Recording setup > Media server configurations. Add a Media Experience Engine 3500 Server Configuration and fill out the required FTP and API settings fields. Click the Get job profiles button to retrieve a list of spaces and profiles from the Media Experience Engine 3500 server; then, choose the profile space and profile that you want to use.
After saving your Media Experience Engine 3500 server configuration, you can add it to a template.
New Recordings:
To automatically get all your recordings transformed by Cisco Media Experience Engine 3500, you need to use a recording alias with a template that has a distribution output using your Cisco Media Experience Engine 3500 server configuration.
Existing recordings:
Alternatively, to transform an existing recording with Cisco Media Experience Engine 3500, perform the following steps. Navigate to Manage outputs for the recording. Select Distributed to Media Experience Engine 3500, Show and Share, Podcast Producer or iTunes U. Select Media Experience Engine 3500 and choose the media server configuration for the Media Experience Engine 3500 server that you want to use.
Automated creation of personal recording aliases
A personal recording alias can now be automatically created for each user with Creator privileges when the user logs in to the Content Server web interface.

Note
To enable this feature, a Site Manager needs to select the Automatically create personal recording aliases for creators checkbox in Site Settings.
The selected system recording alias settings (with the exception of name, owner, H.323 ID, E.164 alias, SIP URI, SIP display name and email address) will be copied to all newly created personal recording aliases. The name of the newly created alias will be the user display name and user name, for example John Smith (jsmith). The H.323 alias will consist of the H.323 gateway prefix with the username appended, for example record.jsmith. The E.164 alias will consist of the E.164 gateway prefix with a random six digit number appended. SIP URI and SIP display name fields will be blank.
Note
The email address suffix needs to be entered in the form @company.com. Newly created personal recording aliases will use the Creator's user name with this suffix appended at the end to create the email address.
Personal recording aliases can also be created in a bulk operation by using the Content Server's API. AddRecordingAlias and DeleteRecordingAlias functions were added, and ModifyRecordingAlias and GetRecordingAlias functions were made much more complete. Please refer to the Cisco TelePresence Content Server API Guide for details.
Improved lookup for access control lists
Editors can now add Active Directory users and groups to access control lists for their recordings if those users or groups exist on the LDAP server configured for the Content Server even if users have not logged in to the Content Server and user or group accounts have not yet been added via the Groups and Users page by a Site Manager.
This feature is supported for Content Servers using Domain or LDAP authentication, which have a valid LDAP server configuration in Site Settings.
Note
Ad-hoc recording of a PIN protected MCU conference
You can now dial out from the Content Server user interface to make an ad-hoc recording of a PIN protected MCU conference.
Enter the MCU conference number in the Dial number field of the Create Recording page and the numeric PIN in the PIN for MCU conference field. Then, click Place call. As the Content Server joins the MCU conference, you will see a message or recording poster confirming the Content Server has joined a password protected MCU conference on an endpoint that has also joined the call.
If you enter an incorrect PIN, the call will not hang up, but you will not see the recording poster or message. The Content Server will be left in the PIN-entry lobby unable to join the conference. You should hang up the call and try again, ensuring you enter the correct PIN.
Support for a static URL for live streaming of MPEG-4 for Flash content from a Wowza Media Server
By default, the stream name for live MPEG-4 for Flash streaming off Wowza Media Server is generated by the Content Server. If the live stream URL needs to be published before streaming starts, Site Managers can now enter a stream name in the Static stream name field on the Media server configuration: Wowza Media Server for Flash > Live unicast streaming settings page. The resulting URL is generated and displayed on the page, for example: rtmp://myWowza/live/mp4:mystream.
PIN protection for watching a recording using a videoconference endpoint
You can now PIN-protect recordings that are available for watching using a videoconference endpoint.
To add a PIN for all new recordings created with a recording alias, edit your recording alias and enter a PIN in the PIN (optional) field in the Play recording on endpoints section. The PIN must be numeric only and 4 digits long. To PIN protect a single recording, enter a PIN in the Play recording on endpoints section of the Edit recording page and save.
When you dial the playback number of a PIN-protected recording from an endpoint, you will see a visual prompt to enter a PIN using the endpoint remote (or a DTMF keypad when using Movi).
Placeholder dots will indicate how many digits have been entered. When the PIN has been entered successfully, the recording will start playing back immediately.

If the PIN has been entered incorrectly, you will be presented with feedback screen and prompted to re-enter the PIN.

The call will disconnect after three unsuccessful attempts or 30 seconds of inactivity.
Content Server and Cisco Show and Share Compatibility Matrix
Table 1 lists compatible Content Server and Cisco Show and Share versions.
Table 1 Content Server and Show and Share Compatibility
Content Server 5.0
Y
Y
N
Content Server 5.1
Y
Y
Y
Content Server 5.2
N
N
Y
1 Content Server recordings with Joined and stacked layouts will not be scaled correctly in the Show and Share Release 5.2.1 media player.
Resolved Caveats
The following issues were found in earlier releases and resolved in 5.2.
API
87357
Added DefaultRecordingAliasID to configuration.xml to expose the default recording alias.
Interoperability
85587
Fixed an issue where the H.239 content channel would never close when in a call with Polycom MGC-25.
Localization and Internationalization
System
Upgrades and repairs
User interface
Video
Open Caveats
The following issues currently apply to this version of Content Server.
—
The Content Server supports only Microsoft Active Directory Server for LDAP and Domain authentication.
—
When configuring LDAP servers in the Authentication section of the Site Settings page, the Content Server cannot accept the root of an Active Directory domain as the base DN. Instead, you must specify an object that resides inside the root. A common root-level object is `OU=users.' If your users and groups are distributed between multiple root-level objects, specify each of them in separate LDAP servers.
56699
Internet Explorer security settings may prevent users from accessing the Windows Server administration interface with IE7 or IE8 on Windows XP (Server Pack 3) even if the Content Server has been added to trusted sites in the browser.
63782
It is not possible to register more than 25 SIP aliases on the Content Server.
77297, 77298
QuickTime plug-in v.7.6.6 or higher causes the following issues when playing back MPEG-4 for QuickTime in the viewer: no video displayed in IE/Firefox on PC and Safari/Firefox on Mac when live streaming and garbled audio when viewing on demand with Firefox/IE on a PC.
Content Server users are advised not to upgrade their QuickTime plug-in to version 7.6.6 or higher.
81835
When the camera is turned off while reviewing recordings from a E20 endpoint, the review overlay will be missing, and a `No incoming video' error message will be displayed.
81954
Live Windows Media multicast streams will not be displayed in the Silverlight player in Firefox 3.6.x on a PC.
82218
When HTTPS is used to view Content Server pages, users will not be able to view content in Silverlight and Flash players.
83035
Progressive download of MPEG-4 for Flash recordings from the Local IIS Web Server will not work in IE7 if the file size of the MPEG-4 for Flash output exceeds 2 GB (KB 298618).
84626
Areas of green pixels might be displayed when starting playback and seeking in a Flash video streaming from a Wowza streaming server on some computers. The workaround is to update video drivers and/or turn off hardware acceleration. Visit the Adobe web site to view minimum hardware requirements for SD and HD video playback and video hardware acceleration support:
http://www.adobe.com/products/flashplayer/systemreqs/#video114984
Using the Dial API and assigning the bit rate value to be a non-numeric character allows the call to connect at 128 kbps.
Upgrading to 5.2

Caution
Prerequisites and Software Dependencies
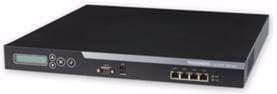
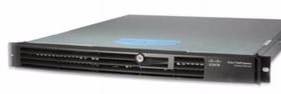
Content Server 5.2 software cannot be installed on first generation Content Server hardware. If you attempt to run the 5.2 installer it will fail.
How to tell which Content Server hardware you have:
Figure 1 shows images of the two generations of Content Server hardware referred to in this document.
Figure 1 Content Server Hardware Editions
The 5.2 installer will upgrade your Content Server from 5.0 or 5.1 versions only. If your Content Server is at an earlier version, you will need to upgrade to 5.0 first before running the 5.2 installer.
A release key is not required for upgrading to 5.2
Caution
Caution
Unsupported components which MUST be removed prior to upgrading:
Microsoft SQL Server 2005 Analysis Services 9.0 OLE DB Provider, Microsoft SQL Server 2005 Backward Compatibility Components, Microsoft SQL Server 2005 Command Line Query Utility, Microsoft SQL Server 2005 Data Mining Viewer Controls, Microsoft SQL Server 2005 JDBC Driver, Microsoft SQL Server 2005 Management Objects Collection, Microsoft SQL Server 2005 Compact Edition, Microsoft SQL Server 2005 Notification Services Client Components, Microsoft SQL Server 2005 Upgrade Advisor, Microsoft SQL Server 2005 Reporting Services Add-in for Microsoft SharePoint Technologies, Microsoft SQL Server 2005 Data Mining Add-ins for Microsoft Office 2007.
Upgrade Instructions
The approximate duration of an upgrade is 10-20 minutes.
To upgrade your Content Server to 5.2, do the following:
Step 1
Step 2
Step 3
Step 4
Step 5
Step 6
•
•
Step 7
•
•
Step 8
Caution
Step 9
Checking for Updates and Getting Help
Cisco recommends registering your product at http://www.tandberg.com/services/video-conferencing-product-registration.jsp in order to receive notifications about the latest software and security updates. New feature and maintenance releases are published regularly, and we recommend that your Content Server software is always kept up to date.
If you experience any problems when configuring or using your Cisco TelePresence Content Server, consult the online help (available within the UI) for an explanation of how its individual features and settings work. If you cannot find the answer you need, check on the web site at http://www.tandberg.com/support to make sure that your product is running the most up-to-date software and for further relevant documentation.
You or your reseller can get help from our support team by raising a case at http://www.tandberg.com/support/video-conferencing-online-support.jsp. Make sure you have the following information ready:
•
•
•
Documentation Updates
This section provides documentation updates for documents available at:
http://www.cisco.com/en/US/products/ps11347/tsd_products_support_series_home.html
Updates to the Administration and User Guide and Online Help
Adding and Editing Call Configurations
The solution supports media encryption only for the H.323 protocol.
Related Documentation
For more information about the Cisco TelePresence Content Server, see these documents:
•
•
•
•
•
•
All documents are located here:
http://www.cisco.com/en/US/partner/products/ps11347/tsd_products_support_series_home.html
Obtaining Documentation and Submitting a Service Request
For information on obtaining documentation, submitting a service request, and gathering additional information, see the monthly What's New in Cisco Product Documentation, which also lists all new and revised Cisco technical documentation, at:
http://www.cisco.com/en/US/docs/general/whatsnew/whatsnew.html
Subscribe to the What's New in Cisco Product Documentation as an RSS feed and set content to be delivered directly to your desktop using a reader application. The RSS feeds are a free service. Cisco currently supports RSS Version 2.0.
Getting Information About Accessibility and Cisco Products
For information about the accessibility of this product, contact the Cisco accessibility team at accessibility@cisco.com.
THE SPECIFICATIONS AND INFORMATION REGARDING THE PRODUCTS IN THIS MANUAL ARE SUBJECT TO CHANGE WITHOUT NOTICE. ALL STATEMENTS, INFORMATION, AND RECOMMENDATIONS IN THIS MANUAL ARE BELIEVED TO BE ACCURATE BUT ARE PRESENTED WITHOUT WARRANTY OF ANY KIND, EXPRESS OR IMPLIED. USERS MUST TAKE FULL RESPONSIBILITY FOR THEIR APPLICATION OF ANY PRODUCTS.
THE SOFTWARE LICENSE AND LIMITED WARRANTY FOR THE ACCOMPANYING PRODUCT ARE SET FORTH IN THE INFORMATION PACKET THAT SHIPPED WITH THE PRODUCT AND ARE INCORPORATED HEREIN BY THIS REFERENCE. IF YOU ARE UNABLE TO LOCATE THE SOFTWARE LICENSE OR LIMITED WARRANTY, CONTACT YOUR CISCO REPRESENTATIVE FOR A COPY.
The Cisco implementation of TCP header compression is an adaptation of a program developed by the University of California, Berkeley (UCB) as part of UCB's public domain version of the UNIX operating system. All rights reserved. Copyright © 1981, Regents of the University of California.
NOTWITHSTANDING ANY OTHER WARRANTY HEREIN, ALL DOCUMENT FILES AND SOFTWARE OF THESE SUPPLIERS ARE PROVIDED "AS IS" WITH ALL FAULTS. CISCO AND THE ABOVE-NAMED SUPPLIERS DISCLAIM ALL WARRANTIES, EXPRESSED OR IMPLIED, INCLUDING, WITHOUT LIMITATION, THOSE OF MERCHANTABILITY, FITNESS FOR A PARTICULAR PURPOSE AND NONINFRINGEMENT OR ARISING FROM A COURSE OF DEALING, USAGE, OR TRADE PRACTICE.
IN NO EVENT SHALL CISCO OR ITS SUPPLIERS BE LIABLE FOR ANY INDIRECT, SPECIAL, CONSEQUENTIAL, OR INCIDENTAL DAMAGES, INCLUDING, WITHOUT LIMITATION, LOST PROFITS OR LOSS OR DAMAGE TO DATA ARISING OUT OF THE USE OR INABILITY TO USE THIS MANUAL, EVEN IF CISCO OR ITS SUPPLIERS HAVE BEEN ADVISED OF THE POSSIBILITY OF SUCH DAMAGES.
Cisco and the Cisco logo are trademarks or registered trademarks of Cisco and/or its affiliates in the U.S. and other countries. To view a list of Cisco trademarks, go to this URL: www.cisco.com/go/trademarks. Third-party trademarks mentioned are the property of their respective owners. The use of the word partner does not imply a partnership relationship between Cisco and any other company. (1110R)
Any Internet Protocol (IP) addresses and phone numbers used in this document are not intended to be actual addresses and phone numbers. Any examples, command display output, network topology diagrams, and other figures included in the document are shown for illustrative purposes only. Any use of actual IP addresses or phone numbers in illustrative content is unintentional and coincidental.
© 2011 Cisco Systems, Inc. All rights reserved.
 Feedback
Contact Cisco
- Open a Support Case

- (Requires a Cisco Service Contract)