Configuring the Cisco TelePresence Content Server Release 6.x to Use an External Windows Media Streaming Server
Available Languages
Table of Contents
Configuring Multicast Streaming
Configure the Content Server for Live Streaming
Configure the External Windows Server for Multicast Streaming
Configuring Unicast and On-demand Streaming
Configure the External Windows Media Server for Unicast and On-demand Streaming
Configure the Content Server for Unicast and On-demand Streaming
Obtaining Documentation and Submitting a Service Request
Configuring the Cisco TelePresence Content Server Release 6.x to Use an External Windows Media Streaming Server
This guide describes how to configure the Cisco TelePresence Content Server (Content Server) Release 6.x to use an external Windows Media streaming server for live multicast, unicast, and on-demand streaming.
Introduction
The Content Server default installation has an embedded Windows Media streaming server that supports live unicast and on-demand streaming of Windows Media content. For Windows Media live multicast streaming you need to configure an external Windows Media server.

Note![]() The Support live multicast streaming check box visible in the Recording setup > Media server configuration > Windows media streaming server window is not supported in Content Server Release 6.x.
The Support live multicast streaming check box visible in the Recording setup > Media server configuration > Windows media streaming server window is not supported in Content Server Release 6.x.
Configuring Multicast Streaming
Complete these procedures in the order shown:
1.![]() Configure the Content Server for Live Streaming
Configure the Content Server for Live Streaming
2.![]() Configure the External Windows Server for Multicast Streaming
Configure the External Windows Server for Multicast Streaming
Configure the Content Server for Live Streaming
Follow these steps to create a Windows Media server on the Content Server with support for live multicast streaming:
Step 1![]() Open a Remote Desktop Connection to the Content Server. Log in as an administrator.
Open a Remote Desktop Connection to the Content Server. Log in as an administrator.
Step 2![]() Go to Recording setup > Media server configurations.
Go to Recording setup > Media server configurations.
Step 3![]() Click Add Windows Media Streaming Server Configuration. Enter the following:
Click Add Windows Media Streaming Server Configuration. Enter the following:
a.![]() In the Server settings area, enter the media server name < WMSLocal >. Check the Support live unicast streaming check box.
In the Server settings area, enter the media server name < WMSLocal >. Check the Support live unicast streaming check box.
b.![]() Click the Network pull radio button.
Click the Network pull radio button.
c.![]() Enter the port number for the external Windows server. The port can be any 4-digit number.
Enter the port number for the external Windows server. The port can be any 4-digit number.
Step 5![]() Go to Recording setup > Templates.
Go to Recording setup > Templates.
Step 6![]() Click Add template. Enter the following:
Click Add template. Enter the following:
a.![]() Enter the template name < temp_multicast >.
Enter the template name < temp_multicast >.
b.![]() Select the Viewable in the Content Server web interface check box.
Select the Viewable in the Content Server web interface check box.
c.![]() Select the Live Stream check box.
Select the Live Stream check box.
d.![]() Specify the media server < WMSLocal > that you created in Step 3.
Specify the media server < WMSLocal > that you created in Step 3.
e.![]() Enter other settings in the configuration fields, as needed.
Enter other settings in the configuration fields, as needed.
Step 8![]() Go to Recording Setup > Recording aliases.
Go to Recording Setup > Recording aliases.
Step 9![]() Click Add recording alias. Enter the following:
Click Add recording alias. Enter the following:
a.![]() Enter the alias name < alias_multicast >.
Enter the alias name < alias_multicast >.
b.![]() In the Dialing properties area, enter the H.323 ID.
In the Dialing properties area, enter the H.323 ID.
c.![]() Specify the < temp_multicast > template that you created in Step 6.
Specify the < temp_multicast > template that you created in Step 6.
d.![]() Enter other settings in the configuration fields, as needed.
Enter other settings in the configuration fields, as needed.
Configure the External Windows Server for Multicast Streaming
Configure the external Windows Media server publishing point. Follow these steps:
Step 1![]() Open a Remote Desktop Connection to the Windows Server. Log in as an administrator.
Open a Remote Desktop Connection to the Windows Server. Log in as an administrator.
Step 2![]() Create a publishing point as follows:
Create a publishing point as follows:
a.![]() Go to Programs > Administrative Tools > Window media services.
Go to Programs > Administrative Tools > Window media services.
b.![]() Right click Publishing Point.
Right click Publishing Point.
c.![]() In the Publishing Point Name window, enter the name < WMSLivePull >. Click Next.
In the Publishing Point Name window, enter the name < WMSLivePull >. Click Next.
d.![]() In the Content Type window, select the Encoder (a live stream) radio button. Click Next.
In the Content Type window, select the Encoder (a live stream) radio button. Click Next.
e.![]() In the Publishing Point Type window, select the Broadcast publishing point radio button. Click Next.
In the Publishing Point Type window, select the Broadcast publishing point radio button. Click Next.
f.![]() In the Delivery Options for Broadcast Publishing Points window, click the Multicast radio button. Click Next.
In the Delivery Options for Broadcast Publishing Points window, click the Multicast radio button. Click Next.
g.![]() In the Add Publishing Point window Encoder URL field, enter the Content Server IP address and port number < http://10.195.13.34:8090 >. Confirm that the port number is not blocked. Click Next.
In the Add Publishing Point window Encoder URL field, enter the Content Server IP address and port number < http://10.195.13.34:8090 >. Confirm that the port number is not blocked. Click Next.
h.![]() In the Publishing Point Summary window, confirm your settings. Click Next.
In the Publishing Point Summary window, confirm your settings. Click Next.
i.![]() In the Completing the Add Publishing Point window, click the After the wizard finishes check box and the Create a.nsc file (recommended) radio button.
In the Completing the Add Publishing Point window, click the After the wizard finishes check box and the Create a.nsc file (recommended) radio button.
Step 3![]() Create a Multicast Announcement as follows:
Create a Multicast Announcement as follows:
a.![]() In the Welcome to Multicast Wizard window, click Next.
In the Welcome to Multicast Wizard window, click Next.
b.![]() In the Specify Files to Create window, click the Multicast information file (.nsc) and announcement files (.asx) radio button. Click Next.
In the Specify Files to Create window, click the Multicast information file (.nsc) and announcement files (.asx) radio button. Click Next.
c.![]() In the Retrieve Stream Format Information window, click the Automatically retrieve stream formats from my encoder radio button.
In the Retrieve Stream Format Information window, click the Automatically retrieve stream formats from my encoder radio button.
Before you click Next, make a call on the Content Server alias < alias_multicast > that you created in Step 9. If you continue without first making a call, the following error message will appear:
d.![]() After the call is created on the Content Server alias, click Next.
After the call is created on the Content Server alias, click Next.
e.![]() (Optional) In the Multicast Logging window, click the Yes check box to enable logging. Click Next.
(Optional) In the Multicast Logging window, click the Yes check box to enable logging. Click Next.
f.![]() In the Save Multicast Announcement Files window, enter the storage locations for the.nsc and.asx files. Click Next.
In the Save Multicast Announcement Files window, enter the storage locations for the.nsc and.asx files. Click Next.
g.![]() In the specify URL to Multicast Information File window, click the Web server radio button. Click Next.
In the specify URL to Multicast Information File window, click the Web server radio button. Click Next.
h.![]() In the Edit Announcement Metadata window, enter the metadata that you want displayed during playback.
In the Edit Announcement Metadata window, enter the metadata that you want displayed during playback.
i.![]() In the Archive Content window, click the No radio button. Click Next.
In the Archive Content window, click the No radio button. Click Next.
Step 4![]() Your multicast broadcast point is started as shown below. When you end the Content Server call, the multicast publishing point is stopped.
Your multicast broadcast point is started as shown below. When you end the Content Server call, the multicast publishing point is stopped.
Note![]() If you create the Content Server call again, you must manually restart the multicast point. Right-click on the MulticastPull icon and select Start.
If you create the Content Server call again, you must manually restart the multicast point. Right-click on the MulticastPull icon and select Start.
Configuring Unicast and On-demand Streaming
Complete these procedures in the order shown:
1.![]() Configure the External Windows Media Server for Unicast and On-demand Streaming
Configure the External Windows Media Server for Unicast and On-demand Streaming
2.![]() Configure the Content Server for Unicast and On-demand Streaming
Configure the Content Server for Unicast and On-demand Streaming
Configure the External Windows Media Server for Unicast and On-demand Streaming
Configure the external Windows Media server to authenticate streams off the Content Server by using a local user account. Follow these steps:
Step 1![]() Open a Remote Desktop Connection to the external Windows Media server. Log in as an administrator.
Open a Remote Desktop Connection to the external Windows Media server. Log in as an administrator.
Step 2![]() Go to Computer Management > Local Users and Groups > Users.
Go to Computer Management > Local Users and Groups > Users.
Step 3![]() Create a new local user account < wmspush >.
Create a new local user account < wmspush >.
Step 4![]() In User Properties, specify Password never expires to prevent the password from expiring automatically.
In User Properties, specify Password never expires to prevent the password from expiring automatically.
Note![]() If you change the password on the external Windows Media server, you need to enter the new password for the user on the Content Server.
If you change the password on the external Windows Media server, you need to enter the new password for the user on the Content Server.
Step 5![]() From the Start menu, choose Windows Media Services > Manage the Streaming Media Server.
From the Start menu, choose Windows Media Services > Manage the Streaming Media Server.
Step 6![]() Select the server name. From the Properties tab select Authorization > WMS Publishing Points ACL Authorization.
Select the server name. From the Properties tab select Authorization > WMS Publishing Points ACL Authorization.
Step 7![]() Double click WMS Publishing Points ACL Authorization to open the Properties window.
Double click WMS Publishing Points ACL Authorization to open the Properties window.
Step 8![]() Click Add. Add the local user < wmspush > that you created in Step 3
Click Add. Add the local user < wmspush > that you created in Step 3![]() .
.
Step 9![]() Select the user and enable permissions to Allow Read, Write, and Create. Click OK.
Select the user and enable permissions to Allow Read, Write, and Create. Click OK.
Step 10![]() From the Properties tab, select Authentication. Verify that the status for WMS Negotiate Authentication is Enabled.
From the Properties tab, select Authentication. Verify that the status for WMS Negotiate Authentication is Enabled.
Step 11![]() From the Properties tab, select Control protocol. Double click WMS HTTP Server Control Protocol to open the Properties window.
From the Properties tab, select Control protocol. Double click WMS HTTP Server Control Protocol to open the Properties window.
Step 12![]() Specify the IP addresses and Content Server port number. Confirm that the port number is not blocked. Click OK.
Specify the IP addresses and Content Server port number. Confirm that the port number is not blocked. Click OK.
Configure the Content Server for Unicast and On-demand Streaming
The following steps will create a new media server on the Content Server with support for live unicast and on-demand streaming. If you require only one type of streaming, complete the steps as needed to create only a live streaming or an on-demand media server.
Step 1![]() Open a Remote Desktop Connection to the Content Server. Log in as an administrator.
Open a Remote Desktop Connection to the Content Server. Log in as an administrator.
Step 2![]() Go to Recording setup > Media server configurations.
Go to Recording setup > Media server configurations.
Step 3![]() Click Add Windows Media Streaming Server Configuration. Enter the following:
Click Add Windows Media Streaming Server Configuration. Enter the following:
a.![]() In the Server settings area, enter the media server name < Push to external Windows Media Streaming Server >. Check the Support live unicast streaming, the Support on demand, or both, check boxes. Enter the external Window Media server address < 10.0.0.1 >.
In the Server settings area, enter the media server name < Push to external Windows Media Streaming Server >. Check the Support live unicast streaming, the Support on demand, or both, check boxes. Enter the external Window Media server address < 10.0.0.1 >.
b.![]() In the Live unicast streaming settings area, enter the username and password to authenticate to the external Windows streaming server. You must enter the username as follows:
In the Live unicast streaming settings area, enter the username and password to authenticate to the external Windows streaming server. You must enter the username as follows:
External_WM_server_Machine_name\username. For example < WMS08\wmspush >.
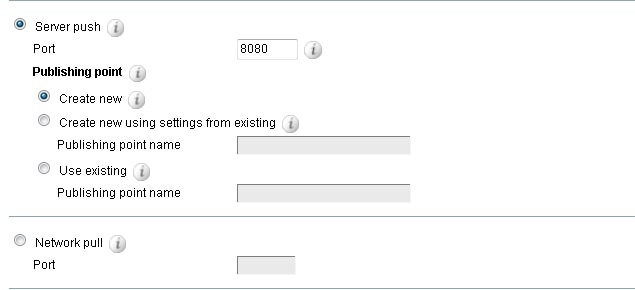
c.![]() Click the Server push radio button. Enter port number 8080 only, that the external Windows Media server uses for incoming push media.
Click the Server push radio button. Enter port number 8080 only, that the external Windows Media server uses for incoming push media.
d.![]() Click the Create new radio button.
Click the Create new radio button.
You can create a new publishing point or use an existing publishing point. The syntax formatting required is Push:*. This syntax means that the publishing point is triggered externally by the Content Server.
e.![]() If you selected the Support On Demand check box, specify the Media location and the On-demand URLs.
If you selected the Support On Demand check box, specify the Media location and the On-demand URLs.
Note![]() Multicasting on TCS 6.x onwards is supported by Unicast network pull only.
Multicasting on TCS 6.x onwards is supported by Unicast network pull only.
Step 5![]() Go to Recording setup > Templates.
Go to Recording setup > Templates.
Step 6![]() Click Add Template. Enter the following:
Click Add Template. Enter the following:
a.![]() Enter the template name < Push to external WM server template >.
Enter the template name < Push to external WM server template >.
b.![]() In the Template section, choose the Viewable in the Content Server web interface check box.
In the Template section, choose the Viewable in the Content Server web interface check box.
c.![]() In the On demand media server configuration area, choose the media server that you created in Step 3 < Push to external Windows Media Streaming server >.
In the On demand media server configuration area, choose the media server that you created in Step 3 < Push to external Windows Media Streaming server >.
d.![]() Enter other settings in the configuration fields, as needed.
Enter other settings in the configuration fields, as needed.
Step 8![]() Go to Recording setup > Recording aliases.
Go to Recording setup > Recording aliases.
Step 9![]() Click Add recording alias. Enter the following:
Click Add recording alias. Enter the following:
a.![]() Enter recording alias name < Push to external WM server >.
Enter recording alias name < Push to external WM server >.
b.![]() Enter the dialing properties.
Enter the dialing properties.
c.![]() In the Recording Settings area, choose the template that you created in Step 6 < Push to external WM server template >.
In the Recording Settings area, choose the template that you created in Step 6 < Push to external WM server template >.
Step 11![]() Make a test call on the recording alias < Push to external WM server > to verify the configuration.
Make a test call on the recording alias < Push to external WM server > to verify the configuration.
Troubleshooting
Problem Publishing point verification
Recommended Action Verify that the broadcast publishing point shows ‘started’ on the remote Windows Media server, which indicates a successful publish.
Recommended Action Verify proper live streaming functionality by pointing a compatible media player at the publishing point with the following syntax: mms:// Content_Server_IP_Address/Publishing_Point_Name
Problem Publishing point failure
Possible Cause Port conflicts that might occur on the external Windows Media server.
Recommended Action Make sure that the port you use for control is available; otherwise, publishing will fail.
Problem Windows authentication
Possible Cause If the Content Server is in Domain A and the external Windows Media server is in Domain B, you might have a problem.
Check the Content Server logs for the following message: Warning: Reporting Windows Media writer status, Error occurred in WMT_ERROR [call_id = 1, address = http:// Content_Server_IP_Address/Publishing_Point_Name, error = error code = (0xc00d2f0b)]
Recommended Action Check your AD configuration, trust, and other settings. The simplest fix is to add the Content Server and the external Windows Media server to the same Domain or Workgroup.
Related Documentation
All Cisco TelePresence Content Server documentation is located here:
http://www.cisco.com/en/US/products/ps11347/tsd_products_support_series_home.html
Obtaining Documentation and Submitting a Service Request
For information on obtaining documentation, submitting a service request, and gathering additional information, see the monthly What’s New in Cisco Product Documentation, which also lists all new and revised Cisco technical documentation, at:
http://www.cisco.com/en/US/docs/general/whatsnew/whatsnew.html
Subscribe to the What’s New in Cisco Product Documentation as an RSS feed and set content to be delivered directly to your desktop using a reader application. The RSS feeds are a free service. Cisco currently supports RSS Version 2.0.
Cisco and the Cisco logo are trademarks or registered trademarks of Cisco and/or its affiliates in the U.S. and other countries. To view a list of Cisco trademarks, go to this URL: www.cisco.com/go/trademarks. Third-party trademarks mentioned are the property of their respective owners. The use of the word partner does not imply a partnership relationship between Cisco and any other company. (1110R)
Any Internet Protocol (IP) addresses and phone numbers used in this document are not intended to be actual addresses and phone numbers. Any examples, command display output, network topology diagrams, and other figures included in the document are shown for illustrative purposes only. Any use of actual IP addresses or phone numbers in illustrative content is unintentional and coincidental.
 Feedback
Contact Cisco
- Open a Support Case

- (Requires a Cisco Service Contract)